各种Adapter的用法
2019独角兽企业重金招聘Python工程师标准>>> 
下面先来看看ArrayAdapter:

 1 package com.shang.test; 2  3  import java.util.ArrayList; 4  5  import android.app.Activity; 6  import android.os.Bundle; 7  import android.widget.ArrayAdapter; 8  import android.widget.ListView; 9 10  /**11  *
12  * @author shangzhenxiang13  *14  */15  public class TestArrayAdapterActivity extends Activity{16 17  private ListView mListView;18  private ArrayList<String> mArrayList = new ArrayList<String>();19  20  @Override21  protected void onCreate(Bundle savedInstanceState) {22  super.onCreate(savedInstanceState);23  setContentView(R.layout.testarrayadapter);24  mListView = (ListView) findViewById(R.id.myArrayList);25  mListView.setAdapter(new ArrayAdapter<String>(this, android.R.layout.simple_expandable_list_item_1, getData()));26  }27  28  private ArrayList<String> getData() {29  mArrayList.add("测试数据1");30  mArrayList.add("测试数据2");31  mArrayList.add("测试数据3");32  mArrayList.add("测试数据4");33  mArrayList.add("测试数据5");34  mArrayList.add("测试数据6");35  return mArrayList;36  }37 }
布局里面有个ListView就可以了:
1 <?xml version="1.0" encoding="utf-8"?>

        2 <LinearLayout xmlns:android="http://schemas.android.com/apk/res/android"

        3 android:orientation="vertical"

        4 android:layout_width="match_parent"

        5 android:layout_height="fill_parent">

        6 <TextView

        7 android:layout_width="match_parent"

        8 android:layout_height="wrap_content"

        9 android:text="@string/hello"/>

        10 <ListView

        11 android:id="@+id/myArrayList"

        12 android:layout_width="match_parent"

        13 android:layout_height="wrap_content"/>

        14 LinearLayout>
上面的代码中用到了ArrayAdapter的构造方法:
public ArrayAdapter (Context context, int textViewResourceId, T[] objects)
Api中是这么描述的:
其中Context为当前的环境变量,可以显示一行文字的一个布局文件,和一个List的集合,也就是数据源。
布局文件可以自己写,也可以用系统的,我这里是用的系统的。自己写的布局中包含一个TextView就可以了,当然系统中也有包含一个TextView的布局文件:就是 android.R.layout.simple_expandable_list_item_1,调用这个比较方便。
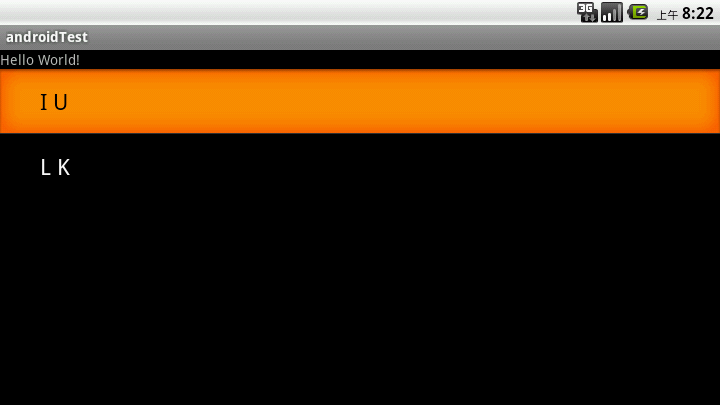
这里给出运行后的效果图:

下面说说SimpleCursorAdapter:
Api中是这么说的:An easy adapter to map columns from a cursor to TextViews or ImageViews defined in an XML file. You can specify which columns you want, which views you want to display the columns, and the XML file that defines the appearance of these views.
简单的说就是 方便把Cursor中得到的数据进行列表显示,并可以把指定的列映射到指定的TextView上。
我这里写的是从联系人中拿到数据并显示在列表上。代码如下:
 1 package com.shang.test; 2  3  import android.app.Activity; 4  import android.database.Cursor; 5  import android.os.Bundle; 6  import android.provider.Contacts.People; 7  import android.widget.ListView; 8  import android.widget.SimpleCursorAdapter; 9 10  /**11  *
12  * @author shangzhenxiang13  *14  */15 public class TestSimpleCursorAdapter extends Activity {16 17  private ListView mListView;18  private Cursor mCursor;19  private SimpleCursorAdapter mAdapter;20  21  @Override22  protected void onCreate(Bundle savedInstanceState) {23  super.onCreate(savedInstanceState);24  setContentView(R.layout.testsimplecursoradapter);25  mListView = (ListView) findViewById(R.id.mySimpleCursorList);26  mCursor = getContentResolver().query(People.CONTENT_URI, null, null, null, null);27  startManagingCursor(mCursor);28  mAdapter = new SimpleCursorAdapter(TestSimpleCursorAdapter.this, android.R.layout.simple_expandable_list_item_1, mCursor, new String[]{People.NAME}, new int[]{android.R.id.text1});29  mListView.setAdapter(mAdapter);30  }31 }
mCursor = getContentResolver().query(People.CONTENT_URI, null, null, null, null);是先获得一个指向系统联系人的Cursor
startManagingCursor(mCursor);是指我们把Cursor交给这个Activity保管,这样Cursor便会和Activity同步,我们不用手动管理了。
simpleCursorAdapter API中是这样说的:
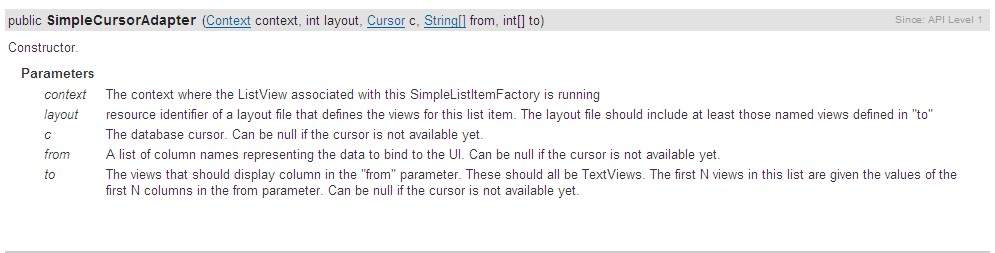
其中前面的2个参数跟ArrayAdapter中是一样的,第三个参数是传个来的参数, 其实也是数据源,后面的2个参数是2个数组,前一个是String【】类型的,而后一个是int【】类型的,说明前一个参数中的值对应的是从数据库中的字段,后一个是布局文件中和这个字段对应的id,也就是说这个字段对应得值要显示在哪里(比如说我们这里查到的联系人中的NAME字段,要显示在一个对应的TextView上面)。
这里我们具体看一下系统的布局,也就是我们这里的第二个参数的布局,便于理解,android.R.layout.simple_expandable_list_item_1.xml文件中是这么写的:
1 <?xml version="1.0" encoding="utf-8"?>

        2

        16

        17 <TextView xmlns:android="http://schemas.android.com/apk/res/android"

        18 android:id="@android:id/text1"

        19 android:layout_width="match_parent"

        20 android:layout_height="?android:attr/listPreferredItemHeight"

        21 android:paddingLeft="?android:attr/expandableListPreferredItemPaddingLeft"

        22 android:textAppearance="?android:attr/textAppearanceLarge"

        23 android:gravity="center_vertical"

        24 />
注意他有一个id,这个id也是系统的id,这个布局中只有一个TextView,所以只能显示一个字段,我们这里显示的联系人的名字,
而最后的一个参数就是由这么写id组成的一个数据(如果有很多TextView的话)。比如说我们要显示很多字段,布局文件中就要写很多TextView,而每一个TextView都有一个ID,第三个参数中有多少个字段,第四个参数中就有多少个id,并一一对应。
我们来看一下运行效果图:
上面说到的2种方法都是显示的文字,比方说我们要显示图片怎么办呢,还要显示很多内容,还要按自己喜欢的布局排列怎么办呢,用SimpleAdapter,扩展性好,可以定义各种各样的布局。
代码如下:
 1 package com.shang.test; 2  3 import java.util.ArrayList; 4 import java.util.HashMap; 5 import java.util.List; 6  7 import android.app.Activity; 8 import android.os.Bundle; 9 import android.widget.ListView;10 import android.widget.SimpleAdapter;11 12 /**13  *
14  * @author shangzhenxiang15  *16  */17 public class TestSimpleAdapter extends Activity {18 19  private ListView mListView;20  private SimpleAdapter mAdapter;21  private List<HashMap<String, Object>> mHashMaps;22  private HashMap<String, Object> map;23  24  @Override25  protected void onCreate(Bundle savedInstanceState) {26  super.onCreate(savedInstanceState);27  setContentView(R.layout.testsimpleadapter);28  mListView = (ListView) findViewById(R.id.mySimpleList);29  mAdapter = new SimpleAdapter(this, getData(), R.layout.simpleitem, new String[]{"image", "title", "info"}, new int[]{R.id.img, R.id.title, R.id.info});30  mListView.setAdapter(mAdapter);31  }32  33  private List<HashMap<String, Object>> getData() {34  mHashMaps = new ArrayList<HashMap<String,Object>>();35  map = new HashMap<String, Object>();36  map.put("image", R.drawable.gallery_photo_1);37  map.put("title", "G1");38  map.put("info", "google 1");39  mHashMaps.add(map);40  41  map = new HashMap<String, Object>();42  map.put("image", R.drawable.gallery_photo_2);43  map.put("title", "G2");44  map.put("info", "google 2");45  mHashMaps.add(map);46  47  map = new HashMap<String, Object>();48  map.put("image", R.drawable.gallery_photo_3);49  map.put("title", "G3");50  map.put("info", "google 3");51  52  mHashMaps.add(map);53  return mHashMaps;54  }55 }
simpleAdapter的数据都是用HashMap构成的List,List里面的每一节对应的是ListView的没一行,这里先建一个HashMap构成的List,布局中有3个元素,ImageView,2个TextView,每个item项的布局文件如下:
1 <?xml version="1.0" encoding="utf-8"?>

        2 <LinearLayout

        3 xmlns:android="http://schemas.android.com/apk/res/android"

        4 android:layout_width="match_parent"

        5 android:layout_height="match_parent"

        6 android:orientation="horizontal">

        7 <ImageView

        8 android:layout_width="wrap_content"

        9 android:id="@+id/img"

        10 android:layout_margin="5px"

        11 android:layout_height="wrap_content">

        12 ImageView>

        13 <LinearLayout

        14 android:id="@+id/linearLayout1"

        15 android:layout_width="wrap_content"

        16 android:layout_height="wrap_content"

        17 android:orientation="vertical">

        18 <TextView

        19 android:id="@+id/title"

        20 android:layout_width="wrap_content"

        21 android:layout_height="wrap_content"

        22 android:textColor="#ffffff"

        23 android:textSize="22px">TextView>

        24 <TextView

        25 android:id="@+id/info"

        26 android:layout_width="wrap_content"

        27 android:layout_height="wrap_content"

        28 android:textColor="#ffffff"

        29 android:textSize="13px">TextView>

        30 LinearLayout>

        31 LinearLayout>
所以有了HashMap构成的数组后,我们要在HashMap中加入数据,按顺序加入图片,title,info,一个HashMap就构成了ListView中的一个Item项,我们在看下API中是怎么描述simpleAdapter的:
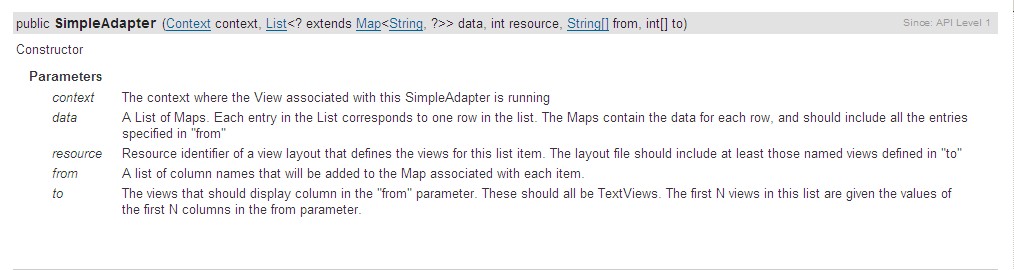
第一个参数和第三个参数跟ArrayAdapter中的是一样的,第二个参数就是由HashMap组成的List,也就是数据源,而第5个参数也就是map中的key,最后一个参数就是map中key对应的值要显示在布局中的位置的id。
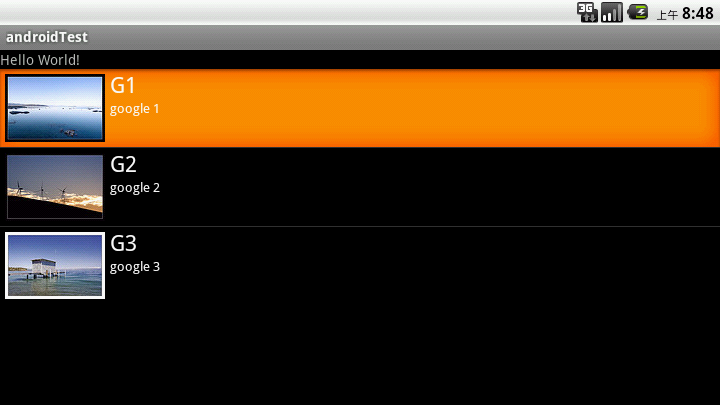
看下效果:
如果我们想在每个Item中加个button,而且点击button有对应的操作,那该怎么办呢。
这时我们可以重写baseAdapter,看代码:
1 package com.shang.test; 2 3 import java.util.ArrayList; 4 import java.util.HashMap; 5 import java.util.List; 6 7 import android.app.Activity; 8 import android.app.AlertDialog; 9 import android.content.Context; 10 import android.content.DialogInterface; 11 import android.os.Bundle; 12 import android.view.LayoutInflater; 13 import android.view.View; 14 import android.view.View.OnClickListener; 15 import android.view.ViewGroup; 16 import android.widget.BaseAdapter; 17 import android.widget.Button; 18 import android.widget.ImageView; 19 import android.widget.ListView; 20 import android.widget.TextView; 21 22 /** 23 * 24 * @author shangzhenxiang 25 * 26 */ 27 public class TestBaseAdapter extends Activity { 28 29 private ListView mListView; 30 31 @Override 32 protected void onCreate(Bundle savedInstanceState) { 33 super.onCreate(savedInstanceState); 34 setContentView(R.layout.baseadapterlist); 35 mListView = (ListView) findViewById(R.id.baselist); 36 mListView.setAdapter(new BaseListAdapter(this)); 37 } 38 39 private List<HashMap<String, Object>> getData() { 40 List<HashMap<String, Object>> maps = new ArrayList<HashMap<String,Object>>(); 41 HashMap<String, Object> map = new HashMap<String, Object>(); 42 map.put("image", R.drawable.gallery_photo_1); 43 map.put("title", "G1"); 44 map.put("info", "google 1"); 45 maps.add(map); 46 47 map = new HashMap<String, Object>(); 48 map.put("image", R.drawable.gallery_photo_2); 49 map.put("title", "G2"); 50 map.put("info", "google 2"); 51 maps.add(map); 52 53 map = new HashMap<String, Object>(); 54 map.put("image", R.drawable.gallery_photo_3); 55 map.put("title", "G3"); 56 map.put("info", "google 3"); 57 maps.add(map); 58 return maps; 59 } 60 61 private class BaseListAdapter extends BaseAdapter implements OnClickListener { 62 63 private Context mContext; 64 private LayoutInflater inflater; 65 66 public BaseListAdapter(Context mContext) { 67 this.mContext = mContext; 68 inflater = LayoutInflater.from(mContext); 69 } 70 71 @Override 72 public int getCount() { 73 return getData().size(); 74 } 75 76 @Override 77 public Object getItem(int position) { 78 return null; 79 } 80 81 @Override 82 public long getItemId(int position) { 83 return 0; 84 } 85 86 @Override 87 public View getView(int position, View convertView, ViewGroup parent) { 88 ViewHolder viewHolder = null; 89 if(convertView == null) { 90 viewHolder = new ViewHolder(); 91 convertView = inflater.inflate(R.layout.testbaseadapter, null); 92 viewHolder.img = (ImageView) convertView.findViewById(R.id.img); 93 viewHolder.title = (TextView) convertView.findViewById(R.id.title); 94 viewHolder.info = (TextView) convertView.findViewById(R.id.info); 95 viewHolder.button = (Button) convertView.findViewById(R.id.basebutton); 96 convertView.setTag(viewHolder); 97 } else { 98 viewHolder = (ViewHolder) convertView.getTag(); 99 }100 101 System.out.println("viewHolder = " + viewHolder);102 viewHolder.img.setBackgroundResource((Integer) getData().get(position).get("image"));103 viewHolder.title.setText((CharSequence) getData().get(position).get("title"));104 viewHolder.info.setText((CharSequence) getData().get(position).get("info"));105 viewHolder.button.setOnClickListener(this);106 107 return convertView;108 }109 110 class ViewHolder {111 ImageView img;112 TextView title;113 TextView info;114 Button button;115 }116 117 @Override118 public void onClick(View v) {119 int id = v.getId();120 switch(id) {121 case R.id.basebutton:122 showInfo();123 break;124 }125 }126 127 private void showInfo() {128 new AlertDialog.Builder(TestBaseAdapter.this).setTitle("my listview").setMessage("introduce....").129 setPositiveButton("OK", new DialogInterface.OnClickListener() {130 131 @Override132 public void onClick(DialogInterface dialog, int which) {133 // TODO Auto-generated method stub134 135 }136 }).show();137 }138 }139 }
在看下item的布局文件:
1 <?xml version="1.0" encoding="utf-8"?>

        2 <LinearLayout

        3 xmlns:android="http://schemas.android.com/apk/res/android"

        4 android:layout_width="match_parent"

        5 android:layout_height="match_parent"

        6 android:orientation="horizontal">

        7 <ImageView

        8 android:layout_width="wrap_content"

        9 android:id="@+id/img"

        10 android:layout_margin="5px"

        11 android:layout_height="wrap_content">

        12 ImageView>

        13 <LinearLayout

        14 android:id="@+id/linearLayout1"

        15 android:layout_width="wrap_content"

        16 android:layout_height="wrap_content"

        17 android:orientation="vertical">

        18 <TextView

        19 android:id="@+id/title"

        20 android:layout_width="wrap_content"

        21 android:layout_height="wrap_content"

        22 android:textColor="#ffffff"

        23 android:textSize="22px">TextView>

        24 <TextView

        25 android:id="@+id/info"

        26 android:layout_width="wrap_content"

        27 android:layout_height="wrap_content"

        28 android:textColor="#ffffff"

        29 android:textSize="13px">TextView>

        30 LinearLayout>

        31

        32 <Button

        33 android:id="@+id/basebutton"

        34 android:text="more"

        35 android:focusable="false"

        36 android:layout_gravity="bottom|right"

        37 android:layout_height="wrap_content"

        38 android:layout_width="wrap_content"/>

        39 LinearLayout>
转载于:https://my.oschina.net/yuanxulong/blog/305170
各种Adapter的用法相关推荐
- android 之自定义Adapter的用法
使用方法: 自定义一个类使其继承BaseAdapter,再在此类中实现四个方法 <1>getCount():得到数据源中元素的个数 <2>getItem(int positio ...
- Adapter的作用及用法
首先,我们常用的Adapter有四种,分别是BaseAdapter.SimpleAdapter.ArrayAdapter.SimpleCursorAdapter四种. BaseAdapter:基础数据 ...
- 安卓学习 之 UI控件(三)
一.常用控件 1.TextView(文本) match_parent:控件与父类相同(基本不用fil_parent)wrap_content:刚好包裹里面内容. android:gravity调节文字 ...
- STL源码剖析 基本算法 < stl_algobase.h >
注意事项 : 实际使用的时候,使用的是<algorithm>这个头文件,不是题目中的< stl_algobase.h > equal函数 如果两个序列在[firsLlast) ...
- 一个Demo学会用Android兼容包新控件
2019独角兽企业重金招聘Python工程师标准>>> 前言 伟大的Google为Android推出了一系列的兼容包,最新的就是Design Support Library了,这里我 ...
- 高仿网易评论列表效果之界面分析
Hello大家好我是周杰伦~!@#¥#@¥%¥%--%&*&--**)--*%&¥%#¥!!!! 不好意思,刚忘了吃药了~~~~扯正事,前几天有个小哥来面试,因为前些天面试了很 ...
- Android高级控件(一)——ListView绑定CheckBox实现全选,增加和删除等功能
Android高级控件(一)--ListView绑定CheckBox实现全选,增加和删除等功能 这个控件还是挺复杂的,也是项目中应该算是比较常用的了,所以写了一个小Demo来讲讲,主要是自定义adap ...
- 关于如何让moveit输出固定时间步长的轨迹点
为什么使用Industrial_trajectory_filters包?因为Moveit生产的轨迹是等距而非等时的.但是在工业应用的机器人中,通常都是按照固定的周期来控制关节轴运动.因此moveit原 ...
- android 实例-个人理财工具 之六,Android 个人理财工具五:显示账单明细 上
前面我们已经将每个月的收支明细存入到SQLite的数据表中,本文将实现从SQLite的数据表中取出这些数据显示为账单明细界面. 下图是最终的效果图: 在设计该界面时我考虑过好几个方案.本来准备使用一个 ...
最新文章
- 程序员感悟----路该怎么走
- PyQt5——布局管理
- 最优化基础和机器学习优化
- 华为如何拍火烧云_华为手机拍照功能介绍-设置通用功能
- Androidclient与服务端交互之登陆演示样例
- junit动态忽略测试_有条件忽略测试的JUnit规则
- python错误代码40035_[Python]网络爬虫(三):异常的处理和HTTP状态码的分类
- 吴恩达|机器学习作业6.0支持向量机(SVM)
- POJ 1166 The Clocks (爆搜 || 高斯消元)
- python_图像去畸变/图像矫正
- 创建C51工程文件疑问点---startup.A51
- java nio书籍_《Java NIO》这本书
- 弘辽科技:淘宝保证金解冻后店铺还在吗?保证金怎么解冻?
- 符号三角形_dfs算法
- java 打印 边距_缩小边距 – Java打印
- 全球与中国细胞推刮器市场现状及未来发展趋势
- Flash鼠绘入门第四课:绘制漂亮的梅花-梅花Flash鼠绘方法一
- 阿里巴巴食堂:看菜名我跪了~程序员:给我来个“油炸产品经理”
- umi中@umijs/plugin-dva的使用,及实现一套增删改
- 直播程序源码Android10.0 导航栏和状态栏动态控制合集
热门文章
- oracle安装前准备,Oracle 安装前准备
- throws java_基于Java中throw和throws的区别(详解)
- kibana创建es索引_es 索引数据创建mapping 普通内部对象 嵌套文档 父子文档创建和查询...
- jdbc mysql 存储过程执行失败_JDBC连接执行MySQL存储过程报空指针或权限错误
- Spring @Bean @Scope @Qualifier
- PyPA Creating Documentation
- Python 装饰器@functools.wraps(func)
- Spark RDD Transformation
- TensorFlow model
- 4.11 一维到三维推广