Karma与TSLint
TSLint
TSLint是一个可扩展的静态分析工具,用于检查TypeScript代码的可读性,可维护性和功能性错误。收到现代编辑和构建系统的广泛支持,并且可以使用您自己的路由,配置和格式化。
安装
npm install tslint typescript -g
运行linter之前,请确保TypeScript源文件能够正确编译。
用法 tslint [options] [file ...]
-v, --version  输出版本号
-c, --config [config]  配置文件
-e, --exclude <exclude>  从路径扩展中全局排除
--fix  修正了选择规则的链接错误(这可能会覆盖linted文件)
--force  返回状态码0,即使有lint错误
-i, --init  生成一个tslint。当前工作目录中的json配置文件
-o, --out [out]  输出文件
--outputAbsolutePaths  输出文件路径是否是绝对路径
-r, --rules-dir [rules-dir]  规则目录
-s, --formatters-dir [formatters-dir]  格式器目录
-t, --format [format]  输出格式(散文、json、时髦、冗长、pmd、msbuild、checkstyle、vso、文件列表、codeFrame)
--test   测试tslint为指定的目录生成正确的输出
-p, --project [project]  tsconfig。json文件
-h, --help  输出使用信息
默认情况下,TSLint将查找tslint.json正在创建的文件的目录中指定的配置文件,如果未找到,则搜索祖先目录。查看规则部分,了解有关可用规则的更多详细信息。
tslint接受以下命令行选项
-c, --config:tslint将使用配置文件的位置来确定哪些规则被激活,以及哪些选项可以 提供给规则。如果没有指定选项,配置文件名为tslint。使用json,只要它存在于路径中。文件的格式是规则:/规则列表/,其中/规则列表/是一个键:值逗号分隔的rulename列表:规则选项对。规则选项可以是布尔true/false值,表示规则是否被使用,或者是一个布尔值,……布尔值提供与非列表情况相同的角色,而列表的其余部分则是传递给规则的选项,该规则将决定它所检查的内容(例如,max-line长度规则的字符数,或者禁止禁止规则的功能)。-e, --exclude:一个文件名或glob,表示从linting中排除文件。如果您需要多个选项,可以多次提供此选项 globs表示要排除哪些文件。--fix:修正了选择规则的链接错误。这可能会覆盖linted文件。--force:返回状态码0,即使有任何lint错误。作为npm脚本运行时很有用。-i, --init:生成一个tslint。当前工作目录中的json配置文件。-o, --out:将结果输出到的文件名。默认情况下,tslint输出到stdout,通常是您运行它的控制台。--outputAbsolutePaths:如果是真的,输出中的所有路径都是绝对的。-r, --rules-dir:另一个规则目录,用于用户创建的规则。tslint将始终检查其默认规则目录在检查用户提供的信息之前,节点模块/tslint/lib/规则规则目录,所以用户提供的规则目录中的规则与基本规则相同的名称将不会被加载。-s, --formatters-dir:为用户创建的格式化程序,另一个格式化目录。格式化程序是将格式化tslint输出的文件把它写在stdout或文件中——out。默认的目录,节点模块/tslint/构建/格式化程序,将永远是首先检查,所以用户创建的表单具有相同的名称因为基础格式化程序将不会被加载。-t, --format:格式化程序用于格式化linter的结果把它输出到stdout或者文件中传递出去。的核心格式器是散文(人类可读)、json(机器可读)和详细。如果不使用此选项,则散文是默认的。其他内置选项包括pmd、msbuild、checkstyle和vso。如果——formatters-dir,可以添加和使用额外的格式化程序选项设置。--test:在匹配的目录上运行tslint,并检查tslint输出匹配.lint文件中的预期输出。自动加载tslint。作为配置文件的目录中的json文件测试。请参阅完整的tslint文档了解更多关于如何这可以用来测试定制规则。-p, --project:包含tsconfig的路径或目录。将会是json文件用于确定哪些文件将被连接。这个标志还使需要类型检查器的规则。-v, --version:当前版本的tslint。-h, --help:打印此帮助消息。
TSLint 代码规则
https://palantir.github.io/tslint/rules/
测试
编写测试程序来探索和确认应用的行为。测试的作用有:
1. 测试守护由于代码变化而打破已有代码(“回归”)的情况。
2. 不管代码被正确使用还是错误使用,测试程序起到澄清代码的作用。
3. 测试程序暴露设计和实现可能出现的错误,测试程序从很多角度为代码亮出警示灯
工具与技术
可以用多种工具和技术来编写运行Angular测试程序。
Jasmine
测试框架提供所有编写基本测试的工具,自带HTML测试运行器,用来在浏览器中执行测试程序
Angular测试工具
为被测试的Angular应用代码创建测试环境。在应用代码与Angular环境互动时,来限制和控制应用的部分代码
Karma
在开发应用的过程中编写和运行单元测试的理想工具,能成为项目开发和连续一体化进程的不可分割的一部分。
Protractor
编写和运行e2e端对端的程序,端对端程序像用户体验应用程序那样探索它。
在测试中一条进程运行真正的应用,另一条运行Protractor测试程序,模拟用户行为,判断应用在浏览器中的反应是否正确。
独立单元测试.vs.Angular测试工具集
独立单元测试用于测试那些完全不依赖Angular或不需要注入值的类实例。
测试程序员会new出一个测试类的实例,为构造函数参数提供所需的测试替身,然后测试该实例的API接口。
我们应该为管道和服务书写独立的单元测试
也可以同样为组件写独立单元测试,不过独立单元测试无法体现组件与Angular交互。
具体来说,就是不能发现组件类如何与它的模板或其他组件交互。
这时就需要Angular测试工具集,包括TestBed类和一些来自@angular/core/testing的助手函数。
第一个Karma测试
创建1st.spec.ts。用Jasmine编写的测试程序都被叫做specs,文件名后缀必须是.spec.ts。
这是karma.conf.js和其他工具所坚持和遵循的规约。
将测试程序spec放到app文件夹下的任意位置,karma.conf.js告诉Karma在这个文件夹下找测试程序文件
describe('1st tests', () => {it('true is true', () => expect(true).toBe(true));
});
运行:npm test,该命令编译应用及其测试代码,启动Karma,两个进程都监视相关文件,往控制台输入信息和检测变化时自动重新运行
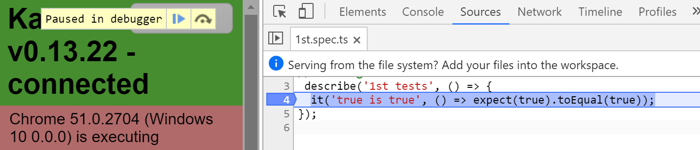
Karma会打开浏览器并开始向控制台输出,查看控制台的输出,大致如下
> npm test
...
[0] 1:37:03 PM - Compilation complete. Watching for file changes.
...
[1] Chrome 51.0.2704: Executed 0 of 0 SUCCESSChrome 51.0.2704: Executed 1 of 1 SUCCESS
SUCCESS (0.005 secs / 0.005 secs)
编译器和Karma都在运行,信息[0]是编译器输入,[1]是Karma的输入
调试测试程序
在浏览器中,像调试应用一样调试测试程序spec。
显示Karma的浏览器窗口(之前被隐藏了)。
点击“DEBUG”按钮;它打开一页新浏览器标签并重新开始运行测试程序
打开浏览器的“Developer Tools”(Windows上的Ctrl-Shift-I或者OSX上的`Command-Option-I)。
选择“sources”页
打开1st.spec.ts测试文件(Control/Command-P, 然后输入文件名字)。
在测试程序中设置断点。
刷新浏览器...然后它就会停在断点上。
测试一个组件
大多数开发人员首先要测试的就是Angular组件,首先我们创建一个组件banner-inline.component.ts
import { Component } from '@angular/core';@Component({selector: 'app-banner',template: '<h1>{{title}}</h1>'
})
export class BannerComponent {title = 'Test Tour of Heroes';
}
我们推荐将单元测试的spec配置文件放到与应用程序源代码文件所在的同一个文件夹中,因为:
这样的测试程序很容易被找到
你可以一眼看出应用程序的那些部分缺乏测试程序。
临近的测试程序可以展示代码是如何在上下文中工作的
当你移动代码(无可避免)时,你记得一起移动测试程序
当你重命名源代码文件(无可避免),你记得重命名测试程序文件。
什么时候我应该把测试spec文件放到测试目录中?
应用程序的整合测试spec文件可以测试横跨多个目录和模块的多个部分之间的互动。 它们不属于任何部分,很自然,没有特别的地方存放它们。
通常,在test目录中为它们创建一个合适的目录比较好。
当然,测试助手对象的测试spec文件也属于test目录,与它们对应的助手文件相邻。
组件对应的测试代码banner-inline.component.spec.ts放在同一目录下
import {BannerComponent} from "./banner-inline.component";
import {ComponentFixture, TestBed} from "@angular/core/testing";
import {DebugElement} from "@angular/core";
import {By} from "@angular/platform-browser";describe('BannerComponent (inline template)', () => {let comp: BannerComponent;let fixture: ComponentFixture<BannerComponent>; let de: DebugElement; let el: HTMLElement; beforeEach(() => { TestBed.configureTestingModule({ declarations: [BannerComponent], // declare the test component  }); fixture = TestBed.createComponent(BannerComponent); comp = fixture.componentInstance; // BannerComponent test instance // query for the title <h1> by CSS element selector de = fixture.debugElement.query(By.css('h1')); el = de.nativeElement; }); });
TestBed测试台
TestBed测试台是Angular测试工具集中的首要概念,他创建Angular测试模块(一个NgModule)
可以通过调用它的configureTestingModule方法来为要测试的类生成模块环境。
其效果是,可以把被测试的组件从原有的应用模块中剥离出来,附件到一个动态生成的Angular测试模块上。
而该测试模块可以为这些测试进行特殊剪裁。
configureTestingModule方法接受一个类似@NgModule的元数据对象,这个元数据对象具有标准的Angular模块的大多数属性。
这里的元数据对象只是声明了要测试的组件BannerComponent。这个元数据中没有imports属性因为:
1.默认的测试模块配置中已经有了BannerComponent所需的一切
2.BannerComponent不需要与任何其他组件交互
在beforeEach中调用configureTestingModule,以便TestBed可以在运行每个测试之前都把自己重置会它的基础状态
基础状态中包含一个默认的测试模块配置,它包含每个测试都需要的那些声明(组件、指令和管道)以及服务提供商
之前提到的测试垫片初始化测试模块配置到一个模块,这个模块和@angular/platform-browser中的BrowserModule类似
这个默认的配置只是测试的基础性工作,稍后我们会调用TestBed.configureTestingModule来传入更多元数据,
这些元数据定义了额外的imports、declarations、providers和适用于这些测试的概要(Schema)
可选的override方法可以微调配置的各个方面
createComponent方法
在配置好TestBed之后,我们可以告诉他创建一个待测组件的实例,这个例子中
TestBed.createComponent创建了一个BannerComponet的实力,并返回一个ComponentFixture
调用了createComponent之后就不要再重新配置TestBed了
createComponent方法封闭了当前的TestBed实例,以免将来在配置它
我们不能再调用任何TestBed的方法修改配置:不能调用configureTestingModule或任何override方法。
如果这么做,TestBed就会抛出错误。
ComponentFixture、DebugElement、query(By.css)
createComponent方法返回ComponentFixtrue,用来控制和访问已创建的组件所在的测试环境。
这个fixture提供了对组件实例自身的访问,同时还提供了用来访问组件的DOM元素的DebugElement对象。
title属性被插值到DOM的<h1>标签中,用CSS选择器从fixture的DebugElement中query<h1>元素
query方法接受predicate函数,并搜索fixture的整个DOM树,试图寻找第一个满足predicate函数的元素。
queryAll方法返回一列数组,包含所有DebugElement中满足predicate的元素。
predicate是返回布尔值的函数,predicate查询接受DebugElement参数,如果元素符合选择条件便返回true。
By类是Angular测试工具之一,它生成游泳的predicate。它的By.css静态方法产生标准CSS选择器predicate
与JQuery选择器相同的方法过滤。
最后这个配置把DebugElement中的nativeElementDOM元素赋值给el属性,测试程序将判断el是否包含期待的标题文本。
测试程序
再每个测试程序之前,Jasmin都一次运行beforeEach函数。
import {BannerComponent} from './banner-inline.component';
import {ComponentFixture, TestBed} from '@angular/core/testing';
import {DebugElement} from '@angular/core';
import {By} from '@angular/platform-browser';describe('BannerComponent (inline template)', () => {let comp: BannerComponent;let fixture: ComponentFixture<BannerComponent>; let de: DebugElement; let el: HTMLElement; beforeEach(() => { TestBed.configureTestingModule({ declarations: [BannerComponent], // declare the test component  }); fixture = TestBed.createComponent(BannerComponent); comp = fixture.componentInstance; // BannerComponent test instance // query for the title <h1> by CSS element selector de = fixture.debugElement.query(By.css('h1')); el = de.nativeElement; }); it('should display original title', () => { fixture.detectChanges(); expect(el.textContent).toContain(comp.title); }); it('should display a different test title', () => { comp.title = 'Test Title'; fixture.detectChanges(); expect(el.textContent).toContain('Test Title'); }); });
测试程序向DebugElement获取原生HTML元素,来满足自己的期望
detectChanges:在额始终的Angular变量检测
每个测试程序都通过调用fixture.detectChanges()来通知Angular执行变更检测。
第一个测试程序立刻这么做,出发数据绑定和并将title属性发送到DOM元素中。
第二个测试程序在更改组件的title属性之后才调用fixture.detectChanges,新值出现在DOM元素中。
产品阶段,当Angular创建组件、用户输入、异步动作完成时,自动触发变更检测。
TestBed.createComponent不会出发变更检测,该工具不会自动将组件的title属性值推送到数据绑定的元素
下面的测试程序展示了这个事实:
it('no title in the DOM until manually call `detectChanges`', () => {expect(el.textContent).toEqual('');});这种行为是有意为之,在Angular初始化数据绑定或者调用生命周期钩子之前,它给测试者机会来查看或改变组件的状态。
自动变更检测
BannerComponent的测试频繁调用detectChanges,有些测试人员更希望Angular的测试环境自动进行变更检查。
这可以通过为TestBed配置上ComponentFixtureAutoDetect提供商来做到。
首先从测试工具库中导入它:创建banner.component.detect-changes.spec.ts
然后添加测试模块配置providers数组
import {ComponentFixtureAutoDetect, TestBed} from '@angular/core/testing';
import {BannerComponent} from './banner-inline.component';describe('BannerDetectChanges', () => {beforeEach(() => {TestBed.configureTestingModule({declarations: [BannerComponent],providers: [{provide: ComponentFixtureAutoDetect, useValue: true}]});});
});
下面测试阐明了自动变更检测的工作原理
import {ComponentFixture, ComponentFixtureAutoDetect, TestBed} from '@angular/core/testing';
import {BannerComponent} from './banner-inline.component';
import {DebugElement} from '@angular/core';
import {By} from '@angular/platform-browser';describe('BannerDetectChanges', () => {let comp: BannerComponent;let fixture: ComponentFixture<BannerComponent>; let de: DebugElement; let el: HTMLElement; beforeEach(() => { TestBed.configureTestingModule({ declarations: [BannerComponent], providers: [ { provide: ComponentFixtureAutoDetect, useValue: true } ] }); fixture = TestBed.createComponent(BannerComponent); comp = fixture.componentInstance; de = fixture.debugElement.query(By.css('h1')); el = de.nativeElement; }); it('should display original title', () => { // Hooray! No `fixture.detectChanges()` needed  expect(el.textContent).toContain(comp.title); }); it('should still see original title after comp.title change', () => { const oldTitle = comp.title; comp.title = 'Test Title'; // Displayed title is old because Angular didn't hear the change :(  expect(el.textContent).toContain(oldTitle); }); it('should display updated title after detectChanges', () => { comp.title = 'Test Title'; fixture.detectChanges(); // detect changes explicitly  expect(el.textContent).toContain(comp.title); }); });
第一个测试程序展示了自动检测的好处。
第二个和第三个测试程序展示了一个重要的局限性,Angular测试环境不会知道测试程序改变了组件的title属性。
自动检测只对异步行为比如承诺的解析、计时器和DOM事件作出反应。
但是直接修改组件属性值的这种同步更新是不会出发自动检测的,测试程序必须手动调用fixture.detectChange()
与其怀疑测试工具会不会执行变更检测,总是显式调用detectChanges(),即使在不需要的时候也没有任何坏处。
测试带有外部模块的组件
BannerComponent的行为和刚才的版本相同,但是实现方式不同,它有一个外部模板和CSS文件,通过templateUrl和styleUrls属性来指定。
创建banner.component
import { Component } from '@angular/core';@Component({selector: 'app-banner',templateUrl: './banner.component.html',styleUrls:  ['./banner.component.css']
})
export class BannerComponent {title = 'Test Tour of Heroes'; }
这些测试有一个问题,TestBed.createComponent方法是同步的。
但是Angular模板编译器必须在创建组件实例之前先从文件系统中读取这些值,而这是异步的。
以前测试内联模板时使用的设置方式不适用于外部模板。
异步的beforeEach
BannerComponet测试的设置方式必须给Angular模板编译器一些时间来读取文件。
以前放在beforeEach中的逻辑被拆分成两个beforeEach调用。
第一个beforeEach处理异步编译工作
import {async, TestBed} from '@angular/core/testing';
import {BannerComponent} from './banner.component';beforeEach(async(() => {TestBed.configureTestingModule({declarations: [BannerComponent]}).compileComponents();
}));
async函数被用作调用beforeEach的参数,async函数是Angular测试工具集的一部分,这里必须引入他。
它接受一个无参数的函数,并返回一个函数,这个函数会作为实参传给beforeEach
async参数的内容看起来非常像同步版beforeEach的函数体,并不能很明显的看出来这是异步函数。
内部实现上,async会把beforeEach的函数体放进一个特殊的异步测试区,隐藏了异步执行的内部机制。
这就是为了调用异步的TestBed.compileComponents方法所要做的一切。
compileComponents方法
TestBed.configureTestingModule方法返回TestBed类,以便你可以链式调用TestBed的其它静态方法,比如compileComponent
TestBed.compileComponents方法会异步编译这个测试模块中配置的所有组件。
BannerComponent是唯一要编译的组件,当compileComponents完成时,外部组件和css文件会被内联。
TestBed.createComponent会用同步的方式创建一个BannerComponent的新实例。
这个例子中,TestBed.compileComponents只会编译BannerComponent
所有这些组件都可能含有外部模板和css文件,TestBed.compileComponents会同时异步便宜所有这些声明的组件。
调用了compileComponents之后就不能再配置TestBed了,务必确保compileComponents是调用TestBed.createComponent
来实例化待测组件之前的最后一步。
compileComponents方法封闭了当前的TestBed实例,以免将来再配置它。
不能再调用任何TestBed的方法修改配置:不能调用configureTestingModule或任何override方法,否则会抛出错误。
同步beforeEach
在异步测试后,还需要用同步测试来完成接下来的步骤。
步骤与异步类似,测试运行器会先等待第一个异步beforeEach函数执行完成后再调用第二个
compileComponents会返回一个Promise,来让我们立即执行额外的任务,比如把第二个beforeEach放到回掉函数then里面。
但是因为不方便阅读,所以大部分还是写两个beforeEach调用的方式。
import { async, ComponentFixture, TestBed } from '@angular/core/testing';
import { By }              from '@angular/platform-browser';
import { DebugElement }    from '@angular/core';import { BannerComponent } from './banner.component';describe('BannerComponent (templateUrl)', () => {let comp:    BannerComponent;let fixture: ComponentFixture<BannerComponent>; let de: DebugElement; let el: HTMLElement; // async beforeEach beforeEach(async(() => { TestBed.configureTestingModule({ declarations: [ BannerComponent ], // declare the test component  }) .compileComponents(); // compile template and css  })); // synchronous beforeEach beforeEach(() => { fixture = TestBed.createComponent(BannerComponent); comp = fixture.componentInstance; // BannerComponent test instance // query for the title <h1> by CSS element selector de = fixture.debugElement.query(By.css('h1')); el = de.nativeElement; }); it('no title in the DOM until manually call `detectChanges`', () => { expect(el.textContent).toEqual(''); }); it('should display original title', () => { fixture.detectChanges(); expect(el.textContent).toContain(comp.title); }); it('should display a different test title', () => { comp.title = 'Test Title'; fixture.detectChanges(); expect(el.textContent).toContain('Test Title'); }); });
测试有依赖的组件
组件经常依赖其他服务,例如下方组件
import { Component, OnInit } from '@angular/core';import { UserService }       from './user.service';@Component({selector: 'app-welcome',template: '<h3 class="welcome" ><i>{{welcome}}</i></h3>'
})
export class WelcomeComponent  implements OnInit {welcome = '-- not initialized yet --'; constructor(private userService: UserService) { } ngOnInit(): void { this.welcome = this.userService.isLoggedIn ? 'Welcome, ' + this.userService.user.name : 'Please log in.'; } }
其中UserService就是模拟作用,没有东西。下面看一下测试模块配置
import {ComponentFixture, TestBed} from '@angular/core/testing';
import {WelcomeComponent} from "./welcome.component";
import {DebugElement} from "@angular/core";
import {UserService} from "./user.service";describe('WelCome Spec', () => {let comp: WelcomeComponent;let fixture: ComponentFixture<WelcomeComponent>; let de: DebugElement; let el: HTMLElement; const userServiceStub = { isLoggedIn: true, user: {name: 'Test User'} }; TestBed.configureTestingModule({ declarations: [WelcomeComponent], providers: [{provide: UserService, useValue: userServiceStub}] }); });
在测试配置中不但声明了被测试的组件,而且在providers数组添加了UserService依赖,但不是真实的UserService。
实际上,服务替身通常更合适进行测试。我们模拟了userService的服务替身。
获取注入服务,一共有两种方法
Injector
Angular的注入是层次化的,可以有很多层注入器,从根TestBed创建的注入器来贯穿整个组件树。
最安全有效的方法就是从被测试的组件的注入器获取,组件注入器是fixture的DebugElement的属性。
let userService = fixture.debugElement.injector.get(UserService);
TestBed.get
也可以通过TestBed.get方法来从根注入器中获取服务,更加简洁。但是只有Angular使用测试的根注入器中的那个服务实例来注入到组件时才有效
userService = TestBed.get(UserService);
获取注入服务其实是服务克隆,与传递过去的对象不一致
beforeEach(() => {// stub UserService for test purposesuserServiceStub = {isLoggedIn: true,user: { name: 'Test User'}};TestBed.configureTestingModule({declarations: [ WelcomeComponent ],providers: [ {provide: UserService, useValue: userServiceStub } ]});fixture = TestBed.createComponent(WelcomeComponent);comp = fixture.componentInstance; // UserService from the root injector userService = TestBed.get(UserService); // get the "welcome" element by CSS selector (e.g., by class name) de = fixture.debugElement.query(By.css('.welcome')); el = de.nativeElement; });it('should welcome the user', () => {fixture.detectChanges();const content = el.textContent;expect(content).toContain('Welcome', '"Welcome ..."');expect(content).toContain('Test User', 'expected name');
});it('should welcome "Bubba"', () => {userService.user.name = 'Bubba'; // welcome message hasn't been shown yetfixture.detectChanges(); expect(el.textContent).toContain('Bubba'); }); it('should request login if not logged in', () => { userService.isLoggedIn = false; // welcome message hasn't been shown yet fixture.detectChanges(); const content = el.textContent; expect(content).not.toContain('Welcome', 'not welcomed'); expect(content).toMatch(/log in/i, '"log in"'); });第一个测试程序是合法测试程序,确认这个被模拟的UserService是否被调用和工作正常。
第二个测试程序是验证变换用户名字的效果
第三个测试程序是检查如果用户没有登录,组件是否显示正确信息
测试异步服务组件
大部分数据服务向远程服务器发起HTTP请求,响应必须是异步的。
@Component({selector: 'twain-quote',template: '<p class="twain"><i>{{quote}}</i></p>'
})
export class TwainComponent  implements OnInit {intervalId: number;quote = '...';constructor(private twainService: TwainService) { } ngOnInit(): void { this.twainService.getQuote().then(quote => this.quote = quote); } }
ngOnInit的twainService.getQuote返回Promise,显然是异步操作。一般来讲不会真正去发送请求,而是仿真请求。
beforeEach(() => {TestBed.configureTestingModule({declarations: [ TwainComponent ],providers: [ TwainService ],});fixture = TestBed.createComponent(TwainComponent);comp = fixture.componentInstance;// TwainService actually injected into the componenttwainService = fixture.debugElement.injector.get(TwainService);// Setup spy on the `getQuote` methodspy = spyOn(twainService, 'getQuote').and.returnValue(Promise.resolve(testQuote));// Get the Twain quote element by CSS selector (e.g., by class name)de = fixture.debugElement.query(By.css('.twain')); el = de.nativeElement; });与其伪造服务对象,它注入了真实的服务,并用Jasmine的spy替换关键的getQuote方法。称为:刺探(Spy)真实服务
spy设计是所有调用getQuote的方法都会收到立刻解析的承诺,得到一条预设的名言。spy拦截了实际getQuote方法,不会联系服务端。
it('should not show quote before OnInit', () => {expect(el.textContent).toBe('', 'nothing displayed');expect(spy.calls.any()).toBe(false, 'getQuote not yet called');
});it('should still not show quote after component initialized', () => {fixture.detectChanges();// getQuote service is async => still has not returned with quoteexpect(el.textContent).toBe('...', 'no quote yet');expect(spy.calls.any()).toBe(true, 'getQuote called'); }); it('should show quote after getQuote promise (async)', async(() => { fixture.detectChanges(); fixture.whenStable().then(() => { // wait for async getQuote fixture.detectChanges(); // update view with quote  expect(el.textContent).toBe(testQuote); }); })); it('should show quote after getQuote promise (fakeAsync)', fakeAsync(() => { fixture.detectChanges(); tick(); // wait for async getQuote fixture.detectChanges(); // update view with quote  expect(el.textContent).toBe(testQuote); }));
同步测试程序
前两个测试程序是同步的,在Spy的帮助下,验证了在Angular调用ngOnInit期间发生的第一次变更检测后,getQuote被调用了。
这两者都不能证明被显示的值是服务提供的,虽然spy返回了解析的承诺,但是内容还没有到来。
这个测试程序必须等待JavaScript引擎一整个回合,返回值才会有效,该测试程序必须要变成异步的。
注意第三个测试程序的async方法,async函数是Angular TestBed的一部分,通过将测试代码放在特殊的异步测试区域来运行。
async函数简化了异步测试程序的代码,会在beforeEach中被调用。
虽然async做了很多工作来尽量隐藏异步特性,但在测试程序中里面调用函数时,有时还是会体现他们的异步行为。
fakeAync可选方法,进一步移除了异步行为,提供了更加直观的代码经验。
whenStable方法
测试程序必须等待getQuote在JavaScript引擎的下一回合中被解析。
本测试对twainService.getQuote返回的承诺没有直接访问,因为它被埋没在TwainComponent.ngOnInit里
对于只测试组件API表面的测试来说,是无法被访问的。
异步测试区域可以访问getQuote承诺,因为它拦截所有调用异步方法所发出的承诺,不管他在那里。
ComponentFixture.whenStable方法返回它自己的承诺,在getQuote承诺完成时被解析。
stable的意思是当所有待处理的异步行为完成时的状态,在stable后whenStable承诺被解析。
然后测试程序继续运行,开始下一轮变更检测,通过Angular来更新DOM,getQuote辅助方法提取出显示元素的文本。
fakeAsync方法
第四个测试程序用不同的方法验证同样的组件行为。
在it参数中,async被fakeAsync替换,fakeAsync是另一种Angular测试工具
和async一样,接受无参数函数并返回一个函数,变成Jasmine的it函数的参数,通过特殊的测试区域运行测试程序,让代码更加简单直观。
tick函数
是Angular测试工具之一,只能在fakeAsync的主体中被调用。
调用tick()模拟时间的推移,直到全部待处理的异步任务都已完成,这个测试案例中,包含getQuote承诺的解析。
不返回任何结果,没有任何承诺需要等待,直接执行与之前相同的代码。
jasmine.done
虽然async和fakeAsync函数大大的简化了异步测试,你仍然可以回退到传统的Jasmine异步测试技术上。
仍然可以接受done回调的函数传给it。但是,你必须链接承诺、处理错误、并在适当的时候调用done
带有done回调的测试函数,适合涉及intervalTimer的代码或者异步Observable函数的场景。
it('should show quote after getQuote promise (done)', (done: any) => {fixture.detectChanges();// get the spy promise and wait for it to resolvespy.calls.mostRecent().returnValue.then(() => {fixture.detectChanges(); // update view with quoteexpect(el.textContent).toBe(testQuote);done();});
});
测试输入输出组件
带有导入和导出的组件通常出现在宿主组件的视图模板上,使用属性绑定来设置输入属性。使用事件绑定来监听输出属性触发的事件。
测试的目的是验证这样的绑定和期待的那样正常工作,测试程序应该设置导入值并监听导出事件。
<dashboard-hero *ngFor="let hero of heroes"  class="col-1-4"[hero]=hero  (selected)="gotoDetail($event)" >
</dashboard-hero>@Component({selector:    'dashboard-hero',templateUrl: './dashboard-hero.component.html',styleUrls: [ './dashboard-hero.component.css' ]
})
export class DashboardHeroComponent { @Input() hero: Hero; @Output() selected = new EventEmitter<Hero>(); click() { this.selected.emit(this.hero); } }
例如上面的代码,*ngFor循环中设置每个组件的hero input属性到迭代的值,并监听组件selected事件。
有下列几种测试方案:
把它当做独立的组件来测试
把它当做被替代组件使用的组件来测试
独立测试
// async beforeEach
beforeEach( async(() => {TestBed.configureTestingModule({declarations: [ DashboardHeroComponent ],}).compileComponents(); // compile template and css
}));// synchronous beforeEach
beforeEach(() => {fixture = TestBed.createComponent(DashboardHeroComponent);comp    = fixture.componentInstance;heroEl  = fixture.debugElement.query(By.css('.hero')); // find hero element// pretend that it was wired to something that supplied a heroexpectedHero = new Hero(42, 'Test Name'); comp.hero = expectedHero; fixture.detectChanges(); // trigger initial data binding });
使用compileComponents异步编译完成组件后,设置执行另一个同步的beforeEach
值得注意的是,expectedHero赋值给组件hero属性的方式,模拟了迭代器中通过属性绑定的赋值方式。
然后看测试程序
it('should display hero name', () => {const expectedPipedName = expectedHero.name.toUpperCase();expect(heroEl.nativeElement.textContent).toContain(expectedPipedName);
});
验证英雄名字通过绑定被传递到模板了,实际页面如下
<div (click)="click()" class="hero">{{hero.name | uppercase}}
</div>
第二个测试程序验证点击行为,点击英雄应该触发selected事件,可供宿主组件监听:
it('should raise selected event when clicked', () => {let selectedHero: Hero;comp.selected.subscribe((hero: Hero) => selectedHero = hero);heroEl.triggerEventHandler('click', null);expect(selectedHero).toBe(expectedHero);
});
这个组件公开EventEmitter属性,测试程序像宿主组件那样来描述它
heroEl是个DebugElement,代表了英雄所在的<div>。测试程序用click事件名字来调用triggerEventHandler
调用.click()时,click事件绑定作出相应。
如果组件像期待的那样工作,click通知组件的selected属性就会发出hero对象,测试程序通过订阅
selected事件而检测到这个值,所以测试应该成功。
triggerEventHandler方法
Angular的DebugElement.triggerEventHandler可以用事件的名字触发任何数据绑定事件。
第二个参数是传递给事件处理器的事件对象。测试程序用null事件对象触发click事件
heroEl.triggerEventHandler('click', null);
测试程序假设运行事件的事件处理器-组件的click方法-不关心事件对象。
其他处理器将会更加严格。比如RouterLink指令期待事件对象,并且该对象具有button属性,
代表了已被按下的鼠标按钮。如果该事件对象不具备上面的条件,指令变会抛出错误。
点击按钮、链接、任意HTML元素是很常见的测试任务。
把click触发过程封装到辅助方法中可以简化这个任务,比如下面的click辅助方法:
/** Button events to pass to `DebugElement.triggerEventHandler` for RouterLink event handler */
export const ButtonClickEvents = {left:  { button: 0 },right: { button: 2 }
};/** Simulate element click. Defaults to mouse left-button click event. */
export function click(el: DebugElement | HTMLElement, eventObj: any = ButtonClickEvents.left): void { if (el instanceof HTMLElement) { el.click(); } else { el.triggerEventHandler('click', eventObj); } }
第一个参数是用来点击的元素,如果你愿意,可以将自定义的事件对象传递给第二个参数。
默认的是鼠标左键事件对象,它被许多事件处理器接受,包括RouterLink指令。
下面是使用click辅助函数重新编写的上一个测试程序。
it('should raise selected event when clicked', () => {let selectedHero: Hero;comp.selected.subscribe((hero: Hero) => selectedHero = hero);click(heroEl);   // triggerEventHandler helperexpect(selectedHero).toBe(expectedHero);
});
在测试宿主组件中测试组件
在前面的方法中,测试本身扮演了宿主组件的角色。
当正常数据绑定到宿主组件时,还会正常工作吗?
使用实际的宿主来测试是可行的,但是这么做似乎不合算。像下面这样使用测试宿主组件来模拟更加容易
//dashboard-hero.component.spec.ts@Component({template: `<dashboard-hero [hero]="hero" (selected)="onSelected($event)"></dashboard-hero>`
})
class TestHostComponent {hero = new Hero(42, 'Test Name');selectedHero: Hero;onSelected(hero: Hero) {this.selectedHero = hero;}
}
测试宿主组件不用理会Router、HeroService服务,甚至*ngFor循环。
测试宿主将组件的hero导入属性设置为它的模拟英雄,将组件的selected事件绑定到它的onSelected处理器,
使用selectedHero属性来记录发送来的英雄,然后测试检查这个属性来验证事件确实发送了正确的英雄。
配置使用测试宿主的测试程序与配置孤立测试相似。
beforeEach( async(() => {TestBed.configureTestingModule({declarations: [ DashboardHeroComponent, TestHostComponent ], // declare both}).compileComponents();
}));beforeEach(() => {// create TestHostComponent instead of DashboardHeroComponentfixture  = TestBed.createComponent(TestHostComponent);testHost = fixture.componentInstance;heroEl   = fixture.debugElement.query(By.css('.hero')); // find herofixture.detectChanges(); // trigger initial data binding
});
这个测试模块配置展示了两个非常重要的区别:
它同时声明了DashboardHerComponent和TestHostComponent
它创建了TestHostComponent,而非DashboardHeroComponent
createComponet返回fixture里有TestHostComponent实例,而非DashboardHeroComponet组件实例。
创建TestHostComponet有创建DashboardHero的副作用,因为后者出现在前者的模板中。
英雄元素的查询语句仍然可以在测试DOM中找到他,尽管元素树比以前更深。
it('should display hero name', () => {const expectedPipedName = testHost.hero.name.toUpperCase();expect(heroEl.nativeElement.textContent).toContain(expectedPipedName);
});it('should raise selected event when clicked', () => {click(heroEl);// selected hero should be the same data bound heroexpect(testHost.selectedHero).toBe(testHost.hero);
});
只有selected事件的测试不一样,确保被选择的DashboardHero英雄确实通过事件绑定被传递到宿主组件
测试带路由器的组件
测试实际的DashbaordComponent似乎令人生畏,因为注入了Router
constructor(private router: Router,private heroService: HeroService) {
}
同时还注入了HeroService,但是我们已经知道如何伪造它。Router的API非常复杂,并且它缠绕了其他服务和许多应用的先决条件。
幸运的是,DashbaordComponet没有使用Router做很多事情
gotoDetail(hero: Hero) {let url = `/heroes/${hero.id}`;this.router.navigateByUrl(url);
}
通常都是这样的,原则上,你测试的是组件,不是路由器,应该只关心在指定的条件下,
组件是否导航到正确的地址。用模拟类来替换路由器是一种简单的方案,下面代码应该可以:
class RouterStub {navigateByUrl(url: string) { return url; }
}
现在我们来利用Router和HeroService的测试stub类来配置测试模块,并为接下来的测试创建实例
beforeEach( async(() => {TestBed.configureTestingModule({providers: [{ provide: HeroService, useClass: FakeHeroService },{ provide: Router, useClass: RouterStub }]}).compileComponents().then(() => {fixture = TestBed.createComponent(DashboardComponent);comp = fixture.componentInstance;});下面的测试程序点击显示的英雄,并利用spy来确认Router.navigateByUrl被调用了而且传进的url是所期待的值。
it('should tell ROUTER to navigate when hero clicked',inject([Router], (router: Router) => { // ...const spy = spyOn(router, 'navigateByUrl');heroClick(); // trigger click on first inner <div class="hero">// args passed to router.navigateByUrl()const navArgs = spy.calls.first().args[0];// expecting to navigate to id of the component's first heroconst id = comp.heroes[0].id;expect(navArgs).toBe('/heroes/' + id,'should nav to HeroDetail for first hero'); }));inject函数
注意第二个it参数里面的inject函数。
it('should tell ROUTER to navigate when hero clicked',inject([Router], (router: Router) => { // ...
}));
inject函数是Angular测试工具之一,注入服务到测试函数,以供修改、监视、操纵
inject函数有两个参数:
1.一列数组,包含了Angular依赖注入令牌
2.一个测试函数,参数与注入令牌数组里的每个项目严格的一一对应
使用TestBed注入器来注入
inject函数使用当前的TestBed注入器,并且只返回这个级别提供的服务,不会返回组件提供商提供的服务。
这个例子通过当前的TestBed注入器来注入Router,对这个测试程序员来说,这是没问题的。
因为Router是由应用的根注入器来提供的。
如果你需要组件自己的注入器提供的服务,调用
userService = fixture.debugElement.injector.get(UserService);
使用组件自己的注入器来获取实际注入到组件的服务。
inject函数关闭当前TestBed实例,使他无法再被配置。不能再调用任何TestBed配置方法,configureTestModule或者任何override方法,否则TestBed将抛出错误。
不要再调用inject以后再试图配置TestBed。
测试带有路由和路由参数的组件
点击英雄触发导航到hero/:id,其中id就是路由参数。
路由器将:id令牌的值推送到ActivateRoute.params可观察属性里,Angular注入ActivatedRoute到HeroDetailComponent中,然后组件提取id,这样他就可以通过HeroDetailService获取相应的英雄。
constructor(private heroDetailService: HeroDetailService,private route:  ActivatedRoute,private router: Router) {
}
HeroDetailComponent在它的ngOnInit方法中监听ActivatedRoute.params的变化
ngOnInit(): void {// get hero when `id` param changesthis.route.paramMap.subscribe(p => this.getHero(p.has('id') && p.get('id')));
}
route.params之后的表达式链接了可观察操作符,从params中提取id然后链接forEach操作符来订阅id变化事件。每次id变化时,用户被导航到不同的英雄。
forEach将新的id值传递到组件的getHero方法,获取英雄并将它赋值到组件的hero属性。
如果id参数无效,pluck操作符就会失败,catch将失败当做创新英雄来处理。
通过操纵被注入到组件构造函数的ActivatedRoute服务,测试程序可以探索HeroDetail是如何对不同的id参数值作出相应的。
现在你已经知道如何模拟Router和数据服务,模拟ActivatedRoute遵循类似的模式,但是有个额外枝节:ActivatedRoute.params是可观察对象。
可观察对象的测试替身
detail.spec.ts依赖ActivatedRouteStub来为每个测试程序设置ActivatedRoute.params值。
是跨应用、可复用的测试辅助类,建议将这样的辅助类放在app目录下的testing的目录
import { BehaviorSubject } from 'rxjs/BehaviorSubject';
import { convertToParamMap, ParamMap } from '@angular/router';@Injectable()
export class ActivatedRouteStub {// ActivatedRoute.paramMap is Observableprivate subject = new BehaviorSubject(convertToParamMap(this.testParamMap));paramMap = this.subject.asObservable();// Test parametersprivate _testParamMap: ParamMap; get testParamMap() { return this._testParamMap; } set testParamMap(params: {}) { this._testParamMap = convertToParamMap(params); this.subject.next(this._testParamMap); } // ActivatedRoute.snapshot.paramMap get snapshot() { return { paramMap: this.testParamMap }; } }
这个stub类有下列值得注意的特征:
这个stub类只实现ActivatedRoute的两个功能:params和snapshot.params
BehaviorSubject驱使这个stub类的params可观察对象,并为每个params的订阅者返回同样的值,直到他接收到新值。
HeroDetail链接它的表达式到这个stub类的params可观察对象,该对象现在被测试者的控制之下。
设置testParams属性导致subject将指定的值推送进params,触发上面描述过的HeroDetail的params订阅,和导航的方式一样。
设置testParams属性同时更新这个stub类内部值,用于snapshot属性的返回
(snapshot是组件使用路由参数的另一种流行方法)
测试可观察对象的替身
describe('when navigate to existing hero', () => {let expectedHero: Hero;beforeEach( async(() => {expectedHero = firstHero;activatedRoute.testParamMap = { id: expectedHero.id };createComponent();}));it('should display that hero\'s name', () => {expect(page.nameDisplay.textContent).toBe(expectedHero.name);});
});
https://angular.cn/guide/testing#the-second-synchronous-beforeeach
转载于:https://www.cnblogs.com/chenxygx/p/9182706.html
Karma与TSLint相关推荐
- 关于反馈的邮件_关于反馈
关于反馈的邮件 重点 (Top highlight) Angular is an onion with the following layers: Angular是具有以下几层的洋葱: The cor ...
- Karma和Jasmine 自动化单元测试环境搭建
最近初学AngularJS ,看到的一些教程中经常有人推荐使用Karma+Jasmine来进行单元测试.自己之前也对Jasmine有些了解,jasmine也是一个不错的测试框架. 1. karma介绍 ...
- 前端测试 karma mocha should 都是什么鬼?
测试TDD和BDD的区别 TDD是测试驱动开发,通过用测试用例来规范约束开发者,编写出质量更高的代码 BDD是行为驱动开发,描述行为路径,就像描述故事,产品和前线业务人员可参与到开发流程中,减轻测试和 ...
- Mocha+should+Karma自动化测试教程
Mocha+should+Karma自动化测试教程 一.了解TDD与BDD 首先,为什么我们了解TDD与BDD的是什么意思? 在实际项目中,大部分都是采用BDD的形式进行开发,也就是行为驱动开发. T ...
- 前端测试简述及使用Karma/Mocha实现的集成测试栗子(Travis CI/Coverage)
前端测试 开发类型 TDD (Test Driven Development),测试驱动开发 BDD (Behavior Driven Development),行为驱动开发 // add.js fu ...
- Karma和Jasmine自动化单元测试——本质上还是在要开一个浏览器来做测试
1. Karma的介绍 Karma是Testacular的新名字,在2012年google开源了Testacular,2013年Testacular改名为Karma.Karma是一个让人感到非常神秘的 ...
- 在vue-cli生成的项目中使用karma+chrome进行单元测试
用vue-cli生成项目时,如果选择了单元测试,那么会采用karma+mocha作为单元测试框架,默认使用的浏览器是PhantomJs. Karma 是一个基于Node.js的JavaScript测试 ...
- Typescript + TSLint + webpack 搭建 Typescript 的开发环境
(1)初始化项目 新建一个文件夹"client-side",作为项目根目录,进入这个文件夹: 我们先使用 npm 初始化这个项目: 这时我们看到了在根目录下已经创建了一个 pack ...
- 【Karma】多环境自动测试框架 -- 基础教程
介绍 前身 Testacular, AngularJs Team 创建出来的. 以下是官网对Karma的相关特点介绍 支持真实浏览器, 无浏览器PhantomJS 热更新,文件变化后自动测试 测试框架 ...
最新文章
- 【python】一次移动平均算法
- find 按时间查找
- 通过onActivityResult()先跳转到联系人界面,然后把传回来的手机号显示到应用的EditText上...
- Anaconda3中Python3.5和Python2.7共存
- Android下拉刷新-SwipeRefreshLayout
- javascript删除数组,索引出现问题解决办法。
- python怎么用gamma函数_如何通俗的理解伽马(gamma)函数
- GCC与VC2013性能比较
- mysql 驱动下载
- 简单操作去除PDF文件
- 论文阅读(12) 与其他后生动物相比,水母被动能量的重新获取有助于推进优势(2013)
- Android控件 - TextView、Button、EditText、CompoundButton、CheckBox简介
- 如何选择项目管理软件?
- 招聘笔试行测题之图形推理题解题思路汇总
- Mybatis-plus 之sql注入器
- 微信登录报错40125和-6签名秘钥问题解决方案
- 没有互联网的济南,要怎么从冬天走向春天?
- 内部显示不支持自定义分辨率
- 百度网盘秒传链接怎么用及实现原理
- 去掉连接图片的虚线框