前端代码部署到docker_使用s3将具有sagemaker的自定义docker模型部署到无服务器前端...
前端代码部署到docker
介绍 (Introduction)
Deploying a model with AWS SageMaker is a great way to allow users or customers to interact with it. While you can use the many algorithms and models that come with SageMaker’s Python SDK, there are also many cases where you might want to create your own algorithm. This requires the use of Docker.
使用AWS SageMaker部署模型是允许用户或客户与之交互的好方法。 尽管您可以使用SageMaker的Python SDK随附的许多算法和模型,但在很多情况下,您可能想创建自己的算法。 这需要使用Docker。
The easiest way to let people interact with your model is by employing AWS Lambda and API Gateway to setup an API POST request to the model.
使人们与您的模型进行交互的最简单方法是使用AWS Lambda和API Gateway设置对模型的API POST请求。
Finally, having an API for sending requests and receiving inference responses from the model is great, but a simple and nice looking web app for users to interact with the data is even better. This is where hosting a static website with S3 and accessing the endpoint with AJAX comes into play.
最后,拥有一个用于发送请求和从模型接收推理响应的API很棒,但是一个简单美观的Web应用程序供用户与数据进行交互就更好了。 这是使用S3托管静态网站并使用AJAX访问终结点的地方。
All of these components of AWS working in unison allows for a sleek development and inference serving framework. This tutorial also covers using AWS CloudWatch to understand ambiguous errors such as 500 Internal Server Errors from the custom model.
AWS的所有这些组件都可以协同工作,从而实现了时尚的开发和推理服务框架。 本教程还介绍了如何使用AWS CloudWatch来了解模棱两可的错误,例如来自自定义模型的500个内部服务器错误。
Check out the repo for the some of the code mentioned below, here.
在此处 ,查看仓库中以下提到的一些代码。
Docker模型 (Docker Model)
To deploy a custom model with SageMaker it must be wrapped by SageMaker’s Estimator class. This can be done by creating a Docker image that interfaces with this class.
要使用SageMaker部署自定义模型,它必须由SageMaker的Estimator类包装。 这可以通过创建与此类连接的Docker映像来完成。
Also, check out this post, if you don’t know what Docker is and why it's so important nowadays.
另外,如果您不知道Docker是什么以及为什么它在当今如此重要,请查看这篇文章 。
安装Docker (Install Docker)
Install Docker for your respective OS with these links: Mac, Ubuntu and Windows. Windows Home edition is a bit more difficult so I will cover some of the steps here, since Windows is the OS I use. Follow these steps first and see how far you get. Refer to the steps below if you get stuck.
通过以下链接为您各自的OS安装Docker: Mac, Ubuntu和Windows 。 Windows Home Edition有点困难,因此在这里我将介绍一些步骤,因为Windows是我使用的操作系统。 请先执行以下步骤,然后看您能走多远。 如果卡住,请参考以下步骤。
WSL 2 is required in Windows Home edition to run Docker Desktop.
Windows Home Edition需要WSL 2才能运行Docker Desktop。
First, you must update to Windows 2004, do this by manually checking for updates and installing any that appear (warning: this will take a lot of memory and time). Then you can install WSL 2 using these directions.
首先,您必须更新到Windows 2004,方法是手动检查更新并安装所有出现的更新(警告:这会占用大量内存和时间)。 然后,你可以使用安装WSL 2 这些方向 。
Docker镜像 (Docker Image)
This tutorial does a great job of explaining each step to setting up a Docker image for our custom model. So follow that tutorial, but first keep these issues in mind:
本教程在解释为我们的自定义模型设置Docker映像的每个步骤方面做得非常出色。 因此,请遵循该教程,但请首先牢记以下问题:
A problem I ran into with the template provided is with installing gevent. As you can see in my Dockerfile, I use easy_install instead of pip.
我使用提供的模板遇到的一个问题是安装gevent。 如您在Dockerfile中看到的,我使用easy_install而不是pip。
RUN easy_install geventImportant: If you create the image code on Windows then you have to make the files Unix compatible, as the endline symbols are different. This can be done with the command dos2unix:
重要提示:如果您在Windows上创建图像代码,则必须使文件与Unix兼容,因为结尾符号是不同的。 这可以通过命令dos2unix完成:
find some/directory -type f -exec dos2unix {} \;Where /some/directory is the directory of the image code.
/ some / directory是映像代码的目录。
Also, make sure to allow files such as model/serve and model/train to be executed with:
另外 ,请确保允许使用以下命令执行模型/服务和模型/训练等文件:
chmod +x file/pathNow follow the steps of the other tutorial until you get to the AWS ECR section. Make sure to create the image and locally test your model as described.
现在,按照其他教程的步骤进行操作,直到进入“ AWS ECR”部分。 确保创建映像并按照说明在本地测试模型。
仅推论模型 (Inference-only Model)
Sometimes you may not need to actually train your model before inference. This was my case with my application I will show at the end of this article. Unfortunately, SageMaker still requires that the model must be fit before deploying. However, you can setup a dummy training script in the Docker image very easily. For example, you can just open the model path and write a dummy string as training.
有时您可能不需要在推理之前实际训练模型。 这是我的应用程序案例,我将在本文结尾处展示。 不幸的是,SageMaker仍然要求模型在部署之前必须适合。 但是,您可以非常轻松地在Docker映像中设置虚拟训练脚本。 例如,您可以打开模型路径并编写一个虚拟字符串作为训练。
Here is (some of) my training script: docker-image-code/anomaly-model/train
这是我的一些训练脚本: docker-image-code / anomaly-model / train
prefix = '/opt/ml/'input_path = prefix + 'input/data'
output_path = os.path.join(prefix, 'output')
model_path = os.path.join(prefix, 'model')# The function to execute the training.
def train():print('\nStarting the training.')with open(os.path.join(model_path, 'model'), 'w') as f:f.write('dummy model params');print('Training complete.')if __name__ == '__main__':train()sys.exit(0)
注册Docker映像 (Register Docker Image)
Once your model image has been created and it works locally, for SageMaker to be able to access it, it must be stored in AWS Elastic Container Registry (ECR).
创建模型图像并在本地运行后,SageMaker才能访问它,必须将其存储在AWS Elastic Container Registry(ECR)中。
Go to AWS ECR and click “Get Started”. Click “Create repository” in orange.
转到AWS ECR ,然后单击“入门”。 单击橙色的“创建存储库”。
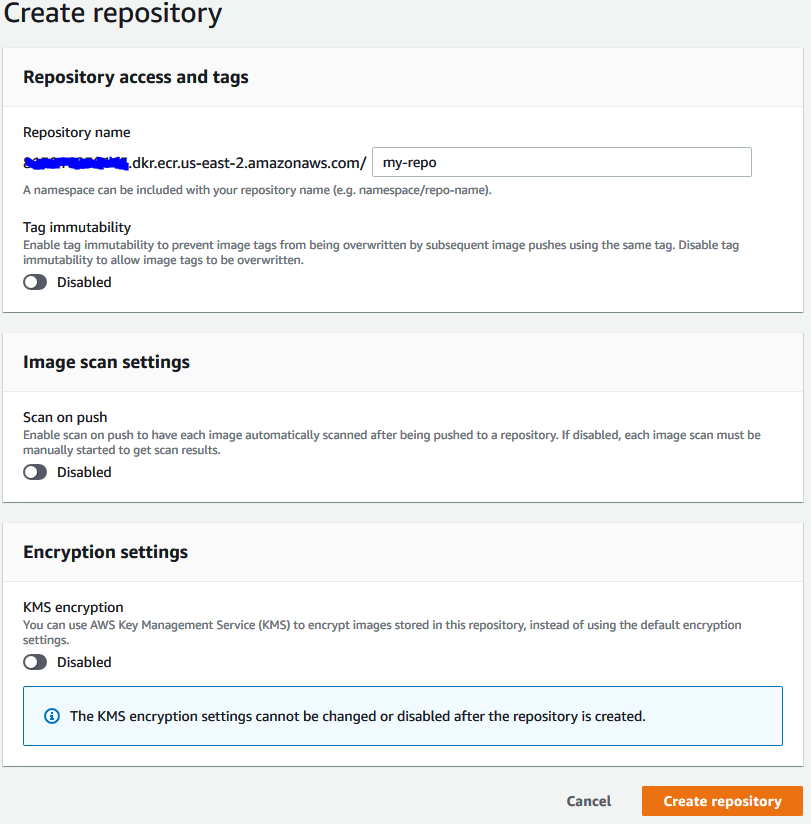
Enter a name that represents your model under “Repository name”. And then “Create repository” again. You don’t need to change any of the other options.
在“存储库名称”下输入代表您的模型的名称。 然后再次“创建存储库”。 您无需更改任何其他选项。
Then select the new repo and click “View push commands”
然后选择新的仓库,然后单击“查看推送命令”

Follow the “macOS / Linux” commands that are shown on your page. If this is your first time doing something like this you will need AWS Command Line Interface (CLI). Follow these instructions. And authenticate Docker with this. Once CLI and authentication is setup you won’t have to do it again.
遵循页面上显示的“ macOS / Linux”命令。 如果您是第一次这样做,则需要AWS Command Line Interface(CLI)。 请按照以下说明进行操作 。 并以此验证Docker。 一旦设置了CLI和身份验证,您将无需再次进行。
Whenever you want to update your model: update the image code, re-create the image, test it locally, and follow the push commands again.
每当您要更新模型时:更新图像代码,重新创建图像,在本地对其进行测试,然后再次执行push命令。
Phew, that probably took a while and some googling, especially if you are on Windows but hopefully I got you through it successfully. If not, let me know in the comments where the problem resides. At this point, you should have a working Docker image for your model and have stored it in the registry.
Phew ,这可能要花一些时间和一些搜索时间,特别是如果您使用的是Windows,但希望我能成功完成它。 如果不是,请在评论中让我知道问题所在。 此时,您应该为模型拥有一个正常工作的Docker映像,并将其存储在注册表中。
使用SageMaker进行部署 (Deploying with SageMaker)
Now we get into using other parts of AWS. First, we have to deploy the model with SageMaker, then use AWS Lambda and API Gateway to set up an API for posting data to your model and receiving an inference response.
现在,我们开始使用AWS的其他部分。 首先,我们必须使用SageMaker部署模型,然后使用AWS Lambda和API Gateway设置API,以将数据发布到模型并接收推理响应。
In a little more detail, the client calls the API created with API Gateway and passes in data for inference. API Gateway then passes this data to the Lambda function. Here it is parsed and sent to the SageMaker model endpoint (known as “invoking”). The model performs prediction with this data and the output is sent back through lambda and API Gateway which responds to the client with the predicted value.
更详细一点,客户端调用使用API Gateway创建的API,并传递数据以进行推断。 然后,API网关将此数据传递给Lambda函数。 在这里,它被解析并发送到SageMaker模型端点(称为“调用”)。 该模型使用此数据执行预测,然后通过lambda和API网关将输出发送回去,API网关以预测值响应客户端。

SageMaker笔记本 (SageMaker Notebook)
First, we are going to deploy our model with SageMaker.
首先,我们将使用SageMaker部署模型。
Create a new notebook instance (or use an existing one). You can use the default settings, and set a name. Upload this notebook from my repo. The only thing that needs to be set is the docker_image_name variable, to the name of your registered docker image. It can be found in ECR under “repositories” as the URI:
创建一个新的笔记本实例(或使用现有的笔记本实例)。 您可以使用默认设置并设置名称。 从我的仓库上传这个笔记本 。 唯一需要设置的是docker_image_name变量, 即已注册的Docker映像的名称。 可以在ECR的“资源库”下找到它作为URI:

Let me explain the code for the notebook below:
让我在下面解释笔记本的代码:
# Install sagemaker (version 1.72)
import sys
!{sys.executable} -m pip install --quiet sagemaker==1.72 -U# Imports
import io
import os
import sys
import time
import json
from IPython.display import display
from time import strftime, gmtime
import boto3
import re
import sagemaker
from sagemaker import get_execution_role# Get the boto3 session and sagemaker client, as well as the current execution role
sess = boto3.Session()
sm = sess.client('sagemaker')
role = sagemaker.get_execution_role()# Name of the docker image containing the model code
docker_image_name = '<Name of docker image in registry on AWS>'# Name and prefix for the S3 bucket storing the model output
account_id = sess.client('sts', region_name=sess.region_name).get_caller_identity()["Account"]
bucket = 'sagemaker-studio-{}-{}'.format(sess.region_name, account_id)
prefix = 'anomaly-detection'
First install SageMaker version 1.72 (I could not get this to work with the most recent version but it might work now). The session, client and execution role are grabbed to create a bucket for the model output. The docker image name is the repo URI for your uploaded image.
首先安装SageMaker 1.72版(我无法将其与最新版本一起使用,但现在可能可以使用)。 会话,客户端和执行角色将被抓取以创建模型输出的存储桶。 泊坞窗图片名称是您上传的图片的仓库URI。
sess = sagemaker.session.Session()
anomaly_detection = sagemaker.estimator.Estimator(image_name=docker_image_name,role=role,train_instance_count=1, train_instance_type='ml.m4.xlarge',output_path='s3://{}/{}/output'.format(bucket, prefix),base_job_name="anomaly-detection",sagemaker_session=sess)
Create the estimator which takes many arguments. The one that can be changed based on your needs is train_instance_type. This is the AWS cloud compute instance that will be used to train the model when fit is called. Note: m1.m4.xlarge seems to be the least expensive one allowed for training. More instance types that may or may not work for training are listed here. If you need more memory for training or just want it to be faster try more expensive instances.
创建带有许多参数的估计器。 可以根据您的需求进行更改的是train_instance_type 。 这是AWS云计算实例,将在调用fit时用于训练模型。 注意: m1.m4.xlarge似乎是允许进行培训的最便宜的一种。 此处列出了更多可能无法进行训练的实例类型。 如果您需要更多的内存来进行训练,或者只是想要更快的速度,请尝试使用更昂贵的实例。
anomaly_detection.fit()Next, we call fit to train the model. This runs the train script in the docker image model directory. You will need to call fit even if the model’s only purpose is inference. This was the case for my project.
接下来,我们称之为拟合训练模型。 这将在docker映像模型目录中运行训练脚本。 即使模型的唯一目的是推理,也需要调用fit 。 我的项目就是这种情况。
endpoint_name = 'anomaly-detection-endpoint'
anomaly_detection.deploy(initial_instance_count=1, instance_type='ml.t2.medium', endpoint_name=endpoint_name)
# Delete endpoint when you don't need your model deployed
sm.delete_endpoint(EndpointName=endpoint_name)
Finally, we make the endpoint by deploying the model. endpoint_name should be something recognizable. The instance types for inference can be even less intensive than for training such as m1.t2.medium which is the cheapest.
最后,我们通过部署模型制作端点。 endpoint_name应该可以识别。 推理的实例类型可能比训练最简单的实例类型(例如最便宜的m1.t2.medium)密集。
Here is more about the price of SageMaker. Use AWS Cost Management to track training and deployment cost of your model (costs can quickly get out of hand if you are not careful about this).
这是有关SageMaker价格的更多信息。 使用 AWS Cost Management 跟踪模型的培训和部署成本(如果您对此不小心,则成本很快就会失控)。
Now we have the model deployed! Lets figure out how to actually allow people to interact with it.
现在我们已经部署了模型! 让我们弄清楚如何真正允许人们与之交互。
使用Lambda和API网关创建API (Creating an API with Lambda & API Gateway)
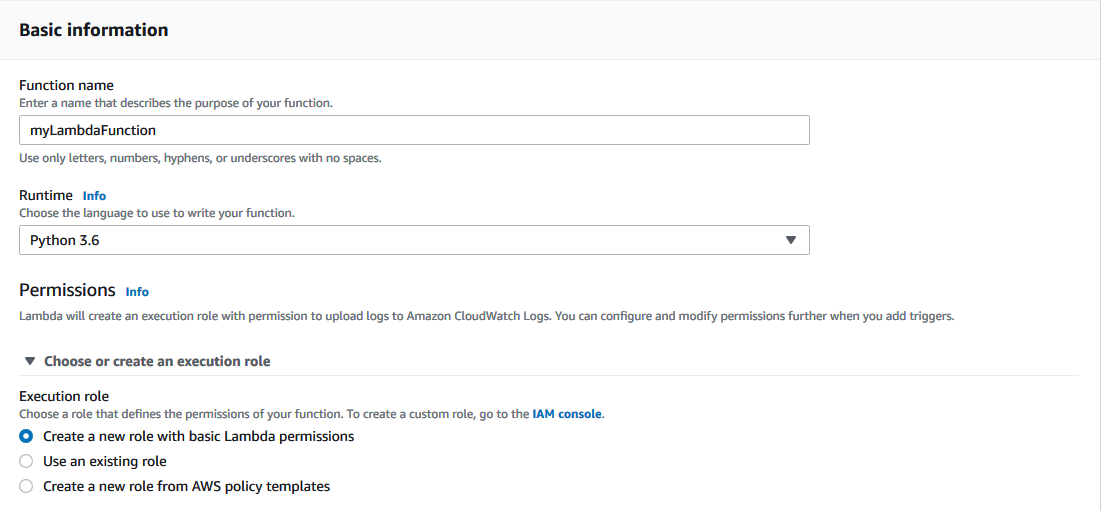
We have to create a lambda function to invoke the endpoint. Go to AWS Lambda and create a new function. Name it something helpful, change the runtime to Python 3.6 and then select an existing execution role that has permission to invoke a model endpoint or create a new execution role.
我们必须创建一个lambda函数来调用端点。 转到AWS Lambda并创建一个新功能。 将其命名为有用的东西,将运行时更改为Python 3.6,然后选择一个具有执行权限的现有执行角色,以调用模型端点或创建新的执行角色。
IAM角色权限 (IAM Role Permissions)
To give permission to invoke model endpoints to your role go to AWS IAM and then “Roles” on the sidebar:
要授予对角色调用模型端点的权限,请转到AWS IAM ,然后在侧边栏上单击 “ Roles”:

Click on the role which for the above example would be “myLambdaFunction-role-….”. In the open “Permissions” tab, click the only policy.
单击上面示例中的角色为“ myLambdaFunction-role-…。”。 在打开的“权限”选项卡中,单击唯一策略。

A JSON description of the policy should come up. Click “Edit policy” and then the “JSON” tabg and add the line “sagemaker:InvokeEndpoint” like so:
应该显示该策略的JSON描述。 单击“编辑策略”,然后单击“ JSON”选项卡,并添加“ sagemaker:InvokeEndpoint”行,如下所示:

Which allows the role to interact with SageMaker endpoints. Click “Review policy” and “Save changes” in blue at the bottom.
这允许角色与SageMaker端点进行交互。 点击底部的蓝色“审核政策”和“保存更改”。
Back to lambda, in the “lambda_function” code panel replace existing code with this code.
返回lambda,在“ lambda_function”代码面板中,用此代码替换现有代码 。
import os
import io
import boto3
import json
import csv# grab environment variables
ENDPOINT_NAME = os.environ['ENDPOINT_NAME']
# grab runtime client
runtime = boto3.client('runtime.sagemaker')def lambda_handler(event, context):# Load data from POST requestdata = json.loads(json.dumps(event))# Grab the payloadpayload = data['body']# Invoke the model. In this case the data type is a JSON but can be other things such as a CSVresponse = runtime.invoke_endpoint(EndpointName=ENDPOINT_NAME,ContentType='application/json',Body=payload)# Get the body of the response from the modelresult = response['Body'].read().decode()# Return it along with the status code of 200 meaning this was succesful return {'statusCode': 200,'body': result}
First you will notice the ENDPOINT_NAME variable. This links our model’s endpoint to this function. Which in my case is anomaly-detection-endpoint:
首先,您会注意到ENDPOINT_NAME变量。 这会将模型的端点链接到此功能。 在我的情况下,这是异常检测端点 :
endpoint_name = 'anomaly-detection-endpoint'
anomaly_detection.deploy(initial_instance_count=1, instance_type='ml.t2.medium', endpoint_name=endpoint_name)
# Delete endpoint when you don't need your model deployed
sm.delete_endpoint(EndpointName=endpoint_name)
Edit the “Environment variables” below the function code:
编辑功能代码下方的“环境变量”:

Add an environment variable with the key as ENDPOINT_NAME and the value as the endpoint name from SageMaker. In my case it would be anomaly-detection-endpoint. And save it.
从SageMaker添加一个环境变量,其键为ENDPOINT_NAME ,值为端点名称。 就我而言,这将是异常检测端点。 并保存。
Looking back at the lambda function code the next important thing is ContentType=’application/json’ in invoking the endpoint. In my case the input data is a JSON because I included some hyperparameters for inference, not just the input data for the model. However, if you don’t need inference hyperparameters then you can make the type ‘text/csv’ and the steps are all pretty much the same.
回顾lambda函数代码,下一个重要的事情是调用端点的ContentType ='application / json' 。 在我的情况下,输入数据是JSON,因为我包括了一些用于推理的超参数,而不仅仅是模型的输入数据。 但是,如果不需要推理超参数,则可以将类型设为“ text / csv” ,并且步骤几乎相同。
创建一个API网关 (Creating an API Gateway)
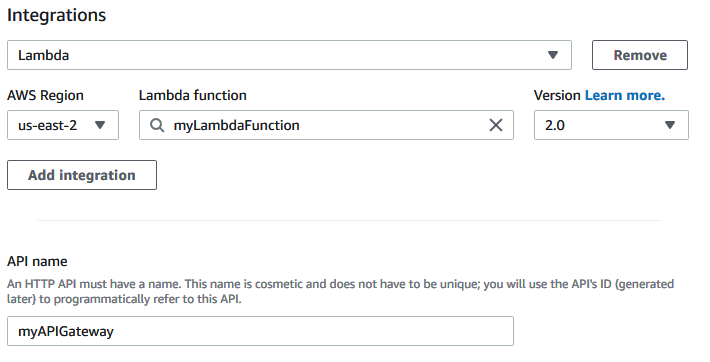
The last step of accessing the deployed model with a POST request is setting up an API. Go to AWS API Gatway and click “Create API” in the top right after logging in. Then choose “HTTP API” as the type and click “Build”. Add a Lambda Integration and choose the correct AWS Region and the name of the lambda function you just made. Then name the gateway. Something like this:
使用POST请求访问已部署模型的最后一步是设置API。 登录后 ,转到AWS API Gatway ,然后单击右上角的“创建API”。然后选择“ HTTP API”作为类型,然后单击“构建”。 添加一个Lambda集成,然后选择正确的AWS区域以及您刚创建的lambda函数的名称。 然后命名网关。 像这样:
Click “Next” and add a route. Select “POST” for the method. In “Resource path” input the lambda name again like /myLambdaFunction. And under “Integration target” put the lambda function name yet again.
点击“下一步”并添加一条路线。 选择“ POST”作为方法。 在“资源路径”中,再次输入lambda名称,如/ myLambdaFunction 。 然后在“集成目标”下再次输入lambda函数名称。

For stages, add a stage called something like test and click the switch so that this stage is auto-deployed. This will be a part of the POST URI.
对于阶段,添加一个称为test之类的阶段,然后单击开关,以便自动部署该阶段。 这将是POST URI的一部分。

Finally, hit “Create” at the bottom.
最后,点击底部的“创建”。
If you go back to your lambda function you will see API Gateway in the diagram at the top. Click it and then show the details. “API endpoint” is the URL for the POST request that people can use to get predictions from your model. It follows the format:
如果返回lambda函数,您将在顶部的图中看到API Gateway。 单击它,然后显示详细信息。 “ API端点”是POST请求的URL,人们可以用来从模型中获取预测。 它遵循以下格式:
https://{restapi_id}.execute-api.{region}.amazonaws.com/{stage_name}/{resource_name}
Finally, you will probably want to allow all origins and headers in the CORS configuration for this API Gateway, otherwise you are going to run into CORS issues while trying to make a POST request in your static S3 website with AJAX.
最后,您可能希望允许此API网关的CORS配置中包含所有起源和标头,否则您将在尝试使用AJAX在静态S3网站中发出POST请求时遇到CORS问题。
Go back to API Gateway and click on your API. Then go to “CORS” under “Develop” in the sidebar.
返回API网关,然后单击您的API。 然后转到侧边栏中“开发”下的“ CORS”。

Click “Configure” and add * for “Access-Control-Allow-Origins”, * for “Access-Control-Allow-Headers” and POST for “Access-Control-Allow-Methods”. Then save it.
单击“配置”,然后为“ Access-Control-Allow-Origins”添加* ,为“ Access-Control-Allow-Header”添加* ,为“ Access-Control-Allow-Methods”添加POST 。 然后保存。
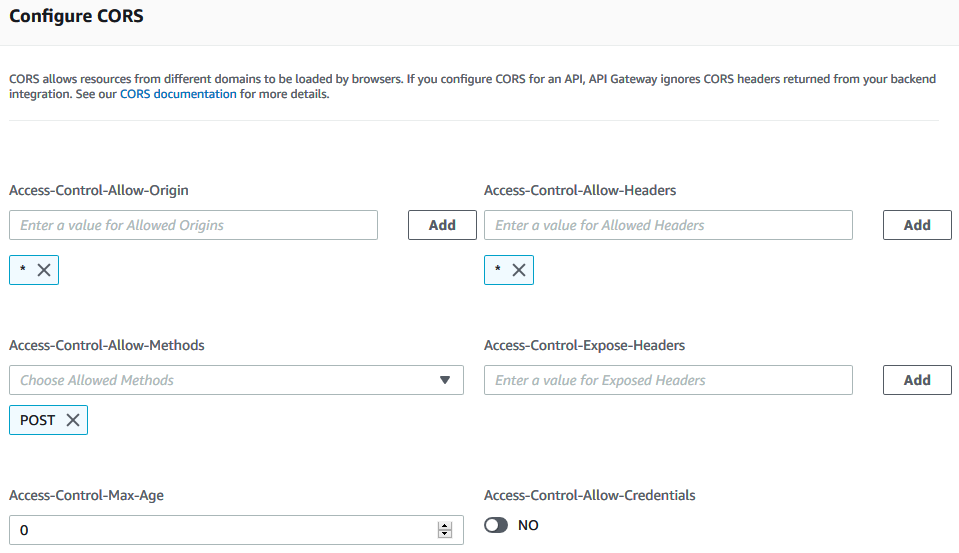
You may wish to be more specific with these options as the wildcard * allows all possible options such as all possible origins accessing this API.
您可能希望对这些选项更加具体,因为通配符*允许所有可能的选项,例如访问此API的所有可能的来源。
Well that was another big section completed! Now the API is setup to receive predictions from your model. In the next section I will describe how to test the calls with Postman and use AWS CloudWatch to fix any ambiguous errors.
好吧,那是另一个很大的部分! 现在,已设置API以接收来自模型的预测。 在下一部分中,我将描述如何使用Postman测试呼叫并使用AWS CloudWatch修复任何模棱两可的错误。
使用Postman和CloudWatch进行测试 (Testing with Postman & CloudWatch)
Lets test the inference code of the model with Postman which is an API development platform and helpful for easily checking our new API. Install Postman for your OS if you haven’t already. Then create a new request and select POST as the type. In the URL tab set the URL I mentioned above.
让我们使用Postman测试模型的推理代码,Postman是API开发平台,有助于轻松检查我们的新API。 如果尚未安装Postman ,请为您的操作系统安装。 然后创建一个新请求并选择POST作为类型。 在“ URL”选项卡中,设置我上面提到的URL。

You can change certain things about the request such as authorization or headers, although I did not change any of that from the default.
您可以更改有关请求的某些内容,例如授权或标头,尽管我没有更改默认值。
Next, we are have to actually input the body of the request. This will contain the data we want the model to use to make a prediction. I’ve found that the easiest way to do this is use the “raw” tab under “Body” for both JSON and CSV data. This will avoid any encoding of the data (unless you need that).
接下来,我们必须实际输入请求的主体。 这将包含我们希望模型用来进行预测的数据。 我发现最简单的方法是对JSON和CSV数据使用“正文”下的“原始”标签。 这将避免对数据进行任何编码(除非您需要)。
For a CSV body, paste the CSV data itself as a raw string. In the format of:
对于CSV正文,请将CSV数据本身粘贴为原始字符串。 格式为:
"First,Line\r\nSecond,Line\n\r......"For a JSON body, write the JSON string. If the actual model input itself is still in CSV format then you can add a key such as “data” with the same value as above. Something like:
对于JSON正文,请编写JSON字符串。 如果实际模型输入本身仍为CSV格式,则可以添加具有与上述相同值的键,例如“ data” 。 就像是:
{"hyperparameter_1": #, "hyperparameter_2": #, "data": "First,Line\r\nSecond,Line\n\r......"}Then click “Send”! Chances are something probably didn’t work. Make sure your endpoint is still up from SageMaker (the notebook itself does NOT need to be running). Lambda is connected to the proper endpoint (from the env variables). And API Gateway is connected to Lambda, with the proper URL for the request. If you get a “500 internal server error” or “ModelError” then something is amiss in your Docker image code OR lambda function code. This is where AWS CloudWatch comes in handy.
然后点击“发送”! 机会可能是行不通的。 确保您的端点仍从SageMaker启动(笔记本计算机本身不需要运行)。 Lambda连接到适当的端点(通过env变量)。 并且API网关已连接到Lambda,具有用于请求的正确URL。 如果收到“ 500内部服务器错误”或“ ModelError”,则说明您的Docker映像代码或lambda函数代码中有问题。 这是AWS CloudWatch派上用场的地方。
AWS CloudWatch (AWS CloudWatch)
The best way to figure out exactly what line of code is triggering an ambiguous error is to use AWS CloudWatch. I’m not gonna go into a lot of detail on CloudWatch but I will mention some helpful things. AWS CloudWatch allows you to monitor running AWS processes that are recorded in logs. For example SageMaker training jobs, notebook instances or endpoints can be tracked.
弄清楚究竟哪一行代码触发了模棱两可的错误,最好的方法是使用AWS CloudWatch。 我不会在CloudWatch上详细介绍,但我会提到一些有用的东西。 AWS CloudWatch允许您监视记录在日志中的正在运行的AWS流程。 例如,可以跟踪SageMaker培训作业,笔记本实例或端点。
To figure out what is triggering an error go to AWS CloudWatch and on the left sidebar go to “Log groups” under “Logs”. You should have some log groups created. First check your lambda function logs. Click on it and you will see a bunch of log streams.
要确定引发错误的原因,请转到AWS CloudWatch,然后在左侧栏中转到“日志”下的“日志组”。 您应该创建了一些日志组。 首先检查您的lambda函数日志。 单击它,您将看到一堆日志流。
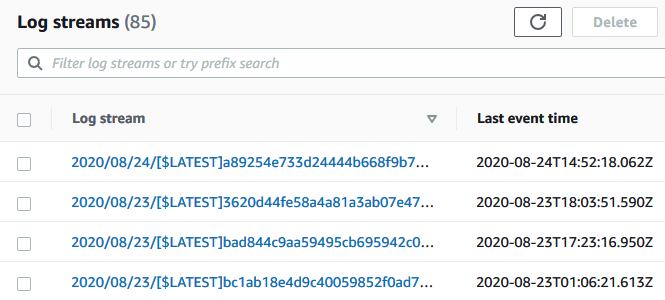
The top most one is the most recent so click that and check out the specific messages. If there are issues from this log group then your lambda function is to blame.
最热门的邮件是最新的邮件,因此请单击该邮件并查看特定的邮件。 如果此日志组中存在问题,则应归咎于您的lambda函数。
The other log group to check is the one attached to your endpoint. Any issue raised here indicates that something is incorrect in your Docker image code. Even if it ran fine locally there can be issues running it in AWS. Also there will be a lot of pings shown here, ignore them or try to filter through them.
要检查的另一个日志组是连接到端点的日志组。 此处出现的任何问题均表明您的Docker映像代码中有不正确的地方。 即使它在本地运行良好,在AWS中运行它也会出现问题。 此外,此处还会显示很多ping,请忽略它们或尝试对它们进行过滤。
Hopefully, its running smoothly now and you get your expected output, if not leave a comment and I will help fix it.
希望它现在运行平稳,如果没有发表任何意见,您将获得预期的输出,我会帮助修复它。
Finally, we have a working and accessible model. You can definitely stop there if all you need is the POST URL. However, another useful thing to do might be to make a nice looking front-end for people to input their own data into the model. An easy way to do this is to use S3 to create a static website to access the POST URL.
最后,我们有一个可行且可访问的模型。 如果您只需要POST URL,那么您绝对可以在这里停下来。 但是,另一有用的操作可能是使人们可以将自己的数据输入到模型中,从而使其外观漂亮。 一种简单的方法是使用S3创建一个静态网站来访问POST URL。
使用S3创建静态网站前端 (Creating a Static Website Front-end with S3)
This Medium article does a great job at describing step-by-step how to create a static website with S3. So instead of recreating this myself, check it out and go through all of its steps (Note: you don’t need to set up a CNAME record).
这篇中型文章在逐步描述如何使用S3创建静态网站方面做得很好。 因此,与其亲自重新创建它,不如将其签出并完成所有步骤(请注意:您无需设置CNAME记录)。
Once you are done with that the only thing I would recommend doing is adding a CORS policy by going to “Permissions” -> “CORS configuration” and pasting this:
完成此操作后,我唯一建议做的就是通过转到“权限”->“ CORS配置”并粘贴以下内容来添加CORS策略:
<?xml version="1.0" encoding="UTF-8"?><CORSConfiguration xmlns="http://s3.amazonaws.com/doc/2006-03-01/"><CORSRule> <AllowedOrigin>*</AllowedOrigin> <AllowedHeader>*</AllowedHeader> <AllowedMethod>POST</AllowedMethod></CORSRule></CORSConfiguration>which will deal with CORS issues the same way we dealt with it in API Gateway.
与我们在API网关中处理CORS的方式相同,它将处理CORS问题。
AJAX POST请求建模 (AJAX POST Request to Model)
Lastly, lets hook up the API call with AJAX in our website. The call is simple and will look something like this:
最后,让我们在我们的网站中使用AJAX连接API调用。 调用很简单,看起来像这样:
$.ajax({type: "POST",url: "https://a3bqc81dv1.execute-api.us-east-2.amazonaws.com/test/myLambdaFunction",data: JSON.stringify({'hyperparmeter_1': 0, 'hyperparameter_2': 0,'data': csv_text}),contentType: 'text/plain',success: function(success){console.log(success);},error: function(error){console.log(error)}
});
Note: Set the content type as text/plain to avoid it encoding your request data just like with Postman (unless you want that).
注意: 将内容类型设置为text / plain,以避免像Postman一样对请求数据进行编码(除非您希望这样做)。
That about wraps up the end-to-end development chain of deploying a custom model with AWS and setting it up with a nice user-facing front-end. If you want to make changes to your model code then re-make the Docker image and push it back to the ECR. Then redeploy. Also, delete the model endpoint when you don’t want it deployed either from the SageMaker console or from the notebook code.
内容涵盖了端到端开发链,该端到端开发链使用AWS部署自定义模型,并使用面向用户的漂亮前端对其进行设置。 如果要更改模型代码,请重新制作Docker映像并将其推回到ECR。 然后重新部署。 另外,当您不希望从SageMaker控制台或笔记本代码中部署模型端点时,请删除它。
我的应用程序-Google趋势数据的异常检测 (My Application — Anomaly Detection for Google Trends Data)
I created a custom model that takes google trends data (CSV) and analyses the plot for anomalies with the algorithm Density-Based Clustering for Applications with Noise (DBSCAN) or Seasonal-Trend decomposition with Loess (STL).
我创建了一个自定义模型,该模型采用了Google趋势数据(CSV),并使用基于密度的聚类算法对带噪声的应用程序(DBSCAN)或黄土的季节性趋势分解(STL)进行了异常图分析。

Briefly, DBSCAN is a machine learning clustering algorithm but can be used for anomaly detection given that unlike K-means it does not cluster all points. These leftover or unclustered points can be considered outliers/anomalies.
简而言之, DBSCAN是一种机器学习聚类算法,但由于与K均值不同,它不能对所有点进行聚类,因此可以用于异常检测。 这些剩余或未聚类的点可以视为异常值/异常。

STL is a statistical decomposition of time-series data for the purpose of detecting anomalies or exploring elements of the data. It decomposes the data into its seasonal pattern, trend and then residual. You can then use tests for outlier detection on the residual such as the Generalized Extreme Studentized Deviate (GESD) test. STL tends to work better than DBSCAN for data with a seasonal pattern, however if there is no seasonal pattern then STL cannot effectively be used.
STL是时间序列数据的统计分解,目的是检测异常或探究数据元素。 它将数据分解为季节性模式,趋势,然后分解为残差。 然后,您可以将测试用于残差的离群值检测,例如广义极端学生偏差(GESD)测试。 对于具有季节性模式的数据,STL往往比DBSCAN更好,但是,如果没有季节性模式,则无法有效地使用STL。
Check out my deployed model front-end here. Search a term on google trends and download the CSV:
在此处查看我部署的模型前端。 搜索有关Google趋势的字词并下载CSV:

Then upload it on the website and fill in the hyperparameters given if there is seasonality to the data.
然后将其上传到网站上,如果数据存在季节性,则填写给定的超参数。
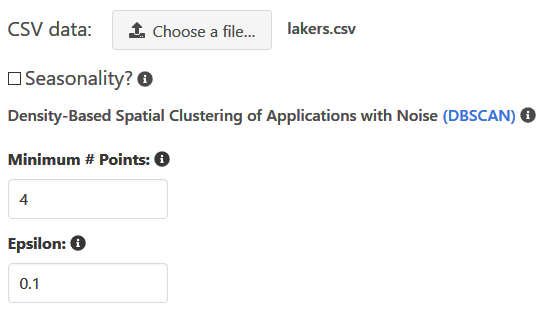
Plot it, and it will look something like this:
绘制它,它将看起来像这样:

Note: The website may not be up all the time
注意: 网站可能并非一直都在打开
Let me know if it's not up and you would like to check it out or if you have any problems with these steps in the comments! And check out the accompanying code here.
让我知道它是否还没有启动,您想检查一下,或者在注释中这些步骤是否有任何问题! 并在此处查看随附的代码。
翻译自: https://towardsdatascience.com/deploying-a-custom-docker-model-with-sagemaker-to-a-serverless-front-end-with-s3-8ee07edc24e6
前端代码部署到docker
http://www.taodudu.cc/news/show-5943676.html
相关文章:
- Ansible 安装与简单使用
- C语言能被3整除,不能被5整除
- C语言冒泡排序对10个数字进行大小排序
- C语言 把100~200之间不能被3整除的数输出
- C语言:输入10个整数,比较求最大值
- 怎样在c语言程序里面添加图片,C语言 使用图形库(Easy X)绘制界面及程序添加音乐...
- C语言求100-200之间不能被3整除的数
- 《大学》读书笔记
- 计算机组成原理学习笔记第4章 4.11——高速缓冲存储器例题选讲
- 计算机组成原理学习笔记第4章 4.14——RAID
- 计算机组成原理学习笔记第4章 4.12——虚拟存储器
- 计算机组成原理学习笔记第4章 4.8——相联存储器
- mac java visualvm_VisualVM连接远程Java进程
- 使用visualVM监控本地tomcat
- 写给自己的2016年总结
- 苹果试玩基本操作技巧(入门篇)
- 美科技巨头每秒能赚多少钱?苹果11376元、谷歌6691元
- 【持续更新中】可用“海马王模拟器”来模拟安卓、苹果的环境
- pyside 蒙版的基本使用-pyqt 掩码 掩模 圆形头像 mask 图像
- PHP 使用GD库合成带二维码和圆形头像的海报步骤以及源码实现
- 游戏素材网站搜集
- 做一个发光的人物logo头像
- php制作圆形用户头像——自定义封装类源代码
- CSS一行代码实现渐变头像
- php上传头像的代码,php实现文件上传及头像预览功能
- 优大麦自动接单软件助手神器
- 一起来聆听亚马逊跨境电商新老麦家的心声
- 从AIPL到GROW,谈互联网大厂的营销分析模型
- 【塔望咨询】X【麦仕醇】开启精酿啤酒新纪元
- 刷数据时代:不刷到500京,都不好打招呼
前端代码部署到docker_使用s3将具有sagemaker的自定义docker模型部署到无服务器前端...相关推荐
- 代码逻辑分析_双11模块79.34%的前端代码是怎样智能生成的?
作者|妙净.波本最近几年,AI 渗透到开发领域的方方面面.在前端领域,设计稿生成代码(简称 D2C)就是一个例子.其目标在于通过 AI 助力前端提效升级,杜绝简单重复性的工作内容.今年"双十 ...
- 【视频课】落地才是硬道理,微信小程序AI模型部署实践!
前言 欢迎大家关注有三AI的视频课程系列,我们的视频课程系列共分为5层境界,内容和学习路线图如下: 第1层:掌握学习算法必要的预备知识,包括Python编程,深度学习基础,数据使用,框架使用. 第2层 ...
- 【视频课】快速掌握6大模型部署框架(Pytorch+NCNN+MNN+Tengine+TensorRT+微信小程序)!...
前言 欢迎大家关注有三AI的视频课程系列,我们的视频课程系列共分为5层境界,内容和学习路线图如下: 第1层:掌握学习算法必要的预备知识,包括Python编程,深度学习基础,数据使用,框架使用. 第2层 ...
- 基于web端和C++的两种深度学习模型部署方式
深度学习Author:louwillMachine Learning Lab 本文对深度学习两种模型部署方式进行总结和梳理.一种是基于web服务端的模型部署,一种是基... 深度学习 Author:l ...
- 【视频课】快速掌握5大模型部署框架(NCNN+MNN+Tengine+TensorRT+微信小程序)
前言 欢迎大家关注有三AI的视频课程系列,我们的视频课程系列共分为5层境界,内容和学习路线图如下: 第1层:掌握学习算法必要的预备知识,包括Python编程,深度学习基础,数据使用,框架使用. 第2层 ...
- 宏观大数据-模型部署说明 V1.3.1
宏观大数据-模型部署说明 V1.3.1 模型部署 2. 准备工作 2.1 获取最新版本 2.1.1 查看钉钉群公告 2.1.2 确认最新版本 [截至2021-10-13最新版本为:模型部署文档\V1. ...
- 如何在亚马逊 SageMaker 进行 Stable Diffusion 模型在线服务部署
文章目录 前言 - 浅谈 AIGC AIGC - 引领人工智能走向春天 春天里盛开的 AI 绘画 AI 绘画之Stable Diffusion 2.0 登场 人人都有机会成为前沿的技术探索者 基于Am ...
- 【云服务器】基于docker容器部署Halo项目的个人博客搭建并部署到云服务器
目录 1 docker快速部署halo个人博客 2 主题设置(本文使用的是M酷Joe 2.0版本的主题,下载链接放在下面了) 2.1 API报错解决方案 2.2 首页分栏设置 2.3 轮播图的修改 2 ...
- 如何通过 Docker 快速部署开源密码管理器 Bitwarden
公众号关注 「奇妙的 Linux 世界」 设为「星标」,每天带你玩转 Linux ! 前言 两年前,我就想自托管 Bitwarden 密码管理器了,但是直到 2022 年快结束的现在,我才真正动手.在 ...
最新文章
- Andriod anim 补间(Tween)动画与Interpolator以及setCustomAnimations方法
- Selenium自动化中DOM,XPATH,CSS定位Web页面对象的优劣性分析
- OpenCASCADE绘制测试线束:数据交换命令之XDE 形状命令
- jsp项目开发案例_Laravel中使用swoole项目实战开发案例一 (建立swoole和前端通信)
- qt android程序联网死机,qt android开发出现致命错误
- 研发部门之间利益之争何时休?如何休?
- WebSocket API 学习笔记
- vagrant启动报错The following SSH command responded with a no
- NetCore控制台实现自定义CommandLine功能
- Java中变量的初始化以及变量的初始化顺序,已经加入个人的简单理解
- 柠檬班软件测试002软件测试的定义
- Java遍历文件夹及图像缩放批处理
- feiyanghaotian(飞扬浩天)的csdn博客
- 人生苦短_人生苦短的说说、句子及图片
- Nexus 搭建docker本地仓库(hosted)和私有仓库(proxy)
- IE浏览器如何导入导出收藏夹
- 程序员一年工作经验之谈
- 一.二.管理和信息化软件的关系
- 基于YOLOv5的口罩佩戴检测方法
- Mac环境下反编译工具的使用