Netty学习(三)高性能之ByteBuf源码解析(篇幅较长)
Netty简单使用
首先到官网看一下Netty Server 和 Client的demo, https://netty.io/wiki/user-guide-for-4.x.html, 我用的是4.1.xx,一般来说不是大版本变更, 变化不会很大.下面是 Netty Server 的demo,跟官网的是一样的.
public class Main {// 下面是一个接收线程, 3个worker线程 ,所以这里是 Reactor多线程模式// 用 Netty 的默认线程工厂,可以不传这个参数private final static ThreadFactory threadFactory = new DefaultThreadFactory("Netty学习之路");// Boss 线程池,用于接收客户端连接private final static NioEventLoopGroup boss = new NioEventLoopGroup(1,threadFactory);// Worker线程池,用于处理客户端操作private final static NioEventLoopGroup worker = new NioEventLoopGroup(3,threadFactory);/** 下面是在构造方法中, 如果不传线程数量,默认是0, super 到 MultithreadEventLoopGroup 这里后, 最终会用 CPU核数*2 作为线程数量, Reactor多线程模式的话,就指定 boss 线程数量=1*  private static final int DEFAULT_EVENT_LOOP_THREADS = Math.max(1, SystemPropertyUtil.getInt("io.netty.eventLoopThreads", NettyRuntime.availableProcessors() * 2));*  protected MultithreadEventLoopGroup(int nThreads, Executor executor, Object... args) {*  super(nThreads == 0 ? DEFAULT_EVENT_LOOP_THREADS : nThreads, executor, args);*  }*/public static void main(String[] args) throws Exception{try {new NettyServer(8888).start();
//            NIOTest();System.out.println(1<<0);}catch(Exception e){System.out.println("netty server启动失败");e.printStackTrace();}}static class NettyServer{private int port;NettyServer(int port){this.port = port;}void start()throws Exception{try {ServerBootstrap serverBootstrap = new ServerBootstrap();ChannelFuture future = serverBootstrap.group(boss, worker).channel(NioServerSocketChannel.class)// 客户端连接等待队列大小.option(ChannelOption.SO_BACKLOG, 1024)// 接收缓冲区.option(ChannelOption.SO_RCVBUF, 32*1024)// 连接超时.option(ChannelOption.CONNECT_TIMEOUT_MILLIS, 10*1000).childHandler(new ChildChannelHandle()).bind(this.port).sync();future.channel().closeFuture().sync();}catch(Exception e){throw e;}finally {boss.shutdownGracefully();worker.shutdownGracefully();}}}static class ChildChannelHandle extends ChannelInitializer<SocketChannel> {@Overrideprotected void initChannel(SocketChannel socketChannel) throws Exception {ChannelPipeline pipeline = socketChannel.pipeline();// 字符串编码pipeline.addLast(worker,new StringEncoder());// 字符串解码pipeline.addLast(worker,new StringDecoder());// 自定义的handle, 状态变化后进行处理的 handlepipeline.addLast(worker,new StatusHandle());// 自定义的handle, 现在是对读取到的消息进行处理pipeline.addLast(worker,new CustomHandle());}}
}
客户端的操作就简单的使用终端来操作了
![]()
这里对 inactive 和 active 进行了状态的输出, 输出接收数据并且原样返回给客户端
接下来看一下代码
CustomHandle
这里对接收到的客户端的数据进行处理
public class CustomHandle extends ChannelInboundHandlerAdapter {private Thread thread = Thread.currentThread();// 读取到客户端数据的事件@Overridepublic void channelRead(ChannelHandlerContext ctx, Object msg) throws Exception {// 这里简单输出一下,然后原样返回给客户端System.out.println(thread.getName()+": channelRead content : "+msg);ctx.writeAndFlush(msg);}
}
StatusHandle
对状态变化后进行处理的Handle(客户端上下线事件)
public class StatusHandle extends ChannelInboundHandlerAdapter {private Thread thread = Thread.currentThread();private String ip;// 客户端上线事件@Overridepublic void channelActive(ChannelHandlerContext ctx) throws Exception {this.ip = ctx.channel().remoteAddress().toString();System.out.println(thread.getName()+": ["+this.ip+"] channelActive -------");}// 客户端下线事件@Overridepublic void channelInactive(ChannelHandlerContext ctx) throws Exception {System.out.println(thread.getName()+": ["+this.ip+"] channelInactive -------");}
}
上面标记了两个地方, 是接下来要讲的地方
1.NioServerSocketChannel作用相当于NIO ServerSocketChannel
2.ChildChannelHandle extends ChannelInitializer , 实现 initChannel 方法
1.NioServerSocketChannel
这个类是 Netty 用于服务端的类,用于接收客户端连接等. 用过NIO的同学都知道, serverSocket开启的时候,需要注册 ACCEPT 事件来监听客户端的连接
(小插曲)下面是Java NIO 的事件(netty基于NIO,自然也会有跟NIO一样的事件)
- public static final int OP_READ = 1 << 0; // 读消息事件
- public static final int OP_WRITE = 1 << 2; // 写消息事件
- public static final int OP_CONNECT = 1 << 3; // 连接就绪事件
- public static final int OP_ACCEPT = 1 << 4; // 新连接事件
- public static final int OP_READ = 1 << 0; // 读消息事件
先看一下 NioServerSocketChannel 的继承类图
![]()
从上面的demo的 channel(NioServerSocketChannel.class) 开始说起吧,可以看到是工厂生成channel.
public B channel(Class<? extends C> channelClass) {if (channelClass == null) {throw new NullPointerException("channelClass");} else {return this.channelFactory((io.netty.channel.ChannelFactory)(new ReflectiveChannelFactory(channelClass)));}}工厂方法生成 NioServerSocketChannel 的时候调用的构造方法:
public NioServerSocketChannel(ServerSocketChannel channel) {super(null, channel, SelectionKey.OP_ACCEPT);config = new NioServerSocketChannelConfig(this, javaChannel().socket());
}
继续往下跟,跟到 AbstractNioChannel 的构造方法:
protected AbstractNioChannel(Channel parent, SelectableChannel ch, int readInterestOp) {super(parent);this.ch = ch;// 记住这个地方记录了 readInterestOpthis.readInterestOp = readInterestOp;try {// 设置为非阻塞ch.configureBlocking(false);} catch (IOException e) {try {ch.close();} catch (IOException e2) {if (logger.isWarnEnabled()) {logger.warn("Failed to close a partially initialized socket.", e2);}}throw new ChannelException("Failed to enter non-blocking mode.", e);}}回到 ServerBootstrap 的链式调用, 接下来看 bind(port) 方法,一路追踪下去,会看到
private ChannelFuture doBind(final SocketAddress localAddress) {// 初始化和注册final ChannelFuture regFuture = initAndRegister();final Channel channel = regFuture.channel();if (regFuture.cause() != null) {return regFuture;}if (regFuture.isDone()) {ChannelPromise promise = channel.newPromise();doBind0(regFuture, channel, localAddress, promise);return promise;} else {final PendingRegistrationPromise promise = new PendingRegistrationPromise(channel);regFuture.addListener(new ChannelFutureListener() {@Overridepublic void operationComplete(ChannelFuture future) throws Exception {Throwable cause = future.cause();if (cause != null) {promise.setFailure(cause);} else {promise.registered();doBind0(regFuture, channel, localAddress, promise);}}});return promise;}}看 initAndRegister 方法
final ChannelFuture initAndRegister() {Channel channel = null;try {channel = channelFactory.newChannel();init(channel);} catch (Throwable t) {if (channel != null) {channel.unsafe().closeForcibly();return new DefaultChannelPromise(channel, GlobalEventExecutor.INSTANCE).setFailure(t);}return new DefaultChannelPromise(new FailedChannel(), GlobalEventExecutor.INSTANCE).setFailure(t);}// 看到这里的注册, 继续往下看ChannelFuture regFuture = config().group().register(channel);if (regFuture.cause() != null) {if (channel.isRegistered()) {channel.close();} else {channel.unsafe().closeForcibly();}}return regFuture;}config().group().register(channel); 往下看, 追踪到 AbstractChannel 的 register --> regist0(promise) (由于调用太多,省去了中间的一些调用代码)
private void register0(ChannelPromise promise) {try {// check if the channel is still open as it could be closed in the mean time when the register// call was outside of the eventLoopif (!promise.setUncancellable() || !ensureOpen(promise)) {return;}boolean firstRegistration = neverRegistered;// 执行注册doRegister();neverRegistered = false;registered = true;// Ensure we call handlerAdded(...) before we actually notify the promise. This is needed as the// user may already fire events through the pipeline in the ChannelFutureListener.// 这里官方也说得很清楚了,确保我们在使用 promise 的通知之前真正的调用了 pipeline 中的 handleAdded 方法, 下面第二点 pipeline.invokeHandlerAddedIfNeeded();safeSetSuccess(promise);// 先调用 regist 方法pipeline.fireChannelRegistered();// Only fire a channelActive if the channel has never been registered. This prevents firing// multiple channel actives if the channel is deregistered and re-registered.// 只有 channel 之前没有注册过才会调用 channelActive// 这里防止 channel deregistered(注销) 和 re-registered(重复调用 regist) 的时候多次调用 channelActiveif (isActive()) {if (firstRegistration) {// 执行 channelActive 方法pipeline.fireChannelActive();} else if (config().isAutoRead()) {// This channel was registered before and autoRead() is set. This means we need to begin read// again so that we process inbound data.//// channel 已经注册过 并且 已经设置 autoRead().这意味着我们需要开始再次读取才能处理 inbound 的数据// See https://github.com/netty/netty/issues/4805beginRead();}}} catch (Throwable t) {// Close the channel directly to avoid FD leak.closeForcibly();closeFuture.setClosed();safeSetFailure(promise, t);}}看到 doRegister() 方法,继续跟下去, 跟踪到 AbstractNioChannel 的 doRegister() 方法
protected void doRegister() throws Exception {boolean selected = false;for (;;) {try {// 这里调用java的 NIO 注册 selectionKey = javaChannel().register(eventLoop().unwrappedSelector(), 0, this);return;} catch (CancelledKeyException e) {if (!selected) {eventLoop().selectNow();selected = true;} else {throw e;}}}}写过NIO的同学应该熟悉上面的这句话:
selectionKey = javaChannel().register(eventLoop().unwrappedSelector(), 0, this);这里就是调用了java NIO的注册, 至于为什么注册的时候 ops = 0 , 继续追踪下去,此处省略一堆调用....(实在是过于繁杂)最后发现, 最终都会调用 AbstractNioChannel 的 doBeginRead() 方法修改 selectionKey 的 interestOps, 客户端连接后,注册的读事件在这里也是相同的操作.
protected void doBeginRead() throws Exception {// Channel.read() or ChannelHandlerContext.read() was calledfinal SelectionKey selectionKey = this.selectionKey;if (!selectionKey.isValid()) {return;}readPending = true;final int interestOps = selectionKey.interestOps();// // 这里是判断有没有注册过相同的事件,没有的话才修改 opsif ((interestOps & readInterestOp) == 0) {// 就是这里, 记得刚才注册的时候,ops == 0 吗, this.readInterestOp 在上面的初始化的时候赋了值// 与 0 逻辑或, 所以最终值就是 this.readInterestOp , 注册事件的数值 不清楚的话可以看一下最上面selectionKey.interestOps(interestOps | readInterestOp);}
}
上面介绍了服务端的 ACCEPT 事件, 接下来是客户端连接的过程.
上面介绍的 服务端 ACCEPT 最后调用的 NIO 的 register 方法, read也是调用nio的register, 但是在 SocketChannel(client) 调用register 之前, 服务端是有一个 server.accept() 方法获取客户端连接, 以此为契机, 最后在 NioServerSocketChannel 里面找到了accept 方法.
// 1protected int doReadMessages(List<Object> buf) throws Exception {// accept 客户端, 传入 serverSocketChannelSocketChannel ch = SocketUtils.accept(javaChannel());try {if (ch != null) {// 创建新的 Netty 的 Channel , 并设置 ops =1 (read), 最后再调用 doBeginRead的时候就会修改 ops 的值 , 跟 server 的一样buf.add(new NioSocketChannel(this, ch));return 1;}} catch (Throwable t) {logger.warn("Failed to create a new channel from an accepted socket.", t);try {ch.close();} catch (Throwable t2) {logger.warn("Failed to close a socket.", t2);}}return 0;}// 2public static SocketChannel accept(final ServerSocketChannel serverSocketChannel) throws IOException {try {return AccessController.doPrivileged(new PrivilegedExceptionAction<SocketChannel>() {@Overridepublic SocketChannel run() throws IOException {// nio 的方法return serverSocketChannel.accept();}});} catch (PrivilegedActionException e) {throw (IOException) e.getCause();}}客户端连接的时候,会触发上面的 server.accept(), 然后会触发 AbstractChannel 的 register 方法 从而调用
AbstractChannel.this.pipeline.fireChannelRegistered();// 这个方法调用下面的两个方法static void invokeChannelRegistered(final AbstractChannelHandlerContext next) {EventExecutor executor = next.executor();if (executor.inEventLoop()) {next.invokeChannelRegistered();} else {executor.execute(new Runnable() {@Overridepublic void run() {next.invokeChannelRegistered();}});}}private void invokeChannelRegistered() {if (invokeHandler()) {try {((ChannelInboundHandler) handler()).channelRegistered(this);} catch (Throwable t) {notifyHandlerException(t);}} else {fireChannelRegistered();}}中间省略800次调用(不得不说Netty的调用就像迷宫..), 最后会调用到 我们接下来要讲的 ChannelInitializer 的 handlerAdded 方法, 见下面2.
2.ChannelInitializer
在解析这个类之前, 要先说一下 pipeline (管道,传输途径啥的都行)它就是一条 handle 消息传递链.
先看一下 AbstractChannelHandlerContext 中的 两个方法
// 查找下一个 inboundHandle (从当前位置往后查找 intBound)private AbstractChannelHandlerContext findContextInbound() {AbstractChannelHandlerContext ctx = this;do {ctx = ctx.next; // 往后查找} while (!ctx.inbound);return ctx;}// 查找下一个 OutboundHandle (从当前位置往前查找 outBound )private AbstractChannelHandlerContext findContextOutbound() {AbstractChannelHandlerContext ctx = this;do {ctx = ctx.prev; // 往前查找} while (!ctx.outbound);return ctx;}为什么是这样呢,我们从 AbstractChannelHandleContext 的 read 和 write 两个方法进入查看
read
@Overridepublic ChannelHandlerContext fireChannelRead(final Object msg) {// findContextInbound() 就是上面2个方法的第一个,结果是往后找到一个 inbound 的 handle// 调用的下面的方法invokeChannelRead(findContextInbound(), msg);return this;}//当读数据(入栈)事件的时候, 从当前位置往后查找 InBoundHandleHandle, 触发下一个 InBoundHandleHandle 的 channelRead 事件static void invokeChannelRead(final AbstractChannelHandlerContext next, Object msg) {final Object m = next.pipeline.touch(ObjectUtil.checkNotNull(msg, "msg"), next);EventExecutor executor = next.executor();if (executor.inEventLoop()) {next.invokeChannelRead(m);} else {executor.execute(new Runnable() {public void run() {next.invokeChannelRead(m);}});}}write
// 当写数据(出栈)事件的时候, 从当前的 handle 往前查找到 OutBoundHandle, 触发前一个 OutBoundHandle 的 write 事件private void write(Object msg, boolean flush, ChannelPromise promise) {AbstractChannelHandlerContext next = this.findContextOutbound();Object m = this.pipeline.touch(msg, next);EventExecutor executor = next.executor();if (executor.inEventLoop()) {if (flush) {next.invokeWriteAndFlush(m, promise);} else {next.invokeWrite(m, promise);}} else {Object task;if (flush) {task = AbstractChannelHandlerContext.WriteAndFlushTask.newInstance(next, m, promise);} else {task = AbstractChannelHandlerContext.WriteTask.newInstance(next, m, promise);}if (!safeExecute(executor, (Runnable)task, promise, m)) {((AbstractChannelHandlerContext.AbstractWriteTask)task).cancel();}}}传递so , inbound 消息传递为从前往后, outbound 的消息传递为从后往前, 所以最先添加的 outbound 将会最后被调用
讲一个平时可能不会注意到到地方:
上面讲的是 AbstractChannelHandleContext 中的方法, AbstractChannel 中也有 write 方法 ,接下来我们就讲 ctx.write() 和 channel.write() 这两个方法调用的区别
AbstractChannelHandleContext#ctx.write()
public ChannelFuture write(Object msg, ChannelPromise promise) {if (msg == null) {throw new NullPointerException("msg");} else {try {if (this.isNotValidPromise(promise, true)) {ReferenceCountUtil.release(msg);return promise;}} catch (RuntimeException var4) {ReferenceCountUtil.release(msg);throw var4;}// 调用下面那个方法this.write(msg, false, promise);return promise;}}private void write(Object msg, boolean flush, ChannelPromise promise) {// 找到下一个 outboundHandleAbstractChannelHandlerContext next = this.findContextOutbound();Object m = this.pipeline.touch(msg, next);EventExecutor executor = next.executor();// 后面代码太多省略...}
AbstractChannel#channel.write()
// ctx.channel().write()public ChannelFuture writeAndFlush(Object msg, ChannelPromise promise) {// 调用下面的方法 return this.pipeline.writeAndFlush(msg, promise);}public final ChannelFuture writeAndFlush(Object msg, ChannelPromise promise) {// tail 是最末尾的一个handlereturn this.tail.writeAndFlush(msg, promise);}总结: ctx.write() 这个方法是在 当前 handle 开始往前查找 OutBoundHandle进行事件传递, 而 channel.write() 是从 pipeline的最后一个handle(tail)往前查找 OutBoundHandle 进行事件传递, 所以 channel.write() 传递的事件会经过所有的 OutBoundHandle .
// 字符串编码
pi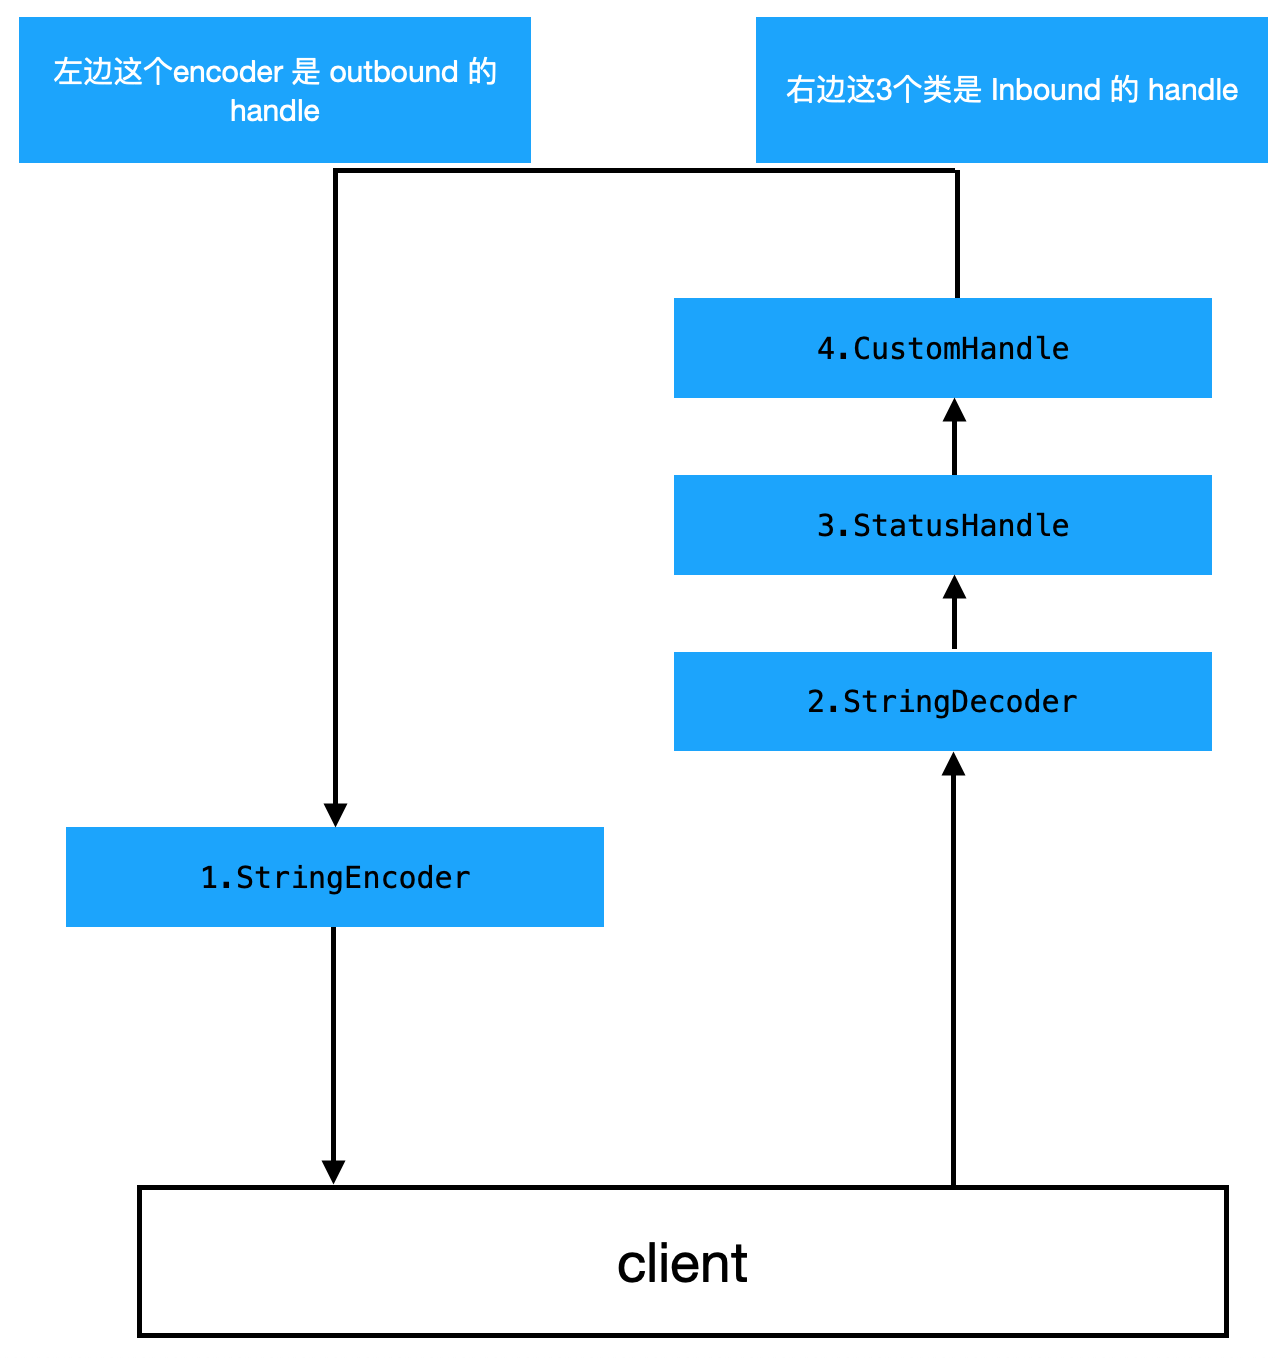peline.addLast(worker,new StringEncoder()); // 1.outbound
// 字符串解码
pipeline.addLast(worker,new StringDecoder()); // 2.inbound
// 自定义的handle, 状态变化后进行处理的 handle
pipeline.addLast(worker,new StatusHandle()); // 3.inbound
// 自定义的handle, 现在是对读取到的消息进行处理
pipeline.addLast(worker,new CustomHandle()); // 4.inbound我们上面4个 handle 添加的顺序为 out, in , in, in , 所以最终调用的话,会变成下面这样
![]()
再看看 ChannelInitializer 这个类
public abstract class ChannelInitializer<C extends Channel> extends ChannelInboundHandlerAdapter/*** This method will be called once the {@link Channel} was registered. After the method returns this instance  * will be removed from the {@link ChannelPipeline} of the {@link Channel}.** @param ch            the {@link Channel} which was registered.* @throws Exception    is thrown if an error occurs. In that case it will be handled by*                      {@link #exceptionCaught(ChannelHandlerContext, Throwable)} which will by default close*                      the {@link Channel}.*/// 上面的意思是说,当 channel(客户端通道)一旦被注册,将会调用这个方法, 并且在方法返回的时候, 这个实例(ChannelInitializer)将会被从 ChannelPipeline (客户端的 pipeline) 中移除
protected abstract void initChannel(C ch) throws Exception;
除了这个抽象方法, 这个类还有一个重载方法
private boolean initChannel(ChannelHandlerContext ctx) throws Exception {if (initMap.putIfAbsent(ctx, Boolean.TRUE) == null) { // Guard against re-entrance.try {// 第二步// 这里调用我们自己实现的那个抽象方法 , 将 我们前面定义的 handle 都加入到 client 的 pipeline 中initChannel((C) ctx.channel());} catch (Throwable cause) {exceptionCaught(ctx, cause);} finally {// 第三步remove(ctx);}return true;}return false;}remove 方法
private void remove(ChannelHandlerContext ctx) {try {ChannelPipeline pipeline = ctx.pipeline();if (pipeline.context(this) != null) {pipeline.remove(this);}} finally {initMap.remove(ctx);}
}
终于写完了这一篇, 这篇的代码有点多, 如果只是demo的话, 不需要花费什么时间, 如果想要深入了解一下 Netty 的话, 可以从这里开始对源码的一点点分析.
转载于:https://www.cnblogs.com/wuhaonan/p/11386835.html
Netty学习(三)高性能之ByteBuf源码解析(篇幅较长)相关推荐
- java 并发框架源码_Java并发编程高阶技术-高性能并发框架源码解析与实战
Java并发编程高阶技术-高性能并发框架源码解析与实战 1 _0 Z' @+ l: s3 f6 r% t|____资料3 Z9 P- I2 x8 T6 ^ |____coding-275-master ...
- 多线程(三)之ReentrantLock源码解析
2019独角兽企业重金招聘Python工程师标准>>> 今天分析ReentrantLock类的源码,在看源码之前,先学习AQS(AbstractQueuedSynchronizer) ...
- .NET Core实战项目之CMS 第三章 入门篇-源码解析配置文件及依赖注入
写在前面 上篇文章我给大家讲解了ASP.NET Core的概念及为什么使用它,接着带着你一步一步的配置了.NET Core的开发环境并创建了一个ASP.NET Core的mvc项目,同时又通过一个实战 ...
- java 并发框架源码_某网Java并发编程高阶技术-高性能并发框架源码解析与实战(云盘下载)...
第1章 课程介绍(Java并发编程进阶课程) 什么是Disruptor?它一个高性能的异步处理框架,号称"单线程每秒可处理600W个订单"的神器,本课程目标:彻底精通一个如此优秀的 ...
- Laravel 学习笔记之 Query Builder 源码解析(下)
说明:本文主要学习下Query Builder编译Fluent Api为SQL的细节和执行SQL的过程.实际上,上一篇聊到了\Illuminate\Database\Query\Builder这个非常 ...
- Kubernetes学习笔记之Calico Startup源码解析
女主宣言 我们目前生产k8s和calico使用ansible二进制部署在私有机房,没有使用官方的calico/node容器部署,并且因为没有使用network policy只部署了confd/bird ...
- Ceph学习——Librados与Osdc实现源码解析
Librados RadosClient类 IoctxImpl AioCompletionImpl OSDC ObjectOperation 封装操作 op_target 封装PG信息 Op 封装操作 ...
- 前端学习(2537):vue源码解析2伪数组转换为真数组
/*1[].slice.call(lis)*//*伪数组 */const lis=document.getElementsByTagName('li')/*判断数组 false*/console.lo ...
- 前端学习(2534)vue源码解析
- SELinux零知识学习四、Audit应用层源码下载、编译和安装
接前一篇文章:SELinux零知识学习三.SELinux应用层源码下载.编译和安装 在前篇文章中编译SELinux源码时,出现了如下错误: seusers_local.c:11:10: 致命错误:li ...
最新文章
- web前端面试题(含答案)
- 十大排序算法之冒泡排序
- esp8266环境搭建
- MySQL 创建触发器
- NOIp2016纪录[那些我所追求的]
- 蝉联四年VOT冠军、发表数十篇顶会论文,卢湖川与IIAU实验室的成功之路
- 简述人工智能的发展历程图_人工智能的历程、现状及未来发展趋势
- 雅思阅读真经总纲_雅思阅读用哪本书?五大热门雅思阅读书籍全面点评
- pylint高频警告错误的原因及处理建议
- Node之Express服务器启动安装与配置
- Find Zombies
- [宋史学习] 陈桥兵变的一些内幕和交锋
- 【单片机毕业设计】【mcuclub-106】智能晾衣架 | 多功能晾衣架【仿真设计】
- 超详细|一篇搞定操作系统——用户接口
- iOS文档查看-QuickLook
- 互换市场和期货市场(互换交易市场)
- STM32相关驱动和软件下载
- Unity C# 中国天气网城市代码 获取当前天气、各种指数方法
- html5 win8风格站点,HTML5 Win8砖块样式的界面布局
- IntelliJ IDEA导入主题包
热门文章
- junit可执行但控制层无法执行_解决junit5无法使用gradle test运行测试
- word 代码块_Python+Excel+Word一秒制作百份合同
- OpenCV-图像处理(03、Mat对象)
- 通过反汇编一个简单的C程序理解计算机是如何工作的
- weightad interval scheduling problems
- mysql sql语句执行到一半会怎么样?
- java上下文的作用_Spring中的应用程序上下文有什么作用? - java
- set_union()和set_intersection()用法:原来并集和交集这样求!
- 计算机网络与通信pdf谢希仁_考情分析|2020年同济大学计算机考研考情分析
- 线性代数 : 矩阵消元