Solr Schema.xml示例
本文英文版地址:https://examples.javacodegeeks.com/enterprise-java/apache-solr/solr-schema-xml-example/
作者姓名:Veeramani Kalyanasundaram
作者简介:Veera是在电信领域工作的软件架构师,拥有丰富的Java中间件技术经验。他是一名OOAD从业者,对性能工程感兴趣。
翻译备注:本文采用谷歌翻译,请有时间的同学可以从英文版学习。
在Solr Schema.xml示例的示例中,我们将讨论Apache Solr提供的schema.xml文件中的不同配置参数。schema.xml描述了我们希望Solr索引的文档。 我们可以定义字段类型和字段本身。 字段类型定义很强大,包括有关Solr如何处理传入字段值和查询值的信息。我们将讨论如何创建字段,创建自定义字段类型,在此示例中使用复制字段和使用动态字段。
为了演示schema.xml文件的使用,我们将使用基本配置在Solr中创建一个核心,并索引与Solr安装一起提供的示例文件。
这个例子的首选环境是solr-5.0.0。在开始Solr安装之前,请确保已安装JDK并已正确设置Java_Home。
1.安装Apache Solr
首先,让我们从以下位置下载最新版本的Apache Solr:
http://lucene.apache.org/solr/downloads.html
Apache Solr已经经历了从4.xx到5.0.0的各种更改,因此如果您有不同版本的Solr,则需要下载5.xx版本以遵循此示例。
下载Solr zip文件后,将其解压缩到文件夹中。 提取的文件夹将如下所示:
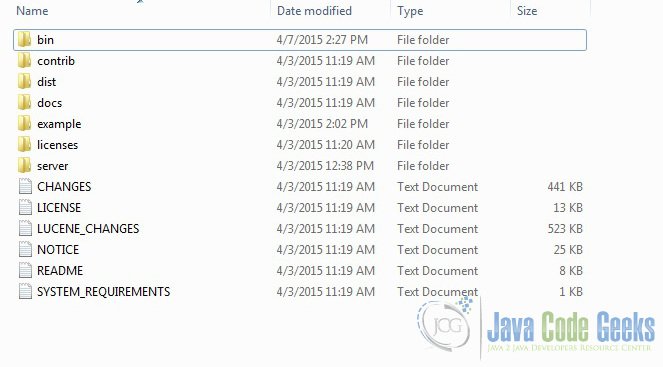
Solr文件夹
bin文件夹包含用于启动和停止服务器的脚本。 example文件夹包含几个示例文件。 我们将使用其中一个来演示Solr如何对数据进行索引。server文件夹包含用于写入所有Solr日志的logs文件夹。在索引期间检查日志中的任何错误将有所帮助。 服务器下的solr文件夹包含不同的集合或核心。 每个核/集合的配置和数据存储在相应的核/集合文件夹中。
Apache Solr附带了一个内置的Jetty服务器。 但在我们启动solr实例之前,我们必须验证JAVA_HOME是否在机器上设置。
我们可以使用命令行脚本启动服务器。 让我们从命令提示符转到bin目录并发出以下命令:
solr start
这将在默认端口8983下启动Solr服务器。
我们现在可以在浏览器中打开以下URL,并验证我们的Solr实例正在运行。 solr管理工具的具体细节超出了示例的范围。
http://localhost:8983/solr/
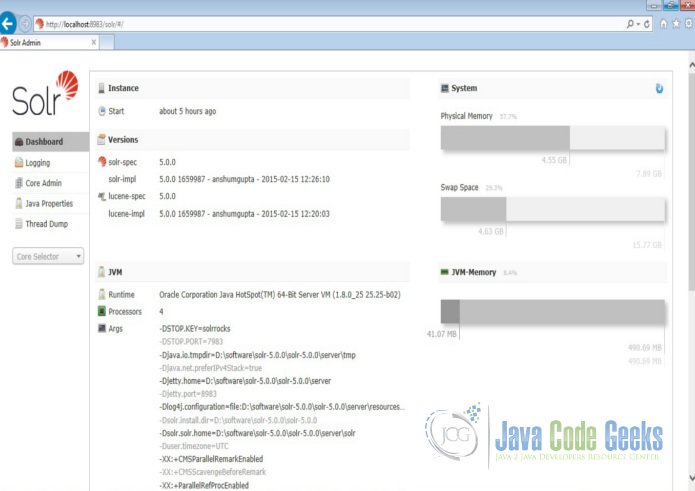
Solr管理控制台
2.创建Solr核心
当Solr服务器在独立模式下启动时,配置称为核心,当在SolrCloud模式下启动时,配置称为集合。在这个例子中,我们将讨论独立的服务器和核心。 我们将暂停SolrCloud讨论以供日后使用。
首先,我们需要创建一个用于索引数据的Core。 Solr create命令有以下选项:
- -c <name> - 要创建的核心或集合的名称(必需)。
- -d <confdir> - 配置目录,在SolrCloud模式下有用。
- -n <configName> - 配置名称。 此默认值与核心或集合的名称相同。
- -p <port> - 要向其发送create命令的本地Solr实例的端口;默认情况下,脚本尝试通过查找正在运行的Solr实例来检测端口。
- -s <shards> - 将集合拆分为的分片数,默认值为1。
- -rf <replicas> - 集合中每个文档的副本数。默认值为1。
在本例中,我们将使用-c参数作为核心名称,使用-d参数作为配置目录。 对于所有其他参数,我们使用默认设置。
现在在命令窗口中导航solr-5.0.0\bin文件夹,并发出以下命令:
solr create -c jcg -d basic_configs
我们可以在命令窗口中看到以下输出。
1
|
<span class="notranslate"onmouseover="_tipon(this)"onmouseout="_tipoff()"><span class="google-src-text"style="direction: ltr; text-align: left">Creating new core'jcg' using command:</span>使用命令创建新核心'jcg':</span>
|
2
|
<span class="notranslate"onmouseover="_tipon(this)"onmouseout="_tipoff()"><span class="google-src-text"style="direction: ltr; text-align: left">http://localhost:8983/solr/admin/cores?action=CREATE&name=jcg&instanceDir=jcg</span> http:// localhost:8983 / solr / admin / cores?action = CREATE&name = jcg&instanceDir = jcg</span>
|
3
|
4
|
<span class="notranslate"onmouseover="_tipon(this)"onmouseout="_tipoff()"><span class="google-src-text"style="direction: ltr; text-align: left">{</span> {</span>
|
5
|
<span class="notranslate"onmouseover="_tipon(this)"onmouseout="_tipoff()"><span class="google-src-text"style="direction: ltr; text-align: left">"responseHeader":{</span> “responseHeader”:{</span>
|
6
|
<span class="notranslate"onmouseover="_tipon(this)"onmouseout="_tipoff()"><span class="google-src-text"style="direction: ltr; text-align: left">"status":0,</span> “status”:0,</span>
|
7
|
<span class="notranslate"onmouseover="_tipon(this)"onmouseout="_tipoff()"><span class="google-src-text"style="direction: ltr; text-align: left">"QTime":663},</span> “QTime”:663},</span>
|
8
|
<span class="notranslate"onmouseover="_tipon(this)"onmouseout="_tipoff()"><span class="google-src-text"style="direction: ltr; text-align: left">"core":"jcg"}</span> “core”:“jcg”}</span>
|
现在我们导航到以下URL,我们可以看到jcg core被填充在核心选择器中。 您还可以查看核心的统计信息。
http://localhost:8983/solr
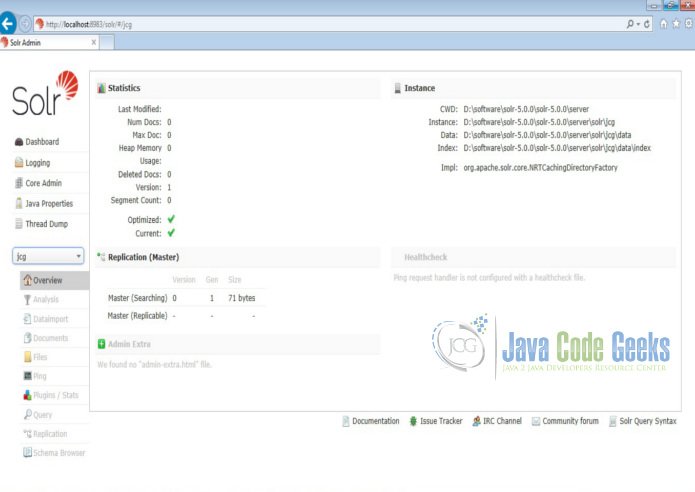
Solr jcg core
3.使用字段类型
我们需要修改文件夹server\solr\jcg\conf下的schema.xml文件,以包含字段。我们将使用随同Solr安装一起提供的示例文件“books.csv”中的一个进行索引。 该文件位于文件夹solr-5.0.0\example\exampledocs
现在我们导航到文件夹server\solr目录。 您将看到一个名为jcg的文件夹。 子文件夹即conf和data分别具有核心的配置和索引数据。
现在编辑\server\solr\jcg\conf文件夹中的schema.xml文件,并在uniqueKey元素后面添加以下内容。
schema.xml
1
|
<spanclass="notranslate"onmouseover="_tipon(this)"onmouseout="_tipoff()"><spanclass="google-src-text"style="direction: ltr; text-align: left"><uniqueKey>id</uniqueKey></span> <uniqueKey> id </ uniqueKey></span>
|
2
|
<spanclass="notranslate"onmouseover="_tipon(this)"onmouseout="_tipoff()"><spanclass="google-src-text"style="direction: ltr; text-align: left"><!-- Fields added for books.csv load--></span> <! - 为books.csv加载添加的字段 - ></span>
|
3
|
<spanclass="notranslate"onmouseover="_tipon(this)"onmouseout="_tipoff()"><spanclass="google-src-text"style="direction: ltr; text-align: left"><fieldname="cat"type="text_general"indexed="true"stored="true"/></span> <fieldname =“cat”type =“text_general”indexed =“true”stored =“true”/></span>
|
4
|
<spanclass="notranslate"onmouseover="_tipon(this)"onmouseout="_tipoff()"><spanclass="google-src-text"style="direction: ltr; text-align: left"><fieldname="name"type="text_general"indexed="true"stored="true"/></span> <fieldname =“name”type =“text_general”indexed =“true”stored =“true”/></span>
|
5
|
<spanclass="notranslate"onmouseover="_tipon(this)"onmouseout="_tipoff()"><spanclass="google-src-text"style="direction: ltr; text-align: left"><fieldname="price"type="tdouble"indexed="true"stored="true"/></span> <fieldname =“price”type =“tdouble”indexed =“true”stored =“true”/></span>
|
6
|
<spanclass="notranslate"onmouseover="_tipon(this)"onmouseout="_tipoff()"><spanclass="google-src-text"style="direction: ltr; text-align: left"><fieldname="inStock"type="boolean"indexed="true"stored="true"/></span> <fieldname =“inStock”type =“boolean”indexed =“true”stored =“true”/></span>
|
7
|
<spanclass="notranslate"onmouseover="_tipon(this)"onmouseout="_tipoff()"><spanclass="google-src-text"style="direction: ltr; text-align: left"><fieldname="author"type="text_general"indexed="true"stored="true"/></span> <fieldname =“author”type =“text_general”indexed =“true”stored =“true”/></span>
|
我们已将indexed的属性设置为true。 这指定了用于索引的字段,并且可以使用索引检索记录。 将值设置为false将使该字段只存储,但不能查询。
还要注意,我们有另一个属性叫stored并设置为true。 这指定字段存储并可以在输出中返回。 将此字段设置为false将使该字段仅编入索引,并且无法在输出中检索。
我们已经为“books.csv”文件中的字段分配了类型。 CSV文件“id”中的第一个字段由schema.xml文件的uniqueKey元素自动处理,用于建立索引。
4.定义字段类型
在创建核心时,默认情况下会创建许多字段类型。 字段类型定义了Solr应如何解释字段中的数据以及如何查询字段。 我们将创建一个字段类型“ text_uppercase”,它将数据转换为大写字母值并对其进行索引。 字段类型定义可以包括四种类型的信息:
- 实现类名称(强制)
- 字段类型的名称(强制)
- 如果字段类型为TextField,则说明字段类型的字段分析
- 字段类型属性 - 根据实现类,一些属性可能是必需的。
字段类型确定字段类型的大多数行为,但也可以定义可选属性。
现在编辑\server\solr\jcg\conf文件夹中的schema.xml文件,并在小写字段类型后添加以下内容。以下配置将创建一个字段类型“text_uppercase”。
schema.xml
01
|
<spanclass="notranslate"onmouseover="_tipon(this)"onmouseout="_tipoff()"><spanclass="google-src-text"style="direction: ltr; text-align: left"><!-- lowercases the entire field value, keeping it as a single token.</span> <! - 降低整个字段值,将其保留为单个令牌。</span> <span class="notranslate" onmouseover="_tipon(this)" onmouseout="_tipoff()"><span class="google-src-text" style="direction: ltr; text-align: left">--></span> - ></span>
|
02
|
<spanclass="notranslate"onmouseover="_tipon(this)"onmouseout="_tipoff()"><spanclass="google-src-text"style="direction: ltr; text-align: left"><fieldTypename="lowercase"class="solr.TextField"positionIncrementGap="100"></span> <fieldTypename =“lowercase”class =“solr.TextField”positionIncrementGap =“100”></span>
|
03
|
<spanclass="notranslate"onmouseover="_tipon(this)"onmouseout="_tipoff()"><spanclass="google-src-text"style="direction: ltr; text-align: left"><analyzer></span> <analyzer></span>
|
04
|
<spanclass="notranslate"onmouseover="_tipon(this)"onmouseout="_tipoff()"><spanclass="google-src-text"style="direction: ltr; text-align: left"><tokenizerclass="solr.KeywordTokenizerFactory"/></span> <tokenizerclass =“solr.KeywordTokenizerFactory”/></span>
|
05
|
<spanclass="notranslate"onmouseover="_tipon(this)"onmouseout="_tipoff()"><spanclass="google-src-text"style="direction: ltr; text-align: left"><filterclass="solr.LowerCaseFilterFactory"/></span> <filterclass =“solr.LowerCaseFilterFactory”/></span>
|
06
|
<spanclass="notranslate"onmouseover="_tipon(this)"onmouseout="_tipoff()"><spanclass="google-src-text"style="direction: ltr; text-align: left"></analyzer></span> </ analyze></span>
|
07
|
<spanclass="notranslate"onmouseover="_tipon(this)"onmouseout="_tipoff()"><spanclass="google-src-text"style="direction: ltr; text-align: left"></fieldType></span> </ fieldType></span>
|
08
|
<spanclass="notranslate"onmouseover="_tipon(this)"onmouseout="_tipoff()"><spanclass="google-src-text"style="direction: ltr; text-align: left"><fieldTypename="text_uppercase"class="solr.TextField"positionIncrementGap="100"></span> <fieldTypename =“text_uppercase”class =“solr.TextField”positionIncrementGap =“100”></span>
|
09
|
<spanclass="notranslate"onmouseover="_tipon(this)"onmouseout="_tipoff()"><spanclass="google-src-text"style="direction: ltr; text-align: left"><analyzer></span> <analyzer></span>
|
10
|
<spanclass="notranslate"onmouseover="_tipon(this)"onmouseout="_tipoff()"><spanclass="google-src-text"style="direction: ltr; text-align: left"><tokenizerclass="solr.WhitespaceTokenizerFactory"/></span> <tokenizerclass =“solr.WhitespaceTokenizerFactory”/></span>
|
11
|
<spanclass="notranslate"onmouseover="_tipon(this)"onmouseout="_tipoff()"><spanclass="google-src-text"style="direction: ltr; text-align: left"><filterclass="solr.UpperCaseFilterFactory"/></span> <filterclass =“solr.UpperCaseFilterFactory”/></span>
|
12
|
<spanclass="notranslate"onmouseover="_tipon(this)"onmouseout="_tipoff()"><spanclass="google-src-text"style="direction: ltr; text-align: left"></analyzer></span> </ analyze></span>
|
13
|
<spanclass="notranslate"onmouseover="_tipon(this)"onmouseout="_tipoff()"><spanclass="google-src-text"style="direction: ltr; text-align: left"></fieldType></span> </ fieldType></span>
|
5.使用复制字段
复制字段命令将文档添加到索引时将一个字段复制到另一个字段。 它用于以不同方式对同一字段建立索引,或者将多个字段添加到同一字段,以便更容易/更快速地搜索。
在我们的示例中,我们将为名称创建一个复制字段。 我们将使用复制字段以大写形式对名称建立索引。
现在编辑\server\solr\jcg\conf文件夹中的schema.xml文件,并在小写字段类型后添加以下内容。以下配置将创建一个字段类型“text_uppercase”。
schema.xml
1
|
<spanclass="notranslate"onmouseover="_tipon(this)"onmouseout="_tipoff()"><spanclass="google-src-text"style="direction: ltr; text-align: left"><!--</span> <! - </span>
|
2
|
<span class="notranslate" onmouseover="_tipon(this)" onmouseout="_tipoff()"><span class="google-src-text" style="direction: ltr; text-align: left"><copyField source="title" dest="text"/></span> <copyField source =“title”dest =“text”/></span>
|
3
|
<span class="notranslate" onmouseover="_tipon(this)" onmouseout="_tipoff()"><span class="google-src-text" style="direction: ltr; text-align: left"><copyField source="body" dest="text"/></span> <copyField source =“body”dest =“text”/></span>
|
4
|
<span class="notranslate" onmouseover="_tipon(this)" onmouseout="_tipoff()"><span class="google-src-text" style="direction: ltr; text-align: left">--></span> - ></span>
|
5
|
<spanclass="notranslate"onmouseover="_tipon(this)"onmouseout="_tipoff()"><spanclass="google-src-text"style="direction: ltr; text-align: left"><copyFieldsource="name"dest="uname"/></span> <copyFieldsource =“name”dest =“uname”/></span>
|
现在我们必须将字段类型分配给目标。 我们将字段类型添加为“text_uppercase”,如下所示。
schema.xml
1
|
<spanclass="notranslate"onmouseover="_tipon(this)"onmouseout="_tipoff()"><spanclass="google-src-text"style="direction: ltr; text-align: left"><uniqueKey>id</uniqueKey></span> <uniqueKey> id </ uniqueKey></span>
|
2
|
<spanclass="notranslate"onmouseover="_tipon(this)"onmouseout="_tipoff()"><spanclass="google-src-text"style="direction: ltr; text-align: left"><!-- Fields added for books.csv load--></span> <! - 为books.csv加载添加的字段 - ></span>
|
3
|
<spanclass="notranslate"onmouseover="_tipon(this)"onmouseout="_tipoff()"><spanclass="google-src-text"style="direction: ltr; text-align: left"><fieldname="cat"type="text_general"indexed="true"stored="true"/></span> <fieldname =“cat”type =“text_general”indexed =“true”stored =“true”/></span>
|
4
|
<spanclass="notranslate"onmouseover="_tipon(this)"onmouseout="_tipoff()"><spanclass="google-src-text"style="direction: ltr; text-align: left"><fieldname="name"type="text_general"indexed="true"stored="true"/></span> <fieldname =“name”type =“text_general”indexed =“true”stored =“true”/></span>
|
5
|
<spanclass="notranslate"onmouseover="_tipon(this)"onmouseout="_tipoff()"><spanclass="google-src-text"style="direction: ltr; text-align: left"><fieldname="price"type="tdouble"indexed="true"stored="true"/></span> <fieldname =“price”type =“tdouble”indexed =“true”stored =“true”/></span>
|
6
|
<spanclass="notranslate"onmouseover="_tipon(this)"onmouseout="_tipoff()"><spanclass="google-src-text"style="direction: ltr; text-align: left"><fieldname="inStock"type="boolean"indexed="true"stored="true"/></span> <fieldname =“inStock”type =“boolean”indexed =“true”stored =“true”/></span>
|
7
|
<spanclass="notranslate"onmouseover="_tipon(this)"onmouseout="_tipoff()"><spanclass="google-src-text"style="direction: ltr; text-align: left"><fieldname="author"type="text_general"indexed="true"stored="true"/></span> <fieldname =“author”type =“text_general”indexed =“true”stored =“true”/></span>
|
8
|
<spanclass="notranslate"onmouseover="_tipon(this)"onmouseout="_tipoff()"><spanclass="google-src-text"style="direction: ltr; text-align: left"><fieldname="uname"type="text_uppercase"indexed="true"stored="true"/></span> <fieldname =“uname”type =“text_uppercase”indexed =“true”stored =“true”/></span>
|
6.使用动态字段
动态字段通过在配置原理上应用约定来创建。 当我们使用基本配置创建核心时,默认情况下会创建以下动态字段。
schema.xml
01
|
<spanclass="notranslate"onmouseover="_tipon(this)"onmouseout="_tipoff()"><spanclass="google-src-text"style="direction: ltr; text-align: left"><dynamicFieldname="*_i"type="int"indexed="true"stored="true"/></span> <dynamicFieldname =“* _ i”type =“int”indexed =“true”stored =“true”/></span>
|
02
|
<spanclass="notranslate"onmouseover="_tipon(this)"onmouseout="_tipoff()"><spanclass="google-src-text"style="direction: ltr; text-align: left"><dynamicFieldname="*_is"type="int"indexed="true"stored="true"multiValued="true"/></span> <dynamicFieldname =“* _ is”type =“int”indexed =“true”stored =“true”multiValued =“true”/></span>
|
03
|
<spanclass="notranslate"onmouseover="_tipon(this)"onmouseout="_tipoff()"><spanclass="google-src-text"style="direction: ltr; text-align: left"><dynamicFieldname="*_s"type="string"indexed="true"stored="true"/></span> <dynamicFieldname =“* _ s”type =“string”indexed =“true”stored =“true”/></span>
|
04
|
<spanclass="notranslate"onmouseover="_tipon(this)"onmouseout="_tipoff()"><spanclass="google-src-text"style="direction: ltr; text-align: left"><dynamicFieldname="*_ss"type="string"indexed="true"stored="true"multiValued="true"/></span> <dynamicFieldname =“* _ ss”type =“string”indexed =“true”stored =“true”multiValued =“true”/></span>
|
05
|
<spanclass="notranslate"onmouseover="_tipon(this)"onmouseout="_tipoff()"><spanclass="google-src-text"style="direction: ltr; text-align: left"><dynamicFieldname="*_l"type="long"indexed="true"stored="true"/></span> <dynamicFieldname =“* _ l”type =“long”indexed =“true”stored =“true”/></span>
|
06
|
<spanclass="notranslate"onmouseover="_tipon(this)"onmouseout="_tipoff()"><spanclass="google-src-text"style="direction: ltr; text-align: left"><dynamicFieldname="*_ls"type="long"indexed="true"stored="true"multiValued="true"/></span> <dynamicFieldname =“* _ ls”type =“long”indexed =“true”stored =“true”multiValued =“true”/></span>
|
07
|
<spanclass="notranslate"onmouseover="_tipon(this)"onmouseout="_tipoff()"><spanclass="google-src-text"style="direction: ltr; text-align: left"><dynamicFieldname="*_t"type="text_general"indexed="true"stored="true"/></span> <dynamicFieldname =“* _ t”type =“text_general”indexed =“true”stored =“true”/></span>
|
08
|
<spanclass="notranslate"onmouseover="_tipon(this)"onmouseout="_tipoff()"><spanclass="google-src-text"style="direction: ltr; text-align: left"><dynamicFieldname="*_txt"type="text_general"indexed="true"stored="true"multiValued="true"/></span> <dynamicFieldname =“* _ txt”type =“text_general”indexed =“true”stored =“true”multiValued =“true”/></span>
|
09
|
<spanclass="notranslate"onmouseover="_tipon(this)"onmouseout="_tipoff()"><spanclass="google-src-text"style="direction: ltr; text-align: left"><dynamicFieldname="*_en"type="text_en"indexed="true"stored="true"multiValued="true"/></span> <dynamicFieldname =“* _ en”type =“text_en”indexed =“true”stored =“true”multiValued =“true”/></span>
|
10
|
<spanclass="notranslate"onmouseover="_tipon(this)"onmouseout="_tipoff()"><spanclass="google-src-text"style="direction: ltr; text-align: left"><dynamicFieldname="*_b"type="boolean"indexed="true"stored="true"/></span> <dynamicFieldname =“* _ b”type =“boolean”indexed =“true”stored =“true”/></span>
|
11
|
<spanclass="notranslate"onmouseover="_tipon(this)"onmouseout="_tipoff()"><spanclass="google-src-text"style="direction: ltr; text-align: left"><dynamicFieldname="*_bs"type="boolean"indexed="true"stored="true"multiValued="true"/></span> <dynamicFieldname =“* _ bs”type =“boolean”indexed =“true”stored =“true”multiValued =“true”/></span>
|
12
|
<spanclass="notranslate"onmouseover="_tipon(this)"onmouseout="_tipoff()"><spanclass="google-src-text"style="direction: ltr; text-align: left"><dynamicFieldname="*_f"type="float"indexed="true"stored="true"/></span> <dynamicFieldname =“* _ f”type =“float”indexed =“true”stored =“true”/></span>
|
13
|
<spanclass="notranslate"onmouseover="_tipon(this)"onmouseout="_tipoff()"><spanclass="google-src-text"style="direction: ltr; text-align: left"><dynamicFieldname="*_fs"type="float"indexed="true"stored="true"multiValued="true"/></span> <dynamicFieldname =“* _ fs”type =“float”indexed =“true”stored =“true”multiValued =“true”/></span>
|
14
|
<spanclass="notranslate"onmouseover="_tipon(this)"onmouseout="_tipoff()"><spanclass="google-src-text"style="direction: ltr; text-align: left"><dynamicFieldname="*_d"type="double"indexed="true"stored="true"/></span> <dynamicFieldname =“* _ d”type =“double”indexed =“true”stored =“true”/></span>
|
15
|
<spanclass="notranslate"onmouseover="_tipon(this)"onmouseout="_tipoff()"><spanclass="google-src-text"style="direction: ltr; text-align: left"><dynamicFieldname="*_ds"type="double"indexed="true"stored="true"multiValued="true"/></span> <dynamicFieldname =“* _ ds”type =“double”indexed =“true”stored =“true”multiValued =“true”/></span>
|
在books.csv文件中,我们有以下字段动态映射到字段类型。
- series_t - 映射到动态字段名称“* _t”并分配类型text_general
- sequence_i - 映射到动态字段名称“* _i”,并分配类型int
- genre_s - 映射到动态字段名称“* _s”并分配类型字符串
7.索引数据
Apache Solr附带一个名为SimplePostTool的独立Java程序。 该程序打包到JAR中,安装在example\exampledocs文件夹下。
现在,我们导航到命令提示符中的example\exampledocs文件夹,并键入以下命令。您将看到一堆使用该工具的选项。
java -jar post.jar -h
使用格式一般如下:
Usage: java [SystemProperties] -jar post.jar [-h|-] [<file|folder|url|arg>

    [<file|folder|url|arg>...]]
正如我们前面所说,我们将索引solr安装附带的“books.csv”文件中的数据。 我们将在命令提示符中导航到solr-5.0.0\example\exampledocs并发出以下命令。
java -Dtype=text/csv -Durl=http://localhost:8983/solr/jcg/update -jar post.jar books.csv
这里使用的SystemProperties是:
- -Dtype - 数据文件的类型。
- -Durl - jcg核心的URL。
文件“books.csv”现在将被索引,并且命令提示符将显示以下输出。
1
|
<span class="notranslate"onmouseover="_tipon(this)"onmouseout="_tipoff()"><span class="google-src-text"style="direction: ltr; text-align: left">SimplePostTool version 5.0.0</span> SimplePostTool版本5.0.0</span>
|
2
|
<span class="notranslate"onmouseover="_tipon(this)"onmouseout="_tipoff()"><span class="google-src-text"style="direction: ltr; text-align: left">Posting files to [base] urlhttp://localhost:8983/solr/jcg/update using content-</span>将文件发布到[base] url http:// localhost:8983 / solr / jcg / update using content-</span>
|
3
|
<span class="notranslate"onmouseover="_tipon(this)"onmouseout="_tipoff()"><span class="google-src-text"style="direction: ltr; text-align: left">typetext/csv...</span>键入text / csv ...</span>
|
4
|
<span class="notranslate"onmouseover="_tipon(this)"onmouseout="_tipoff()"><span class="google-src-text"style="direction: ltr; text-align: left">POSTingfile books.csv to [base]</span>将文件books.csv发布到[base]</span>
|
5
|
<span class="notranslate"onmouseover="_tipon(this)"onmouseout="_tipoff()"><span class="google-src-text"style="direction: ltr; text-align: left">1 files indexed.</span> 1个文件已索引。</span>
|
6
|
<span class="notranslate"onmouseover="_tipon(this)"onmouseout="_tipoff()"><span class="google-src-text"style="direction: ltr; text-align: left">COMMITting Solr index changes tohttp://localhost:8983/solr/jcg/update...</span>提交Solr索引更改为http:// localhost:8983 / solr / jcg / update ...</span>
|
7
|
<span class="notranslate"onmouseover="_tipon(this)"onmouseout="_tipoff()"><span class="google-src-text"style="direction: ltr; text-align: left">Time spent: 0:00:00.647</span>所用时间:0:00:00.647</span>
|
8.下载配置
这是schema.xml配置的一个示例。
您可以在这里下载此示例的模式文件: schema.xml
Solr Schema.xml示例相关推荐
- Solr Schema.xml分析
2019独角兽企业重金招聘Python工程师标准>>> Solr Schema.xml分析 一.字段配置(schema) schema.xml位于solr/conf/目录下,类似于数 ...
- Apache Solr schema.xml及solrconfig.xml文件中文注解
一.字段配置(schema) schema.xml位于solr/conf/目录下,类似于数据表配置文件, 定义了加入索引的数据的数据类型,主要包括type.fields和其他的一些缺省设置. 1.先来 ...
- solr之schema.xml中文翻译
译者:张春玲 原文地址:http://blog.csdn.net/zcl_love_wx/article/details/51907488 翻译中----- 声明:faceting我也一直不清楚在so ...
- solr配置-Schema.xml
可参考配置:http://wiki.apache.org/solr/SchemaXml(基本上文档上面讲的已经很详细了) 先来看一下Schema.xml都有什么配置 1,uniqueKey 2,n多n ...
- 【solr专题之二】配置文件:solr.xml solrConfig.xml schema.xml
1.关于默认搜索域 If you are using the Lucene query parser, queries that don't specify a field name will use ...
- 1、solr包结构介绍,solrCore的安装配置,solr部署到Tomcat,多solrCore配置,配置中文分词器,界面功能介绍,Schema.xml的基本使用,数据导入
一.下载solr,下载地址是:http://archive.apache.org/dist/lucene/solr/,选择自己想要的solr的版本,本项目使用的版本是4.10.3 二.如果想下载Luc ...
- Solr 配置文件之schema.xml
schema.xml这个配置文件的根本目的是为了通过配置告诉Solr怎样建立索引. solr的数据结构例如以下: document:一个文档.一条记录 field:域.属性 solr通过搜索某个或某些 ...
- Solr基础教程之Schema.xml(二)
在 Solr 中,使用一个或多个 Document 来构建索引.Document 包括一个或多个 Field.Field 包括名称.内容以及告诉 Solr 如何处理内容的元数据. 例如,Field 可 ...
- solr的schema.xml配置属性解释
schema.xml做什么? SOLR加载数据,创建索引和数据时,核心数据结构的配置文件是schema.xml,该配置文件主要用于配置数据源,字段类型定义,搜索类型定义等.schema.xml的配置直 ...
最新文章
- 智源论坛报名丨斯坦福大学马腾宇博士:为深度模型设计显示正则器
- 赠票 | 中国数据智能管理峰会(上海)
- SGU 185 Two shortest
- java 异步读写_Java异步与AIO
- art.dialog弹出框后再根据其内部iframe的大小调整大小
- 简述计算机图形的图形应用主要有哪些,5计算机图形学考试简答题复习.doc
- PIN码 Adsense在线身份验证
- Qt creator 中文显示问题(常量中有换行符或中文显示乱码)
- 光伏组件为何出现白色线条?
- Zend Famework 2 | 如何在自定义类中使用Service Manager
- spring mvc 前台属性数据的传递和后台属性数据的接收
- 电商 竞品分析_电商竞品分析
- 微软提供的无限次延长Vista激活
- PyMOL免费下载及安装教程【Win版】
- 大数据BI可视化应用介绍
- 重磅:Mobileye官宣推迟IPO,营收增速放缓、市场竞争加剧
- 【判断是否为手机号】
- 西宁-青海--茶卡盐湖-敦煌自由行攻略
- 可发教育类论文的期刊《家长》简介及投稿邮箱
- 智汀智能系统,开启智能家居新时代