人脸检测卷积神经网络_卷积神经网络和计算机视觉的人脸面具检测算法
人脸检测卷积神经网络
In this article, we explore an application of Computer Vision that is largely relevant to the global health crisis that is the Coronavirus. As many countries continue their desperate fight to control the infection rate and spread of the virus, we have seen the integration of many unfamiliar; and somewhat inconvenient, protection measures being introduced into society over the past 6 months. One of these particular measures; at least in the UK, is the mandatory requirement of wearing a protective face mask in shops, cafes, restaurants, and other compact or enclosed social environments. This project looks at automating the task of checking whether someone is wearing a protective mask through the development, training, and deployment of a Computer Vision ML model. The specific Machine Learning model used in this project is the widely popular Convolutional Neural Network (CNN).
在本文中,我们探讨了计算机视觉的一种应用,该应用与冠状病毒这一全球性健康危机在很大程度上相关。 随着许多国家继续为控制病毒的感染率和传播而进行的拼命斗争,我们看到了许多陌生人的融合。 而且在过去的6个月中,已在社会上引入了一些保护措施,这有些不便。 这些特别措施之一; 至少在英国,这是在商店,咖啡馆,饭店和其他紧凑或封闭的社交环境中戴防护口罩的强制性要求。 该项目着眼于通过开发,培训和部署Computer Vision ML模型来检查某人是否戴着防护面具的自动化任务。 该项目中使用的特定机器学习模型是广泛流行的卷积神经网络(CNN)。
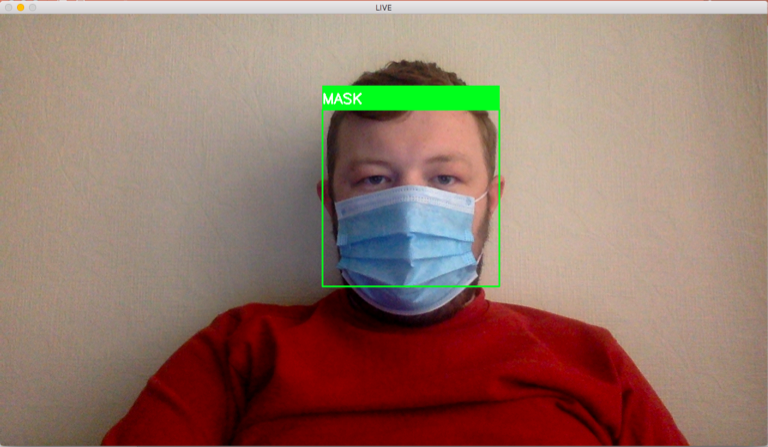
Starting with the end in mind, we will first take a look at the demonstration video which shows the trained CNN model in action. Here the model is attempting to classifying images from a live webcam feed into one of two target categories: “Wearing a mask”, or “Not wearing a mask”. This is the product that will be developed within this project.
从头开始,我们将首先观看演示视频,该演示视频展示了训练有素的CNN模型的实际应用。 在这里,模型正在尝试将实时网络摄像头中的图像分类为两个目标类别之一:“戴口罩”或“不戴口罩”。 这是将在此项目中开发的产品。
Before diving deep into the logic and code that the project encompasses, it is good to provide an overview of what exactly a Convolutional Neural Network is and why it is one of the most popular Machine Learning algorithms for Computer Vision tasks. We will then take a comprehensive walkthrough of the project, discussing and understanding each step and how it contributes towards the end goal of a fully trained and optimized model that is ready for deployment. This walkthrough will contain 4 major subsections:
在深入研究该项目包含的逻辑和代码之前,最好先概述一下卷积神经网络到底是什么以及为什么它是用于计算机视觉任务的最受欢迎的机器学习算法之一。 然后,我们将对该项目进行全面的演练,讨论和理解每个步骤,以及它如何为经过全面培训和优化的模型的最终目标做出贡献,这些模型可以进行部署。 本演练将包含4个主要小节:
- Acquisition and exploration of the training/testing dataset采集和探索训练/测试数据集
- Data pre-processing,数据预处理
- CNN architecture development, training, and testingCNN架构开发,培训和测试
- Model deployment for live webcam feeds实时网络摄像头提要的模型部署
Project code can be found on my GitHub page: (Link)
项目代码可以在我的GitHub页面上找到:(链接)
什么是卷积神经网络,它如何工作? (What is a Convolutional Neural Network, and how does it work?)
This supporting information has been taken and adapted by Sumit Saha’s article “A Comprehensive Guide to Convolutional Neural Networks — the ELI5 way” which can be accessed from the references section of this article.
Sumit Saha的文章“卷积神经网络综合指南-ELI5方式”已采用并改编了此支持信息,可从本文的参考部分中获得该信息。
The agenda for Computer Vision is to enable machines to view and perceive the physical world in similar ways to how us humans do. This includes the ability to accurately and reliably carry out a multitude of image-based tasks including, but not limited to:
Computer Vision的议程是使机器能够以类似于人类的方式查看和感知物理世界。 这包括准确,可靠地执行许多基于图像的任务的能力,包括但不限于:
- Analysing & Classifying objects (“is this a picture of a cat, or a dog?”)分析和分类对象(“这是猫还是狗的图片?”)
- Object Recognition (“Can you recognize and label everything in this image for me”),对象识别(“您能帮我识别并标记此图像中的所有内容吗”),
- Media Recreation (“What would the Mona Lisa look like if it was painted in the style of Vincent Van Gogh?”) — probably something like the middle re-creation below.媒体娱乐(“如果蒙娜丽莎以文森特·梵高的风格绘画,会是什么样?”)—可能类似于下面的中间娱乐。
The advancements in computer processing power and complexity, and data capturing and storage, through time and continuous expert hardware engineering have helped AI enthusiasts overcome previous significant blockers that prevented earlier adoption of Computer Vision tools and techniques in everyday use. Now, in 2020, such Computer Vision applications are; and continue to be, implemented in many aspects of everyday life; from quirky filters and backgrounds on Snapchat images/videos to Smartphone security with Retina or Full Face scans to proximity detection in car sensor systems, to name but a few. The Convolutional Neural Network is what drives much of the decision-making behind these algorithms. But how exactly does it work?
随着时间的推移以及持续不断的专家硬件工程技术的发展,计算机处理能力和复杂性以及数据捕获和存储方面的进步帮助AI爱好者克服了以前的重大障碍,从而阻止了计算机视觉工具和技术在日常使用中的较早采用。 现在,到了2020年,此类计算机视觉应用程序应运而生。 并将继续在日常生活的许多方面得到实施; 从Snapchat图像/视频上古怪的滤镜和背景到具有Retina或全脸扫描的智能手机安全性,再到汽车传感器系统中的接近检测,仅举几例。 卷积神经网络是这些算法背后许多决策的驱动力。 但是它是如何工作的呢?
简介—卷积神经网络 (Introduction — Convolutional Neural Network)
A Convolutional Neural Network is an algorithm that can take in an image as input, assign importance (in the form of trainable weights and biases) to aspects or features of the image and output a decision or some other form of logic based on what it has “seen” in the image. The data pre-processing / preparation required is very minimal when it comes to CNN architectures as the features of your data are the actual pixel values and with enough training data, CNN will automatically define which of these pixels are most important in its decision-making. (Sumit Saha, 2018)
卷积神经网络是一种算法,它可以将图像作为输入,为图像的各个方面或特征分配重要性(以可训练的权重和偏差的形式),并根据其所具有的内容输出决策或某种其他形式的逻辑在图像中“看到”。 对于CNN架构,所需的数据预处理/准备工作非常少,因为数据的特征是实际像素值,并且具有足够的训练数据,CNN会自动定义这些像素中的哪一个对其决策最重要。 (Sumit Saha,2018)
为什么选择CNN而不是前馈NN? (Why choose CNN over Feed-Forward NN?)
Any image stored electronically is just a matrix of pixel values ranging from 0 (Black) to 255 (White), with values in-between this range indicating the “Greyness” of the pixel — the closer the value to 0, the darker the grey (and vice versa).
任何以电子方式存储的图像都只是一个像素值的矩阵,范围从0(黑色)到255(白色),在此范围之间的值表示像素的“灰度”-值越接近0,则灰度越深(反之亦然)。
So why not just flatten this matrix into a single vector of pixels and feed it directly into a Multi-layer Perceptron Neural Network, where each pixel corresponds to an input neuron? It’s not quite as easy as that…
那么,为什么不将这个矩阵展平为单个像素矢量,然后直接将其馈送到多层感知器神经网络,其中每个像素对应一个输入神经元呢? 那不是那么容易……
In the case of a standard feed-forward NN, each input neuron would directly map to a feature in the dataset, and the assumption here is that each neuron (and thus feature) is completely independent of each other. However, this is not the case for image data. Pixels in an image have both Spatial and Temporal dependencies — if you imagine an image of the moon in the night sky, you would expect all of the pixels near the moon to have similar pixel values (they should all be around 200–255), and the further away from the moon the pixel is, the darker the pixel becomes (and closer it’s value reduces towards 0). A standard feed-forward Neural Network would not be able to preserve this type of Spatial and Temporal information and it’s performance is constrained to the information it can gain from each individual pixel in the image without considering other pixels nearby.
在标准前馈NN的情况下,每个输入神经元都将直接映射到数据集中的特征,并且这里的假设是每个神经元(因此也就是特征)彼此完全独立。 但是,图像数据不是这种情况。 图像中的像素具有时空相关性-如果您想象夜空中的月亮图像,则可能希望月亮附近的所有像素都具有相似的像素值(它们都应在200-255之间),并且像素离月球越远,像素就越暗(值越接近0)。 标准的前馈神经网络将无法保留这种类型的时空信息,并且其性能受其可以从图像中每个单独像素获取的信息的约束,而无需考虑附近的其他像素。
The Convolutional Neural Network, on the other hand, can capture these dependencies through the application of relevant filters. The architecture performs a better fitting to the image dataset due to the reduction in the number of parameters involved and the reusability of weights. In other words, the network can be trained to understand the sophistication of the image better.
另一方面,卷积神经网络可以通过应用相关过滤器来捕获这些依赖性。 由于所涉及参数的数量减少以及权重的可重用性,该体系结构对图像数据集的拟合效果更好。 换句话说,可以训练网络以更好地理解图像的复杂性。
CNN输入图像 (CNN Input Images)
In the figure to the left, we have a RGB image which is separated into its three colour planes — Red, Green, and Blue. The dimensions of this very basic image are 4 x 4 x 3 — four pixels in height and width, and three colour channels.
在左图中,我们有一个RGB图像,该图像被分成三个颜色平面-红色,绿色和蓝色。 此基本图像的尺寸为4 x 4 x 3-高度和宽度为四个像素,以及三个颜色通道。
The above 4 x 4 image has 16 pixels per colour channel. For an RGB image, this would equal a total of 16 x 3 (colour channels) = 48 pixels. You can imagine how computationally intensive this would become once our images reach much higher dimensions. For example, an 8K image with dimensions (7680 x 4320 x 3) would equal a total of 99,532,800 pixels per image! One of the major roles of the CNN is to reduce these images into a form which is easier to process, without losing the features that contribute heavily towards its predicting capability. This is paramount when we come to design an architecture that is not only good at deriving the features in the image but can also scale well to massive image datasets (think tens of thousands of images and above).
上面的4 x 4图像每个颜色通道有16个像素。 对于RGB图像,这等于总共16 x 3(彩色通道)= 48像素。 您可以想象一下,一旦我们的图像达到更高的尺寸,这种计算将变得多么密集。 例如,尺寸为(7680 x 4320 x 3)的8K图像等于每个图像总计99,532,800像素! CNN的主要作用之一是将这些图像缩小为易于处理的形式,而又不会丢失对其预测能力有重大贡献的功能。 当我们要设计一种架构时,这非常重要,该架构不仅善于推导图像中的特征,而且还可以很好地扩展到庞大的图像数据集(请考虑数以万计的图像及以上)。
卷积层—核心 (Convolutional Layer — The Kernal)
Example image dimensions: 5 (height) x 5 (width) x 3 (colour channels) = 75 pixel total.
图像尺寸示例:5(高度)x 5(宽度)x 3(颜色通道)=总共75像素。
In our example image to the left, the green section represents our matrix of image pixels, and the smaller yellow matrix is the kernal/filter. This filter has dimensions 3 x 3 x 3.
在我们左边的示例图像中,绿色部分代表我们的图像像素矩阵,而较小的黄色矩阵是内核/滤镜。 该过滤器的尺寸为3 x 3 x 3。
In the convolutional layer, the filter begins at the top-left most area of the input image and completes a matrix multiplication operation between the values in the filter and the pixel values in the area of the image it is hovering over. The result from this calculation is placed into the relevant space on the output “feature map” (the pink 3 x 3 matrix). The filter then slides one pixel to the right and repeats this process. It continues to do this until it can no longer shift right, whereby it will instead shift to the leftmost space of the image, and down one pixel. This filter will complete a total of 9 matrix multiplications which will fill each entry in the 3 x 3 feature map.
在卷积层中,滤镜从输入图像的最左上角区域开始,并完成滤镜中的值和其上悬停的图像区域中的像素值之间的矩阵乘法运算。 计算结果将放置在输出“功能图”(粉红色的3 x 3矩阵)的相关空间中。 然后,滤镜向右滑动一个像素,并重复此过程。 它会继续执行此操作,直到无法再右移为止,从而它将移至图像的最左侧空间并向下移动一个像素。 此过滤器将完成9个矩阵乘法,这些乘法将填充3 x 3特征图中的每个条目。
The primary objective of the Convolutional Layer is to extract features such as edges, lines, and basic shapes, from the input image. The early convolutional layers extract very low-level features (colour, lines, gradients) with subsequent layers extracting higher-level features (lines, shapes, objects).
卷积层的主要目的是从输入图像中提取诸如边缘,线条和基本形状之类的特征。 早期的卷积层提取非常低级的特征(颜色,线条,渐变),随后的层提取较高级别的特征(线条,形状,对象)。
To help manage the dimensions of your images, you could choose to alter the padding or stride hyper-parameters of the model. This falls slightly outside the scope of this project and so I would direct you to the following website if you would like to learn more about these parameters and how they can affect your model behavior- https://machinelearningmastery.com/padding-and-stride-for-convolutional-neural-networks/
为了帮助管理图像的尺寸,您可以选择更改模型的填充或跨距超参数。 这稍微超出了该项目的范围,因此,如果您想了解更多有关这些参数以及它们如何影响模型行为的信息,我将带您进入以下网站-https ://machinelearningmastery.com/padding-and-迈向卷积神经网络/
池化层 (Pooling Layer)
Similar to the Convolutional Layer, the Pooling layer is responsible for reducing the spatial size of the feature map. This is primarily to reduce the computational power required to process the data through dimensionality reduction (think back to those 8K images). Furthermore, the other important role of this layer is to extract the dominant features which are both rotational and positional invariant within the input image, thus helping to maintain strong prediction capability,
与卷积层相似,池化层负责减小要素图的空间大小。 这主要是为了通过降维来减少处理数据所需的计算能力(回想那些8K图像)。 此外,该层的另一个重要作用是提取输入图像中旋转和位置不变的主要特征,从而有助于保持强大的预测能力,
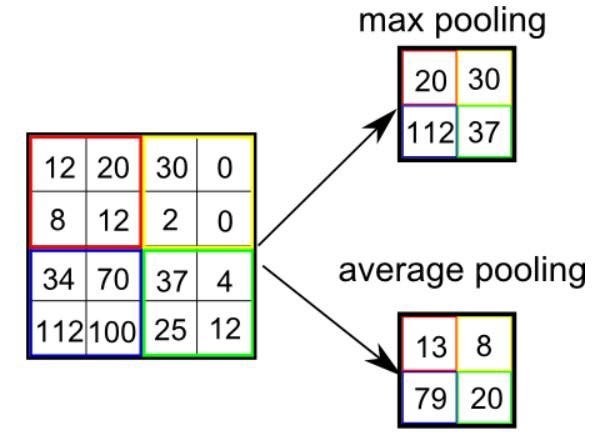
“There are two common types of Pooling: Max Pooling and Average Pooling. Max Pooling returns the maximum value from the portion of the image covered by the filter. On the other hand, Average Pooling returns the average of all the values from the portion of the image covered by the filter.
“共有两种常见的池化类型:最大池化和平均池化。 “最大池化 ”从过滤器覆盖的图像部分返回最大值 。 另一方面,“ 平均池化 ”从过滤器覆盖的图像部分返回所有值的平均值 。
Max Pooling also performs as a Noise Suppressant. It discards the noisy activations altogether and also performs de-noising along with dimensionality reduction. On the other hand, Average Pooling simply performs dimensionality reduction as a noise suppressing mechanism. Hence, we can say that Max Pooling generally performs a lot better than Average Pooling.”
Max Pooling还可以用作噪声抑制器 。 它完全丢弃了嘈杂的激活,并且还执行了降噪以及降维。 另一方面,平均池化仅执行降维作为噪声抑制机制。 因此,可以说, 最大池化通常比平均池化好很多 。”
Passing through the relevant Convolutional and Pooling layers should enable the model to successfully understand the most important features within your image. It is at this stage where we can flatten the data and pass it through a Feed-forward Neural Network to allow the classification into an output category to take place.
通过相关的卷积和池化层应该使模型能够成功理解图像中最重要的特征。 正是在这个阶段,我们可以整理数据并将其通过前馈神经网络传递,以允许分类到输出类别中。
分类-全连接层(FC层) (Classification — Fully Connected Layer (FC Layer))
“Adding a Fully-Connected layer is a (usually) cheap way of learning non-linear combinations of the high-level features as represented by the output of the convolutional layer. The Fully-Connected layer is learning a possibly non-linear function in that space.
“添加全连接层是学习卷积层输出所代表的高级特征的非线性组合的(通常)便宜的方法。 全连接层正在学习该空间中可能存在的非线性函数。
Now that we have converted our input image into a suitable form for our Multi-Level Perceptron, we shall flatten the image into a column vector. The flattened output is fed to a feed-forward neural network and backpropagation applied to every iteration of training. Over a series of epochs, the model is able to distinguish between dominating and certain low-level features in images and classify them using the Softmax Classification technique.”
现在,我们已经将输入图像转换为适合多层感知器的形式,我们将图像展平为列向量。 展平的输出被馈送到前馈神经网络, 反向传播应用于训练的每次迭代。 在一系列时期中,该模型能够区分图像中的主要特征和某些低级特征,并使用Softmax分类技术对其进行分类 。”
项目演练 (Project Walkthrough)
The code for this project has been studied and adapted based on work by Thakshila Dasun — https://github.com/aieml/face-mask-detection-keras.
根据Thakshila Dasun的工作,研究并改编了该项目的代码-https: //github.com/aieml/face-mask-detection-keras 。
1.数据集的获取和探索 (1. Acquisition and exploration of the dataset)
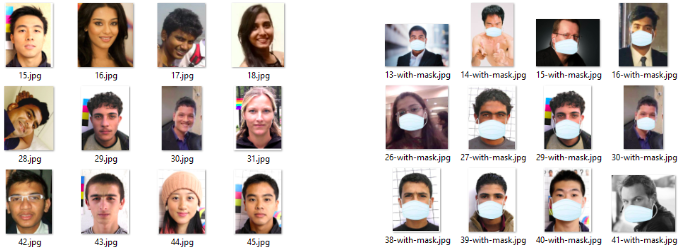
The original dataset that was acquired contained a total of 1,376 images. 690 of these images were of people who were not wearing a face mask, with the remaining 686 images being of people who were wearing a face mask. This dataset was kindly prepared by Prajna Bhandary. To help with better model performance and generalization capability, I have decided to greatly extend this dataset with my own images. The final dataset consisted of a total of 4,814 images — 2,408 for the ‘With a Mask’ class, and 2,406 for the ‘Without a Mask’ class.
原始数据集总共包含1,376张图像。 这些图像中有690张是未戴口罩的人的图像,其余686张图像是戴口罩的人的图像。 该数据集由Prajna Bhandary精心准备。 为了帮助提高模型性能和泛化能力,我决定使用自己的图像大大扩展此数据集。 最终的数据集总共包含4,814张图像-“带遮罩”类别的图像为2408,而“无遮罩”类别的图像为2406。
2.数据预处理 (2. Data Pre-processing)
As previously stated, the pre-processing steps needed within the Computer Vision domain is very minimal. For this project, we took just two preparation steps. These were:
如前所述,Computer Vision域中所需的预处理步骤非常少。 对于此项目,我们仅执行了两个准备步骤。 这些曾经是:
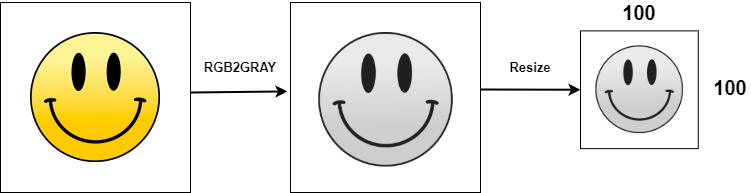
- First, each image was converted from RGB (Red, Green, Blue) to a Grayscale image. Colour images have three channels (one for each colour) while grayscale images just have the one colour channel (the ‘grayness’ of each pixel)首先,将每个图像从RGB(红色,绿色,蓝色)转换为灰度图像。 彩色图像具有三个通道(每种颜色一个),而灰度图像仅具有一个颜色通道(每个像素的“灰度”)
- The images were then resized to help reduce the CNN model complexity, and thus reduce the computational power required to train the model然后调整图像大小,以帮助减少CNN模型的复杂度,从而减少训练模型所需的计算能力
The images were stored in a ‘dataset’ directory which had two folders, one titled ‘with mask’ and one titled ‘without mask’. These folder names became our class labels.
图像存储在“数据集”目录中,该目录有两个文件夹,一个名为“ with mask”,一个名为“ without mask”。 这些文件夹名称成为我们的班级标签。
For each image in both folders, we used the cv2.cvtColor function to convert the BGR image to a Grayscale image. We then used the cv2.resize function to resize our image to dimensions (img_size, img_size). Our img_size parameter was set to 100, and so each image becomes a 100 x 100 square image. The prepared image is appended to the ‘data’ list, and the class label is appended to the ‘target’ list.
对于两个文件夹中的每个图像,我们使用cv2.cvtColor函数将BGR图像转换为灰度图像。 然后,我们使用cv2.resize函数将图像调整为尺寸(img_size,img_size)。 我们的img_size参数设置为100,因此每个图像都变成100 x 100方形图像。 准备好的图像将添加到“数据”列表中,而类标签将添加到“目标”列表中。
To reduce model complexity and optimize training time, we can first convert the ‘data’ list to a more efficient numpy array, and then divide the array by 255 — this will normalise the pixel range to between 0 and 1. The data will have dimensions (no. of images, img_size, img_size, colour channel).
为了降低模型的复杂性并优化训练时间,我们可以先将“数据”列表转换为更有效的numpy数组,然后将该数组除以255-这会将像素范围归一化为0到1。数据将具有尺寸(图像数量,img_size,img_size,颜色通道)。
The ‘target’ list can also be converted to a numpy array and then converted to a one-hot encoding vector. Information on what one-hot encoding is can be found here.
“目标”列表也可以转换为numpy数组,然后转换为一键编码矢量。 关于什么是单编码的信息可以在这里找到。
np.save saves the arrays to a binary file in numpy format.
np.save将数组保存为numpy格式的二进制文件。
3. CNN架构的开发,培训和测试 (3. CNN architecture development, training, and testing)
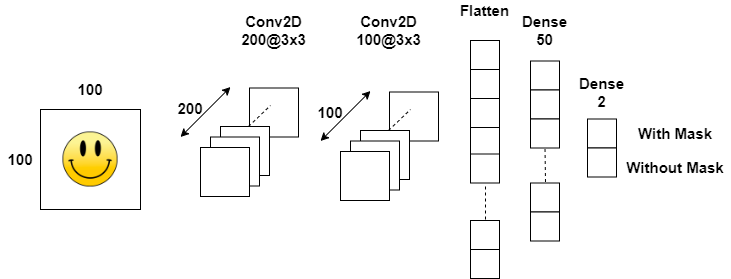
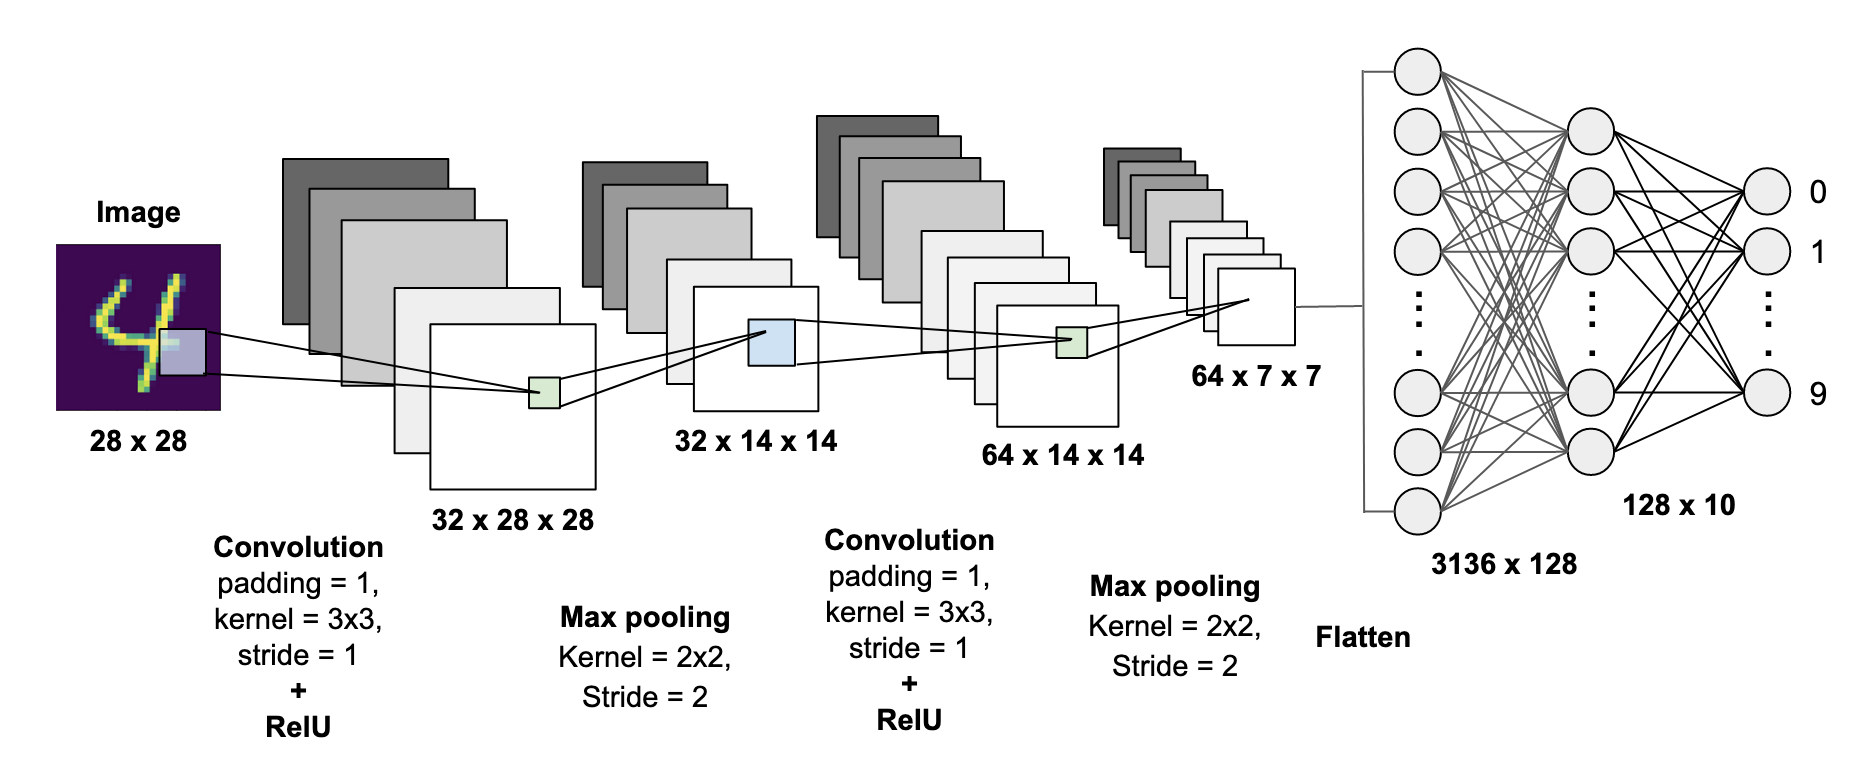
To begin developing the Convolutional Neural Network, we first need to import the required functions from the Keras ML library. The CNN architecture is then defined using a series of the model.add function. The architecture for this project contains:
要开始开发卷积神经网络,我们首先需要从Keras ML库中导入所需的函数。 然后,使用一系列model.add函数定义CNN架构。 该项目的体系结构包含:
- 2 Convolutional Layers, both of which have a 3 x 3 convolutional window and ReLU activation function. The first Conv layer produces 200 feature maps, whereas the second produces 100 feature maps. Stride and Padding has not been altered in this project.2个卷积层,均具有3 x 3卷积窗口和ReLU激活功能。 第一转换层产生200个特征图,而第二层产生100个特征图。 在此项目中,“步幅和填充”没有更改。
- 2 Max Pooling layers, both of which have window sizes of 2 x 2.2个最大池化层,这两个层的窗口大小均为2 x 2。
- 2 Fully-Connected layers (one hidden layer, one output layer). The hidden layer has 50 neurons, and the output layer has only 2 (one for each class). Softmax activation function has been used to calculate the class probabilities.2个全连接层(一个隐藏层,一个输出层)。 隐藏层有50个神经元,输出层只有2个(每个类一个)。 Softmax激活函数已用于计算类别概率。
The model also uses dropout to help prevent overfitting of the model to the training data. More information on this hyper-parameter can be accessed here.
该模型还使用辍学来帮助防止模型过度拟合训练数据。 可以在此处访问有关此超参数的更多信息。
As with every machine learning implementation, the dataset is split into ‘training’ and ‘testing’ subsets. Here, 90% of the data is used to train the model, and 10% is used to test the model.
与每个机器学习实现一样,数据集也分为“训练”和“测试”子集。 在这里,90%的数据用于训练模型,而10%的数据用于测试模型。
The model trains for 20 epochs with the loss and accuracy communicated through the programming interface. 20% of the data is used to validate the model. The best performing model is saved into a project file. As you can see, by epoch 11 the model was able to hit over 99% accuracy and under 0.03 loss on the training data.
该模型训练20个时期,并通过编程界面传达损失和准确性。 20%的数据用于验证模型。 性能最好的模型将保存到项目文件中。 如您所见,到第11阶段,该模型能够达到99%以上的准确性,并且训练数据损失低于0.03。
The loss value for each epoch of training is plotted in the graph above. From about epoch 7 onwards, the loss continues to decrease on the training set, but not on the validation set. This is a sign that the model is starting to overfit to our training data. There are a number of alterations that could be made to help counteract overfitting, however, as we’ll see from below, the model still manages to achieve an impressive accuracy score on the validation data without these alterations in place.
上图中绘制了每个训练时期的损耗值。 从大约第7个时期开始,损失在训练集上继续减少,但在验证集上没有减少。 这表明该模型已开始过拟合我们的训练数据。 可以进行许多更改以帮助抵消过度拟合,但是,正如我们从下面看到的那样,在没有进行这些更改的情况下,该模型仍然可以在验证数据上取得令人印象深刻的准确性得分。
Along with plotting the model’s loss over each epoch, we also plot the model’s accuracy score. This metric tends to average out at about 97% on the validation set, which is an impressive score for the size of the dataset we used to train the model. Testing the model on the actual unseen test data set yielded an accuracy score of 97.71% with a loss of 0.07.
除了绘制每个时期的模型损失外,我们还绘制模型的准确性得分。 该指标在验证集上的平均值通常约为97%,对于我们用来训练模型的数据集的大小而言,这是一个令人印象深刻的分数。 在实际看不见的测试数据集上测试模型的准确性得分为97.71%,损失为0.07。
4.实时网络摄像头提要的模型部署 (4. Model deployment for live webcam feeds)
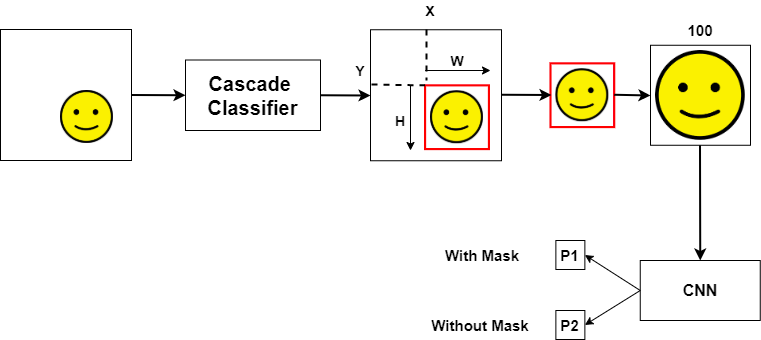
Now that the model has been trained and it’s performance has been evaluated on the unseen images from the test set, we can think about how we want to feed our live webcam images into the model for prediction, and how we would like the prediction to be fed back to the user in a suitable format. All of the images from the webcam feed will need to undergo the same data pre-processing steps that we carried out on the training data, with the additional step of identifying where a face is located within the webcam image. The visual above shows how the webcam feed will be processed from the original image to a cropped “face only” image, to the fully pre-processed image ready for classification.
既然已经对模型进行了训练,并且已经对测试集中看不到的图像进行了性能评估,那么我们可以考虑如何将实时网络摄像头图像输入到模型中进行预测,以及我们希望如何进行预测以适当的格式反馈给用户。 网络摄像头提要中的所有图像都需要进行与训练数据相同的数据预处理步骤,另外还需要识别面部在网络摄像头图像中的位置。 上方的视觉效果显示了如何将网络摄像头提要从原始图像处理为裁剪后的“仅面部”图像,再到经过完全预处理的图像以进行分类。
In terms of the visual feedback from the classification task, we have decided that the output will come in the form of two rectangular boxes (one will have a Green outline if a mask is present, and a Red outline if a mask is not present) and the other will encompass the Class label (‘Mask’ or ‘No Mask’). These boxes will be shown on the live webcam feed around our cropped “face only” image.
根据分类任务的视觉反馈,我们已决定输出将以两个矩形框的形式出现(如果有遮罩,则将有一个绿色轮廓,如果没有遮罩,则将有一个红色轮廓)另一个将包含“类别”标签(“遮罩”或“无遮罩”)。 这些框将显示在实时网络摄像头提要中,并围绕我们裁剪的“仅面部”图像。
We first use Cv2.CascadeClassifier (Haar Cascade Frontal Face) to detect faces within an image. This classifier is a very popular algorithm that can be used to detect single or multiple faces within the image. To learn more about this, you can visit this webpage.
我们首先使用Cv2.CascadeClassifier(Haar级联正面人脸)来检测图像中的人脸。 该分类器是一种非常流行的算法,可用于检测图像中的单个或多个面部。 要了解更多信息,请访问此网页 。
Cv2.VideoCapture(0) indicates that we would like to capture video data from the device’s camera. For this project, I have used the built-in Apple Mac webcam.
Cv2.VideoCapture(0)表示我们想从设备的摄像头捕获视频数据。 对于此项目,我使用了内置的Apple Mac网络摄像头。
I have then defined the labels dictionary (Mask or No Mask) and the colour dictionary (Red if No Mask, Green if Mask).
然后,我定义了标签字典(遮罩或无遮罩)和颜色字典(如果没有遮罩则为红色,如果蒙版则为绿色)。
While the webcam feed is live, we used source.read() to take in each individual image from the video, we then use Cv2.cvtColor to convert the image from an BGR image to a Grayscale image, and then split all the detected faces out into their individual items of data.
在网络摄像头feed处于直播状态时,我们使用source.read()从视频中获取每个单独的图像,然后使用Cv2.cvtColor将图像从BGR图像转换为灰度图像,然后分割所有检测到的脸部分解成各自的数据项。
For each x,y co-ordinate, and width and height of the detected faces, we crop the image to include just the face only and then resize it dimensions to 100 x 100 which is the same as our training images. We also convert this to a numpy array and then divide all pixel values by 255 to normalise the pixel value range.
对于每个x,y坐标以及检测到的脸部的宽度和高度,我们将图像裁剪为仅包括脸部,然后将其尺寸调整为100 x 100,这与我们的训练图像相同。 我们还将其转换为numpy数组,然后将所有像素值除以255以归一化像素值范围。
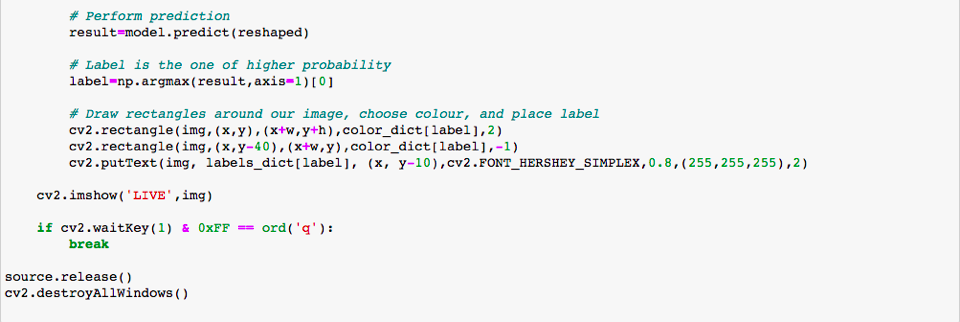
The image has now been fully prepared and is ready to be classified by the algorithm. model.predict is the line of code that evaluates the image and receives a classification decision. The visual rectangle feedback and output label is chosen based on the classification result, and this is overlayed on the webcam feed (as shown below).
图像已经准备好,可以通过算法进行分类。 model.predict是评估图像并接收分类决策的代码行。 根据分类结果选择可视矩形反馈和输出标签,并将其叠加在网络摄像头提要上(如下所示)。
翻译自: https://medium.com/@tomstaite1/face-mask-detection-algorithm-using-convolutional-neural-network-ai-computer-vision-15f08988533e
人脸检测卷积神经网络
http://www.taodudu.cc/news/show-4246323.html
相关文章:
- 神仙打架看不懂?用人话解读NIPS神经网络攻防赛清华三连冠团队模型算法
- TYPEC 转HDMI VGA+PD+ USB3.0 HUB+TF/CF/SD+RJ45等多功能扩展坞方案设计资料|TYPE-C转HDMI转VGA带PD USB3.0多功能拓展器方案介绍
- [Camera]摄像头图像处理及色彩模型
- 动态功能连接:前景、问题和解释
- 用于图像降噪的卷积自编码器
- Linux下串口编制【转】
- Linux应用基础——串口应用编程
- 第三篇 香橙派的外设开发基础(中)— 串口篇
- centos7 串口配置修改_Linux串口参数设置
- Ubuntu中shell命令-(4)-echo/tar/which/whereis/ps/kill/top/df/du
- 串口调试小节之五 串口参数设置查询
- Linux串口编程select方式
- Linux串口通信之termios结构体说明
- linux串口操作及设置
- 3-3 uniapp、HTML5+、Native.js 功能代码汇总
- Android项目大全
- 为用户提供确定性——互联网平台建设
- 数据建模太难?全美一等奖得主,带你从入门到超神!
- 电梯测试震动软件,保证质量电梯振动分析仪
- 新时达电梯服务器维修,常见的新时达电梯维修时问题分析
- 如何测试电梯?
- 电梯模拟系统
- 2022年电梯考试电梯检验员练习题及答案
- 支付宝第三方支付保证数据的安全性
- springboot+调用支付宝第三方接口(沙箱环境)
- 支付宝第三方支付接口java调用详细文档
- 股票期权 【小白手册】(含大量图解)
- 【航线运输驾驶员理论考试】气象学
- Python将一个正整数分解质因数。例如:输入90,打印出90=2*3*3*5。
- python 将一个正整数分解质因数。例如:输入90,打印出90=2*3*3*5。
人脸检测卷积神经网络_卷积神经网络和计算机视觉的人脸面具检测算法相关推荐
- 卷积网络和卷积神经网络_卷积神经网络的眼病识别
卷积网络和卷积神经网络 关于这个项目 (About this project) This project is part of the Algorithms for Massive Data cour ...
- cnn卷积神经网络_卷积神经网络(CNN)原理及应用
一.CNN原理 卷积神经网络(CNN)主要是用于图像识别领域,它指的是一类网络,而不是某一种,其包含很多不同种结构的网络.不同的网络结构通常表现会不一样.从CNN的一些典型结构中,可以看到这些网络创造 ...
- 卷积云神经网络_卷积神经网络简介
广告 一.卷积 我们在 2 维上说话.有两个 的函数 f(x, y) 和 g(x, y) .所谓 f 和 g 的卷积就是一个新的 的函数 c(x, y) .通过下式得到: 这式子的含义是:遍览从负无穷 ...
- 矩阵一维卷积c++_深度神经网络卷积层计算加速与优化
01 传统卷积层计算 首先我们定义符号F()函数为卷积函数 一维卷积:F(n,m) n代表输出的维度,m代表滤波器的维度 二维卷积:F(n*m,r*s) n*m代表输出的维度,r*s代表滤波器的维度 ...
- 模型 标签数据 神经网络_大型神经网络和小数据的模型选择
模型 标签数据 神经网络 The title statement is certainly a bold claim, and I suspect many of you are shaking yo ...
- rnn 递归神经网络_递归神经网络rnn的简单解释
rnn 递归神经网络 Recurrent neural network is a type of neural network used to deal specifically with seque ...
- 人工神经网络_人工神经网络实践
人工神经网络(Artificial Neural Network,ANN) 使一种受人脑生物神经网络信息处理方式启发而诞生的一种计算模型,得益于语音识别.计算机视觉和文本处理方面的许多突破性成果,人工 ...
- 检测对抗样本_避免使用对抗性T恤进行检测
检测对抗样本 How can just wearing a specific type of t-shirt make you invisible to the person detection an ...
- 卷积云神经网络_卷积神经网络
阅读提醒,本文以严谨为主,兼顾理解. 目标 介绍CNNs的基础结构和训练方法. 理解本文所需知识: 高中数学,高中语文 完全读懂本文所需知识: 微积分,线性代数 为了大众阅读,在英文第一次出现的时候, ...
最新文章
- 电信用户流失预测案例(2)(特征工程)
- 电路板必须用c语言编程吗,上大学才知道绿油油的板子叫PCB,如何成为一名电子工程师...
- Fiddler插件开发 - 实现网站离线浏览功能
- ssh连接出现:WARNING: REMOTE HOST IDENTIFICATION HAS CHANGED!
- 为什么说Java中只有值传递(另一种角度)
- C++ STL之Set
- mysql中正则表达式的用法_mysql之正则表达式的用法
- 后序遍历的非递归算法python_Python非递归实现二叉树的后续遍历
- Codeforces Round #503 (by SIS, Div. 2) C. Elections
- Quartus II软件的使用
- mysql bcnf_bcnf范式
- android中slider控件,VideoRangeSlider视频裁剪控件
- 程序员加油站 -- 不是人人都懂的学习要点
- 计算机函数countifs使用,countifs函数的使用方法
- 在IDEA中更改项目名(project)
- 余涛-Kinect技术在企业级的应用及展望
- 从零基础到web前端工程师(三)
- 【汽车制造业】“新三化+新能源”蓝海,加速车企数字化转型进入“深水区”
- 翻译图片中文字的网站
- Vue2 轮播图组件 原生slide组件