使用Bitbucket Cloud学习Git
This article was sponsored by Bitbucket. Thank you for supporting the sponsors who make SitePoint possible.
本文由Bitbucket赞助。 感谢您支持使SitePoint成为可能的赞助商。
目的 (Objective)
Learn the basics of Git with this space themed tutorial.
通过此空间主题教程,学习Git的基础知识。
任务简介 (Mission Brief)
Your mission is to learn the ropes of Git by completing the tutorial and tracking down all your team’s space stations. Commands covered in this tutorial:
您的任务是通过完成本教程并跟踪团队所有空间站来学习Git的绳索。 本教程介绍的命令:
- git clone, git config, git add, git status, git commit, git push, git pull, git branch, git checkout, and git mergegit clone,git config,git add,git status,git commit,git push,git pull,git branch,git checkout和git merge
| Time | Audience | Prerequisites |
|---|---|---|
| 30 minutes | You are new to Git and Bitbucket Cloud | You have installed Git |
| You have a Bitbucket account |
| 时间 | 听众 | 先决条件 |
|---|---|---|
| 30分钟 | 您是Git和Bitbucket Cloud的新手 | 您已经安装了Git |
| 您有一个Bitbucket帐户 |
创建一个Git仓库 (Create a Git Repository)
As our new Bitbucket space station administrator, you need to be organized. When you make files for your space station, you’ll want to keep them in one place and shareable with teammates, no matter where they are in the universe. With Bitbucket, that means adding everything to a repository. Let’s create one!
作为我们新的Bitbucket空间站管理员,您需要组织起来。 当您为空间站制作文件时,无论文件在宇宙中的什么位置,您都希望将它们保存在一个位置并与队友共享。 使用Bitbucket,这意味着将所有内容添加到存储库中。 让我们创建一个!
Some fun facts about repositories
有关存储库的一些有趣的事实
- You have access to all files in your local repository, whether you are working on one file or multiple files.无论您正在处理一个文件还是多个文件,您都可以访问本地存储库中的所有文件。
- You can view public repositories without a Bitbucket account if you have the URL for that repository.如果您拥有公共存储库的URL,则可以查看该存储库而无需Bitbucket帐户。
- Each repository belongs to a user account or a team. In the case of a user account, that user owns the repository. + In the case of a team, that team owns it.每个存储库都属于一个用户帐户或一个团队。 对于用户帐户,该用户拥有存储库。 +如果是团队,则由该团队拥有。
- The repository owner is the only person who can delete the repository. If the repository belongs to a team, an admin can delete the repository.存储库所有者是唯一可以删除存储库的人。 如果存储库属于团队,则管理员可以删除该存储库。
- A code project can consist of multiple repositories across multiple accounts but can also be a single repository from a single account.代码项目可以包含多个帐户中的多个存储库,但也可以是单个帐户中的单个存储库。
- Each repository has a 2 GB size limit, but we recommend keeping your repository no larger than 1 GB.每个存储库都有2 GB的大小限制,但是我们建议您将存储库的大小限制为不超过1 GB。
步骤1.创建存储库 (Step 1. Create the repository)
Initially, the repository you create in Bitbucket is going to be empty without any code in it. That’s okay because you will start adding some files to it soon. This Bitbucket repository will be the central repository for your files, which means that others can access that repository if you give them permission. After creating a repository, you’ll copy a version to your local system—that way you can update it from one repo, then transfer those changes to the other.
最初,您在Bitbucket中创建的存储库将为空,其中没有任何代码。 没关系,因为您很快就会开始向其中添加一些文件。 该Bitbucket存储库将是您文件的中央存储库,这意味着如果您授予其他人许可,其他人也可以访问该存储库。 创建存储库后,您将一个版本复制到本地系统,这样您就可以从一个存储库中更新它,然后将那些更改转移到另一个存储库中。

Do the following to create your repository:
执行以下操作创建您的存储库:
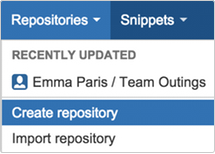
From Bitbucket, click Repositories > Create repository button at the top of the page.
在Bitbucket中,单击页面顶部的“ 存储库”>“创建存储库”按钮。
The system displays the Create a new repository page. Take some time to review the dialog’s contents. With the exception of the Repository type, everything you enter on this page you can later change.
系统显示创建新存储库页面。 花一些时间查看对话框的内容。 除“存储库”类型外,您在此页面上输入的所有内容都可以稍后更改。
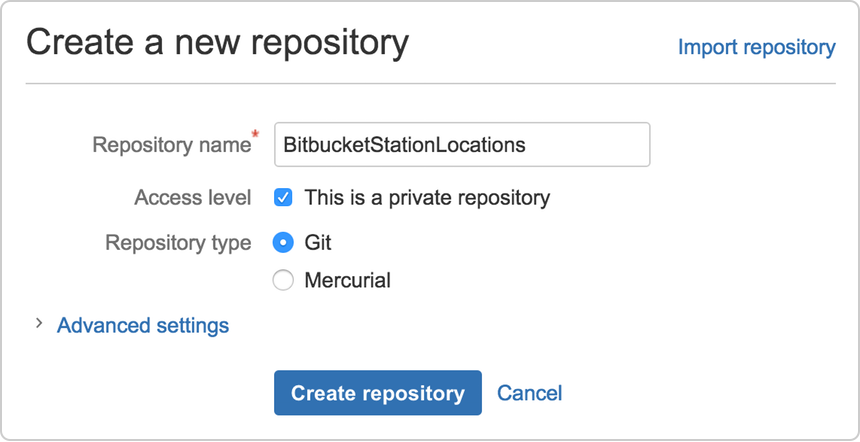
Enter
BitbucketStationLocationsfor the Name field. Bitbucket uses this Name in the URL of the repository. For example, if the userthe_besthas a repository calledawesome_repo, the URL for that repository would behttps://bitbucket.org/the_best/awesome_repo.在“ 名称”字段中输入
BitbucketStationLocations。 Bitbucket在存储库的URL中使用此名称 。 例如,如果用户the_best具有一个名为awesome_repo的存储库,则该存储库的URL将为https://bitbucket.org/the_best/awesome_repo。For Access level, leave the This is a private repository box checked. A private repository is only visible to you and those you give access to. If this box is unchecked, everyone can see your repository.
对于访问级别 ,请选中 “ 这是一个专用存储库”框 。 私有存储库仅对您和您授予访问权限的用户可见。 如果未选中此框,则每个人都可以看到您的存储库。
Pick Git for the Repository type. Keep in mind that you can’t change the repository type after you click Create repository.
选择Git作为存储库类型 。 请记住,点击创建存储库后,您将无法更改存储库类型。
Click Create repository. Bitbucket creates your repository and displays its Overview page.
单击创建存储库 。 Bitbucket创建您的存储库并显示其“ 概述”页面。
步骤2.探索您的新存储库 (Step 2. Explore your new repository)
Take some time to explore the repository you have just created. You should be on the repository’s Overview page:
花一些时间来浏览刚刚创建的存储库。 您应该在存储库的“ 概述”页面上:
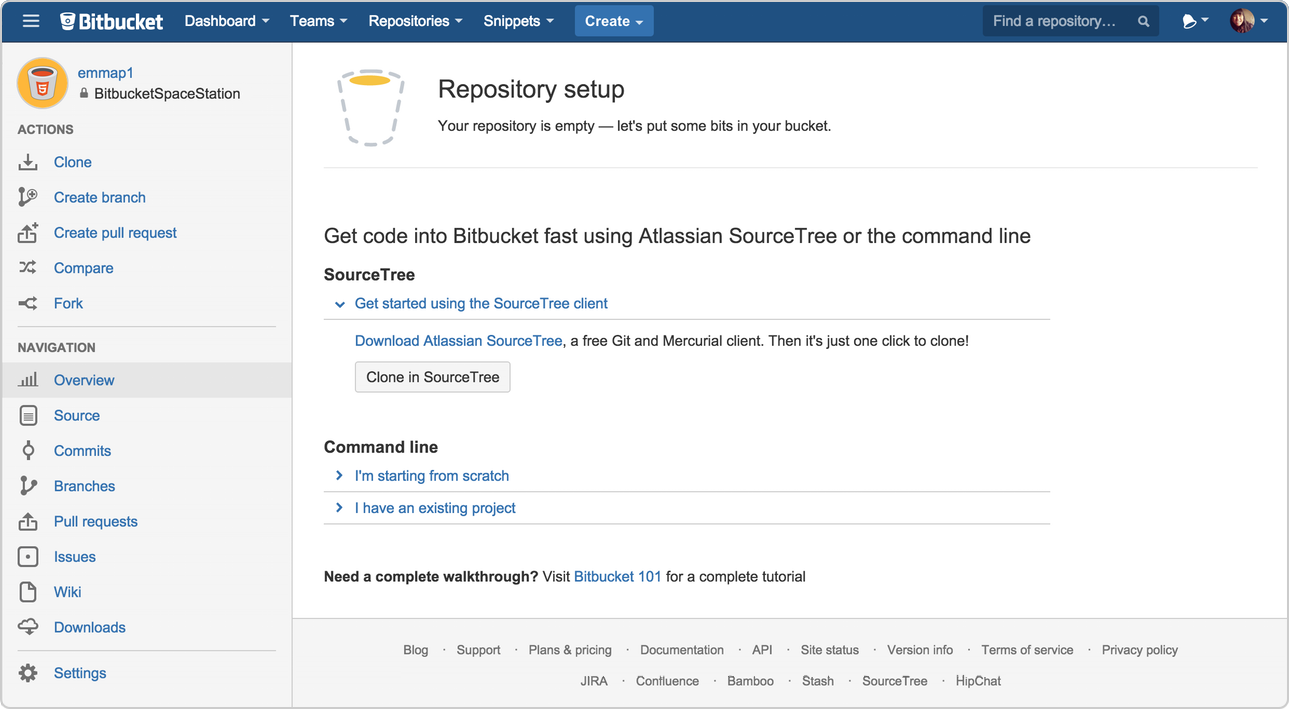
Click items on the Navigation menu to see what is behind each one. To view the shortcuts available to navigate these items, press the ? key on your keyboard.
单击导航菜单上的项目以查看每个项目背后的内容。 要查看可用于浏览这些项目的快捷方式,请按?。 键盘上的琴键。
When you click the Commits option on the menu bar, you find that you have no commits because you have not created any content for your repository. Your repository is private and you have not invited anyone to the repository, so the only person who can create or edit the repository’s content right now is you, the repository owner.
当您单击菜单栏上的“ 提交”选项时,您发现没有提交,因为尚未为存储库创建任何内容。 您的存储库是私有的,您没有邀请任何人加入存储库,因此,当前唯一可以创建或编辑存储库内容的人就是您,存储库所有者。
复制您的Git存储库并添加文件 (Copy Your Git Repository and Add Files)
Now that you have a place to add and share your space station files, you need a way to get to it from your local system. To set that up, you want to copy the Bitbucket repository to your system. Git refers to copying a repository as “cloning” it. When you clone a repository, you create a connection between the Bitbucket server (which Git knows as origin) and your local system.
现在您已经拥有添加和共享空间站文件的位置,您需要一种从本地系统访问该文件的方法。 要进行设置,您需要将Bitbucket存储库复制到系统中。 Git将复制存储库称为“克隆”它。 克隆存储库时,将在Bitbucket服务器(Git知道它是源服务器)和本地系统之间创建连接。

You are about to use a whole bunch of Git and non-Git commands from a terminal. If you’ve never used the command line before, learn where to find it at The Command Line Crash Course.
您将在终端上使用一堆Git和非Git命令。 如果您以前从未使用过命令行,请在“命令行崩溃课程”中了解在哪里找到它 。
步骤1.将存储库克隆到本地系统 (Step 1. Clone your repository to your local system)
Open a browser and a terminal window from your desktop. After opening the terminal window, do the following:
从桌面打开浏览器和终端窗口。 打开终端窗口后,请执行以下操作:
Navigate to your home (~) directory.
导航到主目录(〜)。
$ cd ~As you use Bitbucket more, you will probably work in multiple repositories. For that reason, it’s a good idea to create a directory to contain all those repositories.
随着更多地使用Bitbucket,您可能会在多个存储库中工作。 因此,最好创建一个目录来包含所有这些存储库。
Create a directory to contain your repositories.
创建一个目录以包含您的存储库。
$ mkdir reposFrom the terminal, update the directory you want to work in to your new repos directory.
在终端上,将要使用的目录更新为新的repos目录。
$ cd ~/reposFrom Bitbucket, go to your BitbucketStationLocations repository.
从Bitbucket,转到您的BitbucketStationLocations存储库。
Click Clone.
单击克隆 。
The system displays a pop-up clone dialog. By default, the clone dialog sets the protocol to HTTPS or SSH, depending on your settings. For the purposes of this tutorial, don’t change your default protocol.
系统显示一个弹出克隆对话框。 默认情况下,克隆对话框根据您的设置将协议设置为HTTPS或SSH。 就本教程而言,请勿更改默认协议。

- Copy the highlighted clone command.复制突出显示的克隆命令。
From your terminal window, paste the command you copied from Bitbucket and press Return.
在终端窗口中,粘贴从Bitbucket复制的命令,然后按Return键。
Enter your Bitbucket password when the terminal asks for it. If you created an account by linking to Google, use your password for that account.
在终端要求时输入您的Bitbucket密码。 如果您通过链接到Google创建了帐户,请使用该帐户的密码。
If you experience a Windows password error:
如果您遇到Windows密码错误:
In some versions of Microsoft Windows operating system and Git you might see an error similar to the one in the following example.
在某些版本的Microsoft Windows操作系统和Git中,您可能会看到与以下示例中的错误类似的错误。
In some versions of Microsoft Windows operating system and Git you might see an error similar to the one in the following example.Windows clone password error example
在某些版本的Microsoft Windows操作系统和Git中,您可能会看到与以下示例中的错误类似的错误。 Windows克隆密码错误示例
$ git clone https://emmap1@bitbucket.org/emmap1/bitbucketstationlocations.git Cloning into 'bitbucketspacestation'... fatal: could not read Password for 'https://emmap1@bitbucket.org': No such file or directoryIf you get this error, enter the following at the command line:
如果出现此错误,请在命令行中输入以下内容:
$ git config --global core.askpass- Then go back to step 4 and repeat the clone process. The bash agent should now prompt you for your password. You should only have to do this once.然后返回到步骤4并重复克隆过程。 bash代理现在应提示您输入密码。 您只需要这样做一次。
At this point, your terminal window should look similar to this:
此时,您的终端窗口应类似于以下内容:
$ cd ~/repos
$ git clone https://emmap1@bitbucket.org/emmap1/bitbucketstationlocations.git Cloning into 'bitbucketstationlocations'... Password warning: You appear to have cloned an empty repository.
You already knew that your repository was empty right? Remember that you have added no source files to it yet.
您已经知道您的存储库是空的,对吗? 请记住,您尚未添加任何源文件。
List the contents of your repos directory and you should see your
bitbucketstationlocationsdirectory in it.列出您的repos目录的内容,您应该在其中看到您的
bitbucketstationlocations目录。$ ls
Congratulations! You’ve cloned your repository to your local system.
恭喜你! 您已将存储库克隆到本地系统。
步骤2.将文件添加到本地存储库并将其放在Bitbucket上 (Step 2. Add a file to your local repository and put it on Bitbucket)
With the repository on your local system, it’s time to get to work. You want to start keeping track of all your space station locations. To do so, let’s create a file about all your locations.
有了本地系统上的存储库,就可以开始工作了。 您想开始跟踪所有空间站的位置。 为此,我们创建一个有关您所有位置的文件。
Go to your terminal window and navigate to the top level of your local repository.
转到终端窗口,然后导航到本地存储库的顶层。
$ cd ~/repos/bitbucketstationlocations/Enter the following line into your terminal window to create a new file with content.
在您的终端窗口中输入以下行以创建一个包含内容的新文件。
$ echo "Earth's Moon" >> locations.txtIf the command line doesn’t return anything, it means you created the file correctly!
如果命令行未返回任何内容,则表明您正确创建了文件!
Get the status of your local repository. The git status command tells you about how your project is progressing in comparison to your Bitbucket repository.
获取本地存储库的状态。 git status命令告诉您与Bitbucket存储库相比,项目的进展情况。
At this point, Git is aware that you created a new file, and you’ll see something like this:
至此,Git意识到您已经创建了一个新文件,并且您将看到类似以下内容的内容:
$ git status On branch master Initial commit Untracked files: (use "git add ..." to include in what will be committed) locations.txt nothing added to commit but untracked files present (use "git add" to track)The file is untracked, meaning that Git sees a file not part of a previous commit. The status output also shows you the next step: adding the file.
该文件未跟踪,这意味着Git看到的文件不是先前提交的一部分。 状态输出还会显示下一步:添加文件。
Tell Git to track your new
locations.txtfile using the git add command. Just like when you created a file, the git add command doesn’t return anything when you enter it correctly.告诉Git使用git add命令跟踪新的
locations.txt文件。 就像创建文件时一样,正确输入git add命令不会返回任何内容。$ git add locations.txtThe
git addcommand moves changes from the working directory to the Git staging area. The staging area is where you prepare a snapshot of a set of changes before committing them to the official history.git add命令将更改从工作目录移动到Git暂存区域。 在暂存区域中,您可以在将更改提交到正式历史记录之前准备一组更改的快照。
Check the status of the file.
检查文件的状态。
$ git status On branch master Initial commit Changes to be committed: (use "git rm --cached <file>..." to unstage) new file: locations.txtNow you can see the new file has been added (staged) and you can commit it when you are ready. The
git statuscommand displays the state of the working directory and the staged snapshot.现在,您可以看到已添加(暂存)新文件,并且可以在准备就绪时提交它。
git status命令显示工作目录和暂存快照的状态。Issue the git commit command with a commit message, as shown on the next line. The -m indicates that a commit message follows.
发出带有提交消息的git commit命令,如下一行所示。 -m指示后面有一个提交消息。
$ git commit -m 'Initial commit' [master (root-commit) fedc3d3] Initial commit 1 file changed, 1 insertion(+) create mode 100644 locations.txtThe
git committakes the staged snapshot and commits it to the project history. Combined withgit add, this process defines the basic workflow for all Git users.git commit会获取暂存的快照并将其提交到项目历史记录。 结合git add,此过程定义了所有Git用户的基本工作流程。
Up until this point, everything you have done is on your local system and invisible to your Bitbucket repository until you push those changes.
到目前为止,您所做的一切都在本地系统上,并且在您推送这些更改之前对Bitbucket存储库不可见。
Learn a bit more about Git and remote repositories
了解更多有关Git和远程存储库的信息
- Git’s ability to communicate with remote repositories (in your case, Bitbucket is the remote repository) is the foundation of every Git-based collaboration workflow.Git与远程存储库(在您的情况下,Bitbucket是远程存储库)进行通信的能力是每个基于Git的协作工作流程的基础。
Git’s collaboration model gives every developer their own copy of the repository, complete with its own local history and branch structure. Users typically need to share a series of commits rather than a single changeset. Instead of committing a changeset from a working copy to the central repository, Git lets you share entire branches between repositories.
Git的协作模型为每个开发人员提供了自己的存储库副本,并带有自己的本地历史记录和分支结构。 用户通常需要共享一系列提交,而不是单个变更集。 Git允许您在存储库之间共享整个分支,而不是将更改集从工作副本提交到中央存储库。

- You manage connections with other repositories and publish local history by “pushing” branches to other repositories. You see what others have contributed by “pulling” branches into your local repository.您可以管理与其他存储库的连接,并通过将分支“推”到其他存储库来发布本地历史记录。 您会看到其他人通过将分支“拉”入本地存储库而做出了什么贡献。
Go back to your local terminal window and send your committed changes to Bitbucket using git push origin master. This command specifies that you are pushing to the master branch (the branch on Bitbucket) on origin (the Bitbucket server).
返回本地终端窗口,并使用git push origin master将已提交的更改发送到Bitbucket。 此命令指定您要推送到原始服务器(Bitbucket服务器)上的主分支(Bitbucket上的分支)。
You should see something similar to the following response:
您应该看到类似于以下响应的内容:
$ git push origin master Counting objects: 3, done. Writing objects: 100% (3/3), 253 bytes | 0 bytes/s, done. Total 3 (delta 0), reused 0 (delta 0) To https://emmap1@bitbucket.org/emmap1/bitbucketstationlocations.git * [new branch] master -> master Branch master set up to track remote branch master from origin.Your commits are now on the remote repository (origin).
您的提交现在位于远程存储库(源)上。

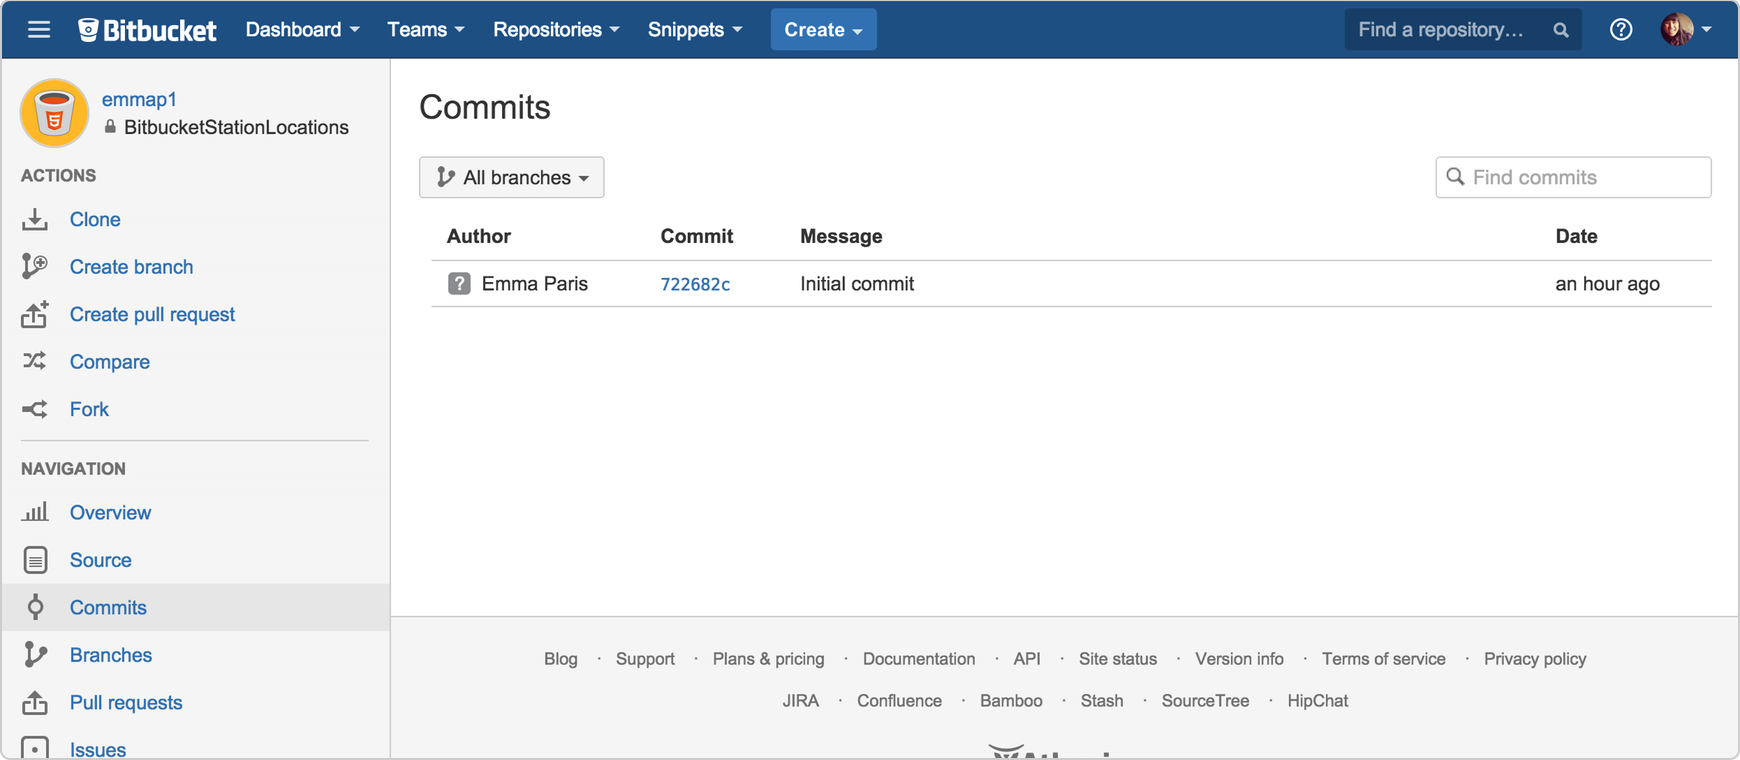
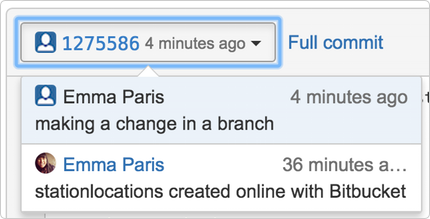
Go to your BitbucketStationLocations repository on Bitbucket and click the Commits item on the menu bar.
转到Bitbucket上的BitbucketStationLocations存储库,然后单击菜单栏上的“ 提交”项。
You should see a single commit on your repository. Bitbucket combines all the things you just did into that commit and shows it to you. You can see that the Author column shows the value you used when you configured the Git global file ( ~/.gitconfig).
您应该在存储库上看到一个提交。 Bitbucket将您刚刚完成的所有操作组合到该提交中,并向您显示。 您可以看到“作者”列显示了您配置Git全局文件(〜/ .gitconfig)时使用的值。
Click the Source option.
单击源选项。
You should see that you have a single source file in your repository, the locations.txt file you just added.
您应该看到存储库中只有一个源文件,即刚刚添加的locations.txt文件。
Remember how the repository looked when you first created it? It probably looks a bit different now.
还记得第一次创建存储库时的外观吗? 现在看起来可能有些不同。
从Bitbucket Cloud上的Git存储库中提取更改 (Pull Changes From Your Git Repository on Bitbucket Cloud)
Next on your list of space station administrator activities, you need a file with more details about your locations. Since you don’t have many locations at the moment, you are going to add them right from Bitbucket.
在空间站管理员活动列表的下一步,您需要一个文件,其中包含有关您的位置的更多详细信息。 由于您目前没有太多位置,因此您将直接从Bitbucket添加它们。
步骤1.在Bitbucket中创建文件 (Step 1. Create a file in Bitbucket)
To add your new locations file, do the following:
要添加新的位置文件,请执行以下操作:
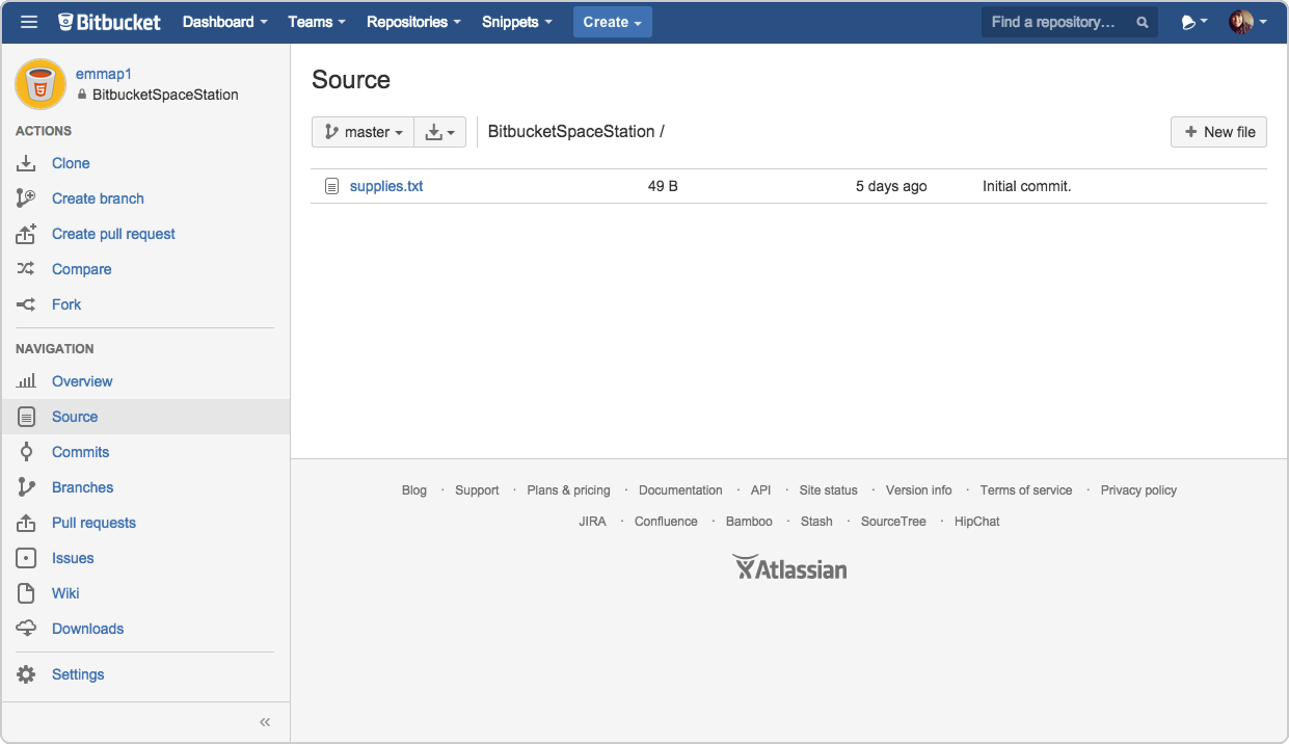
From your BitbucketStationLocations repository, click Source to open the source directory. Notice you only have one file,
locations.txt, in your directory.在您的BitbucketStationLocations存储库中,单击“ 源”以打开源目录。 请注意,目录中只有一个文件
locations.txt。
From the Source page, click New file in the top right corner. This button only appears after you have added at least one file to the repository.
在“ 源”页面中,单击右上角的“ 新建文件 ”。 仅在将至少一个文件添加到资源库后,此按钮才会出现。
A page for creating the new file opens, as shown in the following image.
如下图所示,将打开一个用于创建新文件的页面。
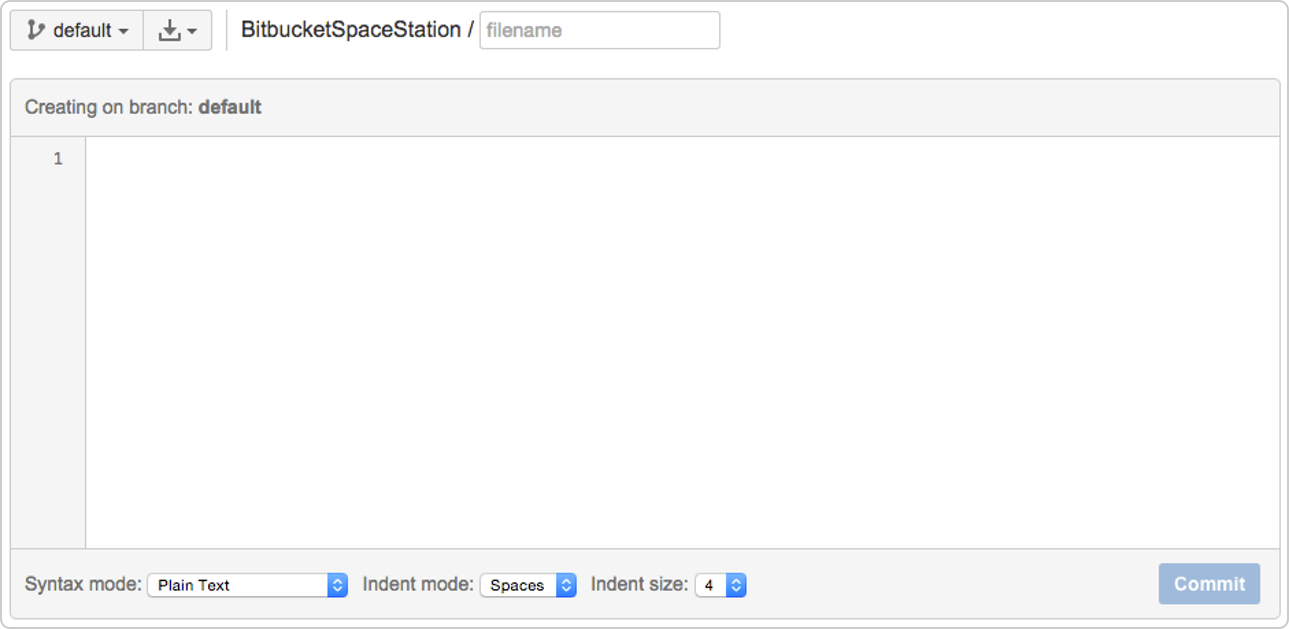
Enter
stationlocationsin the filename field.在文件名字段中输入
stationlocations。Select HTML from the Syntax mode list.
从语法模式列表中选择HTML 。
Add the following HTML code into the text box:
将以下HTML代码添加到文本框中:
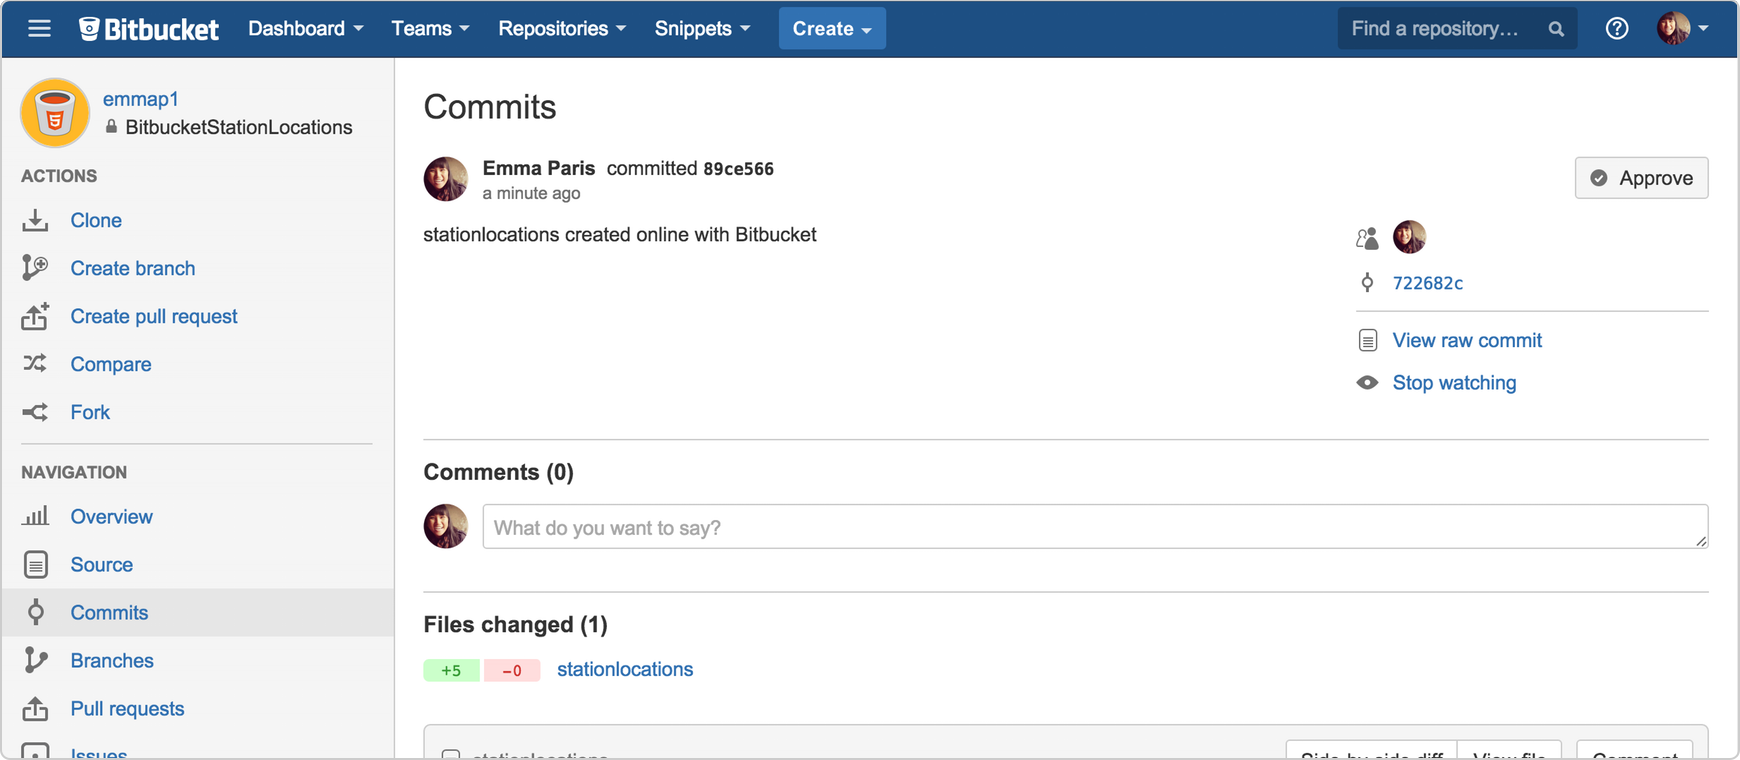
<p>Bitbucket has the following space stations:</p> <p> <b>Earth's Moon</b><br> Headquarters </p>Click Commit. The Commit message field appears with the message:
点击提交 。 出现“ 提交消息”字段,并显示以下消息:
stationlocations created online with Bitbucket.Click Commit under the message field.
单击消息字段下的提交 。
You now have a new file in Bitbucket! You are taken to a page with details of the commit, where you can see the change you just made:
您现在在Bitbucket中有一个新文件! 您将转到包含提交详细信息的页面,您可以在其中看到刚刚进行的更改:
If you want to see a list of the commits you’ve made so far, click the Commits link on the left side.
如果要查看到目前为止已完成的提交的列表,请单击左侧的“ 提交”链接。
步骤2.从远程存储库中提取更改 (Step 2. Pull changes from a remote repository)
Now we need to get that new file into your local repository. The process is pretty straight forward, basically just the reverse of the push you used to get the locations.txt file into Bitbucket.
现在,我们需要将该新文件放入本地存储库。 该过程非常简单,基本上与您用来将locations.txt文件导入Bitbucket的推送相反。
To pull the file into your local repository, do the following:
要将文件拉入本地存储库,请执行以下操作:
Open your terminal window and navigate to the top level of your local repository.
打开终端窗口,然后导航到本地存储库的顶层。
$ cd ~/repos/bitbucketstationlocations/Enter the
git pull --allcommand to pull all the changes from Bitbucket. (In more complex branching workflows, pulling and merging all changes might not be appropriate .) Enter your Bitbucket password when asked for it. Your terminal should look similar to the following:输入
git pull --all命令从Bitbucket中提取所有更改。 (在更复杂的分支工作流程中,不适合进行所有更改的合并。)在询问时输入您的Bitbucket密码。 您的终端应类似于以下内容:$ git pull --all Fetching origin remote: Counting objects: 3, done. remote: Compressing objects: 100% (3/3), done. remote: Total 3 (delta 0), reused 0 (delta 0) Unpacking objects: 100% (3/3), done. From https://bitbucket.org/emmap1/bitbucketstationlocations fe5a280..fcbeeb0 master -> origin/master Updating fe5a280..fcbeeb0 Fast-forward stationlocations | 5 ++++++++++++++ 1 file changed, 5 insertions(+) create mode 100644 stationlocationsThe git pull command merges the file from your remote repository (Bitbucket) into your local repository with a single command.
git pull命令使用一个命令将文件从远程存储库(Bitbucket)合并到本地存储库中。

- Navigate to your repository folder on your local system and you’ll see the file you just added.导航到本地系统上的存储库文件夹,您将看到刚添加的文件。
Fantastic! With the addition of the two files about your space station location, you have performed the basic Git workflow (clone, add, commit, push, and pull) between Bitbucket and your local system.
太棒了! 通过添加有关空间站位置的两个文件,您已经在Bitbucket和您的本地系统之间执行了基本的Git工作流程(克隆,添加,提交,推送和拉取)。
使用Git分支合并文件 (Use a Git Branch to Merge a File)
Being a space station administrator comes with certain responsibilities. Sometimes you’ll need to keep information locked down, especially when mapping out new locations in the solar system. Learning branches will allow you to update your files and only share the information when you’re ready.
作为空间站管理员要承担某些责任。 有时您需要保持信息锁定状态,特别是在绘制太阳系中的新位置时。 学习分支将使您可以更新文件,并且仅在准备就绪时才共享信息。
Branches are most powerful when you’re working on a team. You can work on your own part of a project from your own branch, pull updates from Bitbucket, and then merge all your work into the main branch when it’s ready. Our documentation includes more explanation of why you would want to use branches.
在团队中工作时,分支机构最强大。 您可以从自己的分支机构中处理项目,从Bitbucket中提取更新,然后在准备就绪时将所有工作合并到主分支中。 我们的文档包含有关为什么要使用分支的更多说明。
A branch represents an independent line of development for your repository. Think of it as a brand-new working directory, staging area, and project history. Before you create any new branches, you automatically start out with the main branch (called master). For a visual example, this diagram shows the master branch and the other branch with a bug fix update.
分支代表您的存储库的独立开发线。 可以将其视为全新的工作目录,暂存区和项目历史记录。 在创建任何新分支之前,您将自动从主分支(称为主分支)开始。 对于一个直观的示例,此图显示了master分支和另一个具有bug修复更新的分支。

步骤1.创建分支并进行更改 (Step 1. Create a branch and make a change)
Create a branch where you can add future plans for the space station that you aren’t ready to commit. When you are ready to make those plans known to all, you can merge the changes into your Bitbucket repository and then delete the no-longer-needed branch.
创建一个分支,您可以在其中添加尚未准备提交的空间站的未来计划。 当您准备好让所有人都知道这些计划时,可以将更改合并到Bitbucket存储库中,然后删除不再需要的分支。
It’s important to understand that branches are just pointers to commits. When you create a branch, all Git needs to do is create a new pointer—it doesn’t create a whole new set of files or folders. Before you begin, your repository looks like this:
重要的是要理解分支只是指向提交的指针。 创建分支时,Git所需要做的就是创建一个新的指针-它不会创建一组全新的文件或文件夹。 在开始之前,您的存储库如下所示:

To create a branch, do the following:
要创建分支,请执行以下操作:
Go to your terminal window and navigate to the top level of your local repository using the following command:
转到终端窗口,并使用以下命令导航到本地存储库的顶层:
$ cd ~/repos/bitbucketstationlocations/Create a branch from your terminal window.
从您的终端窗口中创建一个分支。
$ git branch future-plansThis command creates a branch but does not switch you to that branch, so your repository looks something like this:
此命令将创建一个分支,但不会将您切换到该分支,因此您的存储库如下所示:

The repository history remains unchanged. All you get is a new pointer to the current branch. To begin working on the new branch, you have to check out the branch you want to use.
存储库历史记录保持不变。 您所获得的只是指向当前分支的新指针。 要开始在新分支上工作,您必须签出要使用的分支。
Checkout the new branch you just created to start using it.
检出刚刚创建的新分支以开始使用它。
$ git checkout future-plans Switched to branch 'future-plans'The
git checkoutcommand works hand-in-hand withgit branch. Because you are creating a branch to work on something new, every time you create a new branch (with git branch), you want to make sure to check it out (withgit checkout) if you’re going to use it. Now that you’ve checked out the new branch, your Git workflow looks something like this:git checkout命令与git branch协同工作。 因为您正在创建一个分支来处理新事物,所以每次创建一个新分支(使用git branch)时,如果要使用它,都要确保将其签出(使用git checkout)。 现在,您已经签出了新分支,您的Git工作流程看起来像这样:
Search for the
bitbucketstationlocationsfolder on your local system and open it. You will notice there are no extra files or folders in the directory as a result of the new branch.在本地系统上搜索
bitbucketstationlocations文件夹并打开它。 您会发现由于新分支,目录中没有多余的文件或文件夹。Open the
stationlocationsfile using a text editor.使用文本编辑器打开
stationlocations文件。Make a change to the file by adding another station location:
通过添加另一个工作站位置来更改文件:
<p>Bitbucket has the following space stations:</p> <p> <b>Earth's Moon</b><br> Headquarters </p> <p> <b>Mars</b><br> Recreation Department </p>- Save and close the file.保存并关闭文件。
Enter
git statusin the terminal window. You will see something like this:在终端窗口中输入
git status。 您将看到如下内容:$ git status On branch future-plans Changes not staged for commit: (use "git add <file>..." to update what will be committed) (use "git checkout -- <file>..." to discard changes in working directory) modified: stationlocations no changes added to commit (use "git add" and/or "git commit -a")Notice the On branch
future-plansline? If you enteredgit statuspreviously, the line was onbranch masterbecause you only had the onemaster branch. Before you stage or commit a change, always check this line to make sure the branch where you want to add the change is checked out.注意分支上的
future-plans行吗? 如果您之前进入git status,则该行位于branch master因为您只有一个master branch。 在暂存或提交更改之前,请始终检查此行,以确保已签出要添加更改的分支。Stage your file.
暂存文件。
$ git add stationlocationsEnter the
git commitcommand in the terminal window, as shown with the following:在终端窗口中输入
git commit命令,如下所示:$ git commit stationlocations -m 'making a change in a branch' [future-plans e3b7732] making a change in a branch 1 file changed, 4 insertions(+)With this recent commit, your repository looks something like this:
通过最近的提交,您的存储库看起来像这样:

Now it’s time to merge the change that you just made back into the
masterbranch.现在是时候将刚才所做的更改合并回
master分支中了。
步骤2.合并分支:快速合并 (Step 2. Merge your branch: fast-forward merging)
Your space station is growing, and it’s time for the opening ceremony of your Mars location. Now that your future plans are becoming a reality, you can merge your future-plans branch into the main branch on your local system.
您的空间站正在增长,现在该是您的火星位置开幕典礼的时候了。 现在您的未来计划已成为现实,您可以将future-plans分支合并到本地系统的主分支中。
Because you created only one branch and made one change, use the fast-forward branch method to merge. You can do a fast-forward merge because you have a linear path from the current branch tip to the target branch. Instead of “actually” merging the branches, all Git has to do to integrate the histories is move (i.e., “fast-forward”) the current branch tip up to the target branch tip. This effectively combines the histories, since all of the commits reachable from the target branch are now available through the current one.
因为您只创建了一个分支并进行了一项更改,所以请使用快进分支方法进行合并。 您可以进行快速合并,因为您具有从当前分支提示到目标分支的线性路径。 Git要做的只是整合历史,而不是“实际”合并分支,而是将当前分支尖端(即“快进”)移动到目标分支尖端。 这有效地结合了历史记录,因为从目标分支可到达的所有提交现在都可以通过当前分支获得。

This branch workflow is common for short-lived topic branches with smaller changes and are not as common for longer-running features.
此分支工作流程通常用于变化较小的短暂主题分支,而对于功能长期运行的主题分支则不常见。
To complete a fast-forward merge do the following:
要完成快速合并,请执行以下操作:
Go to your terminal window and navigate to the top level of your local repository.
转到终端窗口,然后导航到本地存储库的顶层。
$ cd ~/repos/bitbucketstationlocations/Enter the
git statuscommand to be sure you have all your changes committed and find out what branch you have checked out.输入
git status命令,以确保您已提交所有更改,并找出已签出的分支。$ git status On branch future-plans nothing to commit, working directory cleanSwitch to the master branch.
切换到主分支。
$ git checkout master Switched to branch 'master' Your branch is up-to-date with 'origin/master'.Merge changes from the future-plans branch into the master branch. It will look something like this:
将更改从未来计划分支合并到主分支。 它看起来像这样:
$ git merge future-plans Updating fcbeeb0..e3b7732 Fast-forward stationlocations | 4 ++++ 1 file changed, 4 insertions(+)You’ve essentially moved the pointer for the master branch forward to the current head and your repository looks something like the fast forward merge above.
实际上,您已经将master分支的指针向前移动到当前头,并且您的存储库看起来像上面的快速向前合并。
Because you don’t plan on using future-plans anymore, you can delete the branch.
由于您不再计划使用将来的计划,因此可以删除分支。
$ git branch -d future-plans Deleted branch future-plans (was e3b7732).When you delete
future-plans, you can still access the branch frommasterusing a commit id. For example, if you want to undo the changes added fromfuture-plans, use the commit id you just received to go back to that branch.当您删除
future-plans,您仍然可以使用提交ID从master访问分支。 例如,如果您要撤消future-plans添加的更改,请使用刚收到的提交ID返回该分支。Enter
git statusto see the results of your merge, which show that your local repository is one ahead of your remote repository. It will look something like this:输入
git status以查看合并结果,这表明本地存储库比远程存储库领先。 它看起来像这样:$ git status On branch master Your branch is ahead of 'origin/master' by 1 commit. (use "git push" to publish your local commits) nothing to commit, working directory clean
Here’s what you’ve done so far:
到目前为止,您已完成以下操作:
- Created a branch and checked it out创建一个分支并签出
- Made a change in the new branch在新分支中进行了更改
- Committed the change to the new branch将更改提交到新分支
- Integrated that change back into the main branch将更改集成回主分支
- Deleted the branch you are no longer using.删除了不再使用的分支。
Next, we need to push all this work back up to Bitbucket, your remote repository.
接下来,我们需要将所有这些工作推回到远程存储库Bitbucket中。
步骤3.将更改推送到Bitbucket (Step 3. Push your change to Bitbucket)
You want to make it possible for everyone else to see the location of the new space station. To do so, you can push the current state of your local repository to Bitbucket.
您想让其他所有人看到新空间站的位置。 为此,您可以将本地存储库的当前状态推送到Bitbucket。
This diagram shows what happens when your local repository has changes that the central repository does not have and you push those changes to Bitbucket.
此图显示了当本地存储库具有中央存储库没有的更改并将这些更改推送到Bitbucket时发生的情况。

Here’s how to push your change to the remote repository:
这是将更改推送到远程存储库的方法:
From the repository directory in your terminal window, enter git push origin master to push the changes. It will result in something like this:
在终端窗口的存储库目录中,输入git push origin master来推送更改。 这将导致如下所示:
$ git push origin master Counting objects: 3, done. Delta compression using up to 8 threads. Compressing objects: 100% (3/3), done. Writing objects: 100% (3/3), 401 bytes | 0 bytes/s, done. Total 3 (delta 0), reused 0 (delta 0) To https://emmap1@bitbucket.org/emmap1/bitbucketstationlocations.git fcbeeb0..e3b7732 master -> masterClick the Overview page of your Bitbucket repository, and notice you can see your push in the Recent Activity stream.
单击您的Bitbucket存储库的“ 概述”页面,然后注意您可以在“ 最近活动”流中看到您的推送。
Click Commits and you can see the commit you made on your local system. Notice that the change keeps the same commit id as it had on your local system.
单击提交 ,您可以看到在本地系统上所做的提交。 请注意,更改保留与本地系统上相同的提交ID。
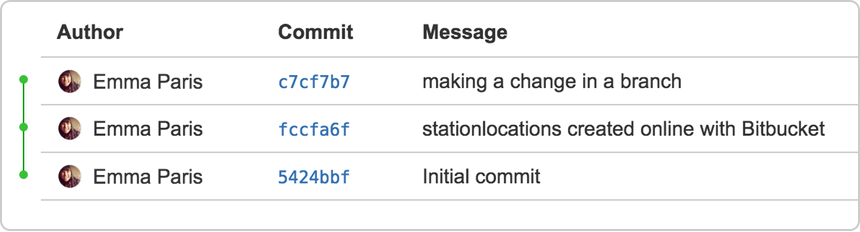
You can also see that the line to the left of the commits list has a straight-forward path and shows no branches. That’s because the
future-plansbranch never interacted with the remote repository, only the change we created and committed.您还可以看到,提交列表左侧的行具有简单的路径,并且未显示任何分支。 这是因为
future-plans分支从未与远程存储库交互,仅与我们创建和提交的更改交互。Click Branches and notice that the page has no record of the branch either.
单击“ 分支” ,请注意该页面也没有该分支的记录。
Click Source, and then click the
stationlocationsfile. You can see the last change to the file has the commit id you just pushed.单击“ 源” ,然后单击“
stationlocations文件。 您可以看到对文件的最后更改具有您刚刚推送的提交ID。Click the file history list to see the changes committed for this file, which will look similar to the following figure.
单击文件历史记录列表以查看为此文件提交的更改,其外观类似于下图。
大功告成! (You are done!)
Not sure you will be able to remember all the Git commands you just learned? No problem. Bookmark our basic Git commands page so that you can refer to it when needed.
不确定您将能够记住刚刚学习的所有Git命令吗? 没问题。 将我们的基本Git命令页面添加为书签,以便您在需要时可以参考它。
翻译自: https://www.sitepoint.com/learn-git-with-bitbucket-cloud/
使用Bitbucket Cloud学习Git相关推荐
- bitbucket创建代码_了解有关Bitbucket Cloud中的代码审查的信息
bitbucket创建代码 This article was sponsored by Bitbucket. Thank you for supporting the sponsors who mak ...
- 深入理解学习Git工作流
2019独角兽企业重金招聘Python工程师标准>>> 个人在学习git工作流的过程中,从原有的 SVN 模式很难完全理解git的协作模式,直到有一天我看到了下面的文章,好多遗留在心 ...
- Spring Cloud 学习资料收集
导读 关于Spring Cloud 去年开始逐渐多的出现在我的视线中,随着微服务这个词越来越热,我们或多或少的都听说过这个词,我们可以将Spring Cloud 看做是java 中Spring 为我们 ...
- Spring Cloud 学习笔记(2 / 3)
Spring Cloud 学习笔记(1 / 3) Spring Cloud 学习笔记(3 / 3) - - - 56_Hystrix之全局服务降级DefaultProperties 57_Hystri ...
- spring cloud bus_Spring Cloud学习笔记--消息总线(Bus)
Spring Cloud Bus links nodes of a distributed system with a lightweight message broker. This can the ...
- Spring Cloud 学习笔记(2 3)
Spring Cloud 学习笔记(1 / 3) Spring Cloud 学习笔记(3 / 3) - - - 56_Hystrix之全局服务降级DefaultProperties 57_Hystri ...
- 深入理解python.md_深入理解学习Git工作流(git-workflow-tutorial)
个人在学习git工作流的过程中,从原有的 SVN 模式很难完全理解git的协作模式,直到有一天我看到了下面的文章,好多遗留在心中的困惑迎刃而解,于是我将这部分资料进行整理放到了github上,欢迎st ...
- Spring Cloud学习笔记
Spring Cloud学习笔记 相关代码地址:https://github.com/gongxings/spring-cloud-study.git 一.工程环境搭建 spring cloud版本: ...
- 厉害了!寓教于乐,用玩游戏的方式学习 Git!
作者 | mozlingyu 来源 | 少数派 用游戏的方式来学习,是一种有趣而高效的方式. 从刚接触电脑时的打字练习软件 金山打字通,到程序猿写代码的利器 Vim 都有小游戏(金山打字通游戏.VIM ...
- Spring Cloud学习1
Spring Cloud学习1 学习视频地址:https://www.bilibili.com/video/BV18E411x7eT?p=3 版本选型 Spring Boot版本号为数字,如Sprin ...
最新文章
- python爬虫执行scrapy crawl demo出现: import win32api ModuleNotFoundError: No module named 'win32api'错误
- hdu 1003 dp
- Hacker(十)----常用入侵工具
- java 生成parquet文件格式,使用Java API将Parquet格式写入HDFS,而不使用Avro和MR
- c++-内存管理-array allocator
- 无悔入华夏怎么一直显示服务器,无悔入华夏完整版
- 二叉查找树的先序遍历,中序遍历,后序遍历
- P1407-[国家集训队]稳定婚姻【tarjan,强连通分量】
- 收录批量查询神器 bluecattools
- Python——高阶函数
- 代码优化能减少多少运行速度_35 个小细节,提升 Java 代码的运行效率!你知道几个?...
- linux lammps 安装教程,LAMMPS安装总结
- ESD问题案例分析-智能手表为例
- (数据结构)二叉树中序遍历
- LaTex的箭头符号及命令
- 两个图片叠加在一起css,css实现图片叠加的几种思路(记录笔记)
- 啊哈添柴挑战1057向世界问好C++
- uCLinux系统分析
- 一文搞懂各大APP!网站python网络爬虫!
- JavaCV开发详解之36:使用delogo滤镜实现去除和屏蔽视频水印