图像增强python_Python图像增强简介(第1部分)
图像增强python
Stuck behind the paywall? Click here to read the full article with my friend link
卡在收费墙后面? 单击 此处 以阅读完整的文章以及我的朋友链接
Image augmentation is a technique for artificially adding more images to your image data to expand the data set. It is mostly used to add variety to the data set so that models don’t over-fit.
图像增强是一种为图像数据人为添加更多图像以扩展数据集的技术。 它主要用于为数据集增加多样性,以免模型过度拟合。
Some of the most common augmentation methods are flipping, rotating, and tweaking image properties like contrast, brightness, and color.
一些最常见的增强方法是翻转,旋转和调整图像属性,例如对比度,亮度和颜色。
We shall apply all these techniques to a sample of image leaves from the Plant-Village Data Set. The data set is available here. Open the link while you are signed in to your Google account so that it's available in the “Shared with me” folder of your Google Drive.
我们将所有这些技术应用于“植物村数据集”中的图像叶片样本。 数据集可在此处获得 。 登录到Google帐户后,打开链接,以便在Google云端硬盘的“与我共享”文件夹中可用。
设置工作区 (Setting Up the Workspace)
To make the setup easy and fast, we’ll be hosting our notebook on Google Colab. For those new to Colab, it is a free development environment offered by Google which lets you use GPUs or TPUs for your modeling needs. It also comes with the Python Imaging Library (PIL) and OpenCV preinstalled, so it saves us the trouble of installing them as they are not shipped with the Anaconda distribution of Python. Using Colab also lets you use Google Drive to host your data, so you don’t have to download 4000+ photos of leaves to your local machine.
为了使设置变得容易和快捷,我们将在Google Colab上托管笔记本。 对于Colab的新用户来说,这是Google提供的免费开发环境,可让您使用GPU或TPU满足您的建模需求。 它还附带了预安装的Python Imaging Library(PIL)和OpenCV,因此它为我们省去了安装它们的麻烦,因为Python的Anaconda发行版中没有提供它们。 使用Colab还可让您使用Google云端硬盘托管数据,因此您不必将4000多张叶子的照片下载到本地计算机上。
Once you open Colab, choose “New Notebook” to open a blank Jupyter Notebook. Then click on “Connect” at the top-right. Once you’ve connected, you’ll be able to see a green tick with the RAM and the disk utilization where “Connect” was earlier. Once this is done, go to “Runtime” from the menu bar, select “Change runtime type”, and then choose “GPU” from the Hardware accelerator drop-down. You can also uncheck the “Omit code cell output when saving this notebook” option if you want to save your notebook with outputs. Click on “Save”, and your GPU-hosted Jupyter Notebook is now ready!
打开Colab后,选择“新笔记本”以打开空白的Jupyter笔记本。 然后点击右上角的“连接”。 连接后,您将可以看到RAM和磁盘利用率在“ Connect”之前的位置上带有绿色的勾号。 完成此操作后,从菜单栏转到“运行时”,选择“更改运行时类型”,然后从硬件加速器下拉列表中选择“ GPU”。 如果要使用输出保存笔记本,还可以取消选中“在保存此笔记本时忽略代码单元输出”选项。 单击“保存”,您的GPU托管Jupyter Notebook现在准备就绪!
We start by importing the libraries. We will use:
我们从导入库开始。 我们将使用:
import numpy as npimport pandas as pdimport matplotlib.pyplot as pltimport cv2import globimport datetimeimport randomfrom tqdm.notebook import tqdmfrom PIL import Imagefrom PIL import ImageEnhancenp.random.seed(1) #to have reproducible results pd.set_option('display.max_colwidth', None)Finally, we just have to mount our Google drive to Colab:
最后,我们只需要将Google驱动器安装到Colab:

Follow the URL, select the Google account which you used to access the data-set, and grant Colab permissions to your Drive. Paste the authorization code at the text box in the cell output, and you’ll get the message Mounted at /gdrive.
跟随该URL,选择用于访问数据集的Google帐户,然后向您的云端硬盘授予Colab权限。 将授权代码粘贴到单元格输出中的文本框中,您将收到消息Mounted at /gdrive 。
Our notebook is now set up!
现在我们的笔记本已经设置好了!
从驱动器读取图像 (Reading Images from Drive)
Let's have a look at the folder structure in Drive:
让我们来看看Drive中的文件夹结构:

Note: In your case, the path will be:
注意:根据您的情况,路径为:
/gdrive/Shared with me/color/Grape___Esca_(Black_Measles)/2da24728-7553-4abc-9dc4-385895eebbc1___FAM_B.Msls 4292.JPGWe will save the paths to a list. We should have 4062 paths in total:
我们将路径保存到列表中。 我们应该总共有4062条路径:

Since loading and processing 4000 images will take a while (~30 mins), even on a GPU, I will just pick 20 random images. (If you want to follow this through till the classification part, I’ld suggest you use the entire set).
由于加载和处理4000张图像需要花费一段时间(约30分钟),即使在GPU上,我也只能选择20张随机图像。 (如果您想一直进行到分类部分,我建议您使用整个集合)。
Now, we’ll use the Image.open() method to open images from these paths, and save them to a NumPy array:
现在,我们将使用Image.open()方法从这些路径打开图像,并将其保存到NumPy数组中:

From orig.shape we can see that we have 20 images of dimension 256x256, with three color channels (R, G, B).
从orig.shape我们可以看到我们有20个尺寸为256x256的图像,并具有三个颜色通道(R,G,B)。
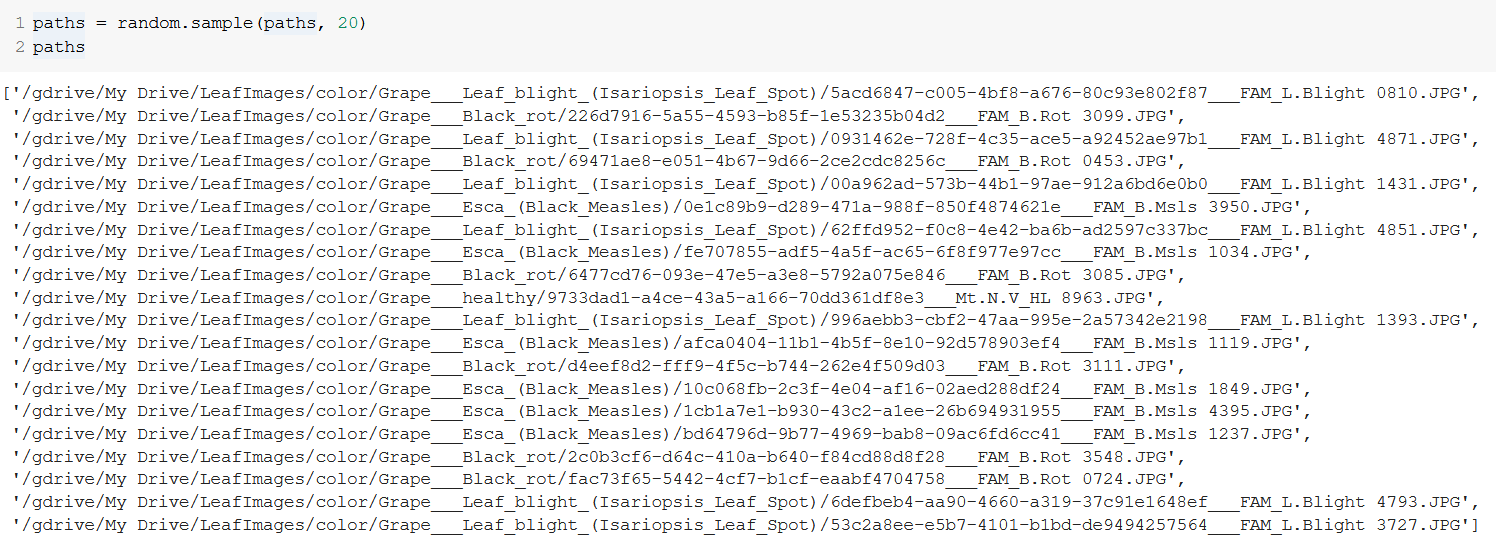
Let’s see how these images look:
让我们看看这些图像的外观:
plt.figure(figsize=(9,9))i = 0for img in orig[0:16]: plt.subplot(4, 4, i+1) plt.xticks([]) plt.yticks([]) plt.grid(False) plt.imshow(img) i += 1plt.suptitle("Original", fontsize=20)plt.show()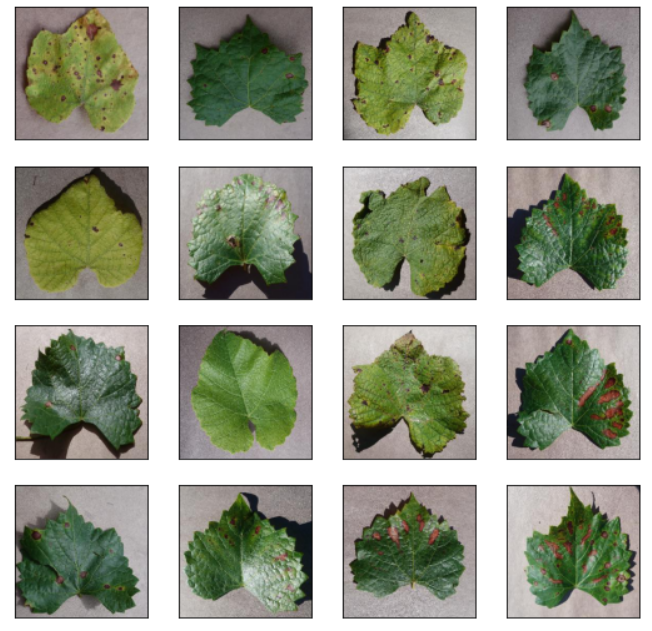
增强影像 (Augmenting the Images)
Now we can finally get started with the image augmentation. We will use PIL’s ImageEnhance method for this.
现在我们终于可以开始图像增强了。 我们将为此使用PIL的ImageEnhance方法。
ImageEnhance’s Contrast(), Brightness(), Sharpness(), and Color() all load the image; then, we can use their enhance() methods to enhance those properties by any factor we choose. We will use np.linspace to choose factors between 0 and 1.5, and np.random.choice to randomize those factors.
ImageEnhance的Contrast() , Brightness() , Sharpness()和Color()均加载图像; 然后,我们可以使用它们的enhance()方法通过我们选择的任何因素来增强这些属性。 我们将使用np.linspace在0和1.5之间选择因子,并使用np.random.choice将这些因子随机化。
The one-liner for doing this for contrast is:
进行对比的一种方法是:
contrast = [np.asarray(ImageEnhance.Contrast(Image.fromarray(img, 'RGB')).enhance(np.random.choice(np.linspace(0.5, 1.5, 5)))) for img in orig]For each img in orig, we first load the image from the img array (specifying the color channel as “RGB”. Then, enhance the contrast by a random value from [0, 0.5, 1, 1.25, 1.5] (np.linspace(0.5, 1.5, 5) will choose five linearly spaced values between 0 and 1.5). Finally, we save this image as an array within the contrast list.
对于orig每个img ,我们首先从img数组加载图像(将颜色通道指定为“ RGB”。然后,通过[ np.linspace(0.5, 1.5, 5) ]中的随机值增强对比度( np.linspace(0.5, 1.5, 5)将在0和1.5之间选择五个线性间隔的值。最后,我们将此图像保存为contrast列表中的数组。
Let us see how the images look with their contrast tweaked:
让我们看看调整了对比度后的图像外观:
plt.figure(figsize=(9,9))i = 0for img in contrast[0:16]: plt.subplot(4, 4, i+1) plt.xticks([]) plt.yticks([]) plt.grid(False) plt.imshow(img) i += 1plt.show()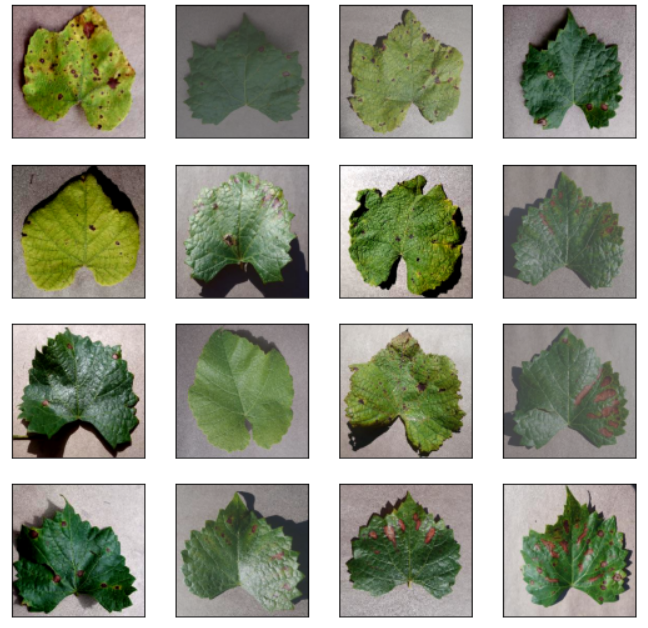
Images with an enhancement factor < 1 look greyer, while those with a factor > 1 are more saturated. Those with a factor = 1 won’t be any different from the original.
增强因子<1的图像看起来更灰白,而因子> 1的图像则更饱和。 因子= 1的那些与原始的没有什么不同。
To amplify the effect of randomness, we sequentially process the images for brightness, sharpness, and color, i.e., the output of one is the input of the other:
为了扩大随机性的影响,我们依次处理图像的亮度,清晰度和颜色,即,一个的输出是另一个的输入:
brightness = [np.asarray(ImageEnhance.Contrast(Image.fromarray(img, 'RGB')).enhance(np.random.choice(np.linspace(0.5, 1.5, 5)))) for img in contrast]sharpness = [np.asarray(ImageEnhance.Contrast(Image.fromarray(img, 'RGB')).enhance(np.random.choice(np.linspace(0.5, 1.5, 5)))) for img in brightness]color = [np.asarray(ImageEnhance.Contrast(Image.fromarray(img, 'RGB')).enhance(np.random.choice(np.linspace(0.5, 1.5, 5)))) for img in sharpness]After all these operations, the images look like:
完成所有这些操作后,图像如下所示:
We are just left with two more operations — flip and rotate.
我们只剩下两个操作-翻转和旋转。
For flip, we will use cv2.flip(). It takes the image and a value between 0, 1 and -1. For 0, it flips vertically; for 1, it flips horizontally; and for -1, it flips both horizontally and vertically. We can randomize these values to randomize the flip, and we can also randomize choosing if the image will be flipped or not. The one-liner for this is:
对于翻转,我们将使用cv2.flip() 。 它获取图像以及介于0、1和-1之间的值。 值为0时,它垂直翻转。 1,它水平翻转; -1时,水平和垂直翻转。 我们可以随机化这些值以随机化翻转,也可以随机化图像是否翻转的选择。 一线的是:
flip = [cv2.flip(img, np.random.choice([0, 1, -1])) if np.random.choice([0, 1]) else img for img in color]If np.random.choice([0, 1]) is 0, we don’t flip and return the input; otherwise, we flip depending on np.random.choice([0, 1, -1]).
如果np.random.choice([0, 1])为0,则不翻转并返回输入。 否则,我们将根据np.random.choice([0, 1, -1])翻转。
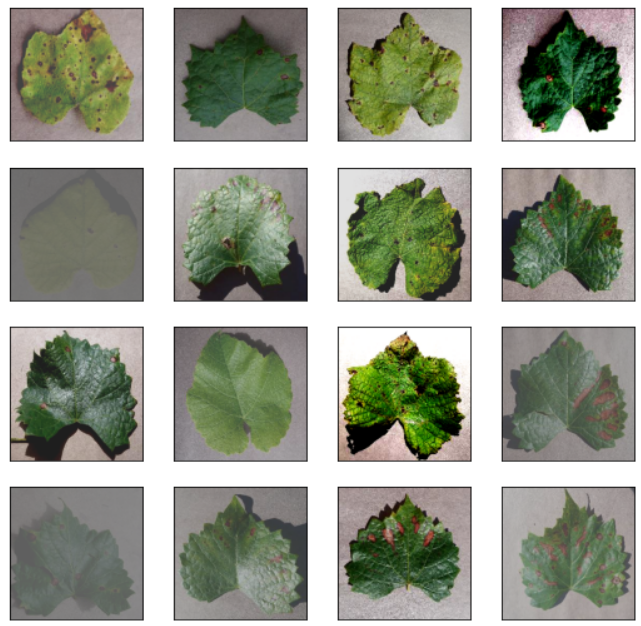
Rotating is straightforward. We load the image from the image array and rotate it by as many degrees as we want. To avoid having to fill, we’ll be randomly rotating the images by 0 (no rotation), 90, 180, or 270 degrees:
旋转很简单。 我们从图像数组加载图像并将其旋转所需的角度。 为避免填充,我们将图像随机旋转0(不旋转),90、180或270度:
rotate = [Image.fromarray(img, 'RGB').rotate(np.random.choice([0, 90, 180, 270])) for img in flip]The final output after all these operations (along with the original images) looks like:
所有这些操作(以及原始图像)之后的最终输出如下所示:

We can then save these images in a separate “augmented” folder:
然后,我们可以将这些图像保存在单独的“增强”文件夹中:
import osfor i, image in tqdm(enumerate(rotate)): directory = paths[i].rsplit('/', 3)[0] + '/augmented/' + paths[i].rsplit('/', 2)[1]+ '/' os.makedirs(directory, exist_ok = True) image.save(directory + paths[i].rsplit('/', 2)[2])In addition to the steps we discussed, you can also add noise and blur to your image as a part of augmentation. These are described in my article on generating text CAPTCHAs in Python:
除了我们讨论的步骤之外,您还可以在图像中添加噪点和模糊作为增强的一部分。 我在Python中生成文本验证码的文章中对此进行了描述:
就这样...现在 (That's It… For Now)
You can find the Colab notebook I used here.
您可以在这里找到我使用的Colab笔记本。
This is the first part of a series I’ll write on Image Augmentation, Segmentation, and Classification. Links to the subsequent articles will be added here once published.
这是我将撰写的有关图像增强,分割和分类的系列文章的第一部分。 一旦发布,将在此处添加指向后续文章的链接。
Part II is now live:
第二部分现已上线:
Thanks for reading, bouquets, and brickbats welcome!
图像增强python_Python图像增强简介(第1部分)相关推荐
- 详解 空域图像增强+频域图像增强
空域图像增强+频域图像增强 文章目录 空域图像增强+频域图像增强 前言 空域图像增强 一.灰度映射:点处理 1.图像求反(将灰度值翻转) 2.对数变换(动态范围压缩) 3.幂次变换 4.阶梯量化 5. ...
- opencv图像增强python_python 基于opencv实现图像增强
为了得到更加清晰的图像我们需要通过技术对图像进行处理,比如使用对比度增强的方法来处理图像,对比度增强就是对图像输出的灰度级放大到指定的程度,获得图像质量的提升.本文主要通过代码的方式,通过OpenCV ...
- opencv 图像增强_图像增强、锐化,利用 Python-OpenCV 帮你实现 4 种方法!
图像增强目的使得模糊图片变得更加清晰.图片模糊的原因是因为像素灰度差值变化不大,如片各区域产生视觉效果似乎都是一样的, 没有较为突出的地方,看起来不清晰的感觉 解决这个问题的最直接简单办法,放大像素灰 ...
- [图像增强]一. 图像增强了解
图像增强 目的是要改善图像的视觉效果, 针对给定图像的应用场合, 有目的地强调图像的整体或局部特性, 将原来不清晰的图像变得清晰或强调某些感兴趣的特征, 扩大图像中不同物体特征之间的差别, 抑制不感兴 ...
- java图像增强_图像增强之空间域滤波
1.为什么进行图像增强 图像增强是指增强图像中某些特征,同时削弱或去除某些不需要的信息,即为了某种应用而去改善图像的质量,消除噪声,显现那些被模糊了的细节或简单的突出一副图像中感兴趣的特征.所以图像增 ...
- 软件测试测试 python_Python测试简介
软件测试测试 python by Goran Aviani 通过Goran Aviani Python测试简介 (An introduction to testing in Python) You h ...
- 统计 python_Python统计简介
统计 python 数据分析 (Data Analytics) 什么是统计 (What is Statistics) Statistics is the discipline that concern ...
- 单元测试 python_Python单元测试简介
单元测试 python You just finished writing a piece of code and you are wondering what to do. Will you sub ...
- python图像增强_图像增强--代码汇总
############# #模块:数据增强 #相关函数: #功能: #1.# 随机改变亮暗.对比度和颜色等 def random_distort(img): #2.# 随机填充 def random ...
- 【数字图像处理】Matlab实现-图像增强-彩色图像增强(彩虹编码,热金属编码)
伪彩色处理 伪彩色增强:把一幅黑白域图像的不同灰度级映射为一幅彩色图像的技术手段. 伪彩色增强有很多种方法,而下面的增强方法则是使用的空间域灰度级-彩色变换法. 空间域灰度级-彩色变换法:可以将灰度图 ...
最新文章
- Web的诞生和网络基础 | 读《图解HTTP》
- java跨平台的特性_【简答题】什么是跨平台特性?Java怎样实现跨平台特性?
- leetcode1442. 形成两个异或相等数组的三元组数目
- 前台等待事件 oracle,Oracle等待事件之buffer busy waits
- ASP.NET删除等操作前的提示解决方案
- SQL 日期函数的使用方法
- 【老生谈算法】matlab实现拉普拉斯变换及其逆变换算法源码——拉普拉斯变换
- 如何在微信小程序中使用echarts绘制地图(微信小程序制作疫情数据地图)
- 08.ThreeJs开发指南-第八章-加载外部模型
- PJzhang:微软出口管制条例
- 新手程序猿编程实战项目推荐「附源码下载」
- 如何让计算机显示器满屏,电脑显示器满屏条纹的解决方法
- 中国广电剑未出鞘,但中国联通和中国电信已吓得瑟瑟发抖
- Metal 系列教程
- 蓝牙BLE5.0扩展广播介绍
- 35岁程序员如何转型
- 从事python需要掌握哪些知识和技能_转行从事Python,需要掌握什么技能?
- uniapp 移动端通话录音上传
- [大学物理实验-1]弹簧谐振子实验
- 基础工业工程一些知识点 易树平第二版
热门文章
- 利用JavaScript生成随机数字!
- javascript事件处理
- ubuntu-12.04.4-server安装
- Dynamic Set Up the Web Reference Url To WebService
- 基于Bayes和KNN的newsgroup 18828文本分类器的Python实现
- 2020-11-13 02_计算机视觉基础
- 190715每日一句
- Opencv打开相机,并在上面用鼠标画框
- Atitit 文件读取规范 目录 1.1. 以fgetss取代fgets读取一行并过滤掉 HTML 和 PHP 标记。 1 1.2. 3. 以二进制读取 fread取代fgets 1 1.3. 4.
- Atitit golang开发环境搭建 目录 1. 编辑helo.go 1 1.1. 调试编译 1 2. Ide选择liteide 2 3. 问题解决 2 4. 附录 2 4.1. Go语言标准库常