kotlin 对话框_Kotlin教程中的android警报对话框
kotlin 对话框
Dialogs are present in our every day lives in the digital world. Almost every user knows what are we talking about when referring to dialogs: ‘those annoying small windows that cover the screen and interrupt what you want to do’… well sort of. It is like most of our Android UI tools, a way to communicate important messages with users. That’s why I have created this Android Alert Dialogs in Kotlin Tutorial.
在数字世界中,我们每天都有对话。 几乎每个用户都知道我们在谈论对话框时在说什么:“那些烦人的小窗口覆盖了屏幕并打断了您想做的事情”……很好。 就像我们的大多数Android UI工具一样,它是一种与用户交流重要消息的方式。 这就是为什么我在Kotlin教程中创建了这个Android Alert对话框。
First, take a look at the Android official definition of dialogs we find the following:
首先,看一下对话框的Android官方定义,我们发现以下内容:
A dialog is a small window that prompts the user to make a decision or enter additional information. A dialog does not fill the screen and is normally used for modal events that require users to take an action before they can proceed.
对话框是一个小窗口,提示用户做出决定或输入其他信息。 对话框不会填满屏幕,通常用于模态事件,要求用户在执行操作之前先采取措施。
https://developer.android.com/guide/topics/ui/dialogs
https://developer.android.com/guide/topics/ui/dialogs
As an Android developer, you will use dialogs in most of your apps, think of examples on the apps you use every day. Here are three simple examples that come to my mind.
作为Android开发人员,您将在大多数应用程序中使用对话框,想一想您每天使用的应用程序中的示例。 这是我想到的三个简单示例。
- Confirmation messages.确认消息。
- Alerts to input a date or text.提示输入日期或文本。
- Alerts to pick an option.提示选择一个选项。
Android Kotlin警报对话框教程 (Android Kotlin Alert Dialogs Tutorial)
As you may already know, in this tutorial, we will learn how to create an Android dialog. Although this is a beginner tutorial, anyone can follow along to brush on the basics and know the best practices. Start by creating a new Android Studio Project, if you don’t know how to do this go check my tutorial on it here, for the purpose of this tutorial I am using:
您可能已经知道,在本教程中,我们将学习如何创建Android对话框。 尽管这是一个初学者教程,但是任何人都可以跟随学习基础知识并了解最佳实践。 首先创建一个新的Android Studio项目,如果您不知道如何执行此操作,请在此处查看我的教程 ,出于本教程的目的,我正在使用:
- Android Studio 3.5.3Android Studio 3.5.3
- Kotlin 1.3Kotlin 1.3
- Compat Library: AndroidX兼容库:AndroidX
If you prefer to download my source code you can get it here:
如果您想下载我的源代码,可以在这里获取:
Starter project
入门项目
开始项目 (Starting the project)
Start with an ‘empty activity template’ and configure the default settings as shown in Image 1 below.
从“空活动模板”开始,然后配置默认设置,如下图1所示。
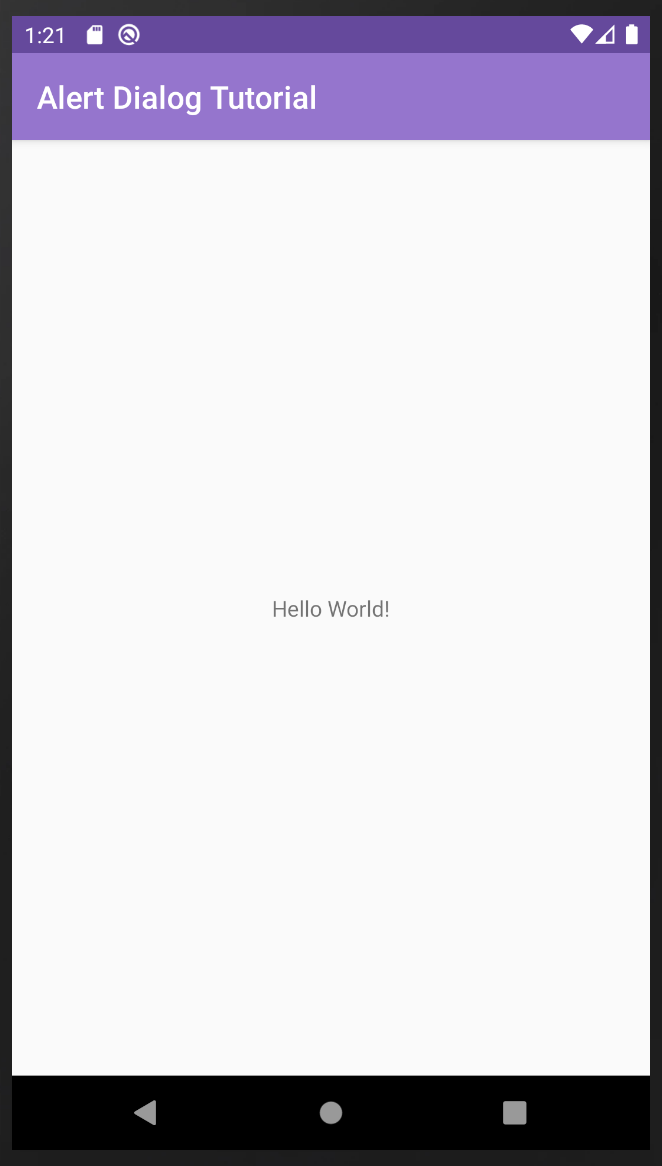
Run the app and you should be able to see something similar to Image 2, colors may vary.
运行该应用程序,您应该能够看到类似于图像2的内容,颜色可能会有所不同。
第1部分:警报基础知识 (Part 1: Alerts basics)
创建一个按钮以显示警报 (Create a button to show the alert)
The first thing you need to do on this screen is to replace the “Hello World” text from the screen and switch it for a button. This button will trigger our most basic alert. To do that head to activity_main.xml, the file should have been opened when you created the project, otherwise, look for it in the folder app > res > drawable. The first time you open the file you will see at the bottom left two tabs, Design, and Text, most likely the one selected is ‘Design’ (Image 3), although this is a good screen for previewing, almost always you will be editing your code in the ‘Text’ section.
在此屏幕上需要做的第一件事是替换屏幕上的“ Hello World”文本,并将其切换为按钮。 此按钮将触发我们最基本的警报。 为此,请转到activity_main.xml ,在创建项目时应已打开该文件,否则,请在文件夹app> res> drawable中查找该文件。 首次打开文件时,您会在左下角的两个标签中选择“设计”和“文本”,最有可能选择的是“设计”(图3),尽管这是一个很好的预览屏幕,但几乎总是在“文本”部分中编辑代码。
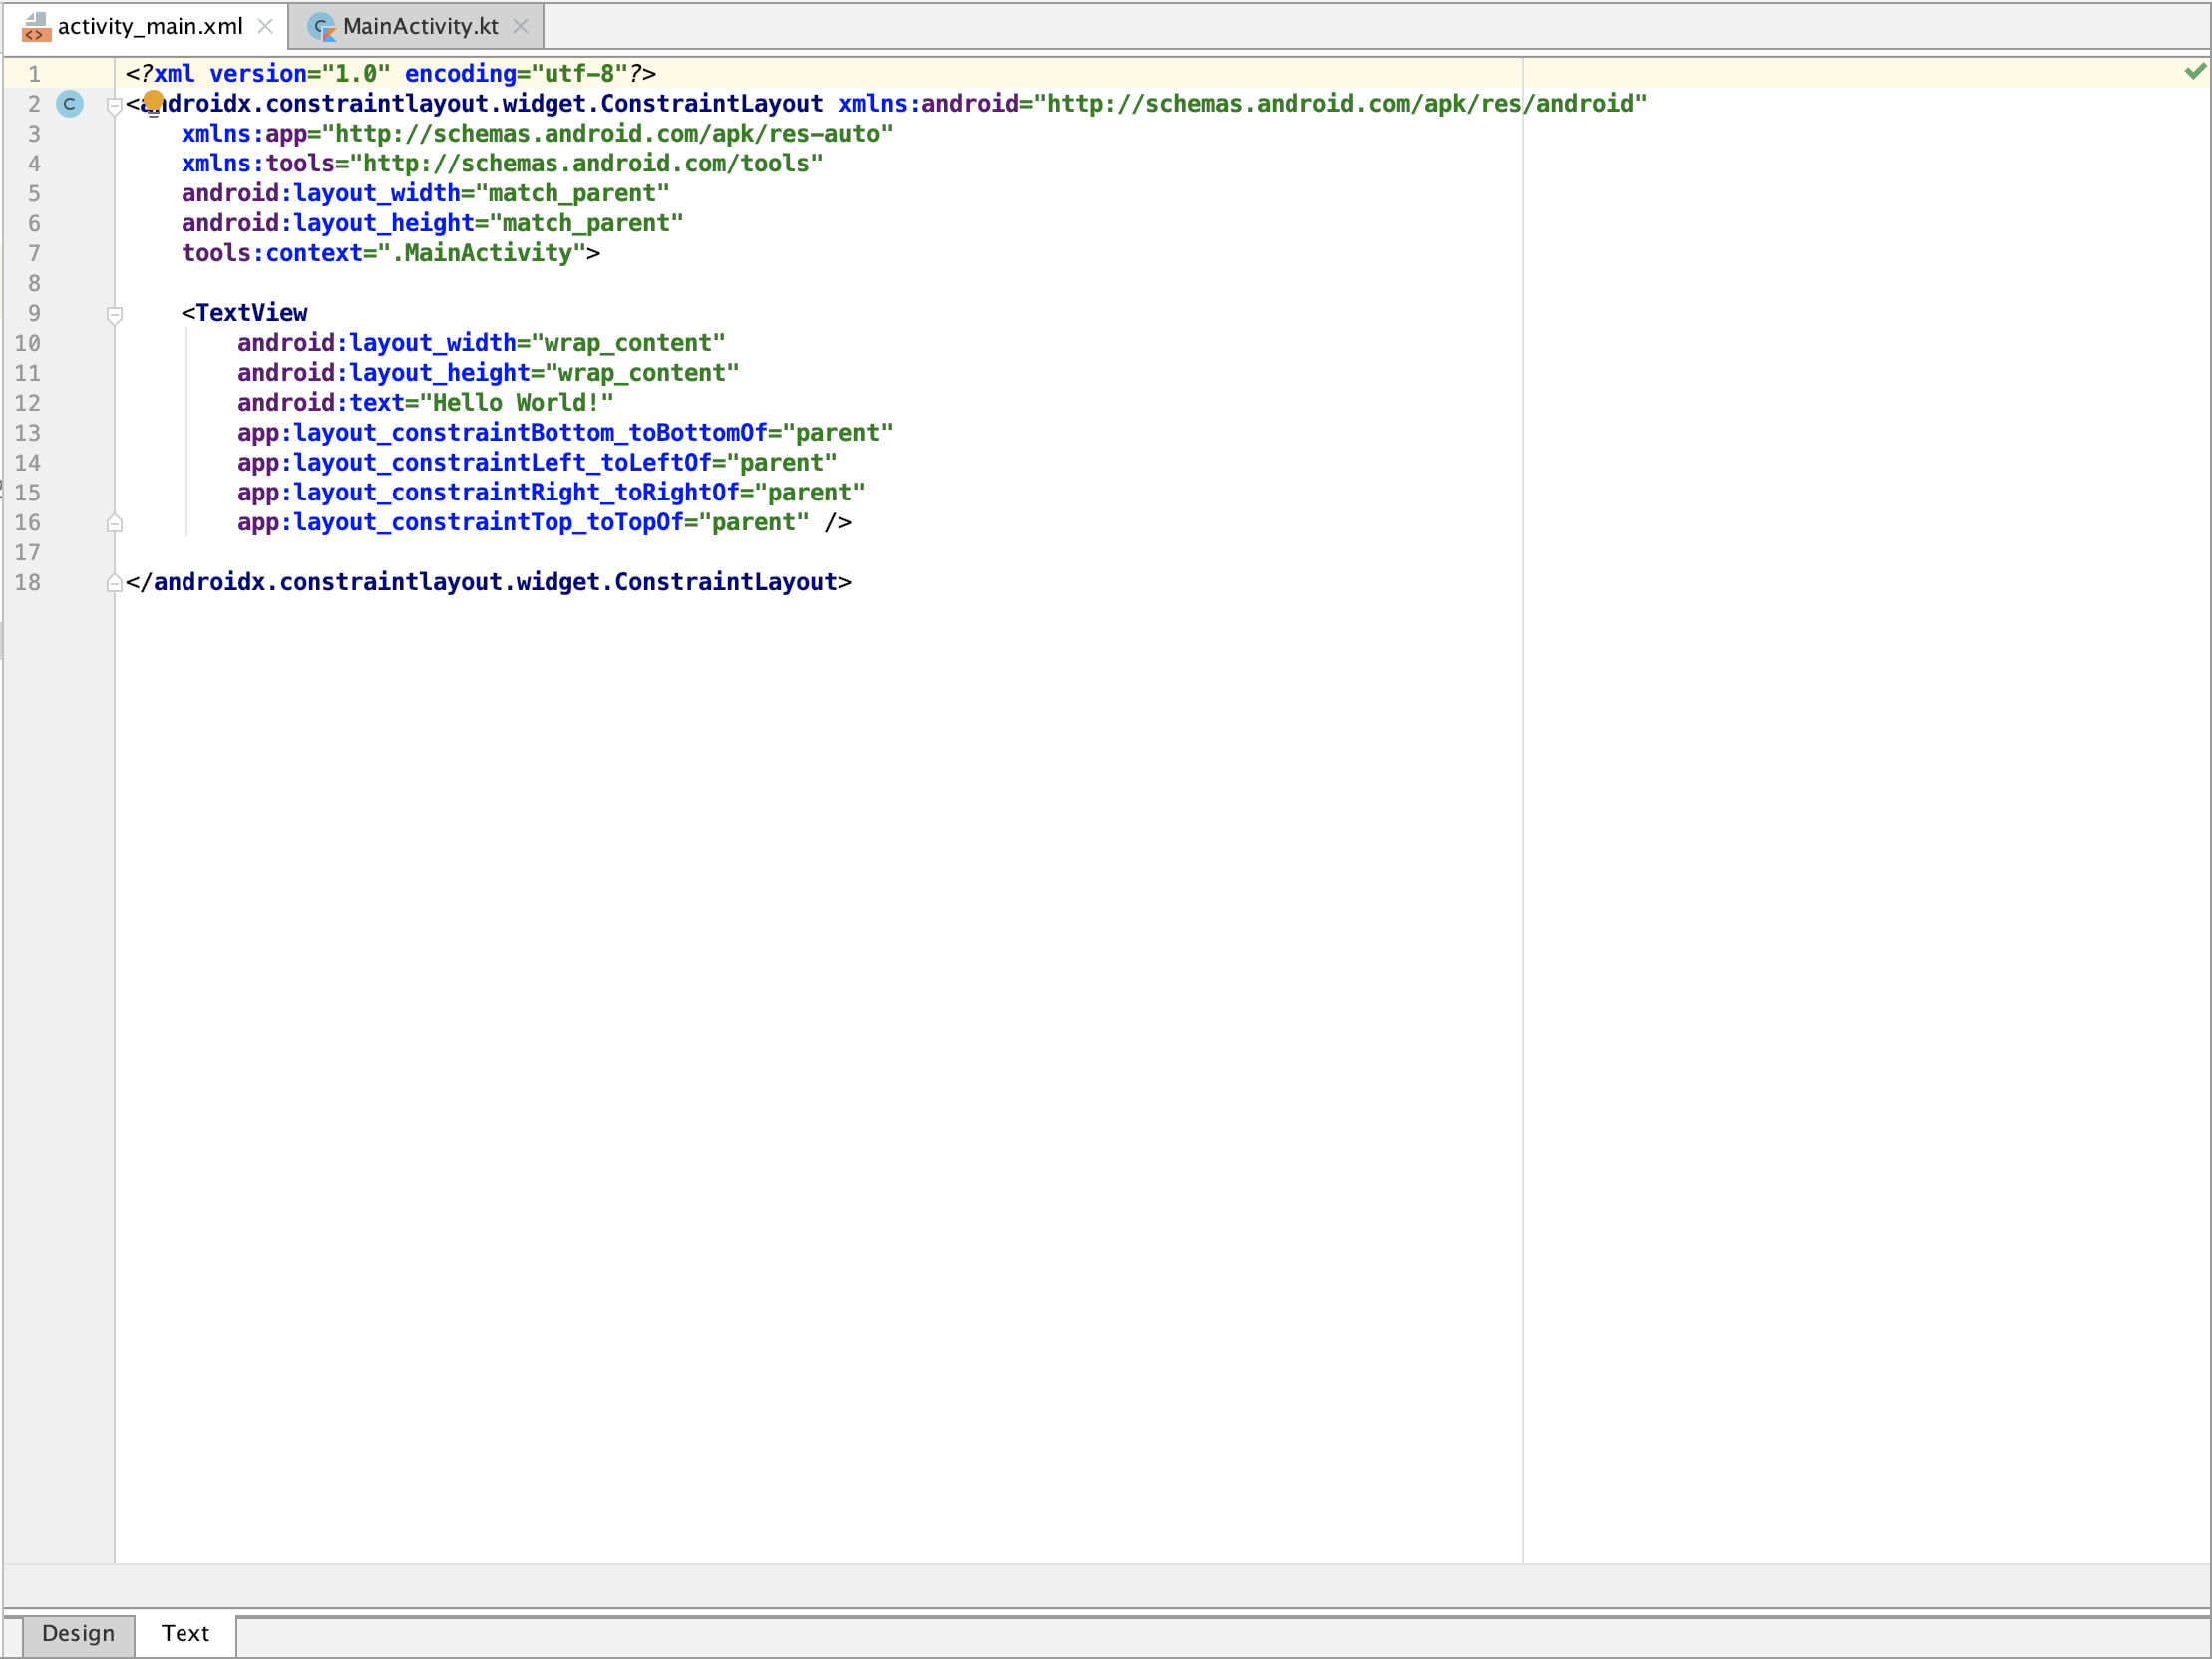
The lines that represent the “Hello world” text are in the <TextView> tag, in the image above (Image 4), they represent lines 9 to 16. Replace that code with the following:
代表“ Hello world”文本的行在<TextView>标记中的上图(图4)中,它们代表第9至16行。用以下代码替换该代码:
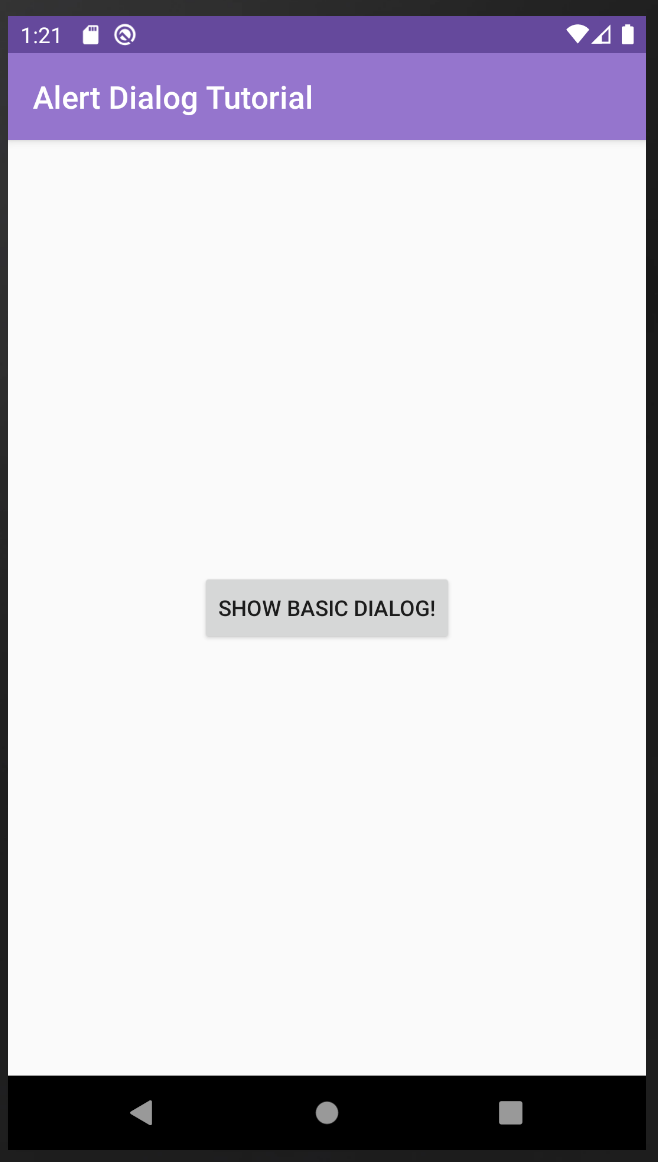
If you compare the code we had before in Image 4 and the new code you will notice we only changed the text and the name of the tag which before was “TextView” and now it is “Button”. As you can see Android XML layout code is pretty straightforward, the rest of the lines in there, that we didn’t modify are properties of the view that indicate it where to position in space, don’t worry about what they mean right now. Going back to the design tab you will now be able to get a preview of the button like shown in the image below (Image 5).
如果您将图像4中以前的代码与新代码进行比较,您会注意到我们只更改了文本和标记名,之前是“ TextView”,现在是“ Button”。 如您所见,Android XML布局代码非常简单明了,其中我们未修改的其余行都是视图的属性,这些属性指示其在空间中的位置,不必担心它们现在的含义。 返回设计选项卡,您现在可以预览按钮,如下图所示(图5)。
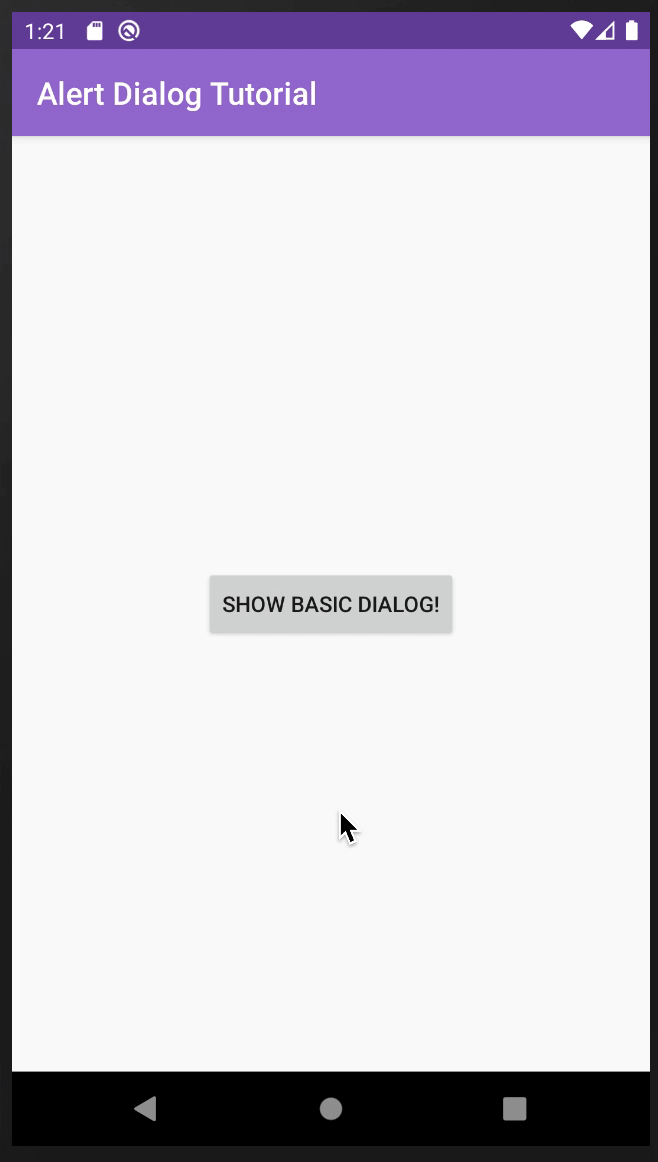
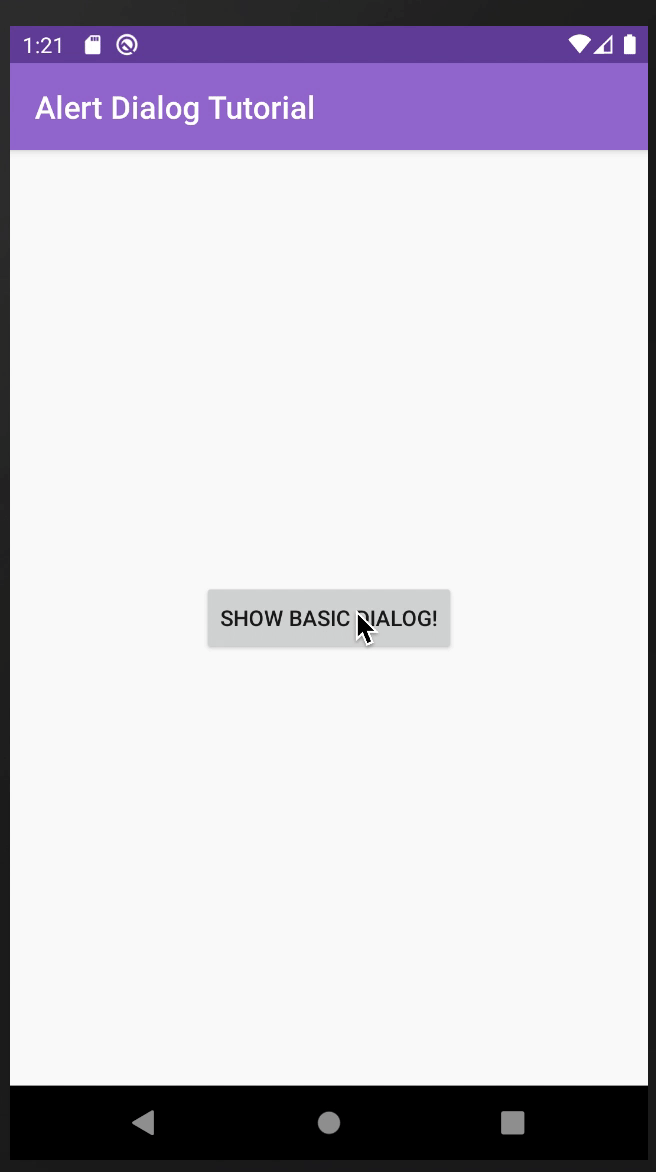
Now run the app and you should see the button on the screen, which by the way is similar to the preview. If you want to know how your result should look like, take a look at Image 6 below.
现在运行该应用程序,您应该在屏幕上看到按钮,顺便说一下,它与预览类似。 如果您想知道结果如何,请看下面的图6。
为警报对话框编码Kotlin代码 (Coding the Kotlin Code for the Alert Dialog)
Open MainActivity.kt, this is the code that contains all the Kotlin code for controlling the screen we previously edited. If you didn’t have the file open since the creation of the project, you can find it in app > java > your project name > MainActivity.kt. As you may see this file has a small amount of code:
打开MainActivity.kt,这是包含用于控制我们先前编辑的屏幕的所有Kotlin代码的代码。 如果自创建项目以来没有打开文件,则可以在app> java>项目名称> MainActivity.kt中找到它。 如您所见,该文件包含少量代码:
- The name of the package it belongs to.它所属的软件包的名称。
- Some default imports.一些默认导入。
- Your main activity class.您的主要活动课程。
The onCreate() function, which is a function that is executed, just after the screen is ‘created’. Inside of it, through the setContentView(R.layout.activity_main), instruction, you are telling the app to use the file activity_main.xml as the layout for this code.
onCreate()函数是在“创建”屏幕之后立即执行的函数。 在其中,通过setContentView(R.layout.activity_main)指令,您告诉应用程序使用文件activity_main.xml作为此代码的布局。
Enough with the explanation, let’s get to the code!
解释够了,让我们看一下代码!

导入所需的类 (Import the needed classes)
First of all, in the imports line, add the following code:
首先,在导入行中,添加以下代码:
The imports may be minimized, you can know this by a … signal after the word import. Open it, either by double-clicking these ellipses or by a (very small) ‘+’ icon to the right of the line. Don’t worry about the order, it doesn’t make any difference.
导入可能会被最小化,您可以在导入一词后的一个...信号中知道这一点。 通过双击这些椭圆或行右侧的(非常小的)“ +”图标来打开它。 不必担心顺序,这没有任何区别。
创建显示警报的方法 (Create a method to show the Alert)
Now for the alert itself, below the onCreate() method, create a new method to show the alert with this code:
现在,对于警报本身,在onCreate()方法下方,创建一个新方法以使用以下代码显示警报:
Let’s go through this code part by part. I labeled the parts with comments (which you don’t have to include in your project), to ease the explanation:
让我们逐部分地研究这段代码。 我用注释标记了零件(您不必在项目中包括注释),以简化说明:
- Android provides a default “builder” to create Alert Dialogs, so you don’t have to worry about the logic behind. Use it and tell the app to create a builder on ‘this’ class.Android提供了默认的“构建器”来创建警报对话框,因此您不必担心背后的逻辑。 使用它并告诉应用在“ this”类上创建一个构建器。
- You set the title and the message for your alert.您设置标题和警报消息。
- You request the builder to show the alert.您要求构建器显示警报。

Now we need to somehow call this method, at the bottom of the onCreate() add this line of code:
现在我们需要以某种方式调用此方法,在onCreate()的底部添加以下代码行:
If you are a bit confused about how your code should look now, take a look at the image below (Image 7) for clarification. Don’t worry, it’s a lot of new info and coding goes hand by hand with practicing.
如果您对现在的代码外观有些困惑,请看下面的图片(图片7)以进行澄清。 不用担心,这是许多新信息,编码和练习是紧密相连的。
Now run the app and see what happens.
现在运行该应用程序,看看会发生什么。

What happened? The app runs, but… the Alert showed just as the screen launched, can you identify why did this happen? Because of the line we added in the last step to the onCreate() method the Alert is showing right away, this isn’t what we want to do, but at least we know our alert works now.
发生了什么? 该应用程序正在运行,但是…警报在屏幕启动时显示,您能确定为什么会这样吗? 由于我们在最后一步中将警报立即显示在onCreate()方法中,因此这不是我们想要执行的操作,但是至少我们知道警报现在可以工作了。
将showAlert()方法附加到按钮操作 (Attaching the showAlert() method to the button action)
The next step would be to make the button trigger the alert, instead of letting the onCreate() do the job. For this, go back to your activity_main.xml file and add the following line inside the button tag:
下一步将是使按钮触发警报,而不是让onCreate()完成工作。 为此,请返回您的activity_main.xml文件,并在button标记内添加以下行:
The result of the XML file is shown in the image below (Image 9).
XML文件的结果如下图所示(图9)。
It is important for you to notice something, the parameter added to the onClick property, has the same value as the name of the function we created above “ funshowBasicDialog(view: View?) “, the key here is the ‘view’ parameter, the method you use on an onClick, has to have a view parameter in order to work.
请务必注意,添加到onClick属性中的参数与我们在“ funshowBasicDialog(view:View?) ”上方创建的函数的名称具有相同的值,这很重要,这里的关键是'view'参数,您在onClick上使用的方法必须具有view参数才能起作用。
Now delete the “ showBasicDialog(null) “ call from the onCreate, and run the app.
现在,从onCreate中删除“ showBasicDialog( null ) ”调用,然后运行该应用程序。
Did it work? Great! That’s the first part of creating an alert.
奏效了吗? 大! 这是创建警报的第一步。
第2部分:添加互动 (Part 2: Adding interaction)
Let’s stop for a moment and think of the first thing that comes to our mind with the word dialog, or alert. Now compare it with the result of our last post (Image 11), if you need a reminder here is the result of the last tutorial:
让我们停一会儿,想一想“对话”或“警报”一词是我们想到的第一件事。 现在,将其与上一篇文章的结果(图11)进行比较,如果需要提醒,这里是上一篇教程的结果:
The question is… What is it missing? What do alerts typically have that this one lacks? The first thing that comes to my mind is ‘buttons’. Most alerts are interactive, with this we mean they give you options and the possibility to choose among them. You are probably familiar with the functionality we implemented, dismissing by clicking on the gray area around, but it is not the best idea. As app developers, we have to prioritize User Experience, abbreviated as UX.
问题是……它缺少什么? 该警报通常缺少什么警报? 我想到的第一件事是“按钮”。 大多数警报是交互式的,这意味着我们为您提供了选择以及在其中进行选择的可能性。 您可能熟悉我们实现的功能,只需单击周围的灰色区域即可将其关闭,但这不是最好的主意。 作为应用程序开发人员,我们必须优先考虑用户体验(缩写为UX)。
按钮和UX (Buttons and UX)
Buttons are a very interesting element of the digital world, but if we look into the origin of buttons, it is not part of the post-computer era, buttons existed way before computers and smartphones. This is the magic of buttons, they belong to the physical world, and that’s why everyone knows how to use them almost intuitively. On the other hand, clicking on the gray area outside a dialog is something we have learned with technology and modern design practices, but is not necessarily intuitive.
按钮是数字世界中非常有趣的元素,但是如果我们研究一下按钮的起源,它就不是后计算机时代的一部分,按钮的存在早于计算机和智能手机。 这就是按钮的魔力,它们属于物理世界,这就是为什么每个人几乎都知道如何直观地使用它们的原因。 另一方面,单击对话框外部的灰色区域是我们从技术和现代设计实践中学到的,但不一定直观。
Buttons are a common element of interaction design. While they may seem like a very simple UI element, they are still one of the most important ones to create.
按钮是交互设计的常见元素。 尽管它们看起来像是一个非常简单的UI元素,但它们仍然是要创建的最重要的元素之一。
https://www.smashingmagazine.com/2016/11/a-quick-guide-for-designing-better-buttons/
https://www.smashingmagazine.com/2016/11/a-quick-guide-for-designing-better-buttons/
在警报中添加按钮 (Adding buttons to your alert)

It is important to remember that buttons give us choices, most alert dialogs will make you choose between two options, that usually are ‘yes’ and ‘no’. Note that these words could be replaced by others more according to your actions.
重要的是要记住,按钮为我们提供了选择,大多数警报对话框将使您在两个选项之间进行选择,通常是“是”和“否”。 请注意,根据您的操作,这些单词可能会被其他单词替换。
Pro-tip: use words that actually tell the user what the button will do, for example: ¿do you want to delete this file? good label: “delete”/”don’t delete”, bad label: “yes”, “no”. It may seem silly but for some users, this may be the difference between accidentally losing a file, or keeping it safe.
专业提示 :使用实际上可以告诉用户按钮将要执行的操作的单词,例如:¿您要删除此文件吗? 好的标签:“删除” /“不删除”,不好的标签:“是”,“否”。 这似乎很愚蠢,但是对于某些用户而言,这可能是意外丢失文件或保持文件安全之间的区别。
Once you have opened the project go to the file ‘ MainActivity.kt’, and locate the showBasicDialogFragment(), after the ‘ builder.setMessage(“your message”)’ instruction and before the ‘ builder.show() ‘, you will be adding the options for the dialog. Add the following code in there.
打开项目后,转到文件“ MainActivity.kt ”,找到showBasicDialogFragment() ,在“ builder.setMessage(“您的消息”) ”指令之后,在“ builder.show() ”之前,您将添加对话框的选项。 在其中添加以下代码。
The app will also most likely be marking the term “Toast” in red, this is because of a missing import, so add the toast import at the top. You can also use the shortcut option+intro or ctrl+intro to auto-import it.
该应用程序很可能还会用红色标记术语“ Toast”,这是由于缺少导入,因此请在顶部添加Toast导入。 您也可以使用快捷方式选项+ intro或ctrl + intro自动导入它。
Note: I have added a section below explaining what is a Toast in case you are curious about how this works.
注意:如果您对Toast感到好奇,我在下面添加了一节,解释什么是Toast。
Now let’s review this code part by part:
现在,让我们逐部分查看此代码:
You are telling the builder object, to create a ‘positive’ button. Android by default already knows what a positive button is, and sometimes depending on the system or accessibility settings you can trigger it by voice commands or other ways. You are indicating that the text to display is “Yes”. and then adding two parameters, the first indicating it is a dialog and then a ‘which’ parameter for telling it what to do when clicking it.
您要告诉构建器对象创建一个“正”按钮。 Android默认情况下已经知道什么是肯定按钮,有时您可以根据系统或辅助功能设置通过语音命令或其他方式触发它。 您指示要显示的文本是“ Yes ”。 然后添加两个参数,第一个参数表示它是一个对话框,然后是一个“ which ”参数,用于告诉它单击时的操作。
This is the action that will be executed when clicking the “Yes”/positive button. In this case, you are creating a Toast item that also has the text “Yes” to test the functionality of your button.
这是单击“是” /正按钮时将执行的操作。 在这种情况下,您要创建一个Toast项,其中也包含文本“ Yes”以测试按钮的功能。
- This code is the same as number one but in this case, you are defining a “negative” button, with the text “No”.该代码与第一代码相同,但是在这种情况下,您定义的是带有文本“否”的“负”按钮。
- Just as in the previous one, this is the same as number two, but with the “No” text.与上一个相同,它与第二个相同,但是带有“ No”文本。
Run the app and check the result.
运行该应用程序并检查结果。
挑战 (Challenge)
Add a maybe button to the dialog!
在对话框中添加一个也许按钮!
See below to get a hint or view the full answer. But before, try to do it by yourself!
请参阅下文以获取提示或查看完整答案。 但在此之前,请尝试自己做!
Hint: Just as Android has methods for positive and negative buttons, it also has a neutral button that you can set.
提示:正如Android拥有用于确定和否定按钮的方法一样,它也具有可以设置的中性按钮。
Just as in the elements above, the neutral button is set with the text and action. Look at the gif below to see the behavior after running the app. Did you get the same result?
就像上面的元素一样,中性按钮设置了文本和动作。 查看下面的gif,以查看运行该应用程序后的行为。 您得到了相同的结果吗?
吐司面包 (Toast items)
Toast items, also known as toasts
kotlin 对话框_Kotlin教程中的android警报对话框相关推荐
- kotlin 对话框_使用Kotlin的Android警报对话框
kotlin 对话框 In this tutorial, we'll be discussing Alert Dialogs and implement them in our Android App ...
- android ems的作用,对话框主题活动中忽略android:minEms
我有一个包含EditText的相对简单的布局.活动本身使用对话框主题.对话框最终很小,编辑文本甚至还不足以显示初始字符串. 我知道小对话框是一个常见问题(IIRC Dianne提到,默认情况下,该对话 ...
- android自定义弹出对话框,使用FlyDialog实现自定义Android弹窗对话框
前言 学习的时候要用到弹窗,但是又觉得i同自带的弹窗样式有点不太美观,搜索资料后发现了FlycoDialog这个开源库,效果很好,而且实现起来也比较方便. 先列举一些比较好看的效果: NormalLi ...
- 如何在Android上显示警报对话框?
我想显示一个对话框/弹出窗口,并向用户显示"您确定要删除此条目吗?"的消息. 一个带有"删除"按钮. 触摸Delete ,它应删除该条目,否则不删除任何条目. ...
- 【ucGUI如何在对话框的标题栏中新增自定义按钮】
ucGUI如何在对话框的标题栏中新增自定义按钮 对话框中可以新增的按钮 在标题栏加入自定义按钮 本文章基于ucGUI3.98版本而言,因为公司不让升级版本,版本变动会带来很多麻烦,因此基于旧版本实现一 ...
- android 设置对话框的高度,如何控制Android中默认警报对话框的宽度和高度?
如何控制Android中默认警报对话框的宽度和高度?AlertDialog.Builder builder = new AlertDialog.Builder(this); builder.setTi ...
- XamarinSQLite教程在Xamarin.Android项目中提取数据库文件
XamarinSQLite教程在Xamarin.Android项目中提取数据库文件 由于不能直接打开该文件,开发者需要先将数据库文件从Android系统中提取出来.操作步骤如下. (5)选择MyDoc ...
- Android中五种常用对话框的使用
场景 Android中常用的五种对话框为 常规对话框.带列表的对话框.自定义的对话框.带进度条的对话框.带日期选择器的对话框. 注: 博客: https://blog.csdn.net/badao_l ...
- android用对话框捕捉异常,Android - 在捕获异常时在doinbackground期间显示警报对话框...
我有这个代码,只要它碰到Source.httpConn就会捕获它,它发送下面的异常来捕获.Android - 在捕获异常时在doinbackground期间显示警报对话框 try { JSONToke ...
最新文章
- AI一分钟|苹果无人车可根据乘客情绪调整行车方式;快商通完成近亿元融资
- SpringBoot自定义参数验证器
- sentinel限流_微服务架构进阶:Sentinel实现服务限流、熔断与降级
- Java EE CDI限定词:快速浏览
- ajax jsonp img
- python文件都是脚本吗_脚本语言系列之Python | Python文件IO
- 给定一个链表,删除链表的倒数第 n 个节点,并且返回链表的头结点。(C++实现)
- 拓端tecdat|Python支持向量回归SVR拟合、预测回归数据和可视化准确性检查实例
- android Camera framework层解析
- python计算bmi指数_python 练习题:计算的BMI指数,并根据BMI指数条件选择
- 学习笔记(03):Qt视频教程-基础实例进阶-多线程下载和断点续传
- Springboot+Mybatis查询三级类目demo
- .net视频觉得做得最好的是天轰穿
- 学生宿舍管理系统需求分析
- 互联网公司纷纷裁员,大家都在说互联网行业进入了寒冬期,你怎么看待这个说法?
- Python-玩转数据-利用百度高德经纬度地图定位
- 一键关闭win10防火墙拦截更新等小工具
- Python 【人工智能】【大数据】【全栈】【自动化】技能-张子夜-专题视频课程...
- html中href传递参数,a href带参数传递
- UE 某图局部 展UV 图标 / CSS 精灵图(sprite) 好像