Spring是如何通过IOC来创建对象的?一文足矣
前言
![]()
一、IOC如何获取对象
面试官:SpringIOC是如何创建对象的?
1.1 Spring是如何获取对象的?
①新建一个maven项目后导入webmvc的依赖:因为webmvc包含了很多其他依赖,为了省事,干脆导入一个总的,方便省事!版本嘛!个人比较喜欢用最新版。
    <dependency><groupId>org.springframework</groupId><artifactId>spring-webmvc</artifactId><version>5.3.5</version></dependency>
1.2.3.4.5.
②新建实体测试类:
public class Person {private String name;private int age;private String like;private String high;//get、set、tostring方法为了篇幅省略,可以自己加或者使用lombok
}
1.2.3.4.5.6.7.
③在resources目录下新建ContextAplication.xml文件
<?xml version="1.0" encoding="UTF-8"?>
<beans xmlns="http://www.springframework.org/schema/beans"xmlns:xsi="http://www.w3.org/2001/XMLSchema-instance"xsi:schemaLocation="http://www.springframework.org/schema/beans http://www.springframework.org/schema/beans/spring-beans.xsd"><bean id="Person" class="entity.Person"><property name="age" value="23"></property><property name="name" value="丁大大"></property><property name="like" value="钓鱼"></property><property name="high" value="173"></property></bean></beans>
1.2.3.4.5.6.7.8.9.10.11.12.
④以上前提之后,你会发现你的测试Person类种发生了变化:点击可以跳转到指定的xml位置哦~
![]()
⑤测试:
Context.getBean() 不指定类时,需要强制转换,所以建议使用第二种方式来获取对象
public class Test {public static void main(String[] args) {ApplicationContext Context = new ClassPathXmlApplicationContext("ContextAplication.xml");
//        Person person = (Person) Context.getBean("Person");//这里不指定的话需要强转,建议用下面的方式来拿对象Person person = Context.getBean("Person",Person.class);System.out.println(person);}
}1.2.3.4.5.6.7.8.
⑥执行结果如下:成功拿到值!
![]()
⑦总结:
控制: 传统的程序对象的创建是由程序来控制创建的。
反转: 交给Spring容器来创建对象,而程序只负责被动的接收对象。这就是反转。
依赖注入: 就是通过set方法来注入的。
1.2 改造案例由xml选择创建对象
①xml:
 <bean id="StudentMapperImpl" class="mapper.impl.StudentMapperImpl"/><bean id="TeacherMapperImpl" class="mapper.impl.TeacherMapperImpl"/><bean id="PersonServiceImpl" class="service.impl.PersonServiceImpl"><property name="studentMapper" ref="StudentMapperImpl"/></bean>
1.2.3.4.5.6.
②测试:
      ApplicationContext Context1 = new ClassPathXmlApplicationContext("ContextAplication.xml");PersonServiceImpl personServiceImpl = Context1.getBean("PersonServiceImpl", PersonServiceImpl.class);personServiceImpl.getPersonInfo();
1.2.3.
③执行结果:
![]()
⑤总结:
对象由Spring 来创建 , 管理 , 装配 !这就是 IOC!
二、IOC是通过什么方式来创建对象的?
2.1 通过无参构造函数来创建对象
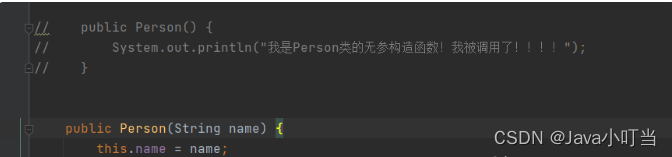
①以Person类为例子,但是加上一个无参构造函数!
public class Person {private String name;private int age;private String like;private String high;public Person() {//输出一句话证明自己被调用了!System.out.println("我是Person类的无参构造函数!我被调用了!!!!");}//set、get、tostring方法因为篇幅原因省略,请手动加上!
}
1.2.3.4.5.6.7.8.9.10.11.12.
②xml中配置:
<?xml version="1.0" encoding="UTF-8"?>
<beans xmlns="http://www.springframework.org/schema/beans"xmlns:xsi="http://www.w3.org/2001/XMLSchema-instance"xsi:schemaLocation="http://www.springframework.org/schema/beans http://www.springframework.org/schema/beans/spring-beans.xsd"><bean id="Person" class="entity.Person"><property name="age" value="23"></property><property name="name" value="丁大大"></property><property name="like" value="钓鱼"></property><property name="high" value="173"></property></bean>
</beans>1.2.3.4.5.6.7.8.9.10.11.
③测试类:
public class Test {public static void main(String[] args) {ApplicationContext Context = new ClassPathXmlApplicationContext("ContextAplication.xml");Person person = Context.getBean("Person", Person.class);System.out.println(person);}
}1.2.3.4.5.6.7.
④执行结果:
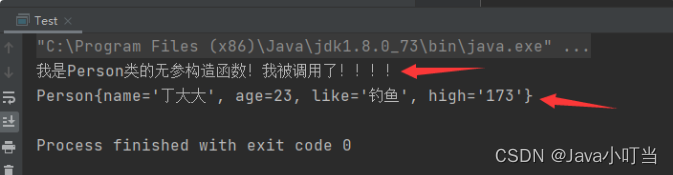
⑤去除无参构造,增加有参构造:
**xml配置程序直接报错:**
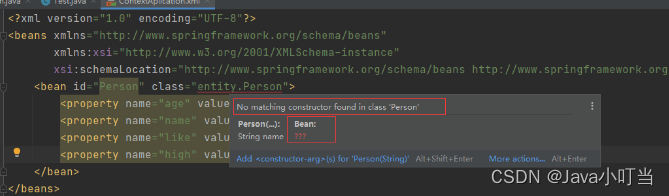
⑥总结:**Spring创建对象默认是通过无参构造函数创建的!
能通过有参构造函数来创建对象嘛?能!看下面!**### 2.2 通过有参构造方法来创建对象
①前提于 2.1 一致,新增有参构造函数:(因为类中,默认的也就是不写构造参数就是无参构造,写了有参构造才能真正意义上去除无参构造,这个不用解释太多吧,java基础的内容了~!)```javapublic Person(String name, int age, String like, String high) {this.name = name;this.age = age;this.like = like;this.high = high;}1.2.3.4.5.6.
②xml配置文件中要发生一定的改变:
<?xml version="1.0" encoding="UTF-8"?>
<beans xmlns="http://www.springframework.org/schema/beans"xmlns:xsi="http://www.w3.org/2001/XMLSchema-instance"xsi:schemaLocation="http://www.springframework.org/schema/beans http://www.springframework.org/schema/beans/spring-beans.xsd"><bean id="Person" class="entity.Person">
<!--        <property name="name" value="丁大大"></property>-->
<!--        <property name="age" value="23"></property>-->
<!--        <property name="like" value="钓鱼"></property>-->
<!--        <property name="high" value="173"></property>--><constructor-arg index="0" value="丁大大"/><constructor-arg name="age" value="23"/><constructor-arg type="java.lang.String" value="钓鱼"/><constructor-arg type="java.lang.String" value="173"/></bean>
</beans>1.2.3.4.5.6.7.8.9.10.11.12.13.14.15.16.
③执行结果:
![]()
⑤总结:
无参构造函数指定值时使用 propert 标签
有参构造函数指定值时使用 constructor-arg 标签,三种写法index --通过下标来给属性赋值name --通过属性名称来给属性赋值type – 指定属性的类型来给属性赋值基本类型可以直接写引用类型得加上全称,如:java.lang.String位置跟index差不多,依次从上到下对应属性的从上到下。
在配置文件加载的时候。其中管理的对象都已经初始化了!
spring源码分析图谱:
![]()
三、Spring的配置
3.1 alias(别名):
为bean设置别名,可设置多个!
①xml:
<?xml version="1.0" encoding="UTF-8"?>
<beans xmlns="http://www.springframework.org/schema/beans"xmlns:xsi="http://www.w3.org/2001/XMLSchema-instance"xsi:schemaLocation="http://www.springframework.org/schema/beans http://www.springframework.org/schema/beans/spring-beans.xsd"><alias name="Person" alias="personAlias1"/><alias name="Person" alias="personAlias2"/><alias name="Person" alias="personAlias3"/><bean id="Person" class="entity.Person"><constructor-arg index="0" value="丁大大"/><constructor-arg name="age" value="23"/><constructor-arg type="java.lang.String" value="钓鱼"/><constructor-arg type="java.lang.String" value="173"/></bean>
</beans>1.2.3.4.5.6.7.8.9.10.11.12.13.14.
②测试类:
public class Test {public static void main(String[] args) {ApplicationContext Context = new ClassPathXmlApplicationContext("ContextAplication.xml");Person person = Context.getBean("personAlias1", Person.class);System.out.println(person);}
}1.2.3.4.5.6.7.
③执行结果:
![]()
④总结:讲实话,这玩意用处不大,因为还有更好的方式来设置别名!
3.2 Bean的配置:
bean就相当于java对象,由Spring创建和管理
①xml:
<?xml version="1.0" encoding="UTF-8"?>
<beans xmlns="http://www.springframework.org/schema/beans"xmlns:xsi="http://www.w3.org/2001/XMLSchema-instance"xsi:schemaLocation="http://www.springframework.org/schema/beans http://www.springframework.org/schema/beans/spring-beans.xsd"><alias name="Person" alias="personAlias1"/><alias name="Person" alias="personAlias2"/><alias name="Person" alias="personAlias3"/><bean id="Person" name="person1,person2 person3;person4" class="entity.Person"><constructor-arg index="0" value="丁大大"/><constructor-arg name="age" value="23"/><constructor-arg type="java.lang.String" value="钓鱼"/><constructor-arg type="java.lang.String" value="173"/></bean>
</beans>1.2.3.4.5.6.7.8.9.10.11.12.13.14.
②测试类:
public class Test {public static void main(String[] args) {ApplicationContext Context = new ClassPathXmlApplicationContext("ContextAplication.xml");Person person = Context.getBean("person4", Person.class);System.out.println(person);}
}1.2.3.4.5.6.7.
③执行结果:
![]()
④总结:
id是bean的唯一标识符
如果没有配置id,那么name相当于标识符,并且可以设置多个
name也是别名,可多个,并且可以通过 逗号 空格 分号 来分隔,是不是比alias别名方便?所以设置别名我们一般使用name
id和name同时存在,name只是别名,不是标识符
class是类的全限定名 包名+类名
![]()
3.3 import(团队合作之导入)
①在实际工作的开发过程中,一个项目可能由多个程序员来进行开发,所以为了解决共性问题,比如:同一文件提交时都进行了修改可能引起冲突,所以我们使用import来解耦!
②新建多个xml配置文件:
![]()
ContextAplication.xml:
<?xml version="1.0" encoding="UTF-8"?>
<beans xmlns="http://www.springframework.org/schema/beans"xmlns:xsi="http://www.w3.org/2001/XMLSchema-instance"xsi:schemaLocation="http://www.springframework.org/schema/beans http://www.springframework.org/schema/beans/spring-beans.xsd"><import resource="dyj1.xml"/><import resource="dyj3.xml"/><import resource="dyj2.xml"/>
</beans>1.2.3.4.5.6.7.8.
dyj1.xml:
<?xml version="1.0" encoding="UTF-8"?>
<beans xmlns="http://www.springframework.org/schema/beans"xmlns:xsi="http://www.w3.org/2001/XMLSchema-instance"xsi:schemaLocation="http://www.springframework.org/schema/beans http://www.springframework.org/schema/beans/spring-beans.xsd"><bean name="person1,person2 person3;person4" class="entity.Person"><constructor-arg index="0" value="丁大大1"/><constructor-arg name="age" value="23"/><constructor-arg type="java.lang.String" value="钓鱼1"/><constructor-arg type="java.lang.String" value="173"/></bean>
</beans>1.2.3.4.5.6.7.8.9.10.11.
dyj2.xml:
<?xml version="1.0" encoding="UTF-8"?>
<beans xmlns="http://www.springframework.org/schema/beans"xmlns:xsi="http://www.w3.org/2001/XMLSchema-instance"xsi:schemaLocation="http://www.springframework.org/schema/beans http://www.springframework.org/schema/beans/spring-beans.xsd"><bean name="person1,person2 person3;person4" class="entity.Person"><constructor-arg index="0" value="丁大大2"/><constructor-arg name="age" value="23"/><constructor-arg type="java.lang.String" value="钓鱼2"/><constructor-arg type="java.lang.String" value="173"/></bean>
</beans>1.2.3.4.5.6.7.8.9.10.11.
dyj3.xml:
<?xml version="1.0" encoding="UTF-8"?>
<beans xmlns="http://www.springframework.org/schema/beans"xmlns:xsi="http://www.w3.org/2001/XMLSchema-instance"xsi:schemaLocation="http://www.springframework.org/schema/beans http://www.springframework.org/schema/beans/spring-beans.xsd"><bean name="person1,person2 person3;person4" class="entity.Person"><constructor-arg index="0" value="丁大大3"/><constructor-arg name="age" value="23"/><constructor-arg type="java.lang.String" value="钓鱼3"/><constructor-arg type="java.lang.String" value="173"/></bean>
</beans>
1.2.3.4.5.6.7.8.9.10.11.
③执行:
![]()
④总结:
如果三个文件都是对同一个操作同一个类,或者说内容一致,那么就以主xml中从上到下最后一个impot为准。
语法格式:
优点:每个人开发
的都是独立的,如果重复的内容,Spring会帮我们自动合并!降低了程序的冲突性!大大提高了后期代码的可维护性!
最后
另外还整理成了40多套PDF文档:全套的Java面试宝典手册,“性能调优+微服务架构+并发编程+开源框架+分布式”等七大面试专栏,包含Tomcat、JVM、MySQL、SpringCloud、SpringBoot、Dubbo、并发、Spring、SpringMVC、MyBatis、Zookeeper、Ngnix、Kafka、MQ、Redis、MongoDB、memcached等等。如果你对这个感兴趣,小编可以免费分享。
Spring是如何通过IOC来创建对象的?一文足矣相关推荐
- Spring学习----IoC容器创建对象
SpringIOC容器,是spring核心内容.功能:创建对象,处理对象的依赖关系 IOC容器创建对象: 创建对象, 有几种方式: 1) 调用无参数构造器 2) 带参数构造器 3) 工厂创建对象 ...
- Spring使用IOC容器创建对象及ClassPathXmlApplicationContext与FileSystemXmlApplicationContext接口详解
IOC容器创建对象及接口详解 引言 类的建立 配置文件 IOC创建对象 运行结果 接口详解 (1)接口一`ClassPathXmlApplicationContext` (2)接口二:`FileSys ...
- Spring核心之对 IOC的理解
Spring核心之对 IOC的理解 Spring是一个轻量级的控制反转(IOC)和面向切面(AOP)的容器框架. 一 .IOC IOC : Inversion of Control,中文译为" ...
- Spring思维导图,让Spring不再难懂(ioc篇)
转载自 Spring思维导图,让Spring不再难懂(ioc篇) 写过java的都知道:所有的对象都必须创建:或者说:使用对象之前必须先创建.而使用ioc之后,你就可以不再手动创建对象,而是从ioc容 ...
- 牛小刚的Spring自学笔记之IOC
牛小刚的Spring自学笔记之IOC,DI 1.啥是IOC,DI IOC就是控制反转,将类的创建啥的控制权交给IOC容器,不用你new ,IOC容器给你new.你需要啥对象直接从IOC容器中拿就可以了 ...
- JAVAWEB开发之Spring详解之——Spring的入门以及IOC容器装配Bean(xml和注解的方式)、Spring整合web开发、整合Junit4测试
Spring框架学习路线 Spring的IOC Spring的AOP,AspectJ Spring的事务管理,三大框架的整合 Spring框架概述 什么是Spring? Spring是分层的Java ...
- spring学习笔记(一)创建对象的四种方式
spring学习笔记(一)创建对象的四种方式 一.简介 Spring是一个轻量级控制反转(IoC)和面向切面(AOP)的容器框架. 所谓IoC就是Iversion of Control,控制反 ...
- Spring的AOP和IOC是什么?使用场景有哪些?Spring事务与数据库事务,传播行为,数据库隔离级别
Spring的AOP和IOC是什么?使用场景有哪些?Spring事务与数据库事务,传播行为,数据库隔离级别 AOP:面向切面编程. 即在一个功能模块中新增其他功能,比方说你要下楼取个快递,你同事对你说 ...
- spring之:XmlWebApplicationContext作为Spring Web应用的IoC容器,实例化和加载Bean的过程...
它既是 DispatcherServlet 的 (WebApplicationContext)默认策略,又是 ContextLoaderListener 创建 root WebApplicationC ...
最新文章
- django 中文乱码或不识别
- 转【C#调用DLL的几种方法,包括C#调用C\C++\C#DLL】
- cordova 强制竖屏
- pivot 用order by 语句排序时,老是超时的解决办法,超Easy
- VC控件DateTimePicker使用方法及其相关
- 怎么将多个html组合_技巧分享之在HTML元素中添加逼真阴影的教程
- Linux下使用NTFS格式移动硬盘
- 二十四种设计模式:代理模式(Proxy Pattern)
- 【计算机科学基础】ASCII码表知识总结
- 求栈中元素个数算法_嵌入式必知基础算法(一)
- 面向能源互联网的多端口DC/DC能源路由器控制策略研究
- ADC芯片CS1242用在电子秤单片机上面
- AquaCrop_原理学习笔记06:土壤水分运动
- 小白怎样使用EXCEL导入MATLAB画出图像
- TestCenter Layer4-7分析
- 如何查看多个Office 365 Group的Owner
- TREC的ad hoc、routing、filtering、topic等术语的解释
- linux下的权限粘滞位
- 一寸证件照比例大小是多少?这些方法轻松修改照片尺寸
- 如何从一款单片机移植到另一款单片机