Learn Blockchains by Building One
You’re here because, like me, you’re psyched about the rise of Cryptocurrencies. And you want to know how Blockchains work—the fundamental technology behind them.
But understanding Blockchains isn’t easy—or at least wasn’t for me. I trudged through dense videos, followed porous tutorials, and dealt with the amplified frustration of too few examples.
I like learning by doing. It forces me to deal with the subject matter at a code level, which gets it sticking. If you do the same, at the end of this guide you’ll have a functioning Blockchain with a solid grasp of how they work.
Before you get started…
Remember that a blockchain is an immutable, sequentialchain of records called Blocks. They can contain transactions, files or any data you like, really. But the important thing is that they’re chained together using hashes.
If you aren’t sure what a hash is, here’s an explanation.
Who is this guide aimed at? You should be comfy reading and writing some basic Python, as well as have some understanding of how HTTP requests work, since we’ll be talking to our Blockchain over HTTP.
What do I need?Make sure that Python 3.6+ (along with pip) is installed. You’ll also need to install Flask and the wonderful Requests library:
pip install Flask==0.12.2 requests==2.18.4
Oh, you’ll also need an HTTP Client, like Postman or cURL. But anything will do.
Where’s the final code?The source code is available here.
Step 1: Building a Blockchain
Open up your favourite text editor or IDE, personally I ❤️ PyCharm. Create a new file, called blockchain.py. We’ll only use a single file, but if you get lost, you can always refer to the source code.
Representing a Blockchain
We’ll create a Blockchain class whose constructor creates an initial empty list (to store our blockchain), and another to store transactions. Here’s the blueprint for our class:
Blueprint of our Blockchain Class
Our Blockchain class is responsible for managing the chain. It will store transactions and have some helper methods for adding new blocks to the chain. Let’s start fleshing out some methods.
What does a Block look like?
Each Block has an index, a timestamp (in Unix time), a list of transactions, a proof (more on that later), and the hash of the previous Block.
Here’s an example of what a single Block looks like:
Example of a Block in our Blockchain
At this point, the idea of a chain should be apparent—each new block contains within itself, the hash of the previous Block. This is crucial because it’s what gives blockchains immutability: If an attacker corrupted an earlier Block in the chain then all subsequent blocks will contain incorrect hashes.
Does this make sense? If it doesn’t, take some time to let it sink in—it’s the core idea behind blockchains.
Adding Transactions to a Block
We’ll need a way of adding transactions to a Block. Our new_transaction()method is responsible for this, and it’s pretty straight-forward:
After new_transaction() adds a transaction to the list, it returns the index of the block which the transaction will be added to—the next one to be mined. This will be useful later on, to the user submitting the transaction.
Creating new Blocks
When our Blockchain is instantiated we’ll need to seed it with a genesis block—a block with no predecessors. We’ll also need to add a “proof” to our genesis block which is the result of mining (or proof of work). We’ll talk more about mining later.
In addition to creating the genesis block in our constructor, we’ll also flesh out the methods for new_block(), new_transaction() and hash():
The above should be straight-forward—I’ve added some comments and docstrings to help keep it clear. We’re almost done with representing our blockchain. But at this point, you must be wondering how new blocks are created, forged or mined.
Understanding Proof of Work
A Proof of Work algorithm (PoW) is how new Blocks are created or minedon the blockchain.The goal of PoW is to discover a number which solves a problem. The number must be difficult to find but easy to verify—computationally speaking—by anyone on the network. This is the core idea behind Proof of Work.
We’ll look at a very simple example to help this sink in.
Let’s decide that the hash of some integer x multiplied by another y must end in 0. So, hash(x * y) = ac23dc...0. And for this simplified example, let’s fix x = 5. Implementing this in Python:
from hashlib import sha256
x = 5
y = 0  # We don't know what y should be yet...
while sha256(f'{x*y}'.encode()).hexdigest()[-1] != "0":y += 1
print(f'The solution is y = {y}')
The solution here is y = 21. Since, the produced hash ends in 0:
hash(5 * 21) = 1253e9373e...5e3600155e860
In Bitcoin, the Proof of Work algorithm is called Hashcash. And it’s not too different from our basic example above. It’s the algorithm that miners race to solve in order to create a new block. In general, the difficulty is determined by the number of characters searched for in a string. The miners are then rewarded for their solution by receiving a coin—in a transaction.
The network is able to easilyverify their solution.
Implementing basic Proof of Work
Let’s implement a similar algorithm for our blockchain. Our rule will be similar to the example above:
Find a numberpthat when hashed with the previous block’s solution a hash with 4 leading
0s is produced.
To adjust the difficulty of the algorithm, we could modify the number of leading zeroes. But 4 is sufficient. You’ll find out that the addition of a single leading zero makes a mammoth difference to the time required to find a solution.
Our class is almost complete and we’re ready to begin interacting with it using HTTP requests.
Step 2: Our Blockchain as an API
We’re going to use the Python Flask Framework. It’s a micro-framework and it makes it easy to map endpoints to Python functions. This allows us talk to our blockchain over the web using HTTP requests.
We’ll create three methods:
/transactions/newto create a new transaction to a block/mineto tell our server to mine a new block./chainto return the full Blockchain.
Setting up Flask
Our “server” will form a single node in our blockchain network. Let’s create some boilerplate code:
A brief explanation of what we’ve added above:
- Line 15: Instantiates our Node. Read more about Flask here.
- Line 18: Create a random name for our node.
- Line 21: Instantiate our
Blockchainclass. - Line 24–26: Create the
/mineendpoint, which is aGETrequest. - Line 28–30: Create the
/transactions/newendpoint, which is aPOSTrequest, since we’ll be sending data to it. - Line 32–38: Create the
/chainendpoint, which returns the full Blockchain. - Line 40–41: Runs the server on port 5000.
The Transactions Endpoint
This is what the request for a transaction will look like. It’s what the user sends to the server:
{"sender": "my address","recipient": "someone else's address","amount": 5
}
Since we already have our class method for adding transactions to a block, the rest is easy. Let’s write the function for adding transactions:
A method for creating Transactions
The Mining Endpoint
Our mining endpoint is where the magic happens, and it’s easy. It has to do three things:
- Calculate the Proof of Work
- Reward the miner (us) by adding a transaction granting us 1 coin
- Forge the new Block by adding it to the chain
Note that the recipient of the mined block is the address of our node. And most of what we’ve done here is just interact with the methods on our Blockchain class. At this point, we’re done, and can start interacting with our blockchain.
Step 3: Interacting with our Blockchain
You can use plain old cURL or Postman to interact with our API over a network.
Fire up the server:
$ python blockchain.py
* Running on http://127.0.0.1:5000/ (Press CTRL+C to quit)
Let’s try mining a block by making a GET request to http://localhost:5000/mine:
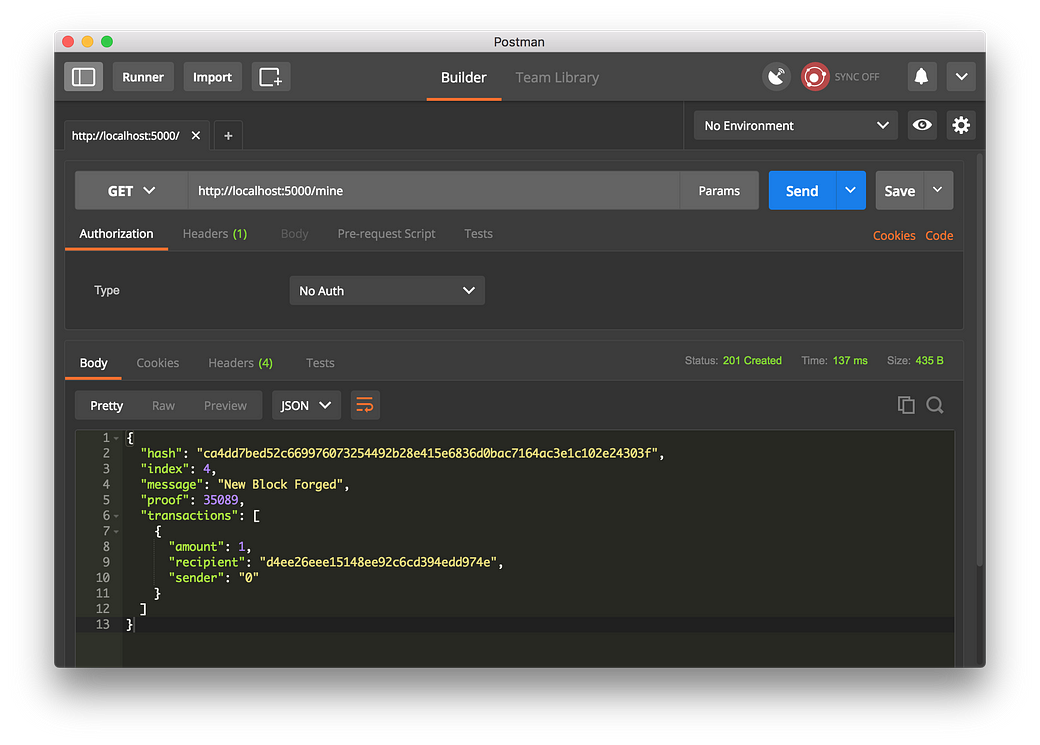
Using Postman to make a GET request
Let’s create a new transaction by making a POST request tohttp://localhost:5000/transactions/new with a body containing our transaction structure:
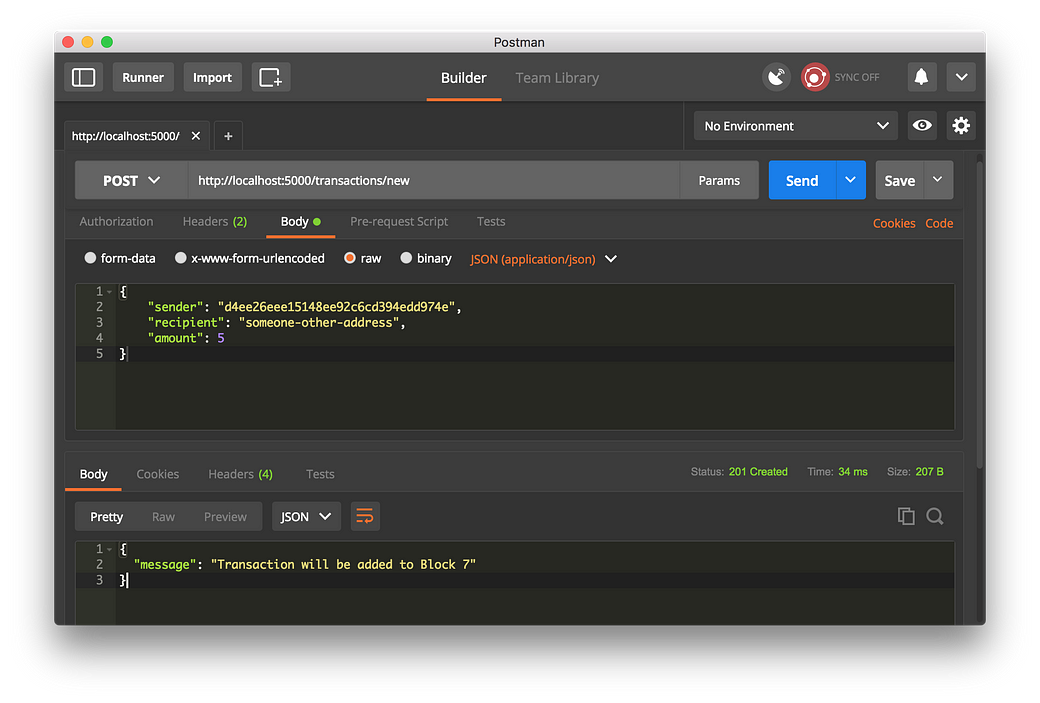
Using Postman to make a POST request
If you aren’t using Postman, then you can make the equivalent request using cURL:
$ curl -X POST -H "Content-Type: application/json" -d '{"sender": "d4ee26eee15148ee92c6cd394edd974e","recipient": "someone-other-address","amount": 5
}' "http://localhost:5000/transactions/new"
I restarted my server, and mined two blocks, to give 3 in total. Let’s inspect the full chain by requesting http://localhost:5000/chain:
{"chain": [{"index": 1,"previous_hash": 1,"proof": 100,"timestamp": 1506280650.770839,"transactions": []},{"index": 2,"previous_hash": "c099bc...bfb7","proof": 35293,"timestamp": 1506280664.717925,"transactions": [{"amount": 1,"recipient": "8bbcb347e0634905b0cac7955bae152b","sender": "0"}]},{"index": 3,"previous_hash": "eff91a...10f2","proof": 35089,"timestamp": 1506280666.1086972,"transactions": [{"amount": 1,"recipient": "8bbcb347e0634905b0cac7955bae152b","sender": "0"}]}],"length": 3
}
Step 4: Consensus
This is very cool. We’ve got a basic Blockchain that accepts transactions and allows us to mine new Blocks. But the whole point of Blockchains is that they should be decentralized. And if they’re decentralized, how on earth do we ensure that they all reflect the same chain? This is called the problem of Consensus, and we’ll have to implement a Consensus Algorithm if we want more than one node in our network.
Registering new Nodes
Before we can implement a Consensus Algorithm, we need a way to let a node know about neighbouring nodes on the network. Each node on our network should keep a registry of other nodes on the network. Thus, we’ll need some more endpoints:
/nodes/registerto accept a list of new nodes in the form of URLs./nodes/resolveto implement our Consensus Algorithm, which resolves any conflicts—to ensure a node has the correct chain.
We’ll need to modify our Blockchain’s constructor and provide a method for registering nodes:
A method for adding neighbouring nodes to our Network
Note that we’ve used a set() to hold the list of nodes. This is a cheap way of ensuring that the addition of new nodes is idempotent—meaning that no matter how many times we add a specific node, it appears exactly once.
Implementing the Consensus Algorithm
As mentioned, a conflict is when one node has a different chain to another node. To resolve this, we’ll make the rule that the longest valid chain is authoritative. In other words, the longest chain on the network is the de-facto one. Using this algorithm, we reach Consensus amongst the nodes in our network.
The first method valid_chain() is responsible for checking if a chain is valid by looping through each block and verifying both the hash and the proof.
resolve_conflicts() is a method which loops through all our neighbouring nodes, downloads their chains and verifies them using the above method. If a valid chain is found, whose length is greater than ours, we replace ours.
Let’s register the two endpoints to our API, one for adding neighbouring nodes and the another for resolving conflicts:
At this point you can grab a different machine if you like, and spin up different nodes on your network. Or spin up processes using different ports on the same machine. I spun up another node on my machine, on a different port, and registered it with my current node. Thus, I have two nodes: http://localhost:5000 and http://localhost:5001.

Registering a new Node
I then mined some new Blocks on node 2, to ensure the chain was longer. Afterward, I called GET /nodes/resolve on node 1, where the chain was replaced by the Consensus Algorithm:

Consensus Algorithm at Work
And that’s a wrap... Go get some friends together to help test out your Blockchain.
I hope that this has inspired you to create something new. I’m ecstatic about Cryptocurrencies because I believe that Blockchains will rapidly change the way we think about economies, governments and record-keeping.
Update: I’m planning on following up with a Part 2, where we’ll extend our Blockchain to have a Transaction Validation Mechanism as well as discuss some ways in which you can productionize your Blockchain.
If you enjoyed this guide, or have any suggestions or questions, let me know in the comments. And if you’ve spotted any errors, feel free to contribute to the codehere!
https://hackernoon.com/learn-blockchains-by-building-one-117428612f46
Learn Blockchains by Building One相关推荐
- freeCodeCamp 练习3 -- Learn accessbility by building a quiz
css letter-spacing 调节字符间距 css 分割线可以用 div 块,设置背景颜色为分割线颜色,自由调节宽度 <div class="divider"> ...
- 第五十八期:从0到1 手把手教你建一个区块链
近期的区块链重回热点,如果你想深入了解区块链,那就来看一下本文,手把手教你构建一个自己的区块链. 作者:Captain编译 近期的区块链重回热点,如果你想深入了解区块链,那就来看一下本文,手把手教你构 ...
- 2018年python薪资_最好的Python:2017和2018年至今我最喜欢的文章集
2018年python薪资 我打算发布此收藏集 (My intention with publishing this collection) Last year I only used Medium ...
- 【区块链新手快速入门】如何构建一个区块链
本文翻译自<Learn Blockchains by Building One>,作者@dvf,原文链接:https://hackernoon.com/learn-blockchains- ...
- 从入门到进阶,史上最全Python精华文章合集
我将这些文章分为 10 类--顺便一提,这也恰好反映出 Python 的多用途.多目标的性质. 这些类别如下: Python 常规编程 Python 性能优化 Python 开发环境及 DevOps ...
- how to learn html5,HTML5与CSS基础
你将学到什么 How to write a Web page Concepts of a markup language Basics of HTML5 and CSS Web design and ...
- unity课设小游戏_Unity制作20个迷你小游戏实例训练视频教程
本教程是关于Unity制作20个迷你小游戏实例训练视频教程,时长:20小时,大小:3.8 GB,MP4高清视频格式,教程使用软件:Unity,附源文件,作者:Raja Biswas,共97个章节,语言 ...
- react测试组件_测试驱动的开发,功能和React组件
react测试组件 This article is part of my studies on how to build sustainable and consistent software. In ...
- react中使用构建缓存_通过构建海滩度假胜地网站,了解如何使用React,Contentful和Netlify...
react中使用构建缓存 In this full course from John Smilga you will learn React by building a beach resort we ...
最新文章
- 机器学习、数据科学、人工智能、深度学习和统计学之间的区别!
- 较传统AGV优势几何?AMR机器人产业格局将变
- 刚换工作,记录下心得
- fastreport(A)
- 我改了500个Bug,但是!!
- 什么是BI(Business Intelligence
- 在Mac系统中如何使用App Cleaner Uninstaller Pro清理应用卸载残留?
- lambda表达式_C++11的lambda表达式递归
- html里的表情,HTML 表情符号
- 何宾 单片机原理及应用_STC单片机原理及应用何宾答案
- python排名上升_11点告诉你,Python为什么这些年在编程语言排行榜上一直上升?...
- openwrt 3G上网功能配置(联通版本)
- Elasticsearch 7.2.0 搜索时报 all shards failed 错误
- 机器学习之GD、SGD
- 真是「狗」了,知乎「吃相」太难看了
- 查看mysql版本的方法
- 60 个让程序员崩溃的瞬间,哈哈哈哈哈哈哈哈哈
- CnOpenData中国电影票房数据简介
- keypad.h arduino按键操作显示
- 【Cocos2d-X】独立开发并发布自己的第一款android手游——SpaceWar