怎么快速制作web原型_如何使用AppGini快速原型制作Web应用程序
怎么快速制作web原型
This article was sponsored by AppGini. Thank you for supporting the partners who make SitePoint possible.
本文由AppGini赞助。 感谢您支持使SitePoint成为可能的合作伙伴。
I honestly can’t think of how many possible reasons there are that you might need a database, especially today. So let’s hypothesize for a moment that you’re a web developer in training.
老实说,我想不出您可能需要数据库的原因有很多,尤其是在今天。 因此,让我们假设您是一名正在接受培训的Web开发人员。
It’s already a pretty confronting world. You’re going to learn HTML, CSS, and JavaScript at an absolute minimum. Then you’ll probably need to pick up a JavaScript library such as jQuery, React, Angular, or whatever you’re drawn to, and more than likely some kind of server-side tech, be it PHP, Ruby, Node.js… you get the idea.
这已经是一个相当对峙的世界。 您将至少学习HTML,CSS和JavaScript。 然后,您可能需要选择一个JavaScript库,例如jQuery,React,Angular或您所吸引的任何东西,并且更有可能使用某种服务器端技术,例如PHP,Ruby,Node.js…你明白了。
And I would say that without fail, even if your ultimate aspiration is to be the best front-end developer out there, you are absolutely going to need to pick up some database skills. Even if you’re working with an amazing ORM, it’s to your benefit to know what’s happening under the hood.
我想说的是,即使您的最终愿望是成为那里最好的前端开发人员,您也绝对需要掌握一些数据库技能。 即使您正在使用出色的ORM,知道幕后发生的一切也对您有利。
Imagine that you want to try your hand at building some kind of web app. You need data, right? If you’re just getting started with APIs you might want to start with a simple weather app, but if you want to try something more complex you may just need to create a database yourself.
想象一下,您想尝试构建某种Web应用程序。 您需要数据,对不对? 如果您只是开始使用API,则可能想从一个简单的天气应用程序开始,但是如果您想尝试更复杂的事情,则可能只需要自己创建一个数据库即可。
Trying to learn too many skills at once has been the downfall of many great people.
一次学习太多技能一直是许多伟人的败笔。
Adding databases into the mix is enough to overload someone. Even if SQL syntax isn’t overly complex, trying to understand how a relational database fits together can be overwhelming, especially when it comes to designing, seeding, and optimizing one.
将数据库添加到组合中足以使某人超载。 即使SQL语法不是太复杂,尝试了解关系数据库如何组合在一起也可能会让人不知所措,尤其是在设计,播种和优化数据库方面。
为什么选择AppGini? (Why AppGini?)
For every argument for using a generator to build things, there are many more against it. But using a tool such as AppGini certainly has its merits, and I believe there are several strong use-cases.
对于使用生成器构建事物的每个论点,都有很多反对的理由。 但是,使用诸如AppGini之类的工具肯定有其优点,我相信有几个强大的用例。
AppGini makes creating a database very easy, such that you can realistically have a database up and running in a few minutes — though, of course, a more complex database will take longer. It’s great for people with limited SQL or Relational Database Management System knowledge, or those who want to prototype an idea with limited time wastage, but you can also use it to efficiently built a production-ready database.
AppGini使创建数据库变得非常容易,因此您实际上可以在几分钟内启动并运行数据库,但是,当然,更复杂的数据库将花费更长的时间。 对于那些对SQL或关系数据库管理系统知识了解有限的人,或者想在有限的时间浪费下构思一个想法的人,这非常有用,但是您也可以使用它来有效地构建可用于生产的数据库。
如何开始使用AppGini (How to Get Started with AppGini)
To get started you’ll need to download AppGini and install it, though a caveat here is that it only runs natively on Windows. Linux users can follow these instructions to virtualize AppGini.
首先,您需要下载AppGini并安装它,但要注意的是它仅在Windows上本地运行。 Linux用户可以按照以下说明虚拟化AppGini。
Once installed, you’ll also need to make sure you have PHP and MySQL running on your machine, with recommended minimum versions being 5.2 and 4 respectively.
安装后,还需要确保计算机上运行了PHP和MySQL,建议的最低版本分别为5.2和4。
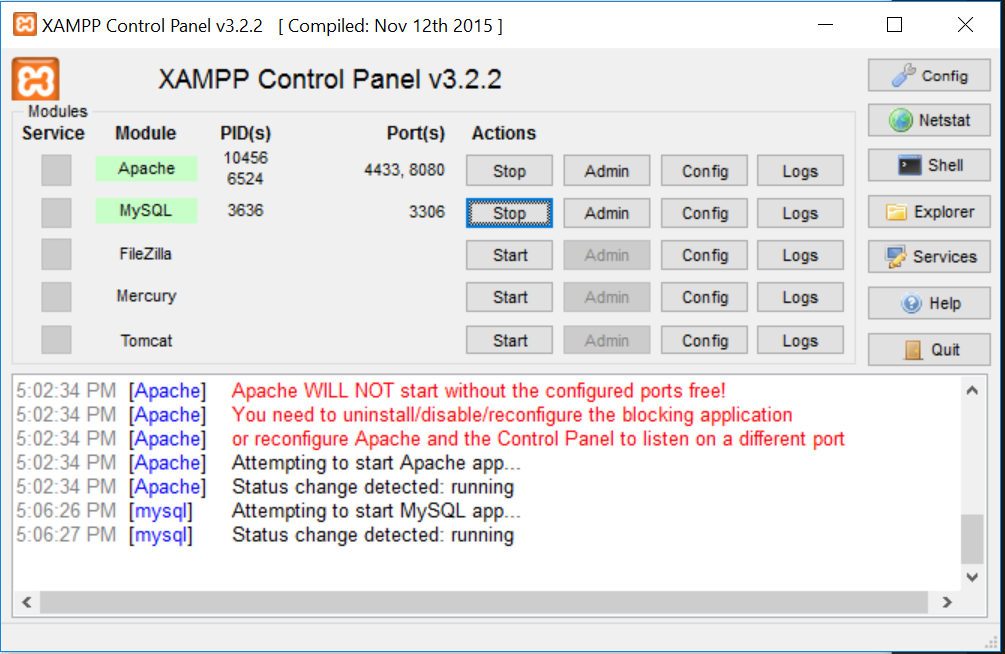
If you don’t have PHP and MySQL set up on your machine right now, there are an abundance of ways to do it — however, for this tutorial I’ve opted to use XAMPP with PHP 5.5 and MySQL 5, which you can download here. Once you’ve got it installed, start the Apache and MySQL servers and verify they are working by opening http://localhost in your browser. You XAMPP control panel should look something like this:
如果您现在没有在计算机上设置PHP和MySQL,则有很多方法可以使用-但是,在本教程中,我选择将XAMPP与PHP 5.5和MySQL 5结合使用,您可以下载 XAMPP 在这里 。 安装后,请启动Apache和MySQL服务器,并通过在浏览器中打开http:// localhost来验证它们是否正常运行。 您的XAMPP控制面板应如下所示:
我们将用AppGini构建的内容 (What We’re Going to Build with AppGini)
We’re going to build a database that you might expect to use for a very simple content management system. For this, we’re going to need to make three tables with various fields.
我们将建立一个数据库,您可能希望将其用于非常简单的内容管理系统。 为此,我们将需要制作三个具有不同字段的表。
- Users (ID, userName, userEmail, userDob, userImage)用户(ID,userName,userEmail,userDob,userImage)
- Categories (ID, categoryID, categoryName) 类别(ID,categoryID,categoryName)
- Posts (ID, AuthorID[FK], postTitle, postContent, postPublishDate, categoryID[FK])帖子(ID,AuthorID [FK],postTitle,postContent,postPublishDate,categoryID [FK])
As we go through creating this I’ll be explaining some of the data types we are working with, and how AppGini handles fields with special names.
在创建过程中,我将解释一些正在使用的数据类型,以及AppGini如何处理具有特殊名称的字段。
在AppGini中创建数据库 (Creating a Database in AppGini)
When you open AppGini it will ask you how you want to begin. We’re just going to choose start a new project and click OK.
当您打开AppGini时,它将询问您如何开始。 我们将选择开始一个新项目,然后单击“确定”。

AppGini will start the project for you with just a database name, new_db, chosen. Here you want to click on new_db and change the name as you please — I’m changing this to be named content.
AppGini将仅选择一个数据库名称new_db为您启动项目。 在这里,您想单击new_db并new_db更改名称-我将其更改为content 。
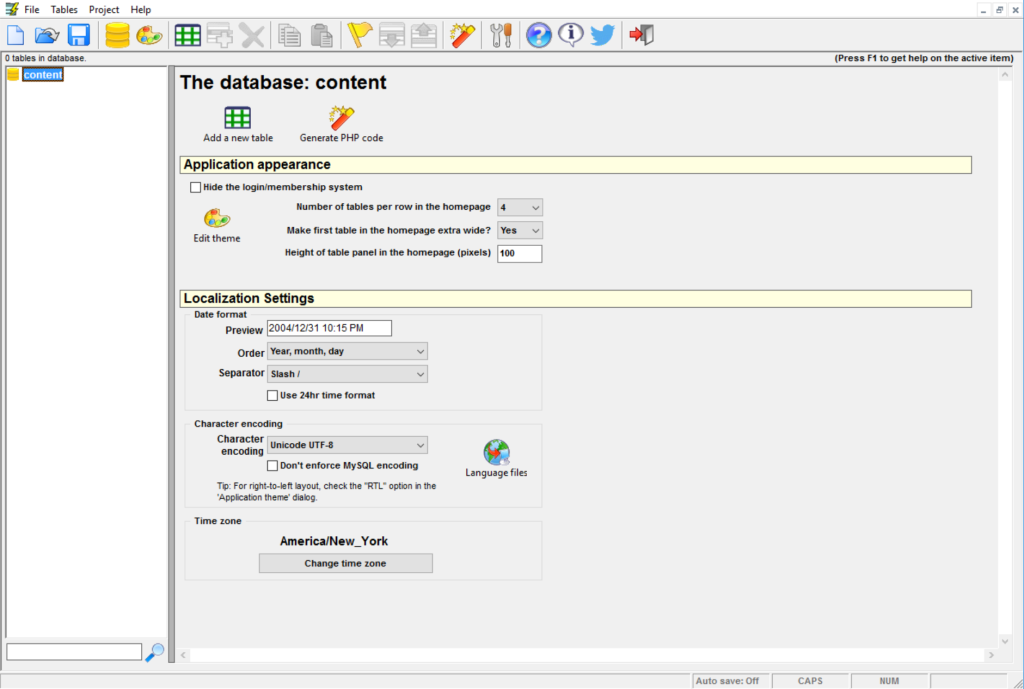
In the main pane you can modify the appearance as you please, but what I want to focus on here are the localization settings. I want to change the date format to Year, Month, Day, and set the character encoding to UTF-8, though that should already be set by default. It’s worth noting that AppGini does support Right-to-Left languages, so you can safely use Arabic, Hebrew, and so on with it.
在主窗格中,您可以根据需要修改外观,但是我想在这里重点介绍的是本地化设置。 我想将日期格式更改为Year, Month, Day ,并将字符编码设置为UTF-8 ,尽管默认情况下应已设置。 值得注意的是,AppGini确实支持从右到左语言,因此您可以安全地使用阿拉伯语,希伯来语等。
Before we move on, here’s what I’m looking at.
在继续之前,这是我要看的东西。
在我们的数据库中创建表 (Creating Tables in Our DB)
The first table we’re going to create is users, and we can do that simply by clicking on ‘Add a new table` — you can see this in the previous screenshot, both in the top menu and in the main pane under the database name.
我们将要创建的第一个表是users ,我们只需单击“添加新表”即可做到这一点-您可以在上一个屏幕快照中的顶部菜单和数据库下方的主窗格中看到此表。名称。
As soon as you add a new table, AppGini will set the cursor so you can change the name, so naturally we’re going to call this one users. I’m going to add in a description stating what the table holds, which will be visible on the AppGini-generated dashboard later.
添加新表格后,AppGini会立即设置光标,以便您更改名称,因此我们自然会称呼此用户。 我将添加描述以说明表的内容,稍后将在AppGini生成的仪表板上看到该表。
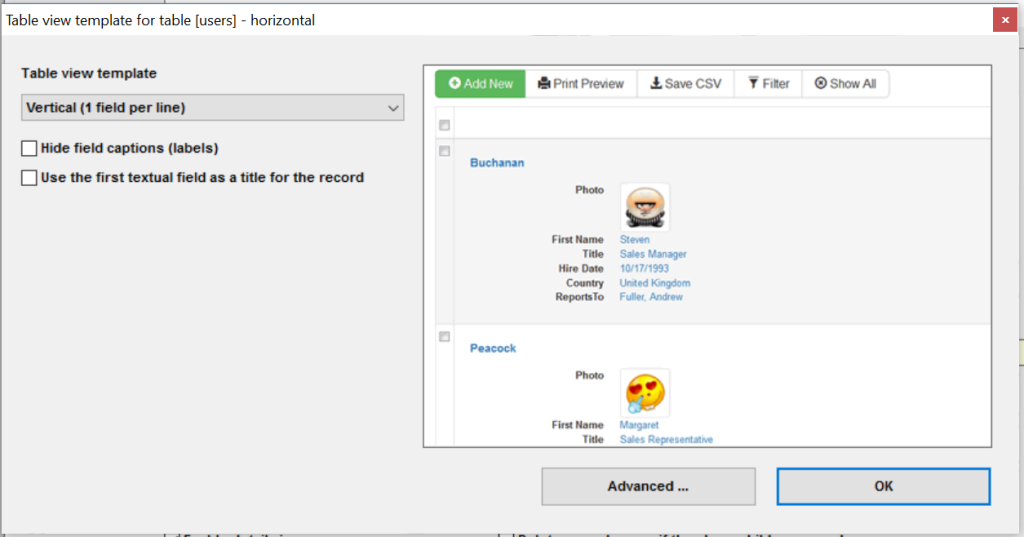
Depending on the data you’re looking to use, you may wish to change the table view template from horizontal to one of the other options, such as Vertical, pictured below, however I find the default works just fine.
根据您要使用的数据,您可能希望将表格视图模板从水平更改为其他选项之一,例如“垂直”,如下图所示,但是我发现默认选项很好。
Now we need to add some fields to our table. You can do this by clicking on “Add Field” which is to the right of “Add Table” in the menu.
现在,我们需要向表中添加一些字段。 您可以通过单击菜单中“添加表”右侧的“添加字段”来执行此操作。
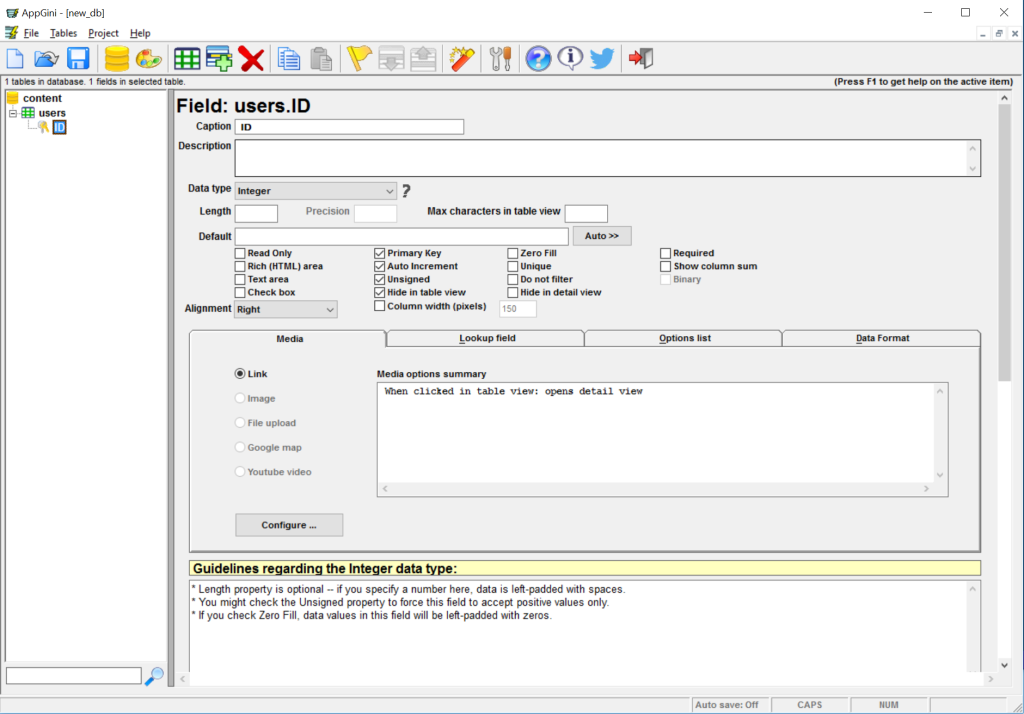
When you do this, again, AppGini will automatically put the cursor in the field name in the left pane. We’re going to call this first field ID, which in AppGini is treated specially. When you name a field ID, it will automatically set it to the Primary Key of the table, make it auto-increment, and hide it in the table view. In an RDBMS such as SQL, the Primary Key is a unique identifier for each row that is set automatically by the database engine when you add a record. Its value auto-incrementing means that each new row’s Primary Key has a value of the prior + 1. We’re going to leave it hidden in the table view because we do not need to see it.
再次执行此操作时,AppGini会自动将光标置于左窗格的字段名称中。 我们将调用此第一个字段ID ,在AppGini中将对它进行特殊处理。 命名字段ID时,它将自动将其设置为表的主键,使其自动递增,并将其隐藏在表视图中。 在RDBMS(例如SQL)中,主键是每行的唯一标识符,当添加记录时,数据库引擎会自动设置每行的唯一标识符。 它的值自动递增意味着每个新行的主键的值都为先前的+1。我们将其隐藏在表视图中,因为我们不需要看到它。
Our next step is to add another field called simply userName. It requires no special configuration and will be created as a character field of up to 40 characters in length.
我们的下一步是添加另一个名为userName字段。 它不需要特殊配置,将被创建为最多40个字符的字符字段。
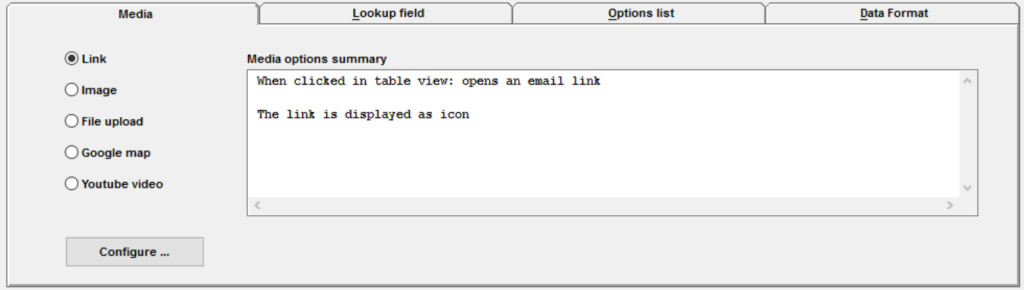
Next we’ll add another field, this time userEmail — but when adding it, we’re going to call it just email. Email is another special word in AppGini, where it will set certain properties for the to-be-generated front end, basically setting the value to have a mailto link, as you can see below.
接下来,我们将添加另一个字段,这次是userEmail ,但是添加时,我们将其仅称为email 。 电子邮件是AppGini中的另一个特殊词,它将为要生成的前端设置某些属性,基本上将其值设置为具有mailto链接,如下所示。
Once you’ve named it email for the autogenerated properties, click on the name and update to userEmail.
为自动生成的属性命名为email后,单击名称并更新为userEmail 。
Now we’re going to add another field. We want to call it userDob but we’re first going to call it date as this is another special word in AppGini, where it will automatically set some properties. In this case, the field’s data type will automatically be set to type Date. Once created, click on the field’s name and change it to userDob, and then change the “Caption” field to “Date of Birth”.
现在,我们将添加另一个字段。 我们想将其userDob但我们首先将其命名为date因为这是AppGini中的另一个特殊词,它将自动设置一些属性。 在这种情况下,该字段的数据类型将自动设置为Date类型。 创建后,单击该字段的名称并将其更改为userDob ,然后将“标题”字段更改为“出生日期”。
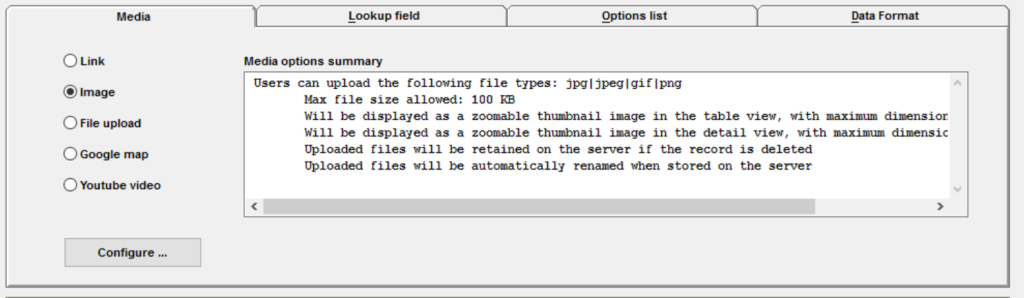
Our final field in this table will be userImage, though yet again we’re going to call it something different — this time it will start as image which sets certain properties for the front end including a prefilled description, so create that and then rename it to userImage. Below you can see the media options summary.
该表中的最后一个字段将为userImage ,不过我们还是要使用不同的名称-这次它将以image开头,该image会设置前端的某些属性(包括预填充的说明),因此请对其进行创建然后重命名到userImage 。 您可以在下面看到媒体选项摘要。
With the users table complete, we’re going to make a new one, this time called categories. After creating the users table this one should be super simple. We want to create two fields.
完成users表后,我们将创建一个新表,这次称为categories 。 创建完users表后,该表应该非常简单。 我们要创建两个字段。
categoryId— name itidto start then rename tocategoryId, andcategoryId—将其命名为id以开始,然后重命名为categoryId,以及categoryName— which we don’t have to do anything special with, though I recommend changing the “Caption” field to “Category Name”categoryName—尽管我建议将“ Caption”字段更改为“ Category Name”,但我们不需要做任何特殊的事情
Finally, we create our third and final table, called posts. Start off by creating a field in this table called id, but then rename it to postId, so we can take advantage of AppGini’s behavior for the best result from the least effort.
最后,我们创建第三个也是最后一个表,称为posts 。 首先在此表中创建一个名为id的字段,然后将其重命名为postId ,以便我们可以利用AppGini的行为以最少的努力获得最佳结果。
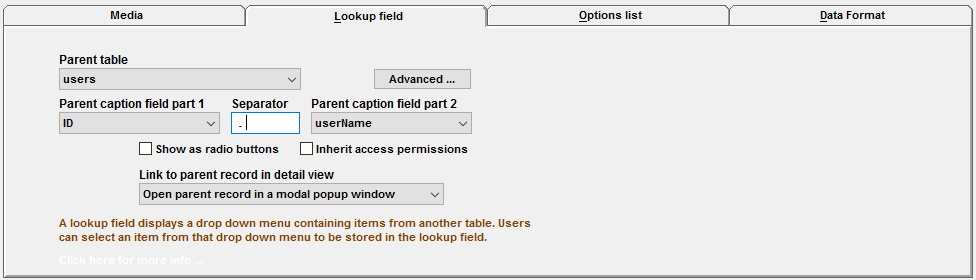
The second field to create for this table is going to be called authorID. Rather than have to fill this in manually for every post that is added, we want it to use data from another table, so we’re going to click on the “Lookup field” tab, select a Parent table of users, then set the caption fields to ID and userName as pictured below.
为此表创建的第二个字段将称为authorID 。 而不是在手动填补这个对于添加每一个岗位,我们希望它从另一个表使用的数据,所以我们要点击“查找字段”选项卡上,选择一个父表users ,然后设置标题字段为ID和userName ,如下图所示。
We’re going to basically do the same thing again, but this time for a field called categoryId, where we’ll go into “Lookup field” and set the caption fields to categoryId and categoryName respectively, pictured below.
我们基本上将再次做同样的事情,但是这次是一个名为categoryId的字段,我们将进入“查找字段”并将标题字段分别设置为categoryId和categoryName ,如下图所示。

Why are we using Lookups? Data integrity. In using Lookups in our tables, what we’re actually doing is setting the field’s value to be a Foreign Key, which is simply the Primary Key from another table, and there are three main benefits:
我们为什么要使用查找? 数据的完整性。 在表中使用查找时,我们实际上所做的是将字段的值设置为外键,这就是另一个表中的主键,它具有三个主要优点:
- The data needed for an item in this table can be pulled from another, preventing data duplication该表中某个项目所需的数据可以从另一个数据中提取,从而防止数据重复
- It becomes almost impossible to insert invalid data into that particular field几乎不可能将无效数据插入该特定字段
- The data is, ideally speaking, protected from being accidentally deleted, where you couldn’t delete a user who had 10 posts without first deleting their posts.理想情况下,可以保护数据免遭意外删除,在这种情况下,您必须先删除具有10个帖子的用户,然后才能删除他们的帖子。
Now create another table, this time called postTitle. The defaults will most likely suffice, though the character limit will be 40, which you may wish to change to be larger. I’d also recommend changing the “Caption” field to “Post Title”.
现在创建另一个表,这次称为postTitle 。 尽管字符数限制为40,但默认值很可能就足够了,您可能希望更改为更大的字符数。 我还建议将“标题”字段更改为“帖子标题”。
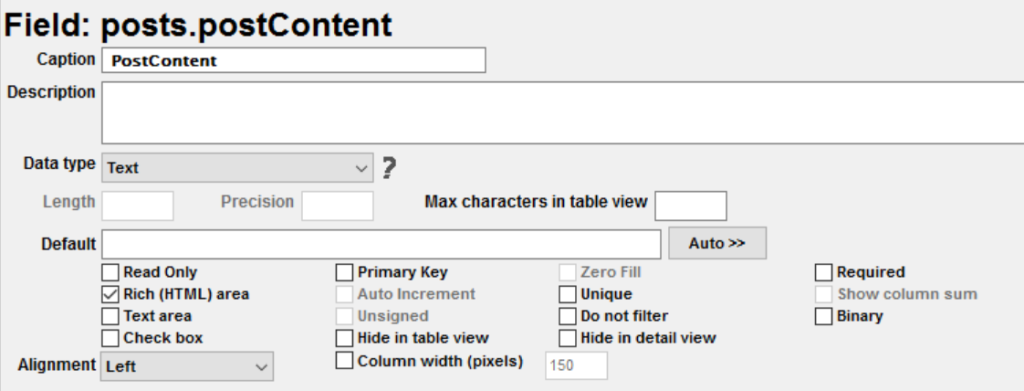
Next we’re going to create the postContent table. Because this is going to store the text that would constitute a post we need to give it some more room to move. As such we want to change the Data type to Text, which is a field that can hold slightly over two billion characters. I’ll also recommend changing the “Caption” to “Post Content”. We also want to change the field’s front end display type to Rich (HTML) area so formatting can be added as required, pictured below for clarity:
接下来,我们将创建postContent表。 因为这将存储将构成帖子的文本,所以我们需要给它更多的移动空间。 因此,我们想将“数据类型”更改为“ Text ,该字段可以容纳略超过20亿个字符。 我还将建议将“标题”更改为“帖子内容”。 我们还希望将字段的前端显示类型更改为Rich (HTML) area以便可以根据需要添加格式,为清晰起见,如下图所示:
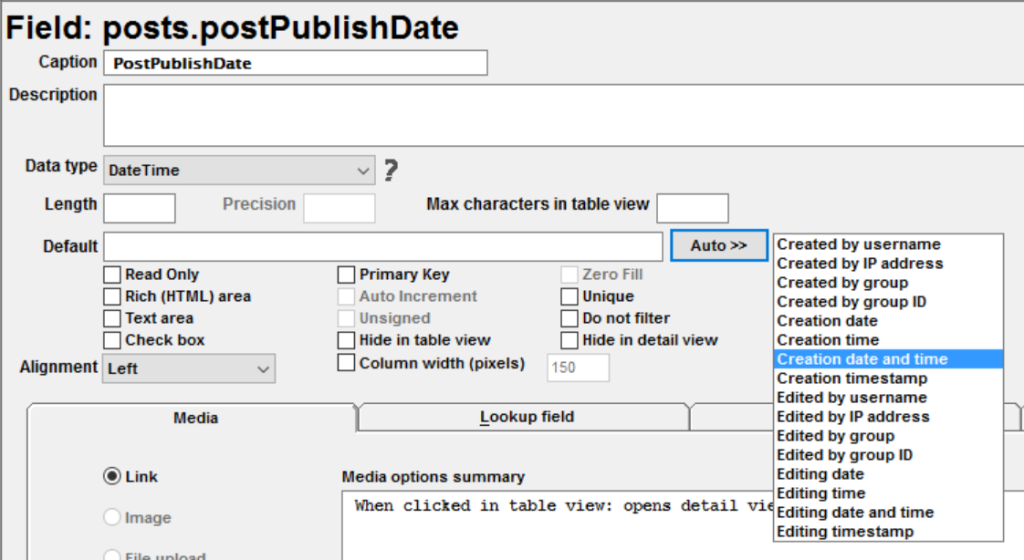
And with that it’s time to create our final table, this time called postPublishDate, and we’re going to set the Data type to DateTime because we want the post to have not just a publish date but the time as well. With this field we want to click on the Auto menu and select Creation date and time so that this is automatically populated, however, this will also set the field as Read Only. And of course, I recommend changing the “Caption” to something a bit more user friendly, in this case “Publish Date”.
这样就可以创建最终表了,这次叫做postPublishDate ,我们将数据类型设置为DateTime因为我们希望发布不仅具有发布日期,而且具有发布时间。 在此字段中,我们要单击“自动”菜单,然后选择“ Creation date and time以便自动填充该Creation date and time ,但是,这还将将该字段设置为“只读”。 当然,我建议将“标题”更改为更加用户友好的名称,在本例中为“发布日期”。
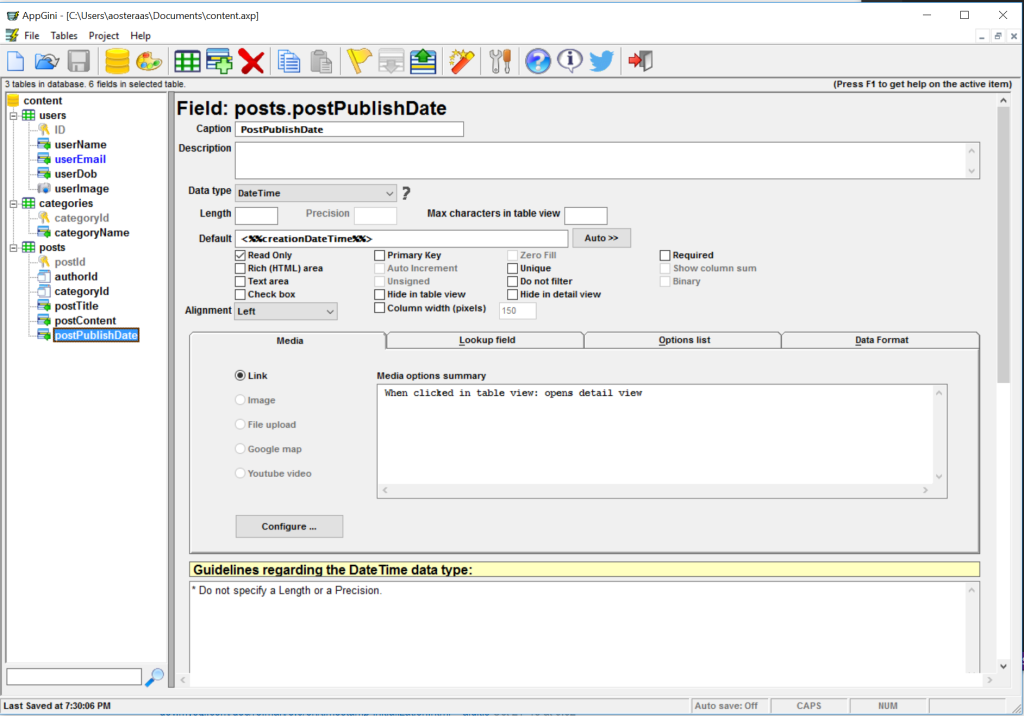
If you wanted to be able to track when it was changed, you could create another field and set its Data type to DateTime and under Auto choose Editing date and time. Otherwise, if you’ve been following along this is how your AppGini will look.
如果您希望能够跟踪其更改时间,则可以创建另一个字段并将其数据类型设置为DateTime然后在“自动”下选择“ Editing date and time 。 否则,如果您一直遵循此方法,则AppGini的外观将如此。
部署数据库 (Deploying Our DB)
Alright! We’ve created the structure for our database, so now it’s just about time to deploy. By default, AppGini will deploy with a standard Bootstrap frontend, however you’re able to change this easily by clicking on your database in the left-hand pane, and then selecting Edit theme.
好的! 我们已经为数据库创建了结构,因此现在就该进行部署了。 默认情况下,AppGini将使用标准的Bootstrap前端进行部署,但是您可以通过在左侧窗格中单击数据库,然后选择“编辑主题”来轻松更改此设置。
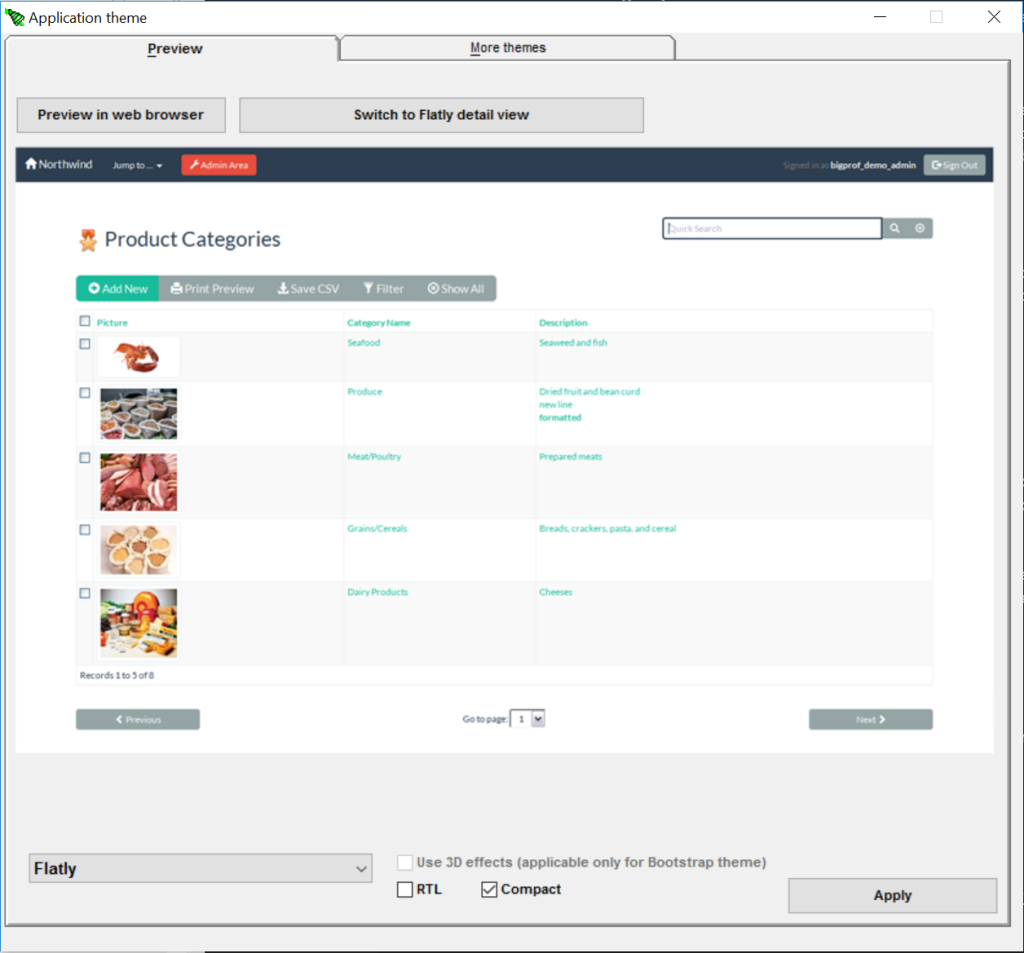
In here you’ll get a preview of how it’s going to look by default. Using the dropdown you can change the theme to another Bootstrap-based template, some of which I am sure readers will recognize from Bootswatch. Below you can see that I have selected Flatly and the preview has updated accordingly.
在这里,您可以预览默认情况下的外观。 使用下拉菜单,您可以将主题更改为另一个基于Bootstrap的模板,我相信读者可以从Bootswatch中识别其中的一些模板。 在下面,您可以看到我选择了Flatly并且相应地更新了预览。
Remember to hit RTL if you need it!
如果需要,请记住按RTL !
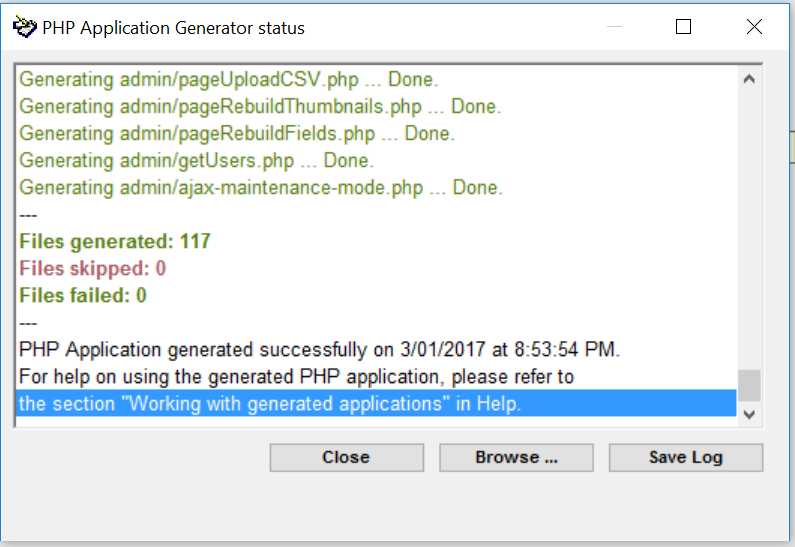
And with that it’s time to hit Generate PHP Code, after which you’ll need to tell AppGini where to deploy the actual code. If you’re using XAMPP and followed the default install then you’ll want to put it in C:\xampp\htdocs\foldername where we will substitute foldername with content. Assuming everything went well you should see an output window just like this.
到了该点击“生成PHP代码”的时候了,之后您需要告诉AppGini在哪里部署实际的代码。 如果您使用的是XAMPP并遵循默认安装,则需要将其放在C:\xampp\htdocs\foldername ,在其中我们用content替换foldername 。 假设一切顺利,您应该会看到这样的输出窗口。
What I want to stress here is that if you want, you can make practically any number of changes to your Database and run the PHP generator again, without fear of losing your data.
我在这里要强调的是,如果需要,您几乎可以对数据库进行任何数量的更改,然后再次运行PHP生成器,而不必担心丢失数据。
Otherwise it’s time to open our project in the browser, which for most people will be http://localhost/content. You’ll see a message saying there’s no configuration file, but not to worry: simply click on continue and you’ll see another message identifying that you’ll need to know the database server, name, username, and password. If you’re using XAMPP in its absolute default configuration, your details will be as follows:
否则,是时候在浏览器中打开我们的项目了,对于大多数人来说,这将是http:// localhost / content。 您会看到一条消息,说没有配置文件,但不用担心:只需单击继续,您将看到另一条消息,表明您需要知道数据库服务器,名称,用户名和密码。 如果您使用XAMPP的绝对默认配置,则详细信息如下:
- Server: localhost服务器:本地主机
- Database name: content (you don’t need to create the database first)数据库名称:内容(您无需首先创建数据库)
- Username: root用户名:root
- Password: blank密码:空白
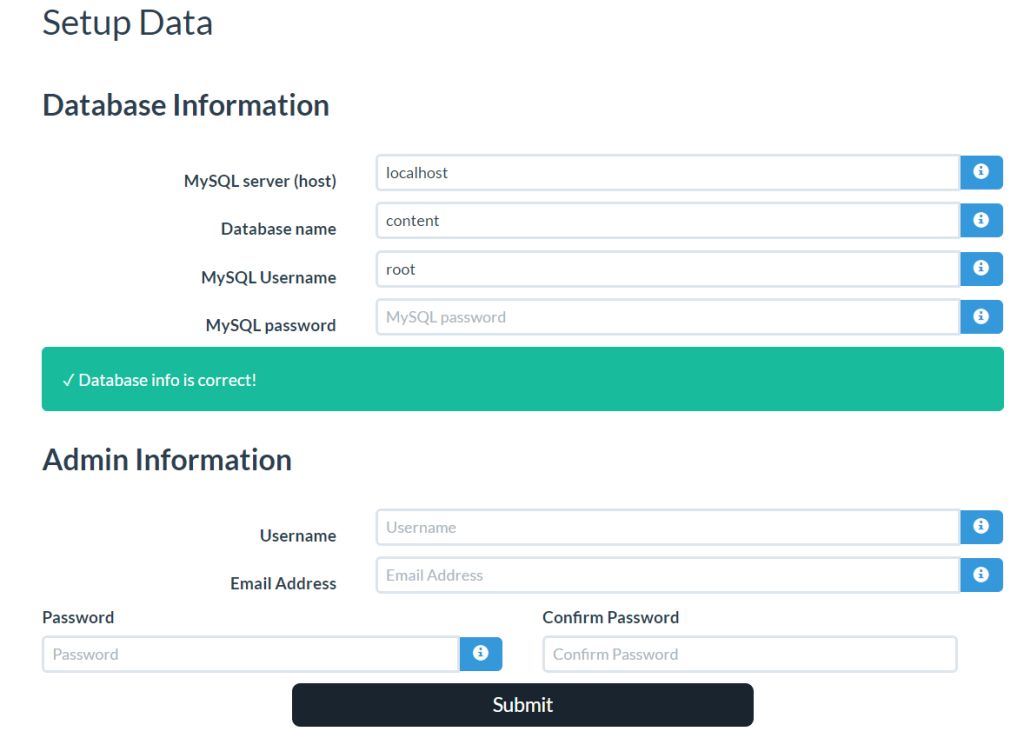
This is all pictured below, however you’ll also need to set an Admin username, email, and password. Please note, these are not related to the content database we have created — these are to log in to the AppGini generated dashboard.
这全都显示在下面,但是您还需要设置管理员用户名,电子邮件和密码。 请注意,这些与我们创建的content数据库无关-它们将登录到AppGini生成的仪表板。
If all goes to plan, you’ll see a success message from which you can navigate to start adding data, import from CSV, or go to the admin homepage to modify application settings. We’ll get straight down to business and start adding data.
如果一切按计划进行,您将看到一条成功消息,从中可以导航开始添加数据,从CSV导入或转到管理主页以修改应用程序设置。 我们将直接开始业务并开始添加数据。
将信息输入我们的数据库 (Inputting Information into Our DB)
First up, we’re going to be adding user data to our users table. If you haven’t already, click on “Start adding data” and then “Users” which will show you everything in that table right now (which is, obviously, nothing).
首先,我们将向用户表添加用户数据。 如果还没有,请单击“开始添加数据”,然后单击“用户”,这将立即向您显示该表中的所有内容(很明显,什么都没有)。
Of course, we’re going to click on “Add New” and get started. I’m going to keep it simple and just add a dummy user to the Database as pictured below.
当然,我们将单击“添加新”并开始使用。 我将保持简单,仅将一个虚拟用户添加到数据库中,如下图所示。
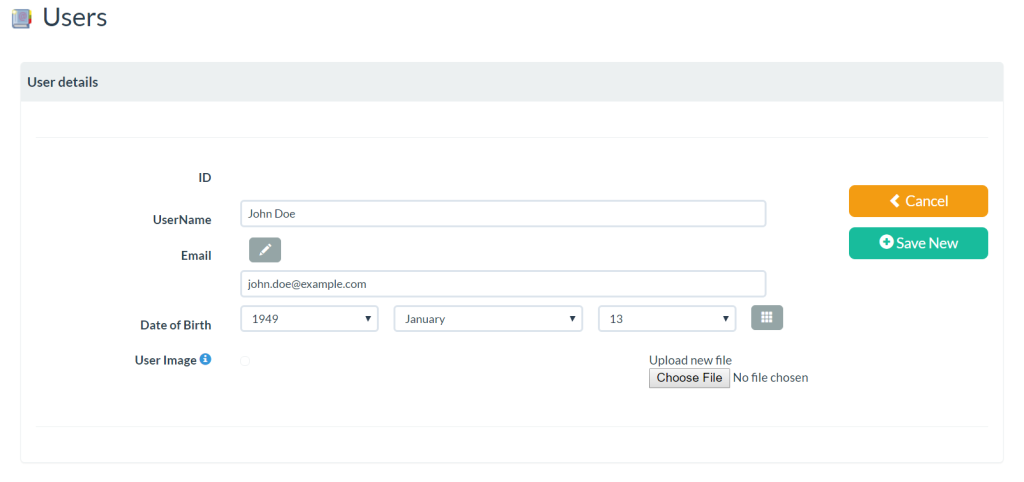
Fill it out as required and when you’re done just click on “Save New”. You’ll see something like this, where we can see all the user data we just put in, and change if required:
根据需要填写,完成后,只需单击“保存新”。 您将看到类似这样的内容,在这里我们可以看到刚放入的所有用户数据,并根据需要进行更改:
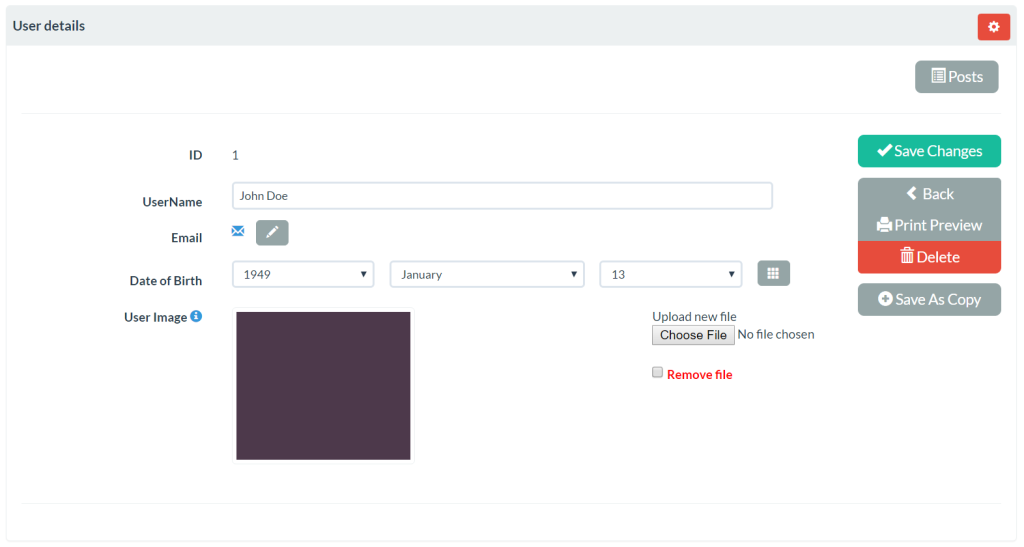
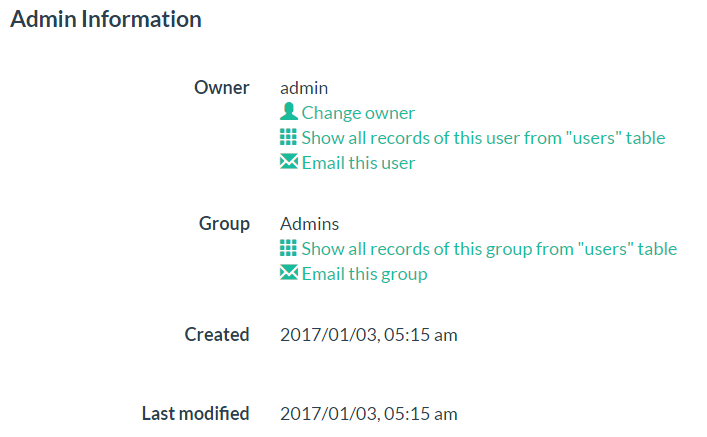
If you are to click the red cog pictured (which shows only when the user is signed in as administrator) you’ll receive a small dialog where you can see the record owner, change said owner, email the user, and so on.
如果您单击如图所示的红色嵌齿轮(仅在用户以管理员身份登录时显示),您将看到一个小对话框,您可以在其中看到记录所有者,更改所述所有者,向用户发送电子邮件等。
From the top menu let’s select Jump to… and navigate into our Categories table and once again, we’re going to add a new record. Because of the limited scope of this table, the only value we can input is the category name, so I’m just going to call my category by “news”.
从顶部菜单中,选择“ 跳至…”并导航到“ Categories表,然后再次添加新记录。 由于此表的范围有限,因此我们只能输入类别名称作为输入值,因此我将用“新闻”来称呼我的类别。
When you’ve done that, use the Jump to… menu again, but this time head into Posts and click on “Add New”.
完成此操作后,再次使用“ 跳至...”菜单,但这一次进入“帖子”并单击“添加新”。
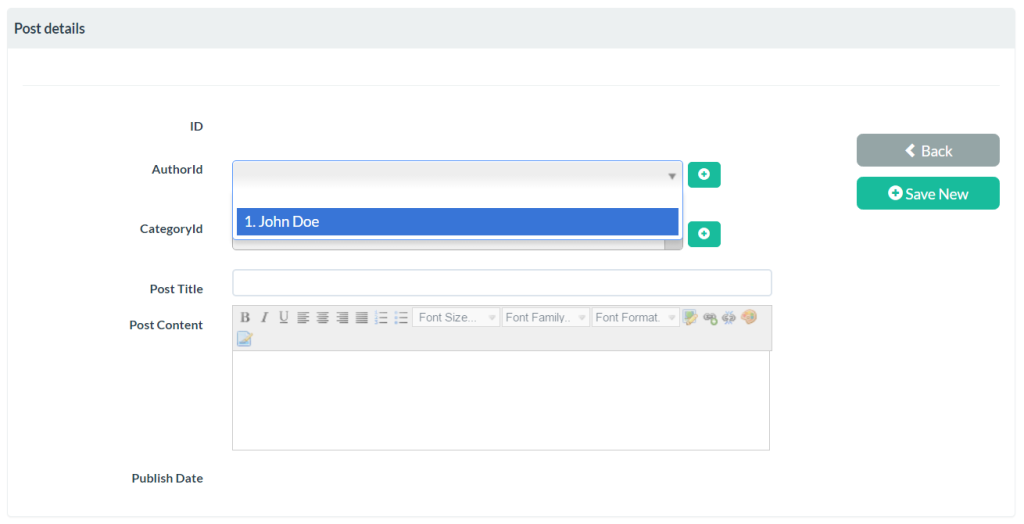
Here you can see that we’ve got a more interesting view to work with. Naturally we can’t change the ID or Publish Date of the post, as they’re managed by the database, and as for the Author ID and Category ID, they’re restricted to what’s in dropdowns. However, the latter two have + buttons next to them, and if you click on those you can add new user and category records while you’re creating the post.
在这里您可以看到我们有一个更有趣的视图可以使用。 自然,我们不能更改帖子的ID或发布日期,因为它们是由数据库管理的,而对于作者ID和类别ID,它们仅限于下拉列表中的内容。 但是,后两个按钮旁边有+按钮,如果您单击它们,则可以在创建帖子时添加新的用户和类别记录。
I’m not going to do either of those, instead electing to set a post title and paste in some classic lorem ipsum into the WYSIWYG editor, though I’ll change it to Comic Sans because I’m a classy guy. When you’re done hit save, then navigate back to the posts table and you should see something like this.
我不打算做任何一个,而是选择设置一个帖子标题,并将一些经典的lorem ipsum粘贴到WYSIWYG编辑器中,尽管我将其更改为Comic Sans,因为我是一个优雅的家伙。 完成后,点击保存,然后导航回posts表,您应该会看到类似的内容。
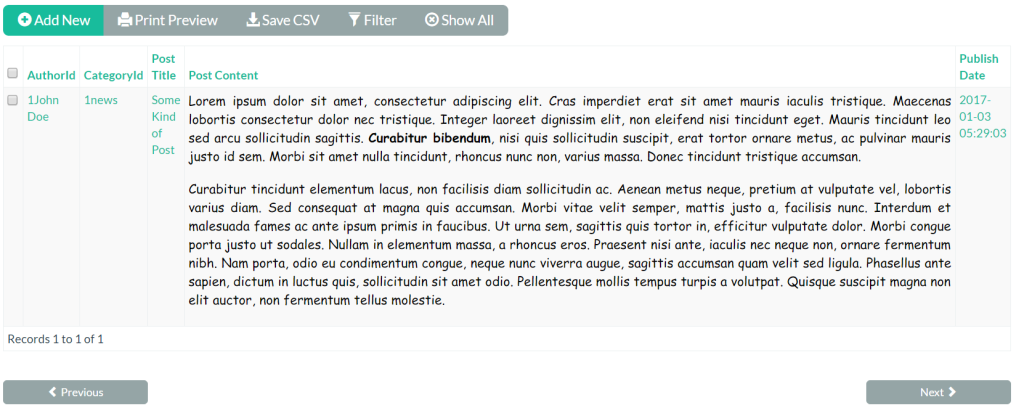
And, well, that’s basically it. That’s how you create a database in AppGini and can feed in data via the generated front end.
而且,基本上就是这样。 这样便可以在AppGini中创建数据库,并可以通过生成的前端输入数据。
导出为CSV (Exporting to CSV)
When you’ve got some data in your tables, if at any time you want to back that data up, you just need to navigate to the table in question, and click on “Save CSV” which will automatically download a CSV to your computer named after the table.
当您的表中有一些数据时,如果您想随时备份该数据,则只需导航到有问题的表,然后单击“保存CSV”即可将CSV自动下载到您的计算机中以表格命名。

行政区 (Admin Area)
The generated app comes with an admin area, which at base gives you an overview of your database. However, there are three main tasks you can perform:
生成的应用程序带有一个管理区域,该区域从根本上为您提供了数据库概述。 但是,您可以执行三个主要任务:
- Group administration小组管理
- Member administration会员管理
- Utilities实用工具
We’re going to be focusing on groups and member administration, so from the Groups menu item up top, select “View Groups” and you’ll see the following:
我们将专注于组和成员管理,因此从顶部的“组”菜单项中选择“查看组”,您将看到以下内容:
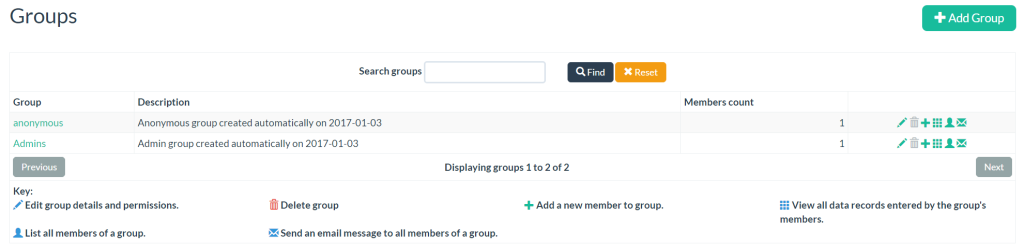
This is the kind of area that would come in handy if you were using AppGini to build a company dashboard of some kind, something that needed many users with varying permissions. With that in mind, let’s click on “Add Group”.
如果您使用AppGini来构建某种类型的公司仪表板,则该区域会派上用场,而这需要许多具有不同权限的用户。 考虑到这一点,让我们单击“添加组”。
You’ll need to define a Group Name at a minimum, but other than that you can set a description, how you want users to be added, such as only added by an admin, that joining requires admin approval, or that users can join without approval.
您至少需要定义一个组名,但除此之外,您还可以设置描述,希望如何添加用户(例如仅由管理员添加),需要管理员批准或用户可以加入的添加方式未经批准。
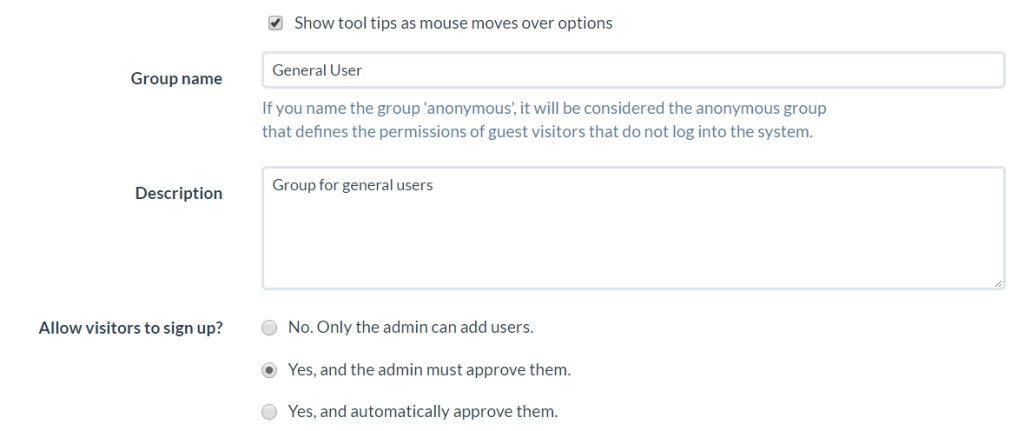
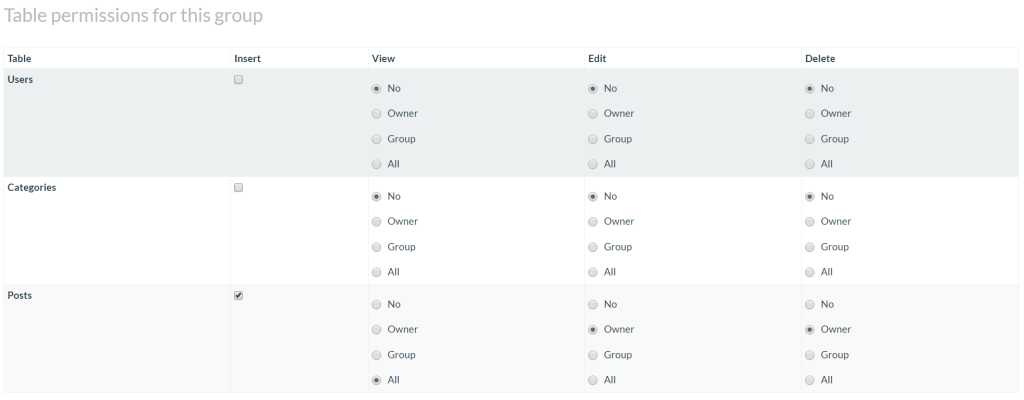
Next, and most importantly, come permissions. Obviously it’s up to you how you define things, but I have modified the permissions so that users in this group can add posts to the posts table, view all posts, but only edit and delete those that they themselves have created.
接下来,最重要的是权限。 显然,这取决于您如何定义事物,但是我已经修改了权限,以便该组中的用户可以将帖子添加到帖子表,查看所有帖子,但只能编辑和删除他们自己创建的帖子。
Once you’ve hit save, you’ll get a new sub menu from which we can simply add a new member to the group, so let’s do just that.
按下“保存”后,您将获得一个新的子菜单,从中我们可以简单地将新成员添加到组中,让我们开始吧。

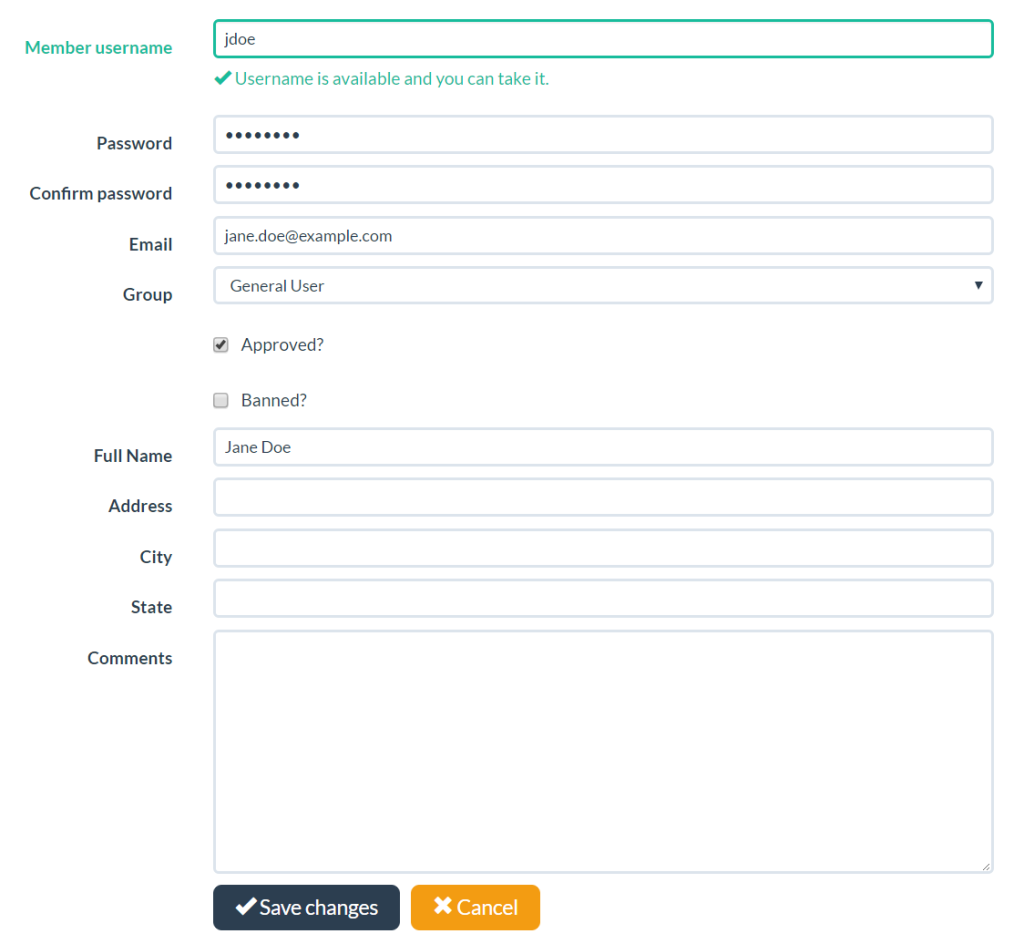
You’ll get the kind of form one would expect when adding a new user to a system, where you set a username, password, and so on.
您将获得一种将新用户添加到系统中时所期望的形式,在该系统中您可以设置用户名,密码等。
Of course, by default, the user will inherit the permissions of the group to which they belong, however are able to set a user’s permissions on a per-account basis. This can be done at any time by navigating to Members in the Admin area, editing the user in question, then clicking “Set special permissions for this user”
当然,默认情况下,用户将继承他们所属的组的权限,但是可以基于每个帐户设置用户的权限。 可以随时执行以下操作:导航到“管理”区域中的“成员”,编辑有问题的用户,然后单击“为此用户设置特殊权限”
定制代码 (Customizing Code)
You’ll also find that it’s really easy to customize the look and behavior of AppGini. In the folder you deployed to — again, in this case it is C:\xampp\htdocs\content — you’ll find another folder called hooks and in there, two files of note, footer-extras.php and header-extras.php. You can add any HTML, CSS, and JavaScript to these files and it will be applied to all pages on the user’s view.
您还将发现自定义AppGini的外观和行为非常容易。 在部署到的文件夹中(在本例中再次为C:\xampp\htdocs\content ,您将找到另一个名为hooks文件夹,并在其中找到两个注释文件, footer-extras.php和header-extras.php 。 您可以将任何HTML,CSS和JavaScript添加到这些文件,并将其应用于用户视图上的所有页面。
For example, because I know the theme is built with Bootstrap, I can add the following into footer-extras.php
例如,因为我知道主题是用Bootstrap构建的,所以可以将以下内容添加到footer-extras.php
<div class="container">
<div class="row">
<div class="col-md-6">
<h4>Column on the left</h4>
</div>
<div class="col-md-6">
<h4>Column on the right</h4>
</div>
</div>
</div>
And it’ll show up on the front end as you would expect it to:
它会像您期望的那样显示在前端:

Most importantly of all, changes made to these files will not be overwritten by AppGini if you need to regenerate the application at a later time.
最重要的是,如果以后需要重新生成应用程序,则AppGini不会覆盖对这些文件所做的更改。
即将发布:分组报告 (Upcoming: Grouped Reports)
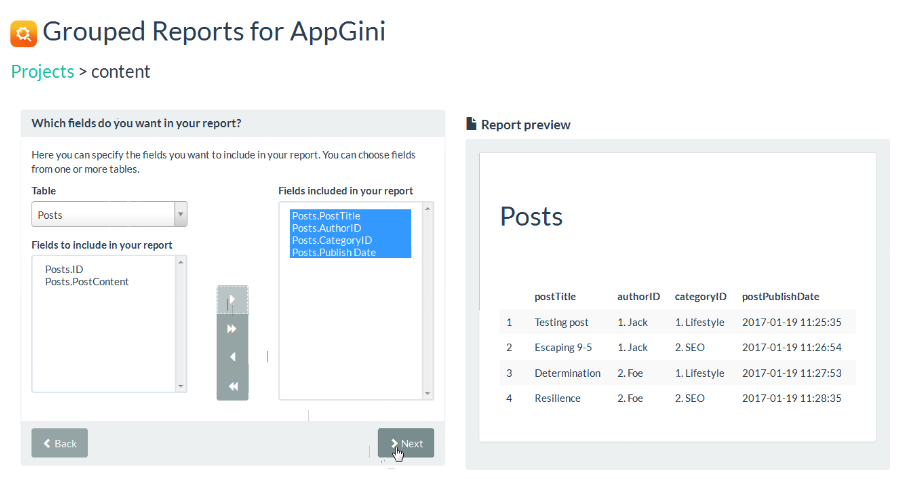
In an upcoming plugin — Grouped Reports for AppGini — you’ll be able to easily generate reports from your database. Just add your AppGini project file, which will be evaluated, and then choose the table you want to generate a report from, then simply pick the columns. As soon as you have selected some columns AppGini will generate a report preview to give you an idea of what you’ll be receiving.
在即将发布的插件(AppGini的分组报告)中,您将能够轻松地从数据库中生成报告。 只需添加您的AppGini项目文件(将对其进行评估),然后选择要从中生成报告的表,然后只需选择列即可。 一旦选择了某些列,AppGini就会生成报告预览,以使您对将要收到的内容有所了解。
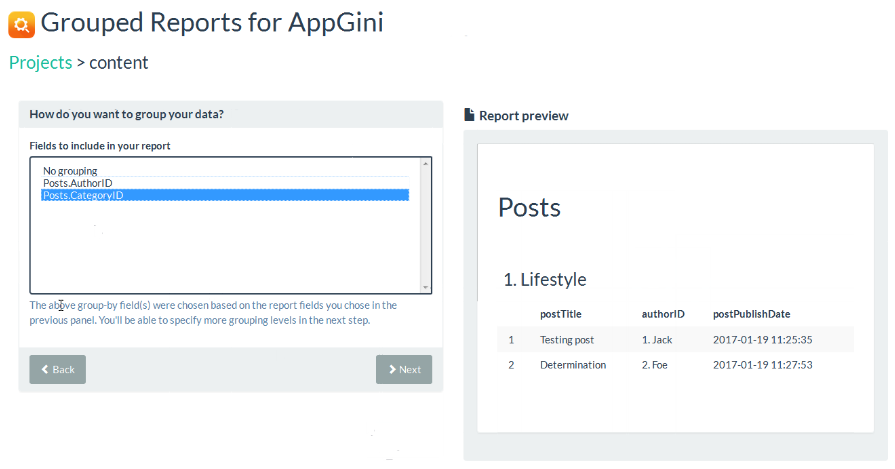
You can also choose to group the data in the report very easily. In this example, you can see that we’ve opted to group by the AuthorID.
您还可以选择非常容易地将报告中的数据分组。 在此示例中,您可以看到我们选择了按AuthorID分组。
结论 (Conclusion)
Hopefully this has provided an overview of how AppGini works and gives you some ideas as to how you can use it to increase your productivity as a developer, or to create easy-to-use applications. You can find out more about AppGini on the app’s website.
希望本文概述了AppGini的工作原理,并为您提供了一些有关如何使用它来提高开发人员生产力或创建易于使用的应用程序的想法。 您可以在应用程序的网站上找到有关AppGini的更多信息。
翻译自: https://www.sitepoint.com/prototype-web-apps-quickly-appgini/
怎么快速制作web原型
怎么快速制作web原型_如何使用AppGini快速原型制作Web应用程序相关推荐
- java osgi web开发_基于 OSGi 和 Spring 开发 Web 应用
开发一个简单的OSGi Web应用实例 一个简单的Web应用 我们写一个简单的 Web 应用 compute.html :计算两个数字的和或乘积.如下图所示: 图1.一个简单例子 一个简单例子.bmp ...
- java web服务_将Java服务公开为Web服务
java web服务 本教程解决了开发人员面临的最实际的情况. 大多数时候,我们可能需要将某些现有服务公开为Web服务. 在项目生命周期的不同阶段可能会遇到这种情况. 如果这是初始阶段,那么您几乎是安 ...
- pyqt5快速开发与实战_用云开发快速制作客户业务需求收集小程序丨实战
导语 业务场景下,如何快速优化业务流程.及时落地创意idea?看云开发如何助力业务效率的快速提升! ▌一.导语 如何省去企业上门(现场)搜集客户需求的环节,节约企业人力和时间成本,将客户的业务定制需求 ...
- 网站制作笔记-bootstrap可视化布局,表单生成工具,快速制作网页原型
百度搜到的连接:http://www.bootcss.com/p/layoutit/ 是2.0的版本 结果我下载了3.0的bootstrap库,发现运行不了 找到了3.0版本的布局系统:http:/ ...
- 怎么快速制作动图?手把手教你快速制作动图
相信小伙伴们在平时的聊天中少不了会用到各种GIF表情包来斗图.当我们想要自己制作有创意的GIF动图的时候,应该怎么办呢?这时候,大家就可以使用**gif制作软件**来制作GIF动图,非常的简单方便,只 ...
- ma5626如何进入web配置_如何给Dnsmasq提供一个Web配置界面?
痛点 平时工作中,经常有同事让我修改Dnsmasq的配置文件(都怪我服务器权限太大),每次有这样的需求,都要放下手中的工作,登录服务器.修改配置文件.重启服务,有时一天有四五次,让我不胜其烦. 解决方 ...
- 已知两点坐标如何快速增加其他坐标_从0开发工程测绘大师小程序之坐标正算篇(十一)...
上一篇我们讲了如何进行实现角度与弧度的互相转化.在该篇中我们会讲解如何进行实现坐标正算的程序. 目录 1.什么是坐标正算 2.代码实现 3.界面展示 侃侃而谈 从该篇开始程序就会慢慢的越往后 ...
- java osgi web开发_在Tomcat中使用Java Web应用程序的OSGi软件包
我试图从Java Web应用程序调用OSGi包的方法.两者都应该在Tomcat 7上运行. 我已经写了一个正常的Java应用程序,它调用OSGi软件包中的方法,如本站所述:http://drupal. ...
- python flask web 发布_在Azu上发布Flask Web应用程序
我有一个Flask web应用,我正试图在azure上发布.我将它部署到web应用程序上,创建了新资源,下载了用户发布配置文件,并使用下载的文件从visualstudio发布了它.在本地主机上一切运行 ...
最新文章
- (0075)iOS开发之cocoapods使用OpenSSL报target has libraries with conflicting names: libcrypto.a and libssl.a
- 十七、Pytorch的安装和使用
- h1、h2、h3标签及strong标签对页面seo的影响
- 计算机改成服务器,旧电脑主机如何改成服务器
- 详解Linux交互式shell脚本中创建对话框实例教程_linux服务器
- cf卡序列号修改工具_王者荣耀无需Root修改荣耀战区软件和方法分享 全国地区可任意修改...
- 下载地址jquery upload file demo (C#)
- 【BZOJ】【2049】【SDOI2008】洞穴勘测 Cave
- sql 查出一张表中重复的所有记录数据并且删除
- Windows系统下显卡挖零币(ZEC)的方法
- 报表类-金蝶K3一次查询所有供应商采购价格
- 二次规划及qpoases简要介绍
- 免费的PDF在线合并工具,拿走不谢!
- FTP修改默认端口后,注意事项
- H7N9?生活还得继续~~适合边玩边学的HTML5五彩连珠游戏 1
- do…while循环语句
- c++ 解析纯真IP数据库qqwry
- 错过这次,再等一年!视频云CDN全线折扣Hi购启动...
- xd怎么做页面滑动_Adobe XD中的滚动组功能详解!
- 关于spotlight_on_oracle的配置及操作