小程序 mina_如何使用Mina自动将应用程序部署到阿里巴巴ECS
小程序 mina
This article was created in partnership with Alibaba Cloud. Thank you for supporting the partners who make SitePoint possible.
本文是与阿里云合作创建的。 感谢您支持使SitePoint成为可能的合作伙伴。
Do you have a tip for making the most out of Alibaba Cloud Services? If so, tell us about it in our SitePoint Community.
您是否有充分利用阿里云服务的小窍门? 如果是这样,请在SitePoint社区中告诉我们。
Mina is a deployment automation tool and a deploy Bash script generator from the Rails world, which came into the spotlight after development companies noticed its advantages over Capistrano. Mina, in contrast to Capistrano, uses only one SSH connection to the deployment server, and executes a batch of bash commands there. This makes it a lot faster than Capistrano, which opens a separate SSH session for every command.
Mina是来自Rails世界的部署自动化工具和部署Bash脚本生成器 ,在开发公司注意到其优于Capistrano的优势后,它们成为了人们关注的焦点。 与Capistrano相比,Mina仅使用一个SSH连接到部署服务器,并在那里执行一批bash命令。 这使其比Capistrano快得多,后者为每个命令打开一个单独的SSH会话。
In this article we will go through setting up Mina for the deployment of a basic Django app – an unorthodox toolset for the Django world, which tends to use Docker or Fabric more. Given Mina’s simplicity and flexibility, we feel it is worth exploring its use in the deployment of Python web apps.
在本文中,我们将通过设置Mina来部署基本的Django应用程序-一种适用于Django世界的非传统工具集,该工具集倾向于更多地使用Docker或Fabric。 鉴于Mina的简单性和灵活性,我们认为有必要探索其在Python Web应用程序部署中的使用。
Django, a “web framework for perfectionists with deadlines,” has been around for some time now. It started off as a content-management oriented web framework, created in-house by web developers at Lawrence Journal World for its news web portal. It was published in 2005, and from there it took off and the rest is history. It became one of the most serious, widely adopted web frameworks, competing with Ruby on Rails. It is in use by Instagram, Disqus, the Washington Times, Mozilla, Bitbucket and others. It’s still thriving.
Django是“ 为有期限的完美主义者提供的Web框架 ”,已经存在了一段时间。 它最初是一个面向内容管理的Web框架,由Lawrence Journal World的Web开发人员内部为其新闻Web门户创建。 它于2005年出版,从那时开始兴起,其余就是历史。 它与Ruby on Rails竞争成为最严重,被广泛采用的Web框架之一。 Instagram,Disqus,《华盛顿时报》,Mozilla,Bitbucket等使用它。 它仍在蓬勃发展。
Django docs suggest Apache with mod-wsgi as the first-choice, and it may be a prevalent option. But since we are performance-obsessed, for this tutorial we decided to cover the deployment of a Django application to Alibaba’s ECS cloud instance with an NGINX and uWSGI stack.
Django文档建议使用mod-wsgi作为首选的Apache,这可能是一个普遍的选择。 但是由于我们着迷于性能,因此在本教程中,我们决定使用NGINX和uWSGI堆栈介绍将Django应用程序部署到阿里巴巴的ECS云实例。
NGINX is a web server notorious for its efficiency, being event-based, and it includes caching options, so it is often an ideal solution. uWSGI is an application server container – an implementation of WSGI, Python’s standard web interface. It plays along with NGINX very well.
NGINX是一个以效率高而著称的Web服务器,它是基于事件的,并且包含缓存选项,因此它通常是理想的解决方案。 uWSGI是一个应用程序服务器容器 – WSGI (Python的标准Web界面)的实现。 它与NGINX的配合非常好。
入门 (Getting Started)
Before we get started, you’ll need to sign up for an Alibaba Cloud account. It’s really easy to get started with Alibaba Cloud and decide whether it’s the right choice for you, because its free trial provides US$300 in credit to new users. Once you’ve signed up and received your credit, you can explore Getting Started resources on a number of topics.
在开始之前,您需要注册一个阿里云帐户。 轻松上手阿里云并确定它是否是您的正确选择,因为它的免费试用版为新用户提供了300美元的信用额 。 注册并获得积分后,您可以探索关于许多主题的入门资源 。
The first thing we will do once our account is set up, is create an ECS instance in the Alibaba Cloud backend console.
设置帐户后,我们要做的第一件事就是在阿里云后端控制台中创建ECS实例。
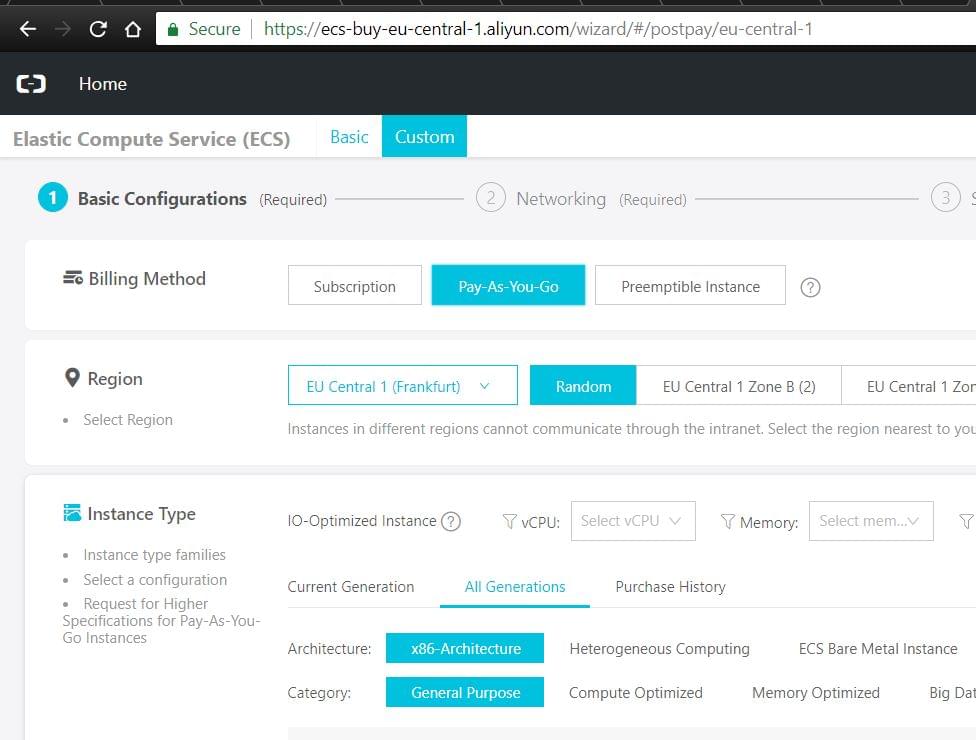
The process is straightforward. We will choose Ubuntu 16.04 LTS for our operating system / OS image. Upon creation, we will want to make sure our instance is assigned to proper security groups. In Alibaba terminology, these are firewall rules for different ports. This is usually something that works by default, but in case of any issues with web access to our instance later on, make sure to check this off.
这个过程很简单。 我们将选择Ubuntu 16.04 LTS作为我们的操作系统/操作系统映像。 创建后,我们将要确保将实例分配给适当的安全组。 用阿里巴巴的术语来说,这些是针对不同端口的防火墙规则。 通常,这通常是默认情况下有效的方法,但是如果以后对我们的实例的网络访问出现任何问题,请确保将其选中。
The security groups page can be accessed through the Elastic Compute Service submenu on the left.
可以通过左侧的“弹性计算服务”子菜单访问安全组页面。
The next thing to do upon creation of our instance is to set it up for SSH key access.
创建实例后,下一步要做的是将其设置为可进行SSH密钥访问。
Perhaps the most straightforward way to do this is to set the instance up, at creation, with a password. Then we can just do the standard ssh-copy-id from our starting system – presumably a local device.
也许最直接的方法是在创建实例时使用密码来设置实例。 然后,我们可以从启动系统(大概是本地设备)中执行标准的ssh-copy-id 。
ssh-copy-id root@xxx.xxx.xxx.xxx, executed from our local device (where we will replace the xxx… sequence with our Alibaba ECS instance public IP address) will prompt us for the password, and upon typing it, our key-based access should be set up.
从本地设备执行ssh-copy-id root@xxx.xxx.xxx.xxx (我们将用阿里巴巴ECS实例公共IP地址替换xxx…序列)将提示我们输入密码,并在键入密码后,我们应该设置基于密钥的访问。
When we log into our instance via ssh, we will do apt-get update to make sure our apt sources are up to date, and then we install git, curl, wget: apt-get install git curl wget -y
当我们通过ssh登录实例时,我们将进行apt-get update以确保apt源是最新的,然后我们安装git,curl,wget: apt-get install git curl wget -y
安装服务器环境 (Installing the Server Environment)
The default Python version that comes as default with Ubuntu 16.04 LTS is the ancient 2.7. In order to run the latest version of Django, we need Python 3+. One of the less painful ways to fix this is to install pyenv, a Python version manager.
Ubuntu 16.04 LTS默认提供的默认Python版本是2.7。 为了运行最新版本的Django,我们需要Python 3+。 解决此问题的一种较轻松的方法是安装python版本管理器pyenv 。
It allows us to change the Python version used globally, or per-project. Before we install pyenv, as per the pyenv wiki, we will install prerequisites:
它允许我们更改全局或每个项目使用的Python版本。 根据pyenv Wiki ,在安装pyenv之前,我们将安装先决条件:
apt-get install -y make build-essential libssl-dev zlib1g-dev libbz2-dev libreadline-dev libsqlite3-dev llvm libncurses5-dev libncursesw5-dev xz-utils tk-dev liblzma-dev zlib1g-dev libffi-dev
apt-get install -y make build-essential libssl-dev zlib1g-dev libbz2-dev libreadline-dev libsqlite3-dev llvm libncurses5-dev libncursesw5-dev xz-utils tk-dev liblzma-dev zlib1g-dev libffi-dev
Then we can install pyenv:
然后我们可以安装pyenv:
curl -L https://github.com/pyenv/pyenv-installer/raw/master/bin/pyenv-installer | bash
curl -L https://github.com/pyenv/pyenv-installer/raw/master/bin/pyenv-installer | bash
Upon completion, the pyenv installer will prompt us to add a couple of lines to the ~/.bash_profile, which we will do:
完成后,pyenv安装程序将提示我们在〜/ .bash_profile中添加几行,我们将这样做:
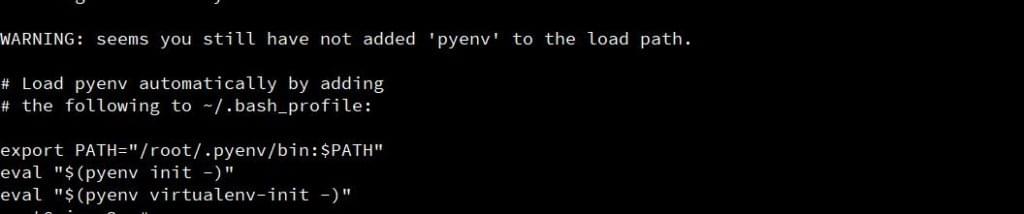
Now we update the PATH in our working session by doing source ~/.bash_profile in our terminal.
现在,通过在终端中执行source ~/.bash_profile在工作会话中更新PATH。
Provided that we did this correctly, we should now be able to install Python version 3.7.0:
只要我们正确执行了此操作,我们现在应该可以安装Python版本3.7.0:
Doing pyenv versions in the server terminal should show us two items now: system and 3.7.0, presuming that we installed the 3.7.0 version successfully.
在服务器终端中执行pyenv versions ,现在应该向我们显示两项: system和3.7.0 ,前提是我们已成功安装了3.7.0版本。
pyenv global 3.7.0 will make our 3.7.0 version the global python version on our system. Should you have issues with pyenv, this is the url to visit.
pyenv global 3.7.0将使我们的3.7.0版本成为系统上的全局python版本。 如果您对pyenv有问题, 请访问以下网址 。
服务器堆栈 (Server stack)
The usual default with Ubuntu images is Apache server, which comes preinstalled. If it is running, we should stop it with service apache2 stop, and then install nginx with apt-get install nginx -y. This should install and start the NGINX server, which should be visible when we visit our server’s public IP address.
Ubuntu映像通常的默认设置是预安装的Apache服务器。 如果它正在运行,我们应该使用service apache2 stop停止它,然后使用apt-get install nginx -y 。 这将安装并启动NGINX服务器,当我们访问服务器的公共IP地址时,该服务器应该可见。
We will also install uWSGI: pip install uwsgi (Python pip is presumably installed when we installed pyenv).
我们还将安装uWSGI: pip install uwsgi install uwsgi(安装pyenv时大概已安装了Python pip)。
We will also make sure we have Django installed: pip install django. We could be using virtualenv here to ensure a contained isolated environment for our app, but for the sake of keeping this tutorial simple, we will skip it.
我们还将确保已安装Django: pip install django 。 我们可能在这里使用virtualenv来确保我们的应用程序包含一个隔离的环境,但是为了使本教程保持简单,我们将跳过它。
In more complex cases, though, it is probably a wise choice.
但是,在更复杂的情况下,这可能是一个明智的选择。
This guide presumes we have directed our domain’s A records to our server IP address, so myxydomain.com is presumed in the rest of this guide to be pointed to our ECS server’s public IP.
本指南假定我们已将域的A记录定向到服务器IP地址,因此本指南的其余部分假定myxydomain.com指向我们的ECS服务器的公共IP。
Now we will create the NGINX virtual host for our website. The file can be found here. We will just go over couple of things:
现在,我们将为我们的网站创建NGINX虚拟主机。 该文件可以在这里找到。 我们将讨论几件事:
server unix:///tmp/minaguide.sock;
server unix:///tmp/minaguide.sock;
Here we are connecting – with NGINX – to the Unix socket that uWSGI will create in the /tmp directory, and /tmp is recommended for otherwise possible permissions complications that may arise from a more complex directory tree. This is what /tmp is for.
在这里,我们使用NGINX连接到uWSGI将在/tmp目录中创建的Unix套接字,并且建议使用/tmp ,否则可能会因更复杂的目录树而导致权限复杂化。 这就是/tmp目的。
include /root/project/minaguide/uwsgi/uwsgi_params;
include /root/project/minaguide/uwsgi/uwsgi_params;
This (/root/project/minaguide) is a directory of our django project on the server, and within it, we will have a uwsgi subdirectory with a uwsgi_params file, which will hold some uWSGI variables. We will come back to this later, and to setting up our uWSGI app.
这个( /root/project/minaguide )是服务器上django项目的目录,在其中,我们将有一个uwsgi子目录,其中包含uwsgi_params文件,该文件将包含一些uWSGI变量。 我们将稍后再讨论,并设置我们的uWSGI应用。
We now have the base server environment we need for deployment.
现在,我们有了部署所需的基本服务器环境。
设置Mina (Setting Up Mina)
We are setting up Mina on the machine from which we are doing the deployment. Presuming the device is also Linux / Ubuntu (and things shouldn’t be much different for Mac users – nor for Windows users, as long as they use Windows Subsystem for Linux ), we will want to make sure we have Ruby and rubygems installed – apt-get install ruby -y should do the trick.
我们从中我们正在做的部署机器上设置米娜。 假设设备也是Linux / Ubuntu(对于Mac用户-Windows用户,只要他们使用Linux的Windows子系统 ,就没有什么不同),我们将要确保已安装Ruby和rubygems – apt-get install ruby -y应该可以解决问题。
When we have done this, we will have the gem command available, so we will do gem install mina.
完成此操作后,我们将提供gem命令,因此我们将执行gem install mina 。
Now – also on our local machine – we will create a directory dedicated to our project, and do mina init there.
现在-在我们的本地计算机上-我们将创建一个专用于我们项目的目录,并在其中进行mina init 。

This creates a config/deploy.rb file in our project directory, which we will edit to configure Mina:
这将在我们的项目目录中创建一个config/deploy.rb文件,我们将对其进行编辑以配置Mina:
require 'mina/rails'
require 'mina/git'
# we fill our base variables here. In this case, using
# ENV['domain'], we dont really need to enter the domain into the file, as
# we will be passing it when we call mina in command line.
# the script presumes we have set up ssh-key access to server, and that it won't ask us
# for password (for 'root' user)
set :application_name, 'minaguide'
set :domain, ENV['domain']
set :deploy_to, '/root/project/minaguide'
set :repository, 'https://github.com/tyaakow/django-uwsgi-starter.git'
set :branch, 'master'
set :user, 'root'
# we have left this empty, but this can be used for choosing pyenv python version, like we
# did manually
task :remote_environment do
end
# here we put any custom commands you need to run at setup
# directory structure from :deploy_to will be created
task :setup do
# we are pulling rc.local from a gist, in order to make daemonize uWSGI
# and make it boot with the system
comment "pulling rc.local to /etc/ ..."
command %{wget -P /etc/ https://gist.githubusercontent.com/tyaakow/62a5f91dbf59b32e088ec15c8375ca76/raw/c0c864317888419cbb9f2c4311149649cea2be1a/rc.local}
comment "making it executable..."
command %{sudo chmod 755 /etc/rc.local}
comment "removing existing virtualhosts from /etc/nginx/sites-enabled/ ..."
command %{rm /etc/nginx/sites-enabled/*}
comment "fetching the virtualhost file from github gist..."
command %{wget -O /etc/nginx/sites-enabled/#{ENV['domain']} https://gist.githubusercontent.com/tyaakow/1cd0a30095000c11301d3359b13a3537/raw/197eb92160588c2e61818a90e28782a344e5fbae/myxydomain.conf }
comment "replacing the myxydomain.com with the actual domain specified in deploy.rb..."
command %{sed -i 's/myxydomain.com/#{ENV['domain']}/g' /etc/nginx/sites-enabled/#{ENV['domain']}}
end
desc "Deploys the current version to the server."
task :deploy do
deploy do
invoke :'git:clone'
on :launch do
command %{sed -i 's/myxydomain.com/#{ENV['domain']}/g' /root/project/minaguide/current/minaguide/settings.py}
command %{uwsgi --emperor /root/project/minaguide/current/uwsgi/vassals --daemonize /var/log/uwsgi-emperor.log}
command %{service nginx restart}
end
end
end
We can see in this file that we are using Ruby string interpolation (the #{} syntax).
我们可以在此文件中看到我们正在使用Ruby字符串插值( #{}语法)。
We also use sed to programmatically replace text in files ( sed -i 's/myxydomain.com/#{ENV['domain']}/g' /root/project/minaguide/current/minaguide/settings.py ) – and we use the ENV['domain'] which needs to be passed to Mina at the command line. This is to illustrate techniques for building some (possibly more sophisticated) scenarios with Mina.
我们还使用sed以编程方式替换文件中的文本( sed -i 's/myxydomain.com/#{ENV['domain']}/g' /root/project/minaguide/current/minaguide/settings.py )–和我们使用需要在命令行中传递给Mina的ENV['domain'] 。 这是为了说明使用Mina构建某些(可能更复杂)方案的技术。
task :setup do is the syntax we can use to define an arbitrary number of tasks.
task :setup do是我们可以用来定义任意数量任务的语法。
As specified in the Mina docs, we can use the symbol-syntax variables assigned with set at the beginning of the file – with fetch(:deploy_to) syntax.
正如Mina docs中指定的那样,我们可以使用在文件开头使用set分配的符号语法变量–带有fetch(:deploy_to)语法。
The file can be found here.
该文件可以在这里找到。
In this tutorial, we pulled our Django app from the GitHub public repo we created for this purpose, but we could have used a local repo, with:
在本教程中,我们从为此目的而创建的GitHub公共存储库中提取了Django应用程序,但是我们可以将本地存储库用于以下用途:
task :deploy do
run(:local) do
… where we would run rsync or scp – or we could have fetched it from a private repo that required ssh-key access.
…我们将在哪里运行rsync或scp –或者我们可以从需要ssh-key访问的私有仓库中获取它。
We could have gone more advanced, creating tasks to install our whole environment, bu we would quickly grow out of the scope of this guide.
我们本可以做得更高级,创建一些任务来安装整个环境,但是我们很快就会超出本指南的范围。
We added the uwsgi directory to our standard Django app in the repo – created by django-admin startproject minaguide:
我们添加了uwsgi目录我们在回购标准Django应用程序-通过创建django-admin startproject minaguide :

… where uwsgi_params are from this page, and uwsgi.ini contains basic uWSGI settings.
…uwsgi_params来自此页面 ,而uwsgi.ini包含基本uWSGI设置。
We are pulling – in our deploy.rb script – the virtual host file for NGINX from this GitHub gist and placing it in /etc/nginx/sites-enabled/:
我们正在deploy.rb脚本中从该GitHub要点提取NGINX的虚拟主机文件,并将其放在/etc/nginx/sites-enabled/ :
# the upstream component nginx needs to connect to
upstream django {
server unix:///tmp/minaguide.sock; #this file will be created by uWSGI
}
# configuration of the server
server {
# the port your site will be served on
listen      80;
# the domain name it will serve for
server_name myxydomain.com; # will be substituted, with sed, with actual domain name provided
# to mina at command line
charset     utf-8;
# max upload size
client_max_body_size 75M;   # adjust to taste
# Django media
location /media  {
alias /root/project/minaguide/current/media;  # your Django project's media files - amend as required
}
location /static {
alias /root/project/minaguide/current/static; # your Django project's static files - amend as required
}
# Finally, send all non-media requests to the Django server.
location / {
uwsgi_pass  django;
include     /root/project/minaguide/current/uwsgi/uwsgi_params; # the uwsgi_params file
# from https://github.com/nginx/nginx/blob/master/conf/uwsgi_params
}
}
More details about deploying Django with uWSGI and NGINX can be found here.
在此处可以找到有关使用uWSGI和NGINX部署Django的更多详细信息。
部署方式 (Deployment)
Now, when we want to deploy, we will call from our local / development system mina setup domain=myfabulousdomain.com – where we will substitute myfabulousdomain.com with the URL of our actual server, where we will deploy. This will then be used by Mina as the aforementioned ENV['domain'].
现在,当我们要进行部署时,我们将从本地/开发系统mina setup domain=myfabulousdomain.com –在该处,我们将myfabulousdomain.com替换为实际服务器的URL,我们将在其中进行部署。 然后Mina会将其用作上述ENV['domain'] 。
This will execute the setup task on our server.
这将在我们的服务器上执行setup任务。
By doing mina deploy domain=myfabulousdomain.com we will execute the deploy task / block. When we visit our domain, we should see the following:
通过执行mina deploy domain=myfabulousdomain.com我们将执行deploy任务/块。 当我们访问我们的域时,应该看到以下内容:
If, during the deployment, we encounter issues with the socket file ( permission & ownership issues, or others ), and we don’t have time to spend fixing it – fastest solution is maybe switching from connecting NGINX to uWSGI socket to connecting it to uWSGI through http – uWSGI has --http and --http-socket options available (we will need to change our upstream django / server connection details in nginx virtual host file – to connect to something likehttp:://127.0.0.1:8080 – and change our uWSGI command appropriately.
如果在部署过程中,我们遇到套接字文件问题(权限和所有权问题,或其他问题),而我们没有时间花在修复它上–最快的解决方案可能是从将NGINX连接到uWSGI套接字切换到将其连接到uWSGI通过http – uWSGI具有--http和--http-socket选项(我们需要在nginx虚拟主机文件中更改upstream django / server连接的详细信息–以连接到类似http:://127.0.0.1:8080东西http:://127.0.0.1:8080 –并适当地更改我们的uWSGI命令。
More info on --http and --http-socket options here and here. uWSGI is a pretty big topic.
有关--http和--http-socket选项的更多信息,请--http 此处和此处 。 uWSGI是一个很大的话题。
结论 (Conclusion)
In this article we use mina, which is a rather simple, very flexible and very fast solution for deployment of apps. In the case of more involved setups, that require more comprehensive solutions – we may need to automate wider scope of system and stack configuration details – we may want to look into Alibaba’s Container Service – which aims to provide solutions for streamlining different DevOps scenarios. Container Registry allows for more sophisticated scenarios.
在本文中,我们使用mina,它是用于部署应用程序的相当简单,非常灵活且非常快速的解决方案。 如果涉及更多的设置,则需要更全面的解决方案–我们可能需要自动化更大范围的系统和堆栈配置详细信息–我们可能要研究阿里巴巴的Container Service ,该服务旨在为简化不同的DevOps场景提供解决方案。 容器注册表允许更复杂的方案。
In case our product / service requires multiple ECS instances – we will also want to look into Alibaba’s Server Load Balancer – which allows us to dynamically scale our infrastructure to keep up with traffic. Another Alibaba’s product, or feature to consider here is Auto Scaling – which automatically deploys new instances either according to predetermined schedule, or based on monitoring eg CPU and memory usage of the running instances.
如果我们的产品/服务需要多个ECS实例(我们还将要研究阿里巴巴的服务器负载均衡器) ,这将使我们能够动态扩展基础架构以适应流量。 阿里巴巴的另一个产品或功能是Auto Scaling ,它可以根据预定的时间表或基于监视(例如正在运行的实例的CPU和内存使用情况)自动部署新实例。
Function Compute allows us, in contrast, to focus on our business logics, while delegating the whole infrastructure and environment worries to the cloud. The service is event driven, can be triggered by other services, and all we do is upload our code (NodeJS, Python, Java). We get charged for actual executed code.
相比之下, 功能计算使我们能够专注于业务逻辑,同时将整个基础架构和环境的担忧转嫁给云。 该服务是事件驱动的,可以由其他服务触发,我们要做的就是上传我们的代码(NodeJS,Python,Java)。 我们对实际执行的代码收费。
Then there is a whole range of security products / services, CDN and monitoring solutions
然后是一整套安全产品/服务, CDN和监视解决方案
翻译自: https://www.sitepoint.com/how-to-automate-app-deployment-to-alibaba-ecs-with-mina/
小程序 mina
小程序 mina_如何使用Mina自动将应用程序部署到阿里巴巴ECS相关推荐
- C# 程序关闭托盘图标不会自动消失
C# 程序关闭托盘图标不会自动消失 c#程序关闭托盘图标不会自动消失,进程的托盘图标却不能随着进程的结束而自动消失 必须将鼠标移到图标上面时才能消失? 请问如何才能做到图标随着进程的结束而自动消失 ...
- html表单中的数据提交后清空,怎么实现小程序中表单提交后自动清空内容
怎么实现小程序中表单提交后自动清空内容 发布时间:2021-03-09 10:50:51 来源:亿速云 阅读:88 作者:小新 小编给大家分享一下怎么实现小程序中表单提交后自动清空内容,相信大部分人都 ...
- access重复数据累计_小程序·云开发之数据库自动备份丨云开发101
小程序云开发之数据库自动备份 数据是无价的,我们通常会把重要的业务数据存放在数据库中,并需要对数据库做定时的自动备份工作,防止数据异常丢失,造成无法挽回的损失. 小程序云开发提供了方便的云数据库供我们 ...
- 小程序文本框为空自动填写_微信免费转码机器人!小程序自动转码!
♥ 小程序转码机器人 微信免费转码机器人主要用于小程序转换成二维码! 此机器人24小时全自动转码永久免费! 大家可以放心使用! 前言:因为小程序不能分享到除了微信以外的应用,在某些小程序活动出现邀请时 ...
- 微信小程序扫码实现web自动登录
清明假期在家无聊,写了一个微信小程序扫码,web登录的demo 技术栈 前端:vue2+vue-socket.io+uuid,微信小程序原生+weapp.socket.io 后端: eggjs+red ...
- python控制相机自动拍照_微信小程序实现倒计时调用相机自动拍照功能
这篇文章主要为大家详细介绍了微信小程序实现倒计时调用相机自动拍照功能,具有一定的参考价值,感兴趣的小伙伴们可以参考一下 本文实例为大家分享了微信小程序定时拍照的具体代码,供大家参考,具体内容如下 在某 ...
- 表情包壁纸独立后台美化二开版本新增加神器功能微信小程序源码下载+教程自动采集
相信玩小程序的朋友对这款小程序应该也不陌生 这是前半年很火的一款微信表情包小程序功能 之前的版本内置了表情包还有壁纸功能 这一期的版本给优化了一下UI和新增加了一些喝酒神器功能 具体新增加的喝酒神器功 ...
- 新款最火表情包壁纸独立后台美化二开版本新增加喝酒神器功能微信小程序源码下载+教程自动采集
相信玩小程序的朋友对这款小程序应该也不陌生 这是前半年很火的一款微信表情包小程序功能 之前的版本内置了表情包还有壁纸功能 这一期的版本给优化了一下UI和新增加了一些喝酒神器功能 具体新增加的喝酒神器功 ...
- 微信小程序进入某一页面自动播放背景音乐
前言:微信小程序进入某一个页面自动播放背景音乐,当退出这个页面时,音乐关闭 wxml代码: <audioloopid="greetings"src="https:/ ...
最新文章
- Neo4j - CQL简介
- solaris上的pkg管理
- pycharm配置git版本管理
- CCF NOI1014 写评语
- html5 烟雾,jQuery烟雾背景发生器(HTML5 Canvas插件waterpipe.js
- python引入模块教程_python进阶教程之模块(module)介绍
- vue 导入excel解析_Vue实现Excel导入并解析
- 达奇机器人编程学院_趣味编程机器人:达奇和达达
- Java企业商品进销存管理系统
- 12.第十三章.合同管理
- 台达触摸屏和vfd-m变频器通讯控制监视程序 使用modbus rtu通讯方式,在触摸屏可以直接控制变频器
- 自动控制系统中的典型环节
- 中国无糖牛奶巧克力行业市场供需与战略研究报告
- Python做一个Kindle电子书下载助手,真香!
- 在linux前台和后台运行程序
- java的可执行文件_java生成可执行文件的方法总结
- 常见DB2锁等待解决流程
- 【Coling 2022】Context-Tuning: Learning Contextualized Prompts for Natural Language Generation
- 今天還是和大家聊點基本功,就是“如何在DLL中活用Interface” DATE :2004-05-21
- 通过活动策划做精准引流