使用Authorize.net的SDK实现符合PCI标准的支付流程
PCI 标准是为了最大限度保护持卡人数据的一套标准。要求很多,可以看 PCI标准 站点了解。对于程序猿来说,要保证的是用户的任何支付信息,都不走自己的服务器,不保存在自己的数据库。
实现符合PCI标准的支付,有两种方式
加载Authorize.net的托管表单
使用AcceptJs
Authorize.net的托管表单,加载方便,安全性高,但是用户定制程度不高,只能稍微改改表单样式,AcceptJs可以使用自己设计的表单,调用AcceptJs做安全性校验和数据发送接收。
一. 前期准备工作
1.1 注册一个沙盒环境账号 (必须)
沙盒环境账号,可以用来在api文档页面直接调试各种接口,也可以在沙盒里面查看各种扣款记录。
如果项目要上线,请注册生产环境账号,这里全部使用沙盒环境。
1.2 下载Authorize.net SDK (非必须)
下载SDK到项目。
cd /your_php_project_path
composer require authorizenet/authorizenet
再在项目中引入即可(如何引入可以看上面地址的介绍,这里不再重复)。
该项目的GITHUB地址:AuthorizeNet/sdk-php 可以在上面搜索、提出你的issues
使用SDK的php案列:AuthorizeNet/sample-code-php
Authorizenet官方实现的一个符合PCI标准的案列AuthorizeNet/accept-sample-app (这个没有使用SDK)
1.3 不使用Authorize.net SDK (非必须)
因为Authorize.net SDK 要求 php: >=5.5 , 所以只能自己封装api请求了,具体如何封装个人自便,但要说明的一点是,Authorize.net 的api,如果选择的是json格式:
header("Content-type:text/json;charset=utf-8");
$curl = curl_init();
curl_setopt($curl, CURLOPT_URL, $this->authorizeUrl);
curl_setopt($curl, CURLOPT_RETURNTRANSFER, true);
curl_setopt($curl, CURLOPT_COOKIESESSION, true);
curl_setopt($curl, CURLOPT_HEADER, 0);
curl_setopt($curl, CURLOPT_POST, 1);
curl_setopt($curl, CURLOPT_POSTFIELDS, urldecode($data));
curl_setopt($curl, CURLOPT_SSL_VERIFYPEER, 0);
curl_setopt($curl, CURLOPT_SSL_VERIFYHOST, 2);
// curl_setopt($curl, CURLOPT_HTTPHEADER,     array('Content-Type: text/plain')); //xml request
curl_setopt($curl, CURLOPT_HTTPHEADER, array('Accept: application/json'));
$result    = curl_exec($curl);
$curlErrno = curl_errno($curl);
$curlError = curl_error($curl);
curl_close($curl);返回的数据也是JSON格式,but。。。。,这个返回的json数据,是无法用
json_decode($result,true)来解析的,需要
json_decode(substr($result, 3), true);来解析。究其原因,应该是它返回的数据带了BOM头,详细请移步 json-decode-returns-null
XML格式我没有去写代码测试,各位有兴趣可以自行测试,也可以在沙盒环境直接测试。
有个直接扣款的API,其中的ORDER参数要有顺序,要有顺序,要有顺序,如果遇到一些API,调试一直报错,但又没有特别的原因,请注意看是否是顺序问题。
1.4 各种环境地址
| 内容 | 测试环境 | 生产环境 |
|---|---|---|
| api请求地址 | apitest url | api url |
| Accept.js | Accept jstest url | Accept js url |
| 请求支付表单 | test payment/payment | accept payment/payment |
| Manage Profiles | Manage Profiles | Manage Profiles |
| Add Payment Profile | Add Payment Profile | Add Payment Profile |
| Add Shipping Profile | Add Shipping Profile | Add Shipping Profile |
| Edit Payment Profile | Edit Payment Profile | Edit Payment Profile |
| Edit Shipping Profile | Edit Shipping Profile | Edit Shipping Profile |
二. iframe 加载托管表单方式发起支付
1. 加载iframe托管表单创建用户的payment Info。
1.1 为用户申请创建CustomerProfileID
需要请求的API : createCustomerProfileRequest
API的详细文档地址:createCustomerProfileRequest
CustomerProfile详细介绍:customer_profiles
该API可以在创建CustomerProfileId 的同时,也创建PaymentProfileId 。但是PaymentProfileId需要的参数都是涉及到用户敏感信息的,按照PCI标准,是不允许商户收集,所以需要使用Authorize.net的托管表单来创建。
所以这一步只简单的传递几个参数即可,使用SDK创建代码:
$customerProfile = new AnetAPI\CustomerProfileType();
$customerProfile->setDescription("Customer 2 Test PHP");
$customerProfile->setMerchantCustomerId('11211');
$customerProfile->setEmail($post['email']);
$request = new AnetAPI\CreateCustomerProfileRequest();
$request->setMerchantAuthentication($this->merchantAuthentication);
$request->setProfile($customerProfile);
$controller = new AnetController\CreateCustomerProfileController($request);
$response = $controller->executeWithApiResponse(\net\authorize\api\constants\ANetEnvironment::SANDBOX);
1.2 为添加PaymentInfo托管表单申请token
需要请求的API : getHostedProfilePageRequest
API的详细文档地址:getHostedProfilePageRequest
用上一步创建的CustomerProfileId $profileId = $response->getCustomerProfileId(); 来获取token
$setting = new AnetAPI\SettingType();
$setting->setSettingName("hostedProfileIFrameCommunicatorUrl");
$url = \Yii::$app->urlManager->createAbsoluteUrl(['authorizenet/special']);
$setting->setSettingValue($url);
$request = new AnetAPI\GetHostedProfilePageRequest();
$request->setMerchantAuthentication($this->merchantAuthentication);
$request->setCustomerProfileId($profileId);
$request->addToHostedProfileSettings($setting);
$controller = new AnetController\GetHostedProfilePageController($request);
$response = $controller->executeWithApiResponse(
\net\authorize\api\constants\ANetEnvironment::SANDBOX);
1.3 视图页面iframe使用token加载托管表单
<form method="post" action="https://test.authorize.net/customer/addPayment" target="add_payment"><input type="hidden" name="token" value="<?php echo $token;?>"/><input id='submit' type="submit" value="添加支付信息"/>
</form>
<iframe id="add_payment" class="embed-responsive-item panel" name="add_payment" width="100%" height="650px" frameborder="0" scrolling="no">
</iframe>此时该iframe里面还没有任何东西,需要提交这个form表单才能加载托管表单,这里给一个函数让他页面加载的时候自动提交以加载托管表单。
var button = document.getElementById('submit');
button.click();
1.4 捕获响应并处理
我们回到 1.2 申请表单这里,这个API支持设置托管表单的很多属性,比较有用的有 :
hostedProfileReturnUrl : 设置托管会话结束(用户点击SAVE)返回给用户的页面 (这里省略)
hostedProfileIFrameCommunicatorUrl : 用来接受、处理Authorize.net响应的页面
上面设置的hostedProfileIFrameCommunicatorUrl的页面为authorizenet/special
function callParentFunction(str) {var referrer = document.referrer;var s = {qstr : str , parent : referrer};if(referrer == 'https://test.authorize.net/customer/addPayment'){switch(str){case 'action=successfulSave' :window.parent.parent.location.href="https://www.basic.com/authorizenet/payment";break;}}
}function receiveMessage(event) {if (event && event.data) {callParentFunction(event.data);}
}if (window.addEventListener) {window.addEventListener("message", receiveMessage, false);
} else if (window.attachEvent) {window.attachEvent("onmessage", receiveMessage);
}if (window.location.hash && window.location.hash.length > 1) {callParentFunction(window.location.hash.substring(1));
}
这里设置成功保存paymentInfo 信息到Authorize.net之后就跳转到 payment 页面支付。
action有不同的状态,可以根据action作相应的处理。
resizeWindow : 托管表单加载
successfulSave : 表单成功保存(CustomerProfile)
cancel : 用户点击取消按钮
transactResponse :支付成功(payment)
2. 加载iframe托管表单发起支付
1.1 通过上面的CustomerProfileId,获取用户填写的PaymentInfo,用来回填支付表单
需要请求的API : getCustomerProfileRequest
API的详细文档地址:getCustomerProfileRequest
$customer = $this->getCustomerProfile($profileId);
$billTo = end($customer->getProfile()->getPaymentProfiles())->getBillTo();因为一个CustomerProfi对应多个PaymentProfile ,这里获取最后一个PaymentProfile。
1.2 为添加Payment托管表单申请token
需要请求的API : getHostedPaymentPageRequest
API的详细文档地址:getHostedPaymentPageRequest
请求该URL,可以指定加载表单的样式等各种参数,具体参考:Accept Hosted feature details page
$transactionRequestType = new AnetAPI\TransactionRequestType();
$transactionRequestType->setTransactionType("authCaptureTransaction");
$transactionRequestType->setAmount("12.23");
$customer = $this->getCustomerProfile(\Yii::$app->session->get('profileId'));
$billTo = end($customer->getProfile()->getPaymentProfiles())->getBillTo();$transactionRequestType->setBillTo($billTo);//回填账单地址
$customer = new AnetAPI\CustomerDataType();
$customer->setEmail(\Yii::$app->session->get('email'));
$customer->setId(\Yii::$app->session->get('user_id'));
$transactionRequestType->setCustomer($customer);$request = new AnetAPI\GetHostedPaymentPageRequest();
$request->setMerchantAuthentication($this->merchantAuthentication);
$request->setTransactionRequest($transactionRequestType);
$setting3 = new AnetAPI\SettingType();
$setting3->setSettingName("hostedPaymentReturnOptions");
$setting3->setSettingValue("{\"url\": \"https://www.basic.com/index.php?r=authorizenet/receipt\", \"cancelUrl\": \"https://www.basic.com/index.php?r=authorizenet/cancel\", \"showReceipt\": false}");
$request->addToHostedPaymentSettings($setting3);//设置托管表单显示email,且必填 (因为form表单没有禁止修改email参数,所以可以设置email但不显示在表单中,以防修改)
$setting4 = new AnetAPI\SettingType();
$setting4->setSettingName('hostedPaymentCustomerOptions');
$setting4->setSettingValue("{\"showEmail\": true, \"requiredEmail\":true}");
$request->addToHostedPaymentSettings($setting4);$setting6 = new AnetAPI\SettingType();
$setting6->setSettingName('hostedPaymentIFrameCommunicatorUrl');
$url = \Yii::$app->urlManager->createAbsoluteUrl(['authorizenet/special']);
$setting6->setSettingValue("{\"url\": \"".$url."\"}");
$request->addToHostedPaymentSettings($setting6);
$controller = new AnetController\GetHostedPaymentPageController($request);
$response = $controller->executeWithApiResponse( \net\authorize\api\constants\ANetEnvironment::SANDBOX);if (($response != null) && ($response->getMessages()->getResultCode() == "Ok") ) {return $response->getToken();
}
1.3 视图页面iframe使用token加载托管表单
<body onload="func()">
<form id="send_hptoken" action="https://test.authorize.net/payment/payment" method="post" target="load_payment" ><input type="hidden" name="token" value="<?php echo $token ?>" /><button type="submit" id="submit">我要支付</button>
</form><iframe id="load_payment" class="embed-responsive-item" name="load_payment" width="100%" height="650px" frameborder="0" scrolling="no">
</iframe>
</body>
<script type="application/javascript">function func(){var button = document.getElementById('submit');button.click();}
</script>
1.4 捕获响应并处理。
同 二.1.14 一致,可以设置为同一个页面,通过referrer来判断是完善支付信息表单的响应,还是支付表单的响应
如:
if(referrer == 'https://test.authorize.net/customer/addPayment'){//your code
}else if(referrer == 'https://test.authorize.net/payment/payment'){//your code
}else if(other){//your code
}
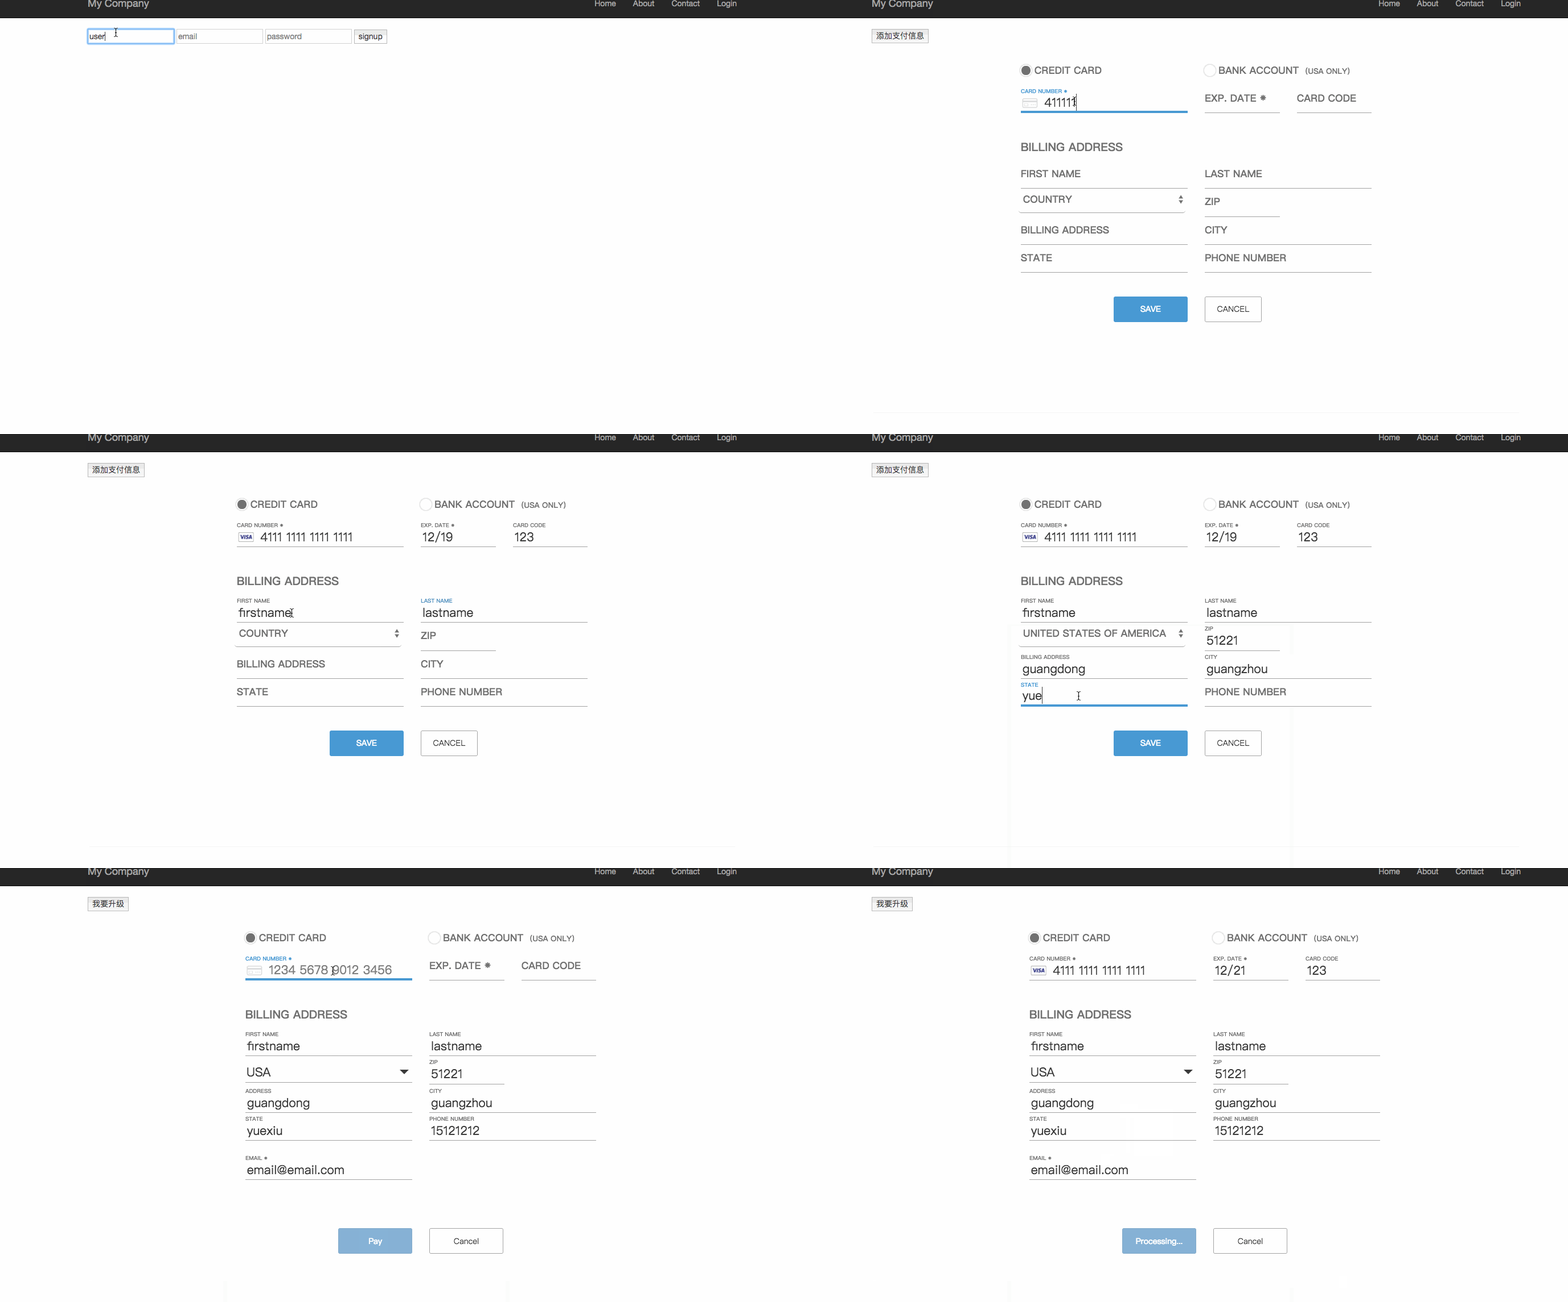
3. 最终效果图

(支付完成后的处理我没做,无非就是弹个窗之类的告诉用户支付成功,再处理后台逻辑之类的)
可以看到,这里只可以回填账单地址、客户电话和email之类的信息。信用卡、信用卡过期时间、信用卡安全码等都无法回填,需要用户再次输入,用户体验非常不好。
所以支付这一步我们可以不用托管表单,使用通过CustomerProfileID发起支付的API来完成
需要请求的API : createTransactionRequest
API的详细文档地址:createTransactionRequest
$paymentprofileid = $this->getCustomerProfile($profileid);
$profileToCharge = new AnetAPI\CustomerProfilePaymentType();
$profileToCharge->setCustomerProfileId($profileid);
$paymentProfile = new AnetAPI\PaymentProfileType();
$paymentProfile->setPaymentProfileId($paymentprofileid);
$profileToCharge->setPaymentProfile($paymentProfile);$transactionRequestType = new AnetAPI\TransactionRequestType();
$transactionRequestType->setTransactionType( "authCaptureTransaction");
$transactionRequestType->setAmount(5);
$transactionRequestType->setProfile($profileToCharge);$request = new AnetAPI\CreateTransactionRequest();
$request->setMerchantAuthentication($this->merchantAuthentication);
$request->setTransactionRequest( $transactionRequestType);
$controller = new AnetController\CreateTransactionController($request);
$response = $controller->executeWithApiResponse( \net\authorize\api\constants\ANetEnvironment::SANDBOX);
4. 结尾补充
托管表单要求你的程序挂载在HTTPS域名下
还可以通过CustomerProfileId、paymentProfileId发起ARB(Auto Recurring Billing)扣款
需要请求的API : ARBCreateSubscriptionRequest
API的详细文档地址:getHostedPaymentPageRequest
关于APB的详细介绍请看:recurring_billing
关于测试请看:testing_guide
可以填写不同的 Zip Code 和 Card Code 来模拟不同的错误返回
三. AccceptJs方式发起支付
(缺)
1. 加载AccpectJS
(缺)
2. 巴拉巴拉
(缺)
缺失的内容请自行参考官方demo。。。。。
使用Authorize.net的SDK实现符合PCI标准的支付流程相关推荐
- 实现不同符合PCI规范的适配器 需求说明:PCI是一种规范,所有实现了该规范的适配器,必如显卡、声卡、网卡都可以安装到PCI插槽上并工作。模拟实现该功能。
实现不同符合PCI规范的适配器 需求说明:PCI是一种规范,所有实现了该规范的适配器,必如显卡.声卡.网卡都可以安装到PCI插槽上并工作.模拟实现该功能. 实现思路及关键代码 1)定义PCI接口,具有 ...
- sublime text3安装python插件和flake8_让你的代码符合PEP8标准——sublime text 2 安装及使用 Python Flake8 Lint 插件...
上周看到一个招Python工程师的要求,其中有一条就是要求代码符合PEP8标准. PEP8标准之前就听说过,是Python官方推荐的一个代码标准.并不是强制要求,只是推荐大家使用,增加代码可读性. 因 ...
- Bye Bye Embed-再见了Embed,符合web标准的媒体播放器代码
由于Embed标签是Netscape的私有财产,故一直未被W3C认可,对于各种媒体文件使用Embed标签是非标准的,如何改变?Elizabeth Castro的 Bye Bye Embed 一文对于各 ...
- C# 对接微信支付时生成符合 RFC3339 标准的日期时间字符串
rfc3339 是一种包含时区信息的字符串标准格式.格式为YYYY-MM-DDTHH:mm:ss+TIMEZONE,YYYY-MM-DD表示年月日,T出现在字符串中,表示time元素的开头,HH:mm ...
- 从支付宝SDK的支付流程理解什么是公钥和私钥,什么是加密和数字签名
2019独角兽企业重金招聘Python工程师标准>>> 名词解释 什么是公钥和私钥 首先要明白公钥和私钥只是一个相对概念,就是说我们不能单纯的去称呼一对密钥中的一个为公钥,另一个为私 ...
- sdk没有登录什么意思_SDK登录与支付流程图文教程
SDK登录流程简介 SDK登录流程 简单介绍登录流程中的8个步骤: 1. 游戏逻辑代码调用SDK提供的登录方法. 将玩家在SDK提供的界面中输入的玩家名称与密码传递给SDK暴露的方法. 2. SDK与 ...
- Android App支付系列(二):支付宝SDK接入详细指南(附官方支付demo)
前言 一家移动互联网公司,说到底,要盈利总是需要付费用户的,自己开发支付系统对于资源有限的公司来说显然不太明智,国内已经有多家成熟的移动支付提供商,阿里就是其中之一. 继< Android Ap ...
- 符合SEO标准的div+css页面参考
下面的部分是著名设计师阿捷发表的div+css三行两列网页参考,星箭在此基础上做了小小的改动,以前乐思蜀也对阿捷的这个经典布局案例进行过修改,将左右代码互换,达到主体内容显示在前更方便搜索引擎抓取分析 ...
- SA8000认证辅导,其宗旨是确保供应商所供应的产品,皆符合社会责任标准的要求
社会责任标准"SA8000",是Social Accountability 8000 International standard的英文简称,是全球首个道德规范国际标准.其宗旨是确 ...
最新文章
- 重大里程碑!VOLO屠榜CV任务,无需额外数据,首次在ImageNet 上达到87.1%
- UWP 使用OneDrive云存储2.x api(一)【全网首发】
- 我的专属QQ 功能篇 (一)
- 脚本升级openssh
- 数学篇--初中数学知识
- 娱乐先锋点歌系统服务器,娱乐先锋 K-LIVE 单机版安装和加歌说明.doc
- Axure8.0基础教程(11-20)AxureRP8基础操作
- 猿创征文|【FreeSwitch开发实践】使用sipp对FreeSwitch进行压力测试
- 软件开发流程规范介绍
- 云服务器宝塔是什么,云服务器如何安装宝塔面板
- uniapp使用picker
- PR放入视频音频后没声音,及提示MME设备内部错误的解决办法
- 切换到ZSH以后遇到的坑
- [名词解释] PATA和SATA I
- 零基础学习UI设计需要多长时间
- HBase二级索引的设计与应用(详解)
- 试用了hipihi首批账号
- ipad访问ftp文件服务器,ipad肿么访问ftp
- 美国php空间推荐,美国php空间php空间推荐
- Java坑人面试题系列: 线程/线程池(高级难度)
