指南:在 linux 下的 Oracle Database 11g 中安装 Oracle Enterprise Manager 10g Grid Control 第 5 版
原文地址:http://www.oracle.com/technetwork/cn/articles/revitt-oem-096363-zhs.html作者:Mike Revitt 逐步详解如何针对 Oracle Enterprise linux 版本 5 上现有的 Oracle 11g 数据库安装 Oracle Enterprise Manager 10g Grid Control 第 5 版。 2009 年 7 月发布 目录
|
1. 简介
Oracle Enterprise Manager 10g Grid Control 第 2 版于 2005 年 11 月发布。目前,所有后续版本都被部署为该版本的升级。遗憾的是,初始版本的前提条件并不支持操作系统或数据库的当前版本;此外,10.2.0.1 的支持表需要 10g 第 1 版数据库。
为解决此问题,Oracle Enterprise Manager 的当前版本(正在开发的第 5 版)支持仅纯软件安装方式,允许产品安装在当前版本的操作系统和数据库中。
本指南将详细介绍如何针对安装在 Oracle Enterprise Linux 第 5 版上的 Oracle 11g 数据库安装当前版本的 Oracle Enterprise Manager Grid Control。本指南使用 Oracle VM 2.1.2 作为测试环境,操作过程中使用的所有软件安装了最新的补丁。
2.前提条件
本安装方法的需求如下:
2 台服务器 这些服务器可以是物理的或者虚拟的。尽管可以在一台服务器中进行安装,但不推荐采用这种方式。在
本指南中,我使用了 Oracle VM 2.1.2 部署的两台虚拟服务器。
OEL 5.3 Oracle Enterprise Linux 第 5 版 update 3;x86 32 位版本 DVD
11.1.0.6.0 Oracle Database 11g 第 1 版
11.1.0.7.0 Oracle Database 11g 第 1 版 — 第一个补丁集(可选)
10.2.0.1.0 Oracle Enterprise Manager 10g Grid Control 第 1 版软件
10.2.0.5.0 Oracle Enterprise Manager 10g Grid Control 第 5 版软件以及 Oracle Enterprise Manager 10g Grid Control Agent 第 5 版
软件;该版本全面支持当前操作系统中的 11g 数据库。
3. 参考信息
本指南的编写参考了以下文献。
B32281-04 适用于 Linux x86 的 Oracle Database 快速安装指南 11g 第 1 版 (11.1)
E10953-07 Oracle Enterprise Manager Grid Control 安装指南 10g 第 5 版 (10.2.0.5.0)
E14503-01 适用于 Linux 和 Microsoft Windows 的 Oracle Enterprise Manager Grid Control 版本说明 10g 第 5 版 (10.2.0.5.0)
说明 784963.1 “如何使用现有数据库 (11g) 选项在 Enterprise Linux 5 上安装 Grid Control 10.2.0.5.0”
说明 602750.1 “ConfigureGC.pl 报表 — 无效的用户名/口令”
错误 7483221 “ConfigureGC.pl 由于 SYS 口令无效而失败”
4. 创建 Oracle Enterprise 模板
安装 Oracle 产品前需要预先准备环境,只有所有的前提条件齐备的情况下,安装才能成功。
首先,我们将在半虚拟化环境中安装 Oracle Enterprise Linux 5 Update 3 (5.3)。如果您已经准备了 OEL 5.3 版模板,请转到“通过 Linux 模板创建数据库虚拟机章节。
准备 DVD
创建半虚拟化环境有些繁琐,因为您无法使用虚拟安装命令行工具从本地硬盘或者 CD-ROM 创建来宾帐户。然而,您可以在主机操作系统中创建一棵安装树,使用以下命令将其挂载为一个 NFS 共享:
[oracle@vm-manager Linux]$ su - root
Password:
[root@vm-manager ~]# mount -o ro,loop  /u01/Linux/Enterprise-R5-U3-Server-i386-dvd.iso /u02
[root@vm-manager ~]# exportfs *:/u02
exportfs: No options for /u01/Linux/FC5 :  suggest (sync) to avoid warning
[root@vm-manager ~]#
安装 Oracle Enterprise Linux 第 5 版 Update 3
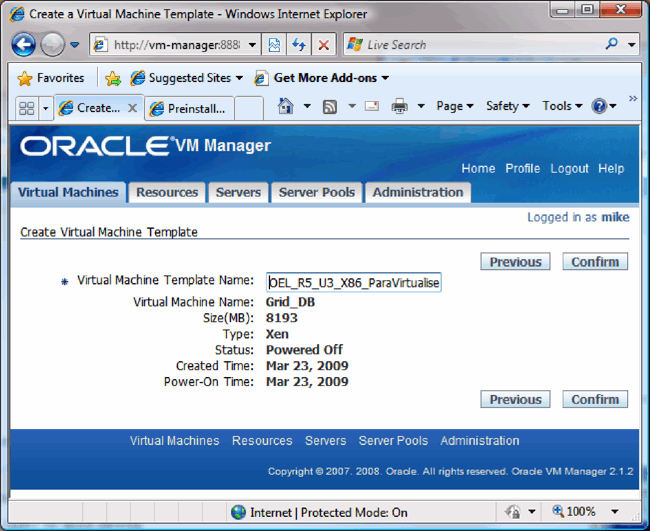
在 Oracle VM Manager 的 Virtual Machines 选项卡中选择 Create Virtual Machine,然后选择以下选项:
- 从安装介质创建
- 从服务器池中选择一个服务器
- 选择 Paravirtualized 虚拟化方法
- 输入之前创建的 DVD 挂载点的 NFS 路径。(使用 IP 地址而非主机名。)
- 为计算机命名并设置操作系统、内存以及磁盘参数。

新服务器一旦启动,即刻运行控制台并遵照屏幕提示进行操作。
设置新分区大小时,选择手动创建以下三个分区:
- 125MB /boot
- 3074MB swap(swap 文件需要 1.5 倍于服务器内存大小,当前服务器 RAM 为 2 GB。)
- 4988MB /
此外:
- 为服务器设置一个固定的 IP 地址。
- 添加 Development Software 包,然后选择 Customize Later。
- 禁用防火墙(在我们的测试环境中不需要此项配置。)
- 禁用 SELinux.(在我们的测试环境中不需要此项配置。)
请勿创建用户,此项工作将在安装结束后执行。
添加缺少的库
安装结束后,我们需要从 DVD 或者 CD 列表中安装以下软件包。
CD2
- unixODBC-2.2.11(32 位)或者更高版本
CD3
- libaio-devel-0.3.106
- sysstat-7.0.0
- libXp-1.0.0-8
- openmotif22-2.2.3-18
- compat-db-4.2.52-5
- unixODBC-devel-2.2.11(32 位)或者更高版本
为此,将这些文件解压缩到 /tmp 目录,然后执行以下命令:
[root@Grid-DB ~]# rpm –i /tmp/libaio-devel-0.3.106-3.2.i386.rpm
[root@Grid-DB ~]# rpm –i /tmp/sysstat-7.0.2-3.el5.i386.rpm
[root@Grid-DB ~]# rpm –i /tmp/libXp-1.0.0-8.1.el5.i386.rpm
[root@Grid-DB ~]# rpm –i /tmp/openmotif22-2.2.3-18.i386.rpm
[root@Grid-DB ~]# rpm –i /tmp/compat-db-4.2.52-5.1.i386.rpm
[root@Grid-DB ~]# rpm –i /tmp/unixODBC-2.2.11-7.1.i386.rpm
[root@Grid-DB ~]# rpm –i /tmp/unixODBC-devel-2.2.11-7.1.i386.rpm
半虚拟化环境目前不支持 CD 和 DVD 驱动器,所以添加缺少的软件包的最简单方法是使用 Firefox 通过 ftp 启动 DVD。

然后,为从 Enterprise Linux 第 4 版到第 5 版名称发生变化的一个库创建链接:
[root@Grid-DB ~]#
[root@Grid-DB ~]# ln -s /usr/lib/libgdbm.so.2.0.0 /usr/lib/libdb.so.2
[root@Grid-DB ~]#
配置内核参数
在默认安装中,有多个参数需要修改(见下文)。
首先,编辑 /etc/sysctl.conf,在该文件的末尾添加以下内容:
#Oracle Requirements
#Mike Revitt 23rd March 2009
kernel.sem = 250 32000 100 128
net.ipv4.ip_local_port_range = 1024 65000
net.core.rmem_default = 4194304
net.core.rmem_max = 4194304
net.core.wmem_default = 262144
net.core.wmem_max = 262144
net.ipv4.tcp_wmem = 262144 262144 262144
net.ipv4.tcp_rmem = 4194304 4194304 4194304
执行以下命令使更改立刻生效:
[root@Grid-DB ~]# sysctl -p
net.ipv4.ip_forward = 0
net.ipv4.conf.default.rp_filter = 1
net.ipv4.conf.default.accept_source_route = 0
kernel.sysrq = 0
kernel.core_uses_pid = 1
net.ipv4.tcp_syncookies = 1
kernel.msgmnb = 65536
kernel.msgmax = 65536
kernel.shmmax = 4294967295
kernel.shmall = 268435456
kernel.sem = 250 32000 100 128
net.ipv4.ip_local_port_range = 1024 65000
net.core.rmem_default = 4194304
net.core.rmem_max = 4194304
net.core.wmem_default = 262144
net.core.wmem_max = 262144
net.ipv4.tcp_wmem = 262144 262144 262144
net.ipv4.tcp_rmem = 4194304 4194304 4194304
保存模板
此步骤完成了一个通用 Oracle Enterprise Linux 第 5 版 Update 3 半虚拟化模板的创建。
关闭虚拟机。
从 More Actions zhogn 选择 Save As Template:
5. 从 Linux 模板创建数据库虚拟机
如有必要,从 Oracle Enterprise Linux 模板创建一个新的虚拟机。
创建 U01 挂载点
通过以下步骤向新的虚拟机中添加一个 U01 挂载点:
1. 编辑虚拟机。
2. 选择 Storage 选项卡。
3. 创建一个新的 8GB 虚拟磁盘。(该容量足够支持数据库和代理。)
4. 启动虚拟机。
5. 连接至控制台并使用 root 帐户登录。
6. 打开一个终端,执行命令 fdisk -l,该命令将识别新磁盘:
[root@Grid-DB ~]# fdisk -lDisk /dev/xvda: 8589 MB, 8589934592 bytes
255 heads, 63 sectors/track, 1044 cylinders
Units = cylinders of 16065 * 512 = 8225280 bytesDevice Boot      Start    End   Blocks   Id System
/dev/xvda1   *       1     16   128488+  83 Linux
/dev/xvda2          17     408  3148740  82 Linux swap / Solaris
/dev/xvda3         409    1044  5108670  83 LinuxDisk /dev/xvdb: 8589 MB, 8589934592 bytes
255 heads, 63 sectors/track, 1044 cylinders
Units = cylinders of 16065 * 512 = 8225280 bytesDisk /dev/xvdb doesn't contain a valid partition table
7. 在之前识别的设备中创建一个主分区。
[root@Grid-DB ~]# fdisk /dev/xvdb
Device contains neither a valid DOS partition table, nor Sun, SGI or OSF disklabel
Building a new DOS disklabel. Changes will remain in memory only,
until you decide to write them. After that, of course, the previous
content won't be recoverable.Warning: invalid flag 0x0000 of partition table 4 will be corrected by w(rite)Command (m for help): n
Command actione   extendedp   primary partition (1-4)
p
Partition number (1-4): 1
First cylinder (1-1044, default 1):
Using default value 1
Last cylinder or +size or +sizeM or +sizeK (1-1044, default 1044):
Using default value 1044Command (m for help): w
The partition table has been altered!Calling ioctl() to re-read partition table.
Syncing disks.
8. 在这个新的分区上添加一个文件系统。
[root@Grid-DB ~]# mkfs -t ext3 /dev/xvdb1
mke2fs 1.39 (29-May-2006)
Filesystem label=
OS type: Linux
Block size=4096 (log=2)
Fragment size=4096 (log=2)
1048576 inodes, 2096474 blocks
104823 blocks (5.00%) reserved for the super user
First data block=0
Maximum filesystem blocks=2147483648
64 block groups
32768 blocks per group, 32768 fragments per group
16384 inodes per group
Superblock backups stored on blocks: 32768, 98304, 163840, 229376, 294912, 819200, 884736, 1605632Writing inode tables: done
Creating journal (32768 blocks): done
Writing superblocks and filesystem accounting information: doneThis filesystem will be automatically checked every 21 mounts or
180 days, whichever comes first.  Use tune2fs -c or -i to override.
[root@Grid-DB ~]#
然后,在执行挂载命令挂载新设备之前,向 /etc/fstab 文件添加必要的命令,如下所示。
[root@Grid-DB ~]# vi /etc/fstabLABEL=/                 /                       ext3    defaults        1 1
LABEL=/boot             /boot                   ext3    defaults        1 2
tmpfs                   /dev/shm                tmpfs   defaults        0 0
devpts                  /dev/pts                devpts  gid=5,mode=620  0 0
sysfs                   /sys                    sysfs   defaults        0 0
proc                    /proc                   proc    defaults        0 0
LABEL=SWAP-xvda2        swap                    swap    defaults        0 0
/dev/xvdb1              /u01                    ext3    defaults        1 1[root@Grid-DB ~]# mkdir /u01
[root@Grid-DB ~]# mount /u01
[root@Grid-DB ~]# df -h
Filesystem            Size  Used Avail Use% Mounted on
/dev/xvda3            4.8G  2.5G  2.1G  55% /
/dev/xvda1            122M   13M  104M  11% /boot
tmpfs                 1.1G     0  1.1G   0% /dev/shm
/dev/xvdb1            7.9G  147M  7.4G   2% /u01
创建 Oracle 用户并设置环境
下一阶段是创建必要的用户和组,并为这些用户设置操作系统环境。
根据 OFA 准则创建组和用户:
[root@Grid-DB ~]# groupadd -g 500 oinstall
[root@Grid-DB ~]# groupadd -g 501 dba
[root@Grid-DB ~]# groupadd -g 502 asmadmin
[root@Grid-DB ~]# groupadd -g 503 oper
[root@Grid-DB ~]# useradd -u 500 -g oinstall -G dba,asmadmin,oper -s /bin/bash oracle[root@Grid-DB ~]# passwd oracle
Changing password for user oracle.
New UNIX password:
Retype new UNIX password:
passwd: all authentication tokens updated successfully.
为 Oracle 用户设置 Shell 限制;在该文件的末尾添加以下代码行:
root@Grid-DB ~]# vi /etc/security/limits.conf#@student        -       maxlogins       4#Oracle Parameters
#Mike Revitt 23rd March 2009
oracle           soft    nproc   2047
oracle           hard    nproc   16384
oracle           soft    nofile  1024
oracle           hard    nofile  65536# End of file
通过在指定文件的末尾添加以下代码行,设置可插入认证模块 (PAM) 限制。
root@Grid-DB ~]# vi /etc/pam.d/login# pam_selinux.so open should only be followed by sessions to be executed in the user context
session    required     pam_selinux.so open
session    optional     pam_keyinit.so force revoke
#Oracle Parameters
#Mike Revitt 23rd March 2009
session    required     pam_limits.so
在全局 profile 文件中设置用户限制。(在该文件的末尾添加以下代码行。)
root@Grid-DB ~]# vi /etc/profilefor i in /etc/profile.d/*.sh ; doif [ -r "$i" ]; then. $ifi
done#Oracle Parameters
#Mike Revitt 23rd March 2009
if [ $USER = "oracle" ]; thenif [ $SHELL = "/bin/ksh" ]; thenulimit -p 16384ulimit -n 65536elseulimit -u 16384 -n 65536fi
fiunset i
unset pathmunge
作为 Oracle 登录,在本地 bash profile 文件中设置以下参数。
oracle@Grid-DB ~]# vi .bash_profile# .bash_profile
umask 022# Get the aliases and functions
if [ -f ~/.bashrc ]; then. ~/.bashrc
fi# User specific environment and startup programsORACLE_BASE=/u01/app/oracle
PATH=$PATH:$HOME/binexport ORACLE_BASE PATH
创建以下目录并设置权限:
root@Grid-DB ~]# mkdir –p /u01/app
root@Grid-DB ~]# chown oracle:oinstall /u01/app
root@Grid-DB ~]# chmod 775 /u01/app
在 hosts 文件中编辑以下项。
root@Grid-DB ~]# vi /etc/hosts# Do not remove the following line, or various programs
# that require network functionality will fail.
127.0.0.1               localhost.localdomain   localhost
172.16.47.98            Grid-DB.cougar.eu.com   Grid-DB
172.16.47.99            Grid-EM.cougar.eu.com   Grid-EM
6. 创建管理服务虚拟机
Oracle VM 一个非常实用的特性是能够快速克隆环境。既然已经创建了虚拟数据库服务器,我们可以为管理服务服务器克隆一个虚拟数据库服务器,而无需重新创建。
这可以通过在 More Actions 下拉菜单中选择 Clone 选项并遵循相应提示来完成。

设置管理服务服务器 IP 地址和主机名
克隆过程创建的新服务器通过 DHCP 获取新的 IP 地址,主机名并不发生改变。
通过以下步骤修改这些参数:
1. 启动新虚拟服务器。
2. 打开控制台并使用 root 帐户登录。
3. 编辑 network 文件并对主机名进行以下更改:
root@Grid-DB ~]# vi /etc/sysconfig/networkNETWORKING=yes
NETWORKING_IPV6=no
HOSTMANE=Grid-EM.cougar.eu.com
GATEWAY=172.16.47.1
4. 编辑网络接口卡文件,对网络参数进行以下更改:
root@Grid-DB ~]# vi /etc/sysconfig/network-scripts/ifcfg-eth0# Xen Virtual Ethernet
DEVICE=eth0
BOOTPROTO=static
ONBOOT=yes
HWADDR=XX:XX:XX:XX:XX:XX        #DO NOT CHANGE THIS VALUE
IPADDR=172.16.47.99
NETMASK=255.255.255.0
5. 重启服务器。
7. 安装 Enterprise Manager Grid Control 信息库 (11.1.0.7.0)
在我们能够安装任何软件之前,需要创建一个足够存储这些安装文件的设备。
在 Oracle VM 中,您可以创建一个共享磁盘来存储按需挂载至服务器的安装介质;这正是我将用到的功能。

此外,您还可以使用 NFS 挂载或者创建一个新的本地磁盘,详见前面的创建 U01 安装点。(注:需要关闭服务器以添加新的存储器。)
安装 Oracle Database 11g 第 1 版 (11.1.0.6)
作为新的 Oracle 帐户登录服务器;进入安装文件所在的目录,并在此目录下运行 runInstaller 命令。
启动 Oracle Universal Installer 并选择 Advanced Installation 方法。(注意,默认的企业版数据库安装并不足以作为 Grid Control 信息库来使用,参见参考说明 784963.1。)
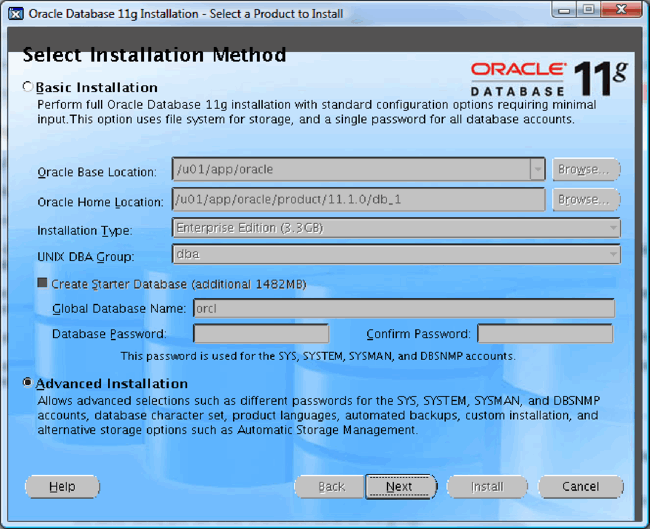
指定这些清单详细信息和凭证:
| 说明 | 值 |
| 清单位置 | /u01/app/oraInventory |
| 操作系统组名称 | oinstall |
将 Installation Type 设置为 Custom。
安装位置如下所示。(使用 OFA 标准 — 应为默认设置。)
| 说明 | 值 |
| Oracle Base | /u01/app/oracle |
| Name: | OraDb11g_home1 |
| 路径: | /u01/app/oracle/product/11.1.0/db_1 |
特定产品的前提条件检查 — 这些必须全部通过:
所需的产品组件如下所示
| 复选框 | 组件名称 |
| √ | Oracle Database 11g |
| √ | 企业版选件 |
| Oracle Advanced Security | |
| √ | Oracle Partitioning |
| Oracle Spatial | |
| Oracle Label Security | |
| Oracle OLAP | |
| Data Mining RDBMS Files | |
| Database Vault 选件 | |
| Real Application Testing | |
| √ | Oracle Net Services |
| √ | Oracle Net Listener |
| Oracle Connection Manager | |
| √ | Oracle Call Interface |
| Oracle Programmer | |
| √ | Oracle XML Development Kit |
| Oracle ODBC Driver | |
| Oracle Configuration Manager |
特许操作系统群组如下所示:
| 说明 | 值 |
| 数据库管理员 (OSDBA) 组: | dba |
| 数据库操作员 (OSOPER) 组: | oper |
| ASM 管理员 (OSASM) 组: | asmadmin |
需要注意的是,此时请勿 创建数据库,因为默认的企业版数据库安装并不足以作为 Grid Control 信息库来使用(详情参见参考说明 784963.1);选择 Install Database Software Only。
安装了二进制文件之后,将创建一些需要作为用户 root 运行的脚本:
[root@Grid-DB u02]#
[root@Grid-DB u02]# /u01/app/oraInventory/orainstRoot.sh
Changing permissions of /u01/app/oraInventory to 770.
Changing groupname of /u01/app/oraInventory to oinstall.
The execution of the script is complete
[root@Grid-DB u02]# /u01/app/oracle/product/11.1.0/db_1/root.sh
Running Oracle 11g root.sh script...The following environment variables are set as:ORACLE_OWNER= oracleORACLE_HOME=  /u01/app/oracle/product/11.1.0/db_1Enter the full pathname of the local bin directory: [/usr/local/bin]: Copying dbhome to /usr/local/bin ...Copying oraenv to /usr/local/bin ...Copying coraenv to /usr/local/bin ...Creating /etc/oratab file...
Entries will be added to the /etc/oratab file as needed by
Database Configuration Assistant when a database is created
Finished running generic part of root.sh script.
Now product-specific root actions will be performed.
Finished product-specific root actions.
[root@Grid-DB u02]#
安装 Oracle Database 11g 补丁集 1 (11.1.0.7)
作为 Oracle 帐户登录服务器;进入补丁文件所在的目录,并在此目录下运行 runInstaller 命令。
选择主目录详细信息。(注:如果没有选定,将默认创建一个新的主目录。)
| 说明 | 值 |
| Name: | OraDb11g_home1 |
| 路径: | /u01/app/oracle/product/11.1.0/db_1 |
特定产品前提条件检查 — 该检查必须 成功。
配置脚本 — 安装了二进制文件之后,将创建一些需要作为用户 root 运行的脚本:
[root@Grid-DB u02]#
[root@Grid-DB u02]# /u01/app/oracle/product/11.1.0/db_1/root.sh
Running Oracle 11g root.sh script...The following environment variables are set as:ORACLE_OWNER= oracleORACLE_HOME=  /u01/app/oracle/product/11.1.0/db_1Enter the full pathname of the local bin directory: [/usr/local/bin]:
The file "dbhome" already exists in /usr/local/bin.  Overwrite it? (y/n)
[n]:
The file "oraenv" already exists in /usr/local/bin.  Overwrite it? (y/n)
[n]:
The file "coraenv" already exists in /usr/local/bin.  Overwrite it? (y/n)
[n]: Entries will be added to the /etc/oratab file as needed by
Database Configuration Assistant when a database is created
Finished running generic part of root.sh script.
Now product-specific root actions will be performed.
Finished product-specific root actions.
[root@Grid-DB u02]#
配置监听器
下一步是创建该数据库的监听器;该步骤最好通过在 Oracle 主目录环境中运行 netca 命令来完成。
运行命令 /u01/app/oracle/product/11.1.0/db_1/bin/netca &。
添加一个新的监听器。
输入监听器名为 LISTENER。
选择 TCP 作为协议。
使用标准端口 (1521)。
创建数据库
最后一步是创建数据库。这一步推荐使用 dbca 来创建一个自定义数据库。(注:请勿配置 Enterprise Manager。)
运行命令 /u01/app/oracle/product/11.1.0/db_1/bin/dbca &
数据库信息如下所示:
| 数据库 SID | 全局名称 | REDO 大小 | 内存 % |
| oemgc | oemgc.cougar.eu.com | 50 MB | 40 % |
在 Database Option 下选择 Keep the enhanced 11g default security settings 和 Enable automatic maintenance tasks。
文件位置:
| 数据库 SID | 名称 | 路径 |
| oemgc | 数据文件 | /u01/app/oracle |
| 索引文件 | /u01/app/oracle | |
| 重做日志 | /u01/app/oracle | |
| 存档日志 | /u01/app/oracle | |
| 控制文件 | /u01/app/oracle |
字符集:
| 数据库字符集 | 国家字符集 | 语言 | 地区 |
| WE8ISO8859P15 | AL16UTF16 | 英语 | 英国 |
配置数据库
成功构建数据库之后,需要多个数据库配置步骤。
首先,编辑 oratab 文件,允许数据库自动启动。
[oracle@Grid-DB Disk1]# vi /etc/oratab# This file is used by ORACLE utilities.  It is created by root.sh
# and updated by the Database Configuration Assistant when creating
# a database.# A colon, ':', is used as the field terminator.  A new line terminates
# the entry.  Lines beginning with a pound sign, '#', are comments.
#
# Entries are of the form:
#   $ORACLE_SID:$ORACLE_HOME:< N|Y >:
#
# The first and second fields are the system identifier and home
# directory of the database respectively.  The third filed indicates
# to the dbstart utility that the database should , "Y", or should not,
# "N", be brought up at system boot time.
#
# Multiple entries with the same $ORACLE_SID are not allowed.
#
#
oemgc:/u01/app/oracle/product/11.1.0/db_1:Y
调整初始化参数值。
[oracle@Grid-DB Disk1]# sqlplus / as sysdbaSQL> ALTER SYSTEM SET session_cached_cursors=200 scope=spfile;
SQL> ALTER SYSTEM SET aq_tm_processes=0 scope=spfile;
SQL> ALTER SYSTEM SET undo_retention=10800 scope=spfile;
SQL> ALTER SYSTEM SET "_b_tree_bitmap_plans"=false scope=spfile;
SQL> @$ORACLE_HOME/rdbms/admin/dbmspool.sqlPackage created.Grant succeeded.SQL> exit
通过停止和启动数据库来应用更改。
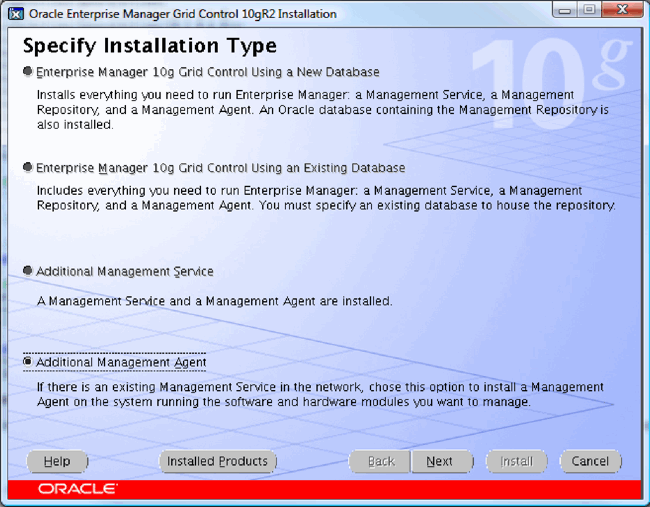
8. 安装 Enterprise Manager Grid Control 管理服务
安装 EM Grid Control 最新版本的第一步是安装 10g 第 2 版的仅软件版本;接着,安装 10g 第 5 版的仅软件版本。安装完这两个版本后,会自动运行配置脚本。
安装 Enterprise Manager 10g Grid Control 第 2 版 (10.2.0.1)
使用如下详述的静默方式、仅软件方法安装 Enterprise Manager 10g Grid Control 第 2 版。所有目录都应以完整路径的形式输入。
在所有示例中,安装文件都位于 /u02/gc10201 中。
使用新的数据库安装类型为 Grid Control 修改基本安装响应文件:
[oracle@Grid-EN ~]# vi response/em_using_existing_db.rsp
更改默认设置中的以下参数;这些值的完整描述和释义在响应文件中给出。
UNIX_GROUP_NAME="oinstall"
FROM_LOCATION="/u02/gc10201/oms/Disk1/stage/products.xml"
BASEDIR="/u01/app/oracle/product/10.2.0"
INSTALLATION_NAME="10gR5"
s_reposHost="Grid-DB.cougar.eu.com"
s_reposPort="1521"
s_reposSID="oemgc"
s_reposDBAPwd="Its-a-secret"
s_mgmtTbsName=/u01/app/oracle/oemgc/mgmt.dbf
s_ecmTbsName=/u01/app/oracle/oemgc/mgmt_ecm_depot1.dbf
s_securePassword="Its-a-secret"
s_securePasswordConfirm="Its-a-secret"
b_lockedSelected=false
s_reposPwd="Its-a-secret"
s_reposPwdConfirm="Its-a-secret"
创建 oraInst.loc。静默安装过程不允许指定清单目录,而是将其设置为默认的 oracle home 目录。以 root 身份编辑 oraInst.loc 文件,添加以下代码行。
[root@Grid-EN ~]# vi /etc/oraInst.locinventory_loc=/u01/app/oraInventory
inst_group=oinstall[root@Grid-EN ~]# mkdir –p /u01/app/oraInventory
[root@Grid-EN ~]# chmod 644 /etc/oraInst.loc
[root@Grid-EN ~]# chmod 770 /u01/app/oraInventory
[root@Grid-EN ~]# cp /etc/oraInst.loc /u01/app/oraInventory/
[root@Grid-EN ~]# chmod 660 /u01/app/oraInventory/oraInst.loc
[root@Grid-EN ~]# chown –R oracle:oinstall /u01/app/oraInventory
使用以下命令安装基础版本。(注:确保在运行这些命令之前已经设置了 ORACLE_BASE。)
[oracle@Grid-EN ~]# /u02/gc10201/runInstaller -noconfig -ignoreSysPrereqs -silent -responseFile /u02/gc10201/response/em_using_existing_db.rsp use_prereq_checker=false
将产生以下输出:
Starting Oracle Universal Installer...Checking installer requirements...Checking operating system version: must be redhat-3, redhat-4 or SuSE-9PassedChecking for Kernel version 2.4.21     Passed
Checking for glibc version glibc-2.3.2-95.3     Passed
Checking swap space: must be greater than 150 MB.   Actual 3074 MB    PassedAll installer requirements met.Preparing to launch Oracle Universal Installer from /tmp/OraInstall2009-03-24_05-03-54PM. Please wait
...[oracle@Grid-EM 10.2.0.1]$ Oracle Universal Installer, Version 10.2.0.1.0 Production
Copyright (C) 1999, 2005, Oracle. All rights reserved.You can find a log of this install session at:/u01/app/oraInventory/logs/installActions2009-03-24_05-03-54PM.log
........................................................................... 100% Done.Loading Product Information
........................................................................... 100% Done.Analyzing dependencies
........................................................................... 100% Done.-----------------------------------------------------------------------------
Summary
Global SettingsSource: /u02/gc10201/oms/Disk1/stage/products.xmlOracle Home: /u01/app/oracle/product/10.2.0/oms10g (oms10g)Installation Type: Core
Product LanguagesEnglish
Space Requirements/ Required 1.66GB (includes 383MB temporary) : Available 7.94GB
New Installations (224 products)Oracle Enterprise Manager Grid Console 10.2.0.1.0
.
.
.Setup in progress (Tue Mar 24 17:08:33 GMT 2009)
........                                                        100% Done.
Setup successfulEnd of install phases.(Tue Mar 24 17:08:34 GMT 2009)
WARNING:
The following configuration scripts need to be executed as the "root" user.
#!/bin/sh
#Root script to run
/u01/app/oracle/product/10.2.0/oms10g/allroot.sh
To execute the configuration scripts:1. Open a terminal window2. Log in as "root"3. Run the scripts4. Return to this window and click "OK" to continueStarting to execute configuration assistants
The following configuration assistants have not been run. This can happen for following reasons -
either root.sh is to be run before config or Oracle Universal Installer was invoked with the -
noConfig option.
--------------------------------------
The "/u01/app/oracle/ product/10.2.0/agent10g/cfgtoollogs/configToolFailedCommands" script contains
all commands that failed, were skipped or were cancelled. This file may be used to run these
configuration assistants outside of OUI. Note that you may have to update this script with passwords
(if any) before executing the same.
The "/u01/app/oracle/product/10.2.0/agent10g/cfgtoollogs/configToolAllCommands" script contains all
commands to be executed by the configuration assistants. This file may be used to run the
configuration assistants outside of OUI. Note that you may have to update this script with passwords
(if any) before executing the same.--------------------------------------
The installation of Oracle Management Agent was successful.
Please check '/u01/app/oraInventory/logs/silentInstall2009-03-24_05-07-42-PM.log' for more details.[oracle@Grid-EM 10.2.0.1]$
安装了二进制文件之后,将创建一些需要作为用户 root 运行的脚本。
[root@Grid-EM ~]# /u01/app/oracle/product/10.2.0/oms10g/allroot.shStarting to execute allroot.sh ......... Starting to execute /u01/app/oracle/product/10.2.0/oms10g/root.sh ......
Running Oracle10 root.sh script...
\nThe following environment variables are set as:ORACLE_OWNER= oracleORACLE_HOME=  /u01/app/oracle/product/10.2.0/oms10gEnter the full pathname of the local bin directory: [/usr/local/bin]: Copying dbhome to /usr/local/bin ...Copying oraenv to /usr/local/bin ...Copying coraenv to /usr/local/bin ...\nCreating /etc/oratab file...
Adding entry to /etc/oratab file...
Entries will be added to the /etc/oratab file as needed by
Database Configuration Assistant when a database is created
Finished running generic part of root.sh script.
Now product-specific root actions will be performed.
Finished execution of  /u01/app/oracle/product/10.2.0/oms10g/root.sh ......Starting to execute /u01/app/oracle/product/10.2.0/agent10g/root.sh ......
Running Oracle10 root.sh script...The following environment variables are set as:ORACLE_OWNER= oracleORACLE_HOME=  /u01/app/oracle/product/10.2.0/agent10gEnter the full pathname of the local bin directory: [/usr/local/bin]:
The file "dbhome" already exists in /usr/local/bin.  Overwrite it? (y/n)
[n]:
The file "oraenv" already exists in /usr/local/bin.  Overwrite it? (y/n)
[n]:
The file "coraenv" already exists in /usr/local/bin.  Overwrite it? (y/n)
[n]: Entries will be added to the /etc/oratab file as needed by
Database Configuration Assistant when a database is created
Finished running generic part of root.sh script.
Now product-specific root actions will be performed.
Finished product-specific root actions.Finished execution of  /u01/app/oracle/product/10.2.0/agent10g/root.sh ......
[root@Grid-EM ~]#
安装 Enterprise Manager 10g Grid Control 第 5 版 (10.2.0.5)
使用如下详述的静默方式、仅软件方法安装 Enterprise Manager 10g Grid Control 第 5 版。所有目录都应以完整路径的形式输入。
在所有示例中,安装文件都位于 /u02/gc10205/3731593/Disk1 中。
首先,停止所有正在运行的 OPMN 进程;这些进程是之前的安装遗留的。
[oracle@Grid-EN ~]#  /u01/app/oracle/product/10.2.0/oms10g/opmn/bin/opmnctl stopall
[oracle@Grid-EN ~]# cp response/patchset.rsp  response/agent_patchset.rsp
复制响应文件 /u02/gc10205/3731593/Disk1/response/patchset.rsp。
[oracle@Grid-EN ~]# cp response/patchset.rsp  response/oms_patchset.rsp
[oracle@Grid-EN ~]# cp response/patchset.rsp  response/agent_patchset.rsp
修改 OMS 响应文件,并更改默认设置中的以下参数;这些值的完整描述和释义在响应文件中给出。
[oracle@Grid-EN ~]# vi response/oms_response.rspORACLE_HOME="/u01/app/oracle/product/10.2.0/oms10g"
b_softwareonly=true
s_sysPassword="Its-a-secret"
sl_pwdInfo={ "Its-a-secret" }
oracle.iappserver.st_midtier:szl_InstanceInformation={ "Its-a-secret" }
修改代理响应文件,并更改默认设置中的以下参数;这些值的完整描述和释义在响应文件中给出。
[oracle@Grid-EN ~]# vi response/agent_response.rspORACLE_HOME="/u01/app/oracle/product/10.2.0/agent10g"
b_softwareonly=true
s_sysPassword="Its-a-secret"
sl_pwdInfo={ "Its-a-secret" }
使用以下命令安装 OMS 升级:(注:确保在运行这些命令之前已经设置了 ORACLE_BASE。)
[oracle@Grid-EN ~]# /u02/gc10205/3731593/Disk1/runInstaller -noconfig -silent
-responseFile /u02/gc10205/3731593/Disk1/response/oms_response.rsp
安装了二进制文件之后,将创建一些需要作为用户 root 运行的脚本。该脚本不会给出成功执行的消息。
[root@Grid-EN ~]# /u01/app/oracle/product/10.2.0/oms10g/root.sh
[root@Grid-EN ~]#
使用以下命令安装 Agent 升级:
[oracle@Grid-EN ~]# /u02/gc10205/3731593/Disk1/runInstaller -noconfig -silent
-responseFile /u02/gc10205/3731593/Disk1/response/agent_response.rsp
安装了二进制文件之后,将创建一些需要作为用户 root 运行的脚本。
[root@Grid-EM ~]# /u01/app/oracle/product/10.2.0/agent10g/root.sh
Finished product-specific root actions.[root@Grid-EM ~]#
使用 ConfigureGC.pl 脚本配置 Grid Control 安装
安装的最后一步是运行在安装过程中跳过的配置脚本。
配置助手在脚本的执行过程中运行时,ORACLE_HOME/cfgtoollogs/cfgfw/ 中的文件将对应于每个 Oracle home,在其相应的目录(即 .../oms10g/ 或者 .../agent10g/)填充这些配置操作的结果。在配置步骤中采取操作(即 process start)时,会将操作日志置于这些位置:
.../oms10g/sysman/log/
.../agent10g/sysman/log/
.../oms10g/opmn/logs/
.../oms10g/j2ee/OC4J_EM/log/
.../oms10g/Apache/Apache/logs
这些配置可能需要大约一小时的时间,会偶尔出现命令会话更新并最终输出错误消息,提示查看 .../oms10g/cfgtoollogs/cfgfw/CfmLogger<>.log 文件。.../oms10g/cfgtoollogs/cfgfw/CfmLogger<>.log 文件和 emca_repos_drop<>.log 文件将会出现编号为 ORA-01017 的错误记录。
可以通过错误 7483221 跟踪这些错误,并将已知的解决方法记录为以下详细指令集合的一部分。
保存并设置环境变量 PERL5IB。
[oracle@Grid-EN ~]# export PERL5LIB_BACKUP=$PERL5LIB
[oracle@Grid-EN ~]# export PERL5LIB=/u01/app/oracle/product/10.2.0/oms10g/perl/lib/5.6.1
通过运行 ConfigureGC.pl 脚本配置 Enterprise Manager Grid Control。
[oracle@Grid-EN ~]# /u01/app/oracle/product/10.2.0/oms10g/perl/bin/perl
/u01/app/oracle/product/10.2.0/oms10g/sysman/install/ConfigureGC.pl
/u01/app/oracle/product/10.2.0
第一种错误:
Base Directory: /u01/app/oracle/product/10.2.0Starting ito execute Configuration Assistants: Running the configuration assistants using the following command:
/u01/app/oracle/product/10.2.0/oms10g/oui/bin/runConfig.sh
INV_PTR_LOC=/u01/app/oracle/product/10.2.0/oms10g/oraInst.loc
ORACLE_HOME=/u01/app/oracle/product/10.2.0/oms10g ACTION=configure MODE=perform
COMPONENT_XML={encap_oms.1_0_0_0_0.xml}
RESPONSE_FILE=/u01/app/oracle/product/10.2.0/agent10g/responsefile
perform - mode is starting for action: configureperform - mode finished for action: configureYou can see the log file: /u01/app/oracle/product/10.2.0/oms10g/cfgtoollogs/oui/configActions2009-03-
24_07-14-44-PM.logConfiguration Assistants failed with errors. Please check the above log. For more details also check /u01/app/oracle/product/10.2.0/oms10g/cfgtoollogs/cfgfw/CfmLogger_<latest_time_stamp>.log
[oracle@Grid-EM Disk1]$
查看上述日志文件中是否存在以下错误:
[oracle@Grid-EN ~]# vi ./oms10g/cfgtoollogs/cfgfw/CfmLogger_<latest_time_stamp>.logINFO: oracle.sysman.top.oms:PerformSecureCommand:runCmd:/u01/app/oracle/product/10.2.0/oms10g/sysman/admin/
emdrep/bin/RepManager -connect(DESCRIPTION=(ADDRESS_LIST=(ADDRESS=(PROTOCOL=TCP)(HOST=Grid-
DB.cougar.eu.com)(PORT=1521)))(CONNECT_DATA=(SID=oemgc)))-action drop -repos_user SYSMAN
-output_file /u01/app/oracle/product/10.2.0/oms10g/sysman/log/emca_repos_drop19_20_31.log have
completed with exitCode=50
INFO: oracle.sysman.top.oms:PerformSecureCommand:runCmd:Command Output stdout:
'Enter SYS user's password :
Getting temporary tablespace from database...
Could not connect to SYS/(DESCRIPTION=(ADDRESS_LIST=(ADDRESS=(PROTOCOL=TCP)(HOST=Grid-
DB.cougar.eu.com)(PORT=1521)))(CONNECT_DATA=(SID=oemgc))): ORA-01017: invalid username/password;
logon denied (DBD ERROR: OCISessionBegin)
这是一个已知错误 (7483221);要解决这个问题,将 SYS 口令设置为默认值并重新运行配置助手。
在数据库服务器上运行
[oracle@Grid-DB ~]# sqlplus / as sysdbaSQL> ALTER USER sys IDENTIFIED BY default;User altered.SQL> EXIT;
在管理服务器上重新运行命令文件
[oracle@Grid-EN ~]# /u01/app/oracle/product/10.2.0/oms10g/perl/bin/perl
/u01/app/oracle/product/10.2.0/oms10g/sysman/install/ConfigureGC.pl /u01/app/oracle/product/10.2.0
监视输出
首先,对最近的 CfmLogger 文件运行 tail 命令并查找日志文件。
[root@Grid-EM ~]# cd /u01/app/oracle/product/10.2.0/oms10g/cfgtoollogs/cfgfw/
[root@Grid-EM ~]# ls –al CfmLogger_*.log
-rw------ 1 oracle oinstall  3764 Mar 26 11:25 CfmLogger_2009-03-26_11-25-19-AM.log
-rw------ 1 oracle oinstall  4245 Mar 26 11:26 CfmLogger_2009-03-26_11-26-14-AM.log
-rw------ 1 oracle oinstall  6231 Mar 26 11:53 CfmLogger_2009-03-26_11-53-21-AM.log
-rw------ 1 oracle oinstall 41248 Mar 26 12:37 CfmLogger_2009-03-26_12-31-47-PM.log
-rw------ 1 oracle oinstall  9208 Mar 26 12:45 CfmLogger_2009-03-26_12-45-39-PM.log[root@Grid-EM ~]#
[root@Grid-EM ~]# tail –f CfmLogger_2009-03-26_12-45-39-PM.logINFO:
oracle.sysman.top.oms:PerformSecureCommand:runCmd:/u01/app/oracle/product/10.2.0/oms10g/sysman/admin/
emdrep/bin/RepManager -connect (DESCRIPTION=(ADDRESS_LIST=(ADDRESS=(PROTOCOL=TCP)(HOST=Grid-
DB.cougar.eu.com)(PORT=1521)))(CONNECT_DATA=(SID=oemgc))) -action create -repos_user SYSMAN
-metalink_username _NOT_AVAILABLE_ -output_file
/u01/app/oracle/product/10.2.0/oms10g/sysman/log/emca_repos_create12_45_49.log -ecm_datafile
/u01/app/oracle/oemgc/mgmt_ecm_depot1.dbf -datafile /u01/app/oracle/oemgc/mgmt.dbf  have completed
with exitCode=0
然后,对该文件的输出运行 tail 命令以监视该过程。
[root@Grid-EM ~]# cd /u01/app/oracle/product/10.2.0/oms10g/sysman/log/
[root@Grid-EM ~]# tail –f emca_repos_create12_45_49.logPackage body created.No errors.
No errors.Package body created.No errors.
No errors.Package body created.
成功完成后,再次对 CfmLogger 文件运行 tail 命令。
[root@Grid-EM ~]# cd /u01/app/oracle/product/10.2.0/oms10g/cfgtoollogs/cfgfw/
[root@Grid-EM ~]# tail –f CfmLogger_2009-03-26_12-45-39-PM.logINFO: oracle.sysman.top.agent:AddingToTargetsXml: Host target
INFO: oracle.sysman.top.agent:Adding
/u01/app/oracle/product/10.2.0/agent10g/sysman/install/hosttgt.out file to
/u01/app/oracle/product/10.2.0/agent10g
INFO: oracle.sysman.top.agent:addToTargetsXML:TargetInstaller added target file =
/u01/app/oracle/product/10.2.0/agent10g/sysman/install/hosttgt.out to
/u01/app/oracle/product/10.2.0/agent10g successfully.
INFO: oracle.sysman.top.agent:AddingToTargetsXml: Data base targets
INFO: oracle.sysman.top.agent:Adding
/u01/app/oracle/product/10.2.0/agent10g/sysman/install/oracledb.out file to
/u01/app/oracle/product/10.2.0/agent10g
INFO: oracle.sysman.top.agent:addToTargetsXML:TargetInstaller added target file =
/u01/app/oracle/product/10.2.0/agent10g/sysman/install/oracledb.out to
/u01/app/oracle/product/10.2.0/agent10g successfully.
INFO: oracle.sysman.top.agent:AddingToTargetsXml:
第二种错误:
Configuration Assistants has executed Successfully.Executing emctl command /u01/app/oracle/product/10.2.0/oms10g/bin/emctl status oms
Oracle Enterprise Manager 10g Release 5 Grid Control
Copyright (c) 1996, 2009 Oracle Corporation.  All rights reserved.
Oracle Management Server is Up.Stopping the oms inorder to run 10205 oms patch configuration
/u01/app/oracle/product/10.2.0/oms10g/opmn/bin/opmnctl stopall
opmnctl: stopping opmn and all managed processes...Running OMS patch configuration using /u01/app/oracle/product/10.2.0/oms10g/oui/bin/runConfig.sh
INV_PTR_LOC=/u01/app/oracle/product/10.2.0/oms10g/oraInst.loc
ORACLE_HOME=/u01/app/oracle/product/10.2.0/oms10g ACTION=patchsetConfigure MODE=perform
COMPONENT_XML={oracle.sysman.top.oms.10_2_0_5_0.xml}
RESPONSE_FILE=/u01/app/oracle/product/10.2.0/oms10g/config.rsp
perform - mode is starting for action: patchsetConfigureperform - mode finished for action: patchsetConfigureYou can see the log file: /u01/app/oracle/product/10.2.0/oms10g/cfgtoollogs/oui/configActions2009-03-26_03-
36-32-PM.log10205 OMS Configuration failed with errors. Please check the above log
[oracle@Grid-EM ~]$
查看上述日志文件中是否存在以下错误。
[oracle@Grid-EN ~]# vi ./oms10g/cfgtoollogs/cfgfw/CfmLogger_< LATEST_TIME_STAMP >.logThe plug-in OMS Oneoff Patch Application has successfully been performed
------------------------------------------------------
------------------------------------------------------
The plug-in Repository Upgrade is runningError occurred while connecting to RepositoryThe plug-in Repository Upgrade has failed its perform method
------------------------------------------------------
The action patchsetConfiguration has failed its perform method
###################################################
[root@Grid-EM ~]#
这是一个已知错误 (7483221);要解决这个问题,将 SYS 的口令设置为原始值并重新运行配置助手。
在数据库服务器上运行
[oracle@Grid-DB ~]# sqlplus / as sysdbaSQL> ALTER USER sys IDENTIFIED BY "Its-as-secret";User altered.SQL> EXIT;
在管理服务器上重新运行命令文件
[oracle@Grid-EN ~]# /u01/app/oracle/product/10.2.0/oms10g/perl/bin/perl
/u01/app/oracle/product/10.2.0/oms10g/sysman/install/ConfigureGC.pl /u01/app/oracle/product/10.2.0
监视输出
对最近的 CfmLogger 文件运行 tail 命令。注意,该 tail 命令在一定时期内可能失效。
[root@Grid-EM ~]# cd /u01/app/oracle/product/10.2.0/oms10g/cfgtoollogs/cfgfw/
[root@Grid-EM ~]# ls –al CfmLogger_*.log
-rw------ 1 oracle oinstall  3764 Mar 26 11:25 CfmLogger_2009-03-26_11-25-19-AM.log
-rw------ 1 oracle oinstall  4245 Mar 26 11:26 CfmLogger_2009-03-26_11-26-14-AM.log
-rw------ 1 oracle oinstall  6231 Mar 26 11:53 CfmLogger_2009-03-26_11-53-21-AM.log
-rw------ 1 oracle oinstall 41248 Mar 26 12:37 CfmLogger_2009-03-26_12-31-47-PM.log
-rw------ 1 oracle oinstall  9208 Mar 26 12:45 CfmLogger_2009-03-26_12-45-39-PM.log
-rw------ 1 oracle oinstall  9208 Mar 26 12:45 CfmLogger_2009-03-26_12-57-27-PM.log
-rw------ 1 oracle oinstall  9208 Mar 26 12:45 CfmLogger_2009-03-26_12-57-39-PM.log
[root@Grid-EM ~]#
[root@Grid-EM ~]# tail –f CfmLogger_2009-03-26_12-57-39-PM.logcomponent beehive is already at 10.2.0.5.0there is not need to do schema upgrade since all components are up to versionRunning setSchemaStatus: BEGIN
EMD_MAINTENANCE.SET_VERSION('_UPGRADE_','0','0','SYSTEM',EMD_MAINTENANCE.G_STATUS_CONFIGURED_READY);
END;Repository Upgrade Successful.INFO: oracle.sysman.top.oms:    Command Error:----------
INFO: oracle.sysman.top.oms:
如果成功完成,会出现类似下面所示的消息
Running OMS patch configuration using /u01/app/oracle/product/10.2.0/oms10g/oui/bin/runConfig.sh
INV_PTR_LOC=/u01/app/oracle/product/10.2.0/oms10g/oraInst.loc
ORACLE_HOME=/u01/app/oracle/product/10.2.0/oms10g ACTION=patchsetConfigure MODE=perform
COMPONENT_XML={oracle.sysman.top.oms.10_2_0_5_0.xml}
RESPONSE_FILE=/u01/app/oracle/product/10.2.0/oms10g/config.rsp
perform - mode is starting for action: patchsetConfigureperform - mode finished for action: patchsetConfigureYou can see the log file: /u01/app/oracle/product/10.2.0/oms10g/cfgtoollogs/oui/configActions2009-03-
26_03-48-32-PM.log10.2.0.5  OMS patch configuration  done
[oracle@Grid-EM ~]$
9. 运行 Enterprise Manager Grid Control 10.2.0.5
第一个任务是通过查看端口列表文件来确定 Grid Control 使用的是哪些端口。
一旦我们具有该地址,即可作为用户 sysman 登录主页。
最后的任务是配置数据库以便对其进行监视。
首先,查看端口列表文件并找到 EM 端口。
[oracle@Grid-EM ~]$ cat /u01/app/oracle/product/10.2.0/oms10g/install/portlist.ini
;OracleAS Components reserve the following ports at install time.
;As a post-installation step, you can reconfigure a component to use a different port.
;Those changes will not be visible in this file.[System]
Host Name = Grid-EM.cougar.eu.com[Ports]
Oracle HTTP Server port =  7777
Oracle HTTP Server Listen port = 7778
Oracle HTTP Server SSL port = 8250
Oracle HTTP Server Listen (SSL) port = 4444
Oracle Notification Server Request port = 6003
Oracle Notification Server Local port = 6101
Oracle Notification Server Remote port = 6200
ASG port = 7890
Oracle HTTP Server Diagnostic port = 7200
Application Server Control RMI port = 1850
Log Loader port = 44000
Java Object Cache port = 7000
DCM Discovery port = 7100
Oracle Management Agent Port = 1157
Application Server Control port = 1156
Web Cache HTTP Listen port = 7777
Web Cache HTTP Listen (SSL) port = 8250
Web Cache Administration port = 9400
Web Cache Invalidation port = 9401
Web Cache Statistics port = 9402
Enterprise Manager Central Console Port = 4889
Enterprise Manager Central Console Secure Port = 1159
[oracle@Grid-EM ~]$
接下来,您需要编辑本地主机文件以提供名称解析。注意,WEB 站点不会解析为 IP 地址。
# Copyright (c) 1993-2006 Microsoft Corp.
#
# This is a sample HOSTS file used by Microsoft TCP/IP for Windows.
#
# This file contains the mappings of IP addresses to host names. Each
# entry should be kept on an individual line. The IP address should
# be placed in the first column followed by the corresponding host name.
# The IP address and the host name should be separated by at least one
# space.
#
# Additionally, comments (such as these) may be inserted on individual
# lines or following the machine name denoted by a '#' symbol.
#
# For example:
#
#      102.54.94.97     rhino.acme.com          # source server
#       38.25.63.10     x.acme.com              # x client host127.0.0.1       localhost172.16.47.98   grid-db.cougar.eu.com           grid-db
172.16.47.99   grid-em.cougar.eu.com           grid-em
作为用户 sysman、使用在响应文件中输入的口令连接 Enterprise Manager。


10. 安装 Enterprise Manager Grid Control Agent
最后一步是安装代理。
安装 EM 10g Agent 第 5 版 (10.2.0.5)
作为 Oracle 帐户登录服务器,进入 Enterprise Manager Grid Control Agent 安装文件所在的目录,并在此目录运行 runInstaller 命令。
启动 Oracle Universal Installer 并选择 Advanced Installation 方法。注意,唯一的后续选项是安装 Additional Management Agent。
将父目录设置为 /u01/app/oracle/product/10.2.0。注意,这与基目录不同。
特定产品的前提条件检查 — 这些必须 全部通过:
指定 Oracle 管理服务位置:
| 说明 | 值 |
| 管理服务主机名: | grid-em.cougar.eu.com |
| 管理服务端口: | 4889 |
指定代理注册口令;该口令为之前在响应文件中使用的口令:
| 说明 | 值 |
| Password: | Its-a-secret |
配置脚本
安装了二进制文件之后,将自动创建一些需要作为用户 root 运行的脚本:
 [root@Grid-DB u02]# [root@Grid-DB u02]# /u01/app/oracle/product/10.2.0/agent10g/root.sh
Running Oracle 11g root.sh script...The following environment variables are set as:ORACLE_OWNER= oracleORACLE_HOME=  /u01/app/oracle/product/10.2.0/agent10gEnter the full pathname of the local bin directory: [/usr/local/bin]:
The file "dbhome" already exists in /usr/local/bin.  Overwrite it? (y/n)
[n]:
The file "oraenv" already exists in /usr/local/bin.  Overwrite it? (y/n)
[n]:
The file "coraenv" already exists in /usr/local/bin.  Overwrite it? (y/n)
[n]: Entries will be added to the /etc/oratab file as needed by
Database Configuration Assistant when a database is created
Finished running generic part of root.sh script.
Now product-specific root actions will be performed.
Finished product-specific root actions.
[root@Grid-DB u02]#
一旦 root 脚本运行,配置助手将自动运行。

配置数据库
您连接到数据库目标后,oemgc 数据库将显示为关闭/不可用,这是因为尚未使用 Grid Control 管理服务注册该数据库。
连接至 Grid Control。

配置数据库。

查看数据库属性。
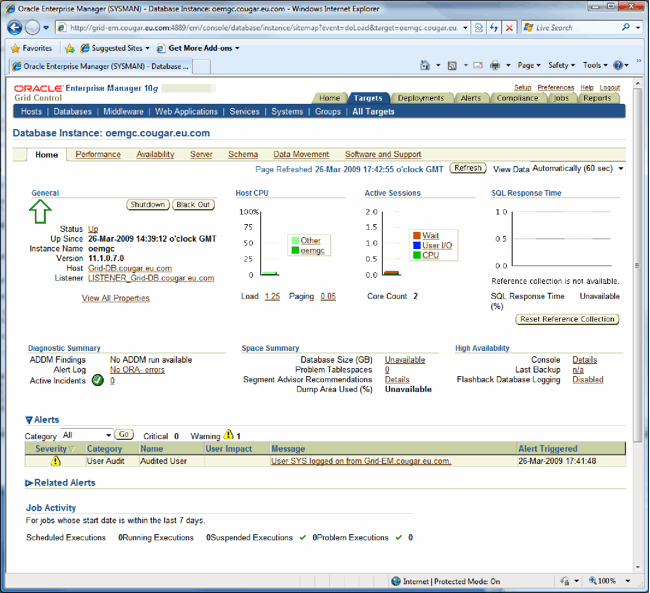
恭喜:您已经成功安装了 10.2.0.5 Enterprise Manager Grid Control。
Mike Revitt 是一位具有 20 年经验的 Oracle 架构师,在 Oracle 网格和 Oracle VM 方面具有相当丰富的经验,目前致力于高可用性、整合性、可伸缩性和虚拟化的研究。
指南:在 linux 下的 Oracle Database 11g 中安装 Oracle Enterprise Manager 10g Grid Control 第 5 版相关推荐
- rhel6安装oracle,在RHEL6中安装Oracle 11g R2数据库
在RHEL6中安装Oracle 11g R2数据库 2011-10-10 TsengYia#126.com http://tsengyia.blog.chinaunix.net/ ######### ...
- linux下使用DBCA(database configuration assistant)创建oracle数据库
前提:切换到图形界面 到Oracle的bin文件夹下,使用oracle用户.运行dbca就可以.和windows的效果一样. 假设出现乱码 export LANG="en_US:UTF-8& ...
- win10开启oracle服务器配置,Windows环境(Win10)下安装、配置服务器类Oracle Database 11g Release 2...
该篇为服务器类Oracle Database 11gRelease 2的安装.配置,若需安装.配置桌面类(通常是选择桌面类,如果是将本机作为服务器来使用,则选择服务器类),可参考"Windo ...
- oracle database 11g 如何正确卸载
如在使用过程中,遇到oracle database 的疑难问题,需要重装的时候,就需要我们先将老的oracle 做完全的卸载删除,这样才能安装新的oracle database. 下面看一下具体的卸载 ...
- 在RHEL6.0 X64系统中安装oracle 11g数据库及安装后设置
前提条件: 1.查看系统版本 [root@server ~]#cat /etc/redhat-release Red Hat Enterprise Linux Server release 6.1 ( ...
- oracle 051考试,OCP/OCA认证考试指南全册Oracle Database 11g(1Z0-051,1Z0-052,1Z0-053)练习与知识点...
第一章 Oracle Database 11g体系结构概述 本章学习内容 解释内存结构 描述进程结构 讲述存储结构 练习1-1 研究所在环境的DRMS 确定自己所在的环境使用的应用程序.应用服务器和数 ...
- 安装Oracle Database 11g 找不到文件“WFMLRSVCApp.ear” .
在64位Windows 7 系统下安装Oracle Database 11g 的过程中, 出现提示: "未找到文件D:\app\Administrator\product\11.2.0\db ...
- Oracle Database 11g Express Edition使用限制,与其他版本的区别
Oracle Database 11g Express Edition是 Oracle 数据库的免费版本,支持标准版的大部分功能,11g Express Edition 提供 Windows 和 Li ...
- Oracle Database 11g Release 2认证支持的操作系统版本跨度很大
Operating System Oracle Database for Windows x64 is supported on the following operating systems: ■ ...
最新文章
- Activity的四种启动模式
- 通过T-SQL语句实现数据库加解密功能
- python-matplotlib
- 属性总结(四):linestyle
- 个人作业-Week2
- EPPlus导出Excel感觉很不错~~~
- error: style attribute '@android:attr/windowEnterAnimation' not found
- 安装数据库windows 安装redmine 详解
- python 获取昨天的日期_利用Python来实现报表的自动发送,解放你时间去做更有意思的事情...
- java rabbitmq 并发_RabbitMQ消息中间件 高级篇二 高并发情况下保障消息投递可靠性...
- 实战:kafka实现日志收集系统
- 云端设计平台Coohom在生产环境中使用istio的经验与实践
- Ext Gantt Web甘特图--自定义任务树
- 三星Galaxy S22系列零部件开始量产:搭载骁龙898 最早1月亮相
- 项目关键路径与项目最长路径有可能不同
- 决定要收藏,让你白嫖阿里矢量图(iconfont矢量图使用)
- “伊”心一意研技术,“伊”丝不苟做服务。Electropure EDI 成功参展第12届上海国际水展
- 使用pandas的话,如何直接删除这个表格里面X值是负数的行?
- 实体-关系图转换为关系模型
- 人类为什么不再登月了?
热门文章
- Sublime Text 显示菜单栏
- 微信小程序把玩(十四)button组件
- 阿里云地域节点IP测试Ping值延迟测速(国内+海外)
- Java 搭建高级画图板
- 反电子教室神器C++
- HUNAN UNIVERSITY ACM/ICPC Judge Online —— Problem 10026 谁拿了最多奖学金
- AD练习笔记 51单片机最小系统开发板
- openwrt挂载U盘或SD卡作为根文件系统
- python程序设计从基础到开发课后题答案夏敏捷_[转载] python程序设计应用教程夏敏捷答案第八章_Python程序设计:从基础到开发...
- 我的博客今天3岁92天了,我领取了精英博主徽章_亮仔_新浪博客