opencv实战从0到N (14)- 凸包算法 convexity defects
opencv实战从0到N (14)- 凸包算法 convexity defects
同步个人知乎:中庸
1,凸包算法(convex hull)
凸包算法:
其实很简单,就是用一个的凸多边形围住所有的点。就好像桌面上有许多图钉,用一根紧绷的橡皮筋将它们全部围起来一样。算法详细步骤:
1. 找到所有点中纵坐标y最小的电,也就是这些点中最下面的点,记为p0。
2. 然后计算其余点与该点的连线与x轴之间夹角的余弦值,将这些点按其对于最低点的余弦值从大到小排序,排序好的点记为p1, p2, p3, ......,选择余弦值大的进行链接。
2,Convexity defects
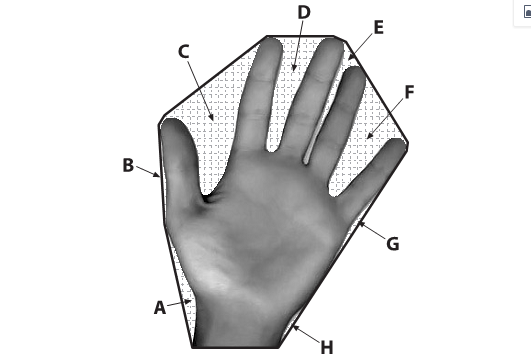
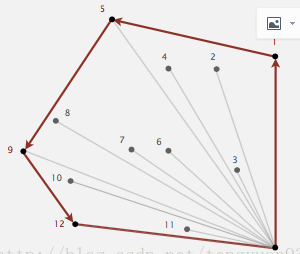
如上图所示,黑色的轮廓线为convexity hull, 而convexity hull与手掌之间的部分为convexity defects. 每个convexity defect区域有四个特征量:起始点(startPoint),结束点(endPoint),距离convexity hull最远点(farPoint),最远点到convexity hull的距离(depth)。
3,opencv实现:
void convexity_defects(Mat src)
{Mat src_copy = src.clone();Mat threshold_output, src_gray;vector<vector<Point> > contours;vector<Vec4i> hierarchy;cvtColor(src, src_gray,CV_BGR2GRAY);imshow("src", src);imshow("src_gray", src_gray);/// Detect edges using Thresholdthreshold(src_gray, threshold_output, 60, 255, THRESH_BINARY);imshow("threshold_output", threshold_output);/// Find contoursfindContours(threshold_output, contours, hierarchy, CV_RETR_TREE, CV_CHAIN_APPROX_SIMPLE, Point(0, 0));/// Find the convex hull object for each contourvector<vector<Point> >hull(contours.size());// Int type hullvector<vector<int>> hullsI(contours.size());// Convexity defectsvector<vector<Vec4i>> defects(contours.size());for (size_t i = 0; i < contours.size(); i++){convexHull(Mat(contours[i]), hull[i], false);// find int type hullconvexHull(Mat(contours[i]), hullsI[i], false);// get convexity defectsconvexityDefects(Mat(contours[i]), hullsI[i], defects[i]);}/// Draw contours + hull resultsMat drawing = Mat::zeros(threshold_output.size(), CV_8UC3);for (size_t i = 0; i< contours.size(); i++){Scalar color = Scalar(210, 50, 255);drawContours(drawing, contours, i, color, 1, 8, vector<Vec4i>(), 0, Point());drawContours(drawing, hull, i, color, 1, 8, vector<Vec4i>(), 0, Point());// draw defectssize_t count = contours[i].size();std::cout << "Count : " << count << std::endl;if (count < 300)continue;vector<Vec4i>::iterator d = defects[i].begin();while (d != defects[i].end()) {Vec4i& v = (*d);//if(IndexOfBiggestContour == i){int startidx = v[0];Point ptStart(contours[i][startidx]); // point of the contour where the defect beginsint endidx = v[1];Point ptEnd(contours[i][endidx]); // point of the contour where the defect endsint faridx = v[2];Point ptFar(contours[i][faridx]);// the farthest from the convex hull point within the defectint depth = v[3] / 256; // distance between the farthest point and the convex hullif (depth > 2 && depth < 500){line(drawing, ptStart, ptFar, CV_RGB(0, 255, 0), 2);line(drawing, ptEnd, ptFar, CV_RGB(0, 255, 0), 2);circle(drawing, ptStart, 4, Scalar(255, 0, 0), 2);circle(drawing, ptEnd, 4, Scalar(255, 0, 0), 2);circle(drawing, ptFar, 4, Scalar(100, 0, 255), 2);}/*printf("start(%d,%d) end(%d,%d), far(%d,%d)\n",ptStart.x, ptStart.y, ptEnd.x, ptEnd.y, ptFar.x, ptFar.y);*/}d++;}}/// Show in a windownamedWindow("Hull demo", CV_WINDOW_AUTOSIZE);imshow("Hull demo", drawing);}int main(int argc, char** argv)
{string filename = "QWQW.jpg";if (filename.empty()){cout << "\nDurn, empty filename" << endl;return 1;}Mat image = imread(filename, 1);if (image.empty()){cout << "\n Durn, couldn't read image filename " << filename << endl;return 1;}convexity_defects(image);cvWaitKey(0);return 0;
}
4,结果:

参考:https://blog.csdn.net/qq_34106574/article/details/88345535
opencv实战从0到N (14)- 凸包算法 convexity defects相关推荐
- opencv实战从0到N (19)编译vc10版opencv3.3.1
编译vc10版opencv3.3.1 1,下载opencv3.3.1的Sources源码:https://opencv.org/releases.html 2,下载并安装Cmake工具:https:/ ...
- Opencv实战之混合高斯前景背景分割算法
-不管三七二十一,先上代码 -读取需要掌握的函数 # 相关函数 # cv.VideoCapture() 初始化摄像头,0开启第一个摄像头,1开启第2个摄像头,返回摄像头对象,一般会自动打开摄像头 # ...
- OpenCV实战(14)——图像线条提取
OpenCV实战(14)--图像线条提取 0. 前言 1. 检测图像轮廓 1.1 图像轮廓 1.2 使用 Canny 算子检测图像轮廓 2. 使用霍夫变换检测图像中的线条 2.1 线条的表示 2.2 ...
- 基于OpenCV实战的图像处理:色度分割
点击上方"小白学视觉",选择加"星标"或"置顶" 重磅干货,第一时间送达 通过HSV色阶使用彩色图像可以分割来分割图像中的对象,但这并不是分 ...
- 基于OpenCV实战:提取中心线
点击上方"小白学视觉",选择加"星标"或"置顶" 重磅干货,第一时间送达 本文转自|AI算法与图像处理 问题 前几天有个人问了我一个问题,问 ...
- 再次升级,985博士整理的71个OpenCV实战项目教程开放下载!
点击上方"小白学视觉",选择加"星标"或"置顶" 重磅干货,第一时间送达 近期小白学视觉公众号推出了多篇Python+OpenCV实战项目的 ...
- 基于OpenCV实战:绘制图像轮廓(附代码)
点击上方"小白学视觉",选择加"星标"或"置顶" 重磅干货,第一时间送达 山区和地形图中海拔高的区域划出的线称为地形轮廓,它们提供了地形的高 ...
- 基于OpenCV实战:对象跟踪
点击上方"小白学视觉",选择加"星标"或"置顶" 重磅干货,第一时间送达 介绍 跟踪对象的基本思想是找到对象的轮廓,基于HSV颜色值. 轮廓 ...
- Opencv实战 | 用摄像头自动化跟踪特定颜色物体
点击上方"小白学视觉",选择加"星标"或"置顶" 重磅干货,第一时间送达 本文转自:新机器视觉 1. 导语 在之前的某个教程里,我们探讨了如 ...
- 基于opencv实战眼睛控制鼠标
点击上方"小白学视觉",选择加"星标"或"置顶" 重磅干货,第一时间送达 如何用眼睛来控制鼠标?一种基于单一前向视角的机器学习眼睛姿态估计方 ...
最新文章
- linux chkconfig 添加服务 开机启动
- 借助LDA主题分析的短文本相似性计算 - 综述帖
- YII2 rule exist unique
- server.transfer 无法跳转页面_H5 腾讯地图无法导航
- cwc云莱特链_CWC的完整形式是什么?
- 微服务架构设计模式~交互方式
- 计算机网络课设不会,计算机网络课设讲述.doc
- 基于JAVA+SpringBoot+Vue+Mybatis+MYSQL的办公一体化系统
- python下载网页内容_使用selenium下载整个html页面内容
- [笔记] 《Windows网络编程(第2版)》
- 【软件工程】图书馆自习室及座位管理系统的分析与设计
- 【Git】pull 分支报错 fatal: Need to specify how to reconcile divergent branches...
- matlab中dot是什么,matlab中ddot是什么
- 关于打印时怎样不出现打印机选项而直接打印的解决方法
- cglib BeanCopier 使用
- 妹妹,这回哥哥听你的了,以前哥哥真的太傻
- 计算机课说话检查200字,上课说话检讨书200字
- BarTender从数据库获取标签打印数量设置方法
- android 打开其它app,Android APP打开另一个APP的几种实现总结
- python语句中的 end=''是什么意思呢