模板缓冲_模板缓冲以及如何使用它可视化体积相交
模板缓冲
介绍 (Introduction)
The trendy thing in real-time rendering these days is ray-tracing. However, traditional rasterization hasn’t disappeared, and it won’t in the near future. I recommend this blog post on the subject: A hybrid rendering pipeline for realtime rendering: (When) is raytracing worth it?
如今,实时渲染中的流行趋势是光线追踪 。 但是,传统的栅格化还没有消失,并且在不久的将来也不会消失。 我推荐有关此主题的博客文章: 用于实时渲染的混合渲染管道:(何时)光线跟踪值得吗?
I find that one of the most neglected elements in the rasterization pipeline is the Stencil Buffer. To get an idea of how neglected it is, I’ve checked the number of appearances of the stencil buffer in the approximately 1000 pages of “Real-Time Rendering”[1]: it appears just 5 times, and there are no more than 4 paragraphs dedicated to it. At least for me, it’s hard to get my head around the stencil buffer because it’s not fully programmable, so I tend to avoid using it. You can only configure it, and to do so you have to think of Boolean algebra, but in 3D.
我发现栅格化管道中最被忽略的元素之一是模板缓冲区 。 为了了解它是如何被忽略的,我检查了大约1000页“实时渲染” [1]中模版缓冲区的出现次数:它仅出现5次,并且不超过专门针对它的4个段落。 至少对我来说,很难完全绕过模板缓冲区,因为它不是完全可编程的,因此我倾向于避免使用它。 您只能对其进行配置,并且必须这样做,但必须考虑布尔代数,但要使用3D。
This blog post is an attempt to demystify the stencil buffer. I will briefly review the rendering pipeline, to see where the stencil sits, and then explain how the stencil works. I will use an example application in WebGL that we use to detect volume intersections, and explain the steps to convert the algorithm in my head to a tabular format that can be used to configure the stencil.
这篇博客文章试图揭开模板缓冲区的神秘面纱。 我将简要回顾渲染管线,以查看模板位于何处,然后解释模板的工作方式。 我将在WebGL中使用一个示例应用程序,该示例程序用于检测体积相交,并说明将我头脑中的算法转换为可用于配置模具的表格格式的步骤。
栅格化渲染管道 (The Rasterization Rendering Pipeline)
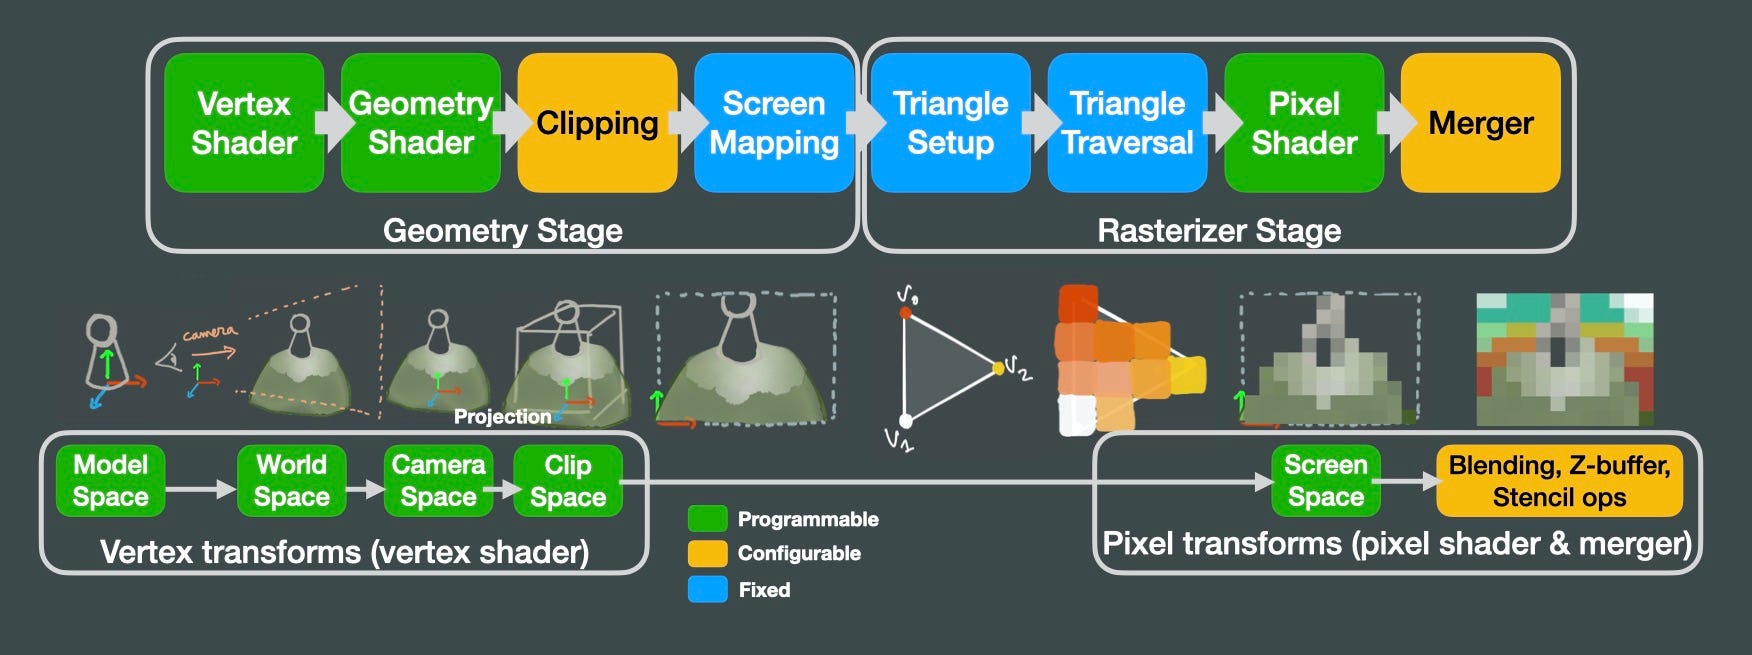
Virtually every GPU implements a rendering pipeline like the one above. In the middle row I tried to illustrate the transformations that we apply to our models until they become an image on the screen. In the vertex shader, we receive the triangles that make up the surface of our 3D model. Then, our vertex shader will apply a series of matrix multiplications to those triangles to convert from the model space (origin of coordinates centered around the model), to world space (origin of coordinates in the world origin), and then to camera space (origin of coordinates in the camera). Then, we apply a projection transform (perspective or orthographic), so the camera frustum becomes a unit cube. Whatever is outside that unit cube gets clipped, and mapped to screen coordinates. Then the rasterizer converts those triangles into pixels, interpolating color values between vertices. Then we can apply operations per pixel in our pixel shader, and blend the result into the frame buffer that we see on screen, in the merger stage.
实际上,每个GPU都像上面那样实现渲染管线。 在中间的一行中,我试图说明我们应用于模型的转换,直到它们成为屏幕上的图像为止。 在顶点着色器中,我们接收到构成3D模型表面的三角形。 然后,我们的顶点着色器将对这些三角形应用一系列矩阵乘法,以从模型空间(以模型为中心的坐标原点),世界空间(世界原点坐标的原点),然后到相机空间进行转换(相机中的坐标原点)。 然后,我们应用投影变换(透视图或正交投影),使摄像机视锥变成一个单位立方体。 该单元多维数据集之外的任何内容都会被裁剪,并映射到屏幕坐标。 然后,光栅化器将这些三角形转换为像素,在顶点之间插入颜色值。 然后,在合并阶段,我们可以在像素着色器中对每个像素应用操作,并将结果混合到屏幕上看到的帧缓冲区中。
合并阶段:混合,Z缓冲区和模具 (The merger stage: blending, Z-buffer, and stencil)
That merger stage does mainly 2 types of operations: blending and discarding pixels. The blending, or Alpha Blending, blends pixel colors of our object with the colors already in the frame buffer based on the alpha value of the texture of the object. The alpha value is typically 8-bit, so there are only 256 possible values. We can also use the alpha value to discard pixels as well, based on a threshold. Pixels with a value smaller than the threshold will be discarded. That’s referred to as alpha masking.
合并阶段主要执行两种类型的操作: 混合和丢弃像素。 blending或Alpha Blending基于对象纹理的alpha值将对象的像素颜色与帧缓冲区中已经存在的颜色进行混合 。 alpha值通常为8位,因此只有256个可能的值。 我们还可以根据阈值使用alpha值丢弃像素。 值小于阈值的像素将被丢弃。 这就是所谓的Alpha遮罩。
Pixels can also be discarded thanks to the Z-buffer. The Z-buffer contains the distance (Z) from the camera to the objects in the scene. Say we have rendered the mountain from the illustration above, and now we try to render a tree that’s behind the mountain. The Z-buffer contains the distance to the camera for every pixel of the mountain. We can compare the Z values of the tree, and discard them if the new Z value is greater than the Z we have already. The tree won’t render. Notice that if we change the rendering order and render the tree first, it will get rendered. However, once we draw the mountain the Z-test won’t fail, so the mountain will be rendered on top. So some pixels will be drawn over several times. That’s what we call the overdraw, which can be used to measure efficiency. Sorting the scene is a way of reducing the overdraw.
借助Z缓冲区,像素也可以被丢弃。 Z缓冲区包含从摄像机到场景中的对象的距离(Z)。 假设我们已根据上图绘制了山峰,现在我们尝试绘制山峰后面的一棵树。 Z缓冲区包含山的每个像素到相机的距离。 我们可以比较树的Z值,如果新的Z值大于我们已有的Z,则将其丢弃。 树不会渲染。 注意,如果我们更改渲染顺序并首先渲染树,则它将被渲染。 但是,一旦绘制了山峰,Z检验就不会失败,因此山峰将呈现在顶部。 因此一些像素将被绘制多次。 这就是我们所说的透支 ,可以用来衡量效率。 对场景进行排序是减少透支的一种方法。
Lastly, we can use the stencil buffer to discard pixels as well. The stencil buffer is typically an 8-bit buffer, so 256 distinct values are possible. In its simplest form, it can be used as an alpha mask. Say that we are seeing the mountain through a window, and we want to hide everything else. We can mark the pixels that belong to the window with an arbitrary number in the stencil buffer, e.g. a 1 signifies a pixel from the window, and then we configure the stencil buffer to discard everything that it’s not labeled as “window”. When combined with the Z-buffer, the stencil buffer can be used as a powerful tool to create volumetric effects, as we will see in the example later on.
最后,我们也可以使用模板缓冲区来丢弃像素。 模板缓冲区通常是8位缓冲区,因此可以有256个不同的值。 以其最简单的形式,它可用作alpha蒙版。 假设我们正在透过窗户看到这座山,而我们想隐藏其他所有东西。 我们可以在模板缓冲区中使用任意数字标记属于窗口的像素,例如1表示窗口中的像素,然后配置模板缓冲区以丢弃所有未标记为“窗口”的内容。 当与Z缓冲区结合使用时,模版缓冲区可以用作创建体积效果的强大工具,我们将在后面的示例中看到。
模板缓冲区配置 (Stencil buffer configuration)
To configure the stencil buffer we have 3 types of settings:
要配置模板缓冲区,我们有3种类型的设置:
Comparison functions. This is the function used to decide whether to discard a pixel or not. For instance, “greater than”, or “less than”. See: available stencil functions in WebGL.
比较功能 。 这是用于决定是否丢弃像素的功能。 例如,“大于”或“小于”。 请参阅: WebGL中可用的模具功能 。
Mask values. These are 8-bit binary masks. There are 3 types of masks: reference, read mask, and write mask. In WebGL, the reference and read mask are set with the stencil function, whereas the write mask is set with the stencil mask. The reference and read mask are used in conjunction with the comparison function. For instance, if the comparison is set to “greater than”, the stencil test will pass if
(refMask & readMask) > (stencil & readMask), where "&" is a bitwise binary AND operation. The write mask gets applied to what we write to the stencil buffer if the test passes and we decide to update it.掩码值 。 这些是8位二进制掩码。 屏蔽有3种类型:参考屏蔽,读取屏蔽和写入屏蔽。 在WebGL中,参考和读取掩码是通过模板功能设置的,而写掩码是通过模板掩码设置的。 参考和读取掩码与比较功能结合使用。 例如,如果将比较设置为“大于”,则如果
(refMask & readMask) > (stencil & readMask)(其中“&”是按位二进制AND运算(refMask & readMask) > (stencil & readMask),则模板测试将通过。 如果测试通过并且我们决定更新它,则将写掩码应用于我们写入模板缓冲区的内容。Stencil operations. These are actions that can be configured in case of a successful or a failed test. You can do things like keep the current stencil value, replace it, or increment it. See: available stencil ops in WebGL. The actions can be configured for the 3 following conditions:
模具操作 。 这些是可以在测试成功或失败的情况下配置的操作。 您可以执行诸如保留当前模板值,替换它或增加它的操作。 请参阅: WebGL中可用的模具操作 。 可以针对以下三种情况配置操作:
- fail: the stencil test fails失败:模板测试失败
- z-fail: the z-test fails (see Z-buffer in previous section)z-fail:z测试失败(请参阅上一节中的Z-buffer)
- z-pass: both the stencil and the z-test pass.z-pass:模具和z-test通过。
Writing it down as one big logical operation, for each pixel, the new value of the stencil buffer can be computed as follows:
将其记为一项大的逻辑运算,对于每个像素,可以如下计算模板缓冲区的新值:
if (refMask & readMask) Comparison (stencil & readMask):It does sound very abstract, doesn’t it? How do all these logical operations become something useful? I hope with the example in the next section you learn how to configure the stencil.
听起来很抽象,不是吗? 所有这些逻辑运算如何变得有用呢? 我希望通过下一节中的示例学习如何配置模板。
使用模板缓冲区可视化体积相交 (Visualizing volume intersections with the stencil buffer)
问题定义 (Problem definition)
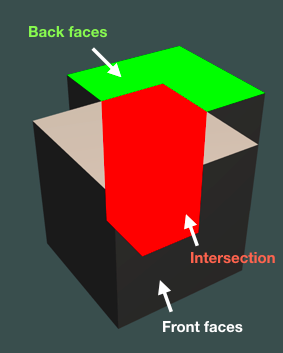
Let start with the problem definition. We want to visualize the volume intersections in a mesh, and any open areas of the mesh. This is a quick way of visually detecting if a mesh is watertight, i.e. the mesh contains no holes and it’s clearly defined inside. Holes are easy to visualize if we render the object in 2 passes. A vertex has 2 sides, front and back. Whether a side is front or back is decided by an arbitrary vertex winding order (it can be configured). When rendering, back faces are usually not rendered, but this culling is one of those things that can be configured in the render pipeline. So we can do a first pass where we render only the back faces in a bright green color, and then a normal pass where we render the rest. If we see green on screen that means that the mesh has a hole in there.
让我们从问题定义开始。 我们要可视化网格中的体积相交以及网格的任何开放区域。 这是一种直观地检测网格是否防水的快速方法,即该网格不包含任何Kong,并且在内部明确定义。 如果我们通过2次渲染对象,则Kong很容易可视化。 一个顶点有2个面,正面和背面。 侧面是正面还是背面取决于任意顶点缠绕顺序(可以配置)。 渲染时,通常不渲染背面,但是这种剔除是可以在渲染管道中配置的那些东西之一。 因此,我们可以进行第一遍,仅以明亮的绿色渲染背面,然后进行普通遍,以渲染其余部分。 如果我们在屏幕上看到绿色,则表示网格中有一个Kong。
体交的配置 (Configuration for volume intersection)
For the volume intersection things get a bit more complicated. I know that the stencil should be useful in this, but how do we set it up? I always start writing down on the white board all the examples of triangle layerings that I can think of. Then, I know that in the end I want a stencil mask that marks exactly the intersection area in the given example. What operations can take me there? There are multiple. The challenge is to find one that works for all the examples you’ve written down. There must be a better way to draw this, but this is what I got:
对于体积相交,情况变得更加复杂。 我知道模版应该在其中有用,但是我们如何设置它呢? 我总是开始在白板上写下我能想到的所有三角形分层示例。 然后,我知道最后我需要一个模版遮罩,以精确标记给定示例中的相交区域。 什么手术可以带我到那里? 有多个。 面临的挑战是找到一个适用于您编写的所有示例的示例。 必须有更好的方法来绘制此图形,但这就是我得到的:
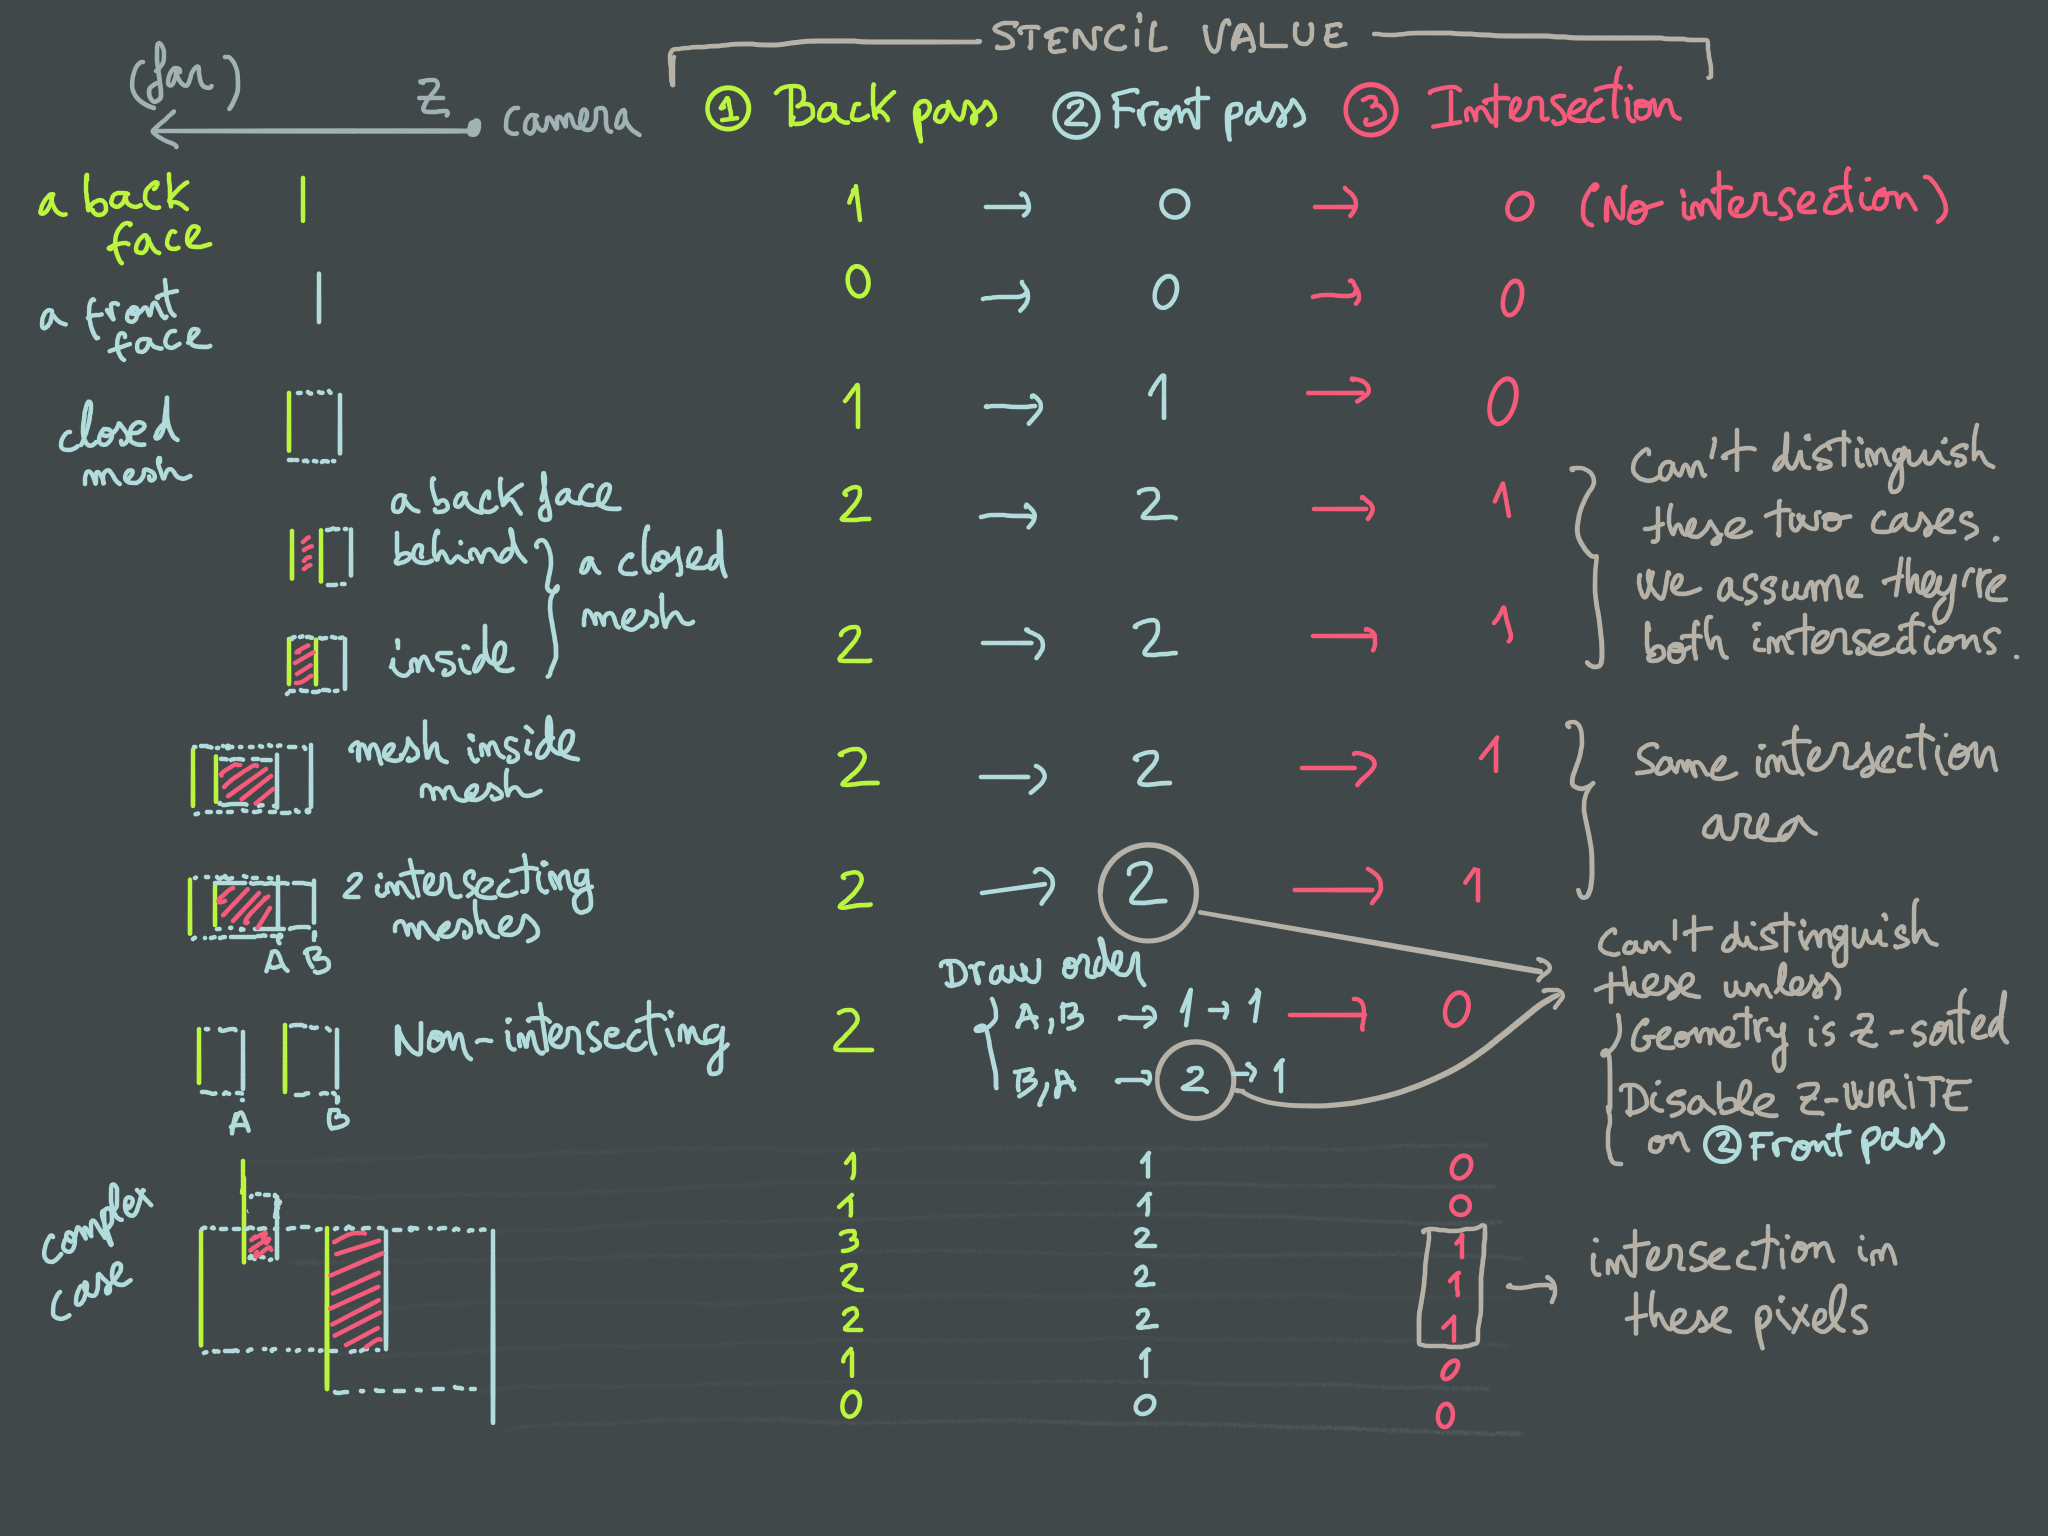
Then, once I think I have all the cases I need, I try to fill in a table with all the stencil configuration per render pass. From the picture above, you can see that the way I designed it, I’m going to need at least 3 passes:
然后,一旦我认为我有所有需要的情况,便尝试使用每个渲染遍历在表格中填写所有模具配置。 从上面的图片中,您可以看到我的设计方式,我至少需要3次通过:
- one to render the back faces, where I count the number of back-facing polygons;一个用于渲染背面,我在其中计算背面多边形的数量;
- a second pass to render the front faces and decrease the counter if the z-test fails. We will avoid writing onto the Z-buffer so we can distinguish those 2 circled cases (where front-face B is rendered before front-face A). Because during the back pass we update the Z-buffer, the Z-buffer before starting the 2nd pass contains the z value of the back face closer to the camera. In the non-intersecting example, the order doesn’t matter, because whether the Z-buffer contains the z of the back-face or the z of B, we can detect a z-test failure when trying to draw A and decrease the counter. But in the intersecting example, if we draw face B first and update the Z-buffer, when trying to draw face A the z-test will fail and we will wrongly decrease the counter. To solve this without having to sort the geometry, we will stop all Z-buffer updates (Z-write off) during this pass.如果z测试失败,则进行第二次渲染以渲染正面并减少计数器。 我们将避免写入Z缓冲区,因此我们可以区分这2个带圆圈的情况(正面B在正面A之前渲染)。 因为在后退过程中我们更新了Z缓冲区,所以在开始第二遍之前的Z缓冲区包含了更靠近相机的背面的z值。 在非相交的示例中,顺序无关紧要,因为Z缓冲区是包含背面的z还是B的z,我们在尝试绘制A并减小A时可以检测到z检验失败。计数器。 但是在相交的示例中,如果我们首先绘制面B并更新Z缓冲区,则在尝试绘制面A时z测试将失败并且我们将错误地减少计数器。 要解决此问题而不必对几何进行排序,我们将在此过程中停止所有Z缓冲区更新(取消Z写入)。
- a third pass to create a binary mask with the intersection area.第三遍创建具有交叉区域的二进制蒙版。
- I can add an optional 4th pass to render the lighting of the non-intersecting volumes.我可以添加可选的第4遍以渲染非相交体积的照明。
Here’s my final stencil table:
这是我最终的模具表:

If you want to check how that translates into code, check this pull request in GitHub: self-intersections for WebGL Model Viewer.
如果要检查如何将其转换为代码,请在GitHub中检查此拉取请求: WebGL Model Viewer的自相交 。
可视化结果 (Visualization results)
Here’s a video of the WebGL Model Viewer in action:
这是运行中的WebGL Model Viewer的视频:
The green areas are back faces, so holes in the mesh, whereas the red areas are the volume intersections. One application of this is to help us spot issues in poses in our avatars. If part of the arm intersects with the chest, we will have problems when trying to dress the avatar with a shirt, because the sleeve will also try to enter the chest and the cloth simulation will struggle. See example below:
绿色区域是背面,因此网格中有Kong,而红色区域是体积相交。 一种应用是帮助我们发现化身中姿势中的问题。 如果手臂的一部分与胸部相交,则在尝试使用衬衫为化身打扮时会遇到问题,因为袖子还会尝试进入胸部,而布料模拟会很困难。 请参见下面的示例:

结论 (Conclusion)
Rasterization is still the most used rendering pipeline in real time graphics. Inside the rasterizer, the Stencil Buffer seems to be the ugly duckling no one wants to hang around with, perhaps only reserved to big graphic gurus. I have showed you with a practical example that we can use the stencil buffer to visualize volume intersections in real time, and that the stencil is not as scary if we describe the problem with examples and in tabular form.
栅格化仍然是实时图形中最常用的渲染管道。 在光栅化器内部,“模板缓冲区”似乎是一个丑陋的小鸭,没人愿意与它混在一起,也许只保留给大型图形大师使用。 我已经通过一个实际示例向您展示了我们可以使用模板缓冲区实时显示体积相交,并且如果我们以示例和表格形式描述问题,模板并不那么令人恐惧。
Visualizing volume intersections in real time has a practical application for us. When we author poses for our avatars, we can immediately see if a pose will end up having cloth simulation problems, and correct the limb position accordingly.
实时可视化体积相交对我们来说具有实际应用。 当我们为化身创作姿势时,我们可以立即查看姿势是否最终会遇到布料模拟问题,并相应地校正肢体位置。
For more applications of the stencil buffer, check the “Real-Time Rendering” book [1], and the Wikipedia article.
有关模板缓冲区的更多应用,请查看“实时渲染”一书[1]和Wikipedia文章 。
Originally published at https://tech.metail.com on July 3, 2020.
最初于 2020年7月3日 在 https://tech.metail.com 上 发布 。
翻译自: https://medium.com/real-time-rendering/the-stencil-buffer-and-how-to-use-it-to-visualize-volume-intersections-34dc1d205ebc
模板缓冲
http://www.taodudu.cc/news/show-893947.html
相关文章:
- b端 ux 设计思维_借助系统思维从视觉设计过渡到UX
- figma下载_Figma的自动版式实用
- lottie 动画_使用After Effects和Lottie制作网络动画而不会损失质量
- 模式匹配 怎么匹配减号_如何使您的应用导航与用户的思维模式匹配
- ux的重要性_颜色在UX中的重要性
- element-ui表单_每日UI挑战强加-登录表单(分步教程)
- shields 徽标_徽标不够用时如何设计应用程序图标
- zoom 用户被锁定_重新考虑Zoom的用户体验
- ui设计看的书_5本关于UI设计的书
- 案例研究设计与方法-罗伯_旭进口重新设计-用户体验案例研究
- axure rp 创建弹框_如何在Axure RP 9中创建交换机
- 界面设计语言_使用任何语言设计界面的提示
- hp-ux锁定用户密码_UX设计101:提出正确的问题-规划和促进用户访谈
- mac基本操作技巧_6个基本设计技巧
- stack smash_扶手椅VGUX:Super Smash Bros.Ultimate
- 全库模式 用户模式 表模式_暗模式,亮模式和用户的故事
- ios 刷新遮罩遮罩_在Adobe XD中进行遮罩的3种方法
- 图像标注技巧_保护互联网上图像的一个简单技巧
- ar软件测试工具_如何为用户测试制作快速的AR原型
- 未来ui设计的发展趋势_2025年的未来UI趋势?
- CSSyphus:烦躁不安的烦恼设计指南。
- 类从未使用_如果您从未依赖在线销售,如何优化您的网站
- 程序详细设计之代码编写规范_我在不编写任何代码的情况下建立了一个设计策划网站
- 图书漂流系统的设计和研究_研究在设计系统中的作用
- 西里尔字符_如何设计西里尔字母Њ(Nje),Љ(Lje),Ћ(Tshe)和Ђ(Dje)
- 最新ui设计趋势_10个最新且有希望的UI设计趋势
- 404 错误页面_如何设计404错误页面,以使用户留在您的网站上
- 公网对讲机修改对讲机程序_更少的对讲机,对讲机-更多专心,专心
- ui设计基础_我不知道的UI设计的9个重要基础
- vue路由匹配实现包容性_包容性设计:面向老年用户的数字平等
模板缓冲_模板缓冲以及如何使用它可视化体积相交相关推荐
- 子模板继承父模板示例_模板设计模式示例
子模板继承父模板示例 本文是我们名为" Java设计模式 "的学院课程的一部分. 在本课程中,您将深入研究大量的设计模式,并了解如何在Java中实现和利用它们. 您将了解模式如此重 ...
- C++_模板特化(specialization),模板偏特化(局部特化)(partial specialization)
C++_模板特化(specialization),模板偏特化(局部特化)(partial specialization) 1.模板特化 函数模板也可以特化,特化要符合模板参数类型 2.模板偏特化(局部 ...
- 什么是C++模板?_百度知道
什么是C++模板?_百度知道 以下内容引自上面网址 模板是一种工具.使用它会给程序员编写大规模的软件带来方便.因为使用模板可以使程序员建立具有通用类型的函数库和类库.模板也是C++语言支持参数化多态性 ...
- 小程序模板报价_小程序模板价格_小程序模板使用多少钱
小程序模板报价_小程序模板价格_小程序模板使用多少钱? 分享一个☞ 微信小程序模板平台,超60个行业的小程序模板免费使用. 在这个平台,小程序模板是免费使用的.收费部分是这个平台提供的小程序功能,档次 ...
- 游戏行业网页整站模板下载_游戏 整站 高光 传奇 黑色
游戏行业网页整站模板下载_游戏 整站 高光 传奇 黑色不仅仅是首页,二级页面,三级页面,登陆,购物车等,页面齐全 功能齐全 js+css+html (img,字体均有),前端html纯静态页面!无后 ...
- 一课时计算机基础教案模板,计算机基础电子教案_初中信息技术教案_模板
计算机基础电子教案_初中信息技术教案_模板 计算机基础电子教案 第1章计算机基础知识 第2章 PC系列计算机 第3章中文Windows 98基础 第4章文件管理和资源管理器 第5章中文 Windows ...
- 清新时尚岗位竞聘个人介绍PPT模板(8598)_竞聘简历PPT_素材在线
清新时尚岗位竞聘个人介绍PPT模板(8598)_竞聘简历PPT_素材在线 清新时尚岗位竞聘个人介绍PPT模板(8598)_竞聘简历PPT_素材在线 2017半年报告工作计划年终总结PPT模板免费下载_ ...
- php开发与应用,PHP开发与应用_大作业_模板
PHP开发与应用_大作业_模板 本 科 课 程 论 文题目_____________________________________学生姓名 学 号 指导教师 学 院 专 业 交稿日期 信息技术学院网 ...
- 泛函编程—模板函数_类模板
函数业务逻辑一样,只是函数参数类型不同 函数模板的本质:类型参数化--泛型编程 语法: template <typename T> template <class T1,class ...
最新文章
- 棱形旋转c语言程序_C 语言时隔 5 年重回巅峰,这 20 个热门项目拿去练手!
- LSTM预测MNIST手写数字张量流图分析
- 为减少用户电话排队,阿里研发了智能客服调度系统
- 訪问劫持?訪问苏宁时发生的怪事
- 1到100的二进制编码_每天经过100天的编码后,我学到了什么
- mysql语句添加索引
- 特斯拉宣布总部将从加州硅谷迁到得州
- paip.hadoop的应用研究总结
- NTKO OFFICE控件帮助文档部分汇总
- ie8无法打开oracle em,IE8无法进入debug模式而引发的Oracle数据库问题-Oracle
- FAT文件系统存储原理
- python3 类中方法的调用
- python-用pyinstaller打包.py文件时,出现maxium recursion depth exceeded解决办法
- vue引入组件路径报错“Already included file name ”
- 用pe修改计算机ip地址,实现WinPE上网功能修改IP及DNS方法
- 中国家庭收入调查(CHIP)数据88-13年
- 计算机屏幕尺寸像素点距概念,电脑屏幕分辨率多少比较好
- linux使用gcc实现扫雷,基于linux环境下扫雷应用程序
- 雷军十年的演讲:吾志所向,一往无前!
- Sentinel Dubbo 适配器看限流与熔断(实战思考篇)
热门文章
- java reference 传引用_Java的引用(reference)---Roni
- 百度时间显示_文章的发布时间对百度优化网站重要吗
- 计算机软件记不住设置,想知道电脑密码记不住了怎么办
- 计算机发展与应用,网络计算机的发展与应用
- MPU6050开发 -- 卡尔曼滤波(转)
- 代理类Proxy------ WeakHashMap----ReferenceQueue---- Reference
- 分珠(dfs+并查集)
- 泛型(Generic)
- 图解SQL的inner join(join)、left join、right join、full outer join、union、union all的区别...
- 《Two Dozen Short Lessons in Haskell》学习(十八) - 交互式键盘输入和屏幕输出