ansible之安装与简单使用
http://www.ansible.com.cn/:参照中文文档
安装方式:采用epel源安装
a安装epel源:
yum install wget
wget dl.fedoraproject.org/pub/epel/6/x86_64/epel-release-6-8.noarch.rpm
rpm -ivh epel-release-6-8.noarch.rpm
yum -y install ansible
b安装epel源:
rpm -ivh http://mirror.serverbeheren.nl/epel/6/x86_64/epel-release-6-8.noarch.rpm
yum install ansible -y
以上两种epel源都可以使用
ansible是基于ssh通信的,所以需要ssh密码共享,节点服务器192.168.1.155,ansible控制端服务器192.168.1.11
基于ssh与节点通信:
ssh-keygen -t rsa -P ''
ssh-copy-id -i .ssh/id_rsa.pub root@192.168.1.155
ansible命令使用
ansible <pattern_goes_here> -m <module_name> -a <arguments>
-f forks:默认为5个,没有超过可以不用定义
-m command:命令操作(默认模块)
-s:以sudo模式
ansible all -m command -a "date"
ansible all -m command -a "service httpd status"
或者直接省略-m command:
ansible all -a "ls /tmp"
首先定义hosts文件:
vim /etc/ansible/hosts
[web]
192.168.1.155
实例演示:
ansible-doc -s copy
ansible web -m copy -a "src=/root/ansible.tar.gz dest=/tmp/"
ansible web -m command -a "ls /tmp"
ansible-doc -s cron
ansible web -m cron -a 'name="custom job" minute=*/3 hour=* day=* month=* weekday=* job="/usr/sbin/ntpdate 192.168.31.1"'
ansible web -a "crontab -l"
ansible-doc -s group
ansible web -m group -a "gid=306 system=yes name=mysql"
ansible web -a "tail -1 /etc/group"
ansible-doc -s user
ansible all -m user -a "":group:基本组,groups:附加组
ansible-doc -s yum
ansible web -m yum -a "state=present name=corosync"
ansible web -a "rpm -qa corosync"
ansible-doc -s service
ansible web -m service -a "state=started name=httpd enabled=yes"
ansible web -a "chkconfig --list httpd"
ansible web -m file -a "dest=/tmp/test.txt group=root mode=600 state=touch"
更多模块参考:
ansible-doc -l:列出所有的模块
ansible-doc -s module_name:指出指定模块对应的参数
当使用ansible第一次copy时,遇到如下错误:
[root@RS2 log]# ansible web -m copy -a "src=/root/test.sh dest=/tmp"
192.168.31.115 | FAILED! => {
"changed": false,
"checksum": "31d5f2c4016e2081d99dcd52bf1ab19f48db767e",
"failed": true,
"msg": "Aborting, target uses selinux but python bindings (libselinux-python) aren't installed!"
}
上述秒数应该是提示libselinux-python没有安装上,于是将它安装:
[root@RS2 log]# ansible web -m yum -a "name=libselinux-python state=present"
再次copy:
[root@RS2 log]# ansible web -m copy -a "src=/root/test.sh dest=/tmp"
192.168.31.115 | SUCCESS => {
"changed": true,
"checksum": "31d5f2c4016e2081d99dcd52bf1ab19f48db767e",
"dest": "/tmp/test.sh",
"gid": 0,
"group": "root",
"md5sum": "7aa31a8e7374035b1869a50b12544605",
"mode": "0644",
"owner": "root",
"secontext": "unconfined_u:object_r:admin_home_t:s0",
"size": 181,
"src": "/root/.ansible/tmp/ansible-tmp-1463435307.96-222484590205418/source",
"state": "file",
"uid": 0
}
于是成功解决错误
简单说几个模块:
模块之一:setup(用来查看远程主机的一些基本信息)
ansible web -m setup
模块之file:
directory:如果目录不存在,就创建目录
file:即使文件不存在,也不会被创建
link:创建软链接
hard:创建硬链接
touch:如果文件不存在,则会创建一个新的文件,如果文件或目录已存在,则更新其最后修改时间
absent:删除目录、文件或者取消链接文件
模块之- template: Templates a file out to a remote server.
ansible web -m template -a "src=/root/ansible/httpd.yaml dest=/tmp":只能复制file,不能复制目录
模块之copy:既能复制文件,也能复制目录
[root@RS2 ansible]# ansible web -m template -a "src=/root/ansible/test dest=/tmp"
192.168.1.155 | FAILED! => {
"changed": false,
"failed": true,
"msg": "IOError: [Errno 21] Is a directory: u'/root/ansible/test'"
}
[root@RS2 ansible]# ansible web -m copy -a "src=/root/ansible/test dest=/tmp"
192.168.1.155 | SUCCESS => {
"changed": false,
"dest": "/tmp/",
"src": "/root/ansible/test"
}
学会模块使用之后就是playbook的编写使用了(基于yaml语言)
playbook:
检测语法错误,并不执行:
[root@RS2 ansible]# ansible-playbook debug.yaml --syntax-check(检测语法)
playbook: debug.yaml
http.yaml
[root@RS2 ansible]# cat httpd.yaml
- hosts: web
remote_user: root
tasks:
- name: install httpd
yum: name=httpd state=present
notify:
- start httpd
handlers:
- name: start httpd
service: name=httpd state=started enabled=yes
[root@RS2 ansible]# ansible-playbook httpd.yaml
PLAY [web] *********************************************************************
TASK [setup] *******************************************************************
ok: [192.168.1.155]
TASK [install httpd] ***********************************************************
changed: [192.168.1.155]
RUNNING HANDLER [start httpd] **************************************************
changed: [192.168.1.155]
PLAY RECAP *********************************************************************
192.168.1.155 : ok=3 changed=2 unreachable=0 failed=0
在playbook中使用item及with_items
copy multi files to destination
[root@RS2 ansible]# cat template.yaml
- hosts: web
remote_user: root
tasks:
- name: copy multi file to destination
template: src=/root/ansible/httpd.yaml dest=/tmp/`item`:多个项目同时更新
with_items:
- httpd001.yaml
- httpd002.yaml
- httpd003.yaml
多项目执行:
- name: touch files with an optional mode
file: dest=`item`.`path` state=touch mode={{item.mode|default(omit)}}
with_items:
- path: /tmp/foo
- path: /tmp/bar
- path: /tmp/baz
mode: "0444"
[root@RS2 ansible]# cat loop.yaml
- hosts: web
remote_user: root
tasks:
- name: echo variables
shell: echo ` item `
with_items: [ 2,3 ]
[root@RS2 ansible]# cat loop.yaml.bak
- hosts: web
remote_user: root
tasks:
- name: echo variables
shell: echo ` item `
with_items:
- 2
- 3
when条件使用:
tasks:
- name: "shutdown Debian flavored systems"
command: /sbin/shutdown -t now
when: ansible_os_family == "Debian"
tasks:
- name: "shutdown CentOS 6 and Debian 7 systems"
command: /sbin/shutdown -t now
when: (ansible_distribution == "CentOS" and ansible_distribution_major_version == "6") or
(ansible_distribution == "Debian" and ansible_distribution_major_version == "7")
[root@RS2 ansible]# cat delete.yaml
- hosts: web
remote_user: root
tasks:
- name: delete any file
shell: rm -f /tmp/httpd.yaml
when: ansible_os_family == "RedHat":判断节点服务器是否为RedHat系列,是的话就删掉文件
ansible_os_family该值是模块setup中的结果信息
- hosts: web
remote_user: root
tasks:
- name: delete someone file
file: dest=/tmp/httpd/yaml state=absent
fatal: [192.168.1.155]: FAILED! => {"changed": false, "failed": true, "msg":
"value of state must be one of: file,directory,link,hard,touch,absent, got: abent"}
删除文件两种方式,推荐file:
1、file: dest=/tmp/httpd/yaml state=absent
2、shell: rm -f /tmp/httpd.yaml
引用变量加条件when:
[root@RS2 ansible]# cat peci.yaml
- hosts: web
remote_user: root
vars:
peci: true:此处变量可自定义
tasks:
- name: judge peci
shell: echo "hello world"
when: peci
注册变量:
[root@RS2 ansible]# cat variables.yaml
- hosts: web
remote_user: root
tasks:
- name: judge file
shell: ls /root/ansible
register: home_dirs
- name: copy file
template: src=/root/ansible/` item ` dest=/tmp/` item `
with_items: home_dirs.stdout.split()----》注册变量的值
利用变量进行替换,以及when结合register的使用,当register的变量result执行成功,when:result|success就继续安装步骤执行
result|success这也就代表注册变量的返回值是成功的
[root@RS2 ansible]# cat test.yaml
- hosts: web
remote_user: root
vars:
apache: httpd
tasks:
- name: install httpd
yum: name=` apache ` state=present
register: result:将上步骤执行的结果注册到变量result中
- name: start httpd
service: name=httpd state=started enabled=yes
when: result|success:当result变量是成功的话,就执行是service步骤
[root@RS2 ansible]# cat test.yaml
- hosts: web
remote_user: root
vars:
apache: httpd
tasks:
- name: install httpd
yum: name=` apache ` state=present
register: result
- name: start httpd
service: name=httpd state=started enabled=yes
when: result|success
- name: display time:这一步骤并没有执行,退出了,证明了失败了才会执行
shell: date
when: result|failed
TASK [display time] ************************************************************
skipping: [192.168.1.155]
[root@RS2 ansible]# cat test.yaml
- hosts: web
remote_user: root
vars:
apache: httpd
tasks:
- name: install httpd
yum: name=` apache ` state=present
register: result
- name: start httpd
service: name=httpd state=started enabled=yes
when: result|success
- name: display time
shell: date
when: result|failed
[root@RS2 ansible]# vim test.yaml
[root@RS2 ansible]# ansible-playbook test.yaml --syntax-check
playbook: test.yaml
[root@RS2 ansible]# ansible-playbook test.yaml
PLAY [web] *********************************************************************
TASK [setup] *******************************************************************
ok: [192.168.1.155]
TASK [install httpd] ***********************************************************
fatal: [192.168.1.155]: FAILED! => {"changed": true, "cmd": "ls /root/ansible", "delta": "0:00:00.021731", "end": "2016-07-30 16:58:19.750658", "failed": true, "rc": 2, "start": "2016-07-30 16:58:19.728927", "stderr": "ls: 无法访问/root/ansible: 没有那个文件或目录", "stdout": "", "stdout_lines": [], "warnings": []}
NO MORE HOSTS LEFT *************************************************************
to retry, use: --limit @test.retry
PLAY RECAP *********************************************************************可以看出并没有执行failed错误的那条date命令,表明错误操作就直接不进行下面操作
192.168.1.155 : ok=1 changed=0 unreachable=0 failed=1
[root@RS2 ansible]# cat test.
test.retry test.yaml
[root@RS2 ansible]# cat test.yaml
- hosts: web
remote_user: root
vars:
apache: httpd
tasks:
- name: install httpd
shell: ls /root/ansible
register: result
ignore_errors: True:接入忽略错误,加入了这行后面failed操作步骤继续运行
- name: start httpd
service: name=httpd state=started enabled=yes
when: result|success
- name: display time
shell: date
when: result|failed
[root@RS2 ansible]# ansible-playbook test.yaml
PLAY [web] *********************************************************************
TASK [setup] *******************************************************************
ok: [192.168.1.155]
TASK [install httpd] ***********************************************************
fatal: [192.168.1.155]: FAILED! => {"changed": true, "cmd": "ls /root/ansible", "delta": "0:00:00.009894", "end": "2016-07-30 17:01:51.789377", "failed": true, "rc": 2, "start": "2016-07-30 17:01:51.779483", "stderr": "ls: 无法访问/root/ansible: 没有那个文件或目录", "stdout": "", "stdout_lines": [], "warnings": []}
...ignoring
TASK [start httpd] *************************************************************上述result是错误结果,所以skip
skipping: [192.168.1.155]
TASK [display time] ************************************************************此处命令成功:ignore_errors: True是加入了这一行
changed: [192.168.1.155]
PLAY RECAP *********************************************************************
192.168.1.155 : ok=3 changed=1 unreachable=0 failed=0
定义变量,替换文件名,进行copy
[root@RS2 ansible]# cat test1.
test1.retry test1.yaml
[root@RS2 ansible]# cat test1.yaml
- hosts: web
remote_user: root
vars:
src_file: test.yaml
tasks:
- name: copy test.yaml to destination
copy: src=/root/ansible/` src_file ` dest=/tmp/` src_file `
[root@RS2 ansible]# ansible-playbook test1.yaml
PLAY [web] *********************************************************************
TASK [setup] *******************************************************************
ok: [192.168.1.155]
TASK [copy test.yaml to destination] *******************************************
changed: [192.168.1.155]
PLAY RECAP *********************************************************************
192.168.1.155 : ok=2 changed=1 unreachable=0 failed=0
错误样例:
[root@RS2 ansible]# cat test1.yaml
- hosts: web
remote_user: root
vars:
src_file: /root/ansible/test.yaml
tasks:
- name: copy test.yaml to destination
copy: src=` src_file ` dest=/tmp/` src_file `
[root@RS2 ansible]# ansible-playbook test1.yaml
PLAY [web] *********************************************************************
TASK [setup] *******************************************************************
ok: [192.168.1.155]
TASK [copy test.yaml to destination] *******************************************
fatal: [192.168.1.155]: FAILED! => {"changed": false, "checksum": "f0f36e6c39f0fdd58399e8cccaa9dcf30e1cef18", "failed": true, "msg": "Destination directory /tmp//root/ansible does not exist"}
NO MORE HOSTS LEFT *************************************************************
to retry, use: --limit @test1.retry
PLAY RECAP *********************************************************************
192.168.1.155 : ok=1 changed=0 unreachable=0 failed=1
安装lamp
[root@RS2 ansible]# cat lamp.yaml
- hosts: web
remote_user: root
tasks:
- name: install php php-mysql httpd
yum: name=` item ` state=present
with_items:
- httpd
- php
- php-mysql
- mysql-server
register: result
- name: start httpd server
service: name=httpd state=started enabled=yes
when: result|success
- name: start mysql server
service: name=mysqld state=started enabled=yes
when: result|success
[root@RS2 ansible]# ansible-playbook lamp.yaml
PLAY [web] *********************************************************************
TASK [setup] *******************************************************************
ok: [192.168.1.155]
TASK [install php php-mysql httpd] *********************************************
changed: [192.168.1.155] => (item=[u'httpd', u'php', u'php-mysql', u'mysql-server'])
TASK [start httpd server] ******************************************************
changed: [192.168.1.155]
TASK [start mysql server] ******************************************************
changed: [192.168.1.155]
PLAY RECAP *********************************************************************
192.168.1.155 : ok=4 changed=3 unreachable=0 failed=0
file做文件覆盖到节点目标机:
[root@RS2 tmp]# cat copy.yaml
- hosts: web
remote_user: root
tasks:
- name: copy file to destination
file: src=/tmp/yum.log dest=/tmp/yum.log state=touch
[root@RS2 tmp]# ansible-playbook copy.yaml
PLAY [web] *********************************************************************
TASK [setup] *******************************************************************
ok: [192.168.1.155]
TASK [copy file to destination] ************************************************
changed: [192.168.1.155]
PLAY RECAP *********************************************************************
192.168.1.155 : ok=2 changed=1 unreachable=0 failed=0
roles:
roles:在/etc/ansible/roles/下面创建一个role名称(比如nginx为例)
roles内各目录中可用的文件
tasks目录:至少创建一个名为main.yml的文件,其定义了此角色的任务列表:此文件可以使用 include包含其他的位于此目录中的tasks文件:
files目录:存放由copy或者script等模块调用的文件:
templates目录:templates模块会自动在此目录中寻找Jinjia2模板文件:
handlers目录:此目录中应当包含一个main。
yml文件:用于定义此角色用到的各handler:在handler中使用include包含的其他的handler文件也应该位于此目录中:
vars目录:应当包含一个main.yml文件,用于定义此角色用到的变量
meta目录:应当包含一个main.yml文件,用于定义此角色的特殊设定及其依赖关系:ansible 1.3及其以后的版本才支持
default目录:为当前角色定义默认变量时使用此目录,应该包含一个main.yml文件
handlers:
handler/main.yaml
---
- name: start nginx
service: name=nginx state=started
- name: reload nginx
service: name=nginx state=reloaded
Meta
Meta/main.yaml
---
dependencies:
- { roles: ssl }
templates
templates/serversforhackers.com.conf:一个配置文件就行
variables
vars/main.yml
---
domain: www.my.com
http_port: 80
tasks:
tasks/main.yaml
---
- name: install nginx
yum: name=nginx state=present
register: result
notify:
- start nginx
- name: copy configure file to destination
template: src=/path/to/serversforhackers.com.conf.j2
dest=/path/to/serversforhackers.com.conf owner=root group=root
- name: create web root directory
file: dest=/www/html owner=nginx group=nginx state=directory mode=775 recurse=yes
notify:
- reload nginx
实例验证:
[root@RS2 nginx]# cat handlers/main.yaml
---
- name: start httpd
service: name=httpd state=started
- name: restart httpd
service: name=httpd state=restarted
[root@RS2 nginx]# cat tasks/main.yaml
---
- name: install httpd
yum: name=httpd state=present
notify:
- start httpd
- name: copy the configure file to destination
template: src=httpd.conf.j2 dest=/etc/httpd/conf/httpd.conf
notify:
- restart httpd
[root@RS2 nginx]# cat templates/httpd.conf.j2 :也就是httpd.conf配置文件后缀加上j2
[root@RS2 nginx]# cat vars/main.yaml
---
http_port: 80
[root@RS2 workflow]# cat install_httpd.yaml
---
- hosts: web
remote_user: root
roles:
- nginx
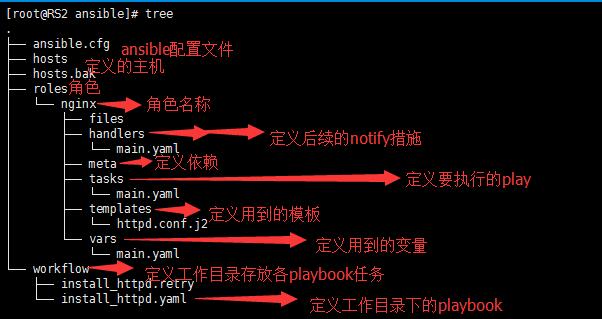
[root@RS2 ansible]# tree整个目录结果
.
|-- ansible.cfg
|-- hosts
|-- hosts.bak
|-- roles
| `-- nginx----》角色名
| |-- files
| |-- handlers-----》定义后续notify的处理play
| | `-- main.yaml
| |-- meta----》定义依赖
| |-- tasks-----》定义任务执行play
| | `-- main.yaml
| |-- templates----》定义模板文件
| | `-- httpd.conf.j2
| `-- vars:定义变量
| `-- main.yaml
`-- workflow-----》工作目录,存放各种playbook来执行角色
|-- install_httpd.retry
`-- install_httpd.yaml-----playbook来执行整个roles下的nginx
附上目录结构图:
转载于:https://blog.51cto.com/huangsir007/1832725
ansible之安装与简单使用相关推荐
- 【Ansible】3个让Ansible性能飞起的简单优化方案!
Ansible 性能优化 在使用 Ansible 的过程中,当管理的服务器数量增加时,不得不面对一个无法避免的问题执行效率慢,这里列出一些解决方案. 一.gathering facts优化前的准备-收 ...
- 《Ansible权威指南》一1.7 Ansible的安装部署
本节书摘来自华章出版社<Ansible权威指南>一书中的第一章,第1.7节,作者 李松涛 魏 巍 甘 捷 更多章节内容可以访问云栖社区"华章计算机"公众号查看. 1.7 ...
- 自动化运维工具ansible(安装与模块介绍)
自动化运维工具ansible(安装与模块介绍) 一.ansible运维工具概述 (一).ansible的特点 (二).ansible的原理 (三)ansible的优点 二.安装ansible 三.an ...
- Ansible的安装及使用
ansible简介 ansible是一种自动化运维工具,基于paramiko开发的,并且基于模块化工作,Ansible是一种集成IT系统的配置管理.应用部署.执行特定任务的开源平台. 它是基于pyth ...
- ANSIBLE的安装和常用模块使用详细教程
ANSIBLE安装和各种模块应用功能 文章目录 ANSIBLE安装和各种模块应用功能 安装配置ANSIBLE ANSIBLE使用 ansible-galaxy工具 ansible-pull工具 ans ...
- 自动化运维工具ansible的安装管理以及模块介绍
自动化运维工具ansible的安装管理以及模块介绍 目录 自动化运维工具ansible的安装管理以及模块介绍 一.ansible概述 1.几种常用运维工具比较 2.Ansible简介 3.Ansibl ...
- ansible自动化运维详解(一)ansible的安装部署、参数使用、清单管理、配置文件参数及用户级ansible操作环境构建
文章目录 ansible自动化运维详解(一)ansible的安装部署.参数使用.清单管理.配置文件参数及用户级ansible操作环境构建 一.ansible的安装部署 1.1.ansible简介 1. ...
- python性能测试可视化_locust安装及其简单使用----基于python的性能测试工具
1.已安装python3.6 ,安装步骤略 pip安装: pip install locust 检查locust是否安装成功 locust --help 2.安装 pyzmq If you inten ...
- docker-compose的安装与简单使用
docker-compose的安装与简单使用 docker-compose简介 屁话不这么多,直接开干 docker-compose安装步骤 由于docker-compose托管在github上面,所 ...
最新文章
- Codeforces 396A 数论,组合数学
- 命令行接口(CLI)将被取而代之,它不再是网络运维的主要工具
- Qt Ctreator搭配VS2013调试——整合QML/C++调试需要的从属调试引擎无法被创建
- 数据结构(十七)最小生成树
- QQ超市模拟排配2D版1.14 (XNA4.0) (增加截图功能、新建地图功能)
- 远程控制软件TeamViewer轻松解决企业运维难题
- 手机163邮箱发送服务器端口,163邮箱发送端口
- mysql 临时表权限_MySQL临时表浅析
- 女性游戏市场崛起,B站能否能否抓住风口打造下一个FGO?
- GridView自带分页 1/总页数 首页 下一页 上一页 尾页 X 页 go 实现方法
- 美团上线美团直播助手
- Android手机拍照或从本地相册选取图片设置头像。适配小米、华为、7.0
- 让终端支持播放mp3,移植mp3解码库libmad和madplay到嵌入式linux
- LightOJ 1395 A Dangerous Maze (II) 期望DP
- 投稿经验分享之三:干货| 如何找寻合适的投稿期刊?
- 斜杠,双斜杠,反斜杠与双反斜杠
- jQuery之datetimepicker控件(时间单位精确到分钟)
- MySQL之——MySQL5.6 my.cnf 参数说明(附上自己服务器上真实配置文件)
- hadoop统计文件行数
- FileUtils【获取SD卡根目录、读写文件、移动、复制、删除文件、获取文件名、后缀名操作类】...
热门文章
- Android在Activity中动态增加xml自定义样式布局控件(引用xml布局文件和循环增加控件)
- vscode 国内镜像快速下载
- XML:体验学习的乐趣之XML总结
- DeepMind登上Science:“和AI相比,人类都是猪队友”,团战称霸雷神之锤3
- 下个目标是攻克FIFA游戏?DeepMind让AI自学传球配合
- 1-10落败,5分钟崩盘!星际2职业高手史上首次被AI击溃,AlphaStar一战成名
- 伊拉克博士深陷战区要耽搁毕业论文,瑞典导师派武装雇佣兵救他全家
- 现在,你可以撸机器猫了
- SoPlus回顾 | 行业大咖论道AI,探讨未来行业发展趋势
- dubbo-monitor-simple-2.5.3-assembly 简易监控中心安装