gitlab详细安装过程,错误解决方案
在centos6.5中安装 GitLab 全过程和问题记录
如果你想省事,使用最新版本的gitlab,请下载一键安装包,一键安装
脚本:https://bitnami.com/stack/gitlab/installer
下载后安装时候请查看README
readme:https://bitnami.com/stack/gitlab/README.txt
以下是编译安装,真TM麻烦
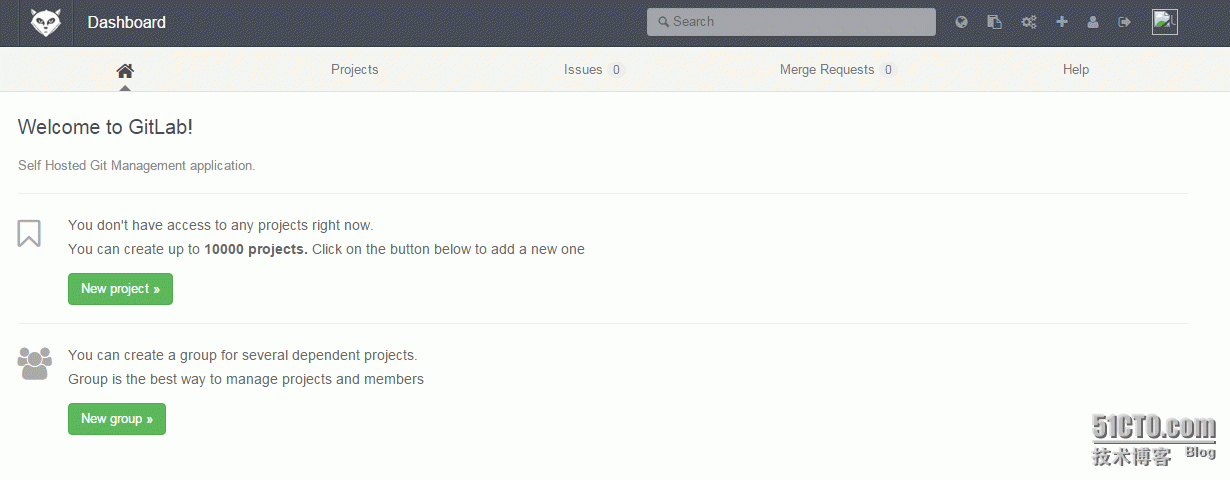
先秀下安装完成后的成果。

centos安装gitlab成果
开始之前
在开始之前请先查看官方的刚需文档: https://github.com/gitlabhq/gitlabhq/blob/master/doc/install/requirements.md ,该文档说明了系统,软件和硬件等各方面的需求。详细的了解这些,可以避免碰到很多怪异的问题。
安装步骤总览
基础操作系统(CentOS 6.4 Minimal,升级后为6.5)
Ruby (版本: 2.0.0p353)
创建项目运行用户(创建git账号,方便权限管理)
GitLab Shell(版本:1.8.0)
数据库(可以支持mysql和PostgreSQL,这里使用mysql,版本:5.1.17)
GitLab(版本:6.3.1)
Web服务器(可支持nginx和apache,这里使用tengine-1.5.2)
防火墙(iptables)
1、安装操作系统
这个比较简单,安装完成之后记的配置下网络,使其可以在启动时自动连接。而后需要升级系统和安装一些相应的软件和依赖包,以下逐一说明。
Tips:如果不能连接国外的网络,经常出现网络错误或者couldn’t not resolve host这样的错误,建议修改dns服务器为8.8.8.8和8.8.4.4。
a、升级操作系统和安装wget
$ sudo yum -y update
$ sudo yum -y install wget
升级完成后,系统版本是6.5。
笔者注:和英文文档不同,笔者这里是先升级系统和安装wget,不然后面的操作会提示wget命令找到。
b、增加EPEL安装源
EPEL,即Extra Packages for Enterprise Linux,这个软件仓库里有很多非常常用的软件,而且是专门针对RHEL设计的,对RHEL标准yum源是一个很好的补充,完全免费使用,由Fedora项目维护,所以如果你使用的是RHEL,或者CentOS,Scientific等RHEL系的linux,可以非常放心的使用EPEL的yum源。
下载并安装GPG key
$ sudo wget -O /etc/pki/rpm-gpg/RPM-GPG-KEY-EPEL-6 https://www.fedoraproject.org/static/0608B895.txt
$ sudo rpm --import /etc/pki/rpm-gpg/RPM-GPG-KEY-EPEL-6
检验下是否安装成功
$ sudo rpm -qa gpg*安装epel-release-6-8.noarch包
$ sudo rpm -Uvh http://dl.fedoraproject.org/pub/epel/6/x86_64/epel-release-6-8.noarch.rpm提示:不要在意x86_64,在i686的机器上一样能使用。
c、增加PUIAS安装源
PUIAS Linux是面向桌面和服务器的完整的操作系统,它靠编译Red Hat Enterprise Linux的源代码包来创建。除了这些上游的软件包外,该项目还提供一些其他的软件仓库:“Addons”包含了通常的Red Hat发行中未收入的额外软件包,“Computational”提供专门针对科学计算的软件,“Unsupported”则收入各种各样的测试性软件 包。该发行由美国普林斯顿 大学的高等研究所维护。
创建/etc/yum.repos.d/PUIAS_6_computational.repo,并添加如下内容:
[PUIAS_6_computational]
name=PUIAS computational Base$releasever -$basearchmirrorlist=$releasever/$basearch/mirrorlist#baseurl=$basearchgpgcheck=1gpgkey=file:///etc/pki/rpm-gpg/RPM-GPG-KEY-puias
下载并安装GPG key
$ sudo wget -O /etc/pki/rpm-gpg/RPM-GPG-KEY-puias http://springdale.math.ias.edu/data/puias/6/x86_64/os/RPM-GPG-KEY-puias
$ sudo rpm --import /etc/pki/rpm-gpg/RPM-GPG-KEY-puias
检验下是否安装成功
$ sudo rpm -qa gpg*Tips:安装完EPEL和PUIAS两个源后,可以检测下:
$ sudo yum repolistd、安装GitLab的所需依赖包和工具
$ su -$ yum -y groupinstall 'Development Tools'
$ yum -y install vim-enhanced readline readline-devel ncurses-devel gdbm-devel glibc-devel tcl-devel openssl-devel curl-devel expat-devel db4-devel byacc sqlite-devel gcc-c++ libyaml libyaml-devel libffi libffi-devel libxml2 libxml2-devel libxslt libxslt-devel libicu libicu-devel system-config-firewall-tui python-devel  redi  sudo wget crontabs logwatch logrotate perl-Time-HiRes git
RHEL提示
如果部分包不能安装,例如: eg. gdbm-devel, libffi-devel and libicu-devel,那么增加rhel6的安装源。
$ yum-config-manager --enable rhel-6-server-optional-rpmse、配置redis
配置redis使其在开机时启动:
$此处redis是yum安装,为了省事、
$ sudo chkconfig redis on
$ sudo service redis start
f、配置邮件服务器
笔者注:这个过程笔者没有配置,请参考英文文档。
2、安装Ruby
下载并编译:
$ su -
$ mkdir /tmp/ruby && cd /tmp/ruby
$ curl --progress ftp://ftp.ruby-lang.org/pub/ruby/2.0/ruby-2.0.0-p353.tar.gz | tar xz
$ cd ruby-2.0.0-p353$ ./configure --prefix=/usr/local/
$ make && make install
安装完成后,重新登录终端确保$PATH生效,检测ruby的安装成功与否:
$ which ruby
/usr/local/bin/ruby$ ruby -v
ruby 2.0.0p353 (2013-11-22 revision 43784) [x86_64-linux]
安装bundle:
$ sudo gem install bundler --no-ri --no-rdoc如果提示sudo: gem: command not found,使用root账号登录执行该命令即可。
3、系统用户
创建用户git
$ su -
$ adduser --system --shell /bin/bash --comment 'GitLab' --create-home --home-dir /home/git/ git
因为git用户不需要登录,所以这里不需要设置git的密码。
转发所有邮件
笔者注:因为上面没有配置发送邮件,这里也省略。
4、配置GitLab shell
GitLab shell是专门为GitLab开发的提供ssh访问和版本管理的软件。
先使用root登录,而后切换成git
$ su -
$ su - git
克隆gitlab shell
$ git clone https://github.com/gitlabhq/gitlab-shell.git $ cd gitlab-shell切换成1.8.0版本,并编辑配置
$ git checkout v1.8.0
$ cp config.yml.example config.yml
这里最重要的是将gitlab_url修改成gitlab的访问域名。形如:http://test.gitlab.com/
笔者注:如果gitlab是使用https访问,则需将http替换成https,配置文件中的self_signed_cert要修改成true,否则gitlab shell在通过api和gitlab进行通信的时候就会出现错误,导致项目push出错。因为后面配置web服务器的时候是使用ssl,所以这里要按照ssl的方式配置。
Tips: 另外如果使用的域名是测试域名,不要忘记在系统的/etc/hosts做域名映射。如果自己有DNS服务器,则不需要绑定hosts
安装一些需要的目录和文件
$ ./bin/install5、安装数据库
笔者这里使用的是msyql,关于PostgreSQL的安装请参考原文档。
安装mysql并设置开机启动:
此处我选择安装MySQL的二进制包:安装参考文档:http://douya.blog.51cto.com/6173221/1579986设置mysql root账号的密码:
$ mysqladmin -uroot password 'your password'创建新用户和数据库给gitlab使用
# 登录数据库
$ mysql -u root -p
# 输入root密码
# 为gitlab创建使用用户
CREATE USER 'gitlab'@'localhost' IDENTIFIED BY 'gitlab账号的密码';
# 创建gitlaba使用的数据库
CREATE DATABASE IF NOT EXISTS `gitlabhq_production` DEFAULT CHARACTER SET `utf8` COLLATE `utf8_unicode_ci`;
# 给予gitlab用户权限
GRANT SELECT, LOCK TABLES, INSERT, UPDATE, DELETE, CREATE, DROP, INDEX, ALTER ON `gitlabhq_production`.* TO 'gitlab'@'localhost';
# 登出数据库
\q
6、安装GitLab
将GitLab安装在git的家目录下:
$ su -
$ su - git
a、克隆GitLab并切换分支到6-3-stable
# 克隆GitLab
$ git clone https://github.com/gitlabhq/gitlabhq.git gitlab
# 进入gitlab目录
$ cd /home/git/gitlab
# 切换到6-3-stable分支  ,需要的可以切换到5.0稳定版
$ git checkout 6-3-stable
b、配置项目
# 复制配置文件
$ cp config/gitlab.yml.example config/gitlab.yml
# 修改配置文件中的访问域名(your_domain_name为项目的访问域名)
$ sed -i 's|localhost|your_domain_name|g' config/gitlab.yml\设定log和tmp目录所有者和权限$ chown -R git log/$ chown -R git tmp/$ chmod -R u+rwX log/$ chmod -R u+rwX tmp/# 创建gitlab-satellites目录$ mkdir /home/git/gitlab-satellites# 创建tmp/pids/和tmp/sockets/目录,确保gitlab有相应的权限$ mkdir tmp/pids/$ mkdir tmp/sockets/$ chmod -R u+rwX tmp/pids/$ chmod -R u+rwX tmp/sockets/# 创建public/uploads目录$ mkdir public/uploads$ chmod -R u+rwX public/uploads# 复制unicorn配置$ cp config/unicorn.rb.example config/unicorn.rb# 编辑unicorn配置(笔者这里采用默认配置)$ vim config/unicorn.rb# 配置git的用户和邮件$ git config --global user.name "GitLab"$ git config --global user.email "gitlab@your_domain_name"$ git config --global core.autocrlf input
这边的配置比较复杂,细心些就行了。
c、配置数据库访问文件
$ cp config/database.yml.mysql config/database.yml编辑config/database.yml,设置其中连接数据库的账号密码,笔者的配置部分如下:
## PRODUCTION#production:adapter: mysql2encoding: utf8reconnect: falsedatabase: gitlabhq_productionpool: 10username: gitlabpassword: "gitlab"# host: localhost# socket: /tmp/mysql.sock
修改其中username和password就可以了,其中密码就是上面数据库步骤中创建gitlab用户的密码。
确保该文件只有git账号有权限读取。
$ chmod o-rwx config/database.ymld、安装Gems
$ sudo  gem install charlock_holmes --version '0.6.9.4'  此时会遇到一个错误,由于在国内无法访问国外网站原因
[root@gitlab gitlab]# gem install charlock_holmes --version '0.6.9.4'ERROR:  Could not find a valid gem 'charlock_holmes' (= 0.6.9.4), here is why:Unable to download data from https://rubygems.org/ - Errno::ECONNRESET: Connection reset by peer - SSL_connect (https://rubygems.org/specs.4.8.gz)
解决办法:
1,
cd  /home/git/gitlab
vim Gemfile
更改
source https://rubygems.org/
为:
source " https://ruby.taobao.org/ "
2,
gem sources -r  https://rubygems.org/
gem sources -a https://ruby.taobao.org/
[root@gitlab gitlab]# gem sources -l
*** CURRENT SOURCES ***https://ruby.taobao.org/
$再次运行,便成功安装
[root@gitlab gitlab]# gem install charlock_holmes --version '0.6.9.4'
$ exit 退出root用户
安装mysql包
$ cd /home/git/gitlab/
[git@Git gitlab]$  bundle install --deployment --without development test postgres puma aws
此时还会出现一个问题
[git@Git gitlab]$ bundle install --deployment --without development test postgres puma aws
-bash: bundle: command not found
解决方案:
[git@Git gitlab]$ sudo   gem install bundler   此不需要用root来安装此时出现第二个错误:
[git@Git gitlab]$  bundle install --deployment --without development test postgres puma aws
Don't run Bundler as root. Bundler can ask for sudo if it is needed, and installing your bundle as root will break this application for all non-root users on this machine.
Fetching gem metadata from https://ruby.taobao.org/........
Fetching version metadata from https://ruby.taobao.org/..
Could not find modernizr-2.6.2 in any of the sources
解决方法:
1,
[git@gitlab gitlab]$ vim Gemfile
gem "modernizr",        "2.6.2"
更改改为:
gem "modernizr-rails",  "2.7.1"
2,
[git@gitlab gitlab]$ vim Gemfile.lock
将modernizr (2.6.2)
更改改为:modernizr-rails (2.7.1)将modernizr (= 2.6.2)
更改改为:modernizr-rails (= 2.7.1)
#重新执行:
[git@gitlab gitlab]$ bundle install --deployment --without development test postgres puma aws
此时遇到新的错误:An error occurred while installing rake (10.1.0), and Bundler cannot continue.
Make sure that `gem install rake -v '10.1.0'` succeeds before bundling.
解决办法:
su -
[root@gitlab gitlab]# gem install rake -v '10.1.0'
此时用root执行
[root@gitlab gitlab]#     bundle install --deployment --without development test postgres puma aws
e、初始化数据和激活高级功能
$ cd /home/git/gitlab
$ bundle exec rake gitlab:setup RAILS_ENV=production
这步完成后,会生一个默认的管理员账号:
Administrator account created:login.........root
password......5iveL!fe
f、安装启动脚本
$ su -
$wget -O /etc/init.d/gitlab https://raw.github.com/gitlabhq/gitlab-recipes/master/init/sysvinit/centos/gitlab-unicorn$ chmod +x /etc/init.d/gitlab$ chkconfig --add gitlab
开机时启动
$ chkconfig gitlab ong、检测应用程序状态
$ su - git
$ cd gitlab/bundle exec rake gitlab:check RAILS_ENV=production   先检查安装环境是否成功、$ bundle exec rake gitlab:env:info RAILS_ENV=production
$ exit
debug模式启动gitlab
bundle exec rails s -e production
可以查看到系统、Ruby、GitLab和GitLab Shell的版本和其他信息。
启动GitLab实例
$ service gitlab start
出现问题
[root@git ~]# /etc/init.d/gitlab start
Stopping unicorn:                                          [FAILED]
Stopping sidekiq:                                          [FAILED]
Starting unicorn: bash: bin/web: No such file or directory[FAILED]
Starting sidekiq: bash: bin/background_jobs: No such file or directory[FAILED]解决方案
[root@git gitlab]#  cd /home/git/gitlabcp -r  script/ bin
[root@git gitlab]#/etc/init.d/gitlab start
Starting unicorn:                                          [  OK  ]
Starting sidekiq:                                          [  OK  ]
h、查看应用更加详细的信息
$ su - git
$ cd gitlab/
$ bundle exec rake gitlab:check RAILS_ENV=production
[git@gitlab gitlab]$ bundle exec rake gitlab:check RAILS_ENV=production
Checking Environment ...Git configured for git user? ... yes
Has python2? ... yes
python2 is supported version? ... yesChecking Environment ... FinishedChecking GitLab Shell ...GitLab Shell version >= 1.7.9 ? ... OK (1.8.0)
Repo base directory exists? ... yes
Repo base directory is a symlink? ... no
Repo base owned by git:git? ... yes
Repo base access is drwxrws---? ... yes
update hook up-to-date? ... yes
update hooks in repos are links: ... can't check, you have no projects
Running /home/git/gitlab-shell/bin/check
Check GitLab API access: OK
Check directories and files: /home/git/repositories: OK/home/git/.ssh/authorized_keys: OK
Test redis-cli executable: redis-cli 2.4.10
Send ping to redis server: PONG
gitlab-shell self-check successfulChecking GitLab Shell ... FinishedChecking Sidekiq ...Running? ... yes
Number of Sidekiq processes ... 1Checking Sidekiq ... FinishedChecking GitLab ...Database config exists? ... yes
Database is SQLite ... no
All migrations up? ... yes
GitLab config exists? ... yes
GitLab config outdated? ... no
Log directory writable? ... yes
Tmp directory writable? ... yes
Init script exists? ... yes
Init script up-to-date? ... noTry fixing it:Redownload the init scriptFor more information see:doc/install/installation.md in section "Install Init Script"Please fix the error above and rerun the checks.
projects have namespace: ... can't check, you have no projects
Projects have satellites? ... can't check, you have no projects
Redis version >= 2.0.0? ... yes
Your git bin path is "/usr/bin/git"
Git version >= 1.7.10 ? ... noTry fixing it:Update your git to a version >= 1.7.10 from 1.7.1Please fix the error above and rerun the checks.Checking GitLab ... Finished
这里会提示一个Init script up-to-date的错误,如下:
Init script up-to-date? ... no
Try fixing it:
Redownload the init scriptFor more information see:
doc/install/installation.md in section "Install Init Script"Please fix the error above and rerun the checks.
原文说明不用介意这个问题,以及git的版本,hooks 咱都不影响使用
7、安装web服务器
笔者选择的是nginx,关于apache方面的请参考原文档
此处我选择的是tengine 编译安装
1,安装省略,因为很简单
2,tengine的配置如下:
user              root git;worker_processes  2;error_log  logs/error.log;
pid        logs/nginx.pid;events {worker_connections  1024;
}http {include      mime.types;default_type  application/octet-stream;log_format  main  '$remote_addr - $remote_user [$time_local] "$request" ''$status $body_bytes_sent "$http_referer" ''"$http_user_agent" "$http_x_forwarded_for"';access_log  logs/access.log  main;
upstream gitlab {server unix:/home/git/gitlab/tmp/sockets/gitlab.socket;
}server {listen *:80 default_server;         server_name your-domainserver_tokens off;    root /home/git/gitlab/public;client_max_body_size 5m;location / {# serve static files from defined root folder;.# @gitlab is a named location for the upstream fallback, see belowtry_files $uri $uri/index.html $uri.html @gitlab;}# if a file, which is not found in the root folder is requested,# then the proxy pass the request to the upsteam (gitlab unicorn)location @gitlab {proxy_read_timeout 300; # https://github.com/gitlabhq/gitlabhq/issues/694proxy_connect_timeout 300; # https://github.com/gitlabhq/gitlabhq/issues/694proxy_redirect     off;proxy_set_header   X-Forwarded-Proto $scheme;proxy_set_header   Host              $http_host;proxy_set_header   X-Real-IP         $remote_addr;proxy_set_header   X-Forwarded-For   $proxy_add_x_forwarded_for;proxy_pass http://gitlab;}
}
}
启动nginx:
root@gitlab tengine]# /usr/local/tengine/sbin/nginx -t
the configuration file /usr/local/tengine/conf/nginx.conf syntax is ok
configuration file /usr/local/tengine/conf/nginx.conf test is successful
[root@gitlab tengine]# /usr/local/tengine/sbin/nginx
访问成果:
去开始哈皮吧~~~
参考资料:http://www.centoscn.com/p_w_picpath-text/install/2015/0320/4929.html
############### 邮件通知########################
你Linux系统使用的是postfix邮箱,而且配置文件能是默认,并且使用mail可以发邮件,所以执行以下,确保可以发邮件
1. 首先是拷贝Gitlab自带的example
cd /home/git/gitlab
sudo -u git -H cp config/initializers/smtp_settings.rb.sample config/initializers/smtp_settings.rb
2. 然后用我们自己的邮箱替换example中的邮箱
sudo -u git -H vim config/initializers/smtp_settings.rb
一键安装路径:
cd /opt/gitlab-8.5.7-0
vim apps/gitlab/htdocs/config/environments/production.rb
这里提供163和腾讯企业邮箱两种配置方式,注意将下面的123456替换成自己的密码
163邮箱:
if Rails.env.production?
Gitlab::Application.config.action_mailer.delivery_method = :smtp
ActionMailer::Base.smtp_settings = {
address: "smtp.163.com",
port: 25,
user_name: "wpgitlab",
password: "123456",
domain: "163.com",
authentication: :plain,
enable_starttls_auto: true
}
end
QQ邮箱:
if Rails.env.production?
Gitlab::Application.config.action_mailer.delivery_method = :smtp
ActionMailer::Base.smtp_settings = {
address: "smtp.exmail.qq.com",
port: 25,
user_name: "wangpeng@scnee.com",
password: "123456",
domain: "smtp.qq.com",
authentication: :plain,
enable_starttls_auto: true,
}
end
3. 修改gitlab.yml
cd /home/git/gitlab
sudo -u git -H vim config/gitlab.yml
一键安装路径:
cd /opt/gitlab-8.5.7-0
vim apps/gitlab/htdocs/config/gitlab.yml
将默认邮箱修改为自己的邮箱
163:
## Email settings
# Email address used in the "From" field in mails sent by GitLab
email_from: wpgit@163.com
腾讯企业邮箱:
## Email settings
# Email address used in the "From" field in mails sent by GitLab
email_from: wangpeng@scnee.com
4. 修改后。重启gitlab
转载于:https://blog.51cto.com/douya/1726333
gitlab详细安装过程,错误解决方案相关推荐
- Win7下MATLAB 7.0下载地址+详细安装+运行错误解决
MATLAB 7.0下载地址 http://pan.baidu.com/share/link?shareid=10874&uk=3928989303 ed2k链接下载地址,打开迅雷或者旋风后, ...
- linux系统 oracle 11g字符界面详细安装过程
oracle 11g字符界面详细安装过程 1. 修改主机名 sed -i "s/HOSTNAME=localhost.localdomain/HOSTNAME=oracledb/" ...
- SQL Server 2005详细安装过程及配置【转载瑞文软件】
SQL Server 2005详细安装过程及配置 说明:个人感觉SQL Server 2005是目前所有的SQL Server版本当中最好用的一个版本了,原因就是这个版本比起其它版本来说要安装简单,操 ...
- 基于Windows环境下CPU和GPU版本Tensorflow详细安装过程
基于Windows环境下CPU和GPU版本Tensorflow详细安装过程 一.Tensorflow简介 TensorFlow 是一个开源的.基于 Python 的机器学习框架,它由 Google 开 ...
- Centos 6.5-yum安装出现错误解决方案
Centos 6.5-yum安装出现错误解决方案 参考文章: (1)Centos 6.5-yum安装出现错误解决方案 (2)https://www.cnblogs.com/su-root/p/9710 ...
- win10下pytorch-gpu安装以及CUDA详细安装过程
win10下pytorch-gpu安装以及CUDA详细安装过程 1.Cuda的下载安装及配置 首先我们要确定本机是否有独立显卡.在计算机-管理-设备管理器-显示适配器中,查看是否 ...
- win10monkey安装教程_详解win10下pytorch-gpu安装以及CUDA详细安装过程
1.Cuda的下载安装及配置 首先我们要确定本机是否有独立显卡.在计算机-管理-设备管理器-显示适配器中,查看是否有独立显卡. 可以看到本机有一个集成显卡和独立显卡NVIDIA GetForce GT ...
- SAS 9.4 的超详细安装过程(保姆级教程)(含安装包+常见问题解决)
目录:SAS 9.4 的超详细安装过程 一.安装前的准备 1.1 环境准备 1.2 安装包分享(解压密码见最后) 二.安装过程 2.1 下载解压完成 2.2 点击setup.exe安装 2.3 以管理 ...
- Matlab R2017b的详细安装过程与激活步骤
Matlab R2017b的详细安装过程与激活步骤 1.从百度网盘下载matlab R2017b的安装包 2.安装与激活步骤 1.从百度网盘下载matlab R2017b的安装包 链接:https:/ ...
最新文章
- AI一分钟 | Yann LeCun怒批机器人Sophia:招摇撞骗;李嘉诚:我比较保守,只投了1亿港币到比特币终端市场
- bnu 34986 Football on Table(数学+暴力)
- 设计模式-建造者模式(转自:http://www.cnblogs.com/cbf4life/archive/2010/01/14/1647710.html)...
- Regex 正则零宽断言
- STM32的时钟配置——时钟树解析
- 操作系统-进程同步与互斥易混点
- AndroidStudio_使用NanoHTTPD搭建HTTP服务_把android设置当成一个http服务器来使用---Android原生开发工作笔记225
- 这辈子最难忘的一顿饭是什么?
- Postfix:邮件系统常见错误代码解释
- 惠普136nw打印机清零_HP打印机清零方法(冷复位恢复出厂设置)
- 视频教程-SAP快速入门-其他
- 用python将word转化成pdf
- Oracle GoldenGate官档知识
- 蓝牙协议5.0 第6卷 翻译
- 完美解决idea2020一直indexing,无法操作的问题
- 数学建模美赛写作技巧
- (codeforces)D. Cloud of Hashtags
- 用好手机上的一款便捷的便签,快速记录我们的想法
- 解决 SecureCRT 和 SecureFX 中文乱码
- 正则匹配以什么开头、以什么结尾,以非什么开头,以非什么结尾