Three.js学习七——播放模型动画时模型沿着轨迹移动
目录
- 效果描述
- 实现流程
- 基本流程
- 工程文件
- 搭建场景
- 添加模型和播放动画
- 添加路径和模型移动
- 完整代码和实现效果
效果描述
在播放导入的模型动画同时,让模型沿着预定路径轨迹移动。例如导入一个会跑步动作的模型,让它沿着一条类似跑道的路径跑步移动。
实现流程
基本流程
1、搭建场景
2、添加模型和播放动画
3、添加路径和模型移动
工程文件
工程文件结构如下图:
static:存放静态资源文件
three.js-master:为官网下载的代码包,包含所有需要用到的资源包,链接:https://github.com/mrdoob/three.js/archive/master.zip
index.html:页面代码
![]()
模型使用的是官方示例中的Soldier模型,文件位置:three.js-master\examples\models\gltf\Soldier.glb
为了方便操作我们将文件拷出来放在上图static\3dmod\gltf文件夹下,static与three.js-master同级
index.html单页代码组成
<!DOCTYPE html>
<html><head><meta charset="utf-8"><title>My first three.js app</title><style>body {margin: 0;}</style>
</head><body><script type="importmap">{"imports": {"three": "./three.js-master/build/three.module.js"}}</script><script type="module">// 下文JS代码位置// ...</script>
</body></html>
参照官网例子:https://threejs.org/examples/#webgl_animation_skinning_blending中的场景和模型
搭建场景
搭建场景环境
import * as THREE from "three";
import { OrbitControls } from "./three.js-master/examples/jsm/controls/OrbitControls.js";let scene, camera, renderer;// 渲染器开启阴影渲染:renderer.shadowMapEnabled = true;
// 灯光需要开启“引起阴影”:light.castShadow = true;
// 物体需要开启“引起阴影”和“接收阴影”:mesh.castShadow = mesh.receiveShadow = true;function init() {scene = new THREE.Scene();camera = new THREE.PerspectiveCamera(75, window.innerWidth / window.innerHeight, 0.1, 1000);renderer = new THREE.WebGLRenderer();// position and point the camera to the center of the scenecamera.position.set(5, 5, 5);camera.lookAt(scene.position);// 增加坐标系红色代表 X 轴. 绿色代表 Y 轴. 蓝色代表 Z 轴.// 添加坐标系到场景中const axes = new THREE.AxesHelper(20);scene.add(axes);// 调整背景颜色,边界雾化scene.background = new THREE.Color(0xa0a0a0);scene.fog = new THREE.Fog(0xa0a0a0, 10, 30);// 半球形光源const hemiLight = new THREE.HemisphereLight(0xffffff, 0x444444);hemiLight.position.set(0, 10, 0);scene.add(hemiLight);// 创建一个虚拟的球形网格 Mesh 的辅助对象来模拟 半球形光源 HemisphereLight.const hemiLighthelper = new THREE.HemisphereLightHelper(hemiLight, 5);scene.add(hemiLighthelper);// 地面const mesh = new THREE.Mesh(new THREE.PlaneGeometry(100, 100), new THREE.MeshPhongMaterial({ color: 0x999999, depthWrite: false }));mesh.rotation.x = - Math.PI / 2;mesh.receiveShadow = true;scene.add(mesh);// 平行光const directionalLight = new THREE.DirectionalLight(0xFFFFFF);directionalLight.castShadow = true;directionalLight.shadow.camera.near = 0.5;directionalLight.shadow.camera.far = 50;directionalLight.shadow.camera.left = -10;directionalLight.shadow.camera.right = 10;directionalLight.shadow.camera.top = 10;directionalLight.shadow.camera.bottom = -10;directionalLight.position.set(0, 5, 5);scene.add(directionalLight);// 用于模拟场景中平行光 DirectionalLight 的辅助对象. 其中包含了表示光位置的平面和表示光方向的线段.const directionalLightHelper = new THREE.DirectionalLightHelper(directionalLight, 5);scene.add(directionalLightHelper);renderer.shadowMap.enabled = true;renderer.setSize(window.innerWidth, window.innerHeight);document.body.appendChild(renderer.domElement);// 控制器const controls = new OrbitControls(camera, renderer.domElement);
}
// 渲染
function animate() {requestAnimationFrame(animate);renderer.render(scene, camera);
};
添加模型和播放动画
导入模型,在《Three.js学习四——模型导入》中有相对详细的介绍。
动画实现基本流程:
1、使用加载器导入模型后,在加载成功后调用的函数中设置动画
2、新建一个AnimationMixer(动画混合器)
3、获取AnimationClip(动画)实例列表
4、设置播放动画,并在每一帧中更新mixer
import { GLTFLoader } from "./three.js-master/examples/jsm/loaders/GLTFLoader.js";let model = null;   //用于模型移动
let clock = new THREE.Clock(); // 用于clock.getDelta()
let mixer;
// 加载器加载完成后添加了动画设置
function loadModel() {// 加载模型并开启阴影和接受阴影const gltfLoader = new GLTFLoader();gltfLoader.setPath('./static/3dmod/gltf/').load('Soldier.glb', function (gltf) {gltf.scene.rotation.y = Math.PI;console.log("gltf", gltf)gltf.scene.scale.set(1, 1, 1)gltf.scene.traverse(function (object) {if (object.isMesh) {object.castShadow = true; //阴影object.receiveShadow = true; //接受别人投的阴影}});// 使用动画混合器及配置mixer = startAnimation(gltf.scene,gltf.animations,gltf.animations[1].name // animationName,这里是"Run");scene.add(gltf.scene);model = gltf.scene;}, function (res) {// console.log(res.total, res.loaded)});};/*** 启动特定网格对象的动画。在三维模型的动画数组中按名称查找动画* @param skinnedMesh {THREE.SkinnedMesh} 要设置动画的网格* @param animations {Array} 数组,包含此模型的所有动画* @param animationName {string} 要启动的动画的名称* @return {THREE.AnimationMixer} 要在渲染循环中使用的混合器*/
function startAnimation(skinnedMesh, animations, animationName) {const m_mixer = new THREE.AnimationMixer(skinnedMesh);          const clip = THREE.AnimationClip.findByName(animations, animationName);if (clip) {const action = m_mixer.clipAction(clip);action.play();}return m_mixer;
};function animate() {requestAnimationFrame(animate);// 更新动画帧if(mixer){mixer.update(clock.getDelta());}renderer.render(scene, camera);
};
添加路径和模型移动
路径:用到了Three.js提供的CatmullRomCurve3:使用Catmull-Rom算法, 从一系列的点创建一条平滑的三维样条曲线。
移动:在每一帧中按照一定步长更新模型位置。
let curve = null; // 存放路径对象
let progress = 0; // 物体运动时在运动路径的初始位置,范围0~1
const velocity = 0.002; // 影响运动速率的一个值,范围0~1,需要和渲染频率结合计算才能得到真正的速率function makeCurve() {//Create a closed wavey loopcurve = new THREE.CatmullRomCurve3([new THREE.Vector3(0, 0, 0),new THREE.Vector3(5, 0, 0),new THREE.Vector3(0, 0, 5)]);curve.curveType = "catmullrom";curve.closed = true;//设置是否闭环curve.tension = 0.5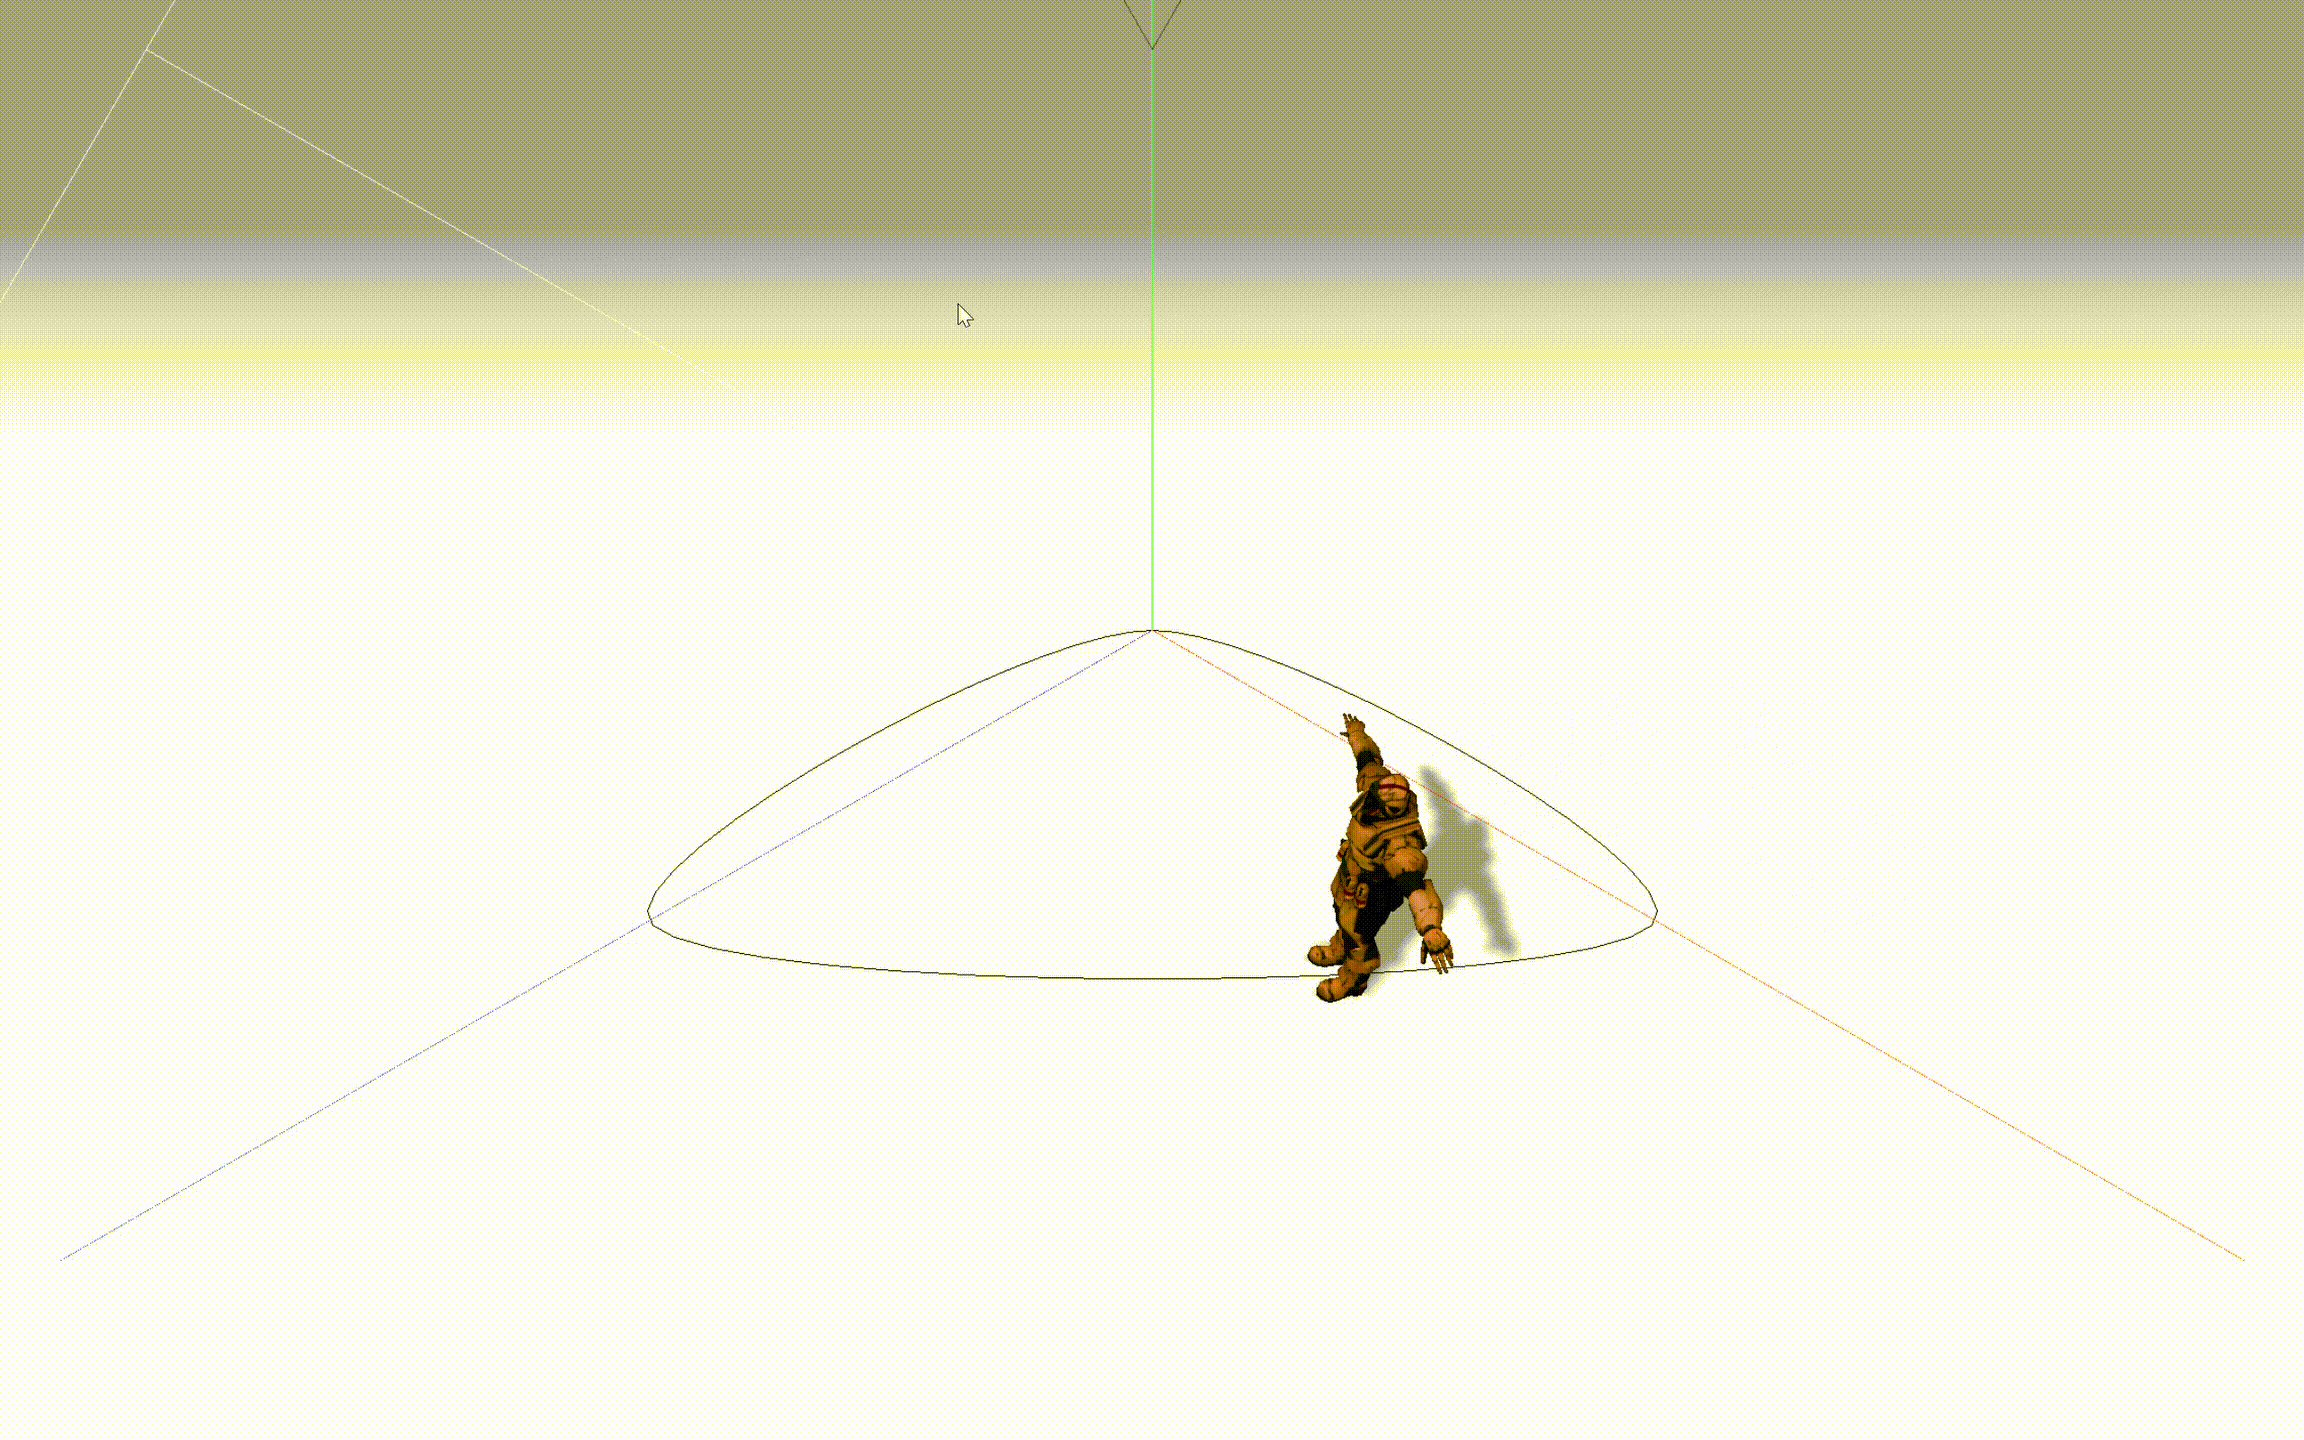
; //设置线的张力,0为无弧度折线// 为曲线添加材质在场景中显示出来,不显示也不会影响运动轨迹,相当于一个Helperconst points = curve.getPoints(50);const geometry = new THREE.BufferGeometry().setFromPoints(points);const material = new THREE.LineBasicMaterial({ color: 0x000000 });// Create the final object to add to the sceneconst curveObject = new THREE.Line(geometry, material);scene.add(curveObject)
}// 物体沿线移动方法
function moveOnCurve() {if (curve == null || model == null) {console.log("Loading")} else {if (progress <= 1 - velocity) {const point = curve.getPointAt(progress); //获取样条曲线指定点坐标const pointBox = curve.getPointAt(progress + velocity); //获取样条曲线指定点坐标if (point && pointBox) {model.position.set(point.x, point.y, point.z);// model.lookAt(pointBox.x, pointBox.y, pointBox.z); //因为这个模型加载进来默认面部是正对Z轴负方向的,所以直接lookAt会导致出现倒着跑的现象,这里用重新设置朝向的方法来解决。var targetPos = pointBox //目标位置点var offsetAngle = 0 //目标移动时的朝向偏移// //以下代码在多段路径时可重复执行var mtx = new THREE.Matrix4() //创建一个4维矩阵// .lookAt ( eye : Vector3, target : Vector3, up : Vector3 ) : this,构造一个旋转矩阵,从eye 指向 target,由向量 up 定向。mtx.lookAt(model.position, targetPos, model.up) //设置朝向mtx.multiply(new THREE.Matrix4().makeRotationFromEuler(new THREE.Euler(0, offsetAngle, 0)))var toRot = new THREE.Quaternion().setFromRotationMatrix(mtx) //计算出需要进行旋转的四元数值model.quaternion.slerp(toRot, 0.2)}progress += velocity;} else {progress = 0;}}};
// moveOnCurve()需要在渲染中一直调用更新,以达到物体移动效果
function animate() {requestAnimationFrame(animate);moveOnCurve();renderer.render(scene, camera);
};完整代码和实现效果
完整代码
<!DOCTYPE html>
<html><head><meta charset="utf-8"><title>My first three.js app</title><style>body {margin: 0;}</style>
</head><body><script type="importmap">{"imports": {"three": "./three.js-master/build/three.module.js"}}</script><script type="module">import * as THREE from "three";import { OrbitControls } from "./three.js-master/examples/jsm/controls/OrbitControls.js";import { GLTFLoader } from "./three.js-master/examples/jsm/loaders/GLTFLoader.js";let scene, camera, renderer;let curve = null, model = null; let clock = new THREE.Clock();let mixer;let progress = 0; // 物体运动时在运动路径的初始位置,范围0~1const velocity = 0.002; // 影响运动速率的一个值,范围0~1,需要和渲染频率结合计算才能得到真正的速率// 渲染器开启阴影渲染:renderer.shadowMapEnabled = true;// 灯光需要开启“引起阴影”:light.castShadow = true;// 物体需要开启“引起阴影”和“接收阴影”:mesh.castShadow = mesh.receiveShadow = true;function init() {scene = new THREE.Scene();camera = new THREE.PerspectiveCamera(75, window.innerWidth / window.innerHeight, 0.1, 1000);renderer = new THREE.WebGLRenderer();// position and point the camera to the center of the scenecamera.position.set(5, 5, 5);camera.lookAt(scene.position);// 增加坐标系红色代表 X 轴. 绿色代表 Y 轴. 蓝色代表 Z 轴.// 添加坐标系到场景中const axes = new THREE.AxesHelper(20);scene.add(axes);// 调整背景颜色,边界雾化scene.background = new THREE.Color(0xa0a0a0);scene.fog = new THREE.Fog(0xa0a0a0, 10, 30);// 半球形光源const hemiLight = new THREE.HemisphereLight(0xffffff, 0x444444);hemiLight.position.set(0, 10, 0);scene.add(hemiLight);// 创建一个虚拟的球形网格 Mesh 的辅助对象来模拟 半球形光源 HemisphereLight.const hemiLighthelper = new THREE.HemisphereLightHelper(hemiLight, 5);scene.add(hemiLighthelper);// 地面const mesh = new THREE.Mesh(new THREE.PlaneGeometry(100, 100), new THREE.MeshPhongMaterial({ color: 0x999999, depthWrite: false }));mesh.rotation.x = - Math.PI / 2;mesh.receiveShadow = true;scene.add(mesh);// 平行光const directionalLight = new THREE.DirectionalLight(0xFFFFFF);directionalLight.castShadow = true;directionalLight.shadow.camera.near = 0.5;directionalLight.shadow.camera.far = 50;directionalLight.shadow.camera.left = -10;directionalLight.shadow.camera.right = 10;directionalLight.shadow.camera.top = 10;directionalLight.shadow.camera.bottom = -10;directionalLight.position.set(0, 5, 5);scene.add(directionalLight);// 用于模拟场景中平行光 DirectionalLight 的辅助对象. 其中包含了表示光位置的平面和表示光方向的线段.const directionalLightHelper = new THREE.DirectionalLightHelper(directionalLight, 5);scene.add(directionalLightHelper);renderer.shadowMap.enabled = true;renderer.setSize(window.innerWidth, window.innerHeight);document.body.appendChild(renderer.domElement);// 控制器const controls = new OrbitControls(camera, renderer.domElement);};function loadModel() {// 加载模型并开启阴影和接受阴影const gltfLoader = new GLTFLoader();gltfLoader.setPath('./static/3dmod/gltf/').load('Soldier.glb', function (gltf) {gltf.scene.rotation.y = Math.PI;console.log("gltf\ngltf", gltf)gltf.scene.scale.set(1, 1, 1)gltf.scene.traverse(function (object) {if (object.isMesh) {object.castShadow = true; //阴影object.receiveShadow = true; //接受别人投的阴影}});// 使用动画混合器及配置mixer = startAnimation(gltf.scene,gltf.animations,gltf.animations[1].name // animationName,这里是"Run");scene.add(gltf.scene);model = gltf.scene;}, function (res) {// console.log(res.total, res.loaded)});};function makeCurve() {// 红色代表 X 轴. 绿色代表 Y 轴. 蓝色代表 Z 轴.// Create a closed wavey loopcurve = new THREE.CatmullRomCurve3([new THREE.Vector3(0, 0, 0),new THREE.Vector3(5, 0, 0),new THREE.Vector3(0, 0, 5)]);curve.curveType = "catmullrom";curve.closed = true;//设置是否闭环curve.tension = 0.5; //设置线的张力,0为无弧度折线// 为曲线添加材质在场景中显示出来,不添加到场景显示也不会影响运动轨迹,相当于一个Helperconst points = curve.getPoints(50);const geometry = new THREE.BufferGeometry().setFromPoints(points);const material = new THREE.LineBasicMaterial({ color: 0x000000 });// Create the final object to add to the sceneconst curveObject = new THREE.Line(geometry, material);scene.add(curveObject)};// 物体沿线移动方法function moveOnCurve() {if (curve == null || model == null) {console.log("Loading")} else {if (progress <= 1 - velocity) {const point = curve.getPointAt(progress); //获取样条曲线指定点坐标const pointBox = curve.getPointAt(progress + velocity); //获取样条曲线指定点坐标if (point && pointBox) {model.position.set(point.x, point.y, point.z);// model.lookAt(pointBox.x, pointBox.y, pointBox.z);//因为这个模型加载进来默认面部是正对Z轴负方向的,所以直接lookAt会导致出现倒着跑的现象,这里用重新设置朝向的方法来解决。var targetPos = pointBox   //目标位置点var offsetAngle = 0 //目标移动时的朝向偏移// //以下代码在多段路径时可重复执行var mtx = new THREE.Matrix4()  //创建一个4维矩阵// .lookAt ( eye : Vector3, target : Vector3, up : Vector3 ) : this,构造一个旋转矩阵,从eye 指向 target,由向量 up 定向。mtx.lookAt(model.position, targetPos, model.up) //设置朝向mtx.multiply(new THREE.Matrix4().makeRotationFromEuler(new THREE.Euler(0, offsetAngle, 0)))var toRot = new THREE.Quaternion().setFromRotationMatrix(mtx)  //计算出需要进行旋转的四元数值model.quaternion.slerp(toRot, 0.2)}progress += velocity;} else {progress = 0;}}};/*** 启动特定网格对象的动画。在三维模型的动画数组中按名称查找动画* @param skinnedMesh {THREE.SkinnedMesh} 要设置动画的网格* @param animations {Array} 数组,包含此模型的所有动画* @param animationName {string} 要启动的动画的名称* @return {THREE.AnimationMixer} 要在渲染循环中使用的混合器*/function startAnimation(skinnedMesh, animations, animationName) {const m_mixer = new THREE.AnimationMixer(skinnedMesh);          const clip = THREE.AnimationClip.findByName(animations, animationName);if (clip) {const action = m_mixer.clipAction(clip);action.play();}return m_mixer;};function animate() {requestAnimationFrame(animate);// 更新动画帧if(mixer){mixer.update(clock.getDelta());}moveOnCurve();renderer.render(scene, camera);};init();loadModel();makeCurve();animate();</script>
</body></html>
实现效果
![]()
Three.js学习七——播放模型动画时模型沿着轨迹移动相关推荐
- cesium火箭发射,模型控制,模型动画,模型移动
起因:最近想做模型的动画,结果上网查资料,看到网上好多对于模型控制的文章都有限制.决定还是自己研究下.欢迎大家一起探讨,评论留言. 效果 火箭 全部代码在最后 起步 模型控制,第一步当然是需要一个合适 ...
- Unity5.X导入FBX文件,播放动画时位置变动的解决方法
当在Unity中导入FBX文件时,有时在播放Legacy动画时会出现模型位置变动的情况.对于这种情况,有两种解决方式: 1)给模型添加一个父物体,设置相对位置为Vector3.Zero. 2)有时会不 ...
- Movie来播放GIF动画
摘自 DroidKe Just Another Android Blog 播放GIF出现的花屏问题 2010/06/10, 16:48 用Movie来播放gif动画时,开始用android的SDK自带 ...
- Three.js学习六——模型动画
目录 Three.js动画系统(Animation system) 实现流程 基本流程 工程文件 场景搭建 添加模型 模型动画 动画实现的基本流程 相关对象方法和代码 完整代码和实现效果 Three. ...
- html5时间线图片自动轮播,js实现自动播放匀速轮播图
本文实例为大家分享了js实现自动播放匀速轮播图的具体代码,供大家参考,具体内容如下 函数封装:( 匀速运动函数) function animate(obj,target,step,speed){ cl ...
- Three.js学习五——让模型沿着轨迹移动
目录 流程 搭建场景环境 添加模型 增加运动轨迹 让模型沿轨迹运动 完整代码和效果 流程 基本流程 1.添加模型 2.增加运动轨迹 3.让模型沿轨迹运动 工程文件结构如下图: static:存放静态资 ...
- VUE3+ThreeJs加载飞机模型且播放模型动画
介绍 Three.js 是一个 3D JavaScript 库,我们经常使用它加载各种不同格式的模型.示例中的直升机模型出处飞机航空器模型-3D模型库-CG模型网-第1页 免费3d模型下载的网站 免费 ...
- 从零开始学习3D可视化之模型动画
获取模型动画 播放模型动画 停止播放模型动画 在搭建3D可视化场景的过程中,我发现很多模型都有内置动画,很多模型在制作阶段就内置了动画,如果模型有内置动画,可以在 ThingJS 中利用 API 调用 ...
- js模仿微信语音播放的动画效果
设计思路: 播放时使用js的setInterval来替换png达到动画效果 当前demo语音播放使用插件BenzAMRRecorder.js 如需要用其它js插件来播放语音也很容易集成到本demo 准 ...
最新文章
- Nordic nRF52832程序下载问题分析
- 多播委托(multicast delegate)
- 大一下学期的自我目标
- 闪回flashback table配合flashback versions query的注意事项
- bus,device,driver三者关系
- (六)基于霍夫变换的直线和圆检测
- 汉诺塔C语言实现(纯代码)
- NoSQL数据库的介绍、NoSQL的产品、NoSQL数据库的分类等;
- 7.Redis过期策略底层是如何实现的?
- pwm控制直流电机转速流程图_直流电机PWM控制原理
- 【现代密码学原理】——消息认证码(学习笔记)
- 怎样批评同事不会错!
- draft伦理——第七章
- 灭霸打个响指的功夫,看懂Verilog多维数组【Verilog高级教程】
- 第六章.决策树(Decision Tree)—CART算法
- win10升级win11后笔记本电脑充不了电解决方法
- Docker常用命令【更新中】
- Crom表达式规则 @Scheduled 定时任务使用
- Ajax的封装及使用
- ValueError: Object arrays cannot be loaded...