corosync+pacemaker+crmsh的高可用web集群的实现
网络规划:
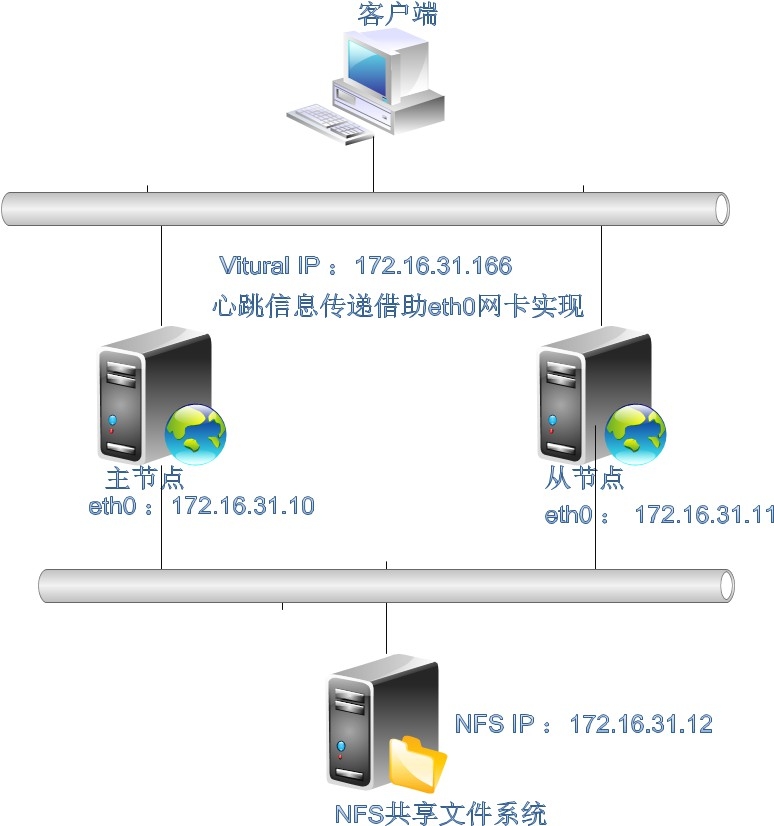
node1:eth0:172.16.31.10/16
node2: eth0: 172.16.31.11/16
nfs: eth0: 172.16.31.12/15
注:
nfs在提供NFS服务的同时是一台NTP服务器,可以让node1和node2同步时间的。
node1和node2之间心跳信息传递依靠eth0传递
web服务器的VIP是172.16.31.166/16
架构图:跟前文的架构一样,只是节点上安装的高可用软件不一致:
一.高可用集群构建的前提条件
1.主机名互相解析,实现主机名通信
[root@node1 ~]# vim /etc/hosts
127.0.0.1 localhost localhost.localdomain localhost4 localhost4.localdomain4
::1 localhost localhost.localdomain localhost6 localhost6.localdomain6
172.16.31.10 node1.stu31.com node1
172.16.31.11 node2.stu31.com node2
复制一份到node2:
[root@node1 ~]# scp /etc/hosts root@172.16.31.11:/etc/hosts
2.节点直接实现ssh无密钥通信
节点1:
[root@node1 ~]# ssh-keygen -t rsa -P ""
[root@node1 ~]# ssh-copy-id -i .ssh/id_rsa.pub root@node2
节点2:
[root@node2 ~]# ssh-keygen -t rsa -P ""
[root@node2 ~]# ssh-copy-id -i .ssh/id_rsa.pub root@node1
测试:
[root@node2 ~]# date ; ssh node1 'date'
Fri Jan 2 05:46:54 CST 2015
Fri Jan 2 05:46:54 CST 2015
时间同步成功!注意时间必须一致!
ntp服务器构建参考:http://sohudrgon.blog.51cto.com/3088108/1598314
二.集群软件安装及配置
1.安装corosync和pacemaker软件包:节点1和节点2都安装
# yum install corosync pacemaker -y
2.创建配置文件并配置
[root@node1 ~]# cd /etc/corosync/
[root@node1 corosync]# cp corosync.conf.example corosync.conf
[root@node1 corosync]# cat corosync.conf
# Please read the corosync.conf.5 manual page
compatibility: whitetank
totem {
version: 2
# secauth: Enable mutual node authentication. If you choose to
# enable this ("on"), then do remember to create a shared
# secret with "corosync-keygen".
#开启认证
secauth: on
threads: 0
# interface: define at least one interface to communicate
# over. If you define more than one interface stanza, you must
# also set rrp_mode.
interface {
# Rings must be consecutively numbered, starting at 0.
ringnumber: 0
# This is normally the *network* address of the
# interface to bind to. This ensures that you can use
# identical instances of this configuration file
# across all your cluster nodes, without having to
# modify this option.
#定义网络地址
bindnetaddr: 172.16.31.0
# However, if you have multiple physical network
# interfaces configured for the same subnet, then the
# network address alone is not sufficient to identify
# the interface Corosync should bind to. In that case,
# configure the *host* address of the interface
# instead:
# bindnetaddr: 192.168.1.1
# When selecting a multicast address, consider RFC
# 2365 (which, among other things, specifies that
# 239.255.x.x addresses are left to the discretion of
# the network administrator). Do not reuse multicast
# addresses across multiple Corosync clusters sharing
# the same network.
#定义组播地址
mcastaddr: 239.31.131.12
# Corosync uses the port you specify here for UDP
# messaging, and also the immediately preceding
# port. Thus if you set this to 5405, Corosync sends
# messages over UDP ports 5405 and 5404.
#信息传递端口
mcastport: 5405
# Time-to-live for cluster communication packets. The
# number of hops (routers) that this ring will allow
# itself to pass. Note that multicast routing must be
# specifically enabled on most network routers.
ttl: 1
}
}
logging {
# Log the source file and line where messages are being
# generated. When in doubt, leave off. Potentially useful for
# debugging.
fileline: off
# Log to standard error. When in doubt, set to no. Useful when
# running in the foreground (when invoking "corosync -f")
to_stderr: no
# Log to a log file. When set to "no", the "logfile" option
# must not be set.
#定义日志记录存放
to_logfile: yes
logfile: /var/log/cluster/corosync.log
# Log to the system log daemon. When in doubt, set to yes.
#to_syslog: yes
# Log debug messages (very verbose). When in doubt, leave off.
debug: off
# Log messages with time stamps. When in doubt, set to on
# (unless you are only logging to syslog, where double
# timestamps can be annoying).
timestamp: on
logger_subsys {
subsys: AMF
debug: off
}
}
#以插件方式启动pacemaker:
service {
ver: 0
name: pacemaker
}
3.生成认证密钥文件:认证密钥文件需要1024字节,我们可以下载程序包来实现写满内存的熵池实现,
[root@node1 corosync]# corosync-keygen
Corosync Cluster Engine Authentication key generator.
Gathering 1024 bits for key from /dev/random.
Press keys on your keyboard to generate entropy.
Press keys on your keyboard to generate entropy (bits = 152).
Press keys on your keyboard to generate entropy (bits = 216).
Press keys on your keyboard to generate entropy (bits = 280).
Press keys on your keyboard to generate entropy (bits = 344).
Press keys on your keyboard to generate entropy (bits = 408).
Press keys on your keyboard to generate entropy (bits = 472).
Press keys on your keyboard to generate entropy (bits = 536).
Press keys on your keyboard to generate entropy (bits = 600).
Press keys on your keyboard to generate entropy (bits = 664).
Press keys on your keyboard to generate entropy (bits = 728).
Press keys on your keyboard to generate entropy (bits = 792).
Press keys on your keyboard to generate entropy (bits = 856).
Press keys on your keyboard to generate entropy (bits = 920).
Press keys on your keyboard to generate entropy (bits = 984).
Writing corosync key to /etc/corosync/authkey.
完成后将配置文件及认证密钥复制一份到节点2:
[root@node1 corosync]# scp -p authkey corosync.conf node2:/etc/corosync/
authkey 100% 128 0.1KB/s 00:00
corosync.conf 100% 2703 2.6KB/s 00:00
4.启动corosync服务:
[root@node1 corosync]# cd
[root@node1 ~]# service corosync start
Starting Corosync Cluster Engine (corosync): [ OK ]
[root@node2 ~]# service corosync start
Starting Corosync Cluster Engine (corosync): [ OK ]
5.查看日志:
查看corosync引擎是否正常启动:
节点1的启动日志:
[root@node1 ~]# grep -e "Corosync Cluster Engine" -e "configuration file" /var/log/cluster/corosync.log
Jan 02 08:28:13 corosync [MAIN ] Corosync Cluster Engine ('1.4.7'): started and ready to provide service.
Jan 02 08:28:13 corosync [MAIN ] Successfully read main configuration file '/etc/corosync/corosync.conf'.
Jan 02 08:32:48 corosync [MAIN ] Corosync Cluster Engine exiting with status 0 at main.c:2055.
Jan 02 08:38:42 corosync [MAIN ] Corosync Cluster Engine ('1.4.7'): started and ready to provide service.
Jan 02 08:38:42 corosync [MAIN ] Successfully read main configuration file '/etc/corosync/corosync.conf'.
节点2的启动日志:
[root@node2 ~]# grep -e "Corosync Cluster Engine" -e "configuration file" /var/log/cluster/corosync.log
Jan 02 08:38:56 corosync [MAIN ] Corosync Cluster Engine ('1.4.7'): started and ready to provide service.
Jan 02 08:38:56 corosync [MAIN ] Successfully read main configuration file '/etc/corosync/corosync.conf'.
查看关键字TOTEM,初始化成员节点通知是否发出:
[root@node1 ~]# grep "TOTEM" /var/log/cluster/corosync.log
Jan 02 08:28:13 corosync [TOTEM ] Initializing transport (UDP/IP Multicast).
Jan 02 08:28:13 corosync [TOTEM ] Initializing transmit/receive security: libtomcrypt SOBER128/SHA1HMAC (mode 0).
Jan 02 08:28:14 corosync [TOTEM ] The network interface [172.16.31.11] is now up.
Jan 02 08:28:14 corosync [TOTEM ] A processor joined or left the membership and a new membership was formed.
Jan 02 08:38:42 corosync [TOTEM ] Initializing transport (UDP/IP Multicast).
Jan 02 08:38:42 corosync [TOTEM ] Initializing transmit/receive security: libtomcrypt SOBER128/SHA1HMAC (mode 0).
Jan 02 08:38:42 corosync [TOTEM ] The network interface [172.16.31.10] is now up.
Jan 02 08:38:42 corosync [TOTEM ] A processor joined or left the membership and a new membership was formed.
Jan 02 08:38:51 corosync [TOTEM ] A processor joined or left the membership and a new membership was formed.
使用crm_mon命令查看节点在线数量:
[root@node1 ~]# crm_mon
Last updated: Fri Jan 2 08:42:23 2015
Last change: Fri Jan 2 08:38:52 2015
Stack: classic openais (with plugin)
Current DC: node1.stu31.com - partition with quorum
Version: 1.1.11-97629de
2 Nodes configured, 2 expected votes
0 Resources configured
Online: [ node1.stu31.com node2.stu31.com ]
查看监听端口5405是否开启:
[root@node1 ~]# ss -tunl |grep 5405
udp UNCONN 0 0 172.16.31.10:5405 *:*
udp UNCONN 0 0 239.31.131.12:5405 *:*
查看错误日志:
[root@node1 ~]# grep ERROR /var/log/cluster/corosync.log
#警告信息:将pacemaker以插件运行的告警,忽略即可
Jan 02 08:28:14 corosync [pcmk ] ERROR: process_ais_conf: You have configured a cluster using the Pacemaker plugin for Corosync. The plugin is not supported in this environment and will be removed very soon.
Jan 02 08:28:14 corosync [pcmk ] ERROR: process_ais_conf: Please see Chapter 8 of 'Clusters from Scratch' (http://www.clusterlabs.org/doc) for details on using Pacemaker with CMAN
Jan 02 08:28:37 [29004] node1.stu31.com pengine: notice: process_pe_message: Configuration ERRORs found during PE processing. Please run "crm_verify -L" to identify issues.
Jan 02 08:28:37 [29004] node1.stu31.com pengine: notice: process_pe_message: Configuration ERRORs found during PE processing. Please run "crm_verify -L" to identify issues.
Jan 02 08:32:47 [29004] node1.stu31.com pengine: notice: process_pe_message: Configuration ERRORs found during PE processing. Please run "crm_verify -L" to identify issues.
Jan 02 08:38:42 corosync [pcmk ] ERROR: process_ais_conf: You have configured a cluster using the Pacemaker plugin for Corosync. The plugin is not supported in this environment and will be removed very soon.
Jan 02 08:38:42 corosync [pcmk ] ERROR: process_ais_conf: Please see Chapter 8 of 'Clusters from Scratch' (http://www.clusterlabs.org/doc) for details on using Pacemaker with CMAN
Jan 02 08:39:05 [29300] node1.stu31.com pengine: notice: process_pe_message: Configuration ERRORs found during PE processing. Please run "crm_verify -L" to identify issues.
Jan 02 08:39:05 [29300] node1.stu31.com pengine: notice: process_pe_message: Configuration ERRORs found during PE processing. Please run "crm_verify -L" to identify issues.
[root@node1 ~]# crm_verify -L -V
#无stonith设备,可以忽略
error: unpack_resources: Resource start-up disabled since no STONITH resources have been defined
error: unpack_resources: Either configure some or disable STONITH with the stonith-enabled option
error: unpack_resources: NOTE: Clusters with shared data need STONITH to ensure data integrity
Errors found during check: config not valid
三.集群配置工具安装:crmsh软件安装
1.配置yum源:我这里存在一个完整的yum源服务器
[root@node1 yum.repos.d]# vim centos6.6.repo
[base]
name=CentOS $releasever $basearch on local server 172.16.0.1
baseurl=http://172.16.0.1/cobbler/ks_mirror/CentOS-6.6-$basearch/
gpgcheck=0
[extra]
name=CentOS $releasever $basearch extras
baseurl=http://172.16.0.1/centos/$releasever/extras/$basearch/
gpgcheck=0
[epel]
name=Fedora EPEL for CentOS$releasever $basearch on local server 172.16.0.1
baseurl=http://172.16.0.1/fedora-epel/$releasever/$basearch/
gpgcheck=0
[corosync2]
name=corosync2
baseurl=ftp://172.16.0.1/pub/Sources/6.x86_64/corosync/
gpgcheck=0
复制一份到节点2:
[root@node1 yum.repos.d]# scp centos6.6.repo node2:/etc/yum.repos.d/
centos6.6.repo 100% 522 0.5KB/s 00:00
2.安装crmsh软件,2各节点都安装
[root@node1 ~]# yum install -y crmsh
[root@node2 ~]# yum install -y crmsh
3.去除上面的stonith设备警告错误:
[root@node1 ~]# crm
crm(live)# configure
crm(live)configure# property stonith-enabled=false
crm(live)configure# verify
#单节点需要仲裁,或者忽略(会造成集群分裂)
crm(live)configure# property no-quorum-policy=ignore
crm(live)configure# verify
crm(live)configure# commit
crm(live)configure# show
node node1.stu31.com
node node2.stu31.com
property cib-bootstrap-options: \
dc-version=1.1.11-97629de \
cluster-infrastructure="classic openais (with plugin)" \
expected-quorum-votes=2 \
stonith-enabled=false \
no-quorum-policy=ignore
无错误信息输出了:
[root@node1 ~]# crm_verify -L -V
[root@node1 ~]#
四.实现使用corosync+pacemaker+crmsh来构建一个高可用性的web集群:
1.httpd服务的完整性测试
测试页构建:
[root@node1 ~]# echo "node1.stu31.com" > /var/www/html/index.html
[root@node2 ~]# echo "node2.stu31.com" > /var/www/html/index.html
启动httpd服务,完成测试:
node1节点:
[root@node1 ~]# service httpd start
Starting httpd: [ OK ]
[root@node1 ~]# curl http://172.16.31.10
node1.stu31.com
node2节点:
[root@node2 ~]# service httpd start
Starting httpd: [ OK ]
[root@node2 ~]# curl http://172.16.31.11
node2.stu31.com
关闭httpd服务,关闭httpd服务自启动:
node1设置:
[root@node1 ~]# service httpd stop
Stopping httpd: [ OK ]
[root@node1 ~]# chkconfig httpd off
node2设置:
[root@node2 ~]# service httpd stop
Stopping httpd: [ OK ]
[root@node2 ~]# chkconfig httpd off
2.定义集群VIP地址
[root@node1 ~]# crm
crm(live)# configure
crm(live)configure# primitive webip ocf:heartbeat:IPaddr params ip='172.16.31.166' nic='eth0' cidr_netmask='16' broadcast='172.16.31.255'
crm(live)configure# verify
crm(live)configure# commit
可以查看node1上的ip地址:
[root@node1 ~]# ip addr show
1: lo: <LOOPBACK,UP,LOWER_UP> mtu 65536 qdisc noqueue state UNKNOWN
link/loopback 00:00:00:00:00:00 brd 00:00:00:00:00:00
inet 127.0.0.1/8 scope host lo
inet6 ::1/128 scope host
valid_lft forever preferred_lft forever
2: eth0: <BROADCAST,MULTICAST,UP,LOWER_UP> mtu 1500 qdisc pfifo_fast state UP qlen 1000
link/ether 08:00:27:16:bc:4a brd ff:ff:ff:ff:ff:ff
inet 172.16.31.10/16 brd 172.16.255.255 scope global eth0
inet 172.16.31.166/16 brd 172.16.31.255 scope global secondary eth0
inet6 fe80::a00:27ff:fe16:bc4a/64 scope link
valid_lft forever preferred_lft forever
切换节点node1为备用节点:
crm(live)configure# cd
crm(live)# node
#将节点1设置为备用节点
crm(live)node# standby
#将备用节点启动
crm(live)node# online
crm(live)node# cd
#查看各节点状态信息
crm(live)# status
Last updated: Fri Jan 2 11:11:47 2015
Last change: Fri Jan 2 11:11:38 2015
Stack: classic openais (with plugin)
Current DC: node1.stu31.com - partition with quorum
Version: 1.1.11-97629de
2 Nodes configured, 2 expected votes
1 Resources configured
#可以看出主备节点都启动了,但是资源是启动在node2上的
Online: [ node1.stu31.com node2.stu31.com ]
webip (ocf::heartbeat:IPaddr): Started node2.stu31.com
我们需要定义资源监控,需要编辑原来定义的webip资源:
[root@node1 ~]# crm
crm(live)# resource
#查看资源webip的状态信息
crm(live)resource# status webip
resource webip is running on: node2.stu31.com
#停止webip资源
crm(live)resource# stop webip
crm(live)resource# cd
crm(live)# configure
#删除资源webip
crm(live)configure# delete webip
#重新定义webip资源,定义资源监控
crm(live)configure# primitive webip IPaddr params ip=172.16.31.166 op monitor interval=10s timeout=20s
#配置校验
crm(live)configure# verify
#提交资源
crm(live)configure# commit
3.定义httpd服务资源及定义资源的约束配置:
#定义httpd服务资源
crm(live)configure# primitive webserver lsb:httpd op monitor interval=30s timeout=15s
crm(live)configure# verify
#定义协同约束,httpd服务资源跟随VIP在节点启动
crm(live)configure# colocation webserver_with_webip inf: webserver webip
crm(live)configure# verify
#定义顺序约束,先启动webip资源,再启动webserver资源
crm(live)configure# order webip_before_webserver mandatory: webip webserver
crm(live)configure# verify
#定义位置约束,资源对节点的倾向性,更倾向于node1节点。
crm(live)configure# location webip_prefer_node1 webip rule 100: uname eq node1.stu31.com
crm(live)configure# verify
#完成设置后就提交
crm(live)configure# commit
crm(live)configure# cd
#查看集群资源启动状态信息
crm(live)# status
Last updated: Fri Jan 2 11:27:16 2015
Last change: Fri Jan 2 11:27:07 2015
Stack: classic openais (with plugin)
Current DC: node1.stu31.com - partition with quorum
Version: 1.1.11-97629de
2 Nodes configured, 2 expected votes
2 Resources configured
Online: [ node1.stu31.com node2.stu31.com ]
webip (ocf::heartbeat:IPaddr): Started node1.stu31.com
webserver (lsb:httpd): Started node1.stu31.com
资源已经启动了,并且启动在node1节点上,我们来测试是否成功!
查看node1节点的VIP信息:
[root@node1 ~]# ip addr show
1: lo: <LOOPBACK,UP,LOWER_UP> mtu 65536 qdisc noqueue state UNKNOWN
link/loopback 00:00:00:00:00:00 brd 00:00:00:00:00:00
inet 127.0.0.1/8 scope host lo
inet6 ::1/128 scope host
valid_lft forever preferred_lft forever
2: eth0: <BROADCAST,MULTICAST,UP,LOWER_UP> mtu 1500 qdisc pfifo_fast state UP qlen 1000
link/ether 08:00:27:16:bc:4a brd ff:ff:ff:ff:ff:ff
inet 172.16.31.10/16 brd 172.16.255.255 scope global eth0
inet 172.16.31.166/16 brd 172.16.255.255 scope global secondary eth0
inet6 fe80::a00:27ff:fe16:bc4a/64 scope link
valid_lft forever preferred_lft forever
查看web服务器的监听端口是否启动:
[root@node1 ~]# ss -tunl |grep 80
tcp LISTEN 0 128 :::80 :::*
到其他主机访问测试:
[root@nfs ~]# curl http://172.16.31.166
node1.stu31.com
我们将node1切换成备用节点:
crm(live)# node standby
crm(live)# status
Last updated: Fri Jan 2 11:30:13 2015
Last change: Fri Jan 2 11:30:11 2015
Stack: classic openais (with plugin)
Current DC: node1.stu31.com - partition with quorum
Version: 1.1.11-97629de
2 Nodes configured, 2 expected votes
2 Resources configured
Node node1.stu31.com: standby
Online: [ node2.stu31.com ]
webip (ocf::heartbeat:IPaddr): Started node2.stu31.com
webserver (lsb:httpd): Started node2.stu31.com
crm(live)#
访问测试:
[root@nfs ~]# curl http://172.16.31.166
node2.stu31.com
测试成功!
4.下面我们来测试定义资源对当前节点的粘性:
[root@node1 ~]# crm
crm(live)# configure
crm(live)configure# property default-resource-stickiness=100
crm(live)configure# verify
crm(live)configure# commit
crm(live)configure# cd
crm(live)# node online
crm(live)# status
Last updated: Fri Jan 2 11:33:07 2015
Last change: Fri Jan 2 11:33:05 2015
Stack: classic openais (with plugin)
Current DC: node1.stu31.com - partition with quorum
Version: 1.1.11-97629de
2 Nodes configured, 2 expected votes
2 Resources configured
Online: [ node1.stu31.com node2.stu31.com ]
webip (ocf::heartbeat:IPaddr): Started node2.stu31.com
webserver (lsb:httpd): Started node2.stu31.com
#上面我们定义位置约束时定义了资源的倾向性是node1,预想情况是我们这边node1上线后会自动抢占node2成为主节点,但是我们定义了资源对节点的粘性,所以我们的node1上线后未抢占node2,说明资源对节点的粘性是比资源对节点的倾向性更强的约束。
五.定义文件系统资源:
1.前提是存在一个共享的文件系统
配置NFS服务器
[root@nfs ~]# mkdir /www/htdocs -pv
[root@nfs ~]# vim /etc/exports
/www/htdocs 172.16.31.0/16(rw,no_root_squash)
[root@nfs ~]# service nfs start
[root@nfs ~]# showmount -e 172.16.31.12
Export list for 172.16.31.12:
/www/htdocs 172.16.31.0/16
创建一个测试网页:
[root@nfs ~]# echo "page from nfs filesystem" > /www/htdocs/index.html
2.客户端挂载nfs文件系统:
[root@node1 ~]# mount -t nfs 172.16.31.12:/www/htdocs /var/www/html/
[root@node1 ~]# ls /var/www/html/
index.html
访问测试:
[root@nfs ~]# curl http://172.16.31.166
page from nfs filesystem
成功后卸载文件系统:
[root@node1 ~]# umount /var/www/html/
3.我们开始定义filesystem资源:
[root@node1 ~]# crm
crm(live)# configure
#定义文件系统存储资源
crm(live)configure# primitive webstore ocf:heartbeat:Filesystem params device="172.16.31.12:/www/htdocs" directory="/var/www/html" fstype="nfs" op monitor interva=20s timeout=40s
crm(live)configure# verify
#校验警告信息,提示我们的start和stop超时时间为设置
WARNING: webstore: default timeout 20s for start is smaller than the advised 60
WARNING: webstore: default timeout 20s for stop is smaller than the advised 60
#删除资源,重新设置
crm(live)configure# delete webstore
#加入start和stop的超时时长
crm(live)configure# primitive webstore ocf:heartbeat:Filesystem params device="172.16.31.12:/www/htdocs" directory="/var/www/html" fstype="nfs" op monitor interva=20s timeout=40s op start timeout=60s op stop timeout=60s
crm(live)configure# verify
#定义资源组,来定义web这个服务需要的所有资源进一个组内,便于管理
crm(live)configure# group webservice webip webstore webserver
INFO: resource references in location:webip_prefer_node1 updated
INFO: resource references in colocation:webserver_with_webip updated
INFO: resource references in order:webip_before_webserver updated
INFO: resource references in colocation:webserver_with_webip updated
INFO: resource references in order:webip_before_webserver updated
#定义完成后就提交,然后查看资源状态信息
crm(live)configure# commit
crm(live)configure# cd
crm(live)# status
Last updated: Fri Jan 2 11:52:51 2015
Last change: Fri Jan 2 11:52:44 2015
Stack: classic openais (with plugin)
Current DC: node1.stu31.com - partition with quorum
Version: 1.1.11-97629de
2 Nodes configured, 2 expected votes
3 Resources configured
Node node2.stu31.com: standby
Online: [ node1.stu31.com ]
Resource Group: webservice
webip (ocf::heartbeat:IPaddr): Started node1.stu31.com
webstore (ocf::heartbeat:Filesystem): Started node1.stu31.com
webserver (lsb:httpd): Started node1.stu31.com
#最后定义一下资源的启动顺序,先启动存储,在启动httpd服务:
crm(live)configure# order webstore_before_webserver mandatory: webstore webserver
crm(live)configure# verify
crm(live)configure# commit
crm(live)configure# cd
crm(live)# status
Last updated: Fri Jan 2 11:55:00 2015
Last change: Fri Jan 2 11:54:10 2015
Stack: classic openais (with plugin)
Current DC: node1.stu31.com - partition with quorum
Version: 1.1.11-97629de
2 Nodes configured, 2 expected votes
3 Resources configured
Node node2.stu31.com: standby
Online: [ node1.stu31.com ]
Resource Group: webservice
webip (ocf::heartbeat:IPaddr): Started node1.stu31.com
webstore (ocf::heartbeat:Filesystem): Started node1.stu31.com
webserver (lsb:httpd): Started node1.stu31.com
crm(live)# quit
bye
访问测试:
[root@nfs ~]# curl http://172.16.31.166
page from nfs filesystem
访问测试成功!
自此,一个由corosync+pacemaker+crmsh构建的web高可用性集群就构建成功!
corosync+pacemaker+crmsh的高可用web集群的实现相关推荐
- 项目 - 基于Docker Swarm的高可用Web集群
目录 项目名称:基于Docker Swarm的高可用Web集群 项目环境:Docker 20.10.3,CentOS 8.2 (8台 1核1G),Ansible 2.9.17,Keepalived,N ...
- 03_项目-基于Docker Swarm的高可用Web集群
文章目录 项目名称:基于Docker Swarm的高可用Web集群 网络拓扑图 数据流程图 项目环境:Docker 20.10.3,CentOS 8.2(8台 1核1G),Ansible 2.9.17 ...
- 项目名称:基于Docker Swarm的高可用Web集群
文章目录 项目名称:基于Docker Swarm的高可用Web集群 网络拓扑图 数据流程图 项目环境:Docker 20.10.3,CentOS 8.2(8台 1核1G),Ansible 2.9.17 ...
- 基于nginx的高可用web集群
文章目录 一.写在前面 编译下载 nginx.conf文件解析 安装好后的操作 日志问题,不同级别的错误 二.环境搭建学习 web服务器配置 错误页面跳转 IO多路复用 在nginx里部署https服 ...
- corosync+pacemaker+crmsh配置高可用集群。
实验环境: admin1.tuchao.com 192.168.18.100 ansible管理节点 admin2.tuchao.com 192.168.18.101 集群节点一 admin3.t ...
- heartbeat v2版CRM的高可用web集群的实现
接上一篇文章:heartbeat v1版CRM的高可用集群的实现 架构图: 网络地址规划: 一.关闭heartbeat服务 node1和node2都需要关闭: # service heartbeat ...
- heartbeat v1版CRM的高可用web集群的实现
实验环境规划: 实验环境: CentOS release 6.6(Final) 三台 IP地址: Node1: eth0:172.16.31.10/16 Node2: eth0:172.16.31 ...
- 搭建基于Heartbeat v2+NFS的高可用Web集群
1.实验环境 HA1:192.168.1.17(RHEL5.8_32bit,web server) HA2:192.168.1.18(RHEL5.8_32bit,web server) NFS:192 ...
- 基于corosync+pacemaker实现主从高可用集群
本实验由两个节点组成高可用主从集群,在实际中不常用,目的是通过实验来加深对corosync的认识和理解. 环境设置: node1:node1.magedu.com ip 172.16.14.10 no ...
最新文章
- 从消费端到企业端,从设备到数据:物联网市场的爆发式增长
- EasyPHP-Devserver-17的坑位
- pix2pixhd_一文读懂GAN, pix2pix, CycleGAN和pix2pixHD
- [Android 插件化(一)] DynamicLoadApk的用法
- java随机产生密码_用Java生成随机密码的方法
- 框架下载_25. Scrapy 框架-下载中间件Middleware
- 浮动和清除(闭合)浮动
- AcWing 4240. 青蛙(最短路 or 最小生成树)
- php_curl模拟登录有验证码实例
- paip.版本控制CVS-SVN-TFS总结
- abort()和exit()的区别
- EPLAN软件卡顿的解决办法
- Matlab系统辨识工具箱
- 计算机文本自定义,自定义文本编辑器
- 下载英文电子书网站,推荐
- JavaScript获取当前时区 时间转换 (实用)
- 如何免费下载DJKK的音乐
- 主轴承盖螺栓拧紧机PLC控制程序
- Mininet系列实验(二):Mininet可视化应用
- 存储引擎,表的数据类型