转:Subversion TortoiseSVN: Installed and started on Windows 2003 server and local machines
Subversion 使用介绍
SVN程序下载地址:
http://subversion.tigris.org/
说明:
1.安装VisualSVN-Server-1.7.1.msi;
2.安装插件VisualSVN-1.7.1.msi;
3.安装客户端TortoiseSVN-1.6.1.16129-win32-svn-1.6.1.msi;
(http://tortoisesvn.net/downloads.html)
4.运行VisualSvn注册机;
5.点击patch,选择VisalSVN\bin\文件夹下的VisualSVN.VS.Interface.dll ,破解;
6.点击generate生成注册码;
7.重新打开visual studio 200*,VisualSVN->registration-->输入刚才生成的注册码;
关于SVN相关知识论坛
http://bbs.iusesvn.com/forum-10-1.html
Introduction
In this article I will walk through the process of installing Subversion and getting started using this very useful version control tool. I chose Subversion based on its ease of use and understanding, the documentation provided is very easy to understand and navigate through, also you can't beat the cost - FREE.
I've laid out this article in a step by step method using the practices that I feel give the best results for my situation, there are always ways to customize this process and I will mention some of these as the steps progress.
Notes:
To clarify some terminology -
When I mention 'Explorer' or 'explorer' I'm referring to the Windows file manager.Subversion will be referred to as SVNTortoiseSVN will be referred to as TSVN
Some of the pictures in this article have been resized.
I've written this article with the beginner in mind, some of the steps and images may seem redundant and unnecessary but I included them so that there would be as little confusion as possible.
The names and aliases used in this article can and probably should be changed to meet your needs.
*There is a One-Step process that installs SVN, TSVN, sets up the service, downloads the documentation, and creates the first repository - http://svn1clicksetup.tigris.org/ I didn't take this route because I wanted a little more control and understanding of what I was putting on my machines.
Quick Reference Links
- I. Documentation Download
- II. Subversion Download
- III. Subversion Executable
- IV. Setting up the SVN log
- V. Setting up SVN as a service
- VI. Uninstall the SVN service
- VII. Create a repository on the server with SVN command line
- VIII. Install TSVN on the server and create a repository
- IX. Install TSVN on client machines
- X. Loading source code into a repository using TSVN
- XI. Creating a local working directory from a repository
- XII. Committing changes back to the repository
Now to Business
I. The first thing I recommend is getting yourself a copy of the most recent Subversion Manual. This will be good for future reference when you want to get more involved with the finer points. http:\\svnbook.red-bean.com\, I recommend the .pdf version as this will allow you to save a copy to your desktop, you can also download a one page HTML of the same documentation.
II. Once you have a copy of the manual on your local desktop it's time to get started with the install. RDC (Remote Desktop Connect) to the server, or log into the server directly and navigate out to the SVN download page http:\\subversion.tigris.org\servlets\ProjectDocumentList?folderID=91
a. From this site select the most recent version of the SVN .exe installer for Windows (svn-1.4.2-setup.exe at the time of this article)

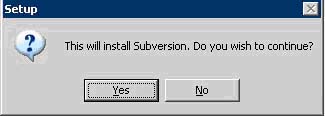
III. Run the .exe on the server

a. Follow the prompts to install SVN on the server
b. Accept the license agreement
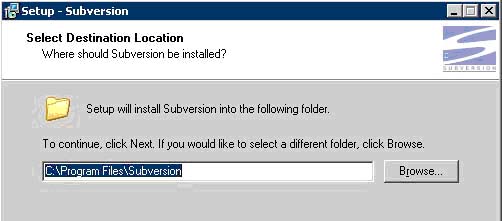
c. Select the destination of SVN on the server:
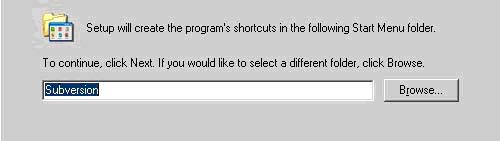
d. Accept the Start menu shortcut 'Subversion'
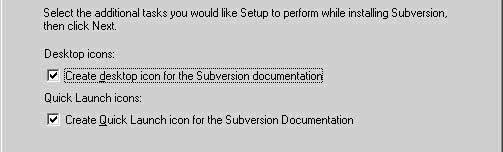
e. Allow the documentation links to be posted to the server
*Note – At the time of this article the documentation that is posted is from SVN version 1.3, but most of the data presented is current with the exceptions of the latest additions. The documentation is still good for use as a reference.
f. Click 'Install' -> 'Next' -> Finish, and you've just installed SVN to the server. Easy, huh?
IV. The next step in the installation process will set up the log editor for SVN
a. Click Start -> select the Control Panel -> System
b. Select the 'Advanced' tab -> Environment Variables

c. Click 'New' under System Variables

d. Set the variable name to SVN_EDITOR
e. Set the Variable Value to C:\Windows\notepad.exe
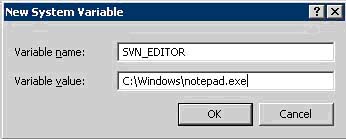
i. This is the default text editor for logs in SVN
f. Click 'OK' out of the menus
V. Setting up SVN as a service on the server
a. First download the .zip file that contains the needed files – http:\\www.stanford.edu\~bsuter\subversion-setup-guide\SVNService.zip

b. Open the zip file and select the file SVNService.exe

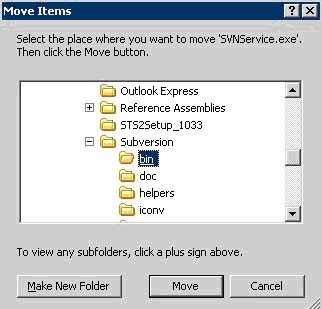
i.Click Edit -> Move to Folder -> Browse to C:\Program Files\Subversion\bin
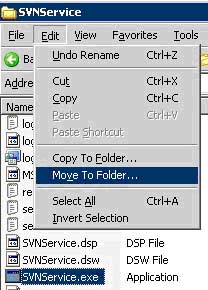
**It's absolutely critical that this file be place here as it needs svnserve.exe to run properly. The other files are not needed for the service to run but you can extract them to the bin file as well for a reference.
c. Open a Command Window
d. Enter 'svnservice –install –daemon - - root "d:\AppRepositories

i. This sets the service to run in the background (daemon) and sets the root directory to the file that holds the repositories (d:\AppRepositories).
e. SVN is now set up as a service

f. Now that SVN is set up as a service on the server you can access it programmatically from the command line and later the TSVN interface using the following format - svn://(ServerName)/(RepositoryName)/ProjectSource/trunk
**Notice that the actual drive (D:/) as well as the folder holding the repositories (AppRepositories) are missing from the command, this is now using the 'root' that was specified in the service creation command.
g. Now to further configure the service go to Start -> Control Panel -> Administrative Tools -> Services

h. Navigate down to SVNService and double click the service. Change 'Startup type:' from manual to Automatic


i. Now SVN will start every time the server boots up.
j. Back in the services screen, click 'Start' in the upper left of the right pane OR click the 'play' icon in the menu tool bar to start the service

k. Close the window and you've implemented SVN as a service.
VI. Uninstall the SVN service
a. Open a Command Window
b. Enter 'svnservice –remove'

c. This command will both stop and remove the service from the directory
VII. Creating a repository using the SVN command line
a. First thing, open a command prompt window
b. Next create a folder on the D: drive to house all the repositories
i. 'mkdir d:\AppRepositories'

c. Within this folder place all project repositories.
**It is possible to place several projects within the same repository but I would not recommend this as there is a chance to get some of the code mixed or replaced inadvertently. It might be beneficial to do this if the repositories that will be grouped are similar in style or use the same resources.
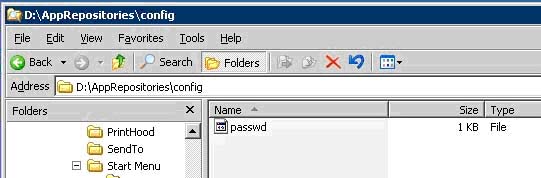
d. Also create a folder within the AppRepositories directory named 'config'. This folder will hold the shared passwd file for all subsequent repositories. **This step is not necessary but it makes manageability much easier.
i. 'mkdir d:\AppRepositories\config'

ii. **We'll put the passwd file into this new folder a few steps down the road, when we set up the repositories' configuration.
e. Now create the first repository, I recommend using the same name for the project as the repository name.
i. 'svnadmin create d:\AppRepositories\((ProjectName))'

f. Once the repository has been created we'll need to create another folder within the repository itself to hold the working directory of the project. I've added the subsequent folders for my own benefit as I feel that this method makes it easier to understand.
i. 'svn mkdir file:\\\d:\AppRepositories\((ProjectName))\ProjectSource'

ii. This subfolder is needed to house the trunk, branches, and tags folders that actually hold the working code. The main repository ((ProjectName)) will still handle the versioning of the project. This folder and those created in the next few steps will need to be created for all repositories.
iii. The trunk folder is where you will store the source code, or working code. The tags folder is used to hold 'snapshots' of the project, i.e. to present version 1.0.22. The branches folder is used to hold the branches of the project, basically the same code but with different functionality, i.e. taking the application in a new direction.
g. Upon creation of the 'ProjectSource' folder a log file will appear in notepad
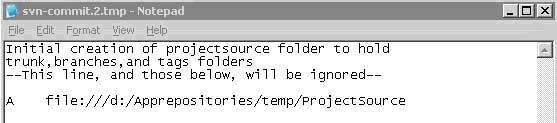
**On the top line above the '- -' enclosed line enter a description of the action, i.e. 'Initial creation of the projectsource folder to hold trunk, branches, and tags source folders.'
h. Click File -> Save -> close notepad
i. Once the log has been saved and closed the command prompt will display 'Committed revision 1'. Each subsequent change made will be a revision to the repository.

j. Now create the trunk, branches, and tags folders
i. 'svn mkdir file:\\\d:\AppRepositories\((ProjectName))\ProjectSource\trunk'

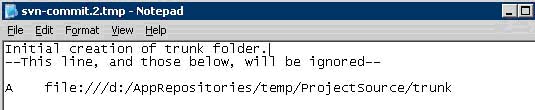
**On the top line of the log file above the '- -' enclosed line enter a description of the action, i.e. 'Initial creation of the trunk folder.'

ii. This is revision 2
iii. 'svn mkdir file:\\\d:\AppRepositories\((ProjectName))\ProjectSource\branches'


**On the top line of the log file above the '- -' enclosed line enter a description of the action, i.e. 'Initial creation of the branches folder.'

iv. This is revision 3
v. 'svn mkdir file:\\\d:\AppRepositories\((ProjectName))\ProjectSource\tags'


**On the top line of the log file above the '- -' enclosed line enter a description of the action, i.e. 'Initial creation of the tags folder.'

vi. This is revision 4
k. All the necessary folders are now created and in place. The next step is to configure access to the repository. **This step can also be done right after creating the repository
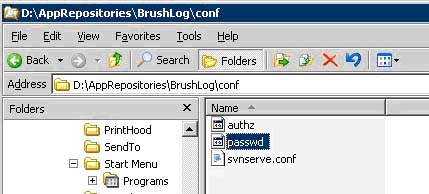
l. Open an explorer window and browse to D:\AppRepository\((ProjectName))\conf
**Note: you will not see the files just added in the explorer window (ProjectSource, trunk, branches, tags) but not to worry they are there but stored in the repository at their respective revisions and still available for access.

m. With the conf file open make a copy of the passwd file and paste it into the config file of AppRepositories that we created earlier.
i. **This step is not necessary, each repository can have its own list of users with their passwords. If you elect to use this method skip to step r.
n. Open the svnserve.conf file.
**If prompted to select which application to view this document in, choose notepad.
o. Under the [general] section, uncomment the auth-access, anon-access, and password-db lines.
i. Delete the '#' symbols, be sure to leave no spaces on the line before the start of the text.
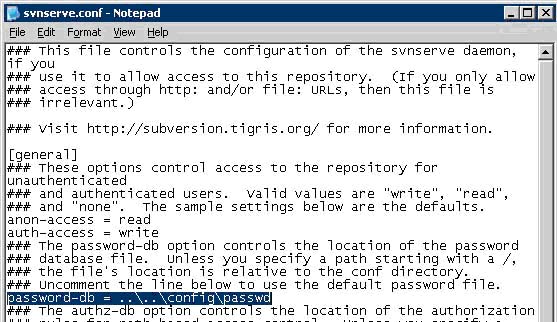
p. Set password-db = '..\..\config\passwd'. This will set the authentication path to the shared passwd file.
q. Click File-> Save -> close the window
r. Now, open the passwd file in the config folder. **When prompted select notepad as the application to use to view the file.
s. Under the [users] section delete the sample users
t. Enter the users that will have access to this repository in the form of username = userpassword. **again make sure that there are no spaces before the first character of text.

i. This will be the only time other than adding new users that you will need to modify the \config\passwd file. Unless of course you're modifying the passwd file for each repository.
u. Click File -> Save -> close the window.
VIII. Create a repository using TSVN on the server
a. TSVN is not necessary at the server level as it is pretty much an end user tool but for the sake of completeness I'm including it here. I personally feel that creating repositories with TSVN is easier than using the command lines.
b. First go to http:\\tortoisesvn.net\downloads
c. Download the latest version of TSVN to the server (1.4.3.8645 at the time of this article)
d. Run the 32-bit installer or 64-bit if this is how your server is configured.

e. Accept the license agreement -> Click Next
f. Accept the default icon tree and location of TSVN -> Click Next
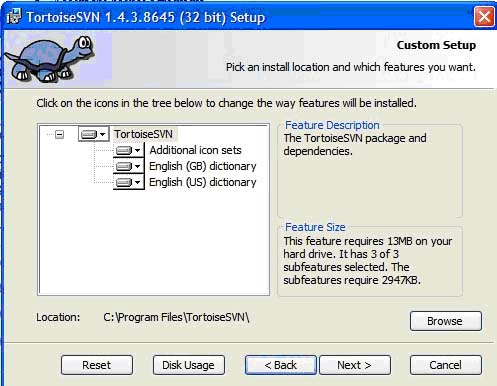
g. Click Install
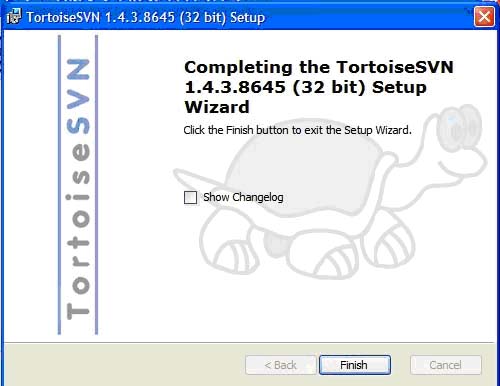
h. When finished installing unselect the 'View Change Log' and click Finish.
i. TSVN requires the system to reboot, close all windows and then select 'Yes' to reboot now
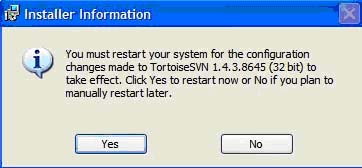
i. Once the system has successfully rebooted, RDC back into the server or reconnect into the system and open an explorer window.
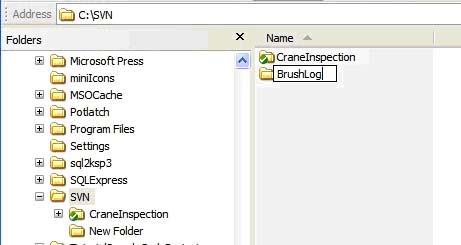
j. Navigate out to the D:\ drive and right-click in the right pane of the window and create a new folder that will house all the repositories. Name the folder 'AppRepositories'.

k. Open the folder and repeat the folder creation process, this time name the folder the same as the project you intend to version. i.e. 'BrushLog'. Also create a folder with the name 'config', that will hold the shared passwd file.

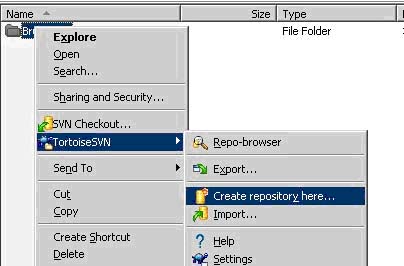
l. Right-Click on the project folder and roll down to TortoiseSVN> -> and click 'Create repository Here'
m. In the first prompt window select 'NativeFileSystem(FSFS)
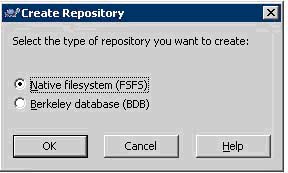
i. **I highly recommend using this system for its flexibility and compatibility
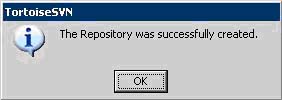
n. Click OK, and the repository is now created.
o. Next create the working directory folder by opening the repository folder and right-clicking the right pane of the window and create a new folder that will house trunk, branches, and tags folders. Name the folder 'ProjectSource'.

p. Open the ProjectSource folder and in the right window create three new folders named: trunk, branches, and tags.

q. Open the svnserve.conf file. **If prompted to select which application to view this document in, choose notepad.

r. Under the [general] section, uncomment the auth-access, anon-access, and password-db lines.
i. Delete the '#' symbols, be sure to leave no spaces on the line before the start of the text.

s. Set password-db = '..\..\config\passwd'. This will set the authentication path to the universal passwd file.
t. Click File-> Save -> close the window
u. Now we will need to configure the authentication for the repositories. Open the conf folder in the repository you just created and copy the passwd file to the config folder under the AppRepositories directory.


v. Open the passwd file, when prompted select notepad as the application used to view the file.

w. Under the [users] section delete the sample users. Be sure to leave no spaces between the text and the start of the line. Enter the name and password for the users that will have access to the repositories in the form of username = userpassword.

i. This is the only time that you will need to change this file with the exception of adding new users. Unless you've elected to use separate passwd files for all repositories.
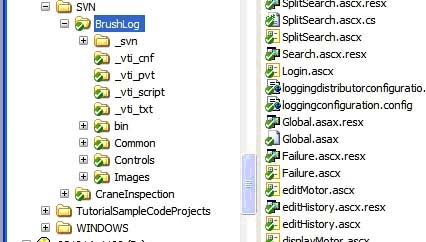
x. The process of creating a repository is now completed using TSVN, note also that in using this method no revisions were completed while adding the files. Also the files are visible within the explorer window.
IX. Install TSVN on client machines
a. First go to http:\\tortoisesvn.net\downloads
b. Download the latest version of TSVN to the computer (1.4.3.8645 at the time of this article)
c. Run the 32-bit installer or 64-bit depending on the machine

d. Accept the license agreement -> Click Next
e. Accept the default icon tree and location of TSVN -> Click Next

f. Click Install
g. When finished installing unselect the 'View Change Log' and click Finish

i. TSVN requires the system to reboot, close all windows and then select 'Yes' to reboot now

X. Loading source code to a repository using TSVN
**Note: Before going on be sure you've completed section IX, a repository must be in place to import
a. Open an explorer window and browse to the folder containing the source code

b. Right-click the folder -> TortoiseSVN> -> Import
i. When using TSVN import(to the server) in this case means the same as export(from the client). This confused me in the beginning.

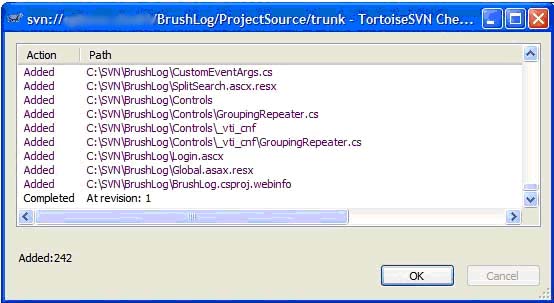
c. Enter 'svn:\\(servername)\(NameOfRepository)\ProjectSource\trunk' into the Url of repository. You can add a description of the import action in the Import Message window, i.e. Initial import of the (ApplicatioName) source code.

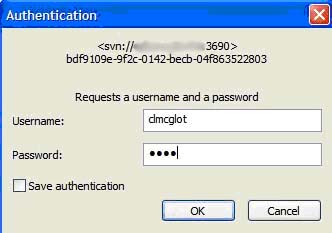
d. At the prompt enter the username and password entered into the passwd file from the repository conf file. This only needs to be done once per session, SVN and TSVN will remember the entries for the duration of the session. Unless you've used separate passwd files, then you'll have to repeat this for each new repository.

e. Click OK and all the files are loaded into the repository and committed at the next revision number (revision 1(TSVN) or 5(SVN command line) depending on the method used to create the repository)

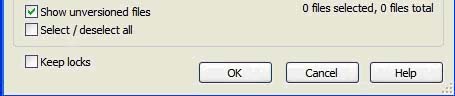
**Note: The total number of files imported is also displayed at the bottom of the window.
XI. Creating a local working directory from a repository
a. Open a windows explorer and browse to the C:\ drive, right-click the right pane and create a new folder. Name the folder SVN.
b. Open the SVN folder, right-click in the right pane and create a new folder with the same name as your repository
c. Right-click the new folder -> SVN Checkout

d. In the 'Url of repository' enter 'svn:\\(ServerName)\(RepositoryName)\ProjectSource\trunk'

**Note: In the bottom section of the window it is possible to specify a previous revision of the project by specifying a revision number. The default is the latest committed version.
e. Click OK
f. This adds all the source code at the current(most recent) revision. The window shows the total number of files added to your directory (Added: ##) and the revision number.
**Note: Every file in this folder has a green check icon on it, this means that this file appears as is from the repository. This icon will change if the file is modified to a red '!' and will remain thus until the file is committed back to the repository on the server.
g. You've now got a working copy of the source code that you can modify, change, or reinvent at your leisure with no worries about 'accidentally' losing everything.
XII. Committing changes back to the repository
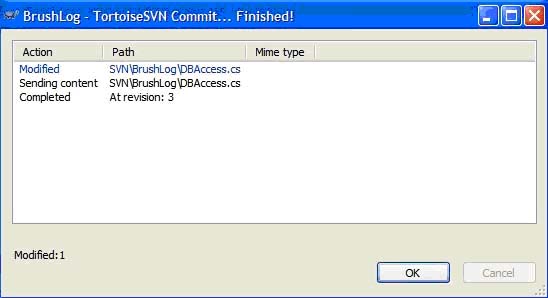
a. When you're ready to save your changes back to the repository browse out to the working directory and right click the folder -> SVNCommit

**Notice that all the changed files are marked with a red '!', this is just TSVN's way of letting you know you've done some work.
b. TSVN allows you to select which file you'd like to commit back into the repository, either a single control, many code pages, or the entire working code.
You can commit any files you choose (not always all of them), but when you commit the files you selected, they are all committed or not at all (When an error occurs for example). *(SDragon42, 3/23/07)*
i. If you are working on a project as part of a team and other members have checked out and checked back in code before you complete yours and your code is not compatible TSVN will display an error. At this point I recommend right-clicking the folder -> TSVN -> Check-for-Modifications. For more on the capabilities of TSVN see the manual.
**Simply checking for changes made to the files is not sufficient to have a compatible working compilation, an Update is required on the working copy to get the latest code from the repository. *(SteveKing, 3/23/07)*
**Note: A cool feature of TSVN is that when you're ready to commit the changes back to the repository all the files that are being sent appear in the lower part of the commit window, and by double-clicking a particular file you can see what exactly was changed between revisions.
ii. Click OK
iii. Enter your username and password from the passwd file
iv. All the changed files are now updated in the repository and loaded into the next revision. The revision number is displayed in the window. Each revision holds all the files for each project; the difference is what is displayed below.
Conclusion
Up to this point you have come far enough to use the basic functionality of SVN with TSVN. Of course there is lots more that can be done with SVN and maybe I'll cover that in a later article, but until then everything is in the documentation that you've downloaded.
Getting the ball rolling is the hardest part of using SVN, once you start incorporating it into your development cycle you'll realize just how easy and beneficial these tools are.
Credit where Credit is due
This article would not be what it is without some help and guidance from some who are more experienced and knowledgeable than myself. First let me thank the CP community for being the supportive and encouraging place that it is for programmers. Second I have a couple shout outs to two individuals that helped me to get not only this article off the ground by providing very poignant research direction but also to complete the work that led to the article in the first place.
- Hans Dietrich - for providing very well written articles and suggestions
- code-frog - for getting me started in the right direction
History
Initial article submission - version 1.0
Errors in text changed - version 1.1
Grievous lack of acknowledgement taken care of - version 1.2
License
This article has no explicit license attached to it but may contain usage terms in the article text or the download files themselves. If in doubt please contact the author via the discussion board below.
A list of licenses authors might use can be found here
转载自: http://www.codeproject.com/KB/architecture/Subversion_on_Windows.aspx
转载于:https://www.cnblogs.com/furenjun/archive/2008/03/27/1125369.html
转:Subversion TortoiseSVN: Installed and started on Windows 2003 server and local machines相关推荐
- windows 2003 server 使用cwrsync同步文件夹的权限问题
windows 2003 server 使用cwrsync 3 同步文件夹后,权限和安全属性不能同步,直接导致无法使用,查阅资料后发现必须在运行命令前使用SET CYGWIN=nontsec参数 将以 ...
- Windows 2003 Server 设置技巧
很多人可以用上的泄漏的版本,相对于工作站系统,服务器在由于做了更多的内核优化,所以在稳定性和安全性方面有很大的提高.但是,很多人并不是需要Server的全部功能的,而且Server系统关闭了某些工作站 ...
- Windows 2003 server 服务器集群实例
两台HP DL580:两台SAN Switch:一台MSA1500做 Windows 2003 server 服务器集群实例. <?xml:namespace prefix = o ns = & ...
- 小型邮件服务器,windows 2003 server小型邮件服务器架设
一.安装pop3和smtp服务组件: 1.安装pop3服务组件:以系统管理员身份登录windows 2003 server系统,依次进入"控制面 板--添加或删除程序--添加/删除windo ...
- 怎样取消Windows 2003 server 意外关机提示
怎样取消Windows 2003 server 意外关机提示 取消系统关机原因方法: (1)打开"开始" --"运行"命令,打开一个运行对话框,在其中输入&qu ...
- windows 2003 server右键菜单没有共享选项的解决办法
windows 2003 server右键菜单没有共享选项的解决办法 首先检查: 1.是否administrator身份登录 2.运行services.msc,检查server,workstation ...
- 2003 r2 远程管理html,在 System x 3850 M2上安装 Windows 2003 Server R2 x86 64
在 System x 3850 M2上安装 Windows 200 适用机型: 所有System x3850 M2 文档内容: 最初要求: 确认机器是否已经链接好远程管理卡,并符合支持的操作系统 准备 ...
- Windows 2003 Server SP2 安装后上网不稳定
背景:使用盘装windows 2003 server,安装后,使用万能驱动安装后所有驱动,设备管理器未显示有异常. 现象:网络连接设置IP后,显示连接成功,开始可以打开baidu并浏览网页,一段时间后 ...
- 服务器电脑能装虚拟机吗,戴尔服务器安装虚拟机并部署Windows 2003 Server
关于免费ESXi 5.1的12G服务器安装和Windows 2003 Server的部署声明: 本文档仅描述在12G服务器上安装ESXi系统和部署Win2003虚拟机的过程,并不涉及项目前的规划/适用 ...
- Windows 2003 server作为软件路由器
不同网段如何互访?用路由器就很简单: Router ...
最新文章
- java响应事件_Swing中添加事件响应的三种处理方式说明
- 运行tensorflow代码出现dtypes.py:516: FutureWarning: Passing (type, 1) or '1type的解决方法(亲测)
- jquery ajax 跨域请求
- Asp.net下from认证统一认证配置
- python3.3使用tkinter实现猜数字游戏代码
- 不是纸上谈兵,VR原来真的可以缓解抑郁症
- Exception in thread main java.lang.NoClassDef...
- 51单片机的红外接收解码
- Debian和Ubuntu版本比较
- 自定义Google搜索引擎
- 【shell】How can I create a select menu in a shell script?
- MATLAB 赋值具有的非单一 rhs 维度多于非单一下标数
- 腾冲樱花谷原生态旅游景区公园网站制作完成
- Ubuntu 16.04 4k屏高分辨率卡顿问题
- 功率型热敏电阻(NTC)的主要参数及深入介绍
- thinkphp5.*远程命令执行漏洞复现
- Linux(Debian)下安装glmark2(-es2)
- 计算机怎么把安全设置降低,如何设置浏览器的安全级别,怎么降低浏览器安全级别...
- 【黑猩猩算法】基于加权反对技术和贪婪搜索进化黑猩猩优化算法求解多模态工程问题附matlab代码
- 开源资产管理系统_使用ThinkPHP能够开发那些管理系统