iOS GZWaterfall任何形式的瀑布流
概述
详细
代码下载:http://www.demodashi.com/demo/11018.html
首先,将所有的类型展示给大家;
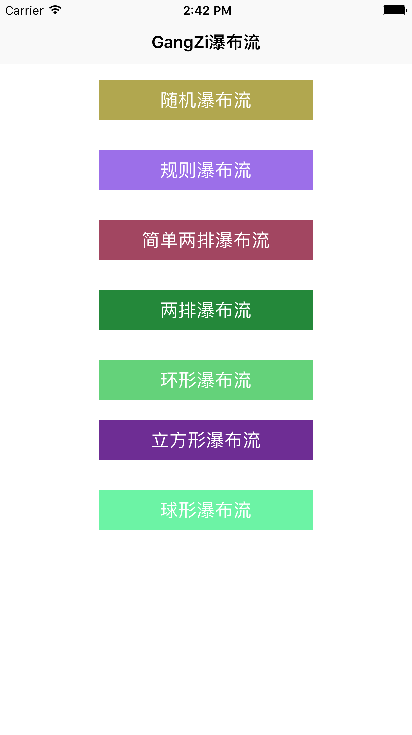
上面图片中展示的样式在Demo中都有实现。
一、项目结构

对于我们要实现的各种各样的 collectionView,根据不同的需求设置不同的列数 ,列边距,行边距,collectionView边距
二、程序实现
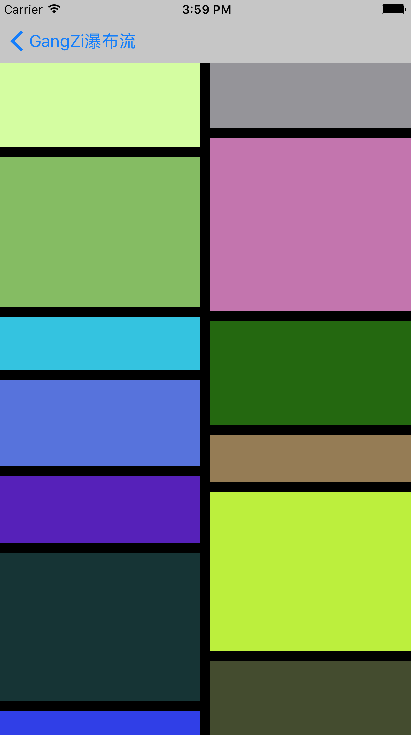
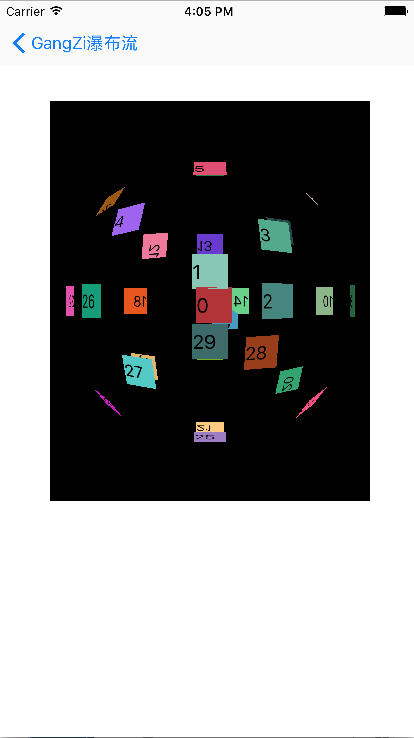
1、随机瀑布流

#pragma mark - 创建collectionView
- (void)setupCollectionView
{GZFallsLayout *fallsLayout = [[GZFallsLayout alloc] init];fallsLayout.delegate = self;UICollectionView *collectionView = [[UICollectionView alloc] initWithFrame:self.view.bounds collectionViewLayout:fallsLayout];[self.view addSubview:collectionView];_collectionView = collectionView;collectionView.dataSource = self;[collectionView registerNib:[UINib nibWithNibName:NSStringFromClass([GZShopCell class]) bundle:nil] forCellWithReuseIdentifier:ID];
}#pragma mark - 创建上下拉刷新
- (void)setupRefresh
{self.collectionView.mj_header = [MJRefreshNormalHeader headerWithRefreshingTarget:self refreshingAction:@selector(loadNewShops)];self.collectionView.mj_footer = [MJRefreshAutoNormalFooter footerWithRefreshingTarget:self refreshingAction:@selector(loadMoreShops)];self.collectionView.backgroundColor = [UIColor whiteColor];[self.collectionView.mj_header beginRefreshing];
}#pragma mark - 加载下拉数据
- (void)loadNewShops
{__weak typeof(self) weakSelf = self;dispatch_async(dispatch_get_global_queue(0, 0), ^{NSArray *shops = [GZShop mj_objectArrayWithFilename:@"1.plist"];[weakSelf.shops removeAllObjects];dispatch_async(dispatch_get_main_queue(), ^{[weakSelf.collectionView reloadData];[weakSelf.shops addObjectsFromArray:shops];[weakSelf.collectionView.mj_header endRefreshing];[weakSelf.collectionView reloadData];});});
}#pragma mark - 加载上拉数据
- (void)loadMoreShops
{__weak typeof(self) weakSelf = self;dispatch_async(dispatch_get_global_queue(0, 0), ^{NSArray *shops = [GZShop mj_objectArrayWithFilename:@"1.plist"];[weakSelf.shops addObjectsFromArray:shops];dispatch_async(dispatch_get_main_queue(), ^{[weakSelf.collectionView.mj_footer endRefreshing];[weakSelf.collectionView reloadData];});});
}- (NSInteger)numberOfSectionsInCollectionView:(UICollectionView *)collectionView
{return 1;
}- (NSInteger)collectionView:(UICollectionView *)collectionView numberOfItemsInSection:(NSInteger)section
{self.collectionView.mj_footer.hidden = self.shops.count == 0;return self.shops.count;
}- (UICollectionViewCell *)collectionView:(UICollectionView *)collectionView cellForItemAtIndexPath:(NSIndexPath *)indexPath
{GZShopCell *cell = [collectionView dequeueReusableCellWithReuseIdentifier:ID forIndexPath:indexPath];if (self.shops && self.shops.count >= indexPath.item+1) cell.shop = self.shops[indexPath.item];return cell;
}- (CGFloat)columnMarginInFallsLayout:(GZFallsLayout *)fallsLayout
{return 5;
}- (CGFloat)rowMarginInFallsLayout:(GZFallsLayout *)fallsLayout
{return 5;
}- (CGFloat)columnCountInFallsLayout:(GZFallsLayout *)fallsLayout
{return 4;
}- (UIEdgeInsets)edgeInsetsInFallsLayout:(GZFallsLayout *)fallsLayout
{return UIEdgeInsetsMake(0, 10, 20, 10);
}- (NSMutableArray *)shops
{if (!_shops) {_shops = [NSMutableArray array];}return _shops;
}// 计算布局属性
- (UICollectionViewLayoutAttributes *)layoutAttributesForItemAtIndexPath:(NSIndexPath *)indexPath
{UICollectionViewLayoutAttributes *attrs = [UICollectionViewLayoutAttributes layoutAttributesForCellWithIndexPath:indexPath];// 每个collectionView的宽度CGFloat collectionViewW = self.collectionView.frame.size.width;// 每个cell的宽度CGFloat w = (collectionViewW - self.edgeInsets.left - self.edgeInsets.right -self.columnMargin * (self.columnCount - 1)) / self.columnCount;// cell的高度NSUInteger randomOfHeight = arc4random() % 100;CGFloat h = w * (randomOfHeight >= 50 ? 250 : 320) / 200;// cell应该拼接的列数NSInteger destColumn = 0;// 高度最小的列数高度CGFloat minColumnHeight = [self.columnHeights[0] doubleValue];// 获取高度最小的列数for (NSInteger i = 1; i < self.columnCount; i++) {CGFloat columnHeight = [self.columnHeights[i] doubleValue];if (minColumnHeight > columnHeight) {minColumnHeight = columnHeight;destColumn = i;}}// 计算cell的xCGFloat x = self.edgeInsets.left + destColumn * (w + self.columnMargin);// 计算cell的yCGFloat y = minColumnHeight;if (y != self.edgeInsets.top) {y += self.rowMargin;}// 随机数,用来随机生成大尺寸cellNSUInteger randomOfWhetherDouble = arc4random() % 100;// 判断是否放大if (destColumn < self.columnCount - 1 // 放大的列数不能是最后一列(最后一列方法超出屏幕)&& _noneDoubleTime >= 1 // 如果前个cell有放大就不放大,防止连续出现两个放大&& (randomOfWhetherDouble >= 45 || _noneDoubleTime >= 8) // 45%几率可能放大,如果累计8次没有放大,那么满足放大条件就放大&& [self.columnHeights[destColumn] doubleValue] == [self.columnHeights[destColumn + 1] doubleValue] // 当前列的顶部和下一列的顶部要对齐&& _lastDoubleIndex != destColumn) { // 最后一次放大的列不等当前列,防止出现连续两列出现放大不美观_noneDoubleTime = 0;_lastDoubleIndex = destColumn;// 重定义当前cell的布局:宽度*2,高度*2attrs.frame = CGRectMake(x, y, w * 2 + self.columnMargin, h * 2 + self.rowMargin);// 当前cell列的高度就是当前cell的最大Y值self.columnHeights[destColumn] = @(CGRectGetMaxY(attrs.frame));// 当前cell列下一列的高度也是当前cell的最大Y值,因为cell宽度*2,占两列self.columnHeights[destColumn + 1] = @(CGRectGetMaxY(attrs.frame));} else {// 正常cell的布局if (_noneDoubleTime <= 3 || _lastFixIndex == destColumn) { // 如果没有放大次数小于3且当前列等于上次矫正的列,就不矫正attrs.frame = CGRectMake(x, y, w, h);} else if (self.columnHeights.count > destColumn + 1 // 越界判断&& y + h - [self.columnHeights[destColumn + 1] doubleValue] < w * 0.1) { // 当前cell填充后和上一列的高度偏差不超过cell最大高度的10%,就和下一列对齐attrs.frame = CGRectMake(x, y, w, [self.columnHeights[destColumn + 1] doubleValue] - y);_lastFixIndex = destColumn;} else if (destColumn >= 1 // 越界判断&& y + h - [self.columnHeights[destColumn - 1] doubleValue] < w * 0.1) { // 当前cell填充后和上上列的高度偏差不超过cell最大高度的10%,就和下一列对齐attrs.frame = CGRectMake(x, y, w, [self.columnHeights[destColumn - 1] doubleValue] - y);_lastFixIndex = destColumn;} else {attrs.frame = CGRectMake(x, y, w, h);}// 当前cell列的高度就是当前cell的最大Y值self.columnHeights[destColumn] = @(CGRectGetMaxY(attrs.frame));_noneDoubleTime += 1;}// 返回计算获取的布局return attrs;
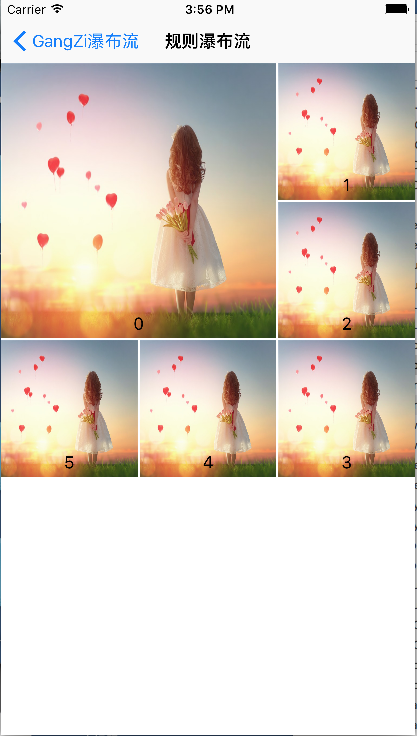
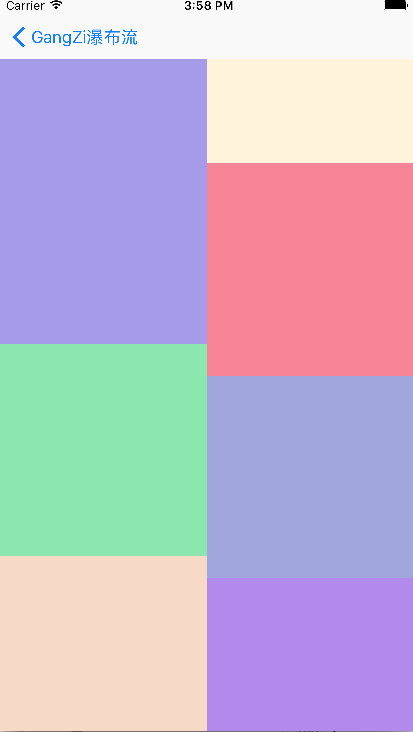
}2、规则瀑布流

// 计算布局属性
- (UICollectionViewLayoutAttributes *)layoutAttributesForItemAtIndexPath:(NSIndexPath *)indexPath
{UICollectionViewLayoutAttributes *attrs = [UICollectionViewLayoutAttributes layoutAttributesForCellWithIndexPath:indexPath];if (indexPath.item == 0) {attrs.frame = CGRectMake(0, 0, ([UIScreen mainScreen].bounds.size.width - 4)/3*2 +2, ([UIScreen mainScreen].bounds.size.width - 4)/3*2 +2);}else if (indexPath.item == 1){attrs.frame = CGRectMake(([UIScreen mainScreen].bounds.size.width - 4)/3*2 +4, 0, ([UIScreen mainScreen].bounds.size.width - 4)/3, ([UIScreen mainScreen].bounds.size.width - 4)/3);}else if (indexPath.item == 2){attrs.frame = CGRectMake(([UIScreen mainScreen].bounds.size.width - 4)/3*2 +4, ([UIScreen mainScreen].bounds.size.width - 4)/3 +2, ([UIScreen mainScreen].bounds.size.width - 4)/3, ([UIScreen mainScreen].bounds.size.width - 4)/3);}else if (indexPath.item == 3){attrs.frame = CGRectMake(([UIScreen mainScreen].bounds.size.width - 4)/3*2 +4, ([UIScreen mainScreen].bounds.size.width - 4)/3 *2 + 4, ([UIScreen mainScreen].bounds.size.width - 4)/3, ([UIScreen mainScreen].bounds.size.width - 4)/3);}else if (indexPath.item == 4){attrs.frame = CGRectMake(([UIScreen mainScreen].bounds.size.width - 4)/3 +2, ([UIScreen mainScreen].bounds.size.width - 4)/3 *2 +4, ([UIScreen mainScreen].bounds.size.width - 4)/3, ([UIScreen mainScreen].bounds.size.width - 4)/3);}else{attrs.frame = CGRectMake(0, ([UIScreen mainScreen].bounds.size.width - 4)/3 *2 +4, ([UIScreen mainScreen].bounds.size.width - 4)/3, ([UIScreen mainScreen].bounds.size.width - 4)/3);}// 返回计算获取的布局return attrs;
}
3、简单两排瀑布流

-(CGSize)collectionViewContentSize
{//计算整个contentsize的大小__block CGFloat height=0;[arr enumerateObjectsUsingBlock:^(id _Nonnull obj, NSUInteger idx, BOOL * _Nonnull stop) {if([obj floatValue]>height){height=[obj floatValue];}}];return CGSizeMake(self.collectionView.bounds.size.width, height);
}-(UICollectionViewLayoutAttributes*)layoutAttributesForItemAtIndexPath:(NSIndexPath *)indexPath
{//计算每一个item的相关属性UICollectionViewLayoutAttributes *attr=[UICollectionViewLayoutAttributes layoutAttributesForCellWithIndexPath:indexPath];int index=0;if([arr[0] floatValue]<[arr[1] floatValue]){index=0;}else{index=1;}CGFloat width=self.collectionView.bounds.size.width/2;CGFloat height=arc4random()%200+100;CGFloat left=index*width;CGFloat top=[arr[index] floatValue];CGRect frame=CGRectMake(left, top, width, height);attr.frame=frame;arr[index]=@([arr[index] floatValue]+height);return attr;
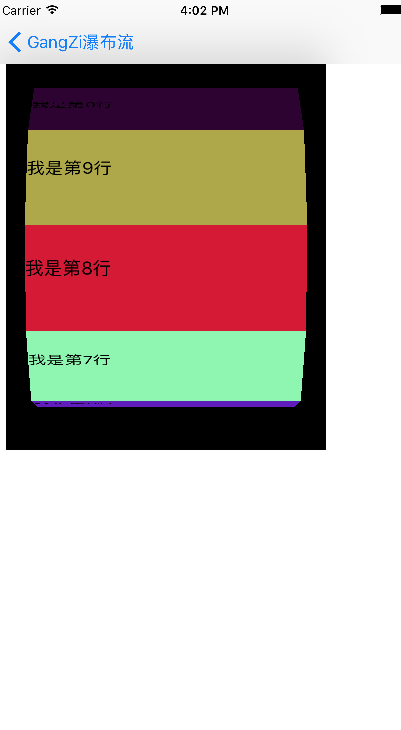
}4、两排瀑布流
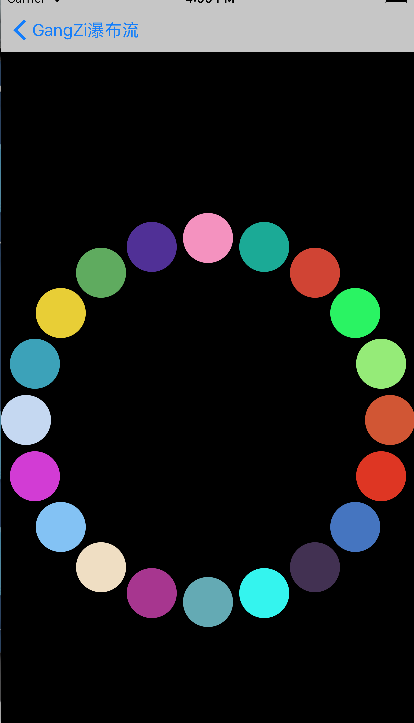
-(void)prepareLayout{_attributeArray = [NSMutableArray array];[super prepareLayout];float WIDTH = ([UIScreen mainScreen].bounds.size.width-self.sectionInset.left-self.sectionInset.right-self.minimumInteritemSpacing)/2;CGFloat colHight[2] = {self.sectionInset.top,self.sectionInset.bottom};for (int i=0; i<_itemCount; i++) {NSIndexPath * index = [NSIndexPath indexPathForItem:i inSection:0];UICollectionViewLayoutAttributes * attribute = [UICollectionViewLayoutAttributes layoutAttributesForCellWithIndexPath:index];CGFloat height = arc4random()%150+40;int width = 0;if (colHight[0]<colHight[1]) {colHight[0] = colHight[0]+height+self.minimumLineSpacing;width = 0; }else{colHight[1] = colHight[1]+height+self.minimumLineSpacing;width = 1;}attribute.frame = CGRectMake(self.sectionInset.left+(self.minimumInteritemSpacing+WIDTH)*width, colHight[width]-height-self.minimumLineSpacing, WIDTH, height);[_attributeArray addObject:attribute];}if (colHight[0]>colHight[1]) {self.itemSize = CGSizeMake(WIDTH, (colHight[0]-self.sectionInset.top)*2/_itemCount-self.minimumLineSpacing);}else{self.itemSize = CGSizeMake(WIDTH, (colHight[1]-self.sectionInset.top)*2/_itemCount-self.minimumLineSpacing);}}5、环形瀑布流

_itemCount = (int)[self.collectionView numberOfItemsInSection:0];_attributeArray = [NSMutableArray array];CGFloat radius =MIN(self.collectionView.frame.size.width, self.collectionView.frame.size.height)/2;CGPoint center = CGPointMake(self.collectionView.frame.size.width/2, self.collectionView.frame.size.height/2);for (int i=0; i<_itemCount; i++) {UICollectionViewLayoutAttributes * attris = [UICollectionViewLayoutAttributes layoutAttributesForCellWithIndexPath:[NSIndexPath indexPathForItem:i inSection:0]];attris.size = CGSizeMake(50, 50);float x = center.x+cosf(2*M_PI/_itemCount*i)*(radius-25);float y = center.y+sinf(2*M_PI/_itemCount*i)*(radius-25);attris.center = CGPointMake(x, y);[_attributeArray addObject:attris];}6、立方瀑布流
-(UICollectionViewLayoutAttributes *)layoutAttributesForItemAtIndexPath:(NSIndexPath *)indexPath{//创建一个item布局属性类UICollectionViewLayoutAttributes * atti = [UICollectionViewLayoutAttributes layoutAttributesForCellWithIndexPath:indexPath];//获取item的个数int itemCounts = (int)[self.collectionView numberOfItemsInSection:0];//设置每个item的大小为260*100atti.size = CGSizeMake(260, 100);atti.center = CGPointMake(self.collectionView.frame.size.width/2, self.collectionView.frame.size.height/2+self.collectionView.contentOffset.y);CATransform3D tran3d = CATransform3DIdentity;tran3d.m34 = -1/2000.0;CGFloat radius = 50/tanf(M_PI*2/itemCounts/2);
//     CGFloat angle = (float)(indexPath.row)/itemCounts*M_PI*2;//获取当前的偏移量float offset = self.collectionView.contentOffset.y;//在角度设置上,添加一个偏移角度float angleOffset = offset/self.collectionView.frame.size.height;CGFloat angle = (float)(indexPath.row+angleOffset-1)/itemCounts*M_PI*2;tran3d = CATransform3DRotate(tran3d, angle, 1.0, 0, 0);tran3d = CATransform3DTranslate(tran3d, 0, 0, radius);//进行设置atti.transform3D = tran3d;return atti;
}
7、球形瀑布流

UICollectionViewLayoutAttributes * atti = [UICollectionViewLayoutAttributes layoutAttributesForCellWithIndexPath:indexPath];//获取item的个数int itemCounts = (int)[self.collectionView numberOfItemsInSection:0];atti.center = CGPointMake(self.collectionView.frame.size.width/2+self.collectionView.contentOffset.x, self.collectionView.frame.size.height/2+self.collectionView.contentOffset.y);atti.size = CGSizeMake(30, 30);CATransform3D trans3D = CATransform3DIdentity;trans3D.m34 = -1/900.0;CGFloat radius = 15/tanf(M_PI*2/itemCounts/2);//根据偏移量 改变角度//添加了一个x的偏移量float offsety = self.collectionView.contentOffset.y;float offsetx = self.collectionView.contentOffset.x;//分别计算偏移的角度float angleOffsety = offsety/self.collectionView.frame.size.height;float angleOffsetx = offsetx/self.collectionView.frame.size.width;CGFloat angle1 = (float)(indexPath.row+angleOffsety-1)/itemCounts*M_PI*2;//x,y的默认方向相反CGFloat angle2 = (float)(indexPath.row+angleOffsetx-1)/itemCounts*M_PI*2;//这里我们进行四个方向的排列if (indexPath.row%4==1) {trans3D = CATransform3DRotate(trans3D, angle1, 1.0,0, 0);}else if(indexPath.row%4==2){trans3D = CATransform3DRotate(trans3D, angle2, 0, 1, 0);}else if(indexPath.row%4==3){trans3D = CATransform3DRotate(trans3D, angle1, 0.5,0.5, 0);}else{trans3D = CATransform3DRotate(trans3D, angle1, 0.5,-0.5,0);}trans3D = CATransform3DTranslate(trans3D, 0, 0, radius);atti.transform3D = trans3D;三、运行效果


代码下载:http://www.demodashi.com/demo/11018.html
注:本文著作权归作者,由demo大师发表,拒绝转载,转载需要作者授权
iOS GZWaterfall任何形式的瀑布流相关推荐
- iOS 两个tableview的 瀑布流
iOS 两个tableview的 瀑布流 1. [代码]Objective-C // // DocViewController.m // getrightbutton // // Cr ...
- 什么是瀑布流布局?瀑布流式布局的优缺点
瀑布流又称瀑布流式布局,是一种多列等宽不等高的一种页面布局方式. 视觉表现为参差不齐的多栏布局.随着页面滚动条向下滚动,这种布局会不断加载数据并附加至当前的尾部. 是一种多列等宽不等高的一种页面布局方 ...
- 【iOS开发每日小笔记(二)】gitHub上的开源“瀑布流”使用心得
这篇文章是我的[iOS开发每日小笔记]系列中的一片,记录的是今天在开发工作中遇到的,可以用很短的文章或很小的demo演示解释出来的小心得小技巧.它们可能会给用户体验.代码效率得到一些提升,或是之前自己 ...
- iOS开发之窥探UICollectionViewController(四) --一款功能强大的自定义瀑布流
在上一篇博客中<iOS开发之窥探UICollectionViewController(三) --使用UICollectionView自定义瀑布流>,自定义瀑布流的列数,Cell的外边距,C ...
- ios开发瀑布流框架的封装
一:瀑布流框架封装的实现思路:此瀑布流框架的封装仿照tableView的底层实现,1:每个cell的frame的设置都是找出每列的最大y值,比较每列的最大y值,将下一个cell放在最大y值最小的那一列 ...
- iOS 瀑布流之栅格布局
代码地址如下: http://www.demodashi.com/demo/14760.html 一 .效果预览 二.确定需求 由下面的需求示意图可知模块的最小单位是正方形,边长是屏幕宽除去边距间隔后 ...
- iOS基础UI瀑布流界面简单搭建
ios UI基础瀑布流 顾名思义是将界面以瀑布流水般的展现出来,使用瀑布流,首先对数据进行懒加载,传入数据后,使用UIcollectionView控件在main.storyboard里进行简单的布局 ...
- RecyclerView瀑布流的形式利用Gilde加载网络图片
RecyclerView的简单介绍 RecyclerView 是在Android5.0之后推出的,是一个比ListView更加灵活更加高效的适配器类型控件.但是RecyclerView不同于其他类型的 ...
- 图片瀑布流ios中部分显示空白
@ios中的web页面图片布局闪动或者显示空白之类问题的解决方法 出现问题的代码(问题现象:ios手机中 商品图片 只有少部分加载成功其余出现大量空白 ) 现在购买再送 80% .pro_img im ...
最新文章
- wdcp php5.3 pdo_mysql,WDCP常用组件(memcache、mysqli、PDO_MYSQL、mysql innodb、libmcrypt、php zip)的安装方法...
- 杭电2032杨辉三角
- Python爬虫实战(1):爬取糗事百科段子
- Java:反射和注解从入门到放弃
- cas5.3:CAS Server搭建
- win10 桌面设置为远程桌面
- 适合python组态软件_组态软件哪个好
- unity3D 音效的设置 音效的开关 制作声音的开关按钮
- SX1308电压调节,踩坑
- Running pipenv gives TypeError: 'module' object is not callable
- 哈利波特魔法游戏(原创)
- CSDN20181213博客黑板报
- SQL Server Check检查约束用法
- 计算机专业主要学什么?
- matlab用抛物线族表示马鞍面,matlab实验报告
- 【 数据集加载 DatasetDataLoader 模块实现与源码详解 深度学习 Pytorch笔记 B站刘二大人 (7/10)】
- QT实现文本编辑器(简易版)
- MYOJ 的来源和现状
- ubuntu gedit找不到命令
- HTML5 音乐播放代码