单应性变换(Homography)的学习与理解
1,单应性矩阵、本质矩阵。
内容源于:
2 Homography Examples using OpenCV ( Python / C ++ )
What is Homography ?
Consider two images of a plane (top of the book) shown in Figure 1. The red dot represents the same physical point in the two images. In computer vision jargon we call these corresponding points. Figure 1. shows four corresponding points in four different colors — red, green, yellow and orange. A Homography is a transformation ( a 3×3 matrix ) that maps the points in one image to the corresponding points in the other image.
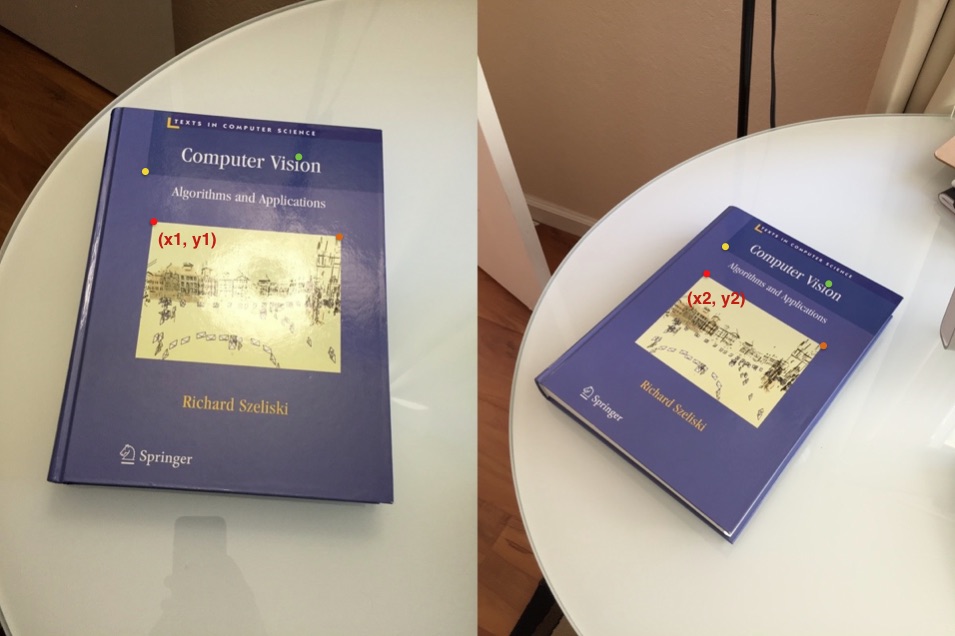 Figure 1 : Two images of a 3D plane ( top of the book ) are related by a Homography
Now since a homography is a 3×3 matrix we can write it as

Let us consider the first set of corresponding points —  in the first image and
  in the second image. Then, the Homography
  maps them in the following way

Image Alignment Using Homography
The above equation is true for ALL sets of corresponding points as long as they lie on the same plane in the real world. In other words you can apply the homography to the first image and the book in the first image will get aligned with the book in the second image! See Figure 2.
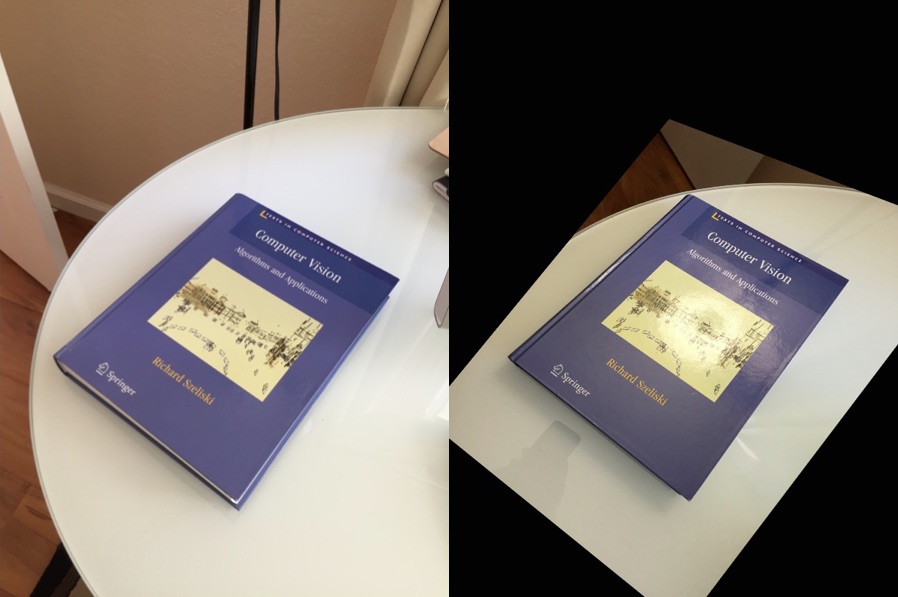 Figure 2 : One image of a 3D plane can be aligned with another image of the same plane using Homography
But what about points that are not on the plane ? Well, they will NOT be aligned by a homography as you can see in Figure 2. But wait, what if there are two planes in the image ? Well, then you have two homographies — one for each plane.
Panorama : An Application of Homography
In the previous section, we learned that if a homography between two images is known, we can warp one image onto the other. However, there was one big caveat. The images had to contain a plane ( the top of a book ), and only the planar part was aligned properly. It turns out that if you take a picture of any scene ( not just a plane ) and then take a second picture by rotating the camera, the two images are related by a homography! In other words you can mount your camera on a tripod and take a picture. Next, pan it about the vertical axis and take another picture. The two images you just took of a completely arbitrary 3D scene are related by a homography. The two images will share some common regions that can be aligned and stitched and bingo you have a panorama of two images. Is it really that easy ? Nope! (sorry to disappoint) A lot more goes into creating a good panorama, but the basic principle is to align using a homography and stitch intelligently so that you do not see the seams. Creating panoramas will definitely be part of a future post.
How to calculate a Homography ?
To calculate a homography between two images, you need to know at least 4 point correspondences between the two images. If you have more than 4 corresponding points, it is even better. OpenCV will robustly estimate a homography that best fits all corresponding points. Usually, these point correspondences are found automatically by matching features like SIFT or SURF between the images, but in this post we are simply going to click the points by hand.
Let’s look at the usage first.
C++
|
1
2
3
4
5
6
7
8
9
10
|
// pts_src and pts_dst are vectors of points in source
// and destination images. They are of type vector<Point2f>.
// We need at least 4 corresponding points.
Mat h = findHomography(pts_src, pts_dst);
// The calculated homography can be used to warp
// the source image to destination. im_src and im_dst are
// of type Mat. Size is the size (width,height) of im_dst.
warpPerspective(im_src, im_dst, h, size);
|
Python
|
1
2
3
4
5
6
7
8
9
10
11
12
13
14
|
'''
pts_src and pts_dst are numpy arrays of points
in source and destination images. We need at least
4 corresponding points.
'''
h, status = cv2.findHomography(pts_src, pts_dst)
'''
The calculated homography can be used to warp
the source image to destination. Size is the
size (width,height) of im_dst
'''
im_dst = cv2.warpPerspective(im_src, h, size)
|
Let us look at a more complete example in both C++ and Python.
OpenCV C++ Homography Example
Images in Figure 2. can be generated using the following C++ code. The code below shows how to take four corresponding points in two images and warp image onto the other.
|
1
2
3
4
5
6
7
8
9
10
11
12
13
14
15
16
17
18
19
20
21
22
23
24
25
26
27
28
29
30
31
32
33
34
35
36
37
38
39
40
41
|
#include "opencv2/opencv.hpp"
using namespace cv;
using namespace std;
int main( int argc, char** argv)
{
// Read source image.
Mat im_src = imread("book2.jpg");
// Four corners of the book in source image
vector<Point2f> pts_src;
pts_src.push_back(Point2f(141, 131));
pts_src.push_back(Point2f(480, 159));
pts_src.push_back(Point2f(493, 630));
pts_src.push_back(Point2f(64, 601));
// Read destination image.
Mat im_dst = imread("book1.jpg");
// Four corners of the book in destination image.
vector<Point2f> pts_dst;
pts_dst.push_back(Point2f(318, 256));
pts_dst.push_back(Point2f(534, 372));
pts_dst.push_back(Point2f(316, 670));
pts_dst.push_back(Point2f(73, 473));
// Calculate Homography
Mat h = findHomography(pts_src, pts_dst);
// Output image
Mat im_out;
// Warp source image to destination based on homography
warpPerspective(im_src, im_out, h, im_dst.size());
// Display images
imshow("Source Image", im_src);
imshow("Destination Image", im_dst);
imshow("Warped Source Image", im_out);
waitKey(0);
}
|
OpenCV Python Homography Example
Images in Figure 2. can also be generated using the following Python code. The code below shows how to take four corresponding points in two images and warp image onto the other.
|
1
2
3
4
5
6
7
8
9
10
11
12
13
14
15
16
17
18
19
20
21
22
23
24
25
26
27
28
29
30
|
#!/usr/bin/env python
import cv2
import numpy as np
if __name__ == '__main__' :
# Read source image.
im_src = cv2.imread('book2.jpg')
# Four corners of the book in source image
pts_src = np.array([[141, 131], [480, 159], [493, 630],[64, 601]])
# Read destination image.
im_dst = cv2.imread('book1.jpg')
# Four corners of the book in destination image.
pts_dst = np.array([[318, 256],[534, 372],[316, 670],[73, 473]])
# Calculate Homography
h, status = cv2.findHomography(pts_src, pts_dst)
# Warp source image to destination based on homography
im_out = cv2.warpPerspective(im_src, h, (im_dst.shape[1],im_dst.shape[0]))
# Display images
cv2.imshow("Source Image", im_src)
cv2.imshow("Destination Image", im_dst)
cv2.imshow("Warped Source Image", im_out)
cv2.waitKey(0)
|
单应性变换(Homography)的学习与理解相关推荐
- 【opencv学习】单应性变换Homography
import cv2 import numpy as np import pylab as pltif __name__ == '__main__':# 读取原始图像im_src = cv2.imre ...
- 【python】图像映射:单应性变换与图像扭曲
[python]图像映射:单应性变换与图像扭曲 单应性变换(Homography) 图像扭曲(仿射变换) 图中图 分段仿射扭曲 单应性变换(Homography) 单应性变换(Homography)即 ...
- 单应性(Homography)变换
我们已经得到了像素坐标系和世界坐标系下的坐标映射关系: 其中,u.v表示像素坐标系中的坐标,s表示尺度因子,fx.fy.u0.v0.γ(由于制造误差产生的两个坐标轴偏斜参数,通常很小)表示5个相机内参 ...
- 利用单应性变换方法将自动驾驶汽车拍的照片变换为鸟瞰图
为什么需要转换为鸟瞰图呢? 因为在检测车道线,需要根据车道线宽度设计合适的滤波器进行噪声剔除,因为车载相机拍出来的图片近处的车道线较宽而远处的车道线较窄,所以需要将图片转换为鸟瞰图.这是车载相机拍摄的 ...
- 单应性变换与仿射变换
经典的仿射变换 初始来自于 ABB实习的项目:目前看有关于多帧去噪论文 Burst Image Deblurring,发现论文作者使用单应性变换进行多帧图片之间的粗对齐. 1.详细的总结性文章 知乎专 ...
- 【备忘】Homographic Adaptation 单应性变换
单应性变换是将一个平面内的点映射到另一个平面内的二维投影变换. 应用 单应性在计算机视觉领域是一个非常重要的概念,它在图像校正.视角变换.图像拼接.增强现实.相机位姿估计.视觉SLAM等领域有非常重要 ...
- Opencv学习笔记 透视变换/单应性变换
1.透视变换概述 透视变换(Perspective Transformation),又称Homography Transformation. 在计算机视觉领域,空间中同一平面的任意两幅图像通过单应性关 ...
- [计算机视觉] 一篇文章教你学会单应性矩阵Homography(Python/C++)
0.国外原文链接 Homography examples using OpenCV ( Python / C ++ ) 1.什么是单应性? 考虑图中显示的平面.红点代表两个图像中的相同物理点.在计算机 ...
- 单应性矩阵Homography计算和优化
单应性矩阵,是用来描述两个平面之间的变换关系,是一个3x3的齐次矩阵. 图上的4个绿色的圈,两两可以对应,H可以表达第一张图变换到第二张图的转换关系.具体的表达式: aaa表示尺度信息,h1−h9h_ ...
- 图像坐标空间变换:透视变换(Perspective Transformation),或称为单应性(Homography)变换
文章目录 透视变换简介 预备知识 透视变换公式推导 投影 二维坐标向齐次坐标的变换 公式求解 例子:A4纸视角校正 原始图片和坐标变换模板 计算程序 结果 透视变换的限制 前向映射与后向映射矩阵不互逆 ...
最新文章
- linux6直连存储挂载磁盘,CentOS7mount网络磁盘的详细步骤
- 第十六届智能车竞赛国赛队伍中节能信标组无线电能接收方案
- [原创] 腾讯RTX二次开发相关的一些注意事项
- poj 1151(线段树求面积并)
- windows消息机制和Linux,Windows消息机制初谈 (转)
- ASP.NET-get与post模式的区别
- 不停刷朋友圈的人_不停刷新闻、朋友圈、微信群的朋友,休息一下,看多了伤身!...
- java模拟连接超时_Java:使用Toxiproxy模拟各种连接问题
- 近一半程序员单身、年薪低于 15 万,程序员扎心现状大调查!
- 时序分析基本概念介绍——SDC概述
- android 坚挺通话广播_关于短信黑名单 BroadCast
- libevent实现TCP 客户端
- C/S架构系统的自动更新功能设计与实现(四)
- 【Unity】在Inspector上显示自定义的位掩码枚举(Flags)
- 要升级win11吗?电脑变板砖的那种
- 安卓期末大作业——猫咪社区(源码+任务书)
- FS2222可调过压过流芯片IC,40V耐压过压保护可调OVP可调OCP
- JS_鼠标移入移出触发事件
- 为什么说HashSet是无序的
- Windows10神州网信政府版的配置修改