Nagios之linux监控windows主机
服务器端安装:
安装snmp服务和其他插件服务:
[root@nagios~]# yum -y install net-snmp* #安装snmp服务。
CPAN安装:
wgetftp://ftp.monash.edu/pub/cpan/modules/by-category/23_Miscellaneous_Modules/CPAN/CPAN-1.9301.tar.gz
tar-zxf CPAN-1.9301.tar.gz
cdCPAN-1.9301
./configure
make
makeinstall
##该环境必须安装,在下面编译nagios-snmp-plugins时会用到。
安装完成后执行下列操作:
[root@nagioslibexec]# perl -MCPAN -e shell
Terminaldoes not support AddHistory.
cpanshell -- CPAN exploration and modules installation (v1.9301)
ReadLinesupport available (maybe install Bundle::CPAN or Bundle::CPANxxl?)
cpan[1]>install Net::SNMP
#安装相应的组件,上面是使用install方式进行安装,如果这种安装方式不成功,那么就需要使用下面的编译方式安装了。
nagios官方有详细介绍:
1)By CPAN (best)
oncommand line, as root :
[your_host]# perl -MCPAN -e shell
cpan shell -- CPAN exploration and modules installation (v1.76)
ReadLine support enabled
cpan> install Net::SNMP
Ifit's the first time you run CPAN, it will probably ask you some (simple)questions.
CPANwill also ask you to satisfy some dependencies (Crypt::DES, Digest::MD5,etc..).
2)"By hand"
Getthe folowings modules (tar.gz format) on www.cpan.org #在cpan官网搜索下面的组件,下载安装。
-Crypt::DES
- Digest::MD5
- Digest::SHA1
- Digest::HMAC
- Net::SNMP
for each one (you must install Net::SNMP at the end) :
tar zxf <module>.tar.gz
cd <module>
perl Makefile.pl
make test
make install
#确保以上相关CPAN的组件全部安装成功。
安装nagios-snmp-plugins:
wgethttp://nagios.manubulon.com/nagios-snmp-plugins.1.1.1.tgz
tarzxfv nagios-snmp-plugins.1.1.1.tgz
#解压后,进入解压后的目录
cdnagios_plugins
./install.sh
#根据提示,基本上都回车,安装。默认就会安装到/usr/local/nagios/libexec下面。可以通过ls查看,多了很多关于snmp的文件。
[root@nagios~]# ll /usr/local/nagios/libexec/|grep snmp
-rwxr-xr-x1 nagios nagios 408559 Aug 24 15:44 check_snmp
-rwxr-xr-x1 root root 10951 Aug 29 16:23 check_snmp_boostedge.pl
-rwxr-xr-x1 root root 17866 Aug 29 16:23 check_snmp_cpfw.pl
-rwxr-xr-x1 root root 16786 Aug 29 16:23 check_snmp_css.pl
-rwxr-xr-x1 root root 8747 Aug 29 16:23 check_snmp_css_main.pl
-rwxr-xr-x1 root root 33562 Aug 29 16:23 check_snmp_env.pl
-rwxr-xr-x1 root root 136373 Aug 29 12:09 check_snmp_int
-rwxr-xr-x1 root root 31919 Aug 29 16:23 check_snmp_int.pl
-rwxr-xr-x1 root root 10108 Aug 29 16:23 check_snmp_linkproof_nhr.pl
-rwxr-xr-x1 root root 22966 Aug 29 17:31 check_snmp_load.pl
-rwxr-xr-x1 root root 18735 Sep 2 21:10 check_snmp_mem.pl
-rwxr-xr-x1 root root 11898 Aug 29 16:23 check_snmp_nsbox.pl
-rwxr-xr-x1 root root 130702 Aug 29 12:09 check_snmp_process
-rwxr-xr-x1 root root 24233 Aug 29 16:23 check_snmp_process.pl
-rwxr-xr-x1 root root 146461 Aug 29 12:09 check_snmp_storage
-rwxr-xr-x1 root root 24006 Aug 29 17:10 check_snmp_storage.pl
-rwxr-xr-x1 root root 14489 Aug 29 16:23 check_snmp_vrrp.pl
-rwxr-xr-x1 root root 11967 Aug 29 16:23 check_snmp_win.pl
进行命令检查:
[root@nagios~]# /usr/local/nagios/libexec/check_snmp_load.pl -H 10.168.0.185 -C 168pop -Tstand -w 80 -c 90 ##检查被监控端的CPU负载
2CPU, average load 0.0% < 80% : OK
[root@nagios~]# /usr/local/nagios/libexec/check_snmp_storage.pl -H 10.168.0.185 -C 168pop-m "^Virtual Memory$" -w 70 -c 90 ##检查虚拟内存使用量
VirtualMemory: 13%used(1551MB/12285MB) (<70%) : OK
添加环境变量
[root@localhostlibexec]#vi /usr/local/nagios/etc/resource.cfg
$USER7$=-C168pop
$USER8$=-Tstand
打开windows主机配置文件:
[root@nagiosetc]# vi nagios.cfg
##############################################################################
#
#NAGIOS.CFG - Sample Main Config File for Nagios 3.2.0
#
#Read the documentation for more information on this configuration
#file. I've provided some comments here,but things may not be so
#clear without further explanation.
#Last Modified: 12-14-2008
##############################################################################
#Definitions for monitoring a Windows machine
cfg_file=/usr/local/nagios/etc/objects/windows.cfg
以下为实际环境中nagios服务中监控windows的操作:
首先更改命令模板:
[root@nagiosobjects]# cat commands.cfg
###############################################################################
#COMMANDS.CFG - SAMPLE COMMAND DEFINITIONS FOR NAGIOS 3.2.0
#
#Last Modified: 05-31-2007
#
#NOTES: This config file provides you with some example command definitions
# that you can reference in host,service, and contact definitions.
#
# You don't need to keep commands in aseparate file from your other
# object definitions. This has been done just to make things easierto
# understand.
#
#process-host-perfdatacommand definition
definecommand {
command_name process-host-perfdata
command_line /usr/local/nagios/libexec/process_perfdata.pl
}
#process-service-perfdatacommand definiton
definecommand {
command_name process-service-perfdata
command_line /usr/local/nagios/libexec/process_perfdata.pl
}
#check_nrpecommand definition
definecommand {
command_name check_nrpe
command_line $USER1$/check_nrpe -H $HOSTADDRESS$-c $ARG1$
}
definecommand {
command_name check_weburl
command_line $USER1$/check_http $ARG1$ -w 10 -c 30
}
#check_snmp_stor"command definition
define command {
command_name check_snmp_stor
command_line $USER1$/check_snmp_storage.pl -H$HOSTADDRESS$ $USER7$ -m $ARG1$ -w $ARG2$ -c $ARG3$ -f
}
#"check_snmp_proc" command definition
define command {
command_name check_snmp_proc
command_line $USER1$/check_snmp_process.pl -H$HOSTADDRESS$ $USER7$ $ARG1$ $ARG2$ -f
}
#"check_snmp_load" command definition
define command {
command_name check_snmp_load
command_line $USER1$/check_snmp_load.pl -H$HOSTADDRESS$ $USER7$ $USER8$ -w $ARG1$ -c $ARG2$ -f
}
define command {
command_name check_traf
command_line $USER1$/check_traffic.sh -V 2c -H$HOSTADDRESS$ $USER7$ -I 1 -w 990,1000 -c 1000,1024 -M -b
}
然后更改windows主机服务文件:
[root@nagiosobjects]# cat windows.cfg
###############################################################################
#WINDOWS.CFG - SAMPLE CONFIG FILE FOR MONITORING A WINDOWS MACHINE
#
#Last Modified: 06-13-2007
#
#NOTES: This config file assumes that you are using the sample configuration
# files that get installed with theNagios quickstart guide.
#
###############################################################################
###############################################################################
#
#SERVICE DEFINITIONS
#
###############################################################################
###############################################################################
#Create a service for monitoring CPU load
#Change the host_name to match the name of the host you defined above
#检查CPU负载
defineservice{
use generic-service
hostgroup_name windows-servers
service_description CPU Load
check_command check_snmp_load!60!80
action_url /nagios/pnp/index.php?host=$HOSTNAME$&srv=$SERVICEDESC$
}
#Create a service for monitoring memory usage
#Change the host_name to match the name of the host you defined above
#检查物理内存使用率
defineservice{
use generic-service
hostgroup_name windows-servers
service_description Memory Usage
check_command check_snmp_stor!"^PhysicalMemory$"!80!90
action_url /nagios/pnp/index.php?host=$HOSTNAME$&srv=$SERVICEDESC$
}
#Create a service for monitoring C:\ disk usage
#Change the host_name to match the name of the host you defined above
#检查C盘磁盘利用率
defineservice{
use generic-service
hostgroup_name windows-servers
service_description C:\ Drive Space
check_command check_snmp_stor!"^C"!90!95
action_url /nagios/pnp/index.php?host=$HOSTNAME$&srv=$SERVICEDESC$
}
#Create a service for monitoring the Explorer.exe process
#Change the host_name to match the name of the host you defined above
#检查虚拟内存使用率
defineservice{
use generic-service
hostgroup_name windows-servers
service_description ram_swap
check_command check_snmp_stor!"^VirtualMemory$"!60!80
}
配置完成后进行配置文件检查并重启服务:
/usr/local/nagios/bin/nagios–v/usr/local/nagios/etc/nagios.cfg
servicenagios reload
问题总结:
1,Argument "v6.0.1" isn't numeric in numeric lt (<)
关于:
Argument "v6.0.1" isn't numeric in numeric lt (<) at/usr/local/nagios/libexec/check_snmp_storage.pl line 407.
出自http://bbs.chinaunix.net/thread-3686728-1-1.html这个报错;
我在/usr/local/nagios/libexec/check_snmp_storage.pl
文件中的407行做了修改将 "<"操作符替换为"lt"操作符,如果是">"那么也应当替换为"gt"操作符
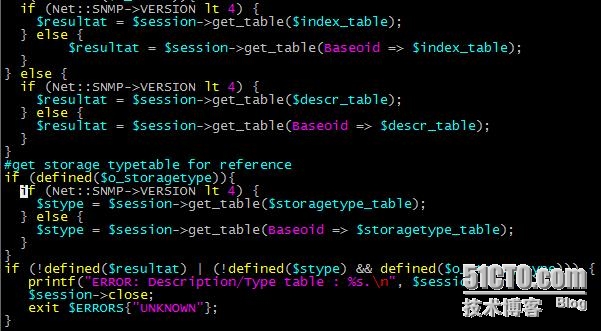 以上这个问题就解决了
2,nagios+pnp让windows出图
[root@core_07libexec]# ./check_snmp_mem.pl -H 127.0.0.1 -C itnms -w 20,30 -c80,90
Ram : 64%, Swap : 0% : > 20, 30 ; WARNING
[root@core_07 libexec]# ./check_snmp_mem.pl -H 127.0.0.1 -C itnms -w20,30 -c 80,90 -f #加个-f就有数据了,也就出图了。
Ram : 64%, Swap : 0% : > 20, 30 ; WARNING |ram_used=5262032;1633629;6534515;0;8168144swap_used=3728;4915888;14747663;0;16386292
转载于:https://blog.51cto.com/chengcai/1328309
Nagios之linux监控windows主机相关推荐
- 架设nagios+rrdtool+pnp4nagios监控windows主机
OS:centos 5.7final 32bit Apache/2.4.2 PHP/5.3.13 Nagios® Core™ 3.4.1 nagios-plugins-1.4.15 rrdtool- ...
- nagios监控windows主机 linux主机
一.NSclient++与nrpe nagios对windows的监控主要有两种方法,一种是NSclient++,另一种是通过nrpe的方式来达到监控目的 NSclient++与nrpe最大的区别就是 ...
- zabbix 通过 zabbix-agent 方式监控 Windows主机
1.实验环境 实验环境基于上一篇博文中的实验环境<zabbix 通过 SNMP 监控 Windows主机> 上一篇博文链接:https://www.jianshu.com/writer#/ ...
- zabbix 通过 SNMP 监控 Windows主机
1.实验环境 zabbix-server:10.0.11.55 Windows客户端:自己在用的笔记本电脑(10.0.11.53) zabbix_agent:Windows 版 agent 2.下载 ...
- Zabbix5系列-监控Windows主机 (三)-CPU温度监控
一.参考 参考另一篇博文配置Windows代理程序 Zabbix5系列-监控Windows主机 (三) 二.监控CPU温度 2.1 由于Windows无法直接读取温度信息,所以用C#写了个脚本调用Op ...
- 四、Zabbix — 监控Windows主机及网络设备
目录 监控Windows主机 监控网络设备 监控Windows主机 1.下载windows客户端 -> 传送 2.安装 3.安装完查看进程
- Nagios监控Windows主机
为什么80%的码农都做不了架构师?>>> 一.下载安装NSClient++ 1.下载NSClient++ 到 http://nsclient.org/nscp/downloa ...
- zabbix监控windows主机
zabbix添加对windows主机的监控 一.windows客户端的配置 关闭windows防火墙或者开通10050和10051端口 (1).关闭防火墙(不推荐直接关闭,测试可以这样做,尤其是最近勒 ...
- 远程控制桌面,外网电脑PC手机ios安卓mac远程桌面连接内网linux和windows主机,史上最全最详细图文教程
通过开放的nat123.windows远程桌面.SSH工具,等合理的配置,实现外网远程控制内网远程桌面连接windows和,外网SSH访问内网LINUX主机的实现:在访问端,同时可以是电脑PC,也可以 ...
最新文章
- class函数 python_python函数之classmethod()
- 方向梯度直方图(Histogram Of Gradient)详解
- 如何正确使用Node.js中的事件
- 我对组件components 和 页面 views 的思考
- OverIQ 中文系列教程【翻译完成】
- 在python中设置密码登录_在python中生成密码
- 如何看待基于OpenStack与Docker技术的云计算建设
- VMware虚拟机下网络连接的三种模式
- 使用Apktools反编译apk应用
- Selenium(二)——webdriver 开始
- git pull checkout后文件权限变更
- [企业管理]邮政系统,真得悲哀呀!居然歪曲理由掩盖事实
- 时域,空域,频域的基本概念
- Matplotlib库简介
- 软件配置管理中基线(baseline)
- 如何用js对url做urlencoding处理?
- 华硕ASUS手机平板官方刷机包raw格式解压修改工具
- 根据输入的银行卡号显示开户银行类型,并将银行卡号四位分隔
- error: ‘ULONG_MAX’ was not declared in this scope
- 【鼠标移动到上面自动显示提示信息文字】