如何利用cobbler 实现系统自动化安装及web管理
1 安装包和配置服务
root:~# yum install cobbler  dhcp -y
root:~# systemctl enable tftp dhcpd httpd cobblerd
root:~# systemctl start tftp  httpd cobblerd
2 修改cobbler 配置文件
vim /etc/cobbler/settings
server: cobblerIP  384
next_server: cobblerIP 272 
default_password_crypted: "$1$VBqc7U0W$F2qhI5oZwR8chJBU.mAly1" 101
manage_dhcp: 1 242 #可自动配置dhcp
root:~# cobbler get-loaders
task started: 2019-04-19_074328_get_loaders
task started (id=Download Bootloader Content, time=Fri Apr 19 07:43:28 2019)
downloading https://cobbler.github.io/loaders/README to /var/lib/cobbler/loaders/README
downloading https://cobbler.github.io/loaders/COPYING.elilo to /var/lib/cobbler/loaders/COPYING.elilo
downloading https://cobbler.github.io/loaders/COPYING.yaboot to /var/lib/cobbler/loaders/COPYING.yaboot
downloading https://cobbler.github.io/loaders/COPYING.syslinux to /var/lib/cobbler/loaders/COPYING.syslinux
downloading https://cobbler.github.io/loaders/elilo-3.8-ia64.efi to /var/lib/cobbler/loaders/elilo-ia64.efi
downloading https://cobbler.github.io/loaders/yaboot-1.3.17 to /var/lib/cobbler/loaders/yaboot
downloading https://cobbler.github.io/loaders/pxelinux.0-3.86 to /var/lib/cobbler/loaders/pxelinux.0
downloading https://cobbler.github.io/loaders/menu.c32-3.86 to /var/lib/cobbler/loaders/menu.c32
downloading https://cobbler.github.io/loaders/grub-0.97-x86.efi to /var/lib/cobbler/loaders/grub-x86.efi
downloading https://cobbler.github.io/loaders/grub-0.97-x86_64.efi to /var/lib/cobbler/loaders/grub-x86_64.efi
*** TASK COMPLETE ***
root:~# cobbler sync
task started: 2019-04-19_074450_sync
*********
!!! TASK FAILED !!!
3 配置dhcp服务
root:~# vim /etc/cobbler/dhcp.template
subnet 192.168.64.0 netmask 255.255.255.0 {option routers             192.168.64.254;option domain-name-servers 1.1.1.1;option subnet-mask         255.255.255.0;range dynamic-bootp        192.168.64.100 192.168.64.254root:~# cobbler sync
task started: 2019-04-19_075613_sync
task started (id=Sync, time=Fri Apr 19 07:56:13 2019)
running pre-sync triggers
..................................
running shell triggers from /var/lib/cobbler/triggers/change/*
*** TASK COMPLETE ***
4导入安装源文件
将光盘挂载好
root:~# df
Filesystem 1K-blocks Used Available Use% Mounted on
/dev/mapper/centos-root 52403200 2066756 50336444 4% /
devtmpfs 919432 0 919432 0% /dev
tmpfs 931612 0 931612 0% /dev/shm
tmpfs 931612 9744 921868 2% /run
tmpfs 931612 0 931612 0% /sys/fs/cgroup
/dev/sda1 1038336 149004 889332 15% /boot
/dev/mapper/centos-home 154057220 33100 154024120 1% /home
tmpfs 186324 0 186324 0% /run/user/0
/dev/sr0 10491772 10491772 0 100% /mnt/7
/dev/sr1 3897932 3897932 0 100% /mnt/6
root:~# cobbler import --path=/mnt/6 --name=Centos-6.10 --arch=x86_64
task started: 2019-04-19_080352_import
task started (id=Media import, time=Fri Apr 19 08:03:52 2019)
Found a candidate signature: breed=redhat, version=rhel6
Found a matching signature: breed=redhat, version=rhel6
Adding distros from path /var/www/cobbler/ks_mirror/Centos-6.10-x86_64:
creating new distro: Centos-6.10-x86_64
trying symlink: /var/www/cobbler/ks_mirror/Centos-6.10-x86_64 -> /var/www/cobbler/links/Centos-6.10-x86_64
creating new profile: Centos-6.10-x86_64
associating repos
checking for rsync repo(s)
checking for rhn repo(s)
checking for yum repo(s)
starting descent into /var/www/cobbler/ks_mirror/Centos-6.10-x86_64 for Centos-6.10-x86_64
processing repo at : /var/www/cobbler/ks_mirror/Centos-6.10-x86_64
need to process repo/comps: /var/www/cobbler/ks_mirror/Centos-6.10-x86_64
looking for /var/www/cobbler/ks_mirror/Centos-6.10-x86_64/repodata/*comps*.xml
Keeping repodata as-is :/var/www/cobbler/ks_mirror/Centos-6.10-x86_64/repodata
*** TASK COMPLETE ***
查看现有安装选项
root:~# cobbler profile listCentos-6.10-x86_64
[root@localhost ~]# cobbler distro list  #安装原文件名称
[root@localhost ~]# cat /var/lib/tftpboot/pxelinux.cfg/default
DEFAULT menu
PROMPT 0
MENU TITLE Cobbler | http://cobbler.github.io/
TIMEOUT 200
TOTALTIMEOUT 6000
ONTIMEOUT localLABEL localMENU LABEL (local)MENU DEFAULTLOCALBOOT -1LABEL Centos-6.10-x86_64kernel /images/Centos-6.10-x86_64/vmlinuzMENU LABEL Centos-6.10-x86_64append initrd=/images/Centos-6.10-x86_64/initrd.img ksdevice=bootif lang=  kssendmac text  ks=http://192.168.64.131/cblr/svc/op/ks/profile/Centos-6.10-x86_64ipappend 2MENU end
cobbler profile remove --name=NAME
cobbler distro remove --name=NAME
现在已经可以自动化安装了,不过cobbler默认配置文件为最小化安装,想要自定义的花要修改配置文件
Centos 7.0下使用system-config-kickstart
修改CentOS-Base.repo[base]                     修改 ---------->[development]
name=CentOS-$releasever - Base
root:~# yum install -y system-config-kickstart.noarch
root:~  # env LANG=zh_CN.UTF-8 system-config-kickstart #生成自定义配置文件
将ks文件和系统关联,生成启动菜单
cobbler profile add --name=Centos6_mini --distro=Centos-6.10-x86_64 --kickstart=/var/lib/cobbler/kickstarts/ks6mini.cfg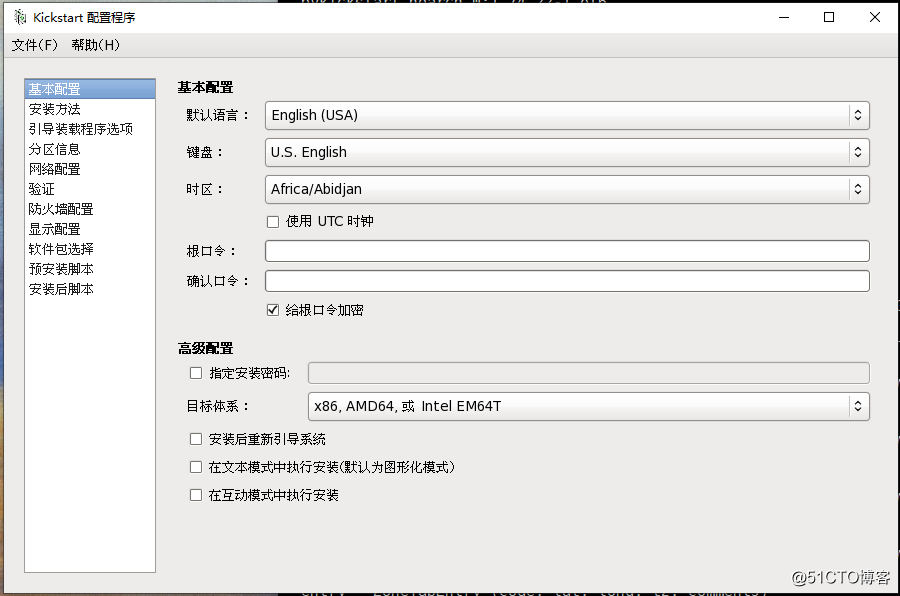
将所有选项选完即可左上角保存
centos6ks文件
#platform=x86, AMD64, or Intel EM64T
#version=DEVEL
# Firewall configuration
firewall --disabled
# Install OS instead of upgrade
install
# Use CDROM installation media
url --url=$tree
# Root password
rootpw --iscrypted $1$RR1QsW0t$qYYwsKO5LloO6y3WaTkdj0
# System authorization information
auth  --useshadow  --passalgo=sha512
# Use text mode install
text
# System keyboard
keyboard us
# System language
lang en_US
# SELinux configuration
selinux --disabled
# Do not configure the X Window System
skipx
# Installation logging level
logging --level=info
# Reboot after installation
reboot
# System timezone
timezone  Asia/Shanghai
# Network information
network  --bootproto=dhcp --device=eth0 --onboot=on
# System bootloader configuration
bootloader --location=mbr --md5pass="$1$EmYezDTP$mBxhDFd/BRDIn6ZBAOtL00"
# Clear the Master Boot Record
zerombr
# Partition clearing information
clearpart --all --initlabel
# Disk partitioning information
part /boot --fstype="ext4" --size=1024
part / --fstype="ext4" --grow --size=1%post
mkdir /root/.ssh
chmod 700 /root/.ssh
cat > /root/.ssh/authorized_keys <<EOF
ssh-rsa AAAAB3NzaC1yc2EAAAABIwAAAQEAtSEz3OSOAI6UMkRjIVk3cXwVf/tYa9YsBOVd4vamGtrAuPN5+zgOj9T9p+QI0nJHva6LR4Wz5es46zXoSrLoKY4rTpqnmuPNYuG3B/cybOv99+hriq7Vs9/OqMIgsLbtk4R99Rg75wL9jXpcyxgKtCyVYG4sjdlfyQXQXuauzai6u9oqKo7MmDyWiC9QJSqfilrQKhUB+OfVo4/vkYxKLsRy8N6k2BoRTk2VIp7XKB4gr3sutgutXk35A3O08ukGBSA+378G2csDmf9nctGv4kSw/gR6Mdy2LnhcxcnPA5IP39Buvkdp2eqXOnY1zWxTiUdLtfAb81rFpwMudtaK1w== rsa 2048-041619
EOF
chmod 600 /root/.ssh/authorized_keys
systemctl stop firewalld
systemctl disable firewalld.service
systemctl stop NetworkManager
systemctl disable NetworkManager
%end%packages
@base
@debugging
@network-tools%end
centos7ks文件
#platform=x86, AMD64, or Intel EM64T
#version=DEVEL
# Install OS instead of upgrade
install
# Keyboard layouts
keyboard 'us'
# Root password
rootpw --iscrypted $1$F4q00dyi$IQ1/CLubGYHtDw6EvSiln0
# System language
lang en_US
# System authorization information
auth  --useshadow  --passalgo=sha512
# Use CDROM installation media
url --url=$tree
# Use graphical install
text
# SELinux configuration
selinux --disabled
# Do not configure the X Window System
skipx# Firewall configuration
firewall --disabled
# Network information
network  --bootproto=dhcp --device=ens33
# Halt after installation
halt
# System timezone
timezone Asia/Shanghai
# System bootloader configuration
bootloader --append=" crashkernel=auto" --location=mbr --boot-drive=sda
# Partition clearing information
clearpart --all --initlabel
reboot
# Disk partitioning information
part /boot --fstype="xfs" --size=1024
part / --fstype="xfs" --grow --size=1%post
mkdir /root/.ssh
chmod 700 /root/.ssh
cat > /root/.ssh/authorized_keys <<EOF
ssh-rsa AAAAB3NzaC1yc2EAAAABIwAAAQEAtSEz3OSOAI6UMkRjIVk3cXwVf/tYa9YsBOVd4vamGtrAuPN5+zgOj9T9p+QI0nJHva6LR4Wz5es46zXoSrLoKY4rTpqnmuPNYuG3B/cybOv99+hriq7Vs9/OqMIgsLbtk4R99Rg75wL9jXpcyxgKtCyVYG4sjdlfyQXQXuauzai6u9oqKo7MmDyWiC9QJSqfilrQKhUB+OfVo4/vkYxKLsRy8N6k2BoRTk2VIp7XKB4gr3sutgutXk35A3O08ukGBSA+378G2csDmf9nctGv4kSw/gR6Mdy2LnhcxcnPA5IP39Buvkdp2eqXOnY1zWxTiUdLtfAb81rFpwMudtaK1w== rsa 2048-041619
EOF
chmod 600 /root/.ssh/authorized_keys
systemctl stop firewalld
systemctl disable firewalld.service
systemctl stop NetworkManager
systemctl disable NetworkManager
sed -i 's/SELINUX=enforcing/SELINUX=disabled/' /etc/selinux/config
mkdir /etc/yum.repo.d/bak
mv /etc/yum.repos.d/*.repo /etc/yum.repos.d/bak/
cat > /etc/yum.repos.d/Centos-Base.repo <<EOF
[development]
name=CentOS-$releasever - Base - mirrors.aliyun.com
failovermethod=priority
baseurl=http://mirrors.aliyun.com/centos/$releasever/os/$basearch/http://mirrors.aliyuncs.com/centos/$releasever/os/$basearch/http://mirrors.cloud.aliyuncs.com/centos/$releasever/os/$basearch/
gpgcheck=1
gpgkey=http://mirrors.aliyun.com/centos/RPM-GPG-KEY-CentOS-7#released updates
[updates]
name=CentOS-$releasever - Updates - mirrors.aliyun.com
failovermethod=priority
baseurl=http://mirrors.aliyun.com/centos/$releasever/updates/$basearch/http://mirrors.aliyuncs.com/centos/$releasever/updates/$basearch/http://mirrors.cloud.aliyuncs.com/centos/$releasever/updates/$basearch/
gpgcheck=1
gpgkey=http://mirrors.aliyun.com/centos/RPM-GPG-KEY-CentOS-7#additional packages that may be useful
[extras]
name=CentOS-$releasever - Extras - mirrors.aliyun.com
failovermethod=priority
baseurl=http://mirrors.aliyun.com/centos/$releasever/extras/$basearch/http://mirrors.aliyuncs.com/centos/$releasever/extras/$basearch/http://mirrors.cloud.aliyuncs.com/centos/$releasever/extras/$basearch/
gpgcheck=1
gpgkey=http://mirrors.aliyun.com/centos/RPM-GPG-KEY-CentOS-7#additional packages that extend functionality of existing packages
[centosplus]
name=CentOS-$releasever - Plus - mirrors.aliyun.com
failovermethod=priority
baseurl=http://mirrors.aliyun.com/centos/$releasever/centosplus/$basearch/http://mirrors.aliyuncs.com/centos/$releasever/centosplus/$basearch/http://mirrors.cloud.aliyuncs.com/centos/$releasever/centosplus/$basearch/
gpgcheck=1
enabled=0
gpgkey=http://mirrors.aliyun.com/centos/RPM-GPG-KEY-CentOS-7#contrib - packages by Centos Users
[contrib]
name=CentOS-$releasever - Contrib - mirrors.aliyun.com
failovermethod=priority
baseurl=http://mirrors.aliyun.com/centos/$releasever/contrib/$basearch/http://mirrors.aliyuncs.com/centos/$releasever/contrib/$basearch/http://mirrors.cloud.aliyuncs.com/centos/$releasever/contrib/$basearch/
gpgcheck=1
enabled=0
gpgkey=http://mirrors.aliyun.com/centos/RPM-GPG-KEY-CentOS-7
EOFcat > /etc/yum.repos.d/epel.repo << EOF
[epel]
name=Extra Packages for Enterprise Linux 7 - $basearch
baseurl=http://mirrors.aliyun.com/epel/7/$basearch
failovermethod=priority
enabled=1
gpgcheck=0
gpgkey=file:///etc/pki/rpm-gpg/RPM-GPG-KEY-EPEL-7[epel-debuginfo]
name=Extra Packages for Enterprise Linux 7 - $basearch - Debug
baseurl=http://mirrors.aliyun.com/epel/7/$basearch/debug
failovermethod=priority
enabled=0
gpgkey=file:///etc/pki/rpm-gpg/RPM-GPG-KEY-EPEL-7
gpgcheck=0[epel-source]
name=Extra Packages for Enterprise Linux 7 - $basearch - Source
baseurl=http://mirrors.aliyun.com/epel/7/SRPMS
failovermethod=priority
enabled=0
gpgkey=file:///etc/pki/rpm-gpg/RPM-GPG-KEY-EPEL-7
gpgcheck=0
EOF
%end%packages
@base
@network-tools%end
web管理
阿里云太新会出错,用搜狐
vi /etc/yum.repos.d/epel.repo
[epel]
name=Extra Packages for Enterprise Linux 7 - $basearch
baseurl=http://mirrors.sohu.com/fedora-epel/7/x86_64/
enabled=1
gpgcheck=0
[root@localhost ~]# yum clean all
[root@localhost network-scripts]# yum install cobbler-web
[root@localhost network-scripts]# service httpd restart
[root@localhost network-scripts]# htdigest /etc/cobbler/users.digest Cobbler cobbleradmin(添加新管理用户)品略图书馆 http://www.pinlue.com/
如何利用cobbler 实现系统自动化安装及web管理相关推荐
- 利用cobbler 实现系统自动化安装及web管理
1 安装包和配置服务 root:~# yum install cobbler dhcp -y root:~# systemctl enable tftp dhcpd httpd cobblerd ro ...
- 磁盘管理来安装linux,Linux_在CentOS系统中安装quota来管理磁盘配额,在网络管理的工作中,由于硬 - phpStudy...
在CentOS系统中安装quota来管理磁盘配额 在网络管理的工作中,由于硬盘的资源是有限的,常常需要为多用户的服务器设定用户的linux磁盘配额.这个功能对公用的多用户服务器(免费的或者收费的)来说 ...
- 利用Cobbler批量快速网络安装CentOS
Cobbler是什么? Cobbler(补鞋匠)集成了PXE.DHCP.DNS.Kickstart服务管理和yum仓库管理工具,相对之前的 Kickstart 更加快捷.方便的批量布署red hat. ...
- 系统自动化安装kickstart
自动化安装的方法: Kickstart Cobbler 1.简介 1.1 什么是PXE PXE,全名Pre-boot Execution Environment,预启动执行环境: 通过网络接口启动计算 ...
- Cobbler实现系统自动安装和cobbler的web管理实现
文章目录 Cobble实现自动安装 Centos{6,7,8} 安装包,查看步骤说明书 设置 cobbler 配置 dhcp 下载启动相关文件 将启动文件同步到 /var/lib/tftpboot/ ...
- 网络安装LINUX系统原理,PXE网络引导系统自动化安装CentOS7
一.PXE 注意:安装前 selinux 禁用,iptables 关闭 dhcp 服务器静态IP地址 1.PXE的工作原理: Client向PXE Server上的DHCP发送IP地址请求消息,DHC ...
- linux系统下安装游戏,在Linux系统下安装GameHub来管理所有游戏
本文将介绍在Linux操作系统下安装GameHub,并且使用它来管理所有游戏,包括使用GameHub安装游戏. 简介 GameHub是一个统一的游戏库,允许在GNU/Linux系统上查看.安装.运行和 ...
- Linux系统的安装以及软件管理
我是在Windows操作系统之下使用虚拟机来进行操作的. 一.首先安装Oracle VM VirtualBox 可以直接百度Oracle VM VirtualBox来搜索,Oracle中国就是我们要的 ...
- CSVN部署安装,实现web管理svn
系统环境:centos7最小化安装 下载这个文件并解压 https://pan.baidu.com/s/1miwdBc8 tar zxvf jdk-8u91-linux-x64.gz mv jdk1. ...
最新文章
- 机洗内裤容易得暗病?这个锅我们袜子不背!
- linux下用gcc如何生成预处理、汇编等文件
- 【CyberSecurityLearning 74】DC系列之DC-5渗透测试
- pandas concat_pandas合并几百个csv只需要一分钟?(含代码,拿去即可用)
- [CXF REST标准实战系列] 一、JAXB xml与javaBean的转换(转)
- ASP.NET -- WebForm -- Cookie的使用 应用程序权限设计 权限设计文章汇总 asp.net后台管理系统-登陆模块-是否自动登陆 C# 读写文件摘要...
- 利用hibernate中的SchemaExport生成数据表
- 响应式织梦通用企业网站后台模板(自适应手机端)
- linux 命令行 浏览器_3个用于Linux命令行的Web浏览器
- unity场景素材_[游戏素材]游戏场景环境天气变化Unity游戏素材资源
- [Swift]LeetCode145. 二叉树的后序遍历 | Binary Tree Postorder Traversal
- Landsat 数据下载与预处理
- 虚拟机安装win10专业版
- 支付宝接口对接指南(三、支付宝开放接口对接:老版SDK)【保姆级】
- 三十九、如何单独发布jar包
- 电脑版微信提示音mp3_安卓充电提示音修改教程,可以自定义哦~
- UE4 C++ UMG框架搭建
- modbus通讯协议详解
- 手机抓包 fiddler magicwifi
- php获取服务器运行时间差,解决php服务器时间差异