dropbox 怎么使用_使用Dropbox API构建自己的Dropbox客户端
dropbox 怎么使用
There are lots of file hosting solutions out there, but few things compare to Dropbox because of its simplicity, auto-sync feature, cross-platform support and other cool features.
有很多文件托管解决方案,但是与Dropbox相比,由于其简单性,自动同步功能,跨平台支持和其他出色功能,因此与之相比几乎没有什么东西。

As a PHP developer you can even take advantage of their API in order to create apps that use its full capabilities. In this article, you’ll learn how to build one such app to perform different operations in a user’s Dropbox account. You will be using the Dropbox API version 2 in this tutorial. If you want to follow along, you can clone the project from Github.
作为PHP开发人员,您甚至可以利用其API来创建使用其全部功能的应用程序。 在本文中,您将学习如何构建一个这样的应用程序,以在用户的Dropbox帐户中执行不同的操作。 在本教程中,您将使用Dropbox API版本2 。 如果您想继续,可以从Github克隆项目 。
创建一个Dropbox应用 (Creating a Dropbox App)
The first thing that you need to do is go to the Dropbox’s developer site and create a new app.
您需要做的第一件事是访问Dropbox的开发人员站点并创建一个新应用 。
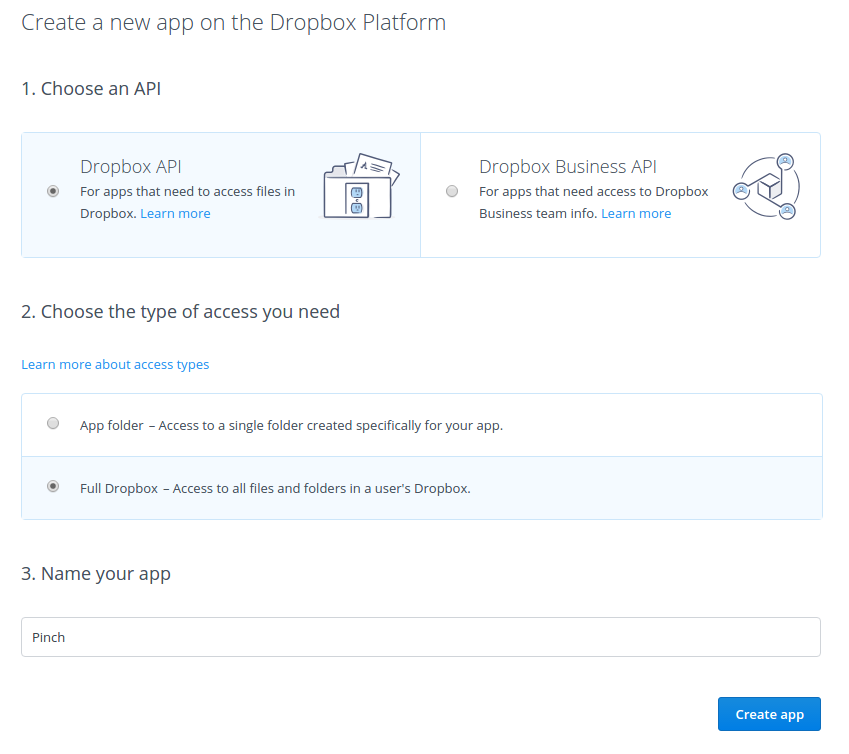
Dropbox offers two APIs: the Dropbox API which is the API for the general public and the Business API for teams. These two APIs are pretty much the same, the only difference being that the business API is specifically used for business accounts, so team features such as access to team information, team member file access and team member management are baked into it by default. We’ll use the former.
Dropbox提供了两个API:Dropbox API(面向大众的API)和面向团队的业务API。 这两个API几乎相同,唯一的区别是业务API是专门用于企业帐户的,因此默认情况下会将团队功能(例如访问团队信息,访问团队成员文件和管理团队成员)纳入其中。 我们将使用前者。
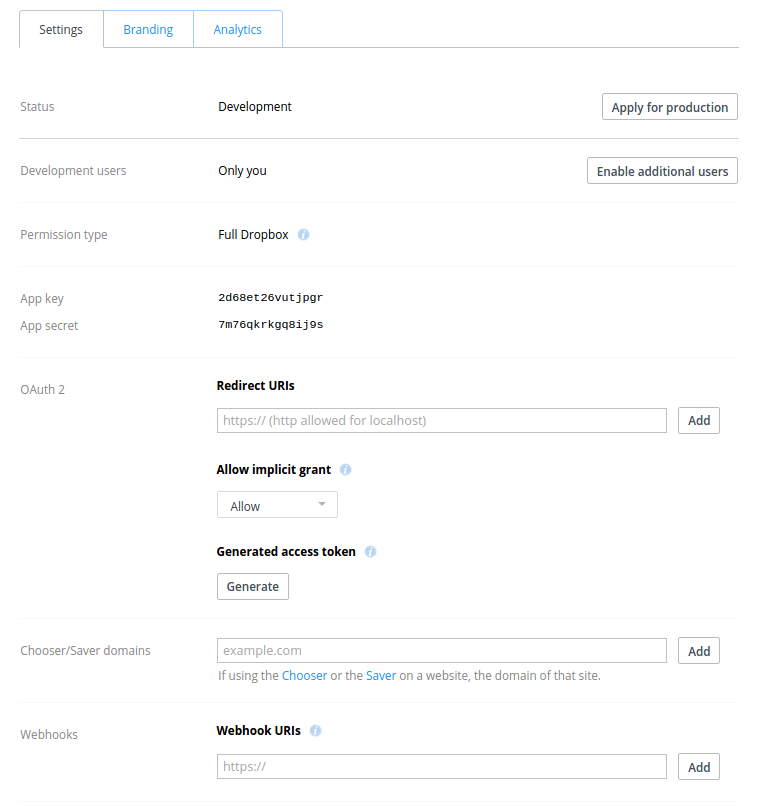
Once you’ve created the app, you’ll see the app settings page:
创建应用程序后,您将看到应用程序设置页面:
From here you can set the following:
在这里您可以设置以下内容:
Development users – this allows you to add Dropbox users for testing your app. By default the status of the app is development. This means that only you can test its functionality. If you let any other user access your app, they won’t be able to use it.
开发用户 –允许您添加Dropbox用户以测试您的应用。 默认情况下,应用程序的状态为“ 开发” 。 这意味着只有您可以测试其功能。 如果您允许任何其他用户访问您的应用,则他们将无法使用该应用。
Permission type – this is the setting that you have selected earlier when you created the app. There are only two permission types: folder and full dropbox. Folder means that your app only has access to the folder that you specify. Full Dropbox means that your app has access to all the user’s files.
权限类型 –这是您在创建应用程序时先前选择的设置。 只有两种权限类型:文件夹和完整的保管箱。 文件夹意味着您的应用程序只能访问您指定的文件夹。 完整的Dropbox意味着您的应用有权访问所有用户的文件。
App key and secret this is the unique key that’s used by Dropbox to identify your app. We’ll need this later.
应用程序密钥和机密这是Dropbox用来标识您的应用程序的唯一密钥。 我们稍后将需要它。
OAuth2 redirect urls – this is where you can set URLs to which your app can redirect right after the user has approved the necessary permissions. Leave this blank for now, you will be adding a value to it later. For now, take note that only the URLs that you have specified here can be used for redirection.
OAuth2重定向网址 –您可以在此处设置应用程序可以在用户批准必要的权限后将其重定向到的URL。 现在将此空白留空,稍后将为其添加一个值。 现在,请注意,只有您在此处指定的URL才能用于重定向。
Allow implicit grant – whether or not to automatically generate an access token once the user has granted the necessary permissions to your app. If you’re making use of Dropbox in the client-side, this should be set to allow so that you can get an access token through JavaScript. For the purpose of this project, you should set it to disallow.
允许隐式授予 –用户授予您的应用必要的权限后,是否自动生成访问令牌。 如果您在客户端使用Dropbox,则应将其设置为允许,这样您就可以通过JavaScript获取访问令牌。 就本项目而言,您应将其设置为disallow 。
Generated access token – you can use this to generate an access token for your account. The access token can be used when making requests to the API.
生成的访问令牌 –您可以使用它为您的帐户生成访问令牌。 向API发出请求时可以使用访问令牌。
Chooser/saver domains – if you’re using drop-ins such as the chooser and saver, this is where you need to specify the domains in which you’re embedding those.
选择器/保存器域 –如果使用的是诸如选择器和保护 器之 类的插件 ,则需要在其中指定嵌入这些域的域。
Webhooks – you can use webhooks if you want your server to perform specific actions whenever a file in the user’s dropbox account changes. You won’t be going through webhooks in this tutorial so I recommend you go check out the webhooks documentation if you need the functionality in your app.
Webhooks –如果用户的保管箱帐户中的文件发生更改时希望服务器执行特定操作,则可以使用webhooks。 在本教程中,您将不会经历Webhooks,因此,如果您需要在应用程序中使用该功能,我建议您查阅一下Webhooks文档 。
构建应用 (Building the App)
Now you’re ready to build the app. You’ll be using Laravel.
现在您已经准备好构建应用程序了。 您将使用Laravel 。
安装依赖项 (Installing Dependencies)
composer create-project --prefer-dist laravel/laravel pinchOnce installed, you also need to install Guzzle, Purl and Carbon.
一旦安装后,你还需要安装狂饮 , 金银丝和碳 。
composer require nesbot/carbon jwage/purl guzzlehttp/guzzleYou’ll be using Guzzle to make HTTP requests to the Dropbox API, Purl for constructing the Dropbox login URL, and Carbon to express the file dates in the user’s timezone.
您将使用Guzzle向Dropbox API发出HTTP请求,使用Purl构造Dropbox登录URL,并使用Carbon来表示用户时区中的文件日期。
组态 (Configuration)
Once Laravel is installed, open the .env file in the root of your project and add the dropbox configuration:
安装.env ,在项目的根目录中打开.env文件,并添加保管箱配置:
DROPBOX_APP_KEY="YOUR DROPBOX APP KEY"
DROPBOX_APP_SECRET="YOUR DROPBOX APP SECRET"
DROPBOX_REDIRECT_URI="YOUR DROPBOX LOGIN REDIRECT URL"
Use the app key and app secret that you got earlier from the Dropbox developer website as the value for DROPBOX_APP_KEY and DROPBOX_APP_SECRET. For the DROPBOX_REDIRECT_URI you have to specify an http URL, so if you’re using a virtual host, you will need to use something like Ngrok to serve the app. Then, in your virtual host configuration, add the URL provided by Ngrok as the ServerAlias.
使用您先前从Dropbox开发人员网站上获得的应用程序密钥和应用程序密钥作为DROPBOX_APP_KEY和DROPBOX_APP_SECRET的值。 对于DROPBOX_REDIRECT_URI您必须指定一个http URL,因此,如果您使用的是虚拟主机,则需要使用Ngrok之类的东西来服务该应用程序。 然后,在虚拟主机配置中,将Ngrok提供的URL添加为ServerAlias 。
<VirtualHost *:80>
ServerName pinch.dev
ServerAlias xxxxxxx.ngrok.io
ServerAdmin wern@localhost
DocumentRoot /home/wern/www/pinch/public
</VirtualHost>
路线 (Routes)
The different pages in the app are defined in the app/Http/routes.php file:
应用程序中的不同页面在app/Http/routes.php文件中定义:
Route::get('/', 'HomeController@index');
Route::post('/', 'HomeController@postIndex');
Route::get('/login', 'HomeController@login');
Route::group(
['middleware' => ['admin']],
function($app){
Route::get('/dashboard', 'AdminController@dashboard');
Route::get('/user', 'AdminController@user');
Route::get('/search', 'AdminController@search');
Route::get('/upload', 'AdminController@upload');
Route::post('/upload', 'AdminController@doUpload');
Route::get('/revisions', 'AdminController@revisions');
Route::get('/restore', 'AdminController@restoreRevision');
Route::get('/download', 'AdminController@download');
});
Breaking down the code above, first you have the routes which deal with logging into Dropbox:
分解上面的代码,首先,您具有处理登录Dropbox的路线:
//displays the view for logging in to dropbox
Route::get('/', 'HomeController@index');
//generates the dropbox login URL
Route::post('/', 'HomeController@postIndex');
//generates the access token based on the token provided by Dropbox
Route::get('/login', 'HomeController@login');
The admin pages are wrapped in a route group so that you could use a middleware to check whether the user accessing it is logged in or not.
管理页面包装在路由组中,因此您可以使用中间件来检查访问它的用户是否已登录。
Route::group(
['middleware' => ['admin']],
function($app){
...
});
Inside the admin route group, you have the route for serving the dashboard page. This page contains the links for each of the different operations that you can perform in the app.
在管理路由组中,您具有用于服务仪表板页面的路由。 此页面包含您可以在应用程序中执行的每个不同操作的链接。
Route::get('/dashboard', 'AdminController@dashboard');The user details page:
用户详细信息页面:
Route::get('/user', 'AdminController@user');The page for searching files:
搜索文件页面:
Route::get('/search', 'AdminController@search');The page for uploading files:
上传文件页面:
Route::get('/upload', 'AdminController@upload');
Route::post('/upload', 'AdminController@doUpload');
The page for viewing the different versions of a specific file and the page for restoring a specific version:
用于查看特定文件的不同版本的页面和用于还原特定版本的页面:
Route::get('/revisions', 'AdminController@revisions');
Route::get('/restore', 'AdminController@restoreRevision');
And lastly, the route for handling file downloads:
最后,处理文件下载的途径:
Route::get('/download', 'AdminController@download');管理员中间件 (Admin Middleware)
Next is the admin middleware (app/Http/Middleware/AdminMiddleware.php):
接下来是管理中间件( app/Http/Middleware/AdminMiddleware.php ):
<?php
namespace App\Http\Middleware;
use Closure;
class AdminMiddleware
{
public function handle($request, Closure $next)
{
if ($request->session()->has('access_token')) {
return $next($request);
}
return redirect('/')
->with('message', ['type' => 'danger', 'text' => 'You need to login']);
}
}
What the above code does is check whether the access_token has been set in the session. If it hasn’t been set, simply redirect to the home page, otherwise proceed with processing the request.
上面的代码所做的是检查会话中是否设置了access_token 。 如果尚未设置,只需重定向到主页,否则继续处理请求。
投寄箱类 (Dropbox Class)
The Dropbox class (app/Dropbox.php) is used for initializing the Guzzle client used for making requests to Dropbox. It has two methods: api and content. api is used for making requests to the API and content is used for dealing with content such as when you upload or download files.
Dropbox类( app/Dropbox.php )用于初始化用于向Dropbox发出请求的Guzzle客户端。 它有两种方法: api和content 。 api用于向API发出请求, content用于处理内容(例如上载或下载文件时)。
<?php
namespace App;
use GuzzleHttp\Client;
class Dropbox
{
public function api()
{
$client = new Client([
'base_uri' => 'https://api.dropboxapi.com',
]);
return $client;
}
public function content()
{
$client = new Client([
'base_uri' => 'https://content.dropboxapi.com'
]);
return $client;
}
}
家庭控制器 (HomeController)
The HomeController contains the logic for the home pages. This is where you add the code for logging into Dropbox and acquiring the access token which can be used by the app to make requests to the API.
HomeController包含主页的逻辑。 您可以在此处添加用于登录Dropbox并获取访问令牌的代码,应用可以使用该代码向API发出请求。
Open the app/Http/Controllers/HomeController.php file:
打开app/Http/Controllers/HomeController.php文件:
<?php
namespace App\Http\Controllers;
use Purl\Url;
use App\Dropbox;
use Illuminate\Http\Request;
class HomeController extends Controller
{
private $api_client;
public function __construct(Dropbox $dropbox)
{
$this->api_client = $dropbox->api();
}
public function index()
{
return view('index');
}
public function postIndex()
{
$url = new Url('https://www.dropbox.com/1/oauth2/authorize');
$url->query->setData([
'response_type' => 'code',
'client_id' => env('DROPBOX_APP_KEY'),
'redirect_uri' => env('DROPBOX_REDIRECT_URI')
]);
return redirect($url->getUrl());
}
public function login(Request $request)
{
if ($request->has('code')) {
$data = [
'code' => $request->input('code'),
'grant_type' => 'authorization_code',
'client_id' => env('DROPBOX_APP_KEY'),
'client_secret' => env('DROPBOX_APP_SECRET'),
'redirect_uri' => env('DROPBOX_REDIRECT_URI')
];
$response = $this->api_client->request(
'POST',
'/1/oauth2/token',
['form_params' => $data]
);
$response_body = json_decode($response->getBody(), true);
$access_token = $response_body['access_token'];
session(['access_token' => $access_token]);
return redirect('dashboard');
}
return redirect('/');
}
}
Breaking down the code above, define a private variable called $api_client. This stores the reference to the Guzzle client that’s returned by calling the api method in the Dropbox class.
分解上面的代码,定义一个私有变量$api_client 。 这将存储对通过调用Dropbox类中的api方法返回的Guzzle客户端的引用。
private $api_client;
public function __construct(Dropbox $dropbox)
{
$this->api_client = $dropbox->api();
}
The index method returns the index view:
index方法返回索引视图:
public function index()
{
return view('index');
}
The index view (resources/views/index.blade.php) contains the form that allows the user to log into Dropbox. It also has a hidden field which is used for the CSRF token (used for preventing Cross-Site Request Forgery attacks).
索引视图( resources/views/index.blade.php )包含允许用户登录Dropbox的表单。 它还具有用于CSRF令牌的隐藏字段(用于防止跨站请求伪造攻击)。
@extends('layouts.default')
@section('content')
<form method="POST">
<input type="hidden" name="_token" value="{{{ csrf_token() }}}" />
<button class="button">Login with Dropbox</button>
</form>
@stop
The index view inherits from the default template (resources/views/layouts/default.blade.php). Inside the #wrapper div is where the login form is rendered.
索引视图继承自默认模板( resources/views/layouts/default.blade.php )。 在#wrapper div内部是呈现登录表单的位置。
<!DOCTYPE html>
<html lang="en">
<head>
<meta charset="UTF-8">
<title>{{ env('APP_TITLE') }}</title>
<link rel="stylesheet" href="{{ url('assets/lib/picnic/picnic.min.css') }}">
<link rel="stylesheet" href="{{ url('assets/css/style.css') }}">
</head>
<body>
<div id="wrapper">
<h1>{{ env('APP_TITLE') }}</h1>
@yield('content')
</div>
</body>
</html>
This template uses picnic css to make things look nicer. The main stylesheet (public/assets/css/style.css) contains some basic styling for the main wrapper and alert boxes:
该模板使用野餐CSS使事情看起来更好。 主要样式表( public/assets/css/style.css )包含主要包装器和警报框的一些基本样式:
#wrapper {
width: 900px;
margin: 0 auto;
}
.alert {
padding: 20px;
}
.alert-danger {
background-color: #F55;
}
.alert-success {
background-color: #60B152;
}
Going back to the HomeController: you have the postIndex method which is responsible for generating the Dropbox login URL. This is where you use the Purl library to construct the login URL.
回到HomeController :您拥有postIndex方法,该方法负责生成Dropbox登录URL。 您可以在此处使用Purl库构造登录URL。
public function postIndex()
{
$url = new Url('https://www.dropbox.com/1/oauth2/authorize');
$url->query->setData([
'response_type' => 'code',
'client_id' => env('DROPBOX_APP_KEY'),
'redirect_uri' => env('DROPBOX_REDIRECT_URI')
]);
return redirect($url->getUrl());
}
The following are the required query parameters for the login URL:
以下是登录URL必需的查询参数:
response_type– what Dropbox will append to the redirect URL that you specify. This can have a value of eithertokenorcode. Usingtokenmeans that the access token will be passed as a hash in the redirect URL. This is useful for client side apps but useless in this case since you’re mainly working in the server side, so usecodeinstead. This passes a unique code to the redirect URL as a query parameter. This code can then be used to exchange for an access token. Note that you cannot have aresponse_typeoftokenif you have disallowed implicit grant in your app settings.response_type– Dropbox将附加到您指定的重定向URL的内容。 它可以具有token或code的值。 使用token意味着访问令牌将作为哈希在重定向URL中传递。 这对客户端应用程序很有用,但在这种情况下没有用,因为您主要是在服务器端工作,所以请改用code。 这会将唯一的代码作为查询参数传递到重定向URL。 然后可以使用此代码交换访问令牌。 请注意,如果您在应用程序设置中不允许隐式授予,则不能具有token的response_type。client_id– your Dropbox app key.client_id–您的Dropbox应用程序密钥。redirect_uri– this can be one of the redirect URLs that you’ve specified in your app settings.redirect_uri–这可以是您在应用设置中指定的重定向URL之一。
Once that’s done, redirect to the final URL that’s generated by Purl.
完成此操作后,重定向到Purl生成的最终URL。
Next is the login method. This is responsible for processing the request in the redirect URL that you’ve specified. This is where the authorization code is being passed. You can get the code by using the Request class so you’re injecting it to the login method.
接下来是login方法。 这负责处理您指定的重定向URL中的请求。 这是传递授权码的地方。 您可以使用Request类来获取代码,以便将其注入login方法。
public function login(Request $request)
{
...
}
Inside the method, check if the code is passed into the URL. If it’s not, redirect back to the home page.
在方法内部,检查code是否传递到URL中。 如果不是,请重定向回主页。
if ($request->has('code')) {
...
}
return redirect('/');
Next, add all the parameters required by the API endpoint for acquiring an access token. This includes the code which is the authorization code that’s passed in the URL. The grant_type is always authorization_code: this is the code that’s passed in the URL that you can use to exchange for an access token. The client_id and client_secret are the Dropbox app key and secret. The redirect_uri is the redirect URL.
接下来,添加API端点所需的用于获取访问令牌的所有参数。 这包括code这是公司在URL中传递的授权码。 grant_type始终是authorization_code :这是URL中传递的代码,可用于交换访问令牌。 client_id和client_secret是Dropbox应用的密钥和机密。 redirect_uri是重定向URL。
$data = [
'code' => $request->input('code'),
'grant_type' => 'authorization_code',
'client_id' => env('DROPBOX_APP_KEY'),
'client_secret' => env('DROPBOX_APP_SECRET'),
'redirect_uri' => env('DROPBOX_REDIRECT_URI')
];
Make a POST request to the /1/oauth2/token endpoint and pass the $data as form parameters:
向/1/oauth2/token端点发出POST请求,并将$data作为表单参数传递:
$response = $this->api_client->request(
'POST',
'/1/oauth2/token',
[
'form_params' => $data
...
]
));
Extract the access token from the response body, set it in the session then redirect to the admin dashboard page:
从响应主体中提取访问令牌,在会话中进行设置,然后重定向到管理控制台页面:
$response_body = json_decode($response->getBody(), true);
$access_token = $response_body['access_token'];
session(['access_token' => $access_token]);
return redirect('dashboard');
管理员控制器 (AdminController)
Once the user is logged in, all the requests are handled by the AdminController (app/Http/Controllers/AdminController.php) which contains the following code:
用户登录后,所有请求均由AdminController ( app/Http/Controllers/AdminController.php )处理,该代码包含以下代码:
<?php
namespace App\Http\Controllers;
use App\Dropbox;
use Illuminate\Http\Request;
class AdminController extends Controller
{
private $api_client;
private $content_client;
private $access_token;
public function __construct(Dropbox $dropbox)
{
$this->api_client = $dropbox->api();
$this->content_client = $dropbox->content();
$this->access_token = session('access_token');
}
public function dashboard()
{
return view('admin.dashboard');
}
public function user()
{
$response = $this->api_client->request('POST', '/2/users/get_current_account', [
'headers' => [
'Authorization' => 'Bearer ' . $this->access_token
]
]);
$user = json_decode($response->getBody(), true);
$page_data = [
'user' => $user
];
return view('admin.user', $page_data);
}
public function search(Request $request)
{
$page_data = [
'path' => '',
'query' => '',
'matches' => []
];
if ($request->has('path') && $request->has('query')) {
$path = $request->input('path');
$query = $request->input('query');
$data = json_encode(
[
'path' => $path,
'mode' => 'filename',
'query' => $query
]
);
$response = $this->api_client->request(
'POST', '/2/files/search',
[
'headers' => [
'Authorization' => 'Bearer ' . $this->access_token,
'Content-Type' => 'application/json'
],
'body' => $data
]);
$search_results = json_decode($response->getBody(), true);
$matches = $search_results['matches'];
$page_data = [
'path' => $path,
'query' => $query,
'matches' => $matches
];
}
return view('admin.search', $page_data);
}
public function revisions(Request $request)
{
if ($request->has('path')) {
$path = $request->input('path');
$data = json_encode([
'path' => $path
]);
$response = $this->api_client->request(
'POST', '/2/files/list_revisions',
[
'headers' => [
'Authorization' => 'Bearer ' . $this->access_token,
'Content-Type' => 'application/json'
],
'body' => $data
]);
$revisions = json_decode($response->getBody(), true);
$page_data = [
'revisions' => $revisions['entries'],
'path' => $path
];
return view('admin.revisions', $page_data);
} else {
return redirect('search');
}
}
public function restoreRevision(Request $request)
{
if ($request->has('path') && $request->has('rev')) {
$path = $request->input('path');
$rev = $request->input('rev');
$data = json_encode([
'path' => $path,
'rev' => $rev
]);
$response = $this->api_client->request(
'POST', '/2/files/restore',
[
'headers' => [
'Authorization' => 'Bearer ' . $this->access_token,
'Content-Type' => 'application/json'
],
'body' => $data
]);
$response_data = json_decode($response->getBody(), true);
if (!empty($response_data)) {
return redirect("revisions?path={$path}")
->with('message', [
'type' => 'success',
'text' => "File has been restored to the following revision: {$response_data['rev']}"
]);
} else {
return redirect("revisions?path={$path}")
->with('message', [
'type' => 'danger',
'text' => 'The revision request failed. Please try again'
]);
}
} else {
return redirect('search');
}
}
public function download(Request $request)
{
if ($request->has('path')) {
$path = $request->input('path');
$data = json_encode([
'path' => $path
]);
$response = $this->content_client->request(
'POST',
'/2/files/download',
[
'headers' => [
'Authorization' => 'Bearer ' . $this->access_token,
'Dropbox-API-Arg' => $data
]
]);
$result = $response->getHeader('dropbox-api-result');
$file_info = json_decode($result[0], true);
$content = $response->getBody();
$filename = $file_info['name'];
$file_extension = substr($filename, strrpos($filename, '.'));
$file = uniqid() . $file_extension;
$file_size = $file_info['size'];
return response($content)
->header('Content-Description', 'File Transfer')
->header('Content-Disposition', "attachment; filename={$file}")
->header('Content-Transfer-Encoding', 'binary')
->header('Connection', 'Keep-Alive')
->header('Content-Length', $file_size);
} else {
return redirect('search');
}
}
public function upload()
{
return view('admin.upload');
}
public function doUpload(Request $request)
{
if ($request->hasFile('file') && $request->has('path')) {
$valid_mimetypes = [
'image/png', 'image/jpeg', 'image/jpg', 'image/gif', 'image/bmp'
];
$valid_size = 5000000; //5Mb
$mime_type = $request->file('file')->getMimeType();
$size = $request->file('file')->getSize();
$filename = $request->file('file')->getClientOriginalName();
$path = $request->input('path') . '/' . $filename;
if (in_array($mime_type, $valid_mimetypes) && $size <= $valid_size) {
$data = json_encode([
'path' => $path,
'mode' => 'add',
'autorename' => true,
'mute' => false
]);
$response = $this->content_client->request(
'POST', '/2/files/upload',
[
'headers' => [
'Authorization' => 'Bearer ' . $this->access_token,
'Content-Type' => 'application/octet-stream',
'Dropbox-API-Arg' => $data
],
'body' => fopen($request->file('file'), 'r')
]);
$response_data = json_decode($response->getBody(), true);
if (!empty($response_data['name'])) {
$name = $response_data['name'];
return redirect('upload')
->with('message', [
'type' => 'success',
'text' => "File with the name {$name} was uploaded!"
]);
}
}
}
return redirect('upload')
->with('message', [
'type' => 'danger',
'text' => 'There was a problem uploading the file'
]);
}
}
Breaking down the code above, inside the class you declare three private variables and initialize them in the constructor. These are the API client, content client, and the access token.
分解上面的代码,在类内部声明三个私有变量,然后在构造函数中对其进行初始化。 它们是API客户端,内容客户端和访问令牌。
private $api_client;
private $content_client;
private $access_token;
public function __construct(Dropbox $dropbox)
{
$this->api_client = $dropbox->api();
$this->content_client = $dropbox->content();
$this->access_token = session('access_token');
}
Next is the method for serving the dashboard view:
接下来是提供仪表板视图的方法:
public function dashboard()
{
return view('admin.dashboard');
}
The dashboard view (resources/views/admin/dashboard.blade.php) contains the following code. It links to all the pages which allows the users to perform different operations in the API:
仪表板视图( resources/views/admin/dashboard.blade.php )包含以下代码。 它链接到所有页面,允许用户在API中执行不同的操作:
@extends('layouts.admin')
@section('content')
<h3>What do you like to do?</h3>
<ul>
<li><a href="/user">View User Info</a></li>
<li><a href="/search">Search Files</a></li>
<li><a href="/upload">Upload Files</a></li>
</ul>
@stop
All views served by the AdminController inherit from the admin template (resources/views/layouts/admin.blade.php). Just like the default template from earlier, this uses picnic css and some base styling. The only difference is that you’re including the alert partial in the page.
AdminController服务的所有视图都继承自管理模板( resources/views/layouts/admin.blade.php )。 就像之前的默认模板一样,它使用了野餐CSS和一些基本样式。 唯一的区别是您将alert部分包括在页面中。
<!DOCTYPE html>
<html lang="en">
<head>
<meta charset="UTF-8">
<title>{{ env('APP_TITLE') }}</title>
<link rel="stylesheet" href="{{ url('assets/lib/picnic/picnic.min.css') }}">
<link rel="stylesheet" href="{{ url('assets/css/style.css') }}">
</head>
<body>
<div id="wrapper">
<h1>{{ env('APP_TITLE') }}</h1>
@include('partials.alert')
@yield('content')
</div>
</body>
</html>
The alert partial (resources/views/partials/alert.blade.php) is used for outputting any data that’s flashed in the session (temporary data that’s immediately deleted once the request is completed). The alert partial contains the following code:
alert partial( resources/views/partials/alert.blade.php )用于输出会话中闪烁的任何数据(请求完成后立即删除的临时数据)。 警报部分包含以下代码:
@if(session('message'))
<div class="alert alert-{{ session('message.type') }}">
{{ session('message.text') }}
</div>
@endif
获取用户数据 (Getting the User Data)
Going back to the AdminController, you have the user method. What this does is make a POST request to the API endpoint which returns the current user’s data. This data is then passed to the user view (resources/views/admin/user.blade.php).
回到AdminController ,您有了user方法。 这样做是向API端点发出POST请求,该请求返回当前用户的数据。 然后,此数据将传递到user视图( resources/views/admin/user.blade.php )。
public function user()
{
$response = $this->api_client->request('POST', '/2/users/get_current_account', [
'headers' => [
'Authorization' => 'Bearer ' . $this->access_token
]
]);
$user = json_decode($response->getBody(), true);
$page_data = [
'user' => $user
];
return view('admin.user', $page_data);
}
The user view shows user data such as the account ID, name and email:
用户视图显示用户数据,例如帐户ID,名称和电子邮件:
@extends('layouts.admin')
@section('content')
<h3>User Info</h3>
<ul>
<li>Account ID: {{ $user['account_id'] }}</li>
<li>Name: {{ $user['name']['display_name'] }}</li>
<li>Email: {{ $user['email'] }}</li>
<li>Referral Link: <a href="{{ $user['referral_link'] }}">{{ $user['referral_link'] }}</a></li>
<li>Account Type: {{ $user['account_type']['.tag'] }}</li>
</ul>
@stop
搜索文件 (Searching Files)
Next is the method for rendering the view for searching files in the user’s Dropbox account:
接下来是呈现视图以在用户的Dropbox帐户中搜索文件的方法:
public function search(Request $request)
{
...
}
Inside the method, initialize the default page data:
在方法内部,初始化默认页面数据:
$page_data = [
'path' => '',
'query' => '',
'matches' => []
];
Check if the path and the query have been passed as a query parameters. The path is the path where the search will be performed. This needs to be an existing path in the user’s Dropbox (e.g /Files, /Documents, /Public). The forward slash is necessary to indicate that you’re starting from the root directory. The query is the name of the file that the user wants to look for. This doesn’t have to be the exact file name.
检查path和query是否已作为查询参数传递。 该path是将在其中执行搜索的路径。 这必须是用户Dropbox中的现有路径(例如/Files , /Documents , /Public )。 必须使用正斜杠表示您从根目录开始。 query是用户想要查找的文件的名称。 不必是确切的文件名。
if ($request->has('path') && $request->has('query')) {
...
}
If the path and query are present, assign them to their own variables and add them to the JSON encoded data required by the search request. The mode that you’re passing along is the type of search that you want to perform. This can be filename, filename_and_content, or deleted_filename.
如果存在path和query ,则将它们分配给它们自己的变量,并将它们添加到搜索请求所需的JSON编码数据中。 您传递的mode是您要执行的搜索类型。 可以是filename , filename_and_content或deleted_filename 。
$path = $request->input('path');
$query = $request->input('query');
$data = json_encode(
[
'path' => $path,
'mode' => 'filename',
'query' => $query
]
);
Send the request:
发送请求:
$response = $this->api_client->request(
'POST', '/2/files/search',
[
'headers' => [
'Authorization' => 'Bearer ' . $this->access_token,
'Content-Type' => 'application/json'
],
'body' => $data
]);
Once you get the response back, extract the response body, convert it to an array then extract the matches that were found. The path and query are also passed in so the user can see what the current query is.
一旦返回响应,请提取响应主体,将其转换为数组,然后提取找到的匹配项。 path和query也将传入,以便用户可以看到当前查询是什么。
$search_results = json_decode($response->getBody(), true);
$matches = $search_results['matches'];
$page_data = [
'path' => $path,
'query' => $query,
'matches' => $matches
];
Render the search view:
渲染搜索视图:
return view('admin.search', $page_data);The search view (resources/views/admin/search.blade.php) contains the following:
搜索视图( resources/views/admin/search.blade.php )包含以下内容:
@extends('layouts.admin')
@section('content')
<h3>Search</h3>
<form method="GET">
<p>
<label for="path">Path</label>
<input type="text" name="path" id="path" value="{{ $path }}">
</p>
<p>
<label for="query">Query</label>
<input type="search" name="query" id="query" value="{{ $query }}">
</p>
<button>Search</button>
</form>
@if(count($matches) > 0)
<h5>Search Results</h5>
<table>
<thead>
<tr>
<th>Filename</th>
<th>Revisions</th>
<th>Download</th>
</tr>
</thead>
<tbody>
@foreach($matches as $match)
<tr>
<td>{{ $match['metadata']['name'] }}</td>
<td><a href="/revisions?path={{ urlencode($match['metadata']['path_lower']) }}">view</a></td>
<td><a href="/download?path={{ urlencode($match['metadata']['path_lower']) }}">download</a></td>
</tr>
@endforeach
</tbody>
</table>
@endif
@stop
From the above code, you can see that you have a form which submits the data via the GET method. If the number of $matches is greater than 0, render the search results table. The table displays the filename, a link for showing the revisions in the file, and a download link for downloading the file. In those two links, you’re passing in the lowercase version of the file path since it’s the required parameter for the revisions and download requests.
从上面的代码中,您可以看到您有一个表单,该表单通过GET方法提交数据。 如果$matches的数量大于0,则呈现搜索结果表。 该表显示文件名,用于显示文件中修订的链接以及用于下载文件的下载链接。 在这两个链接中,您传递的是文件路径的小写版本,因为它是修订和下载请求的必需参数。
文件修订 (File Revisions)
The revisions method is responsible for listing the different revisions of a file. This checks if the path is present in the request and just redirects back to the search page if it’s not.
revisions方法负责列出文件的不同版本。 这将检查请求中是否存在该path如果不存在,则仅重定向回搜索页面。
public function revisions(Request $request)
{
if ($request->has('path')) {
...
} else {
return redirect('search');
}
}
Otherwise, it uses the path as a parameter for the request:
否则,它将path用作请求的参数:
$path = $request->input('path');
$data = json_encode([
'path' => $path
]);
Then, make the request, extract the data from the response body, convert it to an array and pass it as the data for the revisions view.
然后,发出请求,从响应主体中提取数据,将其转换为数组,并将其作为revisions视图的数据传递。
$response = $this->api_client->request(
'POST', '/2/files/list_revisions',
[
'headers' => [
'Authorization' => 'Bearer ' . $this->access_token,
'Content-Type' => 'application/json'
],
'body' => $data
]);
$revisions = json_decode($response->getBody(), true);
$page_data = [
'revisions' => $revisions['entries'],
'path' => $path
];
return view('admin.revisions', $page_data);
The revisions view (resources/views/admin/revisions.blade.php) outputs the file path and displays a table containing the revision details such as the revision ID (a unique ID assigned by Dropbox every time a file is revised), the modification timestamp, the size of the file in bytes, and a link for restoring a specific revision.
revisions视图( resources/views/admin/revisions.blade.php )输出文件路径,并显示包含修订版详细信息的表,例如修订版ID(每次修订文件时,Dropbox分配的唯一ID),修改时间戳,文件大小(以字节为单位)以及用于还原特定修订的链接。
@extends('layouts.admin')
@section('content')
<h3>Revisions</h3>
<strong>File: </strong> {{ $path }}
<table>
<thead>
<tr>
<th>Revision ID</th>
<th>Modified</th>
<th>Size (Bytes)</th>
<th>Restore</th>
</tr>
</thead>
<tbody>
@foreach($revisions as $rev)
<tr>
<td>{{ $rev['rev'] }}</td>
<td>{{ Carbon\Carbon::parse($rev['server_modified'])->setTimezone(env('APP_TIMEZONE'))->toDayDateTimeString() }}</td>
<td>{{ $rev['size'] }}</td>
<td><a href="/restore?path={{ urlencode($rev['path_lower']) }}&rev={{ $rev['rev'] }}">restore</a></td>
</tr>
@endforeach
</tbody>
</table>
@stop
Note that this is where you use the Carbon library to express the timestamp into the timezone that was added in the .env file. Also note that the lowercase file path and the revision ID are passed in as query parameters to the route for restoring a specific file revision.
请注意,这里是您使用Carbon库将时间戳记表达为.env文件中添加的时区的.env 。 另请注意,小写文件路径和修订ID作为查询参数传递到用于还原特定文件修订的路由。
恢复修订 (Restoring Revisions)
The restoreRevision method lists the different revisions of a file. The API endpoint /2/files/restore requires both the file path and the revision ID, so you check if they were passed in the request. If not, then simply redirect back to the search page.
restoreRevision方法列出了文件的不同修订版。 API端点/2/files/restore需要文件路径和修订ID,因此您检查它们是否在请求中传递。 如果不是,则只需重定向回搜索页面。
public function restoreRevision(Request $request)
{
if ($request->has('path') && $request->has('rev')) {
...
} else {
return redirect('search');
}
}
If the path and revision ID were passed, add those to the request parameters and then make the request:
如果传递了路径和修订ID,则将其添加到请求参数中,然后发出请求:
$path = $request->input('path');
$rev = $request->input('rev');
$data = json_encode([
'path' => $path,
'rev' => $rev
]);
$response = $this->api_client->request(
'POST', '/2/files/restore',
[
'headers' => [
'Authorization' => 'Bearer ' . $this->access_token,
'Content-Type' => 'application/json'
],
'body' => $data
]);
Once you get the response data back, check if it’s not empty, which means that the revision request was completed. Redirect back with a success message if this happens. If not, redirect back with an error message. To test this, you can open the Dropbox app in your machine. It should immediately sync the restored version if it’s completed.
取回响应数据后,请检查其是否为空,这表示修订请求已完成。 如果发生这种情况,请重定向并返回一条成功消息。 如果不是,请重定向并返回错误消息。 要对此进行测试,您可以在计算机中打开Dropbox应用。 如果完成,它应该立即同步还原的版本。
$response_data = json_decode($response->getBody(), true);
if (!empty($response_data)) {
return redirect("revisions?path={$path}")
->with('message', [
'type' => 'success',
'text' => "File has been restored to the following revision: {$response_data['rev']}"
]);
} else {
return redirect("revisions?path={$path}")
->with('message', [
'type' => 'danger',
'text' => 'The revision request failed. Please try again'
]);
}
下载档案 (Downloading Files)
Next is the method which handles download requests. Just like the other methods that you’ve used so far, this method also requires the file path.
接下来是处理下载请求的方法。 就像您到目前为止使用的其他方法一样,该方法也需要文件路径。
public function download(Request $request)
{
if ($request->has('path')) {
...
} else {
return redirect('search');
}
}
If the path is present, add it to the request parameters:
如果存在该路径,请将其添加到请求参数中:
$path = $request->input('path');
$data = json_encode([
'path' => $path
]);
Then, perform the request. Note that this time you’re not passing anything to the body of the request. Instead, you’re passing it in the Dropbox-API-Arg request header.
然后,执行请求。 请注意,这次您没有将任何内容传递给请求的主体。 而是在Dropbox-API-Arg请求标头中传递它。
$response = $this->content_client->request(
'POST',
'/2/files/download',
[
'headers' => [
'Authorization' => 'Bearer ' . $this->access_token,
'Dropbox-API-Arg' => $data
]
]);
The response body that you get from this request is the binary data of the file itself. The file info is passed in the response header so use the getHeader method provided by Guzzle to extract the header data in the form of an array. The file info is stored in the first item as a JSON string, so use json_decode to convert it to an array.
您从此请求获得的响应主体是文件本身的二进制数据。 文件信息在响应标头中传递,因此请使用Guzzle提供的getHeader方法提取数组形式的标头数据。 文件信息作为JSON字符串存储在第一项中,因此请使用json_decode将其转换为数组。
$result = $response->getHeader('dropbox-api-result');
$file_info = json_decode($result[0], true);
Extract the file contents, generate the file name to be used for the download, and get the file size:
提取文件内容,生成用于下载的文件名,并获取文件大小:
$content = $response->getBody();
$filename = $file_info['name'];
$file_extension = substr($filename, strrpos($filename, '.'));
$file = uniqid() . $file_extension;
$file_size = $file_info['size'];
Return the response data and add the necessary headers so that the browser will treat it as a download request. Note that the uniqid function is used to generate the filename. This is because you’re passing the filename in the header and any illegal character might cause the download request to fail so it serves as a safety measure.
返回响应数据并添加必要的标头,以便浏览器将其视为下载请求。 请注意, uniqid函数用于生成文件名。 这是因为您要在标题中传递文件名,并且任何非法字符都可能导致下载请求失败,因此这是一种安全措施。
return response($content)
->header('Content-Description', 'File Transfer')
->header('Content-Disposition', "attachment; filename={$file}")
->header('Content-Transfer-Encoding', 'binary')
->header('Connection', 'Keep-Alive')
->header('Content-Length', $file_size);
上载档案 (Uploading Files)
Now proceed with the final operation that you can perform in this app: file uploads. First, render the upload view:
现在继续执行您可以在此应用中执行的最终操作:文件上传。 首先,渲染upload视图:
public function upload()
{
return view('admin.upload');
}
The upload view (resources/views/admin/upload.blade.php) has a form which asks for the path to which the file will be uploaded and the file itself.
upload视图( resources/views/admin/upload.blade.php )具有一种形式,用于询问文件将被上传到的路径以及文件本身。
@extends('layouts.admin')
@section('content')
<h3>Upload</h3>
<form method="POST" enctype="multipart/form-data">
<input type="hidden" name="_token" value="{{{ csrf_token() }}}" />
<p>
<label for="path">Path</label>
<input type="text" name="path" id="path">
</p>
<p>
<label for="file">File</label>
<input type="file" name="file" id="file">
</p>
<button>upload</button>
</form>
@stop
Once the form is submitted, it is processed by the doUpload method. This checks if a file has been uploaded and if a path has been specified. If it hasn’t been set, redirect back to the upload page with an error message.
提交表单后,将通过doUpload方法对其进行处理。 这将检查文件是否已上传以及是否已指定路径。 如果尚未设置,请重定向到上载页面,并显示一条错误消息。
public function doUpload(Request $request)
{
if ($request->hasFile('file') && $request->has('path')) {
...
}
return redirect('upload')
->with('message', [
'type' => 'danger',
'text' => 'There was a problem uploading the file'
]);
}
If the path and file are present, specify the valid mime types and the valid file size:
如果存在路径和文件,请指定有效的mime类型和有效的文件大小:
$valid_mimetypes = [
'image/png', 'image/jpeg', 'image/jpg', 'image/gif', 'image/bmp'
];
$valid_size = 5000000; //5Mb
Get the file info:
获取文件信息:
$mime_type = $request->file('file')->getMimeType();
$size = $request->file('file')->getSize();
$filename = $request->file('file')->getClientOriginalName();
$path = $request->input('path') . '/' . $filename;
Check if the file has a valid mime type and size. If so, add the request parameters. This includes the path to where the file will be saved in the user’s Dropbox. mode is the action to be performed if the file already exists. This can have a value of either add, overwrite or update. add means that the file will be added but Dropbox will append a number to the filename (file (2).txt, file (3).txt, etc.). Next is autorename, which should always be set to true if the mode is set to add. That way, the new file will be automatically renamed if a file with the same name already exists. The last option is mute which simply tells Dropbox whether to notify the user or not. The default for this option is false which means that the user will be notified by the Dropbox app when a file is uploaded. If this is set to true, the notification is not sent.
检查文件是否具有有效的mime类型和大小。 如果是这样,请添加请求参数。 这包括将文件保存在用户的Dropbox中的path 。 mode是文件已存在时要执行的操作。 它的值可以为add , overwrite或update 。 add表示将添加文件,但Dropbox将在文件名后附加一个数字( file (2).txt , file (3).txt等)。 接下来是autorename ,如果将mode设置为add ,则应始终将其设置为true 。 这样,如果已经存在同名文件,则新文件将自动重命名。 最后一个选项是mute ,它只是告诉Dropbox是否通知用户。 此选项的默认值为false ,这意味着在上传文件时,Dropbox应用会通知用户。 如果将其设置为true ,则不发送通知。
if (in_array($mime_type, $valid_mimetypes) && $size <= $valid_size) {
$data = json_encode([
'path' => $path,
'mode' => 'add',
'autorename' => true,
'mute' => false
]);
}
Make the file upload request. Note that this uses the content client as opposed to the API client since you’re dealing with files and not data. The upload options are passed in the Dropbox-API-Arg header as a JSON string, while the binary data for the file itself is passed in the request body. Also specify the Content-Type to be application/octet-stream as you’re passing in binary data to the request body.
提出文件上传请求。 请注意,这是使用内容客户端而不是API客户端,因为您要处理文件而不是数据。 上载选项作为JSON字符串在Dropbox-API-Arg标头中传递,而文件本身的二进制数据在请求正文中传递。 在将二进制数据传递到请求正文时,还应将Content-Type指定为application/octet-stream 。
$response = $this->content_client->request(
'POST', '/2/files/upload',
[
'headers' => [
'Authorization' => 'Bearer ' . $this->access_token,
'Content-Type' => 'application/octet-stream',
'Dropbox-API-Arg' => $data
],
'body' => fopen($request->file('file'), 'r')
]);
Once you get a response back, convert it to an array and check for the filename. If it’s present, redirect back to the upload page and inform the user that the file was uploaded.
收到响应后,将其转换为数组并检查文件名。 如果存在,请重定向回到上传页面,并通知用户文件已上传。
$response_data = json_decode($response->getBody(), true);
if (!empty($response_data['name'])) {
$name = $response_data['name'];
return redirect('upload')
->with('message', [
'type' => 'success',
'text' => "File with the name {$name} was uploaded!"
]);
}
结论 (Conclusion)
In this article, you’ve learned how to work with the Dropbox API in PHP. Specifically, you’ve learned how to log into Dropbox, get the current user’s info, search for files, list the file revisions, restore a revision, download a file, and finally upload a file.
在本文中,您学习了如何在PHP中使用Dropbox API。 具体来说,您已经学习了如何登录Dropbox,获取当前用户的信息,搜索文件,列出文件修订版本,还原修订版本,下载文件以及最后上传文件。
You’ve only taken a look at few of the things that you can do with the Dropbox API, so if you want to learn more I recommend you to go check out the Documentation.
您仅了解了Dropbox API可以执行的几项操作,因此,如果您想了解更多信息,建议您阅读文档 。
Questions? Comments? Leave them below the like button!
有什么问题吗 注释? 将它们放在“喜欢”按钮下面!
翻译自: https://www.sitepoint.com/build-your-own-dropbox-client-with-the-dropbox-api/
dropbox 怎么使用
dropbox 怎么使用_使用Dropbox API构建自己的Dropbox客户端相关推荐
- dropbox免费容量_免费课程:使用ES6和Dropbox构建费用管理器
dropbox免费容量 In my previous startup, we used the Dropbox API heavily in our production process. Our p ...
- ktor框架用到了netty吗_教你如何构建异步服务器和客户端的 Kotlin 框架 Ktor
Ktor 是一个使用 Kotlin 以最小的成本快速创建 Web 应用程序的框架. Ktor 是一个用于在连接系统(connected systems)中构建异步服务器和客户端的 Kotlin 框架. ...
- Pytorch ——基础指北_叁 [Pytorch API 构建基础模型]
Pytorch --基础指北_叁 系列文章目录 Pytorch --基础指北_零 Pytorch --基础指北_壹 Pytorch --基础指北_贰 Pytorch --基础指北_叁 文章目录 Pyt ...
- darksky 经纬度_使用DarkSky API构建天气应用
darksky 经纬度 网络构建几乎是每个人都可以享受到的乐趣,特别是当您使用API动态提取数据时. 有些人可能称其为"网页应用程序",有些人则称其为"网页" ...
- react hooks使用_如何使用React Hooks和Context API构建简单的PokémonWeb App
react hooks使用 After seven years of full stack development using Ruby, Python, and vanilla JavaScript ...
- ios apple语音性别_如何使用Apple的CoreML和Vision API构建图像识别iOS应用
ios apple语音性别 by Mark Mansur 马克·曼苏尔(Mark Mansur) 如何使用Apple的CoreML和Vision API构建图像识别iOS应用 (How to buil ...
- dropbox 10g升级_通过空间升级,应用程序等为您的Dropbox帐户增值
dropbox 10g升级 Dropbox is a great way to store files in the cloud and access them easily from devices ...
- 【物体检测快速入门系列 | 01 】基于Tensorflow2.x Object Detection API构建自定义物体检测器
这是机器未来的第1篇文章 原文首发地址:https://blog.csdn.net/RobotFutures/article/details/124745966 CSDN话题挑战赛第1期 活动详情地址 ...
- SpringBoot整合Swagger测试api构建
@Author:SimpleWu 什么是Swagger? Swagger是什么:THE WORLD'S MOST POPULAR API TOOLING 根据官网的介绍: Swagger Inspec ...
- 使用 OpenAI API 构建 Next.js 应用程序的初学者指南
欢迎阅读我们的初学者指南,了解如何使用 OpenAI API 构建 Next.js 应用程序.在本教程中,我们将引导您完成利用 OpenAI API 的功能创建功能强大且智能的 Next.js 应用程 ...
最新文章
- cocos2dx-3.9 集成admob
- 前后端分离的接口规范
- 将Button等控件嵌入到repeater中
- TensorFlow学习笔记(十三)TensorFLow 常用Optimizer 总结
- SparkStreaming -Kafka数据源
- 程序员应如何理解高并发中的协程
- JimuReport积木报表1.3.3 版本发布,可视化报表工具
- STM8单片机复位源判断
- linux命令行可以看图片吗,活久见!Linux命令行居然也可以用来查看图像?
- 【恋上数据结构】递归(函数调用过程、斐波那契数列、上楼梯、汉诺塔、递归转非递归、尾调用)
- Notepad++ 配置java编译环境
- MYSQL列中的数据以逗号隔开,如何查询
- Win7虚拟Wifi热点(设置后能连接wifi但无法上网的可按后面提示操作)
- java库的使用--Failsafe
- android获取系统签名,Android apk签名详解——AS签名、获取签名信息、系统签名、命令行签名...
- openstack中虚拟机CPU与内存布局设计(三)
- @Value注入静态变量(static)
- useragent android,获取android默认的useragent
- 【Coursera】深度神经网络的改进:超参数调整、正则化和优化(更新中2023/04/12)
- matlab根据根求多项式,matlab求解多项式的根