Android 应用开发(38)TableLayout(表格布局)
TableLayout(表格布局)
前面我们已经学习了平时实际开发中用得较多的线性布局(LinearLayout)与相对布局(RelativeLayout), 其实学完这两个基本就够用了,笔者在实际开发中用得比较多的也是这两个,当然作为一个好学的程序猿, 都是喜欢刨根问题的,所以虽说用得不多,但是还是有必要学习一下基本的用法的,说不定哪一天能用得上呢! 你说是吧,学多点东西没什么的,又不吃亏!好了,扯淡就扯到这里,开始这一节的学习吧,这一节我们会学习 Android中的第三个布局:TableLayout(表格布局)!
1.本节学习路线图
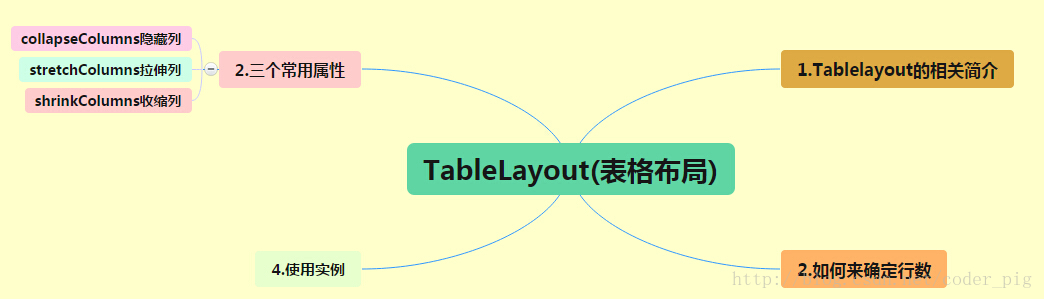
路线图分析: 从上面的路线图,可以看出TableLayout的用法还是很简单的,无非就是确定表格的行数,以及使用 那三个属性来设置每一行中的第某列的元素隐藏,拉伸,或者收缩即可!
2.TableLayout的介绍
相信学过HTML的朋友都知道,我们可以通过< table >< tr >< td >就可以生成一个HTML的表格, 而Android中也允许我们使用表格的方式来排列组件,就是行与列的方式,就说我们这节的TableLayout! 但却不像我们后面会讲到的Android 4.0后引入的GridLayout(网格)布局一样,直接就可以设置多少行与多少列!
3.如何确定行数与列数
- ①如果我们直接往TableLayout中添加组件的话,那么这个组件将占满一行!!!
- ②如果我们想一行上有多个组件的话,就要添加一个TableRow的容器,把组件都丢到里面!
- ③tablerow中的组件个数就决定了该行有多少列,而列的宽度由该列中最宽的单元格决定
- ④tablerow的layout_width属性,默认是fill_parent的,我们自己设置成其他的值也不会生效!!! 但是layout_height默认是wrapten——content的,我们却可以自己设置大小!
- ⑤整个表格布局的宽度取决于父容器的宽度(占满父容器本身)
- ⑥有多少行就要自己数啦,一个tablerow一行,一个单独的组件也一行!多少列则是看tableRow中 的组件个数,组件最多的就是TableLayout的列数
4.三个常用属性
android:collapseColumns:设置需要被隐藏的列的序号
android:shrinkColumns:设置允许被收缩的列的列序号
android:stretchColumns:设置运行被拉伸的列的列序号以上这三个属性的列号都是从0开始算的,比如shrinkColunmns = "2",对应的是第三列!
可以设置多个,用逗号隔开比如"0,2",如果是所有列都生效,则用"*"号即可
除了这三个常用属性,还有两个属性,分别就是跳格子以及合并单元格,这和HTML中的Table类似:android:layout_column="2":表示的就是跳过第二个,直接显示到第三个格子处,从1开始算的!
android:layout_span="4":表示合并4个单元格,也就说这个组件占4个单元格
属性使用示例:
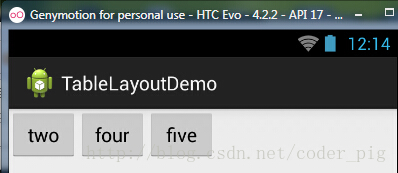
①collapseColumns(隐藏列)
流程:在TableRow中定义5个按钮后,接着在最外层的TableLayout中添加以下属性: android:collapseColumns = "0,2",就是隐藏第一与第三列,代码如下:
<TableLayout  android:id="@+id/TableLayout2"  android:layout_width="fill_parent"  android:layout_height="wrap_content"  android:collapseColumns="0,2" >  <TableRow>  <Button  android:layout_width="wrap_content"  android:layout_height="wrap_content"  android:text="one" />  <Button  android:layout_width="wrap_content"  android:layout_height="wrap_content"  android:text="two" />  <Button  android:layout_width="wrap_content"  android:layout_height="wrap_content"  android:text="three" />  <Button  android:layout_width="wrap_content"  android:layout_height="wrap_content"  android:text="four" />  <Button  android:layout_width="wrap_content"  android:layout_height="wrap_content"  android:text="five" />  </TableRow>
</TableLayout>
运行效果图:
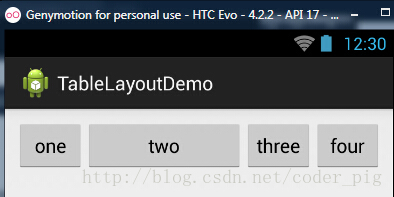
②stretchColumns(拉伸列)
流程:在TableLayout中设置了四个按钮,接着在最外层的TableLayout中添加以下属性: android:stretchColumns = "1"
设置第二列为可拉伸列,让该列填满这一行所有的剩余空间,代码如下:
<TableLayout    android:id="@+id/TableLayout2"    android:layout_width="fill_parent"    android:layout_height="wrap_content"    android:stretchColumns="1" >    <TableRow>    <Button    android:layout_width="wrap_content"    android:layout_height="wrap_content"    android:text="one" />    <Button    android:layout_width="wrap_content"    android:layout_height="wrap_content"    android:text="two" />    <Button    android:layout_width="wrap_content"    android:layout_height="wrap_content"    android:text="three" />    <Button    android:layout_width="wrap_content"    android:layout_height="wrap_content"    android:text="four" />                 </TableRow>
</TableLayout>
运行效果图:
③shrinkColumns(收缩列)
步骤:这里为了演示出效果,设置了5个按钮和一个文本框,在最外层的TableLayout中添加以下属性: android:shrinkColumns = "1"
设置第二个列为可收缩列,代码如下:
<TableLayout  android:id="@+id/TableLayout2"  android:layout_width="fill_parent"  android:layout_height="wrap_content"  android:shrinkColumns="1" >  <TableRow>  <Button  android:layout_width="wrap_content"  android:layout_height="wrap_content"  android:text="one" />  <Button  android:layout_width="wrap_content"  android:layout_height="wrap_content"  android:text="two" />  <Button  android:layout_width="wrap_content"  android:layout_height="wrap_content"  android:text="three" />  <Button  android:layout_width="wrap_content"  android:layout_height="wrap_content"  android:text="four" />  <Button  android:layout_width="wrap_content"  android:layout_height="wrap_content"  android:text="five" />  <TextView  android:layout_width="wrap_content"  android:layout_height="wrap_content"  android:text="文本XX" />  </TableRow>
</TableLayout>
运行截图:
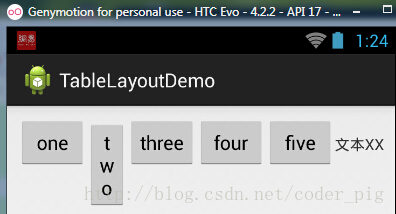
从图中我们可以看到two这个按钮被挤压成条条状,这个就是收缩,为了保证表格能适应 父容器的宽度!至于另外两个属性就不讲解了,用法和HTML相同!有兴趣的可以研究下!
5.使用实例
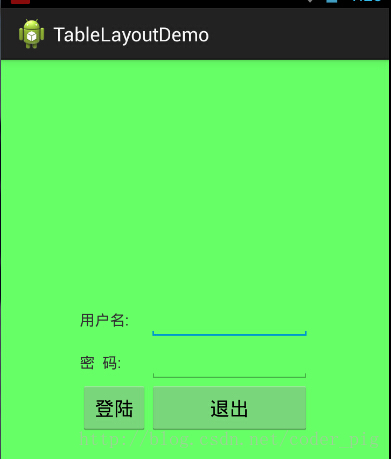
使用TableLayout来完成简单的登录界面,运行效果图如下:
流程解析:
①调用gravity属性,设置为center_vertical,让布局里面的组件在竖直方向上居中
②将TableLayout中的第一和第四列设置为可拉伸
③在每个TableRow中添加两个TextView,用于拉伸填满该行,这样可以让表格水平居中
android:stretchColumns="0,3" 设置为0.3,是为了让两边都充满,那么中间部分就可以居中了
详细代码如下:
<TableLayout xmlns:android="http://schemas.android.com/apk/res/android" xmlns:tools="http://schemas.android.com/tools" android:id="@+id/TableLayout1" android:layout_width="match_parent" android:layout_height="match_parent" tools:context=".MainActivity" android:stretchColumns="0,3" android:gravity="center_vertical" android:background="#66FF66" > <TableRow> <TextView /> <TextView android:layout_width="wrap_content" android:layout_height="wrap_content" android:text="用户名:"/> <EditText android:layout_width="wrap_content" android:layout_height="wrap_content" android:minWidth="150dp"/> <TextView /> </TableRow> <TableRow> <TextView /> <TextView android:layout_width="wrap_content" android:layout_height="wrap_content" android:text="密 码:" /> <EditText android:layout_width="wrap_content" android:layout_height="wrap_content" android:minWidth="150dp" /> <TextView /> </TableRow> <TableRow> <TextView /> <Button android:layout_width="wrap_content" android:layout_height="wrap_content" android:text="登陆"/> <Button android:layout_width="wrap_content" android:layout_height="wrap_content" android:text="退出"/> <TextView /> </TableRow> </TableLayout>
6.发现的问题
相信大家在使用这个这TableLayout的TableRow的时候会遇到这个警告:
当然,程序还是可以运行的,不过或许你是强迫症患者,看到黄色感叹号你就不爽的话! 而解决这个警告的方法也是很奇葩的:只要你的TableLayout里面有2个或以上的TableRow就可以了!

Android 应用开发(38)TableLayout(表格布局)相关推荐
- android简单实现表格布局,Android开发中TableLayout表格布局
Android开发中TableLayout表格布局 一.引言 在移动端应用程序开发中,常常会使用到表格布局,iOS和Android开发框架中都提供了独立的表格视图控件供开发者使用,例如iOS中的UIT ...
- android表格布局最后一个组件,Android布局之TableLayout表格布局
Tablelayout类以行和列的形式对控件进行管理,每一行为一个TableRow对象,或一个View控件.当为TableRow对象时,可在TableRow下添加子控件,默认情况下,每个子控件占据一列 ...
- android html 显示表格边框,tablelayout表格布局详解
如果你已经下载好MT4软件(很多专业外汇平台都有提供下载的),在手机桌面找到图表打开,然后选择好交易商,输入账号密码就可以了. TableLayout怎样实现表格布局 表格布局的子对象不能指定 lay ...
- 第15章、布局Layouts之TableLayout表格布局(从零开始学Android)
TableLayout表格布局 TableLayout是指将子元素的位置分配到行或列中.Android的一个TableLayout有许多TableRow组成,每一个TableRow都会定义一个Row. ...
- Android基础入门教程——2.2.3 TableLayout(表格布局)
Android基础入门教程--2.2.3 TableLayout(表格布局) 标签(空格分隔): Android基础入门教程 本节引言: 前面我们已经学习了平时实际开发中用得较多的线性布局(Linea ...
- 【Android 】零基础到飞升 | TableLayout(表格布局)
2.2.3 TableLayout(表格布局) 本节引言: 前面我们已经学习了平时实际开发中用得较多的线性布局(LinearLayout)与相对布局(RelativeLayout), 其实学完这两个基 ...
- android标签table,详解Android TableLayout表格布局
表格布局的标签是TableLayout,TableLayout继承了LinearLayout.所以它依然是一个线性布局. 前言: 1.TableLayout简介 2.TableLayout行列数的确定 ...
- Android学习|布局——TableLayout 表格布局
Android学习|布局--TableLayout 表格布局 一.概述 二.常见属性 4.子控件设置属性 三.Demo 1.android:collapseColumns 2.android:stre ...
- TableLayout 表格布局,FrameLaout 帧布局 ,AbsoluteLayout绝对布局的分析
这三个布局就放在一起来写了他们用的比较少,不过为了写这遍 博客我换特意去复习了下, 第一个表格布局TableLayout 表格布局顾名思义 就是与表格类似,以行,列形式来管理其中的组件的, 它是< ...
最新文章
- RabbitMQ学习笔记一:本地Windows环境安装RabbitMQ Server
- 前端书签归纳(持续更新)
- 第一道java编程题
- 再谈软件测试-工作感悟
- 三目运算符_C语言知识点:运算符的优先级和结合性
- java reducebykey_Spark入门(五)--Spark的reduce和reduceByKey
- js 取get过来的数据
- 【品味人生】毕业十年有感,给年轻人的一点忠告
- unity3d自动寻路教程
- ActiveMQ笔记(二)
- CCS 软件使用经验四则
- windows7修改或删除曾经保存的远程桌面连接的密码
- 电力系统自动化远程监控方案
- 斑马网络招聘汽车安全软件工程师
- 融360赴美IPO:大数据能否助其吸引海外投资者青睐?
- Py之h5py:Python库之h5py库的简介、安装、使用方法详细攻略
- 【软考题目】假设某磁盘的每个磁道划分成11个物理块,每块存放1个逻辑记录。
- 看一眼就会马上收藏的宝藏设计网站
- 既生 synchronized 何生 JUC 的 显式 locks ?
- linux 开发实施工程师_招聘级linux实施工程师 - 力聘网