azure db 设置时区_将数据迁移到Azure Cosmos DB
azure db 设置时区
In the previous article, Start your journey with Azure Cosmos DB, we provided you with the backpack that helps you to start your journey with Azure Cosmos DB and filled it with detailed information about the Cosmos DB usage benefits, how to create your first Cosmos DB account, create a new database, container, and items and finally how to query the data stored in that container.
在上一篇文章“ 使用Azure Cosmos DB开始您的旅程”中 ,我们为您提供了一个背包,可帮助您开始使用Azure Cosmos DB的旅程,并向其提供有关Cosmos DB使用好处,如何创建第一个Cosmos DB的详细信息帐户,创建一个新的数据库,容器和项目,最后如何查询存储在该容器中的数据。
In this article, we will show how to migrate a SQL Server database table’s data into an Azure Cosmos DB container using the Cosmos DB Data Migration tool and query the migrated data.
在本文中,我们将展示如何使用Cosmos DB数据迁移工具将SQL Server数据库表的数据迁移到Azure Cosmos DB容器并查询迁移的数据。
Azure Cosmos DB数据迁移工具 (Azure Cosmos DB Data Migration Tool)
When planning to migrate your data into an Azure Cosmos DB, you need to use the suitable migration tool that supports your Cosmos DB API type. For example, the Cosmos DB Data Migration tool can be used to migrate the data from the SQL API and the Table API, but it does not support migrating data into Mongo DB API and Gremlin API.
计划将数据迁移到Azure Cosmos DB时,需要使用支持Cosmos DB API类型的合适迁移工具。 例如,Cosmos DB数据迁移工具可用于从SQL API和Table API迁移数据,但不支持将数据迁移到Mongo DB API和Gremlin API。
Before using the Cosmos DB Data Migration tool, you need to make sure that the Microsoft .NET Framework 4.51 or higher is installed on the machine where you will run the migration tool. Also, if you plan to migrate a huge amount of data into the Cosmos DB container, make sure to increase the throughput in order to migrate the data faster, as the data migration speed depends highly on the throughput amount. You can easily decrease the throughput after completing the data migration operation to eliminate any high costs issue.
在使用Cosmos DB数据迁移工具之前,您需要确保在运行迁移工具的计算机上安装了Microsoft .NET Framework 4.51或更高版本。 另外,如果您计划将大量数据迁移到Cosmos DB容器中,请确保增加吞吐量以更快地迁移数据,因为数据迁移速度在很大程度上取决于吞吐量。 完成数据迁移操作后,您可以轻松地降低吞吐量,从而消除任何高成本问题。
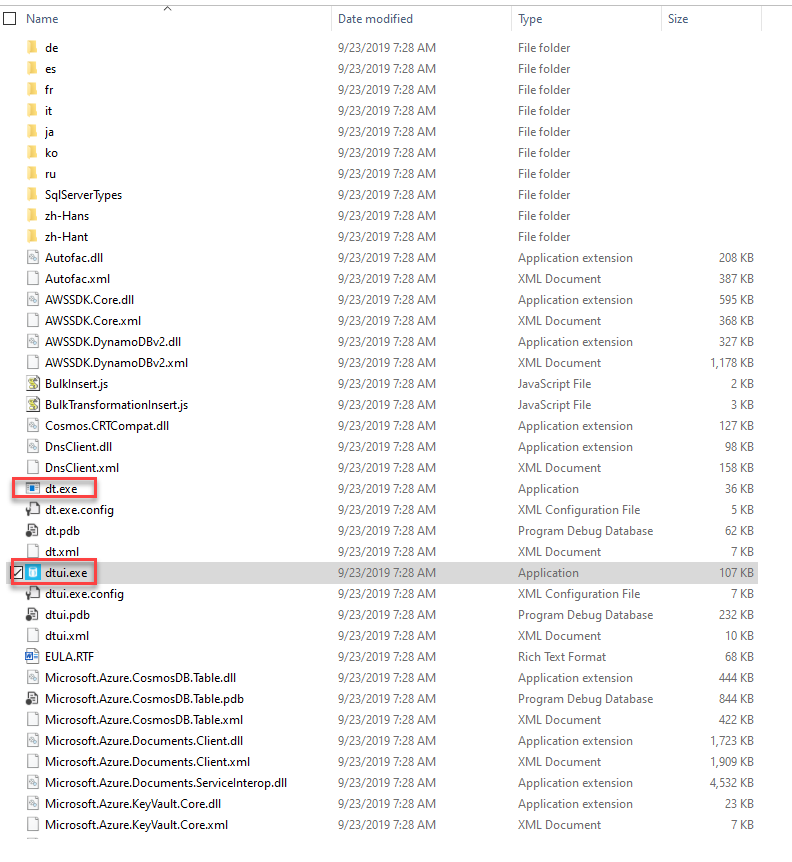
A precompiled copy of the Cosmos DB Data Migration tool can be downloaded directly from this page. The downloaded package contains both a command-line version of the data migration tool, as Dt.exe, and a graphical user interface version of that tool, as Dtui.exe, as shown below:
宇宙DB数据迁移工具的预编译的副本可以直接从下载此页面。 下载的软件包包含数据迁移工具的命令行版本Dt.exe和该工具的图形用户界面版本Dtui.exe ,如下所示:
迁移SQL数据 (Migrate SQL Data)
The Cosmos DB Data Migration tool is an executable tool, which requires no installation to start the migration process. So, to launch the Data Migration tool, double-click on the executable file of the tool, and it will start directly.
Cosmos DB数据迁移工具是一个可执行工具,无需安装即可启动迁移过程。 因此,要启动数据迁移工具,请双击该工具的可执行文件,它将直接启动。
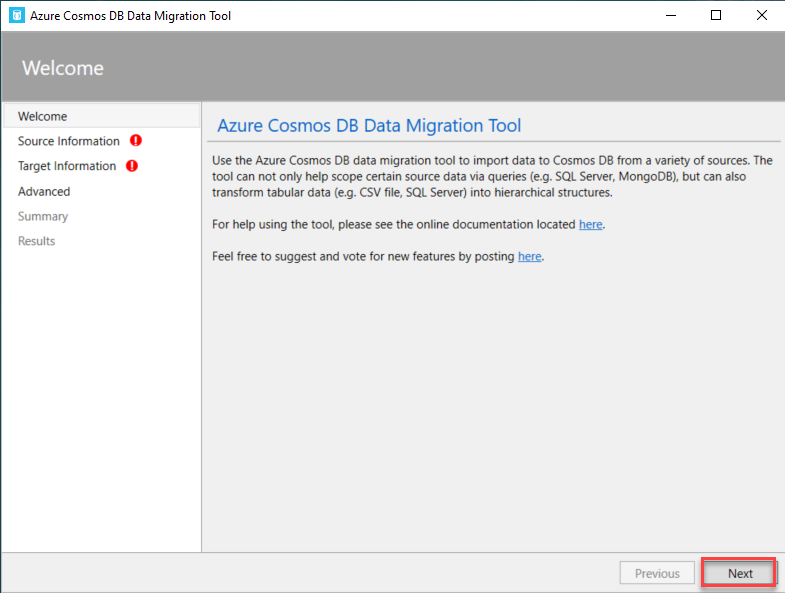
When the Data Migration tool launches, the Welcome page will display a piece of introductory information about that tool, providing external links for the tool documentation and for suggesting new features for that tool, as shown below:
启动数据迁移工具时,“ 欢迎”页面将显示有关该工具的一些介绍性信息,提供该工具文档的外部链接以及该工具的新功能的建议,如下所示:
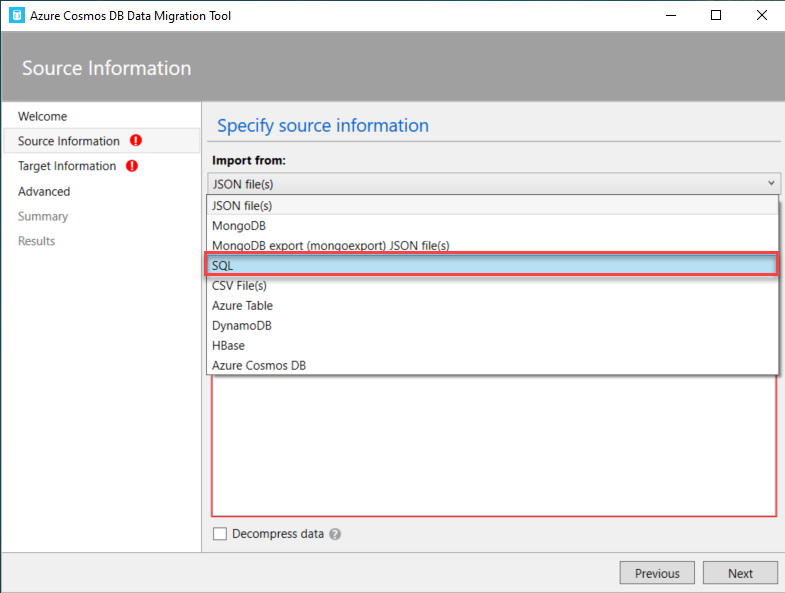
The Data Migration tool can be used to import data into your Cosmos DB container, from different data sources. This includes importing data from JSON files, MongoDB, SQL Server, CSV files, Azure Table storage, Amazon DynamoDB, and Azure Cosmos DB SQL API containers.
数据迁移工具可用于将数据从不同数据源导入Cosmos DB容器。 这包括从JSON文件,MongoDB,SQL Server,CSV文件,Azure表存储,Amazon DynamoDB和Azure Cosmos DB SQL API容器导入数据。
In this demo, we will copy data from a SQL Server instance, by choosing the SQL data source, as shown below:
在此演示中,我们将通过选择SQL数据源从SQL Server实例复制数据,如下所示:
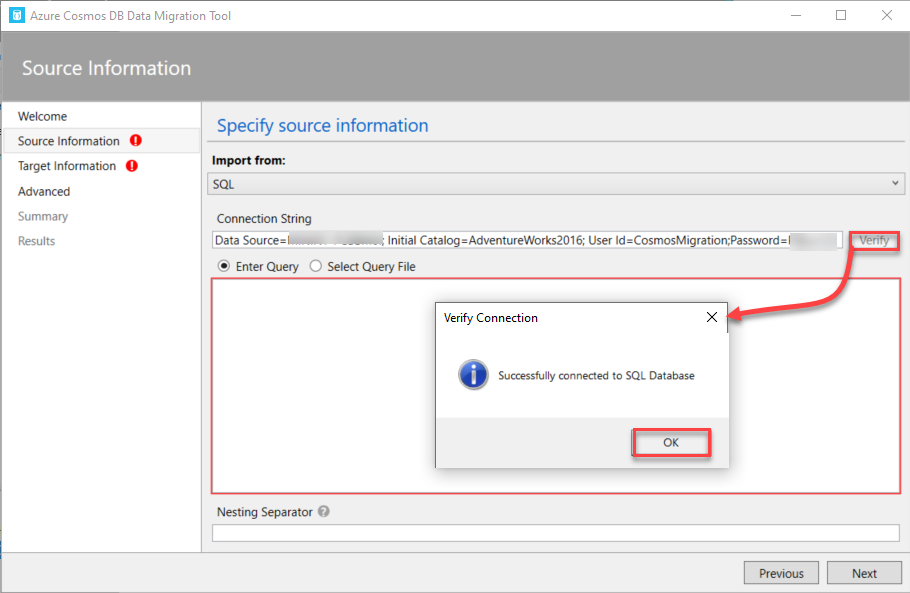
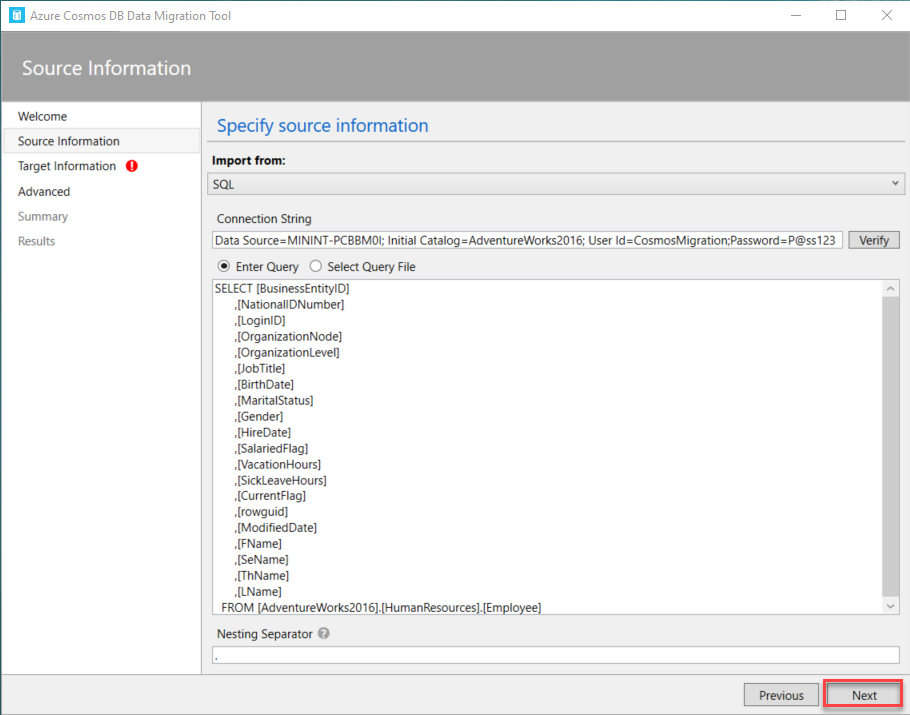
In order to connect to the SQL Server data source, provide the Standard SQL Server connection string that contains the SQL Server name, the database name, and authorized account credentials to connect to that SQL Server instance. Click on the Verify option to validate the connecting string and make sure that the connection is opened to that SQL Server instance, as below:
为了连接到SQL Server数据源,请提供标准SQL Server连接字符串 ,其中包含SQL Server名称,数据库名称和授权帐户凭据以连接到该SQL Server实例。 单击“ 验证”选项以验证连接字符串,并确保已打开与该SQL Server实例的连接,如下所示:
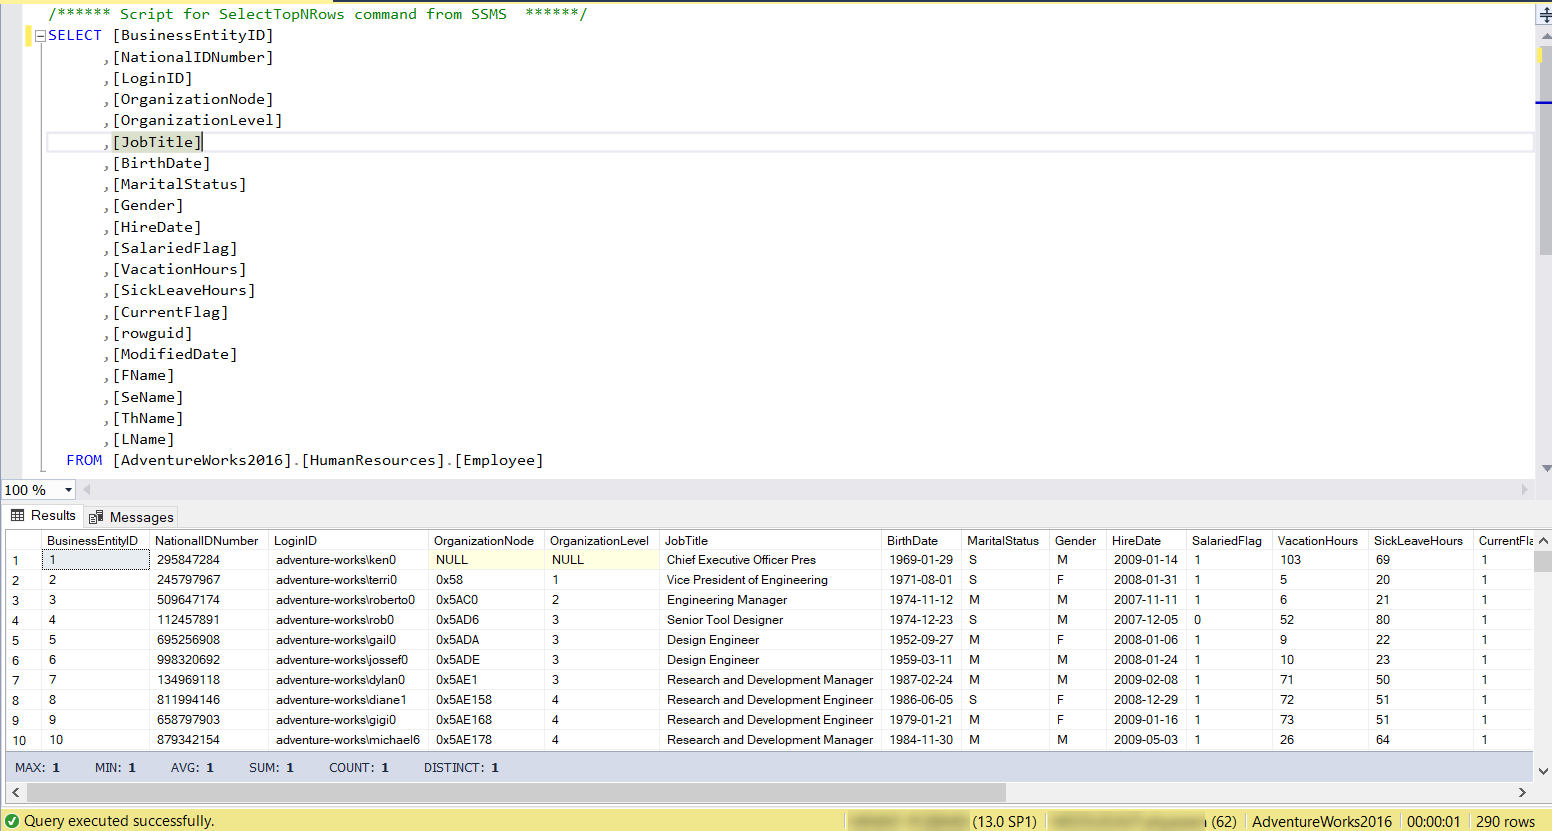
The next step is to provide the T-SQL query that is used to retrieve the data to be migrated from that SQL Server instance. It is recommended to write and tune that T-SQL query first using the SSMS tool, to retrieve only the columns and records that you really need to migrate, in the most optimized way, as shown below:
下一步是提供T-SQL查询,该查询用于检索要从该SQL Server实例迁移的数据。 建议首先使用SSMS工具编写和调整T-SQL查询,以最优化的方式仅检索您真正需要迁移的列和记录,如下所示:
Once the optimal T-SQL query is ready, provide it directly to the Azure Cosmos DB Data Migration tool, or save it as a file and browse that file in the data migration tool.
最佳T-SQL查询准备就绪后,直接将其提供给Azure Cosmos DB数据迁移工具,或将其另存为文件并在数据迁移工具中浏览该文件。
The Nesting Separator option is used to modify the structure of the generated document by creating hierarchical relationships for the sub-properties, such as the state, country, street and building number of the address, during the data import process, as shown below:
嵌套分隔符选项用于在数据导入过程中通过为子属性创建层次结构关系来修改生成的文档的结构,例如在数据导入过程中,地址的州,国家,街道和建筑物的编号,如下所示:
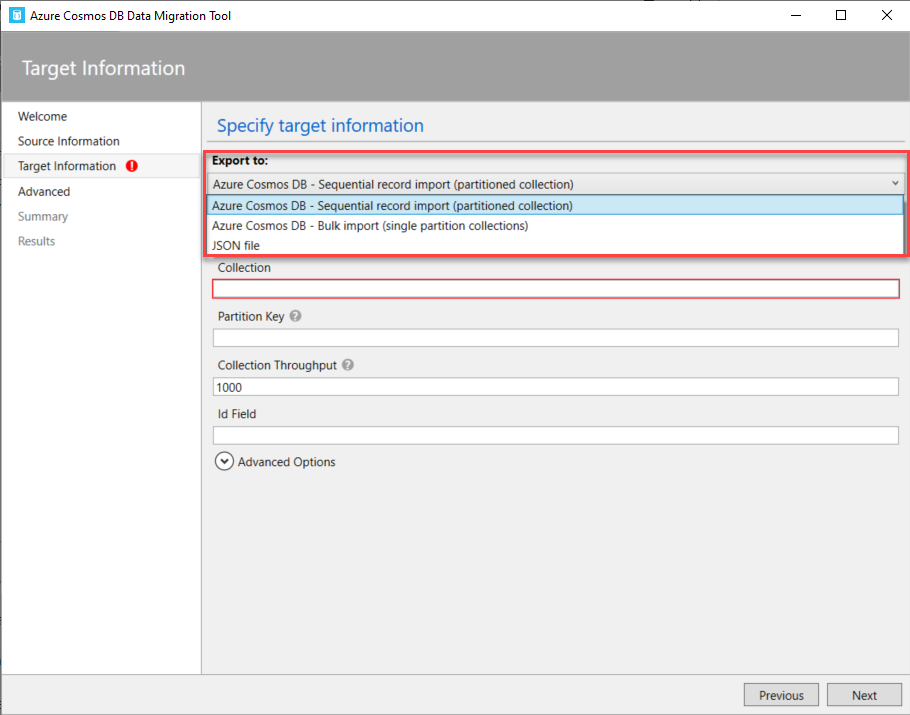
In the Target Information page, specify whether to migrate the data into a JSON file that can be used later, or migrate it directly into an Azure Cosmos DB container using the Sequential or Bulk import method.
在“目标信息”页面中,指定是将数据迁移到供以后使用的JSON文件,还是使用顺序或批量导入方法将其直接迁移到Azure Cosmos DB容器。
The Bulk importer uses the Cosmos DB stored procedure for the copy efficiency, where the stored procedure will be created and executed during the import operation then deleted from the target collection when the import operation completed, with the ability to migrate to a one or more single-partitioned containers.
批量导入程序使用Cosmos DB存储过程来提高复制效率,该存储过程将在导入操作期间创建并执行,然后在导入操作完成后从目标集合中删除,并能够迁移到一个或多个分区的容器。
On the other hand, the sequential importer copies the source records one by one, with the ability to migrate the data to only one container that contains single or multiple partitions.
另一方面,顺序导入器会逐个复制源记录,并且能够将数据迁移到仅包含一个或多个分区的一个容器中。
In this demo, we will use the sequential importer option, as shown below:
在此演示中,我们将使用顺序导入器选项,如下所示:
Before going through the next steps in the Data Migration tool wizard, make sure that you already have a database created under your Azure Cosmos DB account. If not, you can easily create a new Cosmos DB database, by following the steps below:
在执行数据迁移工具向导中的下一步之前,请确保已在Azure Cosmos DB帐户下创建了一个数据库。 如果没有,您可以按照以下步骤轻松创建新的Cosmos DB数据库:

Keep the name of the created database as we will use it in the next step.
保留创建的数据库的名称,因为我们将在下一步中使用它。
In order to get the connection string of the Azure Cosmos DB account, open the account in the Azure Portal and copy the Primary Connection String under the Keys option, as shown below:
为了获取Azure Cosmos DB帐户的连接字符串,请在Azure门户中打开该帐户,然后在“密钥”选项下复制“主连接字符串”,如下所示:
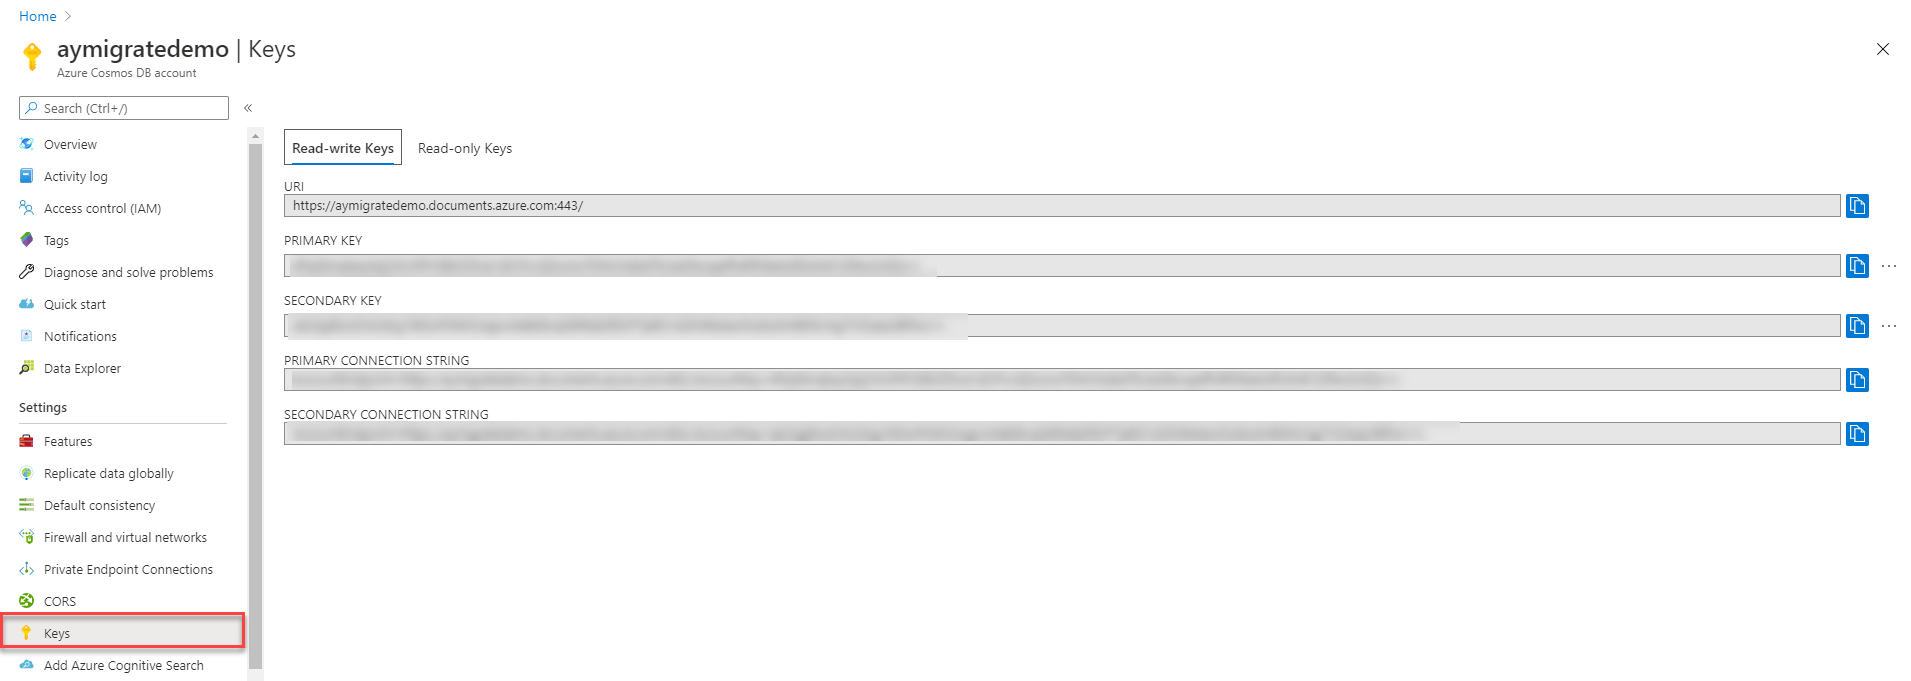
In order to build the Azure Cosmos DB connection string that can be used in the Data Migration tool, we need to append the name of the created database, as Database=<database name>, at the right side of the connection string that is copied from the Cosmos DB keys.
为了构建可在数据迁移工具中使用的Azure Cosmos DB连接字符串,我们需要在复制的连接字符串的右侧附加创建的数据库的名称,如Database = <数据库名称>。从Cosmos DB键中。
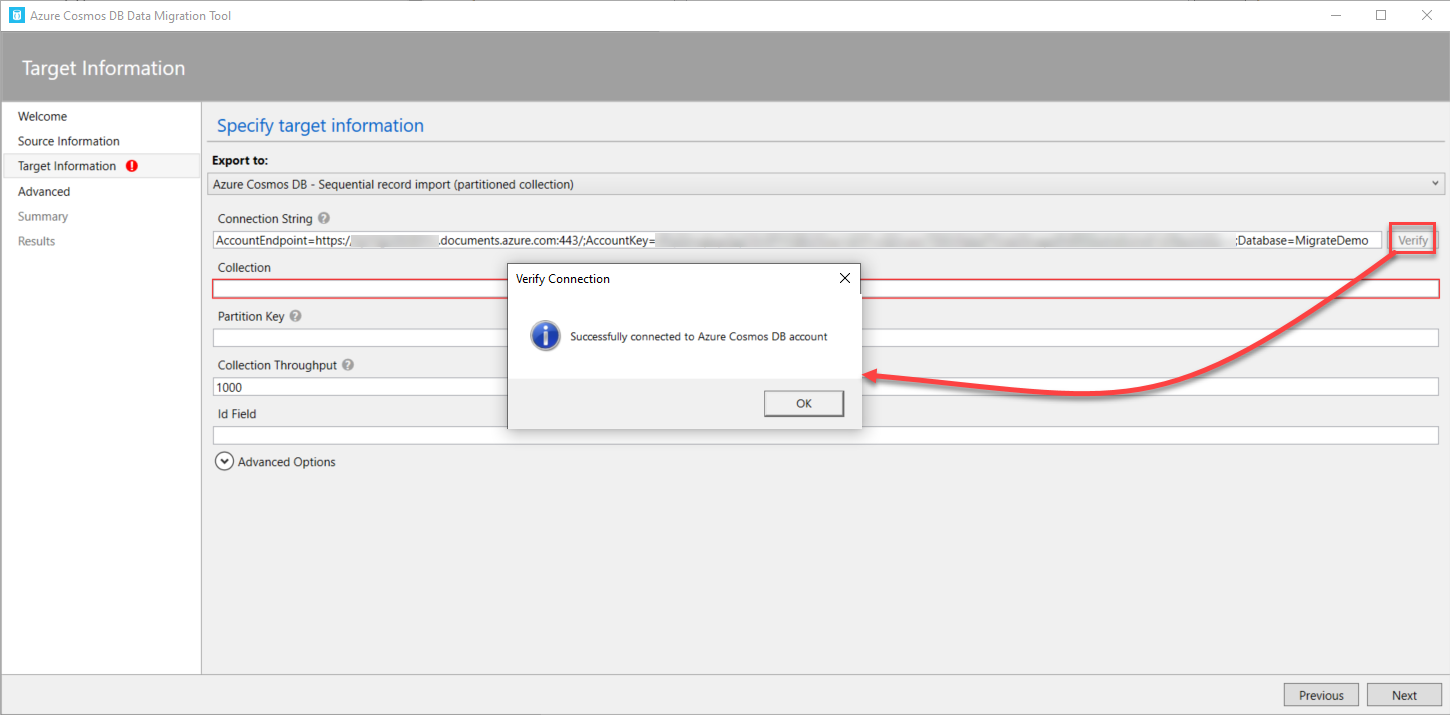
After providing the target connection string, click on the Verify option to validate and test the connection to that account, as shown below:
提供目标连接字符串后,单击“ 验证”选项以验证和测试与该帐户的连接,如下所示:
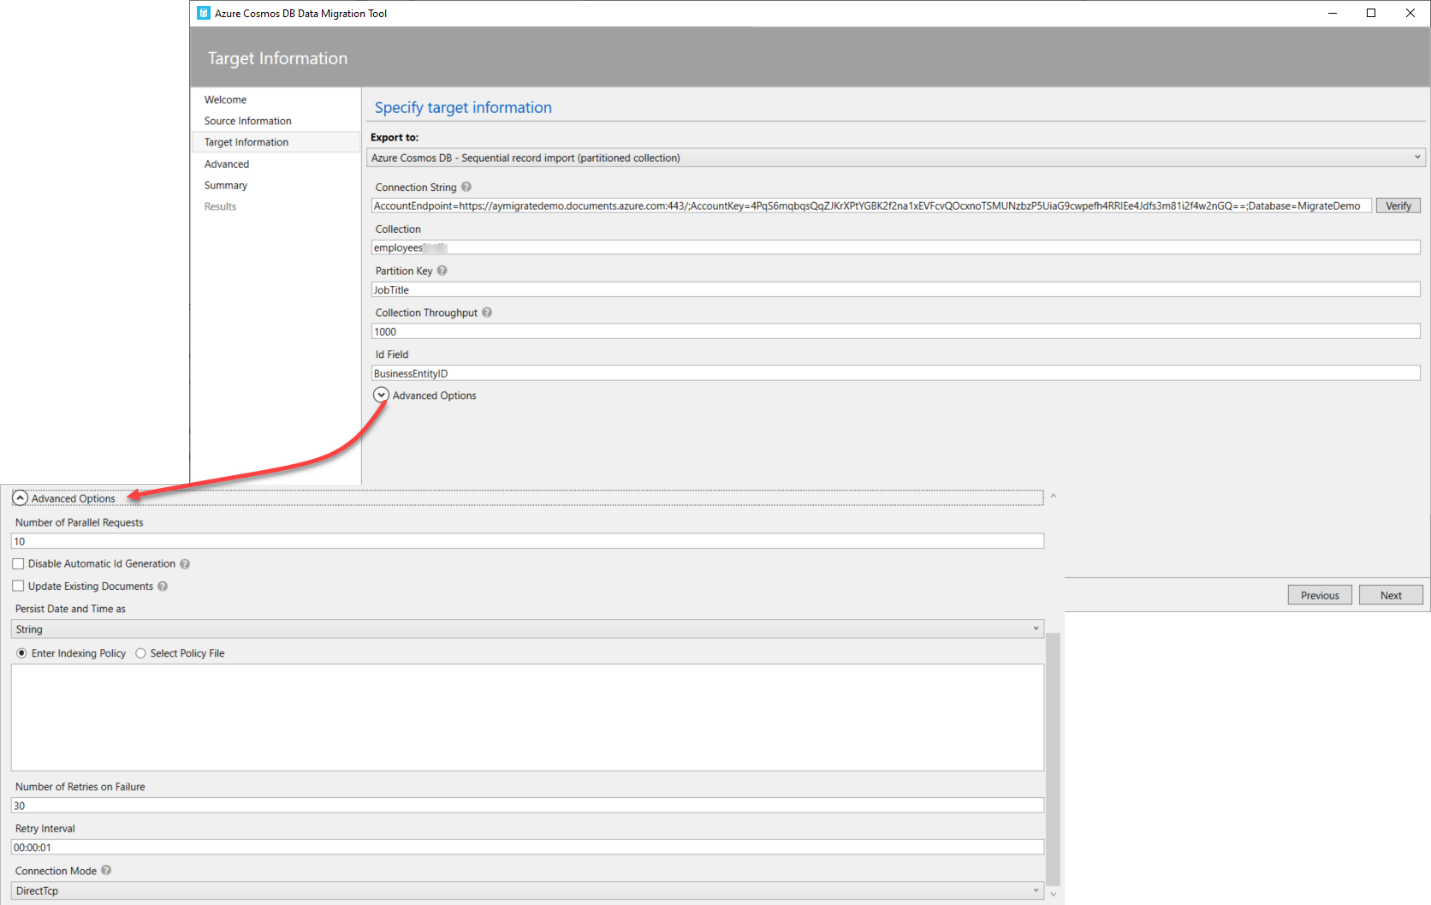
In the Collection field, you need to provide the name of the container to migrate the data into, where we can only create one container for the Sequential importer, with the ability to create multiple partitions on that container using the provided value of the Partition Key. Multiple containers that are supported by the Bulk importer can be created by providing the name of the collection prefix and the range of collections, as [0-n]. In this example, we will create one container, and use the JobTitle column as a partition key, and the BusinessEntityID as the ID field in the collection items.
在“集合”字段中,您需要提供要将数据迁移到其中的容器的名称,在这里我们只能为顺序导入器创建一个容器,并能够使用提供的分区键值在该容器上创建多个分区。 可以通过提供集合前缀的名称和集合范围来创建批量导入器支持的多个容器,如[0-n]。 在此示例中,我们将创建一个容器,并将JobTitle列用作分区键,并将BusinessEntityID用作收集项中的ID字段。
It is recommended to tune the throughput amount to make the import operation faster. In our example, we will keep it with default value as we will migrate a small number of records to the Azure Cosmos DB database.
建议调整吞吐量,以使导入操作更快。 在我们的示例中,我们将其保留为默认值,因为我们会将少量记录迁移到Azure Cosmos DB数据库。
You can also configure a number of advanced options, such as the number of parallel requests, whether to disable the automatic Id generation and consider using the imported ID field, updating (overwriting) the existing documents, specifying the number of retries in case of import failure, the interval between retries, the connection mode, including DirectTcp, DirectHttps, and Gateway and finally persisting the data as String, Epoch or Both, as shown below:
您还可以配置许多高级选项,例如并行请求的数量,是否禁用自动ID生成并考虑使用导入的ID字段,更新(覆盖)现有文档,在导入的情况下指定重试次数失败,重试之间的时间间隔,连接模式(包括DirectTcp,DirectHttps和Gateway),最后将数据持久存储为String,Epoch或Both,如下所示:
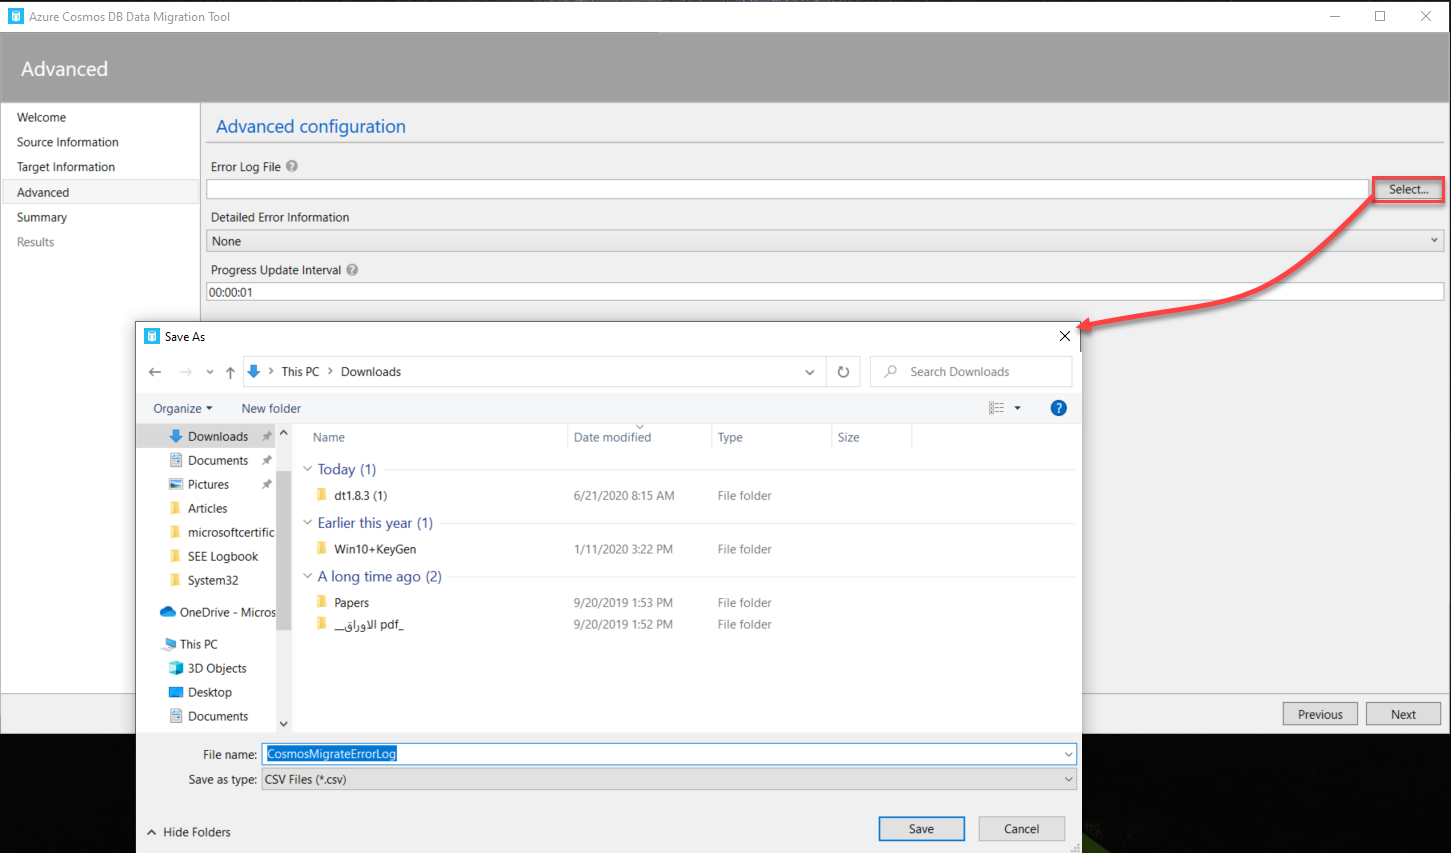
In the Advanced Configuration window, you will be requested to specify the location of the import error log file, the type of errors to write to that log file and the update frequency of the import progress messages, as shown below:
在“高级配置”窗口中,将要求您指定导入错误日志文件的位置,要写入该日志文件的错误类型以及导入进度消息的更新频率,如下所示:
The next window is the Summary window, in which you can review all your selections before proceeding with the import operation, as shown below:
下一个窗口是“ 摘要”窗口,您可以在其中查看所有选择,然后再进行导入操作,如下所示:
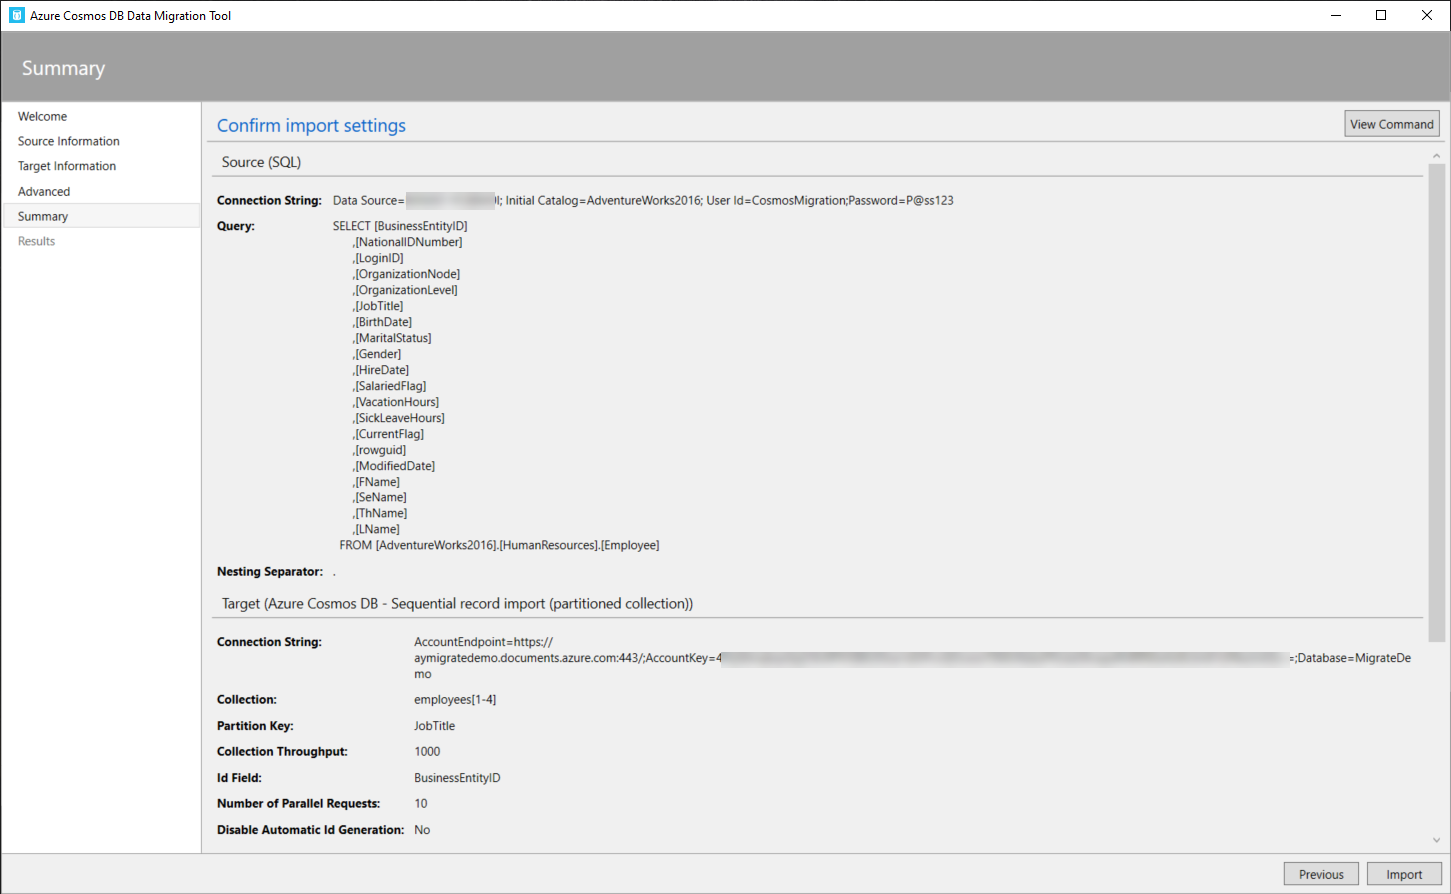
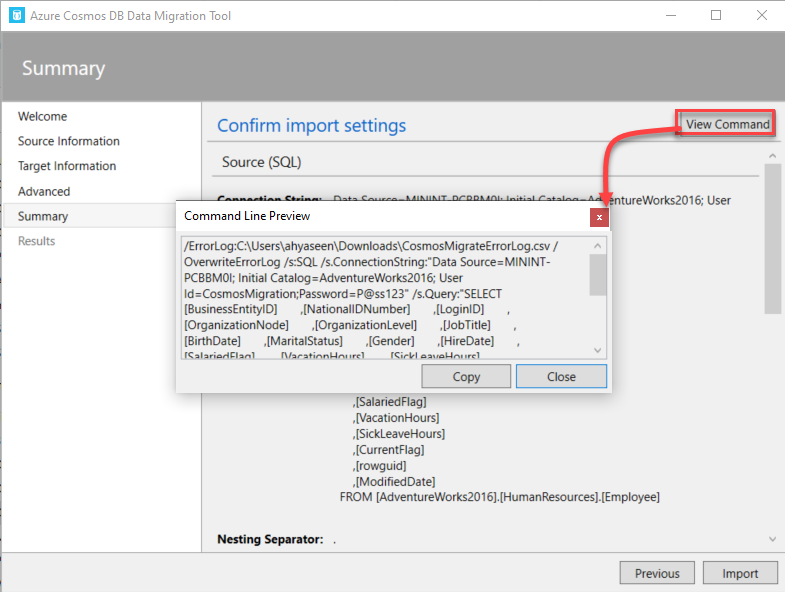
If you manage to perform the import process later or using a command-line tool, the Summary window provides you with the ability to view and copy the command that can be used to import the data based on your choices from the previous steps, as shown below:
如果您设法以后执行导入过程或使用命令行工具,则“摘要”窗口使您能够查看和复制可用于根据先前步骤中的选择来导入数据的命令,如下所示下面:
After reviewing all selected options, click on the Import option to start the import operation and monitor the progress of the data migration.
复查所有选定的选项后,单击“ 导入”选项以开始导入操作并监视数据迁移的进度。
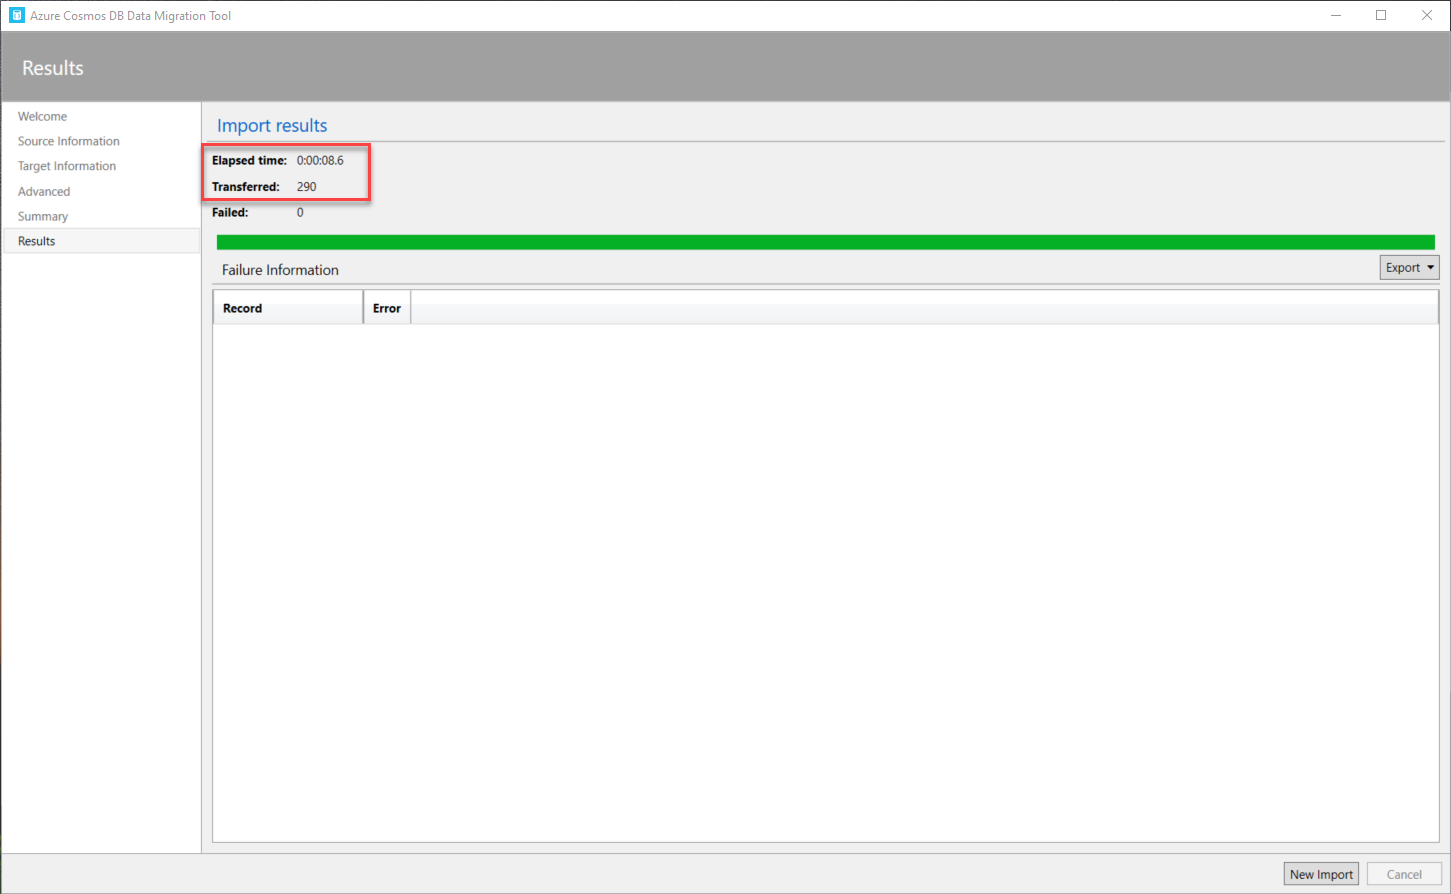
Once the operation completed, the Data Migration tool provides you with the ability to export the failure report or start a new import operation, as shown below:
操作完成后,数据迁移工具将使您能够导出故障报告或开始新的导入操作,如下所示:
查询迁移数据 (Query Migrated Data)
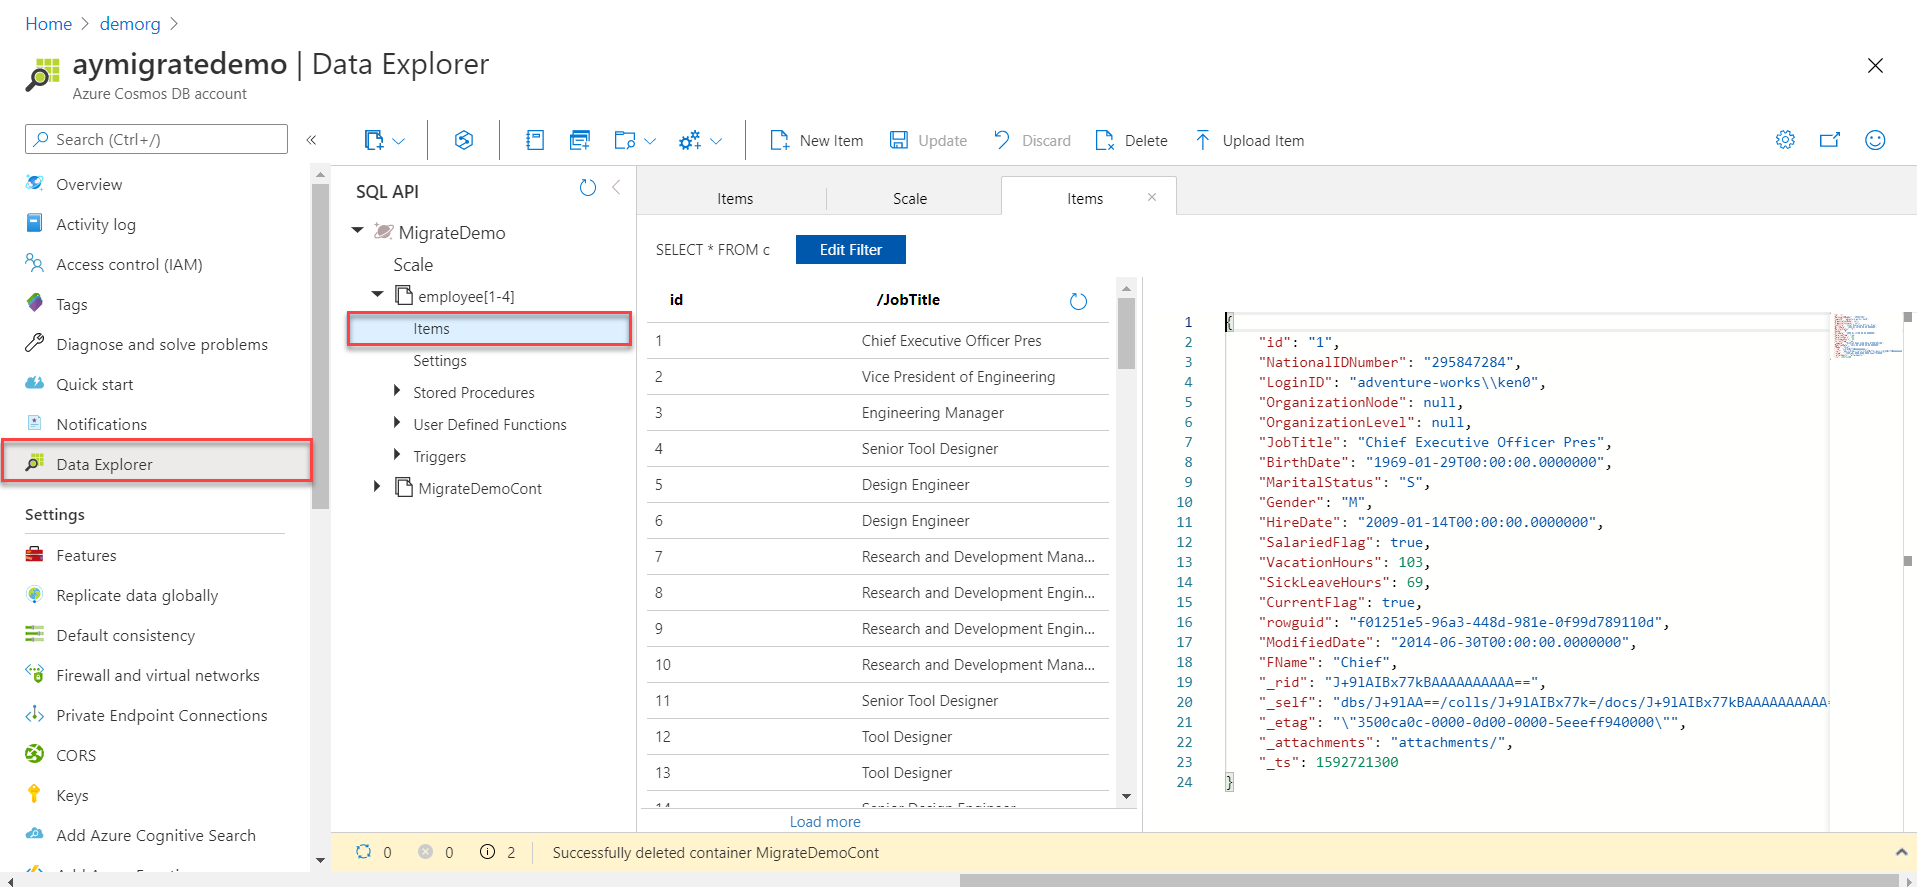
To validate that the data is migrated to the Azure Cosmos DB container, open the Cosmos DB account using the Azure Portal and browse the database container under the Data Explorer, as shown below:
若要验证是否已将数据迁移到Azure Cosmos DB容器,请使用Azure门户打开Cosmos DB帐户,并在“数据资源管理器”下浏览数据库容器,如下所示:
To write your own query, instead of using the default data filter, click on the New SQL Query option, to open the query editor, as shown below:
要编写您自己的查询,而不是使用默认的数据过滤器,请单击“ 新建SQL查询”选项,以打开查询编辑器,如下所示:

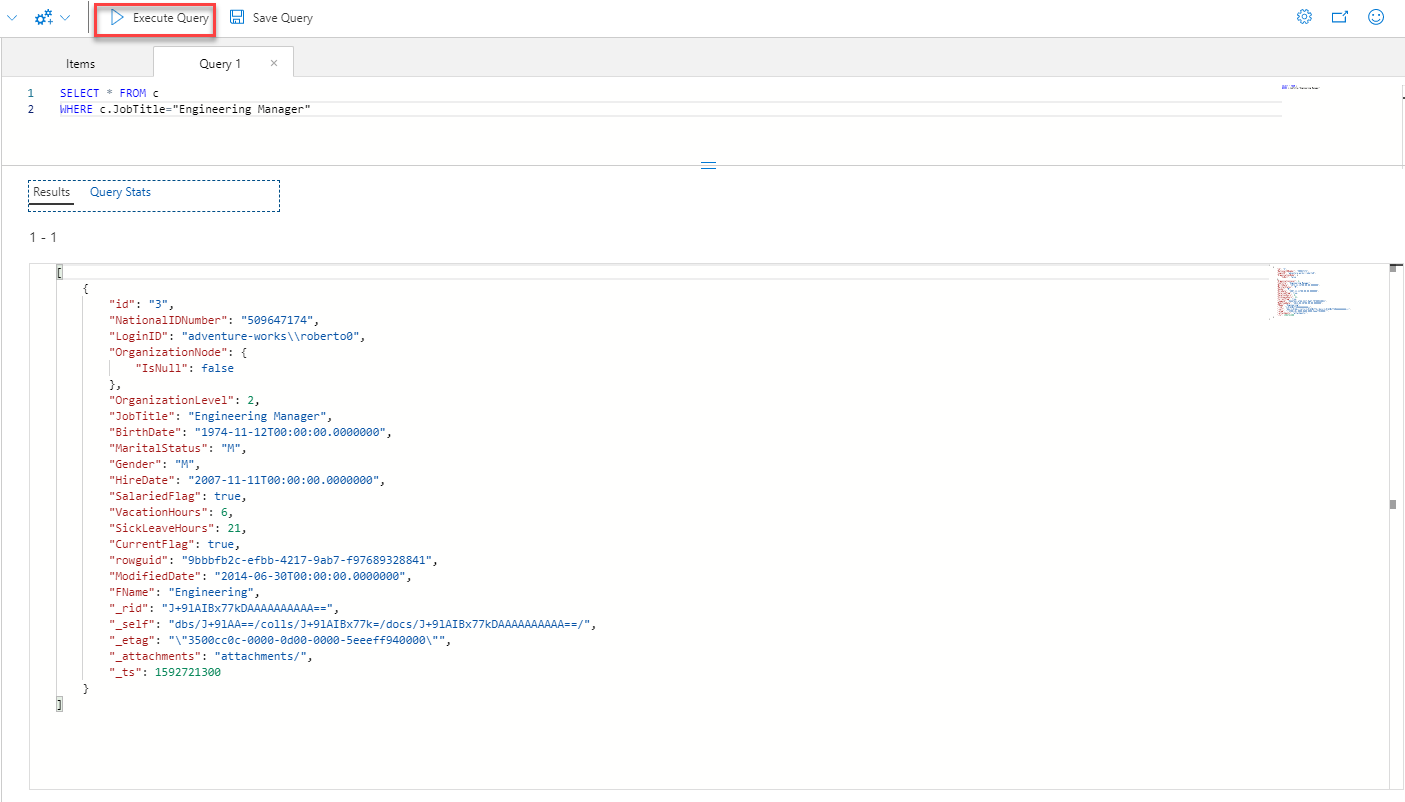
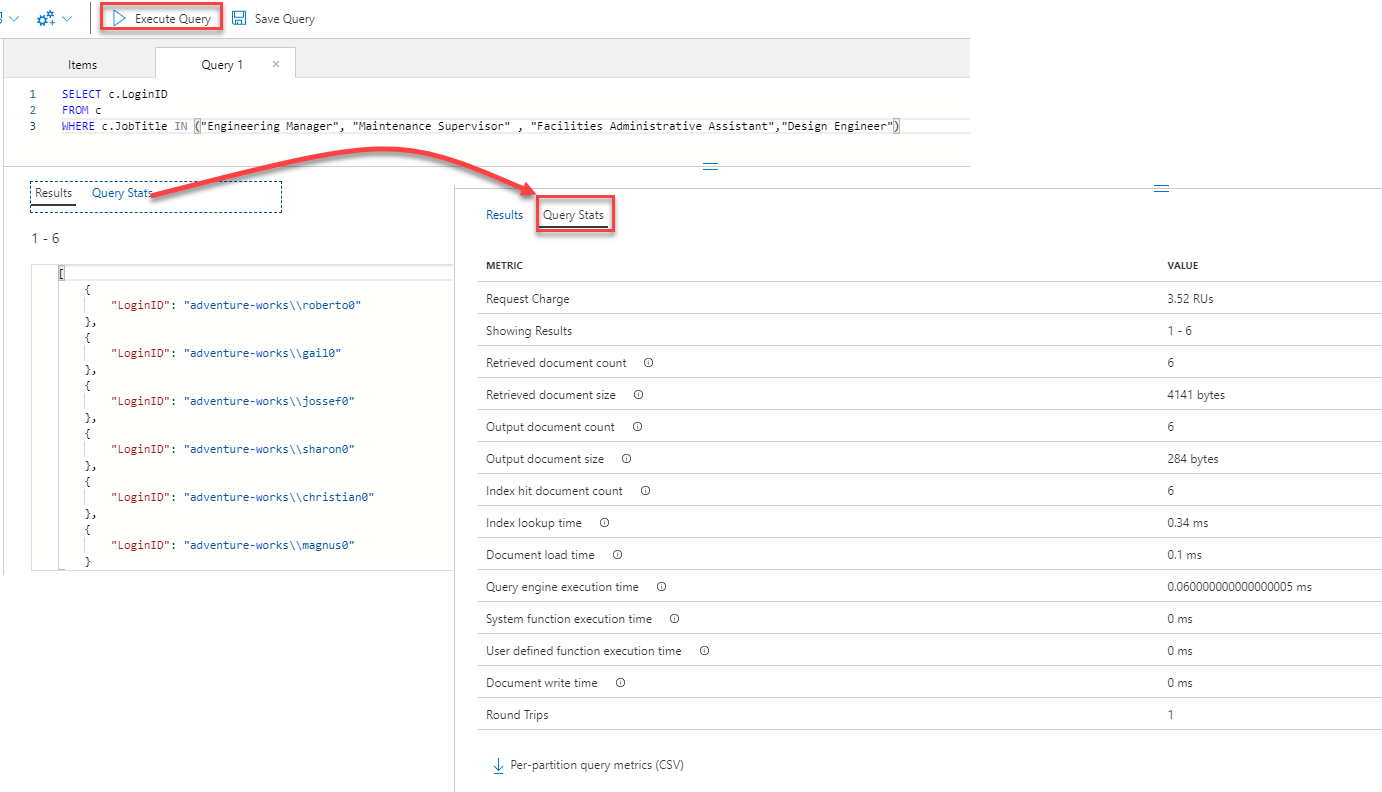
In the query editor window, customize the default SELECT query by proving your T-SQL statement. For example, we will return only the employees with a specific job title, by adding a new filter using the WHERE clause, then execute the query, as shown below:
在查询编辑器窗口中,通过证明您的T-SQL语句来自定义默认的SELECT查询。 例如,通过使用WHERE子句添加新的过滤器,然后执行查询,我们将仅返回具有特定职位的雇员,如下所示:
We can customize the T-SQL query by specifying the list of columns that we are interested in, and provide the names of the columns in the SELECT statement, then execute the query, as below:
我们可以通过指定我们感兴趣的列的列表来定制T-SQL查询,并在SELECT语句中提供列的名称,然后执行查询,如下所示:
The query editor provides you also with the ability to write more complex T-SQL queries to retrieve only the data that you are interested in and in the preferred view. But you need to tune the query and make sure that this query is not consuming a lot of Azure Cosmos DB resources. This can be verified by checking the Query Statistics for each query to end up with the best performing one, as shown below:
查询编辑器还使您能够编写更复杂的T-SQL查询,以仅检索您感兴趣的数据和首选视图中的数据。 但是您需要调整查询,并确保此查询不会消耗大量的Azure Cosmos DB资源。 可以通过检查每个查询的“查询统计信息”以得出效果最好的查询来验证这一点,如下所示:
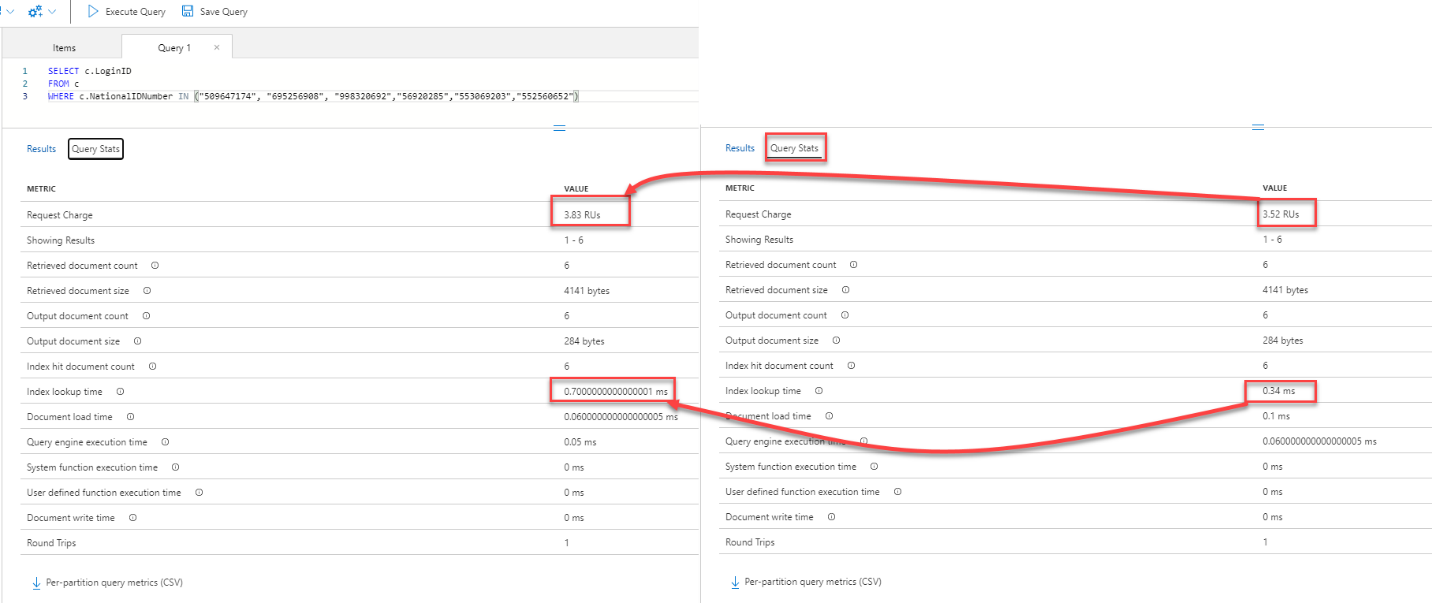
Another thing to consider here is to make sure that you are using the partition key in your query to filter the retrieved data, as the data already stored in the containers based on the partition key column values.
此处要考虑的另一件事是,确保您在查询中使用分区键来筛选检索到的数据,因为已基于分区键列值将数据存储在容器中。
This is clear from the simple example below, where writing a query that filters the data using another column instead of the partition key, as in the left query, will consume extra 8% RUs compared to filtering the data using the partition key, as in the right query, in addition to the 51% extra index lookup time required to query the data based on the non-partition key, as shown below:
从下面的简单示例可以清楚地看出,与使用分区键过滤数据相比,编写一个使用另一列而不是分区键过滤数据的查询(如左查询)将消耗额外的8%RU。正确的查询,除了基于非分区键查询数据所需的51%的额外索引查找时间外,如下所示:
结论 (Conclusion)
In this article, we discussed how to migrate your SQL Server database table’s data into an Azure Cosmos DB container using the Cosmos DB Data Migration tool and querying the data using T-SQL statements. I hope you find it useful.
在本文中,我们讨论了如何使用Cosmos DB数据迁移工具将SQL Server数据库表的数据迁移到Azure Cosmos DB容器,以及如何使用T-SQL语句查询数据。 希望对你有帮助。
翻译自: https://www.sqlshack.com/migrating-your-data-into-the-azure-cosmos-db/
azure db 设置时区
azure db 设置时区_将数据迁移到Azure Cosmos DB相关推荐
- azure db 设置时区_使用Azure Cosmos DB开始您的旅程
azure db 设置时区 In this article, we will discuss why we need to use Azure Cosmos DB and how to configu ...
- azure db 设置时区_关于Azure Cosmos DB(以前称为DocumentDB)的8件事
azure db 设置时区 介绍 (Introduction) Azure Cosmos DB is a low-latency, high throughput, globally distribu ...
- azure db 设置时区_在Azure Cosmos DB中应用字段运算符和对象
azure db 设置时区 Since we will sometimes require removing documents in Azure Cosmos DB, we'll want to b ...
- sql azure 语法_如何将SQL数据迁移到Azure Cosmos DB
sql azure 语法 In this article, I have explained the step by step process of migrating data from SQL S ...
- 数据迁移测试_自动化数据迁移测试
数据迁移测试 Data migrations are notoriously difficult to test. They take a long time to run on large data ...
- mysql中如何设置时区_如何设置MySQL的时区?
我认为这可能是有用的: 有三个位置可以在MySQL中设置时区: 在[mysqld]部分中的"my.cnf"文件中default-time-zone='+00:00' @global ...
- java calendar 设置时区_详解Java时区处理之Date,Calendar,TimeZone,SimpleDateFormat
一.概述 1.问题描述 使用Java处理时间时,我们可能会经常发现时间不对,比如相差8个小时等等,其真实原因便是TimeZone.只有正确合理的运用TimeZone,才能保证系统时间无论何时都是准确的 ...
- java calendar 设置时区_设置calendar时区
iOS - Swift NSTimeZone时区 前言 public class NSTimeZone : NSObject, NSCopying, NSSecureCoding NSTimeZone ...
- mysql6.0设置时区_关于Mysql6.0+的时区错乱问题
如果使用mysql6.0+的JDBC驱动版本的时候,有时候会出现程序时间与数据库时间相差很多个小时; 1.如果以北京时间为例,相差8个小时的情况一般是你在连接jdbc的url中没有标明system_t ...
最新文章
- [错误]xstring(525) : warning C4530:
- 初学Python,我给你总结了常见的17个错误
- 三行代码接入,社交软件打字时底下弹出的表情布局,自定义ViewPager+页面点标+各种功能的android小框架。...
- 公众号微信支付ios和android,【微信支付】
- 汇编之浮点数处理(CrackMe003前置知识)
- Altium Designer中敷铜间距修改问题
- leetcode860. 柠檬水找零
- 树的存储结构-双亲表示法
- [导入][你必须知道的.NET]第十回:品味类型---值类型与引用类型(下)-应用征途...
- [流体输配管网] 使用 Matlab 绘制莫迪图
- 【BZOJ2653】middle,主席树(非权值线段树)维护序列和信息+二分答案
- Unicode 子集 数量统计
- CSDN客服联系方式
- 马克思主义原理 - 圣才思维导图
- uni ios视频黑屏、无声音或无法播放
- Python中numpy的np.where()函数
- 重命名多个图片文件,并修改图片后缀名
- potplayer录制视频包含字幕
- spring的@Scheduled 定时任务没反应(三种配置方式)
- 暗原色原理去雾matlab代码(Matlab)