静态组件_静态网站的出色附加组件,可让您跳舞
静态组件
This post is originally from www.jaredwolff.com
这篇文章最初来自www.jaredwolff.com
Privacy.
隐私。
Performance.
性能。
Brilliant looks.
出色的外观。
Can you have all three?
你能全部三个吗?
(Of course!)
(当然!)
Having a statically generated blog is great. Many folks use services like Disqus and Google Analytics to make them even better. Not surprising if you were one of them! Privacy concerns are are the forefront of everyone’s attention. So, rather than keeping the status quo, it’s time to do something about it!
拥有静态生成的博客很棒。 许多人使用诸如Disqus和Google Analytics(分析)之类的服务来使其变得更好。 如果您是其中之一,就不足为奇了! 隐私问题是每个人关注的重点。 因此,不是保持现状,而是该做点什么了!
If you've been looking to protect your site visitor's privacy and improve performance this blog post is for you.
如果您一直在寻求保护站点访问者的隐私并提高性能,则本博客文章适合您。
In this article we'll be using DigitalOcean’s Docker droplet. It allows you to host several different applications/services on one (virtual) machine. By the end of it you'll know how to run your own comments server using Commento. Plus i’ll share a few tricks i’ve learned along the way to make it much easier for you.
在本文中,我们将使用DigitalOcean的Docker Drop。 它使您可以在一台(虚拟)计算机上托管多个不同的应用程序/服务。 到最后,您将知道如何使用Commento运行自己的注释服务器。 另外,我将分享一些我在学习过程中学到的技巧,以使您更轻松。
Leeeets go!
Leeeets去!
反向代理 (Reverse Proxy)
One of the most important aspects of this setup is the reverse proxy. A reverse proxy acts like a router. Requests come in for a certain domain. That request is then routed to the service associated with that domain.
此设置最重要的方面之一是反向代理。 反向代理就像路由器一样。 请求进入某个域。 然后,该请求将路由到与该域关联的服务。
Here’s a diagram from the Nginx Reverse Proxy + Let’s Encrypt Helper documentation. It'll help illustrate the idea.
这是Nginx反向代理+加密助手文档的图表。 这将有助于说明这个想法。
Another benefit is that there’s an extra layer of protection to the outside world. Your websites run in a private network and the only access is through the Nginx reverse proxy. Point your DNS to the server and Nginx handles all the magic.
另一个好处是对外界有额外的保护层。 您的网站在专用网络中运行,唯一的访问是通过Nginx反向代理。 将您的DNS指向服务器,Nginx处理所有问题。
Here's how to get it setup:
这是设置方法:
Go ahead and set up your Digital Ocean Droplet. All the info you need is right here. The $5 version is more than sufficient.
继续并设置您的Digital Ocean Droplet。 您需要的所有信息都在这里 。 5美元的版本绰绰有余。
Go here to clone the repository. You can also run this in your terminal. Make sure you SSH into your Digital Ocean droplet first!
转到此处克隆存储库。 您也可以在终端中运行它。 确保首先通过SSH进入Digital Ocean Drop!
git clone git@github.com:evertramos/docker-compose-letsencrypt-nginx-proxy-companion.gitChange directories to the cloned repository.
将目录更改为克隆的存储库。
Copy
.env.sampleto.envand update the values inside. I had to change theIPvalue to the IP of my Digital Ocean Droplet. I left all the other ones alone.将
.env.sample复制到.env并更新其中的值。 我必须将IP值更改为Digital Ocean Droplet的IP。 我不理会其他所有的人。Run
docker-compose up -dto start everything. (you can run without the-doption to make sure everything starts ok. Or you can attach the log output usingdocker container logs -f <container name运行
docker-compose up -d以启动所有内容。 (您可以在不使用-d选项的情况下运行,以确保一切正常。或者您可以使用docker container logs -f <container name附加日志输出
When pointing your sub-domains to this server, make sure you use an A record. Here's an example of mine:
将子域指向该服务器时,请确保使用A记录。 这是我的一个例子:
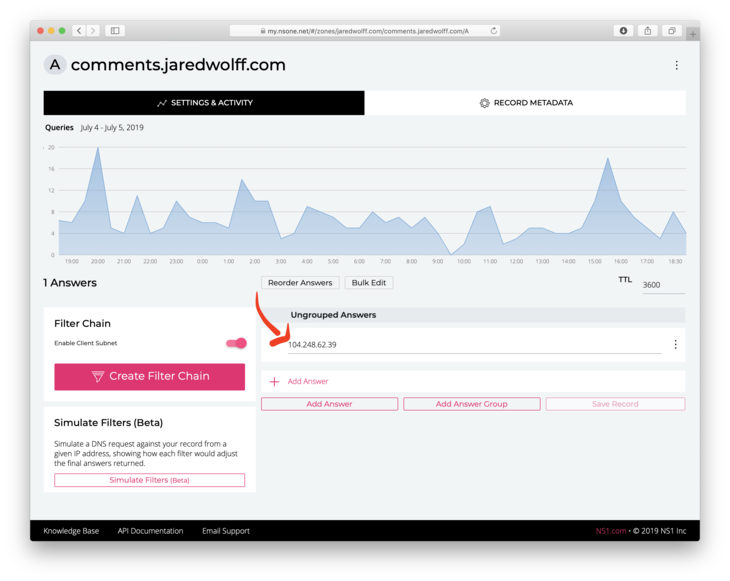
Depending on your DNS provider, you'll have to figure out how to set an A record. That is beyond the purpose of this article though!
根据您的DNS提供商,您必须弄清楚如何设置A记录。 但是,这超出了本文的目的!
使用Docker Compose设置Commento (Setting Up Commento with Docker Compose)
Here is the current docker compose file i'm using for Commento. It includes a few more environment variables for configuring Github, Gitlab and Google. It also includes the environment variables for setting the SMTP settings. These parameters are important. Otherwise you can't receive password reset or moderation emails!
这是我用于Commento的当前docker compose文件。 它包含更多用于配置Github,Gitlab和Google的环境变量。 它还包括用于设置SMTP设置的环境变量。 这些参数很重要。 否则,您将无法收到密码重设或审核电子邮件!
version: '3'services:commento:image: registry.gitlab.com/commento/commentocontainer_name: commentorestart: alwaysenvironment:COMMENTO_ORIGIN: https://${COMMENTS_URL}COMMENTO_PORT: 8080COMMENTO_POSTGRES: postgres://postgres:postgres@postgres:5432/commento?sslmode=disableCOMMENTO_SMTP_HOST: ${SMTP_HOST}COMMENTO_SMTP_PORT: ${SMTP_PORT}COMMENTO_SMTP_USERNAME: ${SMTP_USERNAME}COMMENTO_SMTP_PASSWORD: ${SMTP_PASSWORD}COMMENTO_SMTP_FROM_ADDRESS: ${SMTP_FROM_ADDRESS}COMMENTO_GITHUB_KEY: ${COMMENTO_GITHUB_KEY}COMMENTO_GITHUB_SECRET: ${COMMENTO_GITHUB_SECRET}COMMENTO_GITLAB_KEY: ${COMMENTO_GITLAB_KEY}COMMENTO_GITLAB_SECRET: ${COMMENTO_GITLAB_SECRET}COMMENTO_GOOGLE_KEY: ${COMMENTO_GOOGLE_KEY}COMMENTO_GOOGLE_SECRET: ${COMMENTO_GOOGLE_SECRET}COMMENTO_TWITTER_KEY: ${COMMENTO_TWITTER_KEY}COMMENTO_TWITTER_SECRET: ${COMMENTO_TWITTER_SECRET}VIRTUAL_HOST: ${COMMENTS_URL}VIRTUAL_PORT: 8080LETSENCRYPT_HOST: ${COMMENTS_URL}LETSENCRYPT_EMAIL: ${EMAIL}depends_on:- postgresnetworks:- db_network- webproxypostgres:image: postgrescontainer_name: postgresenvironment:POSTGRES_DB: commentoPOSTGRES_USER: postgresPOSTGRES_PASSWORD: postgresnetworks:- db_networkvolumes:- postgres_data_volume:/var/lib/postgresql/datanetworks:db_network:webproxy:external: truevolumes:postgres_data_volume:To set the environment variables, put them inside an .env file. Make sure the .env file is in the same directory as docker-compose.yml. When you run docker-compose up it will apply the variables set in the .env file. Nothing gets set if they're left blank.
要设置环境变量,请将它们放在.env文件中。 确保.env文件与.env docker-compose.yml位于同一目录中。 当您运行docker-compose up ,它将应用.env文件中设置的变量。 如果将它们留为空白,则不会设置任何内容。
Set the required COMMENTS_URL and EMAIL or you may run into problems. The best way to set these is by pacing them in the .env file. Here is an example:
设置所需的COMMENTS_URL和EMAIL否则您可能会遇到问题。 设置它们的最佳方法是在.env文件中调整它们的.env 。 这是一个例子:
COMMENTS_URL=comments.your.url
EMAIL=you@your.url
获取OAuth密钥和机密 (Getting OAuth Key & Secret)
Commento works with most popular OAuth providers. Thus visitors can leave comments without making an account.
Commento与最受欢迎的OAuth提供程序一起使用。 因此,访问者无需发表评论即可发表评论。
The instructions are similar for each. I've outlined the steps for all of them below.
每种方法的说明相似。 我在下面概述了所有步骤。
推特 (Twitter)
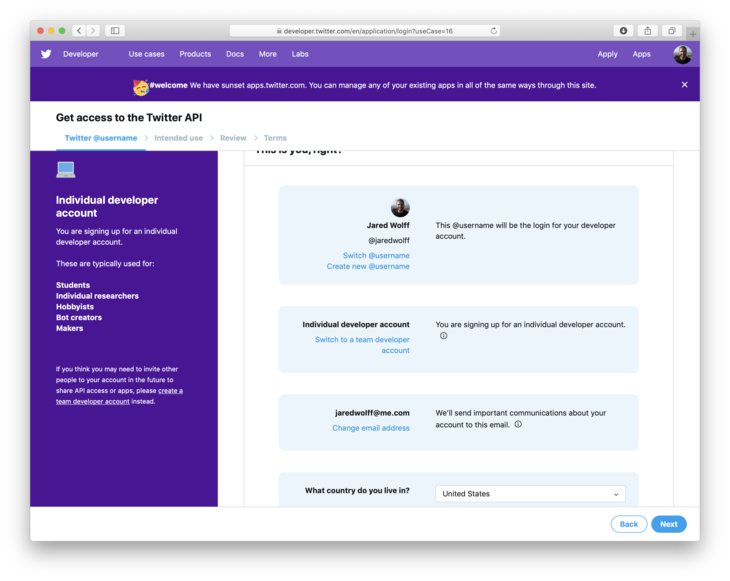
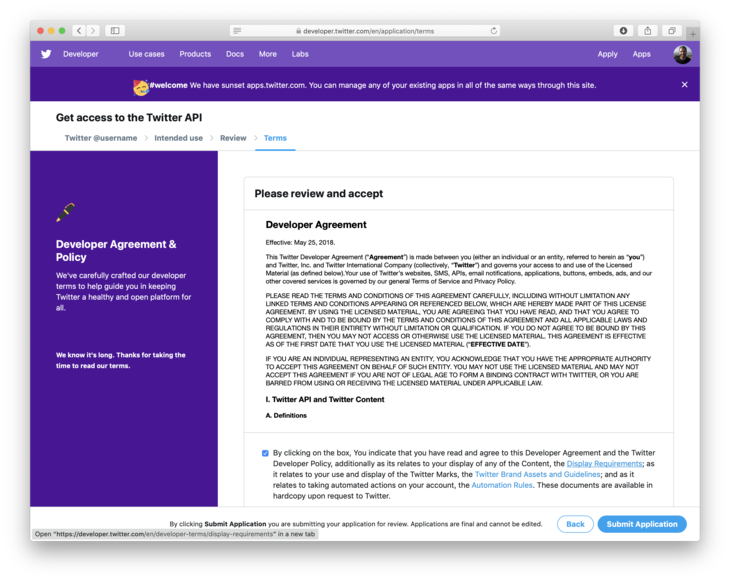
Login to Twitter.com and apply for a developer account: https://developer.twitter.com/en/application/use-case
登录Twitter.com并申请开发者帐户: https : //developer.twitter.com/en/application/use-case
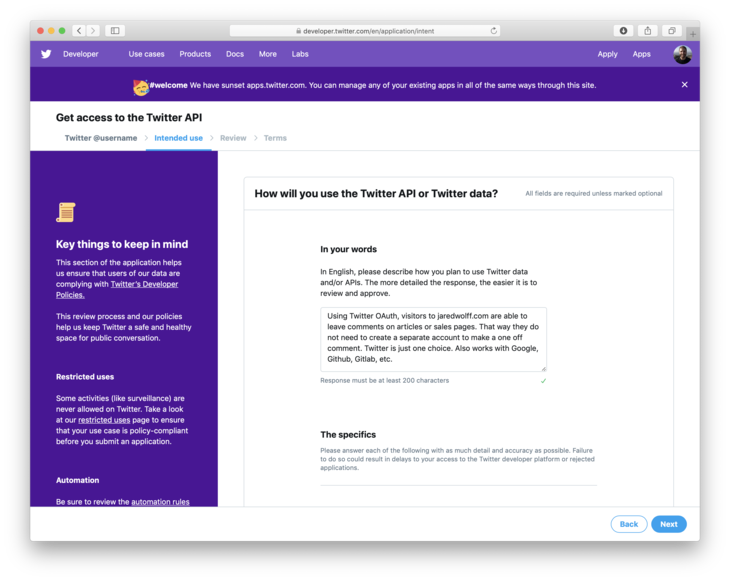
Describe how you'll use the API. You can use what I wrote.
描述如何使用API。 你可以用我写的东西。
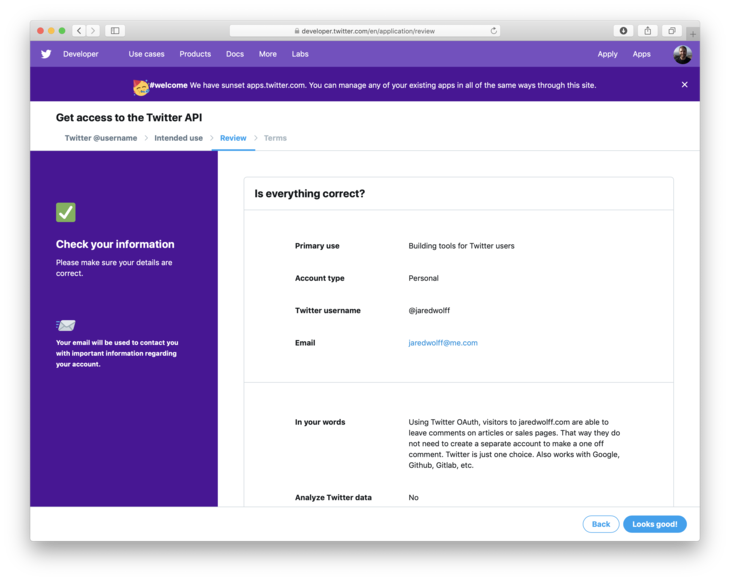
Double check your entry and click Looks Good!
仔细检查您的输入,然后单击“ 看起来不错”!
Agree to the terms of service.
同意服务条款。
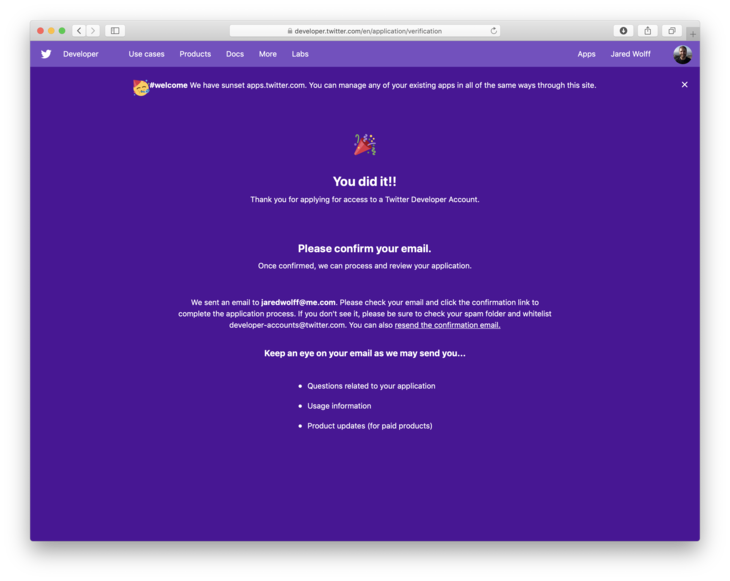
They'll tell you to check your email for a confirmation. Confirm your email and you should be able to create your first app!
他们会告诉您检查您的电子邮件以进行确认。 确认您的电子邮件,您应该可以创建您的第一个应用程序!
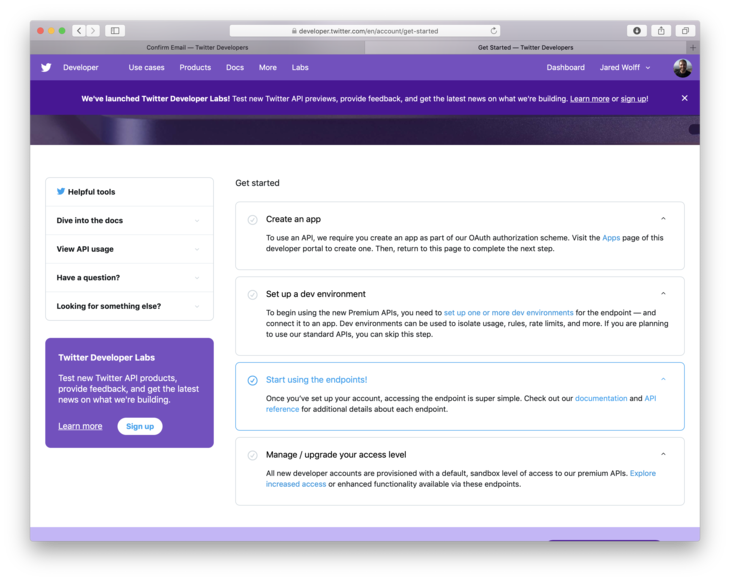
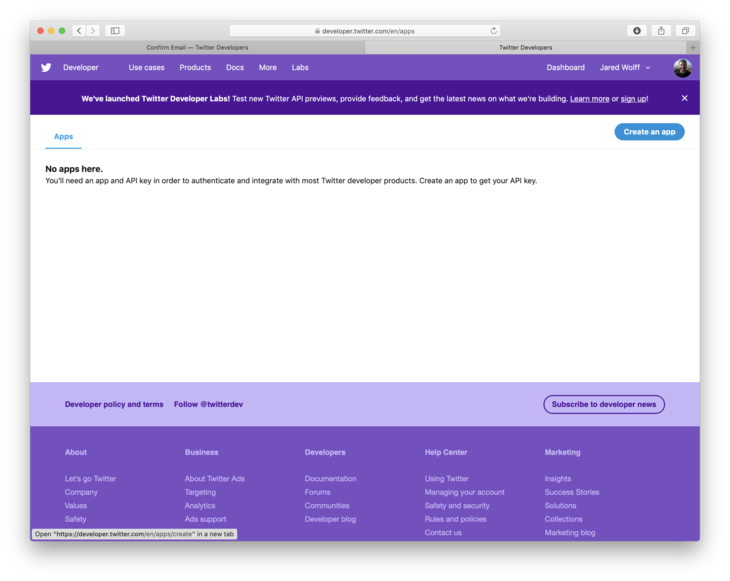
Once approved to to Get started click Create an app.
获得批准开始使用后,请点击创建应用 。
Next screen, again click Create an app
在下一个屏幕上,再次单击创建应用
Enter all the appropriate details. For the callback URL, use
https://<your URL>/api/oauth/github/callbackwhere<your URL>is your Commento subdomain.输入所有适当的详细信息。 对于回调URL,请使用
https://<your URL>/api/oauth/github/callback,其中<your URL>是您的Commento子域。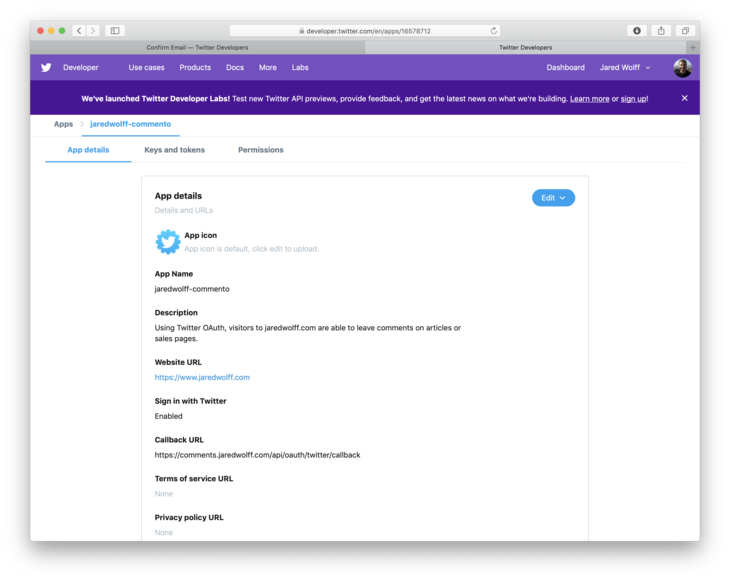
Finally, once you're done filling out the information to go the Keys and Tokens area. Save both the key and token. Enter them into the
.envfile. You can useCOMMENTO_TWITTER_KEYandCOMMENTO_TWITTER_SECRET最后,完成信息填写后,进入Keys和Token区域。 保存密钥和令牌。 将它们输入
.env文件。 您可以使用COMMENTO_TWITTER_KEY和COMMENTO_TWITTER_SECRET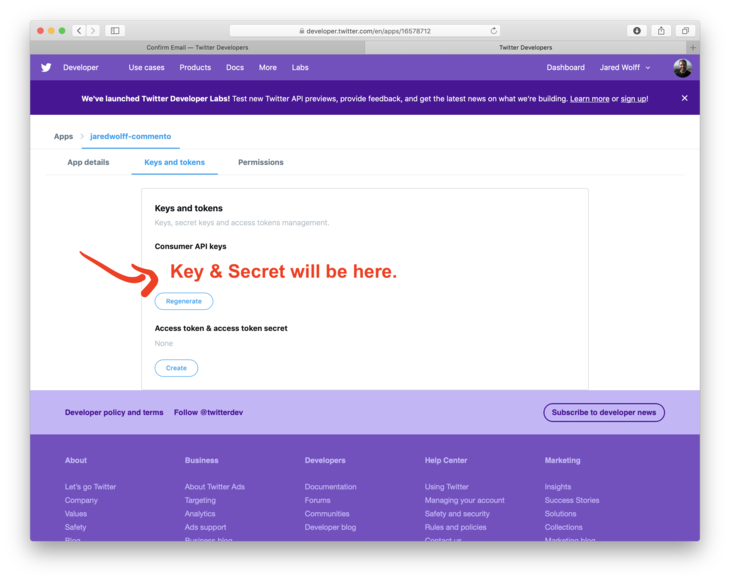
Gitlab (Gitlab)
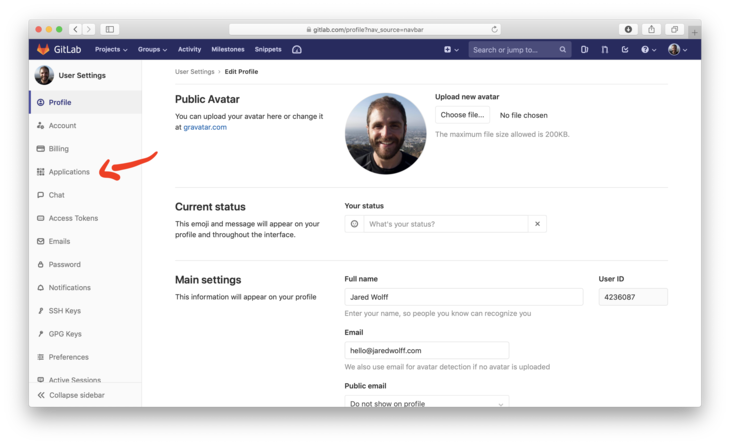
Login to Gitlab.com and go to to top right and click Settings
登录到Gitlab.com并转到右上角,然后单击“设置”
Then click on Applications
然后点击“ 应用程序”
Enter a name for your app. I put Commento.
输入您的应用名称。 我放了Commento 。
Set the Redirect URI to
https://<your URL>/api/oauth/gitlab/callback将重定向URI设置为
https://<your URL>/api/oauth/gitlab/callbackSelect the read_user scope.
选择read_user范围。
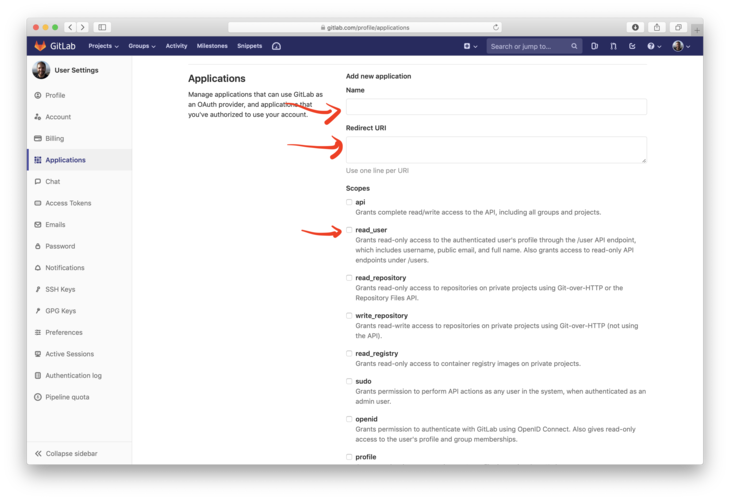
Click the green Save Application button
单击绿色的“ 保存应用程序”按钮
Copy the Application ID and Secret and place them in your
.envfile usingCOMMENTO_GITLAB_KEYandCOMMENTO_GITLAB_SECRET复制应用程序ID和密钥 ,然后使用
COMMENTO_GITLAB_KEY和COMMENTO_GITLAB_SECRET将它们放在.env文件中
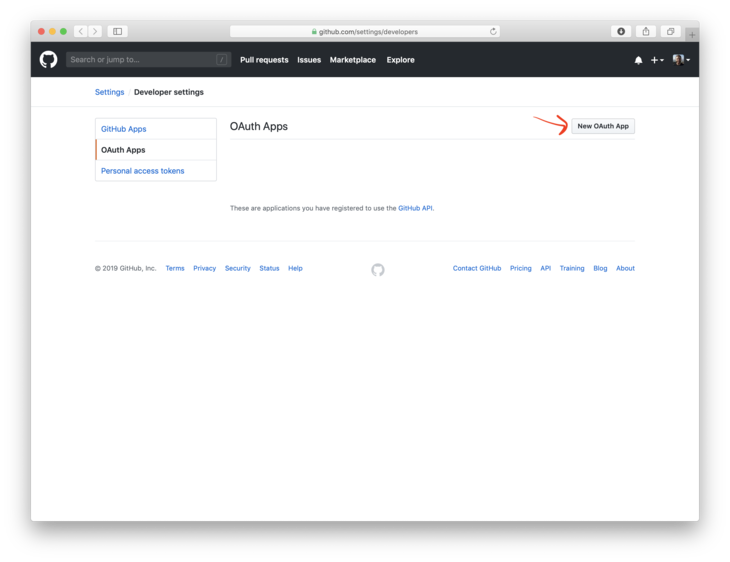
Github (Github)
To get your OAuth key and secret, you'll need to go to this URL: https://github.com/settings/developers
要获取OAuth密钥和机密,您需要转到以下URL: https : //github.com/settings/developers
Once there, click on New OAuth App
到达那里后,点击新的OAuth应用
Enter your details. For the callback URL, use
https://<your URL>/api/oauth/github/callbackwhere<your URL>is your Commento subdomain.输入您的详细信息。 对于回调URL,请使用
https://<your URL>/api/oauth/github/callback,其中<your URL>是您的Commento子域。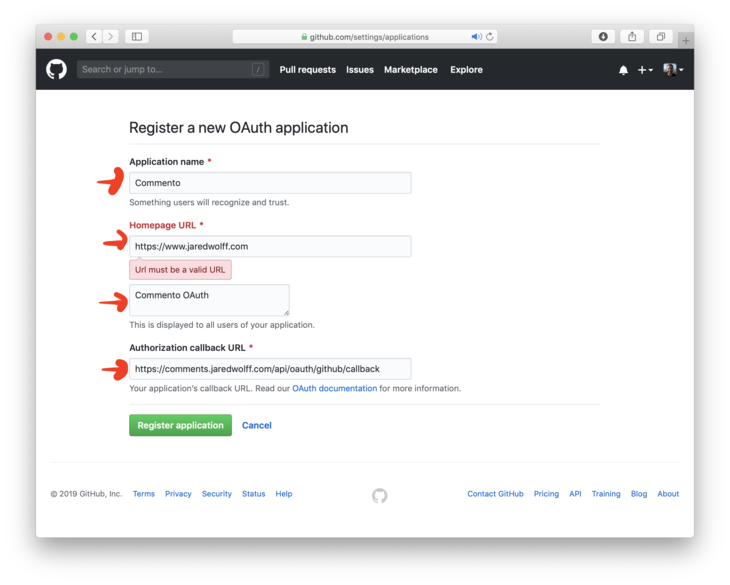
Note: Make sure you include
httpsin your URLs.注意:请确保在网址中包含
https。Grab the Client ID and Client secret and put that into your
.envfile usingCOMMENTO_GITHUB_KEYandCOMMENTO_GITHUB_SECRET获取客户端ID和客户端密钥 ,然后使用
COMMENTO_GITHUB_KEY和COMMENTO_GITHUB_SECRET将其放入.env文件中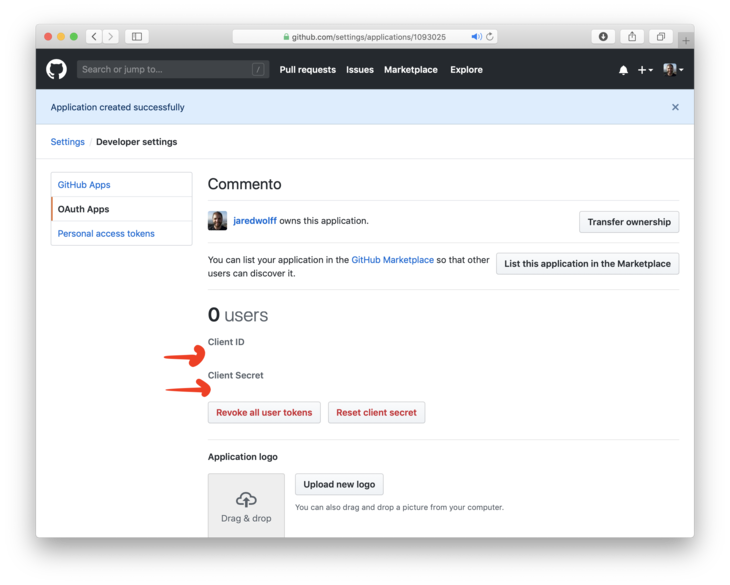
谷歌 (Google)
Setting up Google is just about as tedious to set up as Twitter. Despite how scary I just made it out to be, it's completely doable. Here are the steps.
设置Google与设置Twitter一样繁琐。 尽管我刚刚证明了它的可怕程度,但这是完全可行的。 步骤如下。
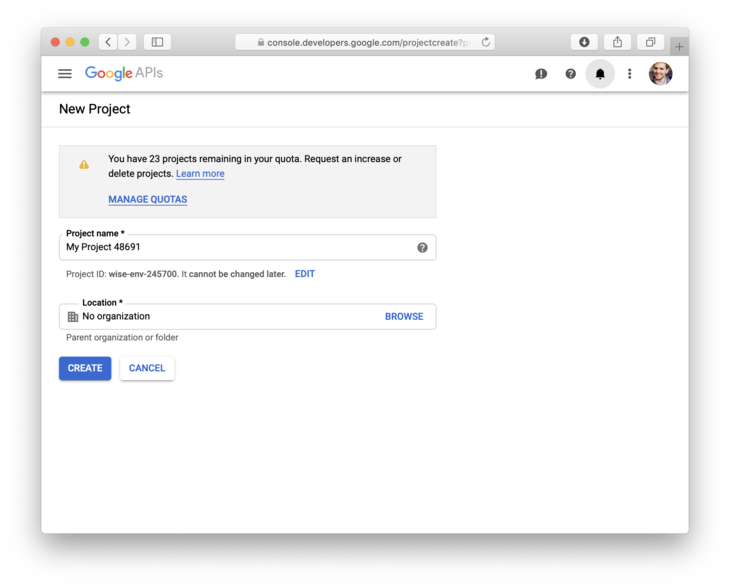
Go to this URL: Google Developer Console
转到以下网址: Google Developer Console
Create a new project
创建一个新项目
Click the GoogleAPIs logo in the top left corner to go back once you have a project. (Make sure the dropdown next to the GoogleAPIs logo is the same as your new project!)
拥有专案后 ,按一下左上角的GoogleAPIs徽标即可返回。 (确保GoogleAPIs徽标旁边的下拉列表与您的新项目相同!)
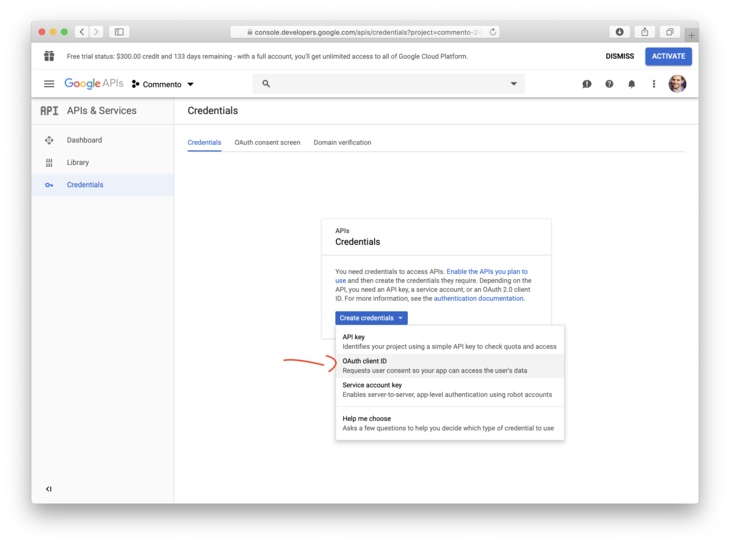
Then, click Credentials on the left side.
然后,单击左侧的凭据 。
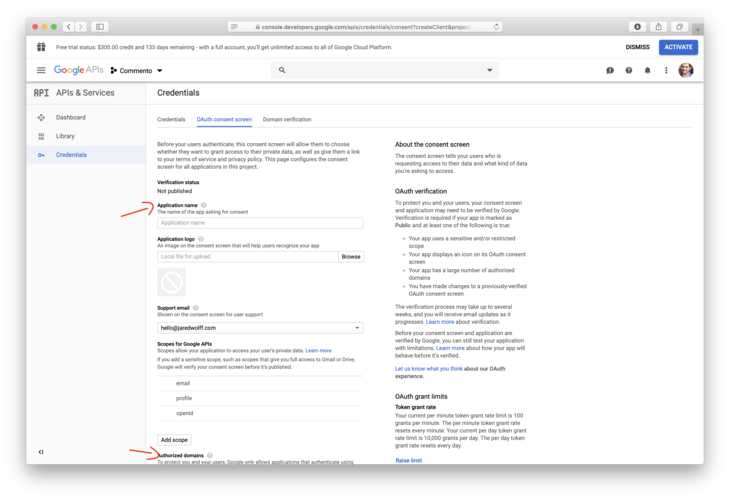
Update the Application Name and Authorized Domains in the OAuth consent screen
在OAuth同意屏幕中更新应用程序名称和授权域
Click Create credentials then OAuth client ID
点击创建凭据,然后点击OAuth客户端ID
On the Create OAuth client ID enter the subdomain associated with Commento to Authorized Javascript origins. Then, enter the full callback URL. For example
https://comments.jaredwolff.com/api/oauth/google/callback. Make it yours by replacingcomments.jaredwolff.comwith your URL.在“ 创建OAuth客户端ID”上,输入与Commento关联到授权Javascript来源的子域。 然后,输入完整的回调URL。 例如
https://comments.jaredwolff.com/api/oauth/google/callback。 把它变成你通过更换comments.jaredwolff.com与您的网址。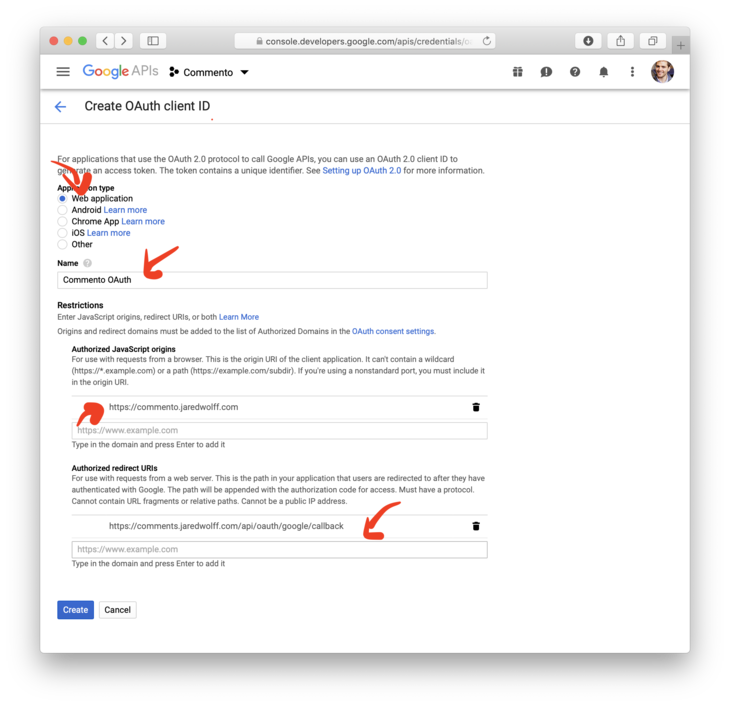
Once entered, click the create button.
输入后,单击创建按钮。
Grab the client ID and client secret
获取客户端ID和客户端机密

Update your
.envfile usingCOMMENTO_GOOGLE_KEYandCOMMENTO_GOOGLE_SECRET使用
COMMENTO_GOOGLE_KEY和COMMENTO_GOOGLE_SECRET更新.env文件
安装您的应用程序 (Install your application)
You've entered your OAuth Credentials email, domain and SMTP credentials. It's time to wrap this show up!
您已输入OAuth凭据电子邮件,域和SMTP凭据。 是时候包装这个展示了!
Once you're done editing your
.envfile. Rundocker-compose up(For files not nameddocker-compose.yml, use the-fflag. Example:docker-compose -f commento.yml up编辑
.env文件后。 运行docker-compose up(对于未命名docker-compose.yml文件,请使用-f标志。例如:docker-compose.ymldocker-compose -f commento.yml upWatch the output for errors. If it looks good you may want to kill it (CTRL+C) and run with the
-dflag观察输出中是否有错误。 如果看起来不错,您可能想杀死它( CTRL + C )并使用
-d标志运行On first start, Commento will prompt you with a login screen.
首次启动时,Commento将提示您登录屏幕。

Create a new account by clicking Don't have an account yet? Sign up.
通过单击“没有帐户?”来创建一个新帐户。 注册。
Enter your information and click Sign Up
输入您的信息,然后单击注册。
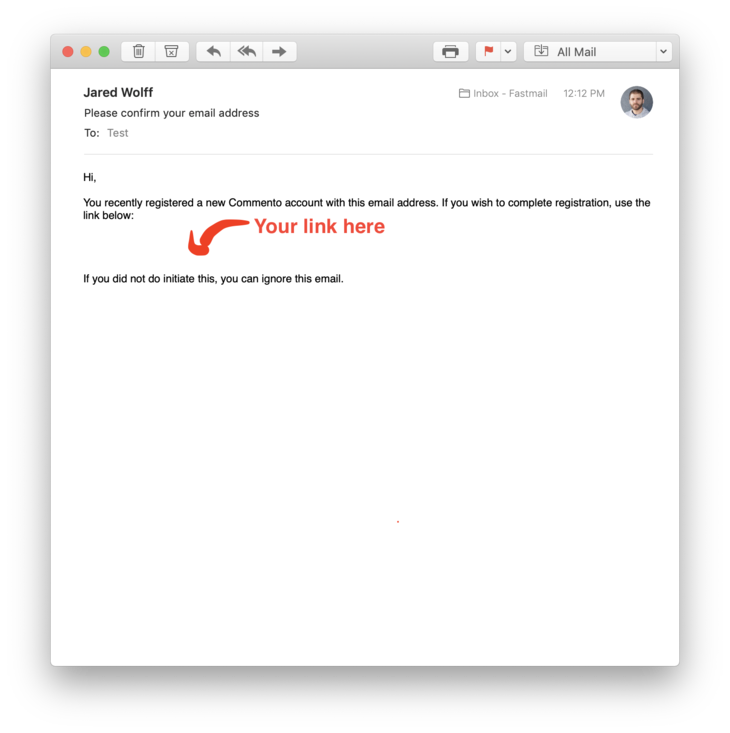
Check your email and click the included link:
检查您的电子邮件,然后单击包含的链接:
Log in with your freshly made account.
使用您的新帐户登录。
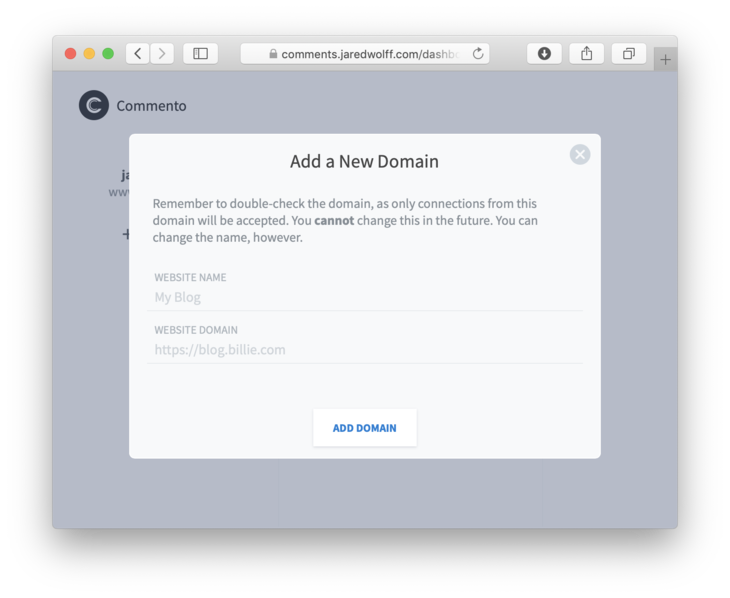
Then, click Add a New Domain.
然后,单击添加新域。
Once created go to Installation Guide. Copy the snippet and place it where ever you want your comments to live. In my case, I put the snippet in an area just after my
<article>tag.创建完成后,请转到安装指南。 复制该代码段并将其放在您想发表评论的地方。 就我而言,我将代码段放在
<article>标签之后的区域中。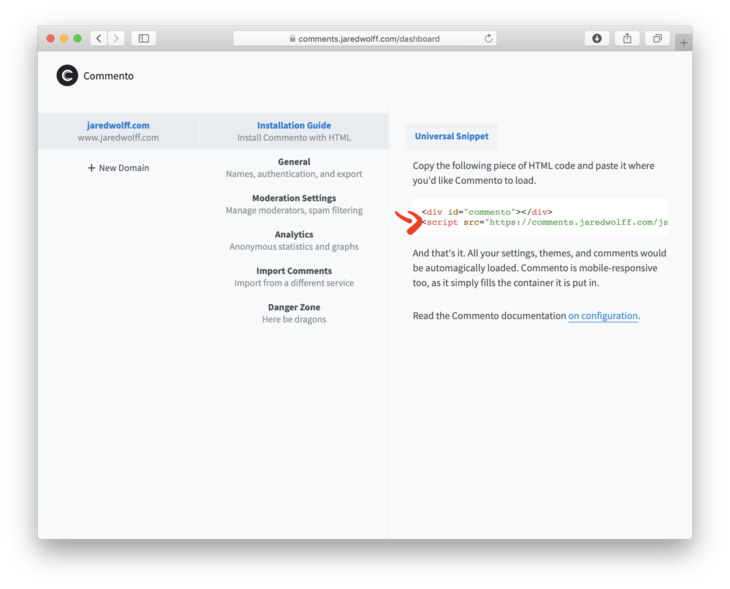
Re-compile your site and check for success!
重新编译您的网站并检查是否成功!
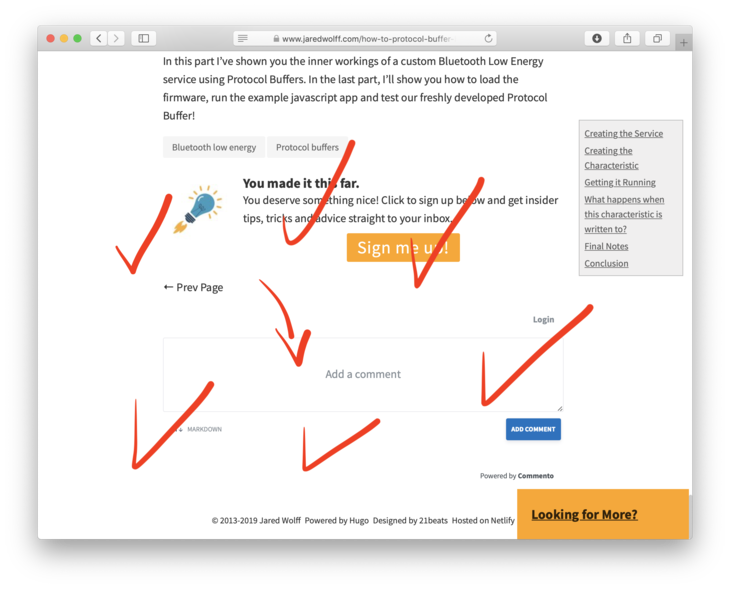
Checkmark! Finally, I recommend you try logging in with each individual OAuth configuration. That way you know it working for your website visitors. ?
复选标记! 最后,建议您尝试使用每个单独的OAuth配置登录。 这样,您就知道它对您的网站访问者有效。 ?
备择方案 (Alternatives)
I spent a good chunk playing around with some of the alternatives. This is by no means a definitive guide on what will work best for your site. Here are some of the top ones as of this writing:
我花了很多钱来玩一些其他选择。 这绝不是最适合您网站的权威指南。 以下是撰写本文时的一些热门文章:
https://utteranc.es/#configuration
https://utteranc.es/#configuration
https://github.com/netlify/gotell
https://github.com/netlify/gotell
https://github.com/eduardoboucas/staticman
https://github.com/eduardoboucas/staticman
https://posativ.org/isso/
https://posativ.org/isso/
https://www.remarkbox.com
https://www.remarkbox.com
https://www.vis4.net/blog/2017/10/hello-schnack/
https://www.vis4.net/blog/2017/10/hello-schnack/
https://github.com/gka/schnack
https://github.com/gka/schnack
There's also a huge thread over at the Hugo blog which has a ton more links and resources as well:
雨果博客上还有一个巨大的话题,该博客还有大量的链接和资源:
https://discourse.gohugo.io/t/alternative-to-disqus-needed-more-than-ever/5516
https://discourse.gohugo.io/t/alternative-to-disqus-needed-more-than-ever/5516
结论 (Conclusion)
Congrats! You are now hosting your own comments server! ?
恭喜! 您现在正在托管自己的评论服务器! ?
In this article you've learned how to harness the power of Docker and a Nginx Reverse Proxy. As an added bonus, you know how to set up OAuth credentials! That way future setup will be easy peasy.
在本文中,您学习了如何利用Docker和Nginx反向代理的功能。 另外,您知道如何设置OAuth凭据! 这样,将来的安装将变得轻松自如。
By the way, this is only the tip of the iceberg. You can set up the same server for analytics, data collection and more. All the example code including code for other applications can be found here.
顺便说一下,这只是冰山一角。 您可以为分析,数据收集等设置同一服务器。 可以在此处找到所有示例代码,包括用于其他应用程序的代码。
Finally, if you're looking pay for Commento head to www.commento.io and sign up for the service. You'll be supporting awesome open source software!
最后,如果您要为Commento付费,请访问www.commento.io并注册该服务。 您将支持出色的开源软件!
If you have comments and questions let's hear em'. Start the conversation down below. ???
如果您有任何意见和疑问,让我们听听。 从下面开始对话。 ???
翻译自: https://www.freecodecamp.org/news/how-to-setup-worry-free-blog-comments-in-20-simple-steps/
静态组件
静态组件_静态网站的出色附加组件,可让您跳舞相关推荐
- java静态链表_静态链表及其创建(C语言实现)
<顺序表和链表优缺点>一节,我们了解了两种存储结构各自的特点,那么,是否存在一种存储结构,可以融合顺序表和链表各自的优点,从而既能快速访问元素,又能快速增加或删除数据元素. 静态链表,也是 ...
- java 静态全局变量_静态变量static和全局变量global
静态变量static , 全局变量global 静态变量 在java也叫类变量从名字可以看出它是属于某个类的而不是类的实例.它的关键字是static存储在静态存储区,当程序执行,类的代码被加载到内存, ...
- pyqt 获取 UI 中组件_你想知道的React组件设计模式这里都有(上)
本文梳理了容器与展示组件.高阶组件.render props这三类React组件设计模式 往期回顾:HBaseCon Asia 2019 Track 3 概要回顾 随着 React 的发展,各种组件设 ...
- pls-00302: 必须声明 组件_手把手教你开发vue组件库
前言 Vue是一套用于构建用户界面的渐进式框架,目前有越来越多的开发者在学习和使用.在笔者写完 从0到1教你搭建前端团队的组件系统 之后很多朋友希望了解一下如何搭建基于vue的组件系统,所以作为这篇文 ...
- 动态添加组件_使用vue.js的动态组件模板
最近刚做完建站工具,准备总结里面使用到的一些技巧,同时会做一版简化的放在 github上. 先来一篇翻译的文章,和我在项目中使用的动态组件思路一样,不过缺少了演化的过程,直接给出了最终的解决方案.这篇 ...
- python动态与静态语言_静态语言和动态语言的区别
via https://blog.csdn.net/hard_days/article/details/84967298 今天在群里聊天的时候,谈论到python和Java相比居然不用定义变量类型.我 ...
- java 静态扫描_静态代码扫描工具 – (八)- 扫描Java项目
静态代码扫描工具 – (八)- 扫描Java项目 1.准备好Java项目代码 只要是java语言实现的项目均可. 比如,自动化测试的代码,测试平台等均可以. 本次案例,使用java语言实现的测试平台来 ...
- 2010_8_18_静态路由_静态路由路由排错(不连续地址汇总)
网络拓扑 试验要求: 使用默认路由代表大多数的网段来减小路由表. 实验配置详解 1.在Route0上 Router#confi t Router(config)#ip route 0.0.0.0 0. ...
- phpstudy安装sg11组件_服务器php安装SG11扩展组件的详细图文教程
大家都知道,php有许多扩展组件,在我们搭建网站时,不同的建站源码对php组件的需求是不同的,今天小编带着大家来安装一次其中的sg11组件.一.宝塔面板用户安装sg11组件的方法 为什么小编会把宝塔面 ...
最新文章
- 测试nb信号的软件_NB-IoT和LORA,谁才是真正的低功耗?从数据看真相
- 面向对象编程 封装 继承 多态(三大特征)(第三篇)
- 298. Binary Tree Longest Consecutive Sequence
- c语言扑克牌随机发三张牌,扑克牌发三张概率组合一副扑克牌52张(不含大、小王),发三张牌,一共多少种组合.另外:1)三张中含一对的组合有多少张?(...
- javascript 点点滴滴01章 javascript的认知
- 挖槽!堪称神级的Java技术手册火了???(文末送书活动)
- Create new module “HelloWorld” – in Magento
- UVa140 Bandwidth 【最优性剪枝】
- iptv管理系统php制作,双子星IPTV管理系统搭建教程
- 《深入理解Java虚拟机》第6章 类文件结构
- 【渝粤题库】 陕西师范大学 202331 证券投资学 作业(专升本)
- C4D 展UV的那些坑
- 计算机实践ps折扇,用PS打造一把水墨画折扇的教程
- 数据禾|2020年青海省小麦种植分布数据
- 【昭阳】开源第2弹 JXT
- np.random用法
- 渗透测试职业规划-三省吾身
- Java面试题消息队列
- Hdu 4503 湫湫系列故事——植树节
- SpringCloud微服务项目的api文档聚合