Spring 源码分析(三) —— AOP(五)创建代理
2019独角兽企业重金招聘Python工程师标准>>> 
创建代理
代理的定义其实非常简单,就是改变原来目标对象方法调用的运行轨迹。这种改变,首先会对这些方法进行拦截,从而为这些方法提供工作空间,随后在进行回调,从而完成 AOP 切面实现的一整个逻辑。
而创建代理是 Spring AOP 功能实现最核心的地方,一般而言 Spring AOP 动态生成代理有两种方法:JDK 和 CGLIB。下面是具体时序图:
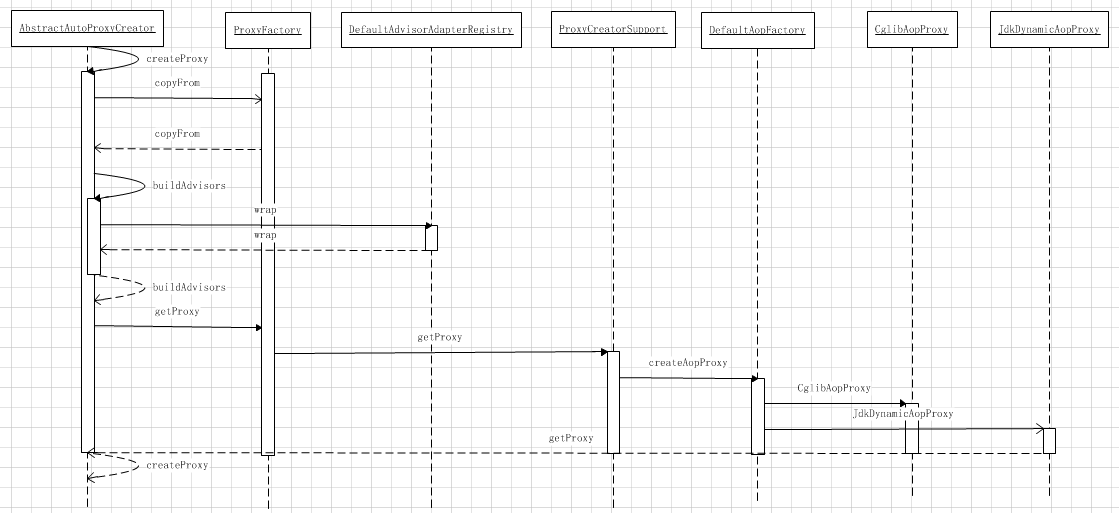
通过时序图的分析我们知道她主要是由 AbstractAutoProxyCreator 类和 ProxyFactory 工厂类来完成的。下面我们进行分析。
初始化操作
创建代理工厂
在获取了所有对应 bean 的增强器后,便可以进行代理的创建了。
AbstractAutoProxyCreator.java
protected Object createProxy(Class<?> beanClass, String beanName, Object[] specificInterceptors, TargetSource targetSource) {ProxyFactory proxyFactory = new ProxyFactory();// 获取当前类中相关属性proxyFactory.copyFrom(this);// 决定对给定的 bean 是否应该使用 targetClass 而不是他的接口代理,// 检查 proxyTargeClass 设置以及 preserveTargetClass 属性if (!proxyFactory.isProxyTargetClass()) {if (shouldProxyTargetClass(beanClass, beanName)) {proxyFactory.setProxyTargetClass(true);}else {evaluateProxyInterfaces(beanClass, proxyFactory);}}Advisor[] advisors = buildAdvisors(beanName, specificInterceptors);for (Advisor advisor : advisors) {// 加入增强器proxyFactory.addAdvisor(advisor);}// 设置要代理的类proxyFactory.setTargetSource(targetSource);// 定制代理customizeProxyFactory(proxyFactory);// 用来控制代理过程被配置之后,是否还允许修改通知。// 缺省值为 false (即在代理被配置之后,不允许修改代理的配置)proxyFactory.setFrozen(this.freezeProxy);if (advisorsPreFiltered()) {proxyFactory.setPreFiltered(true);}return proxyFactory.getProxy(getProxyClassLoader());
}
对于代理类的创建及处理,Spring 委托给了 ProxyFactory 去处理,而在此函数中主要是对 ProxyFactory 的初始化操作,进而对真正的创建代理做准备,这些初始化操作包括6个内容:(1)获取当前类中的属性。(2)添加代理接口。(3)封装 Advisor 并加入到 ProxyFactory 中。(4)设置要代理的类。(5)当然在 Spring 中还为子类提供了定制的函数 customizeProxyFactory,子类可以在此函数中对 ProxyFactory 的进一步封装。(6)进行获取代理操作。
封装逻辑
其中,封装 Advisor 并加入到 ProxyFactory 中以及创建代理是最为繁琐的两个过程,可以通过 ProxyFactory 提供 addAdvisor 方法直接将通知器置如代理创建工厂中,但是将拦截器封装为通知器还是需要一定逻辑的。
AbstractAutoProxyCreator.java
protected Advisor[] buildAdvisors(String beanName, Object[] specificInterceptors) {// 解析注册的所有 interceptorNameAdvisor[] commonInterceptors = resolveInterceptorNames();List<Object> allInterceptors = new ArrayList<Object>();if (specificInterceptors != null) {// 加入拦截器allInterceptors.addAll(Arrays.asList(specificInterceptors));if (commonInterceptors != null) {if (this.applyCommonInterceptorsFirst) {allInterceptors.addAll(0, Arrays.asList(commonInterceptors));}else {allInterceptors.addAll(Arrays.asList(commonInterceptors));}}}if (logger.isDebugEnabled()) {int nrOfCommonInterceptors = (commonInterceptors != null ? commonInterceptors.length : 0);int nrOfSpecificInterceptors = (specificInterceptors != null ? specificInterceptors.length : 0);logger.debug("Creating implicit proxy for bean '" + beanName + "' with " + nrOfCommonInterceptors +" common interceptors and " + nrOfSpecificInterceptors + " specific interceptors");}Advisor[] advisors = new Advisor[allInterceptors.size()];for (int i = 0; i < allInterceptors.size(); i++) {// 拦截器进行封装转化为 Advisoradvisors[i] = this.advisorAdapterRegistry.wrap(allInterceptors.get(i));}return advisors;
}
DefaultAdvisorAdapterRegistry.java
@Override
public Advisor wrap(Object adviceObject) throws UnknownAdviceTypeException {// 如果要封装的对象本身就是 Advisor 类型的那么无需再做过多处理if (adviceObject instanceof Advisor) {return (Advisor) adviceObject;}// 因为此封装方法只对 Advisor 与 Advice 两种类型的数据有效if (!(adviceObject instanceof Advice)) {throw new UnknownAdviceTypeException(adviceObject);}Advice advice = (Advice) adviceObject;if (advice instanceof MethodInterceptor) {// 如果是 MethodInterceptor 类型则使用 DefaultPointcutAdvisor 封装return new DefaultPointcutAdvisor(advice);}// 如果存在 Advisor 的适配器那么也需要进行封装for (AdvisorAdapter adapter : this.adapters) {// Check that it is supported.if (adapter.supportsAdvice(advice)) {return new DefaultPointcutAdvisor(advice);}}throw new UnknownAdviceTypeException(advice);
}
由于 Spring 中涉及过多的拦截器、通知器、增强方法等方式来对逻辑进行增强,所以非常有必要统一封装成 Advisor 来进行代理的创建,完成了增强的封装过程,那么解析最重要的一步就是代理的创建与获取了。
AspectJProxyFactory.java
public <T> T getProxy(ClassLoader classLoader) {return (T) createAopProxy().getProxy(classLoader);
}
代理生成
创建代理
我们接着上面的例子继续进行分析。
ProxyCreatorSupport.java
protected final synchronized AopProxy createAopProxy() {if (!this.active) {activate();}// 创建代理return getAopProxyFactory().createAopProxy(this);
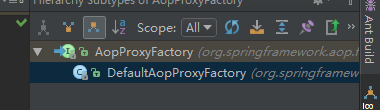
}createAopProxy 方法封装在 AopProxyFactory 接口中,通过对接口继承关系的跟踪,最终在 DefaultAopFactory中找到了其实现方法。
DefaultAopFactory.java
@Override
public AopProxy createAopProxy(AdvisedSupport config) throws AopConfigException {// 这里判断是使用 JDKProxy 的实现或者 CGLIBProxy 的实现if (config.isOptimize() || config.isProxyTargetClass() || hasNoUserSuppliedProxyInterfaces(config)) {Class<?> targetClass = config.getTargetClass();if (targetClass == null) {throw new AopConfigException("TargetSource cannot determine target class: " +"Either an interface or a target is required for proxy creation.");}if (targetClass.isInterface()) {return new JdkDynamicAopProxy(config);}return new ObjenesisCglibAopProxy(config);}else {return new JdkDynamicAopProxy(config);}
}
到此已经完成了代理创建。而源码中提到的 JDK 动态代理 和 CGLIB 字节码生成代理笔者会在随后进行介绍,这里需要注意的是if中的三个判断条件:(1)optimize:用来控制通过CGLIB创建的代理是否使用激进的优化策略。除非完全了解AOP。否则不推荐。目前这个属性也仅仅用于 CGLIB。(2)proxyTargetClass:这个属性为 true 时,目标类本身本代理而不是目标类的接口。如果这个属性值被设为 true,CGLIB 代理将被创建,设置方式:<aop:aspectj-autoproxy proxy-target-class="true"/>。(3)hasNoUserSuppliedProxyInterfaces:是否存在代理接口。
创建代理的方法
Spring AOP 内动态生成代理有两种方法:JDK 和 CGLIB。一般情况下,如果目标对象实现了接口,默认情况下会采用 JDK 动态代理实现 AOP。如果目标对象实现了接口,可以强制使用 CGLIB 实现 AOP。如果目标对象没有实现接口,必须采用 CGLIB,Spring 会自动在 JDK动态代理和 CGLIB 之间转化。而且,JDK 动态代理只能对实现了接口的类生成代理,而不能针对类。CGLIB是针对类实现代理的,但主要是对指定的类生成一个子类,覆盖其中的方法,是继承实现,所以该类或方法最好不要声明成 final。
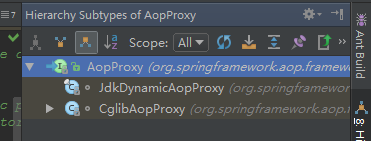
这里需要特别注意的是 AopProxy 接口,通过上面的代码我们知道了,AopProxy 才是生成代理的主要位置。而前面看到的 ProxyFactory 在 AopProxy 代理对象和IOC容器配置之间仅仅起一个桥梁作用。AopProxy 代理对象可以由 JDK 或 CGLIB 来生成,而下面是他们的层次关系:
JDK 动态代理
在对于 JDK 代理的使用中,JDK 动态代理的实现类 JdkDynamicAopProxy,而 JdkDynamicAopProxy 类最为核心的是 InvocationHandler 接口。而在 JdkDynamicAopProxy 类的方法里较为重要的有三个:构造函数、invoke 方法和 getProxy 方法。下面我就一个个的进行分析:
JdkDynamicAopProxy.java
public JdkDynamicAopProxy(AdvisedSupport config) throws AopConfigException {Assert.notNull(config, "AdvisedSupport must not be null");if (config.getAdvisors().length == 0 && config.getTargetSource() == AdvisedSupport.EMPTY_TARGET_SOURCE) {throw new AopConfigException("No advisors and no TargetSource specified");}this.advised = config;
}
从源码我们可以看出,构造函数主要适用于传值。
JdkDynamicAopProxy.java
@Override
public Object getProxy(ClassLoader classLoader) {if (logger.isDebugEnabled()) {logger.debug("Creating JDK dynamic proxy: target source is " + this.advised.getTargetSource());}Class<?>[] proxiedInterfaces = AopProxyUtils.completeProxiedInterfaces(this.advised);findDefinedEqualsAndHashCodeMethods(proxiedInterfaces);return Proxy.newProxyInstance(classLoader, proxiedInterfaces, this);
}
而 getProxy 方法则是用于获取生成的代理对象的,是必不可少的方法。
JdkDynamicAopProxy.java
@Override
public Object invoke(Object proxy, Method method, Object[] args) throws Throwable {MethodInvocation invocation;Object oldProxy = null;boolean setProxyContext = false;TargetSource targetSource = this.advised.targetSource;Class<?> targetClass = null;Object target = null;try {// equals 方法的处理if (!this.equalsDefined && AopUtils.isEqualsMethod(method)) {return equals(args[0]);}// hash 方法的处理if (!this.hashCodeDefined && AopUtils.isHashCodeMethod(method)) {return hashCode();}if (!this.advised.opaque && method.getDeclaringClass().isInterface() &&method.getDeclaringClass().isAssignableFrom(Advised.class)) {// Service invocations on ProxyConfig with the proxy config...return AopUtils.invokeJoinpointUsingReflection(this.advised, method, args);}Object retVal;// 有时候目标对象内部的自我调用将无法实施切面中的增强// 则需要通过属性暴露代理if (this.advised.exposeProxy) {// Make invocation available if necessary.oldProxy = AopContext.setCurrentProxy(proxy);setProxyContext = true;}target = targetSource.getTarget();if (target != null) {targetClass = target.getClass();}// 获取当前方法的拦截器List<Object> chain = this.advised.getInterceptorsAndDynamicInterceptionAdvice(method, targetClass);if (chain.isEmpty()) {// 如果没有发现任何拦截器那么直接调入切点方法retVal = AopUtils.invokeJoinpointUsingReflection(target, method, args);}else {// 将拦截器封装在 ReflectiveMethodInvocation// 以便于使用期 proceed 进行链接表用拦截器invocation = new ReflectiveMethodInvocation(proxy, target, method, args, targetClass, chain);// 执行拦截器链retVal = invocation.proceed();}// 返回结果Class<?> returnType = method.getReturnType();if (retVal != null && retVal == target && returnType.isInstance(proxy) &&!RawTargetAccess.class.isAssignableFrom(method.getDeclaringClass())) {retVal = proxy;}else if (retVal == null && returnType != Void.TYPE && returnType.isPrimitive()) {throw new AopInvocationException("Null return value from advice does not match primitive return type for: " + method);}return retVal;}finally {if (target != null && !targetSource.isStatic()) {targetSource.releaseTarget(target);}if (setProxyContext) {AopContext.setCurrentProxy(oldProxy);}}
}
ReflectiveMethodInvocation.java
@Override
public Object proceed() throws Throwable {// 执行完所有增强后执行切点方法if (this.currentInterceptorIndex == this.interceptorsAndDynamicMethodMatchers.size() - 1) {return invokeJoinpoint();}// 获取下一个要执行的拦截器Object interceptorOrInterceptionAdvice =this.interceptorsAndDynamicMethodMatchers.get(++this.currentInterceptorIndex);if (interceptorOrInterceptionAdvice instanceof InterceptorAndDynamicMethodMatcher) {// 动态匹配InterceptorAndDynamicMethodMatcher dm =(InterceptorAndDynamicMethodMatcher) interceptorOrInterceptionAdvice;if (dm.methodMatcher.matches(this.method, this.targetClass, this.arguments)) {return dm.interceptor.invoke(this);}else {// 不匹配则不执行拦截器return proceed();}}else {// 将 this 作为参数传递以保证档期实例中调用链的执行return ((MethodInterceptor) interceptorOrInterceptionAdvice).invoke(this);}
}
通过源码我们知道,invoke 方法是其核心逻辑实现的地方。其主要的工作就是创建一个拦截器链,然后使用 ReflectiveMethodInvocation 类对链进行封装,最后通过 proceed 方法对拦截器进行逐个调用,而 proceed 方法负责实现方法前调用以及后置调用的逻辑处理,然后将工作委托给各个增强器,在增强器内部实现具体逻辑。
CGLIBProxy 字节码生成代理
CGLIB 是一个强大的高性能的代码生成包。Spring AOP 中完成 CGLIB 代理是托付给 CglibAopProxy 类来实现的,而也动态代理相似 getProxy 方法是这个类的主要入口。
CglibAopProxy.java
@Override
public Object getProxy(ClassLoader classLoader) {if (logger.isDebugEnabled()) {logger.debug("Creating CGLIB proxy: target source is " + this.advised.getTargetSource());}try {Class<?> rootClass = this.advised.getTargetClass();Assert.state(rootClass != null, "Target class must be available for creating a CGLIB proxy");Class<?> proxySuperClass = rootClass;if (ClassUtils.isCglibProxyClass(rootClass)) {proxySuperClass = rootClass.getSuperclass();Class<?>[] additionalInterfaces = rootClass.getInterfaces();for (Class<?> additionalInterface : additionalInterfaces) {this.advised.addInterface(additionalInterface);}}// 验证 ClassvalidateClassIfNecessary(proxySuperClass, classLoader);// 创建及配置 Enhancer Enhancer enhancer = createEnhancer();if (classLoader != null) {enhancer.setClassLoader(classLoader);if (classLoader instanceof SmartClassLoader &&((SmartClassLoader) classLoader).isClassReloadable(proxySuperClass)) {enhancer.setUseCache(false);}}enhancer.setSuperclass(proxySuperClass);enhancer.setInterfaces(AopProxyUtils.completeProxiedInterfaces(this.advised));enhancer.setNamingPolicy(SpringNamingPolicy.INSTANCE);enhancer.setStrategy(new UndeclaredThrowableStrategy(UndeclaredThrowableException.class));// 设置拦截器Callback[] callbacks = getCallbacks(rootClass);Class<?>[] types = new Class<?>[callbacks.length];for (int x = 0; x < types.length; x++) {types[x] = callbacks[x].getClass();}// fixedInterceptorMap only populated at this point, after getCallbacks call aboveenhancer.setCallbackFilter(new ProxyCallbackFilter(this.advised.getConfigurationOnlyCopy(), this.fixedInterceptorMap, this.fixedInterceptorOffset));enhancer.setCallbackTypes(types);// 生成代理类以及创建代理return createProxyClassAndInstance(enhancer, callbacks);}catch (CodeGenerationException ex) {throw new AopConfigException("Could not generate CGLIB subclass of class [" +this.advised.getTargetClass() + "]: " +"Common causes of this problem include using a final class or a non-visible class",ex);}catch (IllegalArgumentException ex) {throw new AopConfigException("Could not generate CGLIB subclass of class [" +this.advised.getTargetClass() + "]: " +"Common causes of this problem include using a final class or a non-visible class",ex);}catch (Exception ex) {// TargetSource.getTarget() failedthrow new AopConfigException("Unexpected AOP exception", ex);}
}
CGLIB 的实现最重要的就是 Enhancer。以上函数完整地阐述了创建 Spring 的 Enhancer 过程,这里值得注意的是设置拦截器链 getCallbacks 方法。
CglibAopProxy.java
private Callback[] getCallbacks(Class<?> rootClass) throws Exception {// 对于 expose-proxy 属性的处理boolean exposeProxy = this.advised.isExposeProxy();boolean isFrozen = this.advised.isFrozen();boolean isStatic = this.advised.getTargetSource().isStatic();// 将拦截器封装在 DynamicAdvisedInterceptor 中Callback aopInterceptor = new DynamicAdvisedInterceptor(this.advised);// Choose a "straight to target" interceptor. (used for calls that are// unadvised but can return this). May be required to expose the proxy.Callback targetInterceptor;if (exposeProxy) {targetInterceptor = isStatic ?new StaticUnadvisedExposedInterceptor(this.advised.getTargetSource().getTarget()) :new DynamicUnadvisedExposedInterceptor(this.advised.getTargetSource());}else {targetInterceptor = isStatic ?new StaticUnadvisedInterceptor(this.advised.getTargetSource().getTarget()) :new DynamicUnadvisedInterceptor(this.advised.getTargetSource());}// Choose a "direct to target" dispatcher (used for// unadvised calls to static targets that cannot return this).Callback targetDispatcher = isStatic ?new StaticDispatcher(this.advised.getTargetSource().getTarget()) : new SerializableNoOp();Callback[] mainCallbacks = new Callback[]{aopInterceptor, // 将拦截器链加入 Callback 中targetInterceptor, // invoke target without considering advice, if optimizednew SerializableNoOp(), // no override for methods mapped to thistargetDispatcher, this.advisedDispatcher,new EqualsInterceptor(this.advised),new HashCodeInterceptor(this.advised)};Callback[] callbacks;// If the target is a static one and the advice chain is frozen,// then we can make some optimisations by sending the AOP calls// direct to the target using the fixed chain for that method.if (isStatic && isFrozen) {Method[] methods = rootClass.getMethods();Callback[] fixedCallbacks = new Callback[methods.length];this.fixedInterceptorMap = new HashMap<String, Integer>(methods.length);// TODO: small memory optimisation here (can skip creation for methods with no advice)for (int x = 0; x < methods.length; x++) {List<Object> chain = this.advised.getInterceptorsAndDynamicInterceptionAdvice(methods[x], rootClass);fixedCallbacks[x] = new FixedChainStaticTargetInterceptor(chain, this.advised.getTargetSource().getTarget(), this.advised.getTargetClass());this.fixedInterceptorMap.put(methods[x].toString(), x);}// Now copy both the callbacks from mainCallbacks// and fixedCallbacks into the callbacks array.callbacks = new Callback[mainCallbacks.length + fixedCallbacks.length];System.arraycopy(mainCallbacks, 0, callbacks, 0, mainCallbacks.length);System.arraycopy(fixedCallbacks, 0, callbacks, mainCallbacks.length, fixedCallbacks.length);this.fixedInterceptorOffset = mainCallbacks.length;}else {callbacks = mainCallbacks;}return callbacks;
}
至此,Spring 源码分析部分就完了,当然这仅仅是他众多实现中的一种。
——水门(2016年3月于杭州)
转载于:https://my.oschina.net/kaywu123/blog/638181
Spring 源码分析(三) —— AOP(五)创建代理相关推荐
- Spring 源码分析(三) —— AOP(二)Spring AOP 整体架构
2019独角兽企业重金招聘Python工程师标准>>> Spring AOP 架构 先是生成代理对象,然后是拦截器的作用,最后是编织的具体实现.这是AOP实现的三个步 ...
- Spring源码分析之Bean的创建过程详解
前文传送门: Spring源码分析之预启动流程 Spring源码分析之BeanFactory体系结构 Spring源码分析之BeanFactoryPostProcessor调用过程详解 本文内容: 在 ...
- Spring源码分析(三)
Spring源码分析 第三章 手写Ioc和Aop 文章目录 Spring源码分析 前言 一.模拟业务场景 (一) 功能介绍 (二) 关键功能代码 (三) 问题分析 二.使用ioc和aop重构 (一) ...
- Spring源码分析之AOP源码分析
文章目录 前言 一.AOP回顾 二.源码分析 EnableAspectJAutoProxy注解 AnnotationAwareAspectJAutoProxyCreator 前言 Spring框架的两 ...
- spring源码分析之Aop
今天读spring源码,读到aop相关内容,在此记录一下,以便以后复习和查阅. 一.spring如何实现Aop 这里简单的说下原理,spring实例化bean要经历一套完整的生命周期,在这个过程中会对 ...
- 【转】ABP源码分析三十五:ABP中动态WebAPI原理解析
动态WebAPI应该算是ABP中最Magic的功能之一了吧.开发人员无须定义继承自ApiController的类,只须重用Application Service中的类就可以对外提供WebAPI的功能, ...
- Spring源码分析之Aop中拦截器,适配器,通知之间的关系
首先举一个例子: public class MethodBeforeAdviceInterceptor implements MethodInterceptor, Serializable {priv ...
- Spring源码分析——汇总全集
文章目录 一.背景 二.源码分析目录 三.源码番外篇(补充) 更新时间 更新内容 备注 2022-04-01 Spring源码分析目录和计划 2022-04-10 Spring源码分析一:容器篇-re ...
- Spring源码分析系列——bean创建过程分析(三)——工厂方法创建bean
前言 spring创建bean的方式 测试代码准备 createBeanInstance()方法分析 instantiateUsingFactoryMethod()方法分析 总结 spring创建be ...
最新文章
- Oracle“死锁”模拟
- CTFshow 命令执行 web59
- react学习笔记(8)生命周期回顾与再认识
- 三菱880彩铅和uni的区别_彩铅测评|150色荷尔拜因彩铅初体验
- 被LTRIM(RTRIM())害死了,差点
- 使用 iPerf 测试 Azure VM 之间的网速
- UNIX(多线程):26---悲观锁和乐观锁
- signature=7a6addc49a87cb6a44a8da5a20a59d1f,Disks and Halos in Pre-Main-Sequence Stars
- JQuery获取和设置Select选项常用方法总结 (转)
- html基礎之渐变属性(斑马线)
- ffmpeg filter过滤器 基础实例及全面解析
- 《数字图像处理 第三版》(冈萨雷斯)——第十一章 表示和描述
- UE4 粒子特效基础学习 (03-制作上升光线特效)
- 基于php的酒店管理系统答辩ppt,基于PHP的连锁酒店管理系统毕业设计论文+任务书+开题报告+中期报告+答辩PPT+项目源码及数据库...
- 计算机实验小学教导主任,小学教导主任2020年度考核个人总结5篇
- DMA驱动框架流程编写
- Vue 项目API接口封装
- html网站统计来访人数,实现网站访问人数统计
- 如何在Google Chrome中手动设置位置信息
- ie input兼容 vue_IE浏览器兼容问题(基于vue)