.playground文件_部署可教学机器:Circuit Playground Express,Arduino,P5.js,TinyUSB
.playground文件
什么是可教学机? (What is Teachable Machine?)
Teachable Machine is a web-based tool that makes creating machine learning models fast, easy, and accessible to everyone. You train a computer to recognize your images, sounds and poses without writing any machine learning code. Then, use your model in your own projects, sites, apps, and more. Anyone can use this like Educators, artists, students, innovators, makers of all kinds — really, anyone who has an idea they want to explore.
Teachable Machine是一个基于Web的工具,可让每个人快速,轻松地访问机器学习模型。 您训练计算机无需编写任何机器学习代码即可识别图像,声音和姿势。 然后,在您自己的项目,网站,应用程序等中使用您的模型。 任何人都可以使用此工具,例如教育者,艺术家,学生,创新者,各种创造者-确实,任何有想法要探索的人。
Teachable Machine V1
示教机 V1
Teachable Machine V2
示教机 V2
如何使用? (How do I use it?)
1)收集数据: (1) Gather Data:)
You can currently train Teachable Machine with images (pulled from your webcam or image files), sounds (in one-second snippets from your mic), and poses (where the computer guesses the position of your arms, legs, etc from an image). More types of training may be coming soon :)
当前,您可以使用图像(从网络摄像头或图像文件中拉出),声音(麦克风中的一秒钟片段)和姿势(计算机从图像中猜测手臂,双腿等的位置)训练可教机。 更多类型的培训可能即将推出:)
2)火车模型: (2) Train Model:)
Train your model by just clicking a single button no need for any smoothing or pre-processing required, Teachable Machine will train a model based on the examples you provided. All the training happens in your browser, so everything stays on your computer. then instantly test it out to see whether it can correctly classify new examples like poses, voice, or images as per prior input which used for training.
只需单击一个按钮即可训练模型,而无需进行任何平滑或预处理,Teachable Machine将根据您提供的示例训练模型。 所有培训都在您的浏览器中进行,因此所有内容都保留在您的计算机上。 然后立即对其进行测试,以查看其是否可以根据用于训练的先前输入正确地对姿势,语音或图像等新示例进行分类。
3)出口模式: (3) Export Model:)
There are a few ways to save your work. You can:
有几种方法可以保存您的工作。 您可以:
Save your entire project to Google Drive. You can save your project to your Google Drive. This saves a .zip file that contains all the samples in each of your classes to Drive. You can then open that .zip again from Teachable Machine later to pick up where you left off.
将整个项目保存到Google云端硬盘 。 您可以将项目保存到Google云端硬盘。 这样会将包含每个类中所有示例的.zip文件保存到云端硬盘。 然后,您可以稍后从Teachable Machine中再次打开该.zip,以从上次中断的地方继续。
Download your samples. You can download all the samples in each class, and upload them later if you want to keep working with the same data.
下载样本 。 您可以下载每个类中的所有样本,如果想继续使用相同的数据,可以稍后再上传。
Download your model. If you download your model and close your tab, you can use that downloaded model later — and nothing is saved on any servers.
下载模型 。 如果下载模型并关闭选项卡,则以后可以使用该下载的模型-任何服务器上都不会保存任何内容。
Save nothing. If you close your tab and do none of the above, nothing is saved in your browser or on any servers.
什么都不存 。 如果关闭选项卡,但不执行上述任何操作,则不会在浏览器或任何服务器上保存任何内容。
背面如何运作? (How does it work on the back?)
Teachable Machine uses TensorFlow.js, a library for machine learning in Javascript, to train and run the models you make in your web browser.
Teachable Machine使用TensorFlow.js (一个使用Javascript进行机器学习的库)来训练和运行您在Web浏览器中创建的模型。
These models use a technique called transfer learning. There’s a pre-trained neural network, and when you create your own classes, you can sort of picture that your classes are becoming the last layer or step of the neural net. Specifically, both the image and pose models are learning off of pre-trained mobile net models, and the sound model is built on Speech Command Recognizer.
这些模型使用一种称为转移学习的技术。 有一个预先训练的神经网络,当您创建自己的类时,您可以看到类正在成为神经网络的最后一层或最后一步的图片。 具体来说,图像和姿势模型都是从预先训练的移动网络模型中学习的,而声音模型是基于语音命令识别器构建的。
+ ve’s of Teachable Machine
ve的教学机
- Easy to train and deploy.易于训练和部署。
- Very little time taken to train the model.训练模型花费的时间很少。
- open source so we can play with multiple classes.开源,因此我们可以玩多个课程。
- Easy steps now such ML knowledge require even if a child wants to make a model then he can and check it on new examples.现在,这样的ML知识很容易就可以完成,即使孩子想要建立模型,他也可以并在新的示例中进行检验。
- ve’s of Teachable Machine
-ve的教学机
- Changing backgrounds/environments.改变背景/环境。
- Framing your examples.举例说明。
- Changing microphones/spaces.更改麦克风/空间。
- Capturing audio samples with high noise.捕获高噪声的音频样本。
- Understanding bias.了解偏见。
- Confusing new examples.令人困惑的新例子。
使用P5.js,TinyUSB,Circuit Playground Express部署可教学机器。 (Deploy Teachable Machine with P5.js, TinyUSB, Circuit Playground Express.)
Prerequisite:
先决条件:
- Adafruit Circuit Playground ExpressAdafruit Circuit游乐场快线
- USB cable — USB A to Micro-BUSB电缆— USB A到Micro-B
- Small Alligator Clip Test Lead小鳄鱼夹测试线
Library:
图书馆:
- Arduino IDEArduino IDE
- Adafruit SAMD Board PackageAdafruit SAMD电路板套件
- Adafruit nRF52840 Board PackageAdafruit nRF52840开发板套件
- Adafruit TinyUSB LibraryAdafruit TinyUSB库

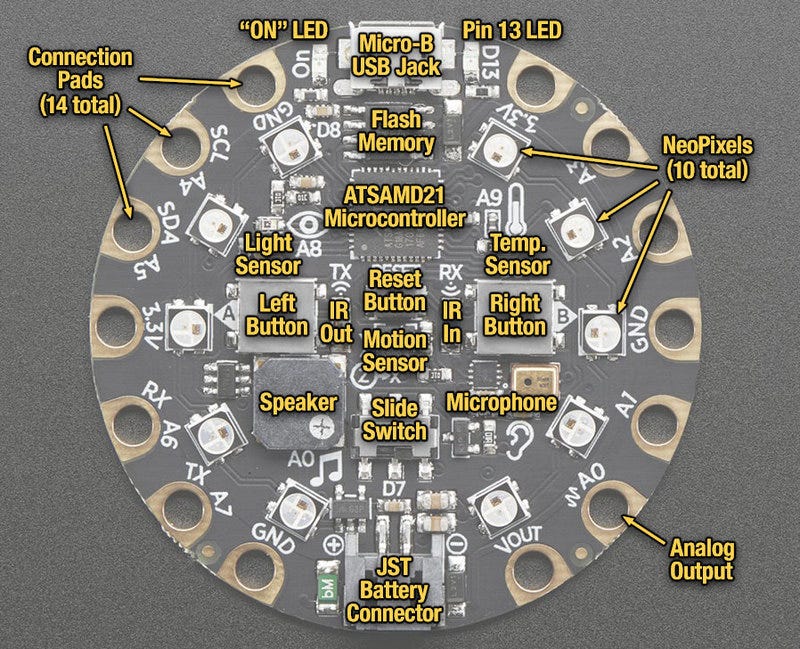
Circuit Playground Express Specifications:
Circuit Playground Express规格:
The Circuit Playground Express is packed with a lot of sensors into one board,
Circuit Playground Express的电路板上装有很多传感器,
- 10 x mini NeoPixels, each one can display any color10 x mini NeoPixels,每个可以显示任何颜色
- 1 x Motion sensor (LIS3DH triple-axis accelerometer with tap detection, free-fall detection)1 x运动传感器(LIS3DH三轴加速度计,带敲击检测,自由落体检测)
- 1 x Temperature sensor (thermistor)1 x温度传感器(热敏电阻)
- 1 x Light sensor (phototransistor). Can also act as a color sensor and pulse sensor.1 x光传感器(光电晶体管)。 也可以充当颜色传感器和脉冲传感器。
- 1 x Sound sensor (MEMS microphone)1 x声音传感器(MEMS麦克风)
- 1 x Mini speaker with class D amplifier (7.5mm magnetic speaker/buzzer)1个带有D类放大器的迷你扬声器(7.5毫米磁性扬声器/蜂鸣器)
- 2 x Push buttons, labeled A and B2个按钮,分别标记为A和B
- 1 x Slide switch1 x滑动开关
- Infrared receiver and transmitter — can receive and transmit any remote control codes, as well as send messages between Circuit Playground Expresses. Can also act as a proximity sensor.红外接收器和发射器-可以接收和发送任何远程控制代码,以及在Circuit Playground Express之间发送消息。 也可以用作接近传感器。
- 8 x alligator-clip friendly input/output pins8个鳄鱼夹友好的输入/输出引脚
- Includes I2C, UART, 8 pins that can do analog inputs, multiple PWM output包括I2C,UART,8个可进行模拟输入的引脚,多个PWM输出
- 7 pads can act as capacitive touch inputs and the 1 remaining is a true analog output7个打击垫可以用作电容式触摸输入,剩下的1个是真正的模拟输出
- Green “ON” LED so you know its powered绿色的“ ON” LED,让您知道其已通电
- Red “#13” LED for basic blinking红色的“#13” LED基本闪烁
- Reset button复位按钮
- ATSAMD21 ARM Cortex M0 Processor, running at 3.3V and 48MHzATSAMD21 ARM Cortex M0处理器,工作在3.3V和48MHz
- 2 MB of SPI Flash storage, used primarily with CircuitPython to store code and libraries.2 MB的SPI Flash存储,主要与CircuitPython一起使用以存储代码和库。
- MicroUSB port for programming and debuggingMicroUSB端口用于编程和调试
- The USB port can act like serial port, keyboard, mouse, joystick, or MIDI!USB端口可以充当串行端口,键盘,鼠标,操纵杆或MIDI!
“IMPORTANT”
“重要”
Only ATSAMD21/51 & nRF52840 chipsets support TinyUSB and Chrome WebUSB browser capability.
仅ATSAMD21 / 51和nRF52840芯片组支持TinyUSB和Chrome WebUSB浏览器功能。
Other Supported Boards:
其他支持的板:
- Adafruit Circuit Playground Express (SAMD21)Adafruit Circuit游乐场快线(SAMD21)
- Adafruit Feather M0 (SAMD21)Adafruit羽毛M0(SAMD21)
- Adafruit Feather M0 Express (SAMD21)Adafruit羽毛M0 Express(SAMD21)
- Adafruit Metro M0 Express (SAMD21)Adafruit Metro M0 Express(SAMD21)
- Adafruit Gemma M0 (SAMD21)Adafruit Gemma M0(SAMD21)
- Adafruit Trinket M0 (SAMD21)Adafruit小饰品M0(SAMD21)
- Adafruit ItsyBitsy M0 (SAMD21)Adafruit ItsyBitsy M0(SAMD21)
- Adafruit pIRkey (SAMD21)Adafruit pIRkey(SAMD21)
- Adafruit Hallowing M0 (SAMD21)Adafruit万圣节M0(SAMD21)
- Adafruit Crickit M0 (SAMD21)Adafruit Crickit M0(SAMD21)
- Adafruit Metro M4 (SAMD51)Adafruit Metro M4(SAMD51)
- Adafruit Grand Central M4 (SAMD51)Adafruit Grand Central M4(SAMD51)
- Adafruit ItsyBitsy M4 (SAMD51)Adafruit ItsyBitsy M4(SAMD51)
- Adafruit Feather M4 Express (SAMD51)Adafruit羽毛M4 Express(SAMD51)
- Adafruit Trellis M4 (SAMD51)Adafruit网格M4(SAMD51)
- Adafruit PyPortal M4 (SAMD51)Adafruit PyPortal M4(SAMD51)
- Adafruit PyPortal M4 Titano (SAMD51)Adafruit PyPortal M4 Titano(SAMD51)
- Adafruit PyBadge M4 Express (SAMD51)Adafruit PyBadge M4 Express(SAMD51)
- Adafruit Metro M4 AirLift Lite (SAMD51)Adafruit Metro M4 AirLift Lite(SAMD51)
- Adafruit PyGamer M4 Express (SAMD51)Adafruit PyGamer M4 Express(SAMD51)
- Adafruit PyGamer Advance M4 (SAMD51)Adafruit PyGamer Advance M4(SAMD51)
- Adafruit PyBadge AirLift M4 (SAMD51)Adafruit PyBadge AirLift M4(SAMD51)
- Adafruit Monster M4SK (SAMD51)Adafruit Monster M4SK(SAMD51)
- Adafruit Hallowing M4 (SAMD51)Adafruit万圣节M4(SAMD51)
Set-Up Adafruit Circuit Playground Express (CPX):
设置Adafruit Circuit Playground Express(CPX):
You can re-compile the code for any SAMD21/SAMD51/nRF52840 chipset that Adafruit supports with TinyUSB. That’s because we have to use WebUSB to communicate and that’s not easy to do with Arduino.
您可以为TinyUSB支持Adafruit支持的任何SAMD21 / SAMD51 / nRF52840芯片组的代码。 那是因为我们必须使用WebUSB进行通信,而使用Arduino并不容易。
The first thing you will need to do is to download the latest release of the Arduino IDE. Download Arduino IDE using below https://www.arduino.cc/download_handler.php
您需要做的第一件事是下载最新版本的Arduino IDE。 使用以下https://www.arduino.cc/download_handler.php下载Arduino IDE
安装所有必需的库和板文件 (Install All Required Libraries and Board Files)

First, We need to import all the Adafruit libraries and Board Files. In the Arduino IDE menus, go to File -> Preferences and paste this URL in Additional Boards Manager URLs: https://www.adafruit.com/package_adafruit_index.json
首先,我们需要导入所有Adafruit库和Board文件。 在Arduino IDE菜单中,转到文件->首选项,然后将此URL粘贴到其他板管理器URL中: https : //www.adafruit.com/package_adafruit_index.json
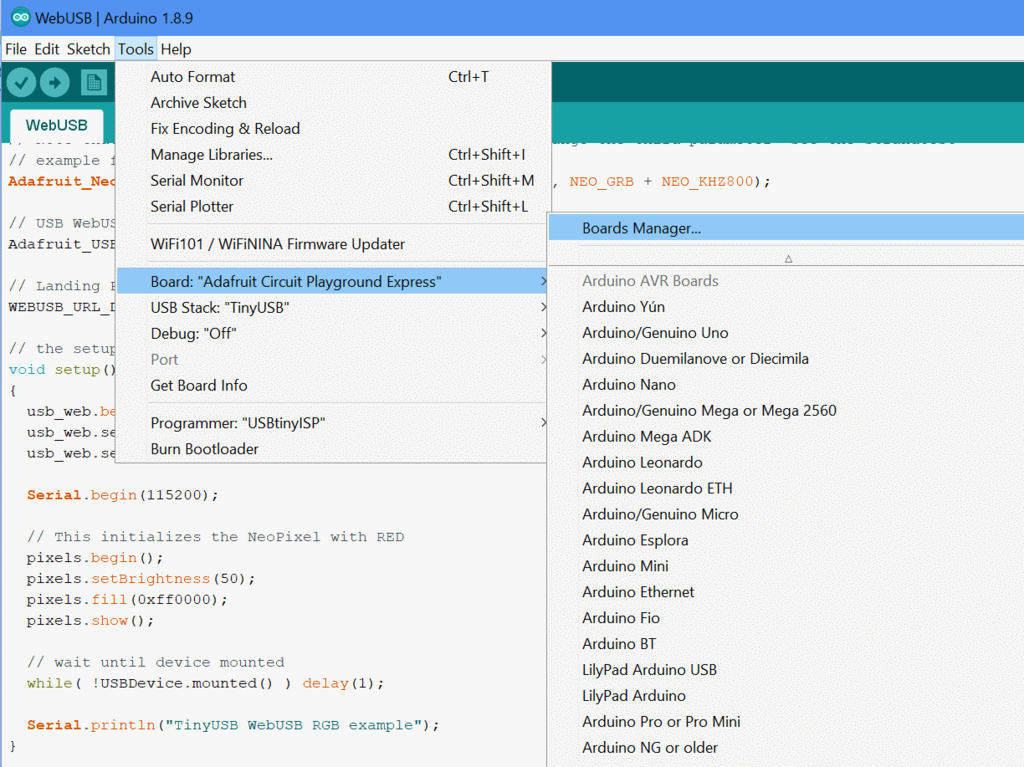
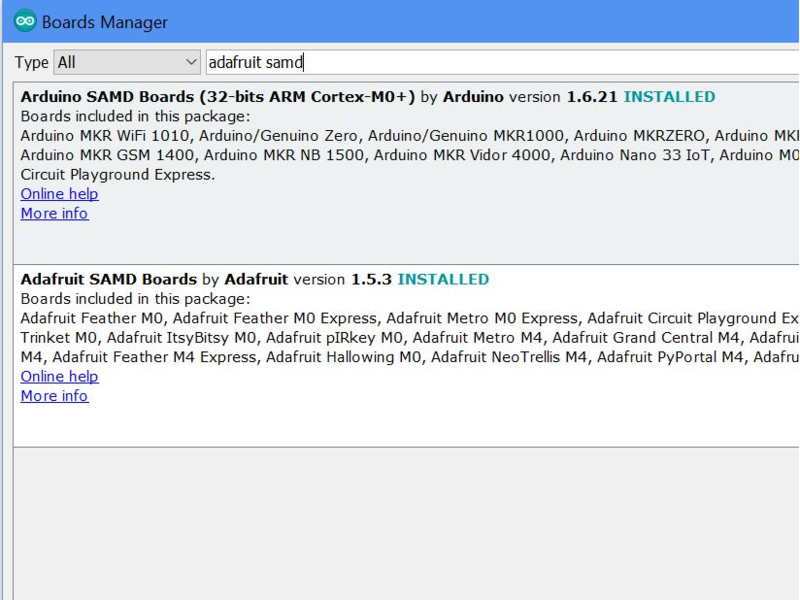
Second, We need to download the required board files. In the Arduino IDE menus, go to Tools -> Board -> Board Manager. Search for Adafruit SAMD Boards. If you are using nRF52840 chipset Search for Adafruit nRF52840.
其次,我们需要下载所需的电路板文件。 在Arduino IDE菜单中,转到工具->板->板管理器。 搜索Adafruit SAMD板。 如果您使用的是nRF52840芯片组,请搜索Adafruit nRF52840。
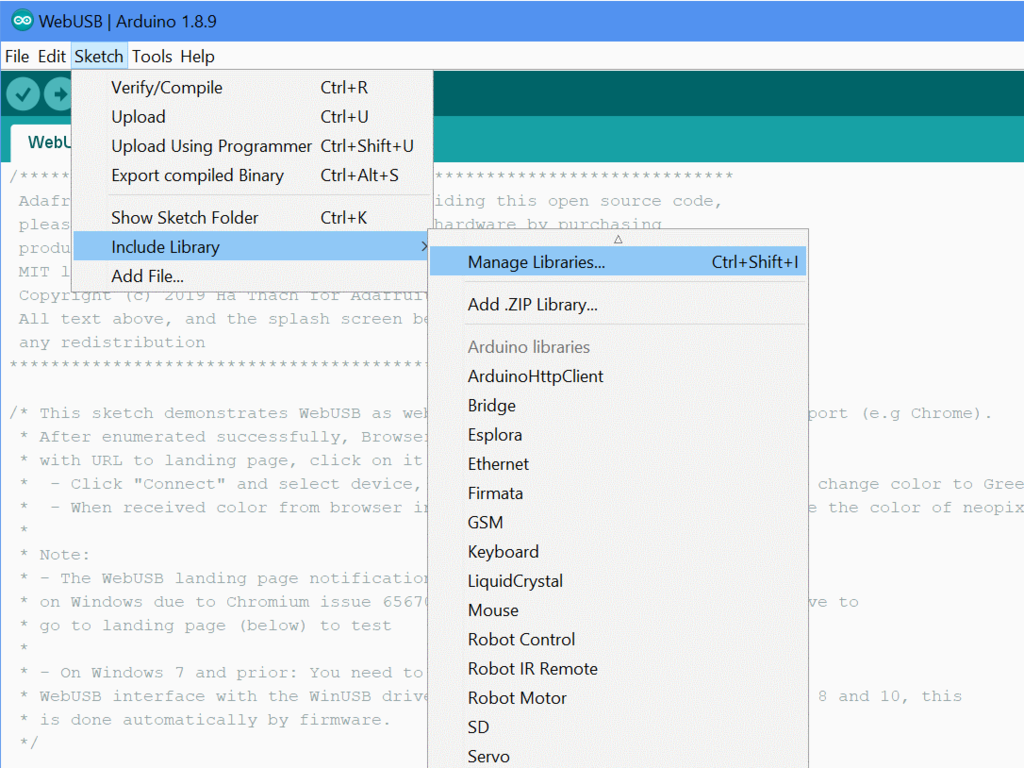

Third, We need to install the libraries. In the Arduino IDE menus, go to Sketch -> Include Library -> Manage Libraries. Search for Adafruit TinyUSB Library & Adafruit NeoPixel library. Now we download the Web USB library. Now go to Sketch -> Include Library -> Add .Zip Library and locate the webUSB library folder and Import it.
第三,我们需要安装库。 在Arduino IDE菜单中,转到Sketch- > Include Library- > Manage Libraries。 搜索Adafruit TinyUSB库和Adafruit NeoPixel库。 现在我们下载Web USB库 。 现在转到Sketch- > Include Library- > Add .Zip Library并找到webUSB库文件夹并将其导入。

Finally, Connect your CPX to your computer via a known, good USB cable (not a charger “power only” cable, please). go to Tools -> USB Stack, and select TinyUSB. If this is not selectable, update your version of the Arduino IDE. Switching the USB stack puts in TinyUSB instead of the default Arduino USB stack. TinyUSB has more features including WebUSB support.
最后,通过已知的优质USB电缆(请不要使用充电器的“仅电源”电缆)将CPX连接到计算机。 转到工具 -> USB堆栈,然后选择TinyUSB 。 如果无法选择,请更新您的Arduino IDE版本。 切换USB堆栈会放入TinyUSB,而不是默认的Arduino USB堆栈。 TinyUSB具有更多功能,包括WebUSB支持。

If you have these settings selected you can proceed with the coding.
如果选择了这些设置,则可以继续进行编码。
Now you can connect your device to P5.js webpage using Chrome WebUSB
现在,您可以使用Chrome WebUSB将设备连接到P5.js网页
Circuit Playground Express Code:
电路游乐场特快代码:
#include <Servo.h>#include <Adafruit_NeoPixel.h>#include “Adafruit_TinyUSB.h”
#include <Servo.h> #include <Adafruit_NeoPixel.h> #include“ Adafruit_TinyUSB.h”
// Which pin on the CPX/board is the Servo connected to?#define SERVO_PIN A1Servo myservo;
//伺服连接到CPX /板上的哪个引脚?#define SERVO_PIN A1Servo myservo;
// Use internal neopixel ring#define NEOPIX_PIN 8#define NUMPIXELS 10Adafruit_NeoPixel pixels = Adafruit_NeoPixel(NUMPIXELS, NEOPIX_PIN, NEO_GRB + NEO_KHZ800);
//使用内部neopixel环#define NEOPIX_PIN 8#define NUMPIXELS 10Adafruit_NeoPixel像素= Adafruit_NeoPixel(NUMPIXELS,NEOPIX_PIN,NEO_GRB + NEO_KHZ800);
// USB WebUSB objectAdafruit_USBD_WebUSB usb_web;
// USB WebUSB对象Adafruit_USBD_WebUSB usb_web;
// Landing Page: scheme (0: http, 1: https), urlWEBUSB_URL_DEF(landingPage, 1 /*https*/, “https://editor.p5js.org/Jude_Raj/present/lKRyYOZ-H”);
//到达网页:方案(0:http,1:https),urlWEBUSB_URL_DEF(landingPage,1 / * https * /,“ https://editor.p5js.org/Jude_Raj/present/lKRyYOZ-H”);
// the setup function runs once when you press reset or power the boardvoid setup(){ usb_web.begin(); usb_web.setLandingPage(&landingPage); usb_web.setLineStateCallback(line_state_callback);
//当您按reset或打开boardvoid setup(){usb_web.begin();时,设置功能将运行一次。 usb_web.setLandingPage(&landingPage); usb_web.setLineStateCallback(line_state_callback);
Serial.begin(115200);
Serial.begin(115200);
// This initializes the NeoPixel with RED pixels.begin(); pixels.setBrightness(20); pixels.fill(0x0F0F0F); // dim white pixels.show();
//这会使用RED像素初始化NeoPixel。 pixel.setBrightness(20); pixel.fill(0x0F0F0F); //调暗白色像素。show();
// wait until device mounted while( !USBDevice.mounted() ) delay(1); pixels.fill(0x0F0F00); // dim yellow pixels.show(); Serial.println(“TinyUSB WebUSB RGB example”); usb_web.print(“Sketch begins.\r\n”); usb_web.flush(); pinMode(LED_BUILTIN, OUTPUT);
//等待设备挂载,同时(!USBDevice.mount())delay(1); pixel.fill(0x0F0F00); //变暗的黄色像素。show(); Serial.println(“ TinyUSB WebUSB RGB示例”); usb_web.print(“素描开始。\ r \ n”); usb_web.flush(); pinMode(LED_BUILTIN,OUTPUT);
myservo.attach(SERVO_PIN); myservo.write(60); }
myservo.attach(SERVO_PIN); myservo.write(60); }
void loop(){ if ( usb_web.available()) { digitalWrite(LED_BUILTIN, HIGH); Serial.print(“-> “); char val = usb_web.read(); digitalWrite(LED_BUILTIN, LOW); Serial.print(“Read value: “); Serial.println(val, DEC);
无效loop(){如果(usb_web.available()){digitalWrite(LED_BUILTIN,HIGH); Serial.print(“->”); char val = usb_web.read(); digitalWrite(LED_BUILTIN,LOW); Serial.print(“读取值:”); Serial.println(val,DEC);
if (val == 1) { // Target bin #1 pixels.fill(0xFFFF00); pixels.show(); Serial.println(“CEREAL!”);
if(val == 1){//目标bin#1像素.fill(0xFFFF00); pixel.show(); Serial.println(“ CEREAL!”);
myservo.write(0); // push cereal to one side delay(2000); // wait for (int pos = 0; pos <= 75; pos++) { // return servo myservo.write(pos); delay(5); } delay(1000); // another wait before we continue
myservo.write(0); //将谷物推向一侧延迟(2000); //等待(int pos = 0; pos <= 75; pos ++){//返回伺服myservo.write(pos); delay(5); } delay(1000); //再次等待,然后继续
} else if (val == 2) { // Target bin #2 pixels.fill(0xFF000FF); pixels.show(); Serial.println(“MALLOW!”);
} else if(val == 2){//目标容器#2 pixel.fill(0xFF000FF); pixel.show(); Serial.println(“ MALLOW!”);
myservo.write(180); // push mallows to other side delay(2000); // wait for (int pos = 180; pos >= 75; pos — ) { // return servo myservo.write(pos); delay(5); } delay(1000); // another wait before we continue } pixels.fill(0); pixels.show();
myservo.write(180); //将锦葵至另一侧延迟(2000); //等待(int pos = 180; pos> = 75; pos —){//返回伺服myservo.write(pos); delay(5); } delay(1000); //再等一会再继续}} pixel.fill(0); pixel.show();
while (usb_web.available()) { usb_web.read(); delay(10); } } else { // no webserial data, tick tock the servo for (int pos = 60; pos <= 90; pos++) { // slowly goes from 60 degrees to 90 degrees myservo.write(pos); delay(3); } for (int pos = 90; pos >= 60; pos — ) { // goes back to 60 myservo.write(pos); delay(3); } }}
while(usb_web.available()){usb_web.read(); 延迟(10); }}} {{ delay(3); } for(int pos = 90; pos> = 60; pos —){//返回60 myservo.write(pos); delay(3); }}}
void line_state_callback(bool connected){ // connected = green, disconnected = red pixels.fill(connected ? 0x00ff00 : 0xff0000); pixels.show();}
无效line_state_callback(bool已连接){//已连接=绿色,已断开=红色像素.fill(已连接?0x00ff00:0xff0000); pixel.show();}
将Circuit Playground Express连接到P5.js Web编辑器页面 (Connect the Circuit Playground Express to P5.js Web editor Page)
Ensure your Circuit Playground Express is still connected to your computer via a USB cable.
确保您的Circuit Playground Express仍通过USB电缆连接到计算机。

- Open this P5 editor in new chrome tab在新的Chrome标签中打开此P5编辑器
P5 Editor: https://editor.p5js.org/Jude_Raj/present/lKRyYOZ-H
P5编辑器: https : //editor.p5js.org/Jude_Raj/present/lKRyYOZ-H
Click Connect CPX, Select the board listed, and click connect. Similar to the below image.
单击“ 连接CPX”,选择列出的板,然后单击“连接”。 类似于下图。

训练模型 (Train the Model)

Try to get somewhere between 75–150 pictures per class. Remember the more accurate data your model has the better it will be.
尝试每堂课获得75-150张图片。 请记住,模型越准确,数据越好。
Train Class 1, Class 2, and a Empty Class (Refer How to use it? from above paragraph).
训练1 类,2类和空 类(请参阅上段的“ 如何使用它?” ) 。
Class 1: Eg(Collection of images of a masked man) This class lets the classifier know when there a masked man in front of the camera thus it should take any action.
第1类:例如,(蒙面男子的图像集合)此类可让分类器知道相机前面是否有蒙面男子,因此应该采取任何措施。
Class 2: Eg(Collection of images of unmasked man) This class lets the classifier know when there an unmasked man in front of the camera thus it should take any action.
第2类 :例如,(未蒙面男子的图像集合)此类可让分类器知道摄像头前面何时有未蒙面男子,因此应采取任何措施。
Empty: Eg(Collection of images where there is no man) This class lets the classifier know when there is no one in front of the camera thus it should not take any action until there is something identifiable.
空 :例如(没有人的地方的图像集合)此类可让分类器知道何时没有人在相机前,因此,除非有可识别的东西,否则它不应采取任何行动。
Now click on Train Model and that’s it! You’ve trained a model.
现在单击火车模型 ,就是这样! 您已经训练了一个模型。
获取模型共享链接 (Get the Model Sharable Link)
Click Export Model and then click Upload my model to cloud.
单击导出模型 ,然后单击将我的模型上传到云。
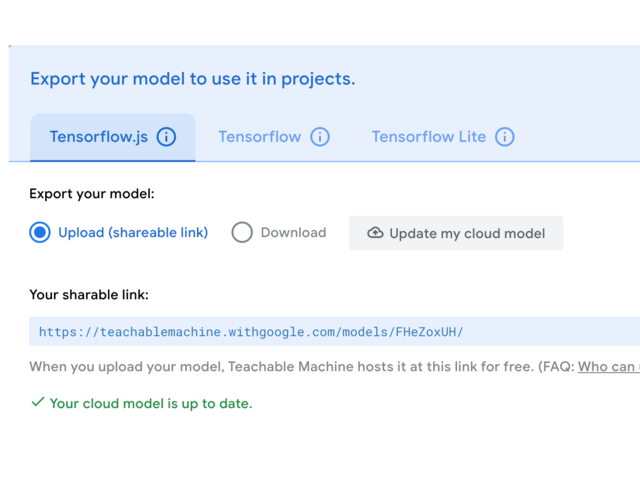
Now you will get Your sharable link. Copy the link, go-to P5 editor, and paste in the link and click LOAD MODEL.
现在,您将获得您的可共享链接。 复制链接,转到P5编辑器,然后粘贴该链接,然后单击“ 加载模型”。

就这样,现在您可以使用Teachable Machine创建自定义分类模型,并使用CPX根据预测的类采取措施。 (That’s it, Now you can create custom classification models using Teachable Machine and take action based on the predicted class using CPX.)
使用P5.js,TinyUSB,Arduino Leonardo部署可教学机器。 (Deploy Teachable Machine with P5.js, TinyUSB, Arduino Leonardo.)
Prerequisite:
先决条件:
- Arduino LeonardoArduino的莱昂纳多
- USB cable — USB A to Micro-BUSB电缆— USB A到Micro-B
- Jumper Cables跨接电缆
Library:
图书馆:
- Arduino IDEArduino IDE
- Arduino AVR Board PackageArduino AVR开发板套件
- WebUSB LibraryWebUSB库

Arduino Leonardo Specifications:
Arduino Leonardo规格:
- Microcontroller: ATmega32u4微控制器:ATmega32u4
- Operating Voltage: 5V工作电压:5V
- Input Voltage (Recommended): 7–12V输入电压(推荐):7–12V
- Input Voltage (limits): 6–20V输入电压(极限):6–20V
- Digital I/O Pins: 20数字输入/输出引脚:20
- PWM Channels: 7PWM通道:7
- Analog Input Channels: 12模拟输入通道:12
- DC Current per I/O Pin: 40 mA每个I / O引脚的直流电流:40 mA
- DC Current for 3.3V Pin: 50 mA3.3V引脚的直流电流:50 mA
- Flash Memory: 32 KB (ATmega32u4) of which 4 KB used by bootloader闪存:32 KB(ATmega32u4),其中4 KB由引导加载程序使用
- SRAM: 2.5 KB (ATmega32u4)SRAM:2.5 KB(ATmega32u4)
- EEPROM: 1 KB (ATmega32u4)EEPROM:1 KB(ATmega32u4)
- Clock Speed: 16 MHz时钟速度:16 MHz
- Length: 68.6 mm长度:68.6毫米
- Width: 53.3 mm宽度:53.3毫米
- Weight: 20 g重量:20克

Other Supported Boards:
其他支持的板:
- Arduino LeonardoArduino的莱昂纳多
- Arduino/Genuino MicroArduino / Genuino Micro
- Arduino/Genuino ZeroArduino / Genuino零
- Arduino/Genuino MKR1000Arduino / Genuino MKR1000
- Arduino MKRZeroArduino的MKRZero
- Arduino MKR FOX 1200Arduino MKR FOX 1200
- Arduino MKR WAN 1300Arduino MKR WAN 1300
- Arduino MKR GSM 1400Arduino MKR GSM 1400
- Arduino MKR NB 1500Arduino MKR NB 1500
- Arduino MKR WiFi 1010Arduino MKR WiFi 1010
- Arduino MKR Vidor 4000Arduino MKR Vidor 4000
- Arduino NANO 33 IoTArduino NANO 33物联网
Set-Up Arduino Leonardo:
设置Arduino Leonardo:
You can re-compile the code for any SAMD21/SAMD51/nRF52840 chipset. That’s because we have to use WebUSB to communicate and that’s not easy to do with Arduino.
您可以重新编译任何SAMD21 / SAMD51 / nRF52840芯片组的代码。 那是因为我们必须使用WebUSB进行通信,而使用Arduino并不容易。
The first thing you will need to do is to download the latest release of the Arduino IDE. Download Arduino IDE using below https://www.arduino.cc/download_handler.php
您需要做的第一件事是下载最新版本的Arduino IDE。 使用以下https://www.arduino.cc/download_handler.php下载Arduino IDE
安装所有必需的库和板文件 (Install All Required Libraries and Board Files)
Arduino IDE contains the Arduino Leonardo Board file as default.
Arduino IDE默认包含Arduino Leonardo Board文件。
We have downloaded all the requirements if not (Refer the last Install All Required Libraries and Board Files Paragraph)
如果没有下载,我们已经下载了所有要求(请参阅最后的“ 安装所有必需的库和主板文件”段落)

Now, Select the Arduino Leonardo under Tools -> Board -> Arduino AVR Boards -> Arduino Leonardo
现在,在工具->板-> Arduino AVR板-> Arduino Leonardo下选择Arduino Leonardo
Select the Port & Select USBTinyISP as Programmer.
选择端口,然后选择USBTinyISP作为Programmer。
If you have these settings selected you can proceed with the coding.
如果选择了这些设置,则可以继续进行编码。
Now you can connect your device to P5.js webpage using Chrome WebUSB
现在,您可以使用Chrome WebUSB将设备连接到P5.js网页
Arduino Leonardo Code:
Arduino Leonardo代码:
#include <WebUSB.h>#include <Servo.h>
#include <WebUSB.h> #include <Servo.h>
//TODO: fix this url hintingWebUSB WebUSBSerial(1 /* https:// */, “https://editor.p5js.org/Jude_Raj/present/B-KOSb1Ub”);
// TODO:修复此网址提示网页WebUSB WebUSBSerial(1 / * https:// * /,“ https://editor.p5js.org/Jude_Raj/present/B-KOSb1Ub”);
#define Serial WebUSBSerialServo myservo;
#define串行WebUSBSerialServo myservo;
const int redPin = 9;const int greenPin = 10;const int bluePin = 11;int pos = 0; // variable to store the servo position
const int redPin = 9; const int greenPin = 10; const int bluePin = 11; int pos = 0; //变量以存储伺服位置
int color[3];int colorIndex;
int color [3]; int colorIndex;
void setup() { while (!Serial) { ; } Serial.begin(9600); Serial.write(“Sketch begins.\r\n”); Serial.flush(); colorIndex = 0; myservo.attach(9); myservo.write(60);}
void setup(){while(!Serial){; } Serial.begin(9600); Serial.write(“素描开始。\ r \ n”); Serial.flush(); colorIndex = 0; myservo.attach(9); myservo.write(60);}
void loop() {
无效循环(){
if (Serial && Serial.available()) { color[colorIndex++] = Serial.read(); if (colorIndex == 1) {
如果(Serial && Serial.available()){color [colorIndex ++] = Serial.read(); 如果(colorIndex == 1){
// Serial.flush(); // analogWrite(redPin, color[0]); if (color[0] == 1) { myservo.write(0); delay(2000); for (pos = 0; pos <= 75; pos += 1) { // goes from 0 degrees to 180 degrees // in steps of 1 degree myservo.write(pos); // tell servo to go to position in variable ‘pos’ delay(5); // waits 15ms for the servo to reach the position } delay(1000); Serial.write(“ceral detected.\r\n”); }
// Serial.flush(); // AnalogWrite(redPin,color [0]); 如果(color [0] == 1){myservo.write(0); delay(2000); for(pos = 0; pos <= 75; pos + = 1){//从0度到180度//以1度为步长myservo.write(pos); //告诉伺服器在变量'pos'delay(5)中定位 //等待15ms,直到伺服到达位置} delay(1000); Serial.write(“检测到子宫颈。\ r \ n”); }
else if (color[0] == 2) { myservo.write(180); delay(2000); for (pos = 180; pos <= 75; pos -= 1) { // goes from 0 degrees to 180 degrees // in steps of 1 degree myservo.write(pos); // tell servo to go to position in variable ‘pos’ delay(20); // waits 15ms for the servo to reach the position } delay(1000); Serial.write(“mallow detected.\r\n”); } while (Serial.available()) { int throwaway = Serial.read(); Serial.write(“Throwing away.\r\n”); }
否则(color [0] == 2){myservo.write(180); delay(2000); for(pos = 180; pos <= 75; pos-= 1){//从0度到180度//以1度为步长myservo.write(pos); //告诉伺服器在变量'pos'delay(20)中转到位置; //等待15ms,以使伺服器到达位置} delay(1000); Serial.write(“检测到锦葵。\ r \ n”); } while(Serial.available()){int throwaway = Serial.read(); Serial.write(“扔掉。\ r \ n”); }
Serial.flush(); colorIndex = 0; } } else { // Serial.println(“asdf”); for (pos = 60; pos <= 90; pos += 1) { // goes from 0 degrees to 180 degrees // in steps of 1 degree myservo.write(pos); // tell servo to go to position in variable ‘pos’ delay(3); // waits 15ms for the servo to reach the position } for (pos = 90; pos >= 60; pos -= 1) { // goes from 180 degrees to 0 degrees myservo.write(pos); // tell servo to go to position in variable ‘pos’ delay(3); // waits 15ms for the servo to reach the position }// delay(200); }
Serial.flush(); colorIndex = 0; }} else {// Serial.println(“ asdf”); for(pos = 60; pos <= 90; pos + = 1){//从0度到180度//以1度为步长myservo.write(pos); //告诉伺服器在变量'pos'delay(3)中定位 //等待15毫秒,直到伺服器到达位置} for(pos = 90; pos> = 60; pos-= 1){//从180度变为0度myservo.write(pos); //告诉伺服器在变量'pos'delay(3)中定位 //等待15ms,直到伺服到达位置} // delay(200); }
}
}
将Arduino Leonardo连接到P5.js Web编辑器页面 (Connect the Arduino Leonardo to P5.js Web editor Page)
Ensure your Arduino Leonardo is still connected to your computer via a USB cable.
确保您的Arduino Leonardo仍通过USB电缆连接到计算机。

- Open this P5 editor in new chrome tab在新的Chrome标签中打开此P5编辑器
P5 Editor: https://editor.p5js.org/Jude_Raj/present/B-KOSb1Ub
P5编辑器: https : //editor.p5js.org/Jude_Raj/present/B-KOSb1Ub
Click Connect Arduino, Select the board listed, and click connect. Similar to the below image.
单击连接Arduino,选择列出的板,然后单击连接。 类似于下图。
训练模型 (Train the Model)
Try to get somewhere between 75–150 pictures per class. Remember the more accurate data your model has the better it will be.
尝试每堂课获得75-150张图片。 请记住,模型越准确,数据越好。
Train Class 1, Class 2, and a Empty Class (Refer How to use it? from above paragraph).
训练1 类,2类和空 类(请参阅上段的“ 如何使用它?” ) 。
Class 1: Eg(Collection of images of a masked man) This class lets the classifier know when there a masked man in front of the camera thus it should take any action.
第1类:例如,(蒙面男子的图像集合)此类可让分类器知道相机前面是否有蒙面男子,因此应该采取任何措施。
Class 2: Eg(Collection of images of unmasked man) This class lets the classifier know when there an unmasked man in front of the camera thus it should take any action.
第2类 :例如,(未蒙面男子的图像集合)此类可让分类器知道摄像头前面何时有未蒙面男子,因此应采取任何措施。
Empty: Eg(Collection of images where there is no man) This class lets the classifier know when there is no one in front of the camera thus it should not take any action until there is something identifiable.
空 :例如(没有人的地方的图像集合)此类可让分类器知道何时没有人在相机前,因此,在有可识别的东西之前,它不应采取任何措施。
Now click on Train Model and that’s it! You’ve trained a model.
现在单击火车模型 ,就是这样! 您已经训练了一个模型。
获取模型共享链接 (Get the Model Sharable Link)
Click Export Model and then click Upload my model to cloud.
单击导出模型 ,然后单击将我的模型上传到云。
Now you will get Your sharable link. Copy the link, go-to P5 editor, and paste in the link and click LOAD MODEL.
现在,您将获得您的可共享链接。 复制链接,转到P5编辑器,然后粘贴链接,然后单击“ 加载模型”。

就这样,现在您可以使用Teachable Machine创建自定义分类模型,并使用Arduino Leonardo根据预测的类采取行动 (That’s it, Now you can create custom classification models using Teachable Machine and take action based on the predicted class using Arduino Leonardo)
我的原型: (My Prototype:)
Check out my Youtube Video…
看看我的YouTube视频...
演示地址
My Prototype Code:
我的原型代码:
#include <Adafruit_NeoPixel.h>#include “Adafruit_TinyUSB.h”#include <LedControl.h>int DIN = A1;int CS = A2;int CLK = A3;
#include <Adafruit_NeoPixel.h> #include“ Adafruit_TinyUSB.h” #include <LedControl.h> int DIN = A1; int CS = A2; int CLK = A3;
LedControl lc=LedControl(DIN,CLK,CS,0);
LedControl lc = LedControl(DIN,CLK,CS,0);
// Use internal neopixel ring#define NEOPIX_PIN 8#define NUMPIXELS 10Adafruit_NeoPixel pixels = Adafruit_NeoPixel(NUMPIXELS, NEOPIX_PIN, NEO_GRB + NEO_KHZ800);
//使用内部neopixel环#define NEOPIX_PIN 8#define NUMPIXELS 10Adafruit_NeoPixel像素= Adafruit_NeoPixel(NUMPIXELS,NEOPIX_PIN,NEO_GRB + NEO_KHZ800);
// USB WebUSB objectAdafruit_USBD_WebUSB usb_web;
// USB WebUSB对象Adafruit_USBD_WebUSB usb_web;
// Landing Page: scheme (0: http, 1: https), urlWEBUSB_URL_DEF(landingPage, 1 /*https*/, “https://editor.p5js.org/Jude_Raj/present/lKRyYOZ-H");
//到达网页:方案(0:http,1:https),urlWEBUSB_URL_DEF(landingPage,1 / * https * /,“ https://editor.p5js.org/Jude_Raj/present/lKRyYOZ-H “);
// the setup function runs once when you press reset or power the boardvoid setup(){ usb_web.begin(); usb_web.setLandingPage(&landingPage); usb_web.setLineStateCallback(line_state_callback);
//当您按reset或打开boardvoid setup(){usb_web.begin();时,设置功能将运行一次。 usb_web.setLandingPage(&landingPage); usb_web.setLineStateCallback(line_state_callback);
Serial.begin(115200);
Serial.begin(115200);
// This initializes the NeoPixel with RED pixels.begin(); pixels.setBrightness(50); pixels.fill(pixels.Color(0, 0, 0, 255)); // True white pixels.show();
//这会使用RED像素初始化NeoPixel。 pixel.setBrightness(50); pixel.fill(pixels.Color(0,0,0,255)); //真白色像素。show();
// wait until device mounted while( !USBDevice.mounted() ) delay(1); pixels.fill(pixels.Color(255, 153, 0)); pixels.show();
//等待设备挂载,同时(!USBDevice.mount())delay(1); pixel.fill(pixels.Color(255,153,0)); pixel.show();
usb_web.flush();
usb_web.flush();
lc.shutdown(0,false); lc.setIntensity(0,15); //Adjust the brightness maximum is 15 lc.clearDisplay(0); }
lc.shutdown(0,false); lc.setIntensity(0,15); //调整最大亮度为15 lc.clearDisplay(0); }
void loop(){ if ( usb_web.available()) { char val = usb_web.read(); if (val == 1) { // Target bin #1 pixels.fill(pixels.Color(255, 0, 0)); // RED pixels.show(); byte stops[8]= {0xBC,0x42,0xA1,0x91,0x89,0x85,0x42,0x3D}; printByte(stops); delay(1000); } else if (val == 2) { // Target bin #2 pixels.fill(pixels.Color(0, 255, 0)); // GREEN pixels.show(); byte arrow_up[8]= {0x18,0x3C,0x7E,0xFF,0x18,0x18,0x18,0x18}; printByte(arrow_up); delay(1000); } pixels.fill(0); pixels.show(); lc.clearDisplay(0);
void loop(){if(usb_web.available()){char val = usb_web.read(); if(val == 1){//目标容器#1 pixel.fill(pixels.Color(255,0,0)); // RED pixel.show(); 字节停止[8] = {0xBC,0x42,0xA1,0x91,0x89,0x85,0x42,0x3D}; printByte(stops); 延迟(1000); } else if(val == 2){//目标容器#2 pixel.fill(pixels.Color(0,255,0)); // GREEN pixel.show(); 字节arrow_up [8] = {0x18,0x3C,0x7E,0xFF,0x18,0x18,0x18,0x18}; printByte(arrow_up); 延迟(1000); } pixel.fill(0); pixel.show(); lc.clearDisplay(0);
while (usb_web.available()) { usb_web.read(); delay(10); } } }
while(usb_web.available()){usb_web.read(); 延迟(10); }}}
void printByte(byte character []){ int i = 0; for(i=0;i<8;i++) { lc.setRow(0,i,character[i]); }}
void printByte(byte character []){int i = 0; for(i = 0; i <8; i ++){lc.setRow(0,i,character [i]); }}
void line_state_callback(bool connected){ // connected = Blue, disconnected = Purple pixels.fill(connected ? pixels.Color(0, 150, 255) : pixels.Color(255, 0, 255)); pixels.show();}
void line_state_callback(bool connected){//连接=蓝色,断开=紫色pixels.fill(已连接?pixel.Color(0,150,255):pixel.Color(255,0,255)); pixel.show();}
翻译自: https://medium.com/analytics-vidhya/deploy-teachable-machine-circuit-playground-express-arduino-p5-js-tinyusb-b30508d4024a
.playground文件
http://www.taodudu.cc/news/show-2894421.html
相关文章:
- Resnet152对102种花朵图像分类(PyTorch,迁移学习)
- RabbitMQ学习之旅
- C++编程基础(1)-C中的malloc/free和C++中的new/delete
- OFGP 协议跨链解决方案
- c++中的构造数据类型----结构体
- new和delete,malloc和free
- 预测分析:R语言实现2.4 评估线性回归模型
- R语言leaps包中的regsubsets函数实现全集子集回归(all subsets regression)、使用调整R方和Mallows Cp统计量筛选最优模型、并可视化不同组合参数下的模型指标
- 最佳回归模型选择指标——马洛斯CP值
- R语言与LASSO回归和LAR算法
- 机器学习之二:回归分析
- 模型选择——子集选择法(Subset Selection)
- Wix安装包制作-个人总结
- python使用aip库识别图片中文字
- java识别图片中文字技术
- python查找文字在图片中的位置_使用Python识别图片中的中/英文字
- matlab获取图片上的字,基于MATLAB图片中文字提取及识别.pdf
- 识别图片中的文字
- 《Unity 2018 AR与VR开发快速上手》简介
- 《AR与VR开发实战》导读
- 《AR与VR开发实战》——第1章AR技术简介
- 《Unity2018AR与VR开发快速上手》随书内容资源相关说明
- 书终于出来了:《Unity3D平台AR与VR开发快速上手》
- AR与VR初探
- AR与VR开发实战pdf
- 证明:如果向量组A可由向量组B线性表示,那么A的秩小于等于B的秩
- 线性变换的矩阵表示式
- 向量组a可由向量组b线性表示什么意思
- 线性代数2:线性方程组与矩阵表示
- 线性表示线性相关线性无关
.playground文件_部署可教学机器:Circuit Playground Express,Arduino,P5.js,TinyUSB相关推荐
- arduino温湿度计库文件_手把手教你DIY最便宜的 arduino 温湿度计,详细图文视频教程...
原标题:手把手教你DIY最便宜的 arduino 温湿度计,详细图文视频教程 冬天人们经常关注家里的温湿度,南方没有暖气更关注温度,北方因为天气干燥,有暖气,所以更关注湿度.下边介绍一个非常简单,并且 ...
- 请在贵网站的根目录下部署一个文件_使用 github pages, 快速部署你的静态网页
使用 github pages, 快速部署你的静态网页 Github Pages 官网 Github Pages: Websites for you and your projects. Hosted ...
- fastdfs搭建_记一次生产环境FastDFS文件系统安装部署过程
概述 因为前面在做FastDFS文件系统安装部署介绍时我们已经测试将文件上传成功了,但我们无法下载.因此安装Nginx作为服务器以支持Http方式访问文件.同时,后面安装FastDFS的Nginx模块 ...
- 如何利用Gitlab-CI持续部署到远程机器?
长话短说,今天聊一聊使用Gitlab-CI 自动部署到远程服务器. 如果看过<基于docker-compose的Gitlab CI/CD实践&排坑指南>这篇文章的朋友,会注意到我是 ...
- 综合实践计算机的入门知识教学设计,3-6年级综合实践活动3.我是电脑小画家_教案、教学设计_市级优课(0001)【信息技术】.doc...
3-6年级综合实践活动3.我是电脑小画家_教案.教学设计_市级优课(0001)[信息技术].doc 田园处处景色美 (三年级) 教学设想教学设想 "田园处处景色美"这一节课是本单元 ...
- CentOS安装Elasticsearch_IK分词器拼音分词器_部署kibana_部署es集群
CentOS安装Elasticsearch_IK分词器_部署kibana_部署es集群 一.部署单点es ①:创建网络 因为我们还需要部署kibana容器,因此需要让es和kibana容器互联.这里先 ...
- redis主从复制,复制功能是高可用Redis的基础,为满足故障恢复和负载均衡等需求把Redis数据复制多个副本部署到其他机器;如何实现redis的主从复制模式以及主从复制模式下常见的运维问题;
目录 一.如何使用redis主从复制模式 1.建立复制 2.断开复制 3.安全性 4.只读模式 5.传输延迟 二.Redis的复制拓扑结构 1.一主一从结构 2.一主多从结构 3.树状主从结构 三.主 ...
- 怎么接收layui上传的文件_layui 上传文件_批量导入数据UI的方法
使用layui的文件上传组件,可以方便的弹出文件上传界面. 效果如下: 点击[批量导入]按钮调用js脚本importData(config)就可以实现数据上传到服务器. 脚本: /*** * 批量导入 ...
- webpack打包生成的map文件_从这十几个方面优化你的 Webpack 配置
目录 开发环境性能优化 生产环境性能优化 开发环境性能优化 优化打包构建速度 HMR 优化代码调试 source-map HMR ❝ 概念:「HMR:」 hot module replacement ...
最新文章
- 利用计算机进行机械设计属于什么,计算机技术机械设计应用
- 腾讯优图开源首个医疗AI ML预训练模型
- 网页、网站规划与设计1
- tensorflow 的模型保存和调用
- 多帧点云数据拼接合并_多工作簿数据合并,还在手动复制粘贴就out了,用批处理一键搞定...
- SpringBoot启动banner更改
- c#中的long类型示例_C#中带示例的带符号字节数组
- 【简报】超棒的免费Web字体服务:Adobe Edge Web字体
- Java并发编程中的join()与interrupt()函数
- 解决在Spring整合Hibernate配置tx事务管理器出现错误的问题
- Repeater控件的
- 摩拜app显示未能连接到服务器,摩拜单车又现大面积故障?回应称未接到反馈
- 【Java】在Eclipse中,很多代码的背景变成黄色、绿色或红色(已解决)
- HTML中spry菜单栏,DreamweaverCS3中用“spry菜单栏”制作纵向导航菜单.docx
- Saliency as Evidence: Event Detection with Trigger Saliency Attribution 论文解读
- 什么是Tuscany?
- FileNotFoundException 问题的解决
- 基于matlab的史密斯圆图演示仿真图
- 雷达信号的脉冲累积(pulse integration)coherent and non-coherent 相干累积与非相干累积
- 考研数据结构之串(4.4)——练习题之将串str中所有值为ch1的字符转换成ch2的字符(C表示)
热门文章
- java程序设计基础实验_JAVA程序设计基础实验1.doc
- 项目管理--项目组织
- 如何接3D模型外包?外包如何报价?高手才能接外包?
- 利用定时/计数器T1产生定时时钟,由P1口控制8个发光二极管,使8个提示灯依次一个一个闪动,闪动频率为10次每秒(8个灯亮一遍为一个周期),循环
- 怎样用计算机给ipd传电影,怎样不使用iTunes将电影导入iPad?
- matlab kmo检验,RPCL(Rival Penalized Competitive Learning)在matlab下的实现
- lisp语言(转自百度)
- U-Boot参数设置
- 嵌入式和物联网有什么关系?一文教你搞明白。
- mysql-8.0.28-winx64安装步骤