Ansible在windows的使用
Ansible在windows的使用
1.linux离线安装ansible
参考博客: ansible离线安装
相关的安装包:
链接:https://pan.baidu.com/s/1vqUSk3B_XKLAvzFGAr0HIw
提取码:3844
使用相关的命令进行安装:
# 安装包解压
tar -xzvf ansible-2.4-rpms.el7.tar.gz
# 进入安装包
cd ansible-2.4-rpms.el7
# 安装ansible依赖内容
rpm -ivh PyYAML*rpm libyaml*rpm python-babel*rpm python-backports*rpm python-backports-ssl_match_hostname*rpm python-cffi*rpm python-enum34*rpm python-httplib2*rpm python-idna*rpm python-ipaddress*rpm python-jinja2*rpm python-markupsafe*rpm python-paramiko*rpm python-passlib*rpm python-ply*rpm python-pycparser*rpm python-setuptools*rpm python-six*rpm python2-cryptography*rpm python2-jmespath*rpm python2-pyasn1*rpm sshpass*rpm --nodeps --force
# 安装ansible
rpm -ivh ansible-2.4.2.0-2.el7.noarch.rpm
安装完成后查看ansible的版本信息:
![]()
另外一种ansible的安装方式时使用 包装好 一个yum源进行安装,未尝试。
2.Linux安装第三方库
当前的python环境版本为2.7.5
![]()
下载第三方库,网址为: https://pypi.org/
离线安装的第三方库有:
pywinrm-0.4.2
ntlm-auth-1.1.0.tar.gz
requests_ntlm-1.1.0.tar.gz
xmltodict-0.12.0-py2.py3-none-any.whl
相关的版本信息如下:
![]()

![]()
![]()
3.配置windows系统
1.改powerShell的策略为remotesigned,否则运行不了powerShell脚本文件。
PS C:\Users\huangp> get-executionpolicy
Restricted
PS C:\Users\huangp> set-executionpolicy remotesigned
PS C:\Users\huangp> get-executionpolicy
RemoteSigned
2.如果Powshell版本不对,执行如下命令更新powshell的版本
目前我是用的是 powershell版本为 5.1.14393
# 查看windows的PowerShell的版本的方法
PS C:\Users\ywwei> host
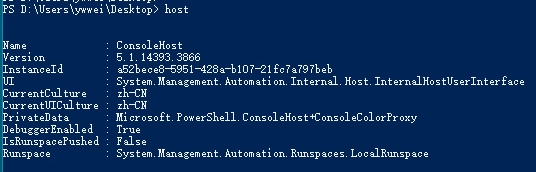
所以我的版本不需要更新。
下面是更新版本信息命令。
#更新PowerShell 2.0到3.0的脚本:
#https://github.com/ansible/ansible/blob/devel/examples/scripts/upgrade_to_ps3.ps1
#调用的命令可以如下
PS C:\Users\huangp> & "E:/temp/upgrade_ps3.ps1"
#或者
PS C:\> powershell.exe -ExecutionPolicy RemoteSigned   -file "C:\p test.ps1"
3.配置远程控制
下载并运行https://github.com/ansible/ansible/blob/devel/examples/scripts/ConfigureRemotingForAnsible.ps1
如果嫌弃Github下载速度太慢:我上传了到了自己的阿里云盘 链接:https://www.aliyundrive.com/s/opYkwmSnQk5
# 进入我我自己的桌面
PS C:\Users\ywwei> cd C:\Users\ywwei\Desktop
# 执行下载后的powershell脚本
PS C:\Users\ywwei\Desktop> .\ConfigureRemotingForAnsible.ps1
4.在PowerShell中执行:
# 启动winrm
winrm qc
# 设置相关的配置
winrm set winrm/config/service '@{AllowUnencrypted="true"}'
winrm set winrm/config/service/auth '@{Basic="true"}'
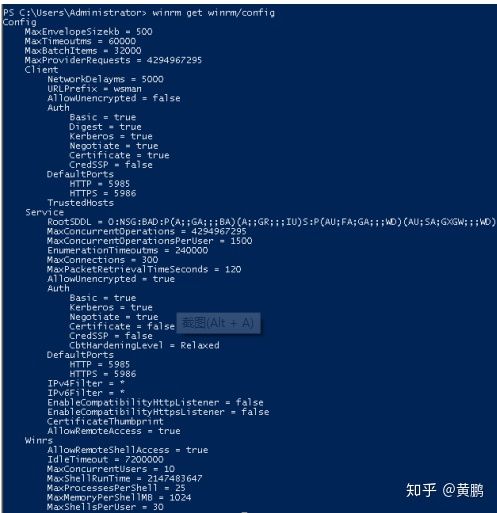
5.查看winrm配置信息
# 查看winrm配置信息
winrm get winrm/config
4.配置Linux主机
4.1配置Linux主机清单
修改主机清单内容
# 添加以下内容
$ sudo vim /etc/ansible/hosts
Linux的主机清单如下所示:
# 个人电脑
[windows]
# ywwei的电脑
192.168.56.101 ansible_ssh_user="LG\ywwei" ansible_ssh_pass="Hitrend@0701" ansible_ssh_port=5985 ansible_connection="winrm" ansible_winrm_server_cert_validation=ignore ansible_winrm_transport=ntlm# 大表架
[largeWatchStand]
# 表架6
192.168.41.29  ansible_ssh_user="admin" ansible_ssh_pass="dddddddd" ansible_ssh_port=5985 ansible_connection="winrm" ansible_winrm_server_cert_validation=ignore ansible_winrm_transport=ntlm
# 表架7
192.168.41.47  ansible_ssh_user="admin" ansible_ssh_pass="dddddddd" ansible_ssh_port=5985 ansible_connection="winrm" ansible_winrm_server_cert_validation=ignore ansible_winrm_transport=ntlm# 点对点表架
[PointToPointMeterRack]
# 包含的测试用例有  浙江、山东、黑龙江、南网深化应用、QMD
192.168.91.62  ansible_ssh_user="user" ansible_ssh_pass="dddddddd" ansible_ssh_port=5985 ansible_connection="winrm" ansible_winrm_server_cert_validation=ignore ansible_winrm_transport=ntlm
查看主机清单内容
# 查看主机清单
$ sudo cat /etc/ansible/hosts
检查是否能够连通
# 查看是否ping通
$ ansible all -m win_ping
如果不能够连通,请检查,或者请查看我的踩坑记录是否有踩过坑。
4.2执行Ansible脚本
完成准备后,可以写个小例子进行测试验证
执行测试脚本
# 测试windows组是否连同
ansible windows -m win_ping
# 查看所有主机是否都可以连通
ansible all -m win_ping
连接成功:
![]()
4.3使用常用模块
4.3.1创建文件夹
ansible windows -m win_file -a 'dest=C:/test state=directory'
4.3.2远程执行cmd 命令
# 远程执行cmd 命令
ansible windows  -m win_shell -a 'ipconfig'
目前我的桌面上存在两个文件夹,A文件夹下面存放了 demo.txt 文件:
![]()
# 复制文件
ansible windows  -m win_shell -a 'copy D:\Users\ywwei\Desktop\A\demo.txt  D:\Users\ywwei\Desktop\B'
# 移动文件
ansible windows  -m win_shell -a 'move D:\Users\ywwei\Desktop\A\demo.txt  D:\Users\ywwei\Desktop\B'
# 修改文件名称
ansible windows  -m win_shell -a 'ren  D:\Users\ywwei\Desktop\A\demo.txt demo1.txt'
# 删除文件
ansible windows  -m win_file -a 'path=D:\Users\ywwei\Desktop\A\demo2.txt state=absent'
# 修改文件名称
ansible windows  -m win_shell -a 'ren  D:\Users\ywwei\Desktop\A\demo.txt demo1.txt'# 使用cmd cllone代码
# clone command
git clone http://192.168.91.237:8929/test/python.git D:\Users\ywwei\Desktop\python
ansible windows  -m win_shell -a 'git clone http://192.168.91.237:8929/test/python.git D:\Users\ywwei\Desktop\python'
4.3.3文件目录操作
# 删除文件
ansible windows  -m win_file -a 'dest=c:\test\hosts.txt state=absent'
# 删除目录
ansible windows  -m win_file -a 'dest=c:\test state=absent'
# 传输文件到windows
ansible windows -m win_copy -a 'src=/etc/hosts dest=c:\test\hosts.txt'
4.3.4重启
# 重启
ansible windows  -m win_reboot
ansible windows  -m win_shell -a 'shutdown -r -t 0'
4.3.5创建用户
# 创建用户
ansible 192.168.11.149 -m win_user -a "name=user1 passwd=123456"
4.4编写playbook
ansible-windows模块介绍:
Windows modules — Ansible Documentation
github示例网址:
https://github.com/ansible-collections/ansible.windows
创建一个目录名称为 playbook
# playbook语法检查
ansible-playbook --syntax-check hello.yml
# 会尝试运行,然后进行语法检查
ansible-playbook -C hello.yml# 执行playbook
ansible-playbook  hello.yml
4.4.1检查是否连接成功
创建一个main.yaml文件
# 测试windows组是否连同
ansible windows -m win_ping# 这位写是不能够执行的
ansible windows -m ansible.windows.win_ping
- hosts: windowstasks:- name: Ensure connectivitywin_ping:
4.4.2创建一个文件
创建一个createDirectoryStructure.yaml
- name: test win_file modulehosts: windowstasks:- name: Create directory structureansible.windows.win_file:path: C:\Temp\folder\subfolderstate: directory
4.2.3更新文件
updateFileVersion.yaml
- name: Update burner version hosts: windowsvars:- burner_version: HiTrend_Flash_Programmer_int_v2.72.exetasks:- name: Delete old burnerwin_file:path: D:\Jenkins\HFP.exestate: absent- name: Copy new burnerwin_copy:src: /home/user/work/ansible/burner/{{burner_version}}dest: D:\Jenkins\HFP.exe
检查文件语法是否合理:
ansible-playbook -C updateFileVersion.yaml# 执行playbook
ansible-playbook updateFileVersion.yaml
4.2.4部署代码
主要功能:实现自动化部署python代码的playbook
- name: Deployment codehosts: windowsvars:- burner_version: HiTrend_Flash_Programmer_int_v2.72.exetasks:- name: Delete old burner:path: D:\Jenkins\HFP.exestate: absent- name: Copy new burnerwin_copy:src: /home/user/work/ansible/burner/{{burner_version}}dest: D:\Jenkins\HFP.exe
5.踩坑记录
5.1离线安装python winrm模块
有网络的情况下安装命令: pip install pywinrm
下载第三方库,网址为: https://pypi.org/
离线安装的第三方库有:
pywinrm-0.4.2
ntlm-auth-1.5.0.tar.gz \ ntlm_auth-1.0.1-py2.py3-none-any.whl (建议使用)
requests_ntlm-1.1.0.tar.gz
xmltodict-0.12.0-py2.py3-none-any.whl
安装第三方库时候出现的坑:
1.Error in ntlm-auth setup command: Invalid environment marker: python_versions"2.7"
![]()
解决方案:
使用下载的 ntlm_auth-1.0.1-py2.py3-none-any.whl 方式进行安装,这是因为我使用的是ntlm_auth-1.0.1-py2.py3-none-any.whl安装方式进行安装的。使用另外一种方式安装后,成功。
2.but you’ ll have requests 2.6.0 which is incompatible
![]()
在安装的过程中出现这些提示信息,需要使用相应的安装包版本进行安装,版本太低或者太高都不行。
3.Retrying (Retry(total=4, connect=None, read=None, redirect=None, status=None))
WARNING: Retrying (Retry(total=4, connect=None, read=None, redirect=None, status=None)) after connection broken by 'NewConnectionError (' spip._vendor. ur11ib3. connection. HTTPSConnection object at 0x7f024a55c590x: Failed to establish a new connection: [ Errno 101] Network is unreachable',)': /simple/six/E
这个原因是因为在内网进行的安装,不能够连接到外部网络,所以会出现这个错误,所以可以进行使用 ntlm-auth-1.5.0.tar.gz 的方式安装第三方库,然后进行查看具体的信息,需要依赖于其他的什么的第三方库。
4.提示信息:不能找到相应的文件目录
尝试使用以下命令进行设置:
添加相应的 --target 信息
![]()
5.2以太网设置
Error: 由于此计算机上的网络连接类型之一设置为公用,因此 WinRM 防火墙例外将不运行。 将网络连接类型更改为域或专用,然后再次尝试。
![]()
打开以太网设置后
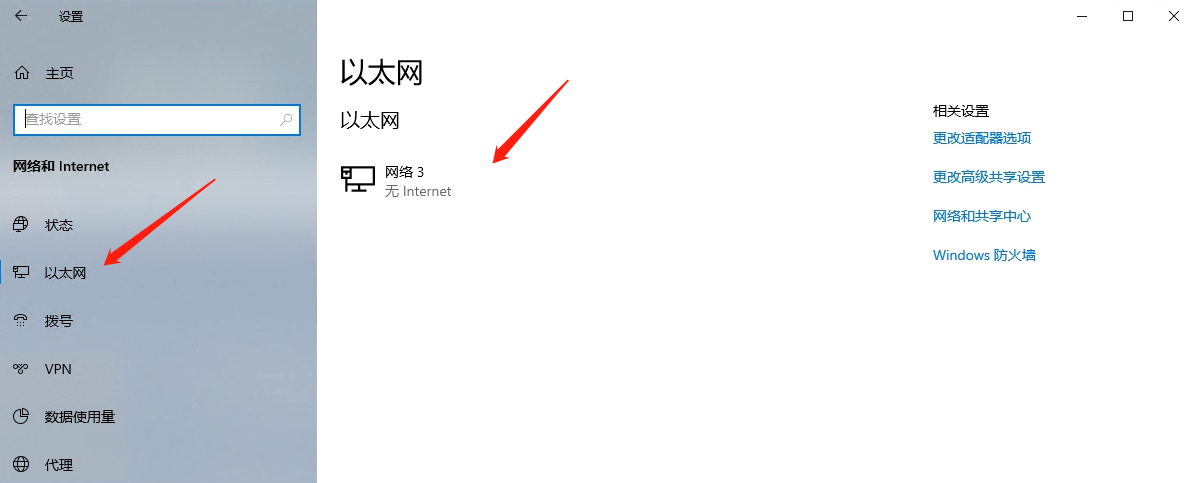
将网络设置为专用后就可以了,重新执行相关命令。

5.3连接不上被管理机器
1.“msg”: “plaintext: the specified credentials were rejected by the server”,
![]()
# 编辑主机的配置文件,添加以下字段
ansible_winrm_transport=ntlm
2.'msg‘: "ssl: the specified credentials were rejected by the server"
![]()
这个是因为在主机清单中缺少 ansible_ssh_port=5985 ,请仔细检查主机清单中的配置信息
3.连接超时
![]()
这个可能用户名或者密码写错了。
5.4在cmd中可以运行windos命令,而playbook报错
在cmd中运行的命令,并不能保证在powershell中可以运行。
![]()
![]()
Ansible在windows的使用相关推荐
- 【Ansible】Ansible控制windows插件安装及运行error与解决方法
一. 问:因pip版本问题无法安装kerberos 答:安装提示需要先安装pip升级包 下载pip9.0.1升级包: ![1_2] 二.问:安装kerberos报错 答:需要先安装libkrb5开发包 ...
- Centos7上的Ansible管理Windows主机的部署
提示:文章写完后,目录可以自动生成,如何生成可参考右边的帮助文档 文章目录 前言 一.Windows主机上的配置 1.检查windows客户机powershell版本 2.下载并安装Microsoft ...
- ansible控制windows 2019
1.在ansible端安装pywinrm [root@ansible ansible]# wget -O /etc/yum.repos.d/epel.repo http://mirrors.aliyu ...
- ansible 远程windows
官方文档查看:https://docs.ansible.com/ansible/latest/user_guide/windows.html Ansible 从1.7+版本开始支持Windows,但前 ...
- 使用ansible统一管理修改Linux和Windows管理员密码
一.ansible安装: 1.选择一台centos 7 2.通过yum安装ansible #安装epel源 yum install epel-release -y #安装ansible yum ins ...
- ansible笔记2--ansible windows基础
ansible笔记2--ansible windows基础 1 介绍 2 环境配置 2.1 Windows 环境配置 2.2 linux 环境配置 3 常见用法 4 注意事项 5 说明 1 介绍 An ...
- Java对接ansible自动运维化平台
Java对接ansible自动运维化平台实现文件采集分发 经过大量查阅,网上使用Java对接ansible自动运维化平台的示例代码几乎没有,为了方便自己后期巩固以及有需要的小伙伴,特以记录!!! 此次 ...
- python控制系统进程_python 监控windows进程
python os.startfile python实现双击运行程序 python监控windows程序 监控进程不在时重新启动 用python监控您的window服务 原创作品,允许转载,转载时请务 ...
- ansible入门与实践
1.应用场景 公司计划在年底做一次大型市场促销活动,全面冲刺下交易额,为明年的上市做准备.公司要求各业务组对年底大促做准备要求所有业务容量进行三倍的扩容,并搭建出多套环境可以共开发和测试人员做测试,运 ...
最新文章
- 31 天重构学习笔记索引
- java 简单跳台阶和变态跳台阶
- 数据结构--位图 BitMap
- jdk1.5、1.6、1.7新特性详细介绍(整理)
- 博客园编辑器插入code功能试用及与EditPlus的语法高亮比较
- MapReduce 原理及执行过程
- Java Socket文件上传
- dotnet core项目升级到 .net core 2.0
- Stm32 基于蓝牙的串口通信 详细篇
- 汽车电子技术——CAN总线系统
- 用 java编写 金字塔_用Java打印金字塔
- java数据流编辑 kylo,Kylo的安装
- (数据结构)线性表(总结)——链式存储结构与顺序储存结构的优缺点
- 加速下载ardupilot工程
- 企业微信H5登录流程,以及遇到的问题解决
- 空气净化器的研究概况
- 面向对象--西餐厅(基础实现)
- 【idm】idm突破cookie封锁 (解决http:1.1 403 forbidden)(附charles使用教程)
- 招聘网站的几个新控件(2)
- 【史上最全】月薪3万的程序员都在用这些实用工具