StackEdit 4.0:多个实例和本地主机
There are many, many MarkDown editors out there. In fact, there are so many, I was made to rant about their current state not so long ago, and reviewed a strong competitor in the field in the hopes of finding the holy grail MD app, to no avail.
那里有许多MarkDown编辑器。 实际上,有很多东西,不久前我就被告知它们的当前状态 ,并回顾了该领域的强大竞争对手,希望找到圣杯MD应用程序,但无济于事。
StackEdit 4.0 (StackEdit 4.0)
StackEdit has, through all that time, remained at the top of the browser based MD editor world, but it always lacked a certain something. The document management was less than ideal, with a chaotic side menu and the lack of a proper quicksearch option, and the spellchecker wasn’t native which caused unnecessary performance hits, especially on larger documents. The stats counters weren’t as approachable as they are now, and options to extend the editor were more limited. Plenty of publish options present in version 4 were missing, too. Most of these shortcomings were addressed in the beta version, but this version was neither very publicly available, nor declared stable – you used it at your own risk of data loss and crashes. I’ve personally been using it reliably for months, but I understand the hesitation of the masses. Last week, however, @benweet finally released the source code of version 4 on Github and geared up for a public release.
一直以来,StackEdit始终处于基于浏览器的MD编辑器世界的首位,但始终缺少某些功能。 文档管理不理想,具有混乱的副菜单和缺少适当的快速搜索选项,而且拼写检查器不是本机,这会导致不必要的性能下降,尤其是在较大的文档上。 统计信息计数器不像现在那么容易获得,并且扩展编辑器的选项更加有限。 第4版中也缺少大量的发布选项。 这些缺陷中的大多数已在beta版本中得到解决,但是该版本既不是非常公开可用,也不是声明为稳定版本-使用此版本时,您将自行承担数据丢失和崩溃的风险。 我个人已经可靠地使用它几个月了,但是我知道群众的犹豫。 但是,上周, @ benweet终于在Github上发布了版本4的源代码,并准备公开发布。
New features include a much improved documents panel with proper folder management, so you can stay on top of your files at all times. You can also search for any document in your stack (very important when you have hundreds).
新功能包括一个经过改进的文档面板,具有适当的文件夹管理功能,因此您可以随时保持在文件顶部。 您还可以搜索堆栈中的任何文档(当您拥有数百个文档时,这一点非常重要)。
Synchronization with cloud services like Dropbox, Google Drive, Github and others has been much improved, and I’ve personally been enjoying auto-synchronization with Google Drive for a while now. While I’m typing, my documents get automatically synced up with my cloud services, so there’s no fear of data loss.
与Dropbox,Google Drive,Github等云服务的同步已大大改善,并且我个人一直很享受与Google Drive的自动同步。 在输入时,我的文档会自动与我的云服务同步,因此不必担心数据丢失。
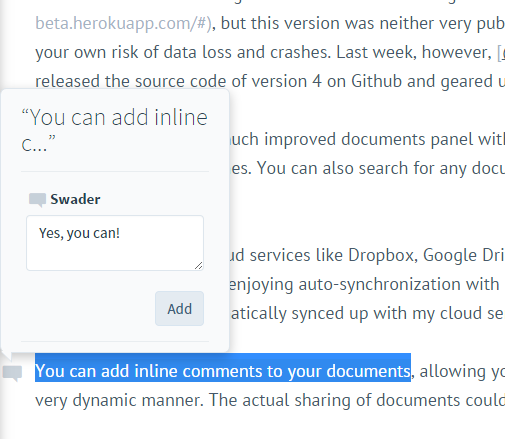
You can now also add inline comments to your documents, allowing you to share them with others and collaborate in a very dynamic manner. The actual sharing of documents could still use some work, but one thing at a time.
现在,您还可以在文档中添加内嵌注释,从而可以与他人共享它们并以非常动态的方式进行协作。 实际的文档共享仍然可以使用一些工作,但一次只能做一件事。
在本地运行 (Running it locally)
Here at SitePoint, we use StackEdit regularly. However, aside from being able to run multiple instances at once, a common complaint has always been code blocks. We currently use a code highlighter in our backend which requires [ code ] tags. While this will eventually change, the fact still remains that a direct to HTML export from StackEdit produces properly classed <code><pre> blocks, which don’t go hand in hand with the highlighter we use. A solution for custom code block exporting should be rather easy to code, but up until now, the source code for StackEdit remained unavailable, and the extensions it did offer weren’t customizable enough.
在SitePoint,我们定期使用StackEdit。 但是,除了能够一次运行多个实例之外,常见的抱怨一直是代码块。 当前,我们在后端中使用代码突出显示工具,该工具需要[ code ]标签。 尽管这最终会改变,但事实仍然是,直接从StackEdit导出到HTML会生成正确分类的<code><pre>块,这些块与我们使用的荧光笔并不能同时使用。 自定义代码块导出的解决方案应该很容易编写代码,但是直到现在,StackEdit的源代码仍然不可用,并且它提供的扩展还不能完全自定义。
To get around this, let’s start with installing StackEdit into a Homestead Improved instance.
为了解决这个问题,让我们开始将StackEdit安装到Homestead Improvementd实例中。
To get StackEdit to run locally, first deploy a regular Homestead Improved instance. No need to make any specific changes, just run it as if you were starting a PHP project — identical to what link tells you to do. Then, SSH into the VM and follow these steps:
要使StackEdit在本地运行,请首先部署常规的Homestead Improvementd实例。 无需进行任何特定的更改,就像在启动PHP项目一样运行它-就像链接告诉您执行的操作一样。 然后,SSH进入虚拟机并执行以下步骤:
cd ~/Code
git clone https://github.com/benweet/stackedit
cd stackedit
npm install --no-bin-link
bower install
(export PORT=5000 && node server.js)
These are more or less the instructions as laid out here, only with a changed port and an added flag to npm install.
这些或多或少是这里列出的说明,只是更改了端口并在npm install添加了标志。
The --no-bin-link flag tells NPM to avoid symlinks. As we’ve learned before, Vagrant and symlinks don’t get along well on Windows hosts, so in an effort to be fully cross-platform, we’re using this flag here.
--no-bin-link标志告诉NPM避免符号链接。 正如我们之前所了解的那样 ,Vagrant和符号链接在Windows主机上相处不佳,因此为了完全跨平台,我们在此使用此标志。
Note for Windows hosts: If npm install throws a throng of errors at you, that’s usually due to a Windows file-path length limitation. Windows can’t support filenames longer than 260 characters, and NPM being what it is, the nested node_modules can have several levels of sub folders before getting anywhere. Booting the VM up from a more “root” location usually solves this problem – in my particular case, moving the VM folder to D: and running vagrant up from there solved things.
Windows主机注意事项:如果npm install向您抛出了很多错误,通常是由于Windows文件路径长度限制所致。 Windows 不支持超过260个字符的文件名 ,而NPM就是这样,嵌套的node_modules在到达任何地方之前可以具有多个子文件夹级别。 从更“根”位置启动VM通常可以解决此问题–在我的特殊情况下,将VM文件夹移动到D:并从那里运行vagrant up解决问题。
Then, to access your locally running instance of StackEdit, just visit http://homestead.app:5000 in your host machine’s browser.
然后,要访问您在本地运行的StackEdit实例,只需在主机浏览器中访问http://homestead.app:5000 。
运行StackEdit的多个实例 (Running multiple instances of StackEdit)
In my original post about the state of MarkDown editors, I noted StackEdit’s single-instance limitation as a big downside. And indeed, it is a big one – when you’re editing a lot of posts, some of which are parts of a single series, you tend to have to jump to and fro every so often.
在我有关MarkDown编辑器状态的原始文章中,我指出了StackEdit的单实例限制是一个很大的缺点。 确实,这是很大的一件事–当您编辑许多帖子时(其中一些帖子是单个系列的一部分),您往往不得不经常来回跳动。
When a web application uses local storage, that local storage container is domain-bound, per session. This means you can actually use several instances of StackEdit even in its original online form, if you open one in your main browser, one in an incognito window, another one in another browser, and so on. This is because each of those domain-session combinations is unique, and uses its own local storage. But in an age where a single browser tab can use over 4GB of RAM (I’m looking at you, Tweetdeck and Google+), opening new browsers and windows is less than an ideal approach.
当Web应用程序使用本地存储时,每个会话该本地存储容器都受域限制。 这意味着,即使您在主浏览器中打开一个,在隐身窗口中打开一个,在另一个浏览器中打开另一个,依旧可以实际使用StackEdit的多个实例,即使是以其原始的在线形式。 这是因为每个域会话组合都是唯一的,并且使用其自己的本地存储。 但是在一个浏览器选项卡可以使用超过4GB RAM的时代(我正在看着您,Tweetdeck和Google+),打开新的浏览器和窗口并不是理想的方法。
To get around this when running our StackEdit instance locally, we can easily define several entries in our host machine’s hosts file.
为了在本地运行StackEdit实例时解决此问题,我们可以轻松地在主机的hosts文件中定义几个条目。
127.0.0.1 test.app
127.0.0.1 test2.app
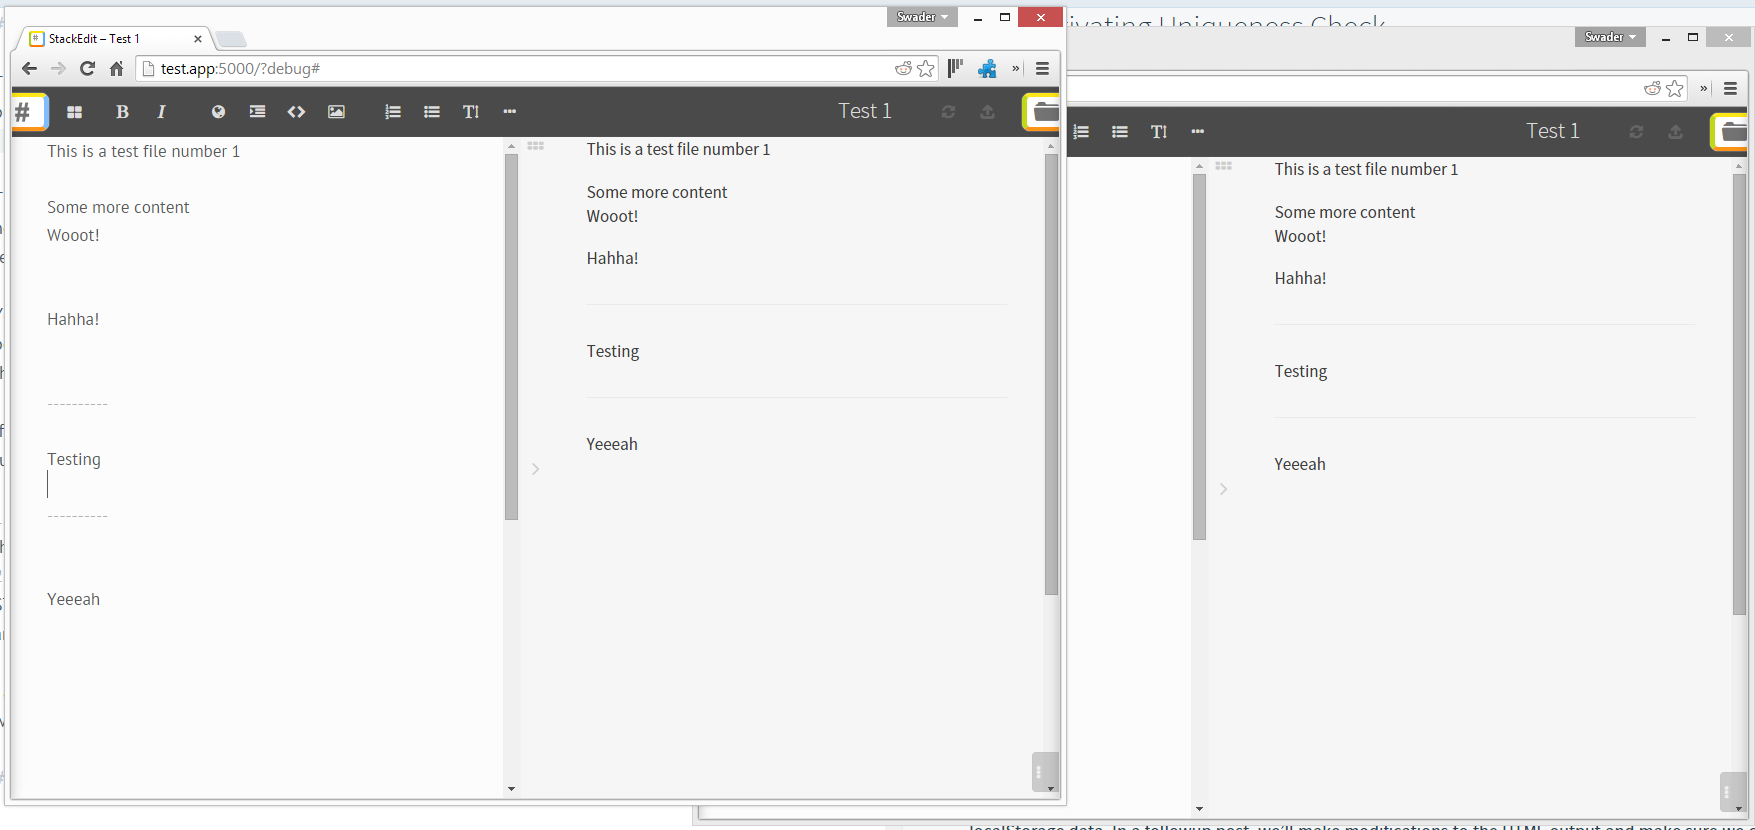
127.0.0.1 test3.appOpening http://test.app:5000, http://test2.app:5000, andhttp://test3.app:5000 will open three different instances of the same running StackEdit application, each with its own local local storage cache.
打开http://test.app:5000 , http://test2.app:5000和http://test3.app:5000将打开相同的运行StackEdit应用的三种不同的情况下,每一个都有自己的本地本地存储缓存。
Those more attentive among you may now be wondering: “But doesn’t that mean we can define domain aliases in the hosts file for the live version of StackEdit, too?” Indeed it does. If we ping stackedit.io to find out its IP address (54.236.87.105 at the time of writing) and put the following into the hosts file:
您当中那些更专心的人现在可能会想:“但这是否意味着我们也可以在hosts文件中为LiveEdit的实时版本定义域别名?” 确实如此。 如果我们对stackedit.io进行ping stackedit.io以找出其IP地址(在撰写本文时为54.236.87.105 ),并将以下内容放入hosts文件:
54.236.87.105 stack1.app
54.236.87.105 stack2.app
54.236.87.105 stack3.app
we can open the live hosted Stacks just like those we just opened locally, by visiting stack1.app/, stack2.app/ and stack3.app/ in the host machine’s browser. There’s a caveat though – since StackEdit is a Heroku app, the IP address of the app may change periodically and maintaining an up to date hosts file would be tedious. Hence, our Vagrant-hosted approach is obviously better – the IP is guaranteed to stay at 127.0.0.1.
我们可以通过在主机浏览器中访问stack2.app/和stack3.app/来打开实时托管的stack1.app/ ,就像我们在本地打开的一样。 但有一个警告-由于StackEdit是Heroku应用程序,因此该应用程序的IP地址可能会定期更改,并且维护最新的hosts文件将很繁琐。 因此,我们的由Vagrant托管的方法显然更好— IP保证保持在127.0.0.1 。
共享资料 (Sharing Data)
Of course, the downside to this approach is having three separate local storage databases – this decouples your StackEdit tabs, and prevents you from sharing the files you’re editing across these “different” instances.
当然,此方法的缺点是具有三个单独的本地存储数据库–这使您的StackEdit选项卡分离,并阻止您在这些“不同”实例之间共享正在编辑的文件。
This will lead to each StackEdit instance being truly separated from the rest, and unable to access the data from the other ones. Of course, you could copy and paste the content from one into the other and maintain different document databases per domain, but that’s too much work. There are two approaches you can take here to solve this.
这将导致每个StackEdit实例与其余实例真正分开,并且无法访问其他实例中的数据。 当然,您可以将内容从一个复制并粘贴到另一个中,并在每个域中维护不同的文档数据库,但这是太多的工作。 您可以在此处采用两种方法来解决此问题。
1.共享LocalStorage数据 (1. Sharing LocalStorage Data)
This approach can be applied to both the online and your locally hosted versions. Like we said before, local storage data is unique per origin (origin being a domain+session combination). Domain X cannot access the local storage of domain Y, and for good reason – if they’re unrelated, they shouldn’t share data.
此方法可以应用于在线版本和本地托管版本。 就像我们之前说过的,本地存储数据对于每个来源都是唯一的(来源是域+会话的组合)。 域X无法访问域Y的本地存储,这是有原因的-如果它们不相关,则它们不应共享数据。
This is where this post comes in handy. It’s almost four years old now, but produced a very interesting project. Put simply, you can use this library to share localStorage across domains, but you need to manually whitelist each domain. In other words, to use this, you would need to define several hosts entries for your StackEdit instances (whether online or locally) like we did above, whitelist them, and then implement some simple localStorage sharing code. The details of the implementation are outside the scope of this post, and, once you see the second approach, will seem somewhat unnecessary.
这是这篇文章派上用场的地方。 现在已经快四年了,但是产生了一个非常有趣的项目 。 简而言之,您可以使用该库跨域共享localStorage,但是您需要手动将每个域列入白名单。 换句话说,要使用此功能,您需要像上面一样为您的StackEdit实例(在线或本地)定义几个主机条目,将它们列入白名单,然后实现一些简单的localStorage共享代码。 实现的细节不在本文的讨论范围之内,一旦您看到了第二种方法,就显得有些不必要了。
2.停用唯一性检查 (2. Deactivating Uniqueness Check)
The only thing actually preventing StackEdit from running two or more instances at once is a uniqueness check built into the application. To be more precise, it’s a call to checkWindowUnique() on line 316 in public/res/core.js. Comment this line.
真正阻止StackEdit一次运行两个或多个实例的唯一事情是应用程序内置的唯一性检查。 更确切地说,这是对public/res/core.js第316行的checkWindowUnique()的调用。 评论此行。
Then, launch a couple of tabs with test.app:5000/?debug to see if it works. The ?debug param is necessary to make StackEdit serve unminified files so we don’t have to run grunt for minification before testing our changes. If you’re happy with the changes, just run grunt in the stackedit folder. Unless you do some additional tweaks to make the code JSHint-valid, you’ll need to run grunt with the --force flag, like so;
然后,使用test.app:5000/?debug启动几个选项卡,看看它是否有效。 要使StackEdit提供未缩小的文件,必须使用?debug参数。因此,在测试更改之前,我们不必运行grunt进行缩小。 如果您对更改感到满意,只需在stackedit文件夹中运行grunt 。 除非您进行一些其他调整以使代码JSHint有效,否则您将需要使用--force标志运行grunt,如下所示;
grunt --forceThis tells it to ignore the JSHint problems (in the particular case above, it’ll tell you that the function checkWindowUnique is defined, but never used). An easy no-force workaround is commenting out that function too, along with the line that calls it.
这告诉它忽略JSHint问题(在上述特定情况下,它将告诉您定义了checkWindowUnique函数,但从未使用过)。 一个简单的强制解决方法就是将该功能以及调用该功能的行注释掉。
You’ll now be able to run multiple instances of StackEdit in your browser, and all the documents will be shared between them. I’ve been using this approach for a while now, and have yet to encounter the race condition that caused this block to be implemented in the first place.
现在,您将能够在浏览器中运行StackEdit的多个实例,并且所有文档将在它们之间共享。 我已经使用这种方法已有一段时间了,并且还没有遇到导致该块首先实现的竞争条件。
If we have StackEdit Tab1 (ST1) and StackEdit Tab2 (ST2) and file X and file Y, keep in mind the following rules:
如果我们具有StackEdit Tab1(ST1)和StackEdit Tab2(ST2)以及文件X和文件Y,请记住以下规则:
- If file X is open in both ST1 and ST2, the changes from the last used ST are applied. Editing file X in ST1 and then refreshing ST2 will show you the contents of file X as present in ST1, and vice versa.如果在ST1和ST2中都打开了文件X,则将应用上次使用的ST的更改。 在ST1中编辑文件X,然后刷新ST2,将显示ST1中存在的文件X的内容,反之亦然。
- If file X is open in both ST1 and ST2, and you switch ST2 to file Y, make some changes, then refresh ST1, ST1 will also be switched to file Y. This is because StackEdit uses localStorage to keep track of your location and open files too, and syncs them up, so you end up where you left off when you re-open the app如果在ST1和ST2中都打开了文件X,并且将ST2切换到文件Y,进行了一些更改,则刷新ST1,ST1也将切换到文件Y。这是因为StackEdit使用localStorage来跟踪您的位置并打开也可以同步文件,因此您最终会在重新打开应用程序时从上次中断的地方结束
I advise against using this multiple instances hack for anything other than only reading one document while writing to the other. Anything more than that gets chaotic rather fast.
我建议不要将这种多个实例用于其他用途,而不仅仅是在读取一个文档的同时写入另一个文档。 除此之外,其他一切都变得非常混乱。
结论 (Conclusion)
StackEdit is a powerful MD editor, but even the best need upgrades sometimes. In this post, we looked at hosting our own local instance of StackEdit and at deploying multiple instances at the same time which share localStorage data. In a followup post, we’ll make modifications to the HTML output and make sure we can tweak the code blocks to our liking. Got any of your own hacks to share? Let us know!
StackEdit是功能强大的MD编辑器,但有时即使是最需要升级的软件也是如此。 在本文中,我们着眼于托管我们自己的StackEdit本地实例,以及同时部署共享localStorage数据的多个实例。 在后续文章中,我们将对HTML输出进行修改,并确保我们可以根据自己的喜好调整代码块。 有自己的黑客分享吗? 让我们知道!
翻译自: https://www.sitepoint.com/stackedit-4-0-multiple-instances-local-hosting/
StackEdit 4.0:多个实例和本地主机相关推荐
- ProE5.0塑胶产品结构设计实例知识视频教程
ProE5.0塑胶产品结构设计实例知识视频教程 链接:https://pan.baidu.com/s/1_Xc99LsZQ_r3TMWnyFluyw 提取码:hwwl
- ANSYS workbench 19.0基础到实例仿真分析视频教程
ANSYS workbench 19.0基础到实例仿真分析视频教程 链接:https://pan.baidu.com/s/1Fi7rdlmQ0oE5i_qx1NXEbA 提取码:gezg
- 【干货】S7-PLCSIM Advanced V3.0 无法启动实例( Error Code:-30,LicenseNotFound)问题解决方法
问题:S7-PLCSIM Adavanced V3.0 无法启动实例( Error Code:-30,LicenseNotFound) 综合网上所有答案,现将该问题的解决方法总结如下: 1.首先需要确 ...
- python创建一个列表_Python创建一个元素都为0的列表实例
Python创建一个元素都为0的列表实例 实现创建一个元素都为0的列表: l=10 lis=[0]*l lis 输出结果: [0, 0, 0, 0, 0, 0, 0, 0, 0, 0] 以上这篇Pyt ...
- 服务器主机本地系统开机,本地主机启动tomcat v9.0服务器错误
我试图启动一个tomcat v9.0服务器在本地主机上春天STS但它会弹出以下错误.本地主机启动tomcat v9.0服务器错误 "本地主机起tomcat服务器V9.0遇到了问题" ...
- 【翻译】WF从入门到精通(第十七章):关联及本地主机通信
上一篇:WF从入门到精通(第十六章):声明式工作流 学习完本章,你将掌握: 1.了解工作流关联(correlation)以及在什么地方必须去使用它.它为什么是重要的 2.使用工作流 ...
- 第5章 uin-app本地主机数据跨域(Cors)数据交互实现
开发前端App最先需要被实现的功能是:与本地主机上已经布置在IIS服务上的后端数据实现跨域(Cores)交互操作,这也是前端App作为前端工程性项目存在的根本意义和需求,因此需要首先对上一章中示例:2 ...
- ISA2006标准版,本地主机不能上网问题的解决一例
今天,帮一位朋友解决ISA SERVER2006标准版本地主机不能上网的问题,中间经历了一些困难,有点意思,故写了下来,供各位参考分享. 一.安装环境: windows server 2003 sp2 ...
- 如何从Docker容器内部连接到计算机的本地主机?
本文翻译自:From inside of a Docker container, how do I connect to the localhost of the machine? So I have ...
最新文章
- mac玩rust用什么画质_玩七日杀Steam游戏用什么加速器?电狐加速器
- 求时间差的sql语句。 比如如下数据
- Sql自动更新不同IP的数据库数据。(link Server)
- golang 怎么把指针内容也打印出来_FDM工艺3D打印出来的模型表面粗糙怎么解决?...
- [SimplePlayer] 1. 从视频文件中提取图像
- 揭秘淘宝286亿海量图片存储与处理架构,互联网营销
- 【FastJson】FastJson一个Bug java.util.LinkedHashMap cannot be cast to com.alibaba.fastjson.Jsonobject
- bzoj 3752: Hack 预处理+暴力dfs
- 华为向emui输入鸿蒙,新颜值/新功能/新体验!EMUI 11上手:手机鸿蒙OS的提前预演...
- pytorch torchvision的版本对应关系 pytorch历史版本
- 最全面的Nginx工作原理讲解,Nginx学习笔记——来自动力节点
- 用PrtSc键触发启动flameshot
- CAD工具——图纸剪切
- 爱你穿越时间,两行来至秋末的眼泪
- 前序、中序、后序表达式
- 视频教程-数据中台-数据仓库建模设计方法和实现-数据仓库
- java向量加法_结构-03. 平面向量加法(10) java
- Vue3基础难点总结
- 做企业数字化转型的最佳拍档,中软国际的变与不变
- 伽卡他卡如何关闭,并恢复任务管理器