MangoDB 学习指南
目录
- 安装篇
- php的扩展与测试
- 使用篇
- mapReduce
- 游标
- 索引
- Mongodb复制
- 分片技术(Shard)
- 安全管理
- 数据备份、恢复与迁移管理
- MongoDB 监控
- MongoDB 自动增长
- 关于ObjectId
- GridFS
安装篇
下载安装
curl -O https://fastdl.mongodb.org/linux/mongodb-linux-x86_64-rhel62-3.2.10.tgztar zxvf mongodb-linux-x86_64-rhel62-3.2.10.tgzmv mongodb-linux-x86_64-rhel62-3.2.10 /usr/local/mv mongodb-linux-x86_64-rhel62-3.2.10 mongodbmkdir /data/dbtouch /var/logs/mongodb/mongodb.logscd mongdb/bin && vim mongodb.conf
配置mongodb.conf
dbpath=/data/db
logpath=/var/logs/mongodb
port=27017
#fork=true
#nohttpinterface=true
重新绑定mongodb的配置文件地址和访问IP
/usr/local/mongodb/bin/mongod --bind_ip localhost -f /usr/local/mongodb/mongodb.conf
可以通过 /usr/local/mongodb/bin/mongod --help 查看帮助 ,其中 -f(--config) 配置文件,--bind_ip 绑定ip
/usr/local/mongodb/bin/mongod --config /usr/local/mongodb/mongodb.conf 添加到 /etc/rc.d/rc.local 开机启动
测试
其中 mongod --config /usr/local/mongodb/mongodb.conf 服务之后,启动 /usr/local/mongodb/bin/mongo 客户端,支持JavaScript 版本,show dbs 查看数据库,db.version() 查看版本
查看当前mongodb进程信息
ps -ef | grep mongod //查看进程号码
cat /proc/24283/limits //查看具体信息
php的扩展与测试
扩展包地址
cd mongodb-1.1.9
/usr/php/bin/phpize
./configure --with-php-config=/usr/askphp/bin/php-config
make;make install
PHP代码
创建集合
$m = new \MongoClient();$db = $m->selectDB("test");$collection = $db->createCollection("my_col");插入文档
$m = new \MongoClient();$db = $m->selectDB("test");$collection = $db->my_col;$document = array("title" => "MongoDB","description" => "database","likes" => 100,"url" => "http://www.baidu.com","by"=>"change.net");$ret_ins = $collection->insert($document);查找文档
$m = new \MongoClient();$db = $m->selectDB("test");$collection = $db->my_col;$cursor = $collection->find();foreach ($cursor as $document) {echo $document["title"] . "\n";}更新文档
$m = new \MongoClient();$db = $m->selectDB("test");$collection = $db->my_col;$collection->update(array("title"=>"MongoDB"), array('$set'=>array("title"=>"MongoDB")));$cursor = $collection->find();foreach ($cursor as $document) {echo $document["title"] . "\n";}删除文档
$m = new \MongoClient();$db = $m->selectDB("test");$collection = $db->my_col;$collection->remove(array("title"=>"MongoDB"), array("justOne" => true));$cursor = $collection->find();foreach ($cursor as $document) {echo $document["title"] . "\n";}使用篇
Start Mongod && Command
mongod
ps aux | grep mongo-- Start the Mongo Shell
mongo
show dbs
use meals-development
show collections
show users
show roles
show profile
show databasesdb.auth()
db.help()
-- collection 为集合的意思 查看更多帮助,查询帮助
db.collection.help()
db.collection.find().help()db.collection.findOne()
db.collection.find().toArray()db.collection.insert()
db.collection.update()
db.collection.save()
db.collection.remove()
db.collection.drop()
db.collection.createIndex()
db.getSiblingDB()
Data Types 类型比较
参考
Date
- Date() method which returns the current date as a string.
- new Date() constructor which returns a Date object using the ISODate() wrapper.
- ISODate() constructor which returns a Date object using the ISODate() wrapper.
ObjectId
new ObjectId
NumberLong && NumberInt
NumberLong("2090845886852")。demo:
db.collection.insert( { _id: 10, calc: NumberLong("2090845886852") } )
db.collection.update( { _id: 10 },{$set:{ calc: NumberLong("2555555000000")}})
db.collection.update( { _id: 10 },{$inc:{ calc: NumberLong(5) } } )
Check Types
- instanceof -- mydoc._id instanceof ObjectId
- typeof -- typeof mydoc._id
SQL && MongoDB Mapping Chart
sql与nosql的不同于区别参考
Executables
| --- | MySQL/Oracle | MongoDB |
|---|---|---|
| Database Server | mysqld/oracle | mongod |
| Database Client | mysql/sqlplus | mongo |
Terminology and Concepts
| SQL Terms/Concepts | MongoDB Terms/Concepts |
|---|---|
| database | database |
| table | collection |
| row | document or BSON document |
| column | field |
| index | index |
| table joins | embedded documents and linking |
| primary key,Specify any unique column or column combination as primary key. | primary key,In MongoDB, the primary key is automatically set to the _id field. |
Create and Alter and CURD
db.users.insert( {user_id: "abc123",age: 55,status: "A"} )-- However, you can also explicitly create a collection:db.createCollection("users")db.users.ensureIndex( { user_id: 1 } )db.users.ensureIndex( { user_id: 1, age: -1 } )db.users.drop()db.users.find()db.users.find({ },{ user_id: 1, status: 1 }
)db.users.find({ },{ user_id: 1, status: 1, _id: 0 }
)db.users.find({ status: "A" },{ user_id: 1, status: 1, _id: 0 }
)
db.users.find({ age: { $gt: 25, $lte: 50 } }
)
db.users.find({ user_id: /^bc/ }
)
db.users.find( { status: "A" } ).sort( { user_id: 1 } )db.users.count()
db.users.find().count()db.users.count( { user_id: { $exists: true } } )
db.users.find( { user_id: { $exists: true } } ).count()db.users.count( { age: { $gt: 30 } } )
db.users.find( { age: { $gt: 30 } } ).count()db.users.distinct( "status" )db.users.findOne()
db.users.find().limit(1)db.users.find().limit(5).skip(10)
db.users.find( { status: "A" } ).explain()db.users.update({ age: { $gt: 25 } },{ $set: { status: "C" } },{ multi: true }
)db.users.update({ status: "A" } ,{ $inc: { age: 3 } },{ multi: true }
)db.users.remove( { status: "D" } )
db.users.remove( )
详细使用
INSERTING DATA
db.customers.insert({  first_name: "chris",last_name:  "aiv"
})--Append a lot of data into a customer
db.customers.insert({  first_name: "Peter",age: 32,address: {street: "120 Main St",city: "Chicago",state: "Illinois",zip: "38475"},phone: {home: "5555555555",work: "4444444444",mobile: "3333333333"},services: [{service_id: "time warner"},{service_id: "pge"},{service_id: "moviepass"}],services_count: 3
});-- Append data to a customerdb.customers.insert({  first_name: "Billy",last_name:  "Corgan",gender: "m"
})-- Insert multiple customers in one querydb.customers.insert([  {first_name: "Jimmy",last_name:  "Hendrix"},{first_name: "Jimmy",last_name:  "Page"},{first_name: "Kurt",last_name:  "Cobain"},{first_name: "Adrian",last_name:  "Belew"},{first_name: "Billy",last_name:  "Corgan"}
])
FINDING DATA
db.customers.find({ first_name: "Peter"}, { services: 1})
db.customers.find({ first_name: "Peter"}, { "services.service_id": 1})
db.customers.findOne(  { first_name: /^billy$/i },{ first_name: 1 }
)db.customers.find({  gender: "male"
})db.customers.find({  gender: /(m|male)/i, first_name: /^billy$/i
})
UPDATING DATA
-- 慎用,破坏式的更新
db.customers.update(  { first_name: "Jimmy" },{ last_name:  "Hendrix"}
)
-- Gentel Update
db.customers.update(  { last_name: /^hendrix$/i },{ $set: { first_name: "Jimmy" } }
)-- Increment a value in a field
db.customers.update(  { first_name: "Billy" },{ $inc: { age: 1 }}
)-- Update or Insert a field using an object ID
db.customers.update(  { _id: ObjectId("581fef808e5fac221dea48ef") },{$set: {first_name:"Lucy",gender: "m",age: 40,birthdate: new Date("2016-11-02")}}
)
-- Update a field using someones first name
db.customers.update(  { first_name: "Jimmy" },{$set: {gender: "male",age: 50,birthdate: new Date("Aug 20, 1985")}},{ upsert: true }
)
-- Add to an existing document
db.customers.update(  { first_name: "Jimmy" },{ $push: {services: {service_id: 'hosting windows',service_name: "windows hosting"}}}
)
-- 第三个参数,如果条件默认不存在,则新增为true表示新增的,默认为false,第四个参数表示全部更新
db.customers.update({first_name:"jack"},{$inc:{age:2}},true);
db.customers.update({first_name:"Jimmy"},{$inc:{age:3}},false,true);
db.customers.update({first_name:"Kurt"},{$inc:{age:-2}});
REMOVING DATA
--Remove a field
db.customers.update(  { last_name: "Page" },{ $unset: { age: 1 }}
)db.customers.update({first_name:"jack"},{$inc:{age:1}})
--Remove a customer
db.customers.remove(  //!!! DO NOT US THIS{ first_name: "Billy"}, true
)
-- Remove any customer above the age of 31
db.customers.remove(  { age: { $gt: 31 } }, true
)
DELETING DATA
-- Delete a collection
db.customers.drop()
SEARCHING DATA
{_id: 1,name: { first: 'John', last: 'Backus' },birth: new Date('Dec 03, 1924'),death: new Date('Mar 17, 2007'),contribs: [ 'Fortran', 'ALGOL', 'Backus-Naur Form', 'FP' ],awards: [{ award: 'National Medal',year: 1975,by: 'NSF' },{ award: 'Turing Award',year: 1977,by: 'ACM' }]
}
db.users.find({awards: {$elemMatch: {award:'National Medal', year:1975}}})--  $gt,gte,$lt,$lte,$ne
db.col.find({"by":"菜鸟教程"}).pretty()
db.col.find({"likes":{$lt:50}}).pretty()
db.col.find({"likes":{$ne:50}}).pretty()
db.users.find({"likes" : {$gt : 100}})-- and or 使用
db.customers.find({$or: [{key1: value1}, {key2:value2}]}).pretty()
db.col.find({"likes": {$gt:50}, $or: [{"by": "教程"},{"title": "MongoDB 教程"}]}).pretty()
//支持js
db.customers.find({$where:function(){ return this.first_name=="jack"}})-- 正则查询db.customers.find({name:{$regex:"yaolan.com"}})
-- 或者
db.customers.find({name:/yaolan.com/})
-- 不区分大小写
db.customers.find({name:{$regex:"yaolan.com",$options:"$i"}})
关于统计,排序,分页,分组等
- db.collections.help() 查看更多操作
- db.collection.find().help();
db.customers.distinct("first_name");
db.customers.count({first_name:"Jimmy",age:{$gt:1}});
db.customers.count({first_name:"Jimmy",age:{$in:[8,90]}});-- 用于分页
db.customers.find().limit(2).skip(1)
-- 用于排序,其中value为1 或 -1 分别为升降序
db.customers.find().sort({first_name:1});
db.customers.find().sort({first_name:-1});-- 分组
-- key :按照那个字段分组
-- initial:初始化函数
-- reduce 函数第一个参数当前文档,第二个参数为前一个集合对象
-- condition: 这个就是过滤条件。
-- finalize: 每一组文档执行完后,多会触发此方法,那么在每组集合里面加上count也就是它的活了
db.customers.group({key:{age:true},initial:{customers:[]},reduce:function(curr,prev){ prev.customers.push(curr.first_name) }
});db.customers.group({key:{age:true},initial:{obj:[]},reduce:function(curr,prev){ prev.obj.push(curr.first_name); prev.obj.push(curr.last_name);prev.obj.push({address:"abc"});}
});-- 存储整个值
db.customers.group({key:{age:true},initial:{obj:[]},reduce:function(curr,prev){ prev.obj.push(JSON.stringify(curr)); }
});-- 删选条件加,每次执行完事件
db.customers.group({key:{age:true},initial:{obj:[]},condition:{age:{$gt:7}},reduce:function(curr,prev){ prev.list = JSON.stringify(curr);   },finalize:function(prev){prev.count =  prev.obj.length;}
});
aggregate 聚合
按照age分组,并以sum的value累计计算和, 聚合,实例类似sql语句: select by_user, count(*) from mycol group by by_user,在上面的例子中,我们通过字段by_user字段对数据进行分组,并计算by_user字段相同值的总和。
db.customers.aggregate([{$group : {_id : "$by_user", num_tutorial : {$sum : 1}}}])db.customers.aggregate([{$group : {_id: "$age",num:{$sum:2}}}])
db.customers.aggregate([{$group : {_id: "$age",num:{$avg:1}}}])
管道的概念
管道在Unix和Linux中一般用于将当前命令的输出结果作为下一个命令的参数。
- $project:修改输入文档的结构。可以用来重命名、增加或删除域,也可以用于创建计算结果以及嵌套文档。
- $match:用于过滤数据,只输出符合条件的文档。
$match使用MongoDB的标准查询操作。- $limit:用来限制MongoDB聚合管道返回的文档数。
- $skip:在聚合管道中跳过指定数量的文档,并返回余下的文档。
- $unwind:将文档中的某一个数组类型字段拆分成多条,每条包含数组中的一个值。
- $group:将集合中的文档分组,可用于统计结果。
- $sort:将输入文档排序后输出。
- $geoNear:输出接近某一地理位置的有序文档。
db.article.aggregate({ $project : {title : 1 ,author : 1 ,}});db.customers.aggregate({$project:{first_name:1,age:1}})db.article.aggregate({ $project : {_id : 0 ,title : 1 ,author : 1}});-- $match用于获取分数大于70小于或等于90记录,然后将符合条件的记录送到下一阶段$group管道操作符进行处理。db.articles.aggregate( [{ $match : { score : { $gt : 70, $lte : 90 } } },{ $group: { _id: null, count: { $sum: 1 } } }] );-- 经过$skip管道操作符处理后,前五个文档被"过滤"掉。db.article.aggregate({ $skip : 5 });
mapReduce
Map-Reduce是一种计算模型,简单的说就是将大批量的工作(数据)分解(MAP)执行,然后再将结果合并成最终结果(REDUCE)。
map :映射函数 (生成键值对序列,作为 reduce 函数参数)。
reduce 统计函数,reduce函数的任务就是将key-values变成key-value,也就是把values数组变成一个单一的值value。。
out 统计结果存放集合 (不指定则使用临时集合,在客户端断开后自动删除)。
query 一个筛选条件,只有满足条件的文档才会调用map函数。(query。limit,sort可以随意组合)
sort 和limit结合的sort排序参数(也是在发往map函数前给文档排序),可以优化分组机制
limit 发往map函数的文档数量的上限(要是没有limit,单独使用sort的用处不大)
db.collection.mapReduce(function() {emit(key,value);},  //map 函数function(key,values) {return reduceFunction},   //reduce 函数{out: collection,query: document,sort: document,limit: number}
)-- demo
db.posts.mapReduce( function() { emit(this.user_name,1); }, function(key, values) {return Array.sum(values)}, {  query:{status:"active"},  out:"post_total" }
)
游标
针对这样的操作,result其实并没有获取到customers中的文档,而是申明一个“查询结构”,for或者next()一次性加载过来,然后让游标逐行读取,当我们枚举完了之后,游标销毁。
var result = db.customers.find().limit(2).skip(1)
var result = db.customers.find();
result.forEach(function(curr){
print(curr.first_name);
});
索引
-- 性能分析函数
db.customers.find({age:7}).explain();
-- hint 强制使用索引
db.customers.find({gender:"M"},{user_name:1,_id:0}).hint({gender:1,user_name:1})
db.customers.find({gender:"M"},{user_name:1,_id:0}).hint({gender:1,user_name:1}).explain();-- 建立索引 (`ensureIndex` 将要被 `createIndex` 替代)
db.customers.ensureIndex({"first_name":1})
db.customers.createIndex({"first_name":1})
db.customers.createIndexes([{"first_name":1},{"age":-1}])
-- 唯一索引
db.customers.ensureIndex({"first_name":1},{"unique":true})
-- 联合索引
db.customers.ensureIndex({"first_name":1,"age":-1})
db.customers.createIndexes([{"first_name":1},{"age":-1}])
-- 查看索引
db.customers.getIndexes();
--删除索引
db.customers.dropIndex("first_name_1")
db.customers.dropIndex({"first_name":1})
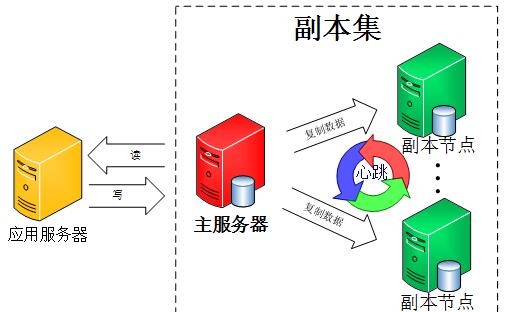
db.customers.dropIndexes();Mongodb复制
mongod --help
主从读写分离(旧版本的,将用replica 副本集代替)
通过主数据库的OpLog日志来复制,如果配置成功可看见sync_pullOpLog
-- 一主两从,主服务器不写默认端口 27017
mongod --dbpath=E:\MongoDB\datamaster --master
mongod --dbpath=E:\MongoDB\dataslave --port=27018 --slave --source=127.0.0.1:27017
mongod --dbpath=E:\MongoDB\dataslave1 --port=27019 --slave --source=127.0.0.1:27017
-- 测试同步
mongo 127.0.0.1:27017
db.users.insert({name:"tom",age:10})
db.users.insert({name:"lucy",age:13})-- 在从服务器上查看
db.usrs.find();
主从配置好之后,从服务器默认是不可读取的,如果出现了 error: { "$err" : "not master and slaveok=false", "code" : 13435 } 这个错误,需要在从服务器上执行rs.slaveok(),之后再从服务器上查询即可。
副本集(代替旧的主从)( --replSet)
- 该集群没有特定的主数据库
如果哪个主数据库宕机了,集群中就会推选出一个从属数据库作为主数据库顶上,这就具备了自动故障恢复功能
N 个节点的集群(至少3个)
任何节点可作为主节点
所有写入操作都在主节点上
自动故障转移
自动恢复
我们使用同一个MongoDB来做MongoDB主从的实验, 操作步骤如下:
关闭正在运行的MongoDB服务器。
mongod --port 27017 --dbpath=E:\MongoDB\datamaster --replSet rs0
以上实例会启动一个名为rs0的MongoDB实例,其端口号为27017。
启动后打开命令提示框并连接上mongoDB服务。
在Mongo客户端使用命令rs.initiate()来启动一个新的副本集。
我们可以使用rs.conf()来查看副本集的配置
查看副本集状态使用 rs.status() 命令
在不同机机子上,需要建立集群名称,具体可以参考如下:(示例在一个机子上,用端口区分)
mongod --dbpath=E:\MongoDB\replsetmaster --port=27017  --replSet replset
mongod --dbpath=E:\MongoDB\replsetslave --port=27018 --replSet replset
mongod --dbpath=E:\MongoDB\replsetslave1 --port=27019  --replSet replset
-- 在任意一个`mongo` 初始化副本集,replset 为上面的副本集名称rs.initiate({_id:"replset",members:[{_id:0,host:"127.0.0.1:27017"},{_id:1,host:"127.0.0.1:27018"},{_id:2,host:"127.0.0.1:27019"}]
})-- 测试同步
mongo 127.0.0.1:27017
db.users.insert({name:"tom",age:10})
db.users.insert({name:"lucy",age:13})-- 在第二个服务器上查看
db.usrs.find();
-- 如果出现错误`not master and slaveok=false` ,默认是从主节点读写数据的,副本节点上不允许读,需要设置副本节点可以读,然后执行 `db.getMongo().setSlaveOk()` 或者`rs.slaveOk()`即可-- rs.addArb() 使用这个追加一个仲裁服务器
mongod --dbpath=xxxx --port=27020 --replSet replset
rs.addArb("192.168.1.2:27020")-- rs.add 陆续增加更多的副本
rs.add("192.168.1.2:27021")
最后查看副本集状态使用 rs.status() 命令。判断当前运行的Mongo服务是否为主节点可以使用命令db.isMaster(),MongoDB的副本集与我们常见的主从有所不同,主从在主机宕机后所有服务将停止,而副本集在主机宕机后,副本会接管主节点成为主节点,不会出现宕机,无缝切换
分片技术(Shard)
在Mongodb里面存在另一种集群(cluster),就是分片技术,可以满足MongoDB数据量大量增长的需求。
复制所有的写入操作到主节点
延迟的敏感数据会在主节点查询
单个副本集限制在12个节点
当请求量巨大时会出现内存不足。
本地磁盘不足
垂直扩展价格昂贵

- Shard:用于存储实际的数据块,实际生产环境中一个shard server角色可由几台机器组个一个replica set承担,防止主机单点故障
- Config Server:mongod实例,存储了整个 ClusterMetadata,其中包括 chunk信息。
- Query Routers: 前端路由,客户端由此接入,且让整个集群看上去像单一数据库,前端应用可以透明使用。
模拟在单机上启用不同的端口,分片
-- 服务器分布
Shard Server 1:27020
Shard Server 2:27021
Shard Server 3:27022
Shard Server 4:27023
Config Server :27100
Route Process:40000-- 1. 启动Shard Server
mkdir -p /www/mongoDB/shard/s0
mkdir -p /www/mongoDB/shard/s1
mkdir -p /www/mongoDB/shard/s2
mkdir -p /www/mongoDB/shard/s3
mkdir -p /www/mongoDB/shard/log/usr/local/mongoDB/bin/mongod --port 27020 --dbpath=E:/MongoDB/shard/s0 --logpath=E:/MongoDB/shard/log/s0.log --logappend
/usr/local/mongoDB/bin/mongod --port 27021 --dbpath=E:/MongoDB/shard/s1 --logpath=E:/MongoDB/shard/log/s1.log --logappend
/usr/local/mongoDB/bin/mongod --port 27022 --dbpath=E:/MongoDB/shard/s2 --logpath=E:/MongoDB/shard/log/s2.log --logappend
/usr/local/mongoDB/bin/mongod --port 27023 --dbpath=E:/MongoDB/shard/s3 --logpath=E:/MongoDB/shard/log/s3.log --logappend-- 2. 启动Config Server,这里只有一台config server 如果不是一台,添加 `--configsvr` 参数
mkdir -p /www/mongoDB/shard/config
/usr/local/mongoDB/bin/mongod --port 27100 --configsvr --dbpath=E:/MongoDB/shard/config --logpath=E:/MongoDB/shard/log/config.log --logappend-- 3. 启动Route Process,mongos启动参数中,chunkSize这一项是用来指定chunk的大小的,单位是MB,默认大小为200MB./usr/local/mongoDB/bin/mongos --port 40000 --configdb localhost:27100 --logpath=E:/MongoDB/shard/log/route.log --chunkSize 200-- 4. 配置Sharding,使用MongoDB Shell登录到mongos,添加Shard节点,然后按照普通的mongo数据库那样,将数据库连接接入接口40000
/usr/local/mongoDB/bin/mongo admin --port 40000db.runCommand({ addshard:"localhost:27020" })
db.runCommand({ addshard:"localhost:27021" })
db.runCommand({ addshard:"localhost:27022" })
db.runCommand({ addshard:"localhost:27023" })
db.runCommand({ enablesharding:"test" })
db.runCommand({ shardcollection: "users", key: { id:1,time:1}})
-- 或者下面写写法是一样的
sh.addShard("localhost:27020");
sh.addShard("localhost:27021");
sh.addShard("localhost:27022");
sh.addShard("localhost:27023");
sh.enableSharding("test");
-- sh.shardCollection("<database>.<collection>", shard-key-pattern) 按照collection的key来分片
sh.shardCollection("test.users",{"name":1,"_id":1});-- 5. 插入数据,测试分片use testfor(var i=0;i<=100000;i++) {db.users.insert({name:"lucy"+i,age:i});}-- 6. 查看分片信息
sh.status()
安全管理
- 以安全认证模式启动
mongod --auth --dbpath /usr/mongo/data -f /var/mongo.log
使用--auth选项启动mongod进程即可启用认证模式。
或者,也可以修改/etc/mongodb.conf,设置auth=true,重启mongod进程。 - 添加用户
-- 创建用户
db.createUser({  "user": "chrisaiv","pwd": "password","roles": [{ role: "clusterAdmin", db: "admin" },{ role: "readAnyDatabase", db: "admin" },"readWrite"]},{ w: "majority", wtimeout: 5000 }
)测试数据库安全认证: `db.auth("admin", "123456")`
为数据库写数据(同步到磁盘)加锁
db.runCommand({fsync:1,lock:1})
说明:该操作已经对数据库上锁,不允许执行写数据操作,一般在执行数据库备份时有用。查看当前锁状态
db.currentOp()解锁
use local db.$cmd.sys.unlock.findOne()
说明:
执行解锁,结果如下所示:
db.currentOp()
数据备份、恢复与迁移管理
```sql
mongodump -h dbhost -d dbname -c collection -o dbdirectory
mongorestore -h dbhost -d dbname -c collection --directoryperdb dbdirectory
-- 备份全部数据库
mkdir testbak
mongodump
-- 备份指定数据库
mongodump -d pagedb
-- 备份一个数据库中的某个集合
mongodump -d pagedb -c page
-- 恢复全部数据库
cd testbak
mongorestore --drop
-- 恢复某个数据库的数据
cd testbak
mongorestore -d pagedb --drop
-- 恢复某个数据库的某个集合的数据
mongorestore -d pagedb -c page --drop
-- 向MongoDB导入数据
mongoimport -d pagedb -c page --type csv --headerline --drop < csvORtsvFile.csv
-- 将文件csvORtsvFile.csv的数据导入到pagedb数据库的page集合中,使用cvs或tsv文件的列名作为集合的列名。
-- 需要注意的是,使用--headerline选项时,只支持csv和tsv文件。
-- type支持的类型有三个:csv、tsv、json
MongoDB 监控
mongostat
mongotop
mongotop 10   -- 等待时间
mongotop --locks  -- 报告每个数据库的锁的使用
MongoDB 自动增长
MongoDB 没有像 SQL 一样有自动增长的功能, MongoDB 的 _id 是系统自动生成的12字节唯一标识。db.createCollection("counters"),通过db.counters.insert({_id:"productid",sequence_value:0}) 来实现
function getNextSequenceValue(sequenceName){var sequenceDocument = db.counters.findAndModify({query:{_id: sequenceName },update: {$inc:{sequence_value:1}},new:true});return sequenceDocument.sequence_value;
}
db.products.insert({"_id":getNextSequenceValue("productid"),"product_name":"Apple iPhone","category":"mobiles"})db.products.insert({"_id":getNextSequenceValue("productid"),"product_name":"Samsung S3","category":"mobiles"})db.products.find()关于ObjectId
前4个字节表示时间戳
接下来的3个字节是机器标识码
紧接的两个字节由进程id组成(PID)
最后三个字节是随机数。
newObjectId = ObjectId()myObjectId = ObjectId("5349b4ddd2781d08c09890f4")ObjectId("5349b4ddd2781d08c09890f4").getTimestamp()new ObjectId().strGridFS
GridFS 用于存储和恢复那些超过16M(BSON文件限制)的文件(如:图片、音频、视频等)。
GridFS 也是文件存储的一种方式,但是它是存储在MonoDB的集合中。
GridFS 可以更好的存储大于16M的文件。
GridFS 会将大文件对象分割成多个小的chunk(文件片段),一般为256k/个,每个chunk将作为MongoDB的一个文档(document)被存储在chunks集合中。
GridFS 用两个集合来存储一个文件:fs.files与fs.chunks。
 --fs.files
{"filename": "test.txt","chunkSize": NumberInt(261120),"uploadDate": ISODate("2014-04-13T11:32:33.557Z"),"md5": "7b762939321e146569b07f72c62cca4f","length": NumberInt(646)
}-- fs.chunks
{"files_id": ObjectId("534a75d19f54bfec8a2fe44b"),"n": NumberInt(0),"data": "Mongo Binary Data"
}-- 添加文件
mongofiles.exe -d gridfs put song.mp3
db.fs.files.find()--_id 获取区块(chunk)
db.fs.chunks.find({files_id:ObjectId('534a811bf8b4aa4d33fdf94d')})
- 参考
- 参考
转载于:https://www.cnblogs.com/icyy/p/6097933.html
MangoDB 学习指南相关推荐
- AutoCAD.net/Map 3D/AIMS/MapGuide/Civil 3D二次开发学习指南
作者:杜长宇 Autodesk Infrastructure Map Server(AIMS)/MapGuide API二次开发学习指南 Autodesk Infrastructure Map Ser ...
- 推荐10个很棒的AngularJS学习指南
AngularJS 是非常棒的JS框架,能够创建功能强大,动态功能的Web app.AngularJS自2009发布以来,已经广泛应用于Web 开发中.但是对想要学习Angular JS 的人而言,只 ...
- 《CCNP ROUTE 300-101学习指南》——2.6节复习题
本节书摘来自异步社区<CCNP ROUTE 300-101学习指南>一书中的第2章,第2.6节复习题,作者 [美]戴安娜 蒂尔(Diane Teare) , 鲍勃 瓦尚(Bob Vacho ...
- 《CCNA学习指南:Cisco网络设备互连(ICND1)(第4版)》——1.13节生产网络模拟问题1-1...
本节书摘来自异步社区<CCNA学习指南:Cisco网络设备互连(ICND1)(第4版)>一书中的第1章,第1.13节生产网络模拟问题1-1,作者[美]Anthony Sequeira,更多 ...
- 【 Linux 】Vim学习指南
本文转载自:Vim学习指南 你想尽可能快地自学vim(为大家所熟知的最好的编辑器) .这是我学习的方法:从细处入手然后慢慢掌握所有技巧. Vim 六十亿美元的编辑器 设计优良,强壮,快速. 学习vim ...
- HBase学习指南之HBase原理和Shell使用
HBase学习指南之HBase原理和Shell使用 参考资料: 1.https://www.cnblogs.com/nexiyi/p/hbase_shell.html,hbase shell 转载于: ...
- git学习指南_几十张动图告诉你 Git到底是怎么玩的
点击上方"Java学习指南 "关注我 , 加个"星标",每天阅读Java干货文章 来源:机器之心git merge.git rebase.git reset.g ...
- 2019年python课本_2019年Python学习指南
Python是一种用LISP和Java编译的语言,JPthon提供了访问Java图像用户界面的途径,可以让他使用可移植的GUI演示和可移植的http/ftp/html库,因此非常适合作为人工智能语言. ...
- Flutter学习指南:文件、存储和网络
Flutter学习指南 交互.手势和动画 UI布局和控件 熟悉Dart语言 编写第一个应用 开发环境搭建 本篇文章我们先学习 Flutter IO 相关的基础知识,然后在 Flutter学习指南:交互 ...
最新文章
- 仅用10天设计的JavaScript,凭什么成为程序员最受欢迎的编程语言?
- 给VMware虚拟机增加硬盘容量:Linux/Windows系统
- C语言step-by-step(四)(循环控制)
- 【Python基础】嵌套 JSON 秒变 Dataframe!
- Python 简单入门学习笔记
- 中文字符频率统计python_python统计字符串出现最多的字母及其出现次数
- 使用数据库的压测工具super-smack测试mysql数据库性能
- vba copy sheet
- 让这个该死的服务跑起来了~
- 行!人工智能玩大了!程序员:太牛!你怎么看?
- 无烟会议室:CMMI vs. Scrum vs. XP(QCon 2010 感受)
- Maven工程解决pom依赖红色波浪线报错
- vba移动文件_VBA代码如何移动文件,如何复制文件
- Docker学习总结
- 泛型(泛型类、泛型方法、泛型接口、通配符)详解
- 大数据毕业设计题目50例
- 十进制数转8421BCD码
- Ubuntu的共享文件夹
- Xrm.WebApi 多对多关系处理
- 局域网唤醒计算机,电脑远程开机_局域网唤醒电脑 | 茶杯猫
热门文章
- Linux基操那些事儿
- 下载spotify音乐_如何在Amazon Echo上播放Spotify音乐
- EI 检索!第六届机械、控制与计算机工程国际学术会议(ICMCCE 2021)征稿中!
- RIME中州韵输入法引擎学习
- Mac系统安装MySQL连接Navicat(手把手,超详细)
- 动态令牌-(OTP,HOTP,TOTP)-基本原理
- mysql 5.5.28 32位 rpm_CentOS7.4下MySQL5.7.28的RPM方式安装
- 常见的计算机国际会议基本信息汇总(NLP、信息检索、数据挖掘、机器学习方向)
- REHL5上多媒体软件安装
- 我的世界p3服务器文件夹,悟饭游戏厅怪物猎人p3文件夹位置 | 手游网游页游攻略大全...