正则表达式科学计数法_数据科学家的正则表达式
正则表达式科学计数法
As data scientists, diving headlong into huge heaps of data is part of the mission. Sometimes, this includes massive corpuses of text. For instance, suppose we were asked to figure out who’s been emailing whom in the scandal of the Panama Papers — we’d be sifting through 11.5 million documents! We could do that manually and read every last email ourselves, or we could leverage the power of Python. After all, a vital raison d’être of code is to automate tasks.
作为数据科学家,深入研究大量数据是任务的一部分。 有时,这包括大量的文本语料库。 例如,假设我们被要求找出在巴拿Maven件丑闻中谁在向谁发送电子邮件-我们将筛选1150万份文档! 我们可以手动执行此操作并自己阅读每一封最后一封电子邮件,也可以利用Python的功能。 毕竟,至关重要的代码存在理由是使任务自动化。
Even so, coding up a script from scratch requires a lot of time and energy. This is where regular expressions come in. Also known as RE, regex, and regular patterns, they form a compact language that allows us to sort through and analyze text in a jiffy. Regex began in 1956, when Stephen Cole Kleene created it as a notation to describe the McCulloch and Pitts model of the human nervous system. In the 1960s, Ken Thompson added the notation to a text editor similar to Notepad for Windows, and regex has grown to prominence since then.
即使这样,从头开始编写脚本仍需要大量时间和精力。 这就是正则表达式的用处。也称为RE,regex和正则模式,它们形成了一种紧凑的语言,使我们可以轻松地对文本进行排序和分析。 正则表达式始于1956年,当时斯蒂芬·科尔·克莱因(Stephen Cole Kleene)将其创建为一种记法,用来描述人类神经系统的McCulloch和Pitts模型 。 在1960年代,肯·汤普森(Ken Thompson)将这种表示法添加到类似于Windows记事本的文本编辑器中,自此之后,正则表达式逐渐发展起来。
A key characteristic of regex is its economical script. We might even think of it as shortcuts through code. Without it, we would have to craft larger chunks of code for the same purpose.
正则表达式的主要特征是其经济的脚本。 我们甚至可能将其视为通过代码的快捷方式。 没有它,我们将不得不为相同的目的制作更大的代码块。
You need basic Python knowledge for this tutorial. If you understand if-else statements, while and for loops, lists, and dictionaries, you’re set to make the most out of this tutorial. You also need a code editor like Visual Code Studio, PyCharm, or Atom. In addition, while we walk through every line of code so you never feel lost, knowing basic pandas would help. Check out our pandas tutorial if you need a refresher.
您需要本教程的基本Python知识。 如果您了解if-else语句,while和for循环,列表和字典,则可以充分利用本教程。 您还需要一个代码编辑器,例如Visual Code Studio,PyCharm或Atom。 此外,尽管我们遍历每一行代码,以使您永远不会迷路,但了解基本的熊猫会有所帮助。 如果需要复习,请查看我们的熊猫教程 。
By the end of the tutorial, we’ll have some familiarity with how regex works, and be able to use its basic patterns and the functions provided by Python’s re module for string analysis. We’ll also experience how efficiently regex and the pandas library bring order to large, unorganised data sets.
到本教程结束时,我们将对regex的工作原理有所了解,并能够使用其基本模式和Python re模块提供的功能进行字符串分析。 我们还将体验正则表达式和熊猫库如何有效地将大型无序数据集排序。
Now, let’s take a look at what regex can do.
现在,让我们看看正则表达式可以做什么。
We will use the Fraudulent Email Corpus from Kaggle. It contains thousands of phishing emails sent between 1998 and 2007. They’re pretty entertaining to read. You can find the corpus here. We’ll first learn basic regex commands with a single email before we go on to slice and dice the entire Corpus.
我们将使用Kaggle的欺诈电子邮件语料库。 它包含1998年至2007年之间发送的数千个网络钓鱼电子邮件。它们非常有趣,易于阅读。 您可以在这里找到语料库。 首先,我们将用一封电子邮件学习基本的正则表达式命令,然后再对整个语料库进行切片和切块。
fh fh = = openopen (( rr "test_emails.txt""test_emails.txt" , , "r""r" )) .. readread ()
()
Notice that we precede the directory path with an `r`. This technique converts a string into a raw string, which helps to avoid conflicts caused by how some machines read characters, such as backslashes in directory paths on Windows. You may also notice that we’re not using the full Corpus right now. Instead, we’ve manually taken the first few emails out of the Corpus and put it into a test file. This is so that we don’t display all the thousands of lines of results in this tutorial every time we print something for a test. That would make for some annoyance. You can use the full Corpus, or use our [test file](/blog/notebooks/regex/test_emails.txt). Either way, your learning experience will be just fine. Now, suppose we want to find out who the emails are from. We could try raw Python on its own:
注意,我们在目录路径前加一个`r`。 此技术将字符串转换为原始字符串,这有助于避免某些机器读取字符的方式引起的冲突,例如Windows上目录路径中的反斜杠。 您可能还会注意到,我们现在没有使用完整的语料库。 相反,我们手动将前几封电子邮件从语料库中取出,并将其放入测试文件中。 这样一来,我们就不会在每次打印测试内容时都在本教程中显示数千行结果。 那会有些烦人。 您可以使用完整的语料库,也可以使用我们的[测试文件](/ blog / notebooks / regex / test_emails.txt)。 无论哪种方式,您的学习经验都会很好。 现在,假设我们要找出电子邮件的来源。 我们可以自己尝试使用原始Python:
Or, we could use regex:
或者,我们可以使用正则表达式:
import import rerefor for line line in in rere .. findallfindall (( "From:.*""From:.*" , , fhfh ):):printprint (( lineline )
)
We’ll walk through this code. We first import Python’s `re` module. Then, we craft the code. It’s just one line shorter than raw Python in this simple example. However, regex will help your script remain economical as it grows. `re.findall()` returns a list of all instances of the pattern in the string. It’s one of the most popular functions in Python’s built-in `re` module. Let’s break it down. The function takes two arguments in the form of `re.findall(pattern, string)`. Here, `pattern` represents the substring we want to find, and `string` represents the main string we want to find it in. The main string can consist of multiple lines. `.*` are shorthand for string patterns. We’ll explain them in detail very, very soon. Suffice to say for now that they match the name and email address in the `From:` field. Let’s take our first look at some common regex patterns before we dive deeper. ## Common regex patterns The pattern we used with `re.findall()` above contains a fully spelt out string, `”From:”`. This is useful when we know precisely what we’re looking for, right down to the actual letters and whether or not they’re upper or lower case. If we don’t know the exact format of the strings we want, we’d be lost. Fortunately, regex has basic patterns that account for this scenario. Let’s look at the ones we use in this tutorial: * `w` matches alphanumeric characters, which means a-z, A-Z, and 0-9. It also matches the underscore, _, and the dash, -. * `d` matches digits, which means 0-9. * `s` matches whitespace characters, which include the tab, new line, carriage return, and space characters. * `S` matches non-whitespace characters. * `.` matches any character except the new line character `n`. With these regex patterns in hand, you’ll quickly understand our code above as we go on to explain it. ## Working with regex patterns We can now explain the use of `.*` in the line `re.findall(“From:.*”, text)` above. Let’s look at `.` first:
我们将逐步讲解这段代码。 我们首先导入Python的`re`模块。 然后,我们编写代码。 在这个简单的示例中,它仅比原始Python短一行。 但是,正则表达式将帮助您的脚本随着其增长而保持经济性。 re.findall()返回字符串中所有模式实例的列表。 它是Python内置的`re`模块中最受欢迎的功能之一。 让我们分解一下。 该函数接受两个参数,形式为`re.findall(pattern,string)`。 在这里,“ pattern”代表我们要查找的子字符串,而“ string”代表我们要在其中找到的主字符串。主字符串可以包含多行。 “。*”是字符串模式的简写。 我们将很快非常详细地解释它们。 现在可以说它们与“发件人:”字段中的名称和电子邮件地址匹配。 在深入探讨之前,让我们先看一些常见的正则表达式模式。 ##常见的正则表达式模式我们在上面的`re.findall()`中使用的模式包含一个完全拼写的字符串“” From:”。 当我们确切地知道我们要查找的内容(精确到实际字母以及它们是否为大写或小写)时,这很有用。 如果我们不知道我们想要的字符串的确切格式,我们将会迷路。 幸运的是,正则表达式具有解决这种情况的基本模式。 让我们看一下在本教程中使用的那些字符:*`w`匹配字母数字字符,这意味着az,AZ和0-9。 它还与下划线_和破折号-相匹配。 *`d`匹配数字,表示0-9。 *`s`匹配空格字符,包括制表符,换行符,回车符和空格字符。 *`S`匹配非空白字符。 *`.`匹配除换行符`n`以外的任何字符。 掌握了这些正则表达式模式后,您将在继续进行解释的同时Swift了解上面的代码。 ##使用正则表达式模式现在,我们可以在上面的“ re.findall(“ From:。*”,text)”行中说明“。*”的用法。 我们先来看一下`.`:
By adding a `.` next to `From:`, we look for one additional character next to it. Because `.` looks for any character except `n`, it captures the space character, which we cannot see. We can try more dots to verify this.
通过在“发件人:”旁边添加“。”,我们在其旁边查找一个附加字符。 由于`.`查找除`n`以外的任何字符,因此它捕获了我们看不到的空格字符。 我们可以尝试更多的点来验证这一点。
for for line line in in rere .. findallfindall (( "From:...........""From:..........." , , fhfh ):):printprint (( lineline )
)
It looks like adding dots does acquire the rest of the line for us. But, it’s tedious and we don’t know how many dots to add. This is where the asterisk symbol, `*`, plays a very useful role. `*` matches 0 or more instances of a pattern on its left. This means it looks for repeating patterns. When we look for repeating patterns, we say that our search is “greedy.” If we don’t look for repeating patterns, we can call our search “non-greedy” or “lazy.” Let’s construct a greedy search for `.` with `*`.
看起来加点确实为我们获得了线的其余部分。 但是,这很繁琐,我们不知道要添加多少点。 这是星号“ *”扮演非常有用的角色的地方。 “ *”匹配其模式的0个或多个实例。 这意味着它将寻找重复模式。 当我们寻找重复的模式时,我们说搜索是“贪婪的”。 如果我们不寻找重复的模式,则可以将搜索称为“非贪婪”或“懒惰”。 让我们用*构造一个贪婪的搜索。
Because `*` matches zero or more instances of the pattern indicated on its left, and `.` is on its left here, we are able to acquire all the characters in the `From:` field till the end of the line. This prints out the full line with beautifully succinct code. We might even go further and isolate only the name:
因为`*`匹配零个或多个左侧模式的实例,而'.`则位于其左侧,所以我们能够获取From:字段中的所有字符,直到行尾。 这会用精美简洁的代码打印出整行。 我们甚至可以更进一步,仅隔离名称:
match match = = rere .. findallfindall (( "From:.*""From:.*" , , fhfh ))for for line line in in matchmatch ::printprint (( rere .. findallfindall (( "" "" .*.* "" "" , , lineline ))
))
Here, we use `re.findall()` to return a list of lines containing the pattern `”From:.*”` as we’ve done before. We assign it to the variable `match` for neatness. Next, we iterate through the list. In each cycle, we perform `re.findall` again. This time, the function starts by matching the first quotation mark. Notice that we use a backslash next to the first quotation mark. The backslash is a special character used for escaping other special characters. For instance, when we want to use a quotation mark as a string literal instead of a special character, we escape it with a backslash like this: `”`. If we do not escape the pattern above with backslashes, it would become `””.*””`, which the Python interpreter would read as a period and an asterisk between two empty strings. It would produce an error and break the script. Hence, it’s crucial that we escape the quotation marks here with backslashes. After the first quotation mark is matched, `.*` acquires all the characters in the line until the next quotation mark, also escaped in the pattern. This gets us just the name, within quotation marks. Each name is also printed within square brackets because `re.findall` returns matches in a list. What if we want the email address instead?
在这里,我们使用`re.findall()`来返回包含模式“ From:。*”`的行的列表,就像我们之前所做的那样。 为了整洁,我们将其分配给变量match。 接下来,我们遍历列表。 在每个周期中,我们再次执行`re.findall`。 这次,该功能从匹配第一个引号开始。 注意,我们在第一个引号旁边使用了反斜杠。 反斜杠是一个特殊字符,用于转义其他特殊字符。 例如,当我们想使用引号作为字符串文字而不是特殊字符时,我们使用反斜杠将其转义,例如:“”。 如果我们不使用反斜杠转义上面的模式,它将变成“””。*””`,Python解释器将其读为两个空字符串之间的句点和星号。 它将产生错误并破坏脚本。 因此,至关重要的是我们在这里用反斜杠将引号引起来。 匹配第一个引号后,`。*`将获取行中的所有字符,直到下一个引号也被转义为止。 这使我们获得的名称只是带引号的名称。 每个名称也打印在方括号中,因为`re.findall`返回列表中的匹配项。 如果我们想要电子邮件地址怎么办?
Looks simple enough, doesn’t it? Only the pattern is different. Let’s walk through it. Here’s how we match just the front part of the email address:
看起来很简单,不是吗? 只有模式不同。 让我们来看一看。 这是我们仅匹配电子邮件地址的前半部分的方式:
for for line line in in matchmatch ::printprint (( rere .. findallfindall (( "wS*@""wS*@" , , lineline ))
))
Emails always contain an @ symbol, so we start with it. The part of the email before the @ symbol might contain alphanumeric characters, which means `w` is required. However, because some emails contain a period or a dash, that’s not enough. We add `S` to look for non-whitespace characters. But, `wS` will get only two characters. Add `*` to look for repetitions. The front part of the pattern thus looks like this: `wS*@`. Now for the pattern behind the @ symbol:
电子邮件总是包含一个@符号,因此我们从它开始。 电子邮件中@符号前的部分可能包含字母数字字符,这意味着必须使用“ w”。 但是,由于某些电子邮件包含句点或破折号,所以这还不够。 我们添加`S`来查找非空白字符。 但是,`wS`将仅得到两个字符。 添加“ *”以查找重复项。 因此,模式的前部如下所示:`wS * @`。 现在查看@符号后面的模式:
The domain name usually contains alphanumeric characters, periods, and a dash sometimes. This is simple, a `.` would do. To make it greedy, we extend the search with a `*`. This allows us to match any character till the end of the line. If we look at the line closely, we see that each email is encapsulated within angle brackets, . Our pattern, `.*`, includes the closing bracket, >. Let’s remedy it:
域名通常包含字母数字字符,句点和短划线。 这很简单,`.`就可以。 为了使它更贪婪,我们将搜索范围扩展为*。 这使我们可以匹配任何字符直到行尾。 如果我们仔细观察这条线,会发现每封电子邮件都封装在尖括号中。 我们的模式“。*”包括右括号>。 让我们对其进行补救:
for for line line in in matchmatch ::printprint (( rere .. findallfindall (( "@.*w""@.*w" , , lineline ))
))
Email addresses end with an alphanumeric character, so we cap the pattern with `w`. Hence, the rear of the @ symbol is `.*w`, which means that the pattern we want is a group of any type of characters that ends with an alphanumeric character. This excludes >. Our full email address pattern thus looks like this: `wS*@.*w`. That was quite a bit to work through! It does take a short while to get used to regex, but, once you get a handle on its patterns, you’ll be able to code for string analysis a lot faster. Next, we’ll run through some common `re` functions that will be useful when we start reorganizing the Corpus. ## Common regex functions `re.findall()` is undeniably useful, and the `re` module provides more equally convenient functions. These include: – `re.search()` – `re.split()` – `re.sub()` We’ll take a gander at these one by one before using them to bring some order to the unwieldy mass of the Corpus. ### re.search() While `re.findall()` matches all instances of a pattern in a string and returns them in a list, `re.search()` matches the first instance of a pattern in a string, and returns it as a `re` match object.
电子邮件地址以字母数字字符结尾,因此我们用“ w”为模式设置上限。 因此,@符号的后面是`。* w',这意味着我们想要的模式是一组以字母数字字符结尾的任何类型的字符。 不包括>。 因此,我们的完整电子邮件地址格式如下:`wS * @。* w`。 这需要花很多时间才能完成! 适应正则表达式确实需要很短的时间,但是一旦掌握了它的模式,就可以更快地进行字符串分析的编码。 接下来,我们将介绍一些常见的“ re”功能,这些功能在开始重新组织语料库时将非常有用。 ##常用的正则表达式函数`re.findall()`无疑是有用的,`re`模块提供了同样方便的函数。 这些包括:–`re.search()`–`re.split()`–`re.sub()`我们将逐个细细地对待这些东西,然后再使用它们为笨拙的商品带来一些秩序。语料库。 ### re.search()虽然`re.findall()`匹配字符串中模式的所有实例并在列表中返回它们,但是`re.search()`匹配字符串中模式的第一个实例,并将其作为“ re”匹配对象返回。
Like `re.findall()`, `re.search()` also takes two arguments. The first is the pattern to match, and the second is the string to find it in. Here, we’ve assigned the results to the `match` variable for neatness. Because `re.search()` returns a `re` match object, we can’t display the name and email address by printing it directly. Instead, we have to apply the `group()` function to it first. We’ve printed both their types out in the code above. As we can see, `group()` converts the match object into a string. We can also see that printing `match` displays properties beyond the string itself, whereas printing `match.group()` displays only the string. ### re.split() Suppose we need a quick way to get the domain name of the email addresses. We could do it with three regex operations, like so:
像`re.findall()`一样,`re.search()`也有两个参数。 第一个是要匹配的模式,第二个是可以找到它的字符串。在这里,为了简洁起见,我们将结果分配给了match变量。 由于`re.search()`返回`re`匹配对象,因此我们无法通过直接打印来显示名称和电子邮件地址。 相反,我们必须首先对其应用group()函数。 我们已经在上面的代码中打印了这两种类型。 如我们所见,`group()`将match对象转换为字符串。 我们还可以看到,打印`match`显示的属性超出字符串本身,而打印`match.group()`仅显示字符串。 ### re.split()假设我们需要一种快速的方法来获取电子邮件地址的域名。 我们可以通过三个正则表达式操作来做到这一点,就像这样:
address address = = rere .. findallfindall (( "From:.*""From:.*" , , fhfh )
)
for for item item in in addressaddress ::for for line line in in rere .. findallfindall (( "wS*@.*w""wS*@.*w" , , itemitem ):):usernameusername , , domain_name domain_name = = rere .. splitsplit (( "@""@" , , lineline ))printprint (( "" {}{} , ,  {}{} "" .. formatformat (( usernameusername , , domain_namedomain_name ))
))
The first line is familiar. We return a list of strings, each containing the contents of the `From:` field, and assign it to a variable. Next, we iterate through the list to find the email addresses. At the same time, we iterate through the email addresses and use the `re` module’s `split()` function to snip each address in half, with the @ symbol as the delimiter. Finally, we print it. ### re.sub() Another handy `re` function is `re.sub()`. As the function name suggests, it substitutes parts of a string. An example:
第一行很熟悉。 我们返回一个字符串列表,每个字符串包含`From:`字段的内容,并将其分配给变量。 接下来,我们遍历列表以查找电子邮件地址。 同时,我们循环访问电子邮件地址,并使用`re`模块的`split()`函数将每个地址切成两半,用@符号作为分隔符。 最后,我们打印它。 ### re.sub()另一个方便的`re`函数是`re.sub()`。 就像函数名称所暗示的那样,它替换字符串的一部分。 一个例子:
Here, we’ve already seen the tasks on the first and second lines performed before. On the third line, we apply `re.sub()` on `address`, which is the full `From:` field in the email header. `re.sub()` takes three arguments. The first is the substring to substitute, the second is a string we want in its place, and the third is the main string itself. ## Regex with pandas Now that we have the basics of regex in hand, we can try something much more sophisticated. However, we need to combine regex with the pandas Python data analysis library. Pandas is immeasurably useful for organising data into neat tables, also known as dataframes, and for understanding it from different angles. Combined with regex’s economical code, it’s like carving soft butter with an extra sharp knife. Don’t worry if you’ve never used pandas before. We walk through the code every step of the way so you never feel lost. As we mentioned in the introduction, if you’d like to learn the library in detail, do visit our [pandas tutorial](https://www.dataquest.io/blog/pandas-python-tutorial/). We can get the pandas library through [Anaconda](https://docs.continuum.io/anaconda/) or pip. Check out the [installation guide](http://pandas.pydata.org/pandas-docs/stable/install.html) for details. ### Sorting emails with regex and pandas The Corpus is a single text file containing thousands of emails. We’ll use regex and pandas to sort the parts of each email into appropriate categories so that the Corpus can be more easily read or analysed. We’ll sort each email into the following categories: * `sender_name` * `sender_address` * `recipient_address` * `recipient_name` * `date_sent` * `subject` * `email_body` Each of these categories will become a column in our pandas dataframe or table. This is useful because it lets us work on each column on its own. For instance, we could write code to find out which domain names the emails come from, instead of coding to isolate the email addresses from the other parts first. Essentially, categorising the important parts of our data set allows us to write much more concise code to acquire granular information later on. In turn, concise code reduces the number of operations our machines have to do, which speeds up our analytical process, especially when working with massive data sets. ## Preparing the script We’ve played through a simpler script above. Let’s start from scratch so it’s clear how all of it comes together.
在这里,我们已经看到了之前在第一和第二行执行的任务。 第三行,我们在“地址”上应用“ re.sub()”,这是电子邮件标题中完整的“发件人:”字段。 re.sub()具有三个参数。 第一个是要替换的子字符串,第二个是我们要替换的字符串,第三个是主字符串本身。 ##熊猫正则表达式现在我们掌握了正则表达式的基础知识,我们可以尝试更复杂的东西。 但是,我们需要将regex与pandas Python数据分析库结合使用。 熊猫对于将数据组织到整洁的表(也称为数据框)以及从不同角度理解数据中非常有用。 结合正则表达式的经济代码,就像用额外的锋利的刀子雕刻软黄油一样。 如果您以前从未使用过熊猫,请不要担心。 我们遍历代码的每一步,因此您永远不会迷路。 正如我们在简介中提到的那样,如果您想详细了解该库,请访问我们的[pandas教程](https://www.dataquest.io/blog/pandas-python-tutorial/)。 我们可以通过[Anaconda](https://docs.continuum.io/anaconda/)或pip获取熊猫库。 有关详细信息,请查看[安装指南](http://pandas.pydata.org/pandas-docs/stable/install.html)。 ###使用正则表达式和熊猫对电子邮件进行排序Corpus是一个包含数千个电子邮件的单个文本文件。 我们将使用正则表达式和熊猫将每封电子邮件的各个部分分类为适当的类别,以便可以更轻松地阅读或分析语料库。 我们将每封电子邮件分类为以下类别:*`sender_name` *`sender_address` *`recipient_address` *`recipient_name` *`date_sent` *`subject` *`email_body`这些类别中的每一个都将成为我们熊猫的一列。数据框或表。 这很有用,因为它使我们能够独立处理每个列。 例如,我们可以编写代码来查找电子邮件来自哪个域名,而不是先进行编码以将电子邮件地址与其他部分隔离开来。 本质上,对数据集的重要部分进行分类可以使我们编写更简洁的代码,以便以后获取详细信息。 反过来,简洁的代码减少了我们的机器必须执行的操作数量,从而加快了我们的分析过程,尤其是在处理海量数据集时。 ##准备脚本我们已经完成了上面的一个简单脚本。 让我们从头开始,以便清楚地了解所有这些如何结合在一起。
import import re
re
import import pandas pandas as as pd
pd
import import emailemailemails emails = = [][]fh fh = = openopen (( rr "test_emails.txt""test_emails.txt" , , "r""r" )) .. readread ()
()
We first import the `re` and `pandas` modules as standard practice dictates, right at the top of the script. We import Python’s `email` package as well, which is especially needed for the body of the email. The body of the email is rather complicated to work with using regex alone. It might even require enough cleaning up to warrant its own tutorial. So, we use the well-developed `email` package to save some time and let us focus on learning regex. Next, we create an empty list, `emails`, which will store dictionaries. Each dictionary will contain the details of each email. We print the results of our code to the screen frequently to illustrate where code goes right or wrong. However, because there are thousands of emails in the data set, this prints thousands of lines to the screen and clogs up this tutorial page. We certainly don’t want to make you scroll down thousands of lines of results over and over again. Thus, as we’ve done at the beginning of the tutorial, we open and read a shorter version of the Corpus. We prepared it by hand just for the purposes of this tutorial. You can use the actual data set at home though. Every time we run a `print()` function, you’ll print thousands of lines to the screen in barely a few seconds. Now, we begin applying regex.
我们首先按照标准惯例将“ re”和“ pandas”模块导入脚本的顶部。 我们也导入了Python的`email`软件包,这对于电子邮件正文特别需要。 单独使用正则表达式时,电子邮件正文相当复杂。 它甚至可能需要足够的清理才能保证有自己的教程。 因此,我们使用完善的`email`软件包来节省时间,让我们专注于学习正则表达式。 接下来,我们创建一个空列表“ emails”,该列表将存储字典。 每本词典将包含每封电子邮件的详细信息。 我们经常将代码的结果打印到屏幕上,以说明代码正确或错误的位置。 但是,由于数据集中有成千上万的电子邮件,因此这会将数千行打印到屏幕上并阻塞了本教程页面。 我们当然不希望您一遍又一遍地向下滚动数千行结果。 因此,正如本教程开始时所做的那样,我们打开并阅读了较短版本的语料库。 我们只是出于本教程的目的手工编写了它。 您可以在家中使用实际数据集。 每次我们运行`print()`函数时,您都将在几秒钟内将数千行打印到屏幕上。 现在,我们开始应用正则表达式。
We use the `re` module’s split function to split the entire chunk of text in `fh` into a list of separate emails, which we assign to the variable `contents`. This is important because we want to work on the emails one by one, by iterating through the list with a for loop. But, how do we know to split by the string `”From r”`? We know this because we looked into the file before we wrote the script. We didn’t have to peruse the thousands of emails in there. Just the first few, to see what the structure of the data looks like. As it so happens, each email is preceded by the string `”From r”`. We’ve taken a screenshot of what the text file looks like:
我们使用`re`模块的split函数将`fh`中的整个文本块拆分为单独的电子邮件列表,然后将其分配给变量`contents'。 这很重要,因为我们希望通过使用for循环遍历列表来逐一处理电子邮件。 但是,我们如何知道将字符串拆分为“ From r”呢? 我们之所以知道这一点,是因为在编写脚本之前我们已经调查了文件。 我们不必仔细阅读其中的数千封电子邮件。 只是前几个,看看数据的结构是什么样子。 碰巧的是,每封电子邮件都以字符串“ From From”开头。 我们已经截取了文本文件的屏幕截图:
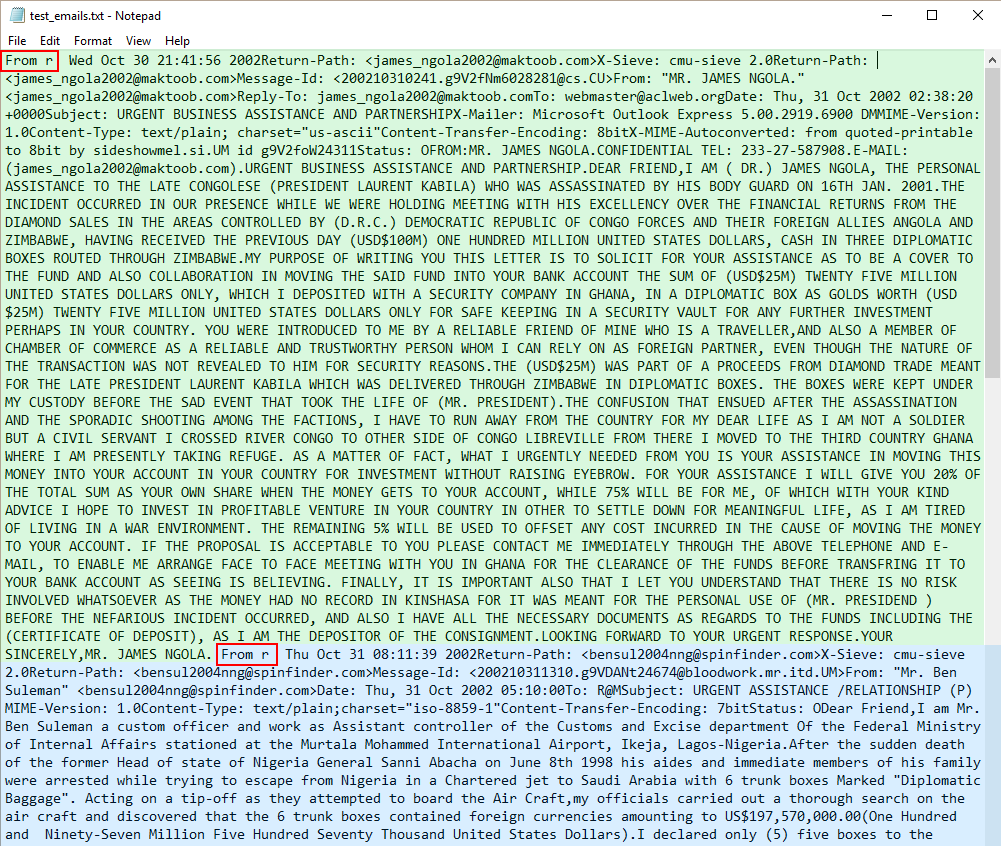
Emails start with “From r”
电子邮件以“ From r”开头
The green block is the first email. The blue block is the second email. As we can see, both emails start with `”From r”`, highlighted with red boxes. One reason we use the Fraudulent Email Corpus in this tutorial is to show that when data is disorganised, unfamiliar, and comes without documentation, we can’t rely solely on code to sort it out. It would require a pair of human eyes. As we’ve just shown, we had to look into the Corpus itself to study its structure. In addition, such data may require a lot of cleaning up, as does this Corpus. For instance, even though we count 3977 emails in this set using the full script we’re about to construct for this tutorial, there are actually more. Some emails are not preceded by `”From r”`, and so are not split into their own. We leave our data set as it is for now, though, lest this tutorial never ends. Notice also that we use `contents.pop(0)` to get rid of the first element in the list. That’s because a `”From r”` string precedes the first email. When that string is split, it produces an empty string at index 0. The script we’re about to write is designed for emails. If it works on an empty string, it might throw up errors. Getting rid of the empty string lets us avoid these errors from breaking our script. ## Getting every name and address with a for loop Next, we work with the emails in the `contents` list.
绿色方框是第一封电子邮件。 蓝色方框是第二封电子邮件。 正如我们所看到的,这两封电子邮件均以“ From r”开头,并以红色框突出显示。 我们在本教程中使用欺诈电子邮件语料库的原因之一是,当数据杂乱无章,不熟悉且没有文档时,我们不能仅仅依靠代码来整理数据。 这将需要一双人眼。 如前所述,我们必须研究语料库本身以研究其结构。 此外,此类数据可能需要大量清理,就像该语料库一样。 例如,即使我们使用本教程将要构建的完整脚本来计算3977封电子邮件,但实际上还有更多。 某些电子邮件之前没有“ From r”发件人,因此也不会拆分成单独的电子邮件。 不过,我们暂时保留数据集,以免本教程永远不会结束。 还要注意,我们使用“ contents.pop(0)”来摆脱列表中的第一个元素。 那是因为在第一个电子邮件之前有一个“ From r”字符串。 拆分该字符串后,它将在索引0处生成一个空字符串。我们将要编写的脚本是为电子邮件设计的。 如果它适用于空字符串,则可能会引发错误。 摆脱空字符串可以避免这些错误破坏脚本。 ##通过for循环获取每个名称和地址接下来,我们将使用“内容”列表中的电子邮件。
for for item item in in contentscontents ::emails_dict emails_dict = = {}
{}
In the code above, we use a `for` loop to iterate through `contents` so we can work with each email in turn. We create a dictionary, `emails_dict`, that will hold all the details of each email, such as the sender’s address and name. In fact, these are the first items we find. This is a three-step process. It begins by finding the `From:` field.
在上面的代码中,我们使用“ for”循环来遍历“ contents”,因此我们可以依次处理每封电子邮件。 我们创建了一个字典“ emails_dict”,其中包含每封电子邮件的所有详细信息,例如发件人的地址和姓名。 实际上,这些是我们发现的第一批物品。 这是一个三步过程。 首先查找“发件人:”字段。
With Step 1, we find the entire `From:` field using the `re.search()` function. The `.` means any character except `n`, and `*` extends it to the end of the line. We then assign this to the variable `sender`. But, data isn’t always straightforward. It can contain surprises. For instance, what if there’s no `From:` field? The script would throw an error and break. We pre-empt errors from this scenario in Step 2.
在第1步中,我们使用`re.search()`函数找到整个`From:`字段。 “。”表示除“ n”以外的任何字符,而“ *”将其扩展到行尾。 然后,我们将其分配给变量`sender`。 但是,数据并不总是那么简单。 它可能包含惊喜。 例如,如果没有“发件人:”字段怎么办? 该脚本将引发错误并中断。 我们在步骤2中避免了这种情况下的错误。
# Step 2: find the email address and name.# Step 2: find the email address and name.if if sender sender is is not not NoneNone ::s_email s_email = = rere .. searchsearch (( rr "wS*@.*w""wS*@.*w" , , sendersender .. groupgroup ())())s_name s_name = = rere .. searchsearch (( rr ":.*<"":.*<" , , sendersender .. groupgroup ())())elseelse ::s_email s_email = = NoneNones_name s_name = = None
None
To avoid errors resulting from missing `From:` fields, we use an `if` statement to check that `sender` isn’t `None`. If it is, we assign `s_email` and `s_name` the value of `None` so that the script can move on instead of breaking unexpectedly. Although this tutorial makes working with regex (and pandas below) look quite straightforward, your actual experience won’t be as clean. For instance, we look like we naturally know to use if-else statements to check for data that might or might not exist. In truth, the reason we know is that we tried the script out again and again on the Corpus while writing it. Writing code is an iterative process. It’s worth noting that even if tutorials seem sensibly linear, actual practice involves a lot more experimentation.
为了避免由于缺少“发件人:”字段而导致的错误,我们使用“ if”语句来检查“发件人”不是“无”。 如果是的话,我们将s_email和s_name的值设置为None,以便脚本可以继续运行而不是意外中断。 尽管本教程使使用正则表达式(和下面的熊猫)的工作看起来非常简单,但是您的实际经验并不那么干净。 例如,我们看起来很自然地会使用if-else语句来检查可能存在或可能不存在的数据。 实际上,我们知道的原因是在编写脚本时我们在语料库上一次又一次地尝试了该脚本。 编写代码是一个反复的过程。 值得注意的是,即使教程看起来是线性的,实际的实践也需要进行更多的实验。
喜欢这篇文章吗? 使用Dataquest学习数据科学! (Enjoying this post? Learn data science with Dataquest!)
- Learn from the comfort of your browser.
- Work with real-life data sets.
- Build a portfolio of projects.
- 从舒适的浏览器中学习。
- 处理实际数据集。
- 建立项目组合。
Start for Free
免费开始
In Step 2, we use a familiar regex pattern from before, `wS*@.*w`, which matches the email address. We use a different tactic for the name. Each name is bounded by the colon, `:`, of the substring `”From:”` on the left, and by the opening angle bracket, `
在步骤2中,我们使用之前熟悉的正则表达式模式“ wS * @。* w”,该模式与电子邮件地址匹配。 我们对名称使用另一种策略。 每个名称都由左侧子字符串“ From:”的冒号“:”和左尖括号“
Note that we’re not using `sender` as the string to search for in each application of `re.search()`. We’ve printed out the types for `sender` and `sender.group()` so that we can see the difference. It looks like `sender` is an `re` match object, which we can’t search with `re.search()`. However, `sender.group()` is a string, precisely what `re.search()` was built for. Let’s see what `s_email` and `s_name` look like.
注意,我们没有在每个re.search()应用程序中使用`sender`作为搜索字符串。 我们已经打印出了`sender`和`sender.group()`的类型,以便我们可以看到不同之处。 看起来“发送者”是“重新”匹配对象,我们无法使用“ re.search()”进行搜索。 但是,“ sender.group()”是一个字符串,恰好是“ re.search()”的构建对象。 让我们看看s_email和s_name是什么样。
printprint (( s_emails_email ))printprint (( s_names_name )
)
Again, we have match objects. Every time we apply `re.search()` to strings, it produces match objects. We have to turn them into string objects. Before we do this, recall that if there is no `From:` field, `sender` would have the value of `None`, and so too would `s_email` and `s_name`. Hence, we have to check for this scenario again so that the script doesn’t break unexpectedly. Let’s see how to construct the code with `s_email` first.
同样,我们有匹配对象。 每当我们对字符串应用`re.search()`时,它都会产生匹配对象。 我们必须将它们变成字符串对象。 在执行此操作之前,请记住,如果没有“发件人:”字段,则“发件人”的值将为“无”,“ s_email”和“ s_name”的值也将为“ none”。 因此,我们必须再次检查这种情况,以便脚本不会意外中断。 让我们首先看看如何用s_email构造代码。
In Step 3A, we use an `if` statement to check that `s_email` is not `None`, otherwise it would throw an error and break the script. Then, we simply convert the `s_email` match object into a string and assign it to the `sender_email` variable. We add this to the `emails_dict` dictionary, which will make it incredibly easy for us to turn the details into a pandas dataframe later on. We do almost exactly the same for `s_name` in Step 3B.
在第3A步中,我们使用`if`语句检查`s_email`不是`None',否则它将引发错误并破坏脚本。 然后,我们简单地将`s_email`匹配对象转换为字符串,并将其分配给`sender_email`变量。 我们将其添加到`emails_dict`字典中,这将使我们日后将细节转换为pandas数据框变得异常容易。 在步骤3B中,我们对`s_name`几乎完全相同。
# Step 3B: remove unwanted substrings, assign to variable.# Step 3B: remove unwanted substrings, assign to variable.if if s_name s_name is is not not NoneNone ::sender_name sender_name = = rere .. subsub (( "s*<""s*<" , , """" , , rere .. subsub (( ":s*"":s*" , , """" , , s_names_name .. groupgroup ()))()))elseelse ::sender_name sender_name = = NoneNone# Add sender's name to dictionary.# Add sender's name to dictionary.emails_dictemails_dict [[ "sender_name""sender_name" ] ] = = sender_name
sender_name
Just as we did before, we first check that `s_name` isn’t `None` in Step 3B. Then, we use the `re` module’s `re.sub()` function twice before assigning the string to a variable. First, we remove the colon and any whitespace characters between it and the name. We do this by substituting `:s*` with an empty string `””`. Then, we remove whitespace characters and the angle bracket on the other side of the name, again substituting it with an empty string. Finally, after assigning the string to `sender_name`, we add it to the dictionary. Let’s check out our results.
就像我们之前所做的一样,我们首先在步骤3B中检查s_name是否不是None。 然后,在将字符串分配给变量之前,我们两次使用`re`模块的`re.sub()`函数。 首先,我们删除冒号和它与名称之间的所有空白字符。 为此,我们用一个空字符串“””替换“:s *”。 然后,我们删除空格字符和名称另一边的尖括号,再次用空字符串替换它。 最后,在将字符串分配给`sender_name`之后,我们将其添加到字典中。 让我们检查一下结果。
Perfect. We’ve isolated the email address and the sender’s name. We’ve also added them to the dictionary, which will come into play soon. Now that we’ve found the sender’s email address and name, we do exactly the same set of steps to acquire the recipient’s email address and name for the dictionary. First, we find the the `To:` field.
完善。 我们已经隔离了电子邮件地址和发件人的姓名。 我们还将它们添加到字典中,该字典将很快投入使用。 现在我们已经找到了发件人的电子邮件地址和名称,我们执行了完全相同的一组步骤来获取字典的收件人的电子邮件地址和名称。 首先,我们找到`To:`字段。
recipient recipient = = rere .. searchsearch (( rr "To:.*""To:.*" , , itemitem )
)
Next, we pre-empt the scenario where `recipient` is `None`.
接下来,我们抢占“收件人”为“无”的情况。
If `recipient` isn’t `None`, we use `re.search()` to find the match object containing the email address and the recipient’s name. Otherwise, we pass `r_email` and `r_name` the value of `None`. Then, we turn the match objects into strings and add them to the dictionary.
如果“收件人”不是“无”,我们将使用“ re.search()”来查找包含电子邮件地址和收件人姓名的匹配对象。 否则,我们将r_email和r_name的值传递为None。 然后,将匹配对象转换为字符串并将其添加到字典中。
if if r_email r_email is is not not NoneNone ::recipient_email recipient_email = = r_emailr_email .. groupgroup ()()elseelse ::recipient_email recipient_email = = NoneNoneemails_dictemails_dict [[ "recipient_email""recipient_email" ] ] = = recipient_emailrecipient_emailif if r_name r_name is is not not NoneNone ::recipient_name recipient_name = = rere .. subsub (( "s*<""s*<" , , """" , , rere .. subsub (( ":s*"":s*" , , """" , , r_namer_name .. groupgroup ()))()))elseelse ::recipient_name recipient_name = = NoneNoneemails_dictemails_dict [[ "recipient_name""recipient_name" ] ] = = recipient_name
recipient_name
Because the structure of the `From:` and `To:` fields are the same, we can use the same code for both. We need to tailor slightly different code for the other fields. ## Getting the date of the email Now for the date the email was sent.
由于From和To字段的结构相同,因此我们可以对两者使用相同的代码。 我们需要为其他字段定制略有不同的代码。 ##获取电子邮件的日期现在确定发送电子邮件的日期。
We acquire the `Date:` field with the same code for the `From:` and `To:` fields. And, just as we do for those two fields, we check that the `Date:` field, assigned to the `date_field` variable, is not `None`.
我们使用与From和To字段相同的代码来获取Date字段。 并且,就像我们对这两个字段所做的一样,我们检查分配给变量“ date_field”的“ Date:”字段是否不是“ None”。
if if date_field date_field is is not not NoneNone ::date date = = rere .. searchsearch (( rr "d+sw+sd+""d+sw+sd+" , , date_fielddate_field .. groupgroup ())())elseelse ::date date = = NoneNoneprintprint (( date_fielddate_field .. groupgroup ())
())
We’ve printed out `date_field.group()` so that we can see the structure of the string more clearly. It includes the day, the date in DD MMM YYYY format, and the time. We want just the date. The code for the date is largely the same as for names and email addresses but simpler. Perhaps the only puzzler here is the regex pattern, `d+sw+sd+`. The date starts with a number. Hence, we use `d` to account for it. However, as the DD part of the date, it could be either one or two digits. Here is where `+` becomes important. In regex, `+` matches 1 or more instances of a pattern on its left. `d+` would thus match the DD part of the date no matter if it is one or two digits. After that, there’s a space. This is accounted for by `s`, which looks for whitespace characters. The month is made up of three alphabetical letters, hence `w+`. Then it hits another space, `s`. The year is made up of numbers, so we use `d+` once more. The full pattern, `d+sw+sd+`, works because it is a precise pattern bounded on both sides by whitespace characters. Next, we do the same check for a value of `None` as before.
我们已经打印出“ date_field.group()”,以便我们可以更清楚地看到字符串的结构。 它包括日期,DD MMM YYYY格式的日期和时间。 我们只想要日期。 日期的代码与姓名和电子邮件地址基本相同,但更简单。 也许唯一的困扰是regex模式,即d + sw + sd +。 日期以数字开头。 因此,我们使用d来解决。 但是,作为日期的DD部分,它可以是一位或两位数字。 这是`+`变得重要的地方。 在正则表达式中,“ +”匹配其模式左侧的1个或多个实例。 因此,“ d +”将匹配日期的DD部分,无论它是一两位数字。 在那之后,有一个空间。 这由`s`解释,它查找空格字符。 该月份由三个字母组成,因此为“ w +”。 然后它碰到另一个空间,`s`。 年份由数字组成,因此我们再次使用`d +`。 完整模式'd + sw + sd +'之所以起作用,是因为它是一个精确的模式,在两侧均以空格字符为边界。 接下来,我们像以前一样检查“ None”的值。
If `date` is not `None`, we turn it from a match object into a string and assign it to the variable `date_sent`. We then insert it into the dictionary. Before we go on, we should note a crucial point. `+` and `*` seem similar but they can produce very different results. Let’s use the date string here as an example.
如果“日期”不是“无”,则将其从匹配对象转换为字符串,并将其分配给变量“ date_sent”。 然后,将其插入字典中。 在继续之前,我们应该注意一个关键点。 “ +”和“ *”看起来很相似,但是它们可以产生非常不同的结果。 让我们以日期字符串为例。
date date = = rere .. searchsearch (( rr "d+sw+sd+""d+sw+sd+" , , date_fielddate_field .. groupgroup ())())# What happens when we use * instead?# What happens when we use * instead?date_star_test date_star_test = = rere .. searchsearch (( rr "d*sw*sd*""d*sw*sd*" , , date_fielddate_field .. groupgroup ())())date_sent date_sent = = datedate .. groupgroup ()()date_star date_star = = date_star_testdate_star_test .. groupgroup ()()printprint (( date_sentdate_sent ))printprint (( date_stardate_star )
)
If we use `*`, we’d be matching zero or more occurrences. `+` matches one or more occurrences. We’ve printed the results for both scenarios. It’s a big difference. As you can see, `+` acquires the full date whereas `*` gets a space and the digit `1`. Next up, the subject line of the email. ## Getting the email subject As before, we use the same code and code structure to acquire the information we need.
如果我们使用*,则将匹配零个或多个匹配项。 “ +”匹配一个或多个事件。 我们已经打印了两种情况的结果。 有很大的不同。 如您所见,“ +”获取完整日期,而“ *”获取空格和数字“ 1”。 接下来,是电子邮件的主题行。 ##获取电子邮件主题与以前一样,我们使用相同的代码和代码结构来获取所需的信息。
We’re becoming more familiar with the use of regex now, aren’t we? It’s largely the same code as before, except that we substitute `”Subject: “` with an empty string to get only the subject itself. ## Getting the body of the email The last item to insert into our dictionary is the body of the email.
现在我们对正则表达式的使用越来越熟悉了,不是吗? 它与以前的代码基本相同,不同之处在于我们用空字符串替换了“ Subject:”以仅获取主题本身。 ##获取电子邮件的正文最后要插入到词典中的项目是电子邮件的正文。
full_email full_email = = emailemail .. message_from_stringmessage_from_string (( itemitem ))body body = = full_emailfull_email .. get_payloadget_payload ()()emails_dictemails_dict [[ "email_body""email_body" ] ] = = body
body
Separating the header from the body of an email is an awfully complicated task, especially when many of the headers are different in one way or another. Consistency is seldom found in raw unorganised data. Luckily for us, the work’s already been done. Python’s `email` package is highly adept at this task. Remember that we’ve already imported the package earlier. Now, we apply its `message_from_string()` function to `item`, to turn the full email into an `email` Message object. A Message object consists of a header and a payload, which correspond to the header and body of an email. Next, we apply its `get_payload()` function on the Message object. This function isolates the body of the email. We assign it to the variable `body`, which we then insert into our `emails_dict` dictionary under the key `”email_body”`. ### Why the email package and not regex for the body You may ask, why use the `email` package rather than regex? This is because there’s no good way to do it with regex at the moment that doesn’t require significant amounts of cleaning up. It would mean another sheet of code that probably deserves its own tutorial. It’s worth checking out how we arrive at decisions like this one. However, we need to understand what square brackets, `[ ]`, mean in regex before we can do that. `[ ]` matches any character placed inside them. For instance, if we want to find `”a”`, `”b”`, or `”c”` in a string, we can use `[abc]` as the pattern. The patterns we discussed above apply as well. `[ws]` would find either alphanumeric or whitespace characters. The exception is `.`, which becomes a literal period within square brackets. Now, we can better understand how we made the decision to use the email package instead. A peek at the data set reveals that email headers stop at the strings `”Status: 0″` or `”Status: R0″`, and end before the string `”From r”` of the next email. We could thus use `Status:s*w*n*[sS]*Fromsr*` to acquire only the email body. `[sS]*` works for large chunks of text, numbers, and punctuation because it searches for either whitespace or non-whitespace characters. Unfortunately, some emails have more than one `”Status:”` string and others don’t contain `”From r”`, which means that we would split the emails into more or less than the number of dictionaries in the emails list. They would not match with the other categories we already have. It becomes problematic when working with pandas. Hence, we elected to leverage the `email` package. ## Create the list of dictionaries Finally, append the dictionary, `emails_dict`, to the `emails` list:
将标题与电子邮件正文分开是一项非常复杂的任务,尤其是当许多标题以一种或另一种方式不同时。 在原始的无组织数据中很少发现一致性。 对我们来说幸运的是,这项工作已经完成。 Python的`email`软件包非常擅长此任务。 请记住,我们之前已经导入了该软件包。 现在,我们将其“ message_from_string()”函数应用于“ item”,以将完整的电子邮件转换为“ email”消息对象。 Message对象由标头和有效负载组成,它们分别对应于电子邮件的标头和正文。 接下来,我们将其get_payload()函数应用于Message对象。 此功能隔离电子邮件的正文。 我们将其分配给变量“ body”,然后将其插入键“ email_body”下的“ emails_dict”字典中。 ###为什么要使用电子邮件软件包而不是正文的正则表达式?您可能会问,为什么要使用`email`软件包而不是正则表达式? 这是因为目前尚无很好的方法来处理正则表达式,因此不需要大量的清理工作。 这意味着另一段代码可能值得拥有自己的教程。 值得检查一下我们如何做出这样的决定。 但是,我们需要先了解正则表达式中的方括号[[]],然后才能执行此操作。 `[]`匹配放置在其中的任何字符。 例如,如果我们要在字符串中找到“ a”,“ b”或“ c”,则可以使用[abc]作为模式。 我们上面讨论的模式也适用。 `[ws]`可以找到字母数字或空格字符。 例外是“。”,它成为方括号内的文字周期。 现在,我们可以更好地了解我们是如何决定使用电子邮件软件包的。 窥视数据集,可以发现电子邮件标题在字符串“ Status:0”或“ Status:R0”处停止,并在下一封电子邮件的字符串“ From r”之前结束。 因此,我们可以使用`Status:s * w * n * [sS] * Fromsr *`仅获取电子邮件正文。 `[sS] *`适用于大块的文本,数字和标点符号,因为它搜索空格或非空格字符。 不幸的是,有些电子邮件具有不止一个“ Status:”字符串,而另一些则不包含“ From From”,这意味着我们会将电子邮件拆分成多于或少于电子邮件列表中词典的数量。 它们与我们已经拥有的其他类别不匹配。 当与熊猫一起工作时,这成为问题。 因此,我们选择使用`email`软件包。 ##创建字典列表最后,将字典emails_dict附加到emails列表:
You might want to print the `emails` list at this point to see how it looks. You can also run `print(len(emails_dict))` to see how many dictionaries, and therefore emails, are in the list. As we mentioned before, the full Corpus contains 3977. Our little test file contains seven. Here’s the code in full:
您可能需要在此时打印“电子邮件”列表,以查看其外观。 您也可以运行`print(len(emails_dict))`来查看列表中有多少本词典,因此还有电子邮件。 如前所述,完整的语料库包含3977。我们的小测试文件包含七个。 这是完整的代码:
import import re
re
import import pandas pandas as as pd
pd
import import emailemailemails emails = = [][]fh fh = = openopen (( rr "test_emails.txt""test_emails.txt" , , "r""r" )) .. readread ()()contents contents = = rere .. splitsplit (( rr "From r""From r" ,, fhfh )
)
contentscontents .. poppop (( 00 ))for for item item in in contentscontents ::emails_dict emails_dict = = {}{}sender sender = = rere .. searchsearch (( rr "From:.*""From:.*" , , itemitem ))if if sender sender is is not not NoneNone ::s_email s_email = = rere .. searchsearch (( rr "wS*@.*w""wS*@.*w" , , sendersender .. groupgroup ())())s_name s_name = = rere .. searchsearch (( rr ":.*<"":.*<" , , sendersender .. groupgroup ())())elseelse ::s_email s_email = = NoneNones_name s_name = = NoneNoneif if s_email s_email is is not not NoneNone ::sender_email sender_email = = s_emails_email .. groupgroup ()()elseelse ::sender_email sender_email = = NoneNoneemails_dictemails_dict [[ "sender_email""sender_email" ] ] = = sender_emailsender_emailif if s_name s_name is is not not NoneNone ::sender_name sender_name = = rere .. subsub (( "s*<""s*<" , , """" , , rere .. subsub (( ":s*"":s*" , , """" , , s_names_name .. groupgroup ()))()))elseelse ::sender_name sender_name = = NoneNoneemails_dictemails_dict [[ "sender_name""sender_name" ] ] = = sender_namesender_namerecipient recipient = = rere .. searchsearch (( rr "To:.*""To:.*" , , itemitem ))if if recipient recipient is is not not NoneNone ::r_email r_email = = rere .. searchsearch (( rr "wS*@.*w""wS*@.*w" , , recipientrecipient .. groupgroup ())())r_name r_name = = rere .. searchsearch (( rr ":.*<"":.*<" , , recipientrecipient .. groupgroup ())())elseelse ::r_email r_email = = NoneNoner_name r_name = = NoneNoneif if r_email r_email is is not not NoneNone ::recipient_email recipient_email = = r_emailr_email .. groupgroup ()()elseelse ::recipient_email recipient_email = = NoneNoneemails_dictemails_dict [[ "recipient_email""recipient_email" ] ] = = recipient_emailrecipient_emailif if r_name r_name is is not not NoneNone ::recipient_name recipient_name = = rere .. subsub (( "s*<""s*<" , , """" , , rere .. subsub (( ":s*"":s*" , , """" , , r_namer_name .. groupgroup ()))()))elseelse ::recipient_name recipient_name = = NoneNoneemails_dictemails_dict [[ "recipient_name""recipient_name" ] ] = = recipient_namerecipient_namedate_field date_field = = rere .. searchsearch (( rr "Date:.*""Date:.*" , , itemitem ))if if date_field date_field is is not not NoneNone ::date date = = rere .. searchsearch (( rr "d+sw+sd+""d+sw+sd+" , , date_fielddate_field .. groupgroup ())())elseelse ::date date = = NoneNoneif if date date is is not not NoneNone ::date_sent date_sent = = datedate .. groupgroup ()()elseelse ::date_sent date_sent = = NoneNoneemails_dictemails_dict [[ "date_sent""date_sent" ] ] = = date_sentdate_sentsubject_field subject_field = = rere .. searchsearch (( rr "Subject: .*""Subject: .*" , , itemitem ))if if subject_field subject_field is is not not NoneNone ::subject subject = = rere .. subsub (( rr "Subject: ""Subject: " , , """" , , subject_fieldsubject_field .. groupgroup ())())elseelse ::subject subject = = NoneNoneemails_dictemails_dict [[ "subject""subject" ] ] = = subjectsubject# "item" substituted with "email content here" so full email not displayed.# "item" substituted with "email content here" so full email not displayed.full_email full_email = = emailemail .. message_from_stringmessage_from_string (( itemitem ))body body = = full_emailfull_email .. get_payloadget_payload ()()emails_dictemails_dict [[ "email_body""email_body" ] ] = = "email body here""email body here"emailsemails .. appendappend (( emails_dictemails_dict ))# Print number of dictionaries, and hence, emails, in the list.
# Print number of dictionaries, and hence, emails, in the list.
printprint (( "Number of emails: " "Number of emails: " + + strstr (( lenlen (( emails_dictemails_dict ))))))printprint (( "" nn "" ))# Print first item in the emails list to see how it looks.
# Print first item in the emails list to see how it looks.
for for keykey , , value value in in emailsemails [[ 00 ]] .. itemsitems ():():printprint (( strstr (( keykey ) ) + + ": " ": " + + strstr (( emailsemails [[ 00 ][][ keykey ]))
]))
We’ve printed out the first item in the `emails` list, and it’s clearly a dictionary with key and value pairs. Because we used a `for` loop, every dictionary has the same keys but different values. We’ve substituted `item` with `”email content here”` so that we don’t print out the entire mass of the email and clog up our screens. If you’re printing this at home using the actual data set, you’ll see the entire email. ## Manipulating data with pandas With dictionaries in a list, we’ve made it infinitely easy for the pandas library to do its job. Each key will become a column title, and each value becomes a row in that column. All we have to do is apply the following code:
我们已经打印出“电子邮件”列表中的第一项,它显然是带有键和值对的字典。 因为我们使用了`for`循环,所以每个字典都具有相同的键但值不同。 我们将“ item”替换为“此处的电子邮件内容”,以便我们不会打印出电子邮件的全部内容,也不会阻塞屏幕。 如果您要使用实际数据集在家打印此文件,则会看到整个电子邮件。 ##使用pandas处理数据通过列表中的字典,我们使pandas库无限轻松地完成其工作。 每个键将成为列标题,每个值将成为该列中的一行。 我们要做的就是应用以下代码:
With this single line, we turn the `emails` list of dictionaries into a dataframe using the pandas `DataFrame()` function. We assign it to a variable too. That’s it. We now have a sophisticated pandas dataframe. This is essentially a neat and clean table containing all the information we’ve extracted from the emails. Let’s look at the first few rows.
在这一行中,我们使用pandas的DataFrame()函数将字典的emails列表转换为数据框。 我们也将其分配给变量。 而已。 现在,我们有了一个复杂的熊猫数据框。 这实际上是一个整洁的表格,其中包含我们从电子邮件中提取的所有信息。 让我们看一下前几行。
pdpd .. DataFrameDataFrame .. headhead (( emails_dfemails_df , , nn == 33 )
)
The `dataframe.head()` function displays just the first few rows rather than the entire data set. It takes one argument. An optional argument allows us to specify how many rows we want displayed. Here, `n=3` lets us view three rows. We can also find precisely what we want. For instance, we can find all the emails sent from a particular domain name. However, let’s learn a new regex pattern to improve our precision in finding the items we want. The pipe symbol, `|`, looks for characters on either side of itself. For instance, `a|b` looks for either `a` or `b`. `|` might seem to do the same as `[ ]`, but they really are different. Suppose we want to match either `”crab”`, `”lobster”`, or `”isopod”`. Using `crab|lobster|isopod` would make more sense than `[crablobsterisopod]`, wouldn’t it? The former would look for each whole word, whereas the latter would look for every single letter. Now, let’s use `|` to find all the emails sent from one or another domain name.
dataframe.head()函数仅显示前几行,而不显示整个数据集。 这需要一个论点。 一个可选参数允许我们指定要显示多少行。 在这里,n = 3让我们查看三行。 我们还可以精确地找到我们想要的东西。 例如,我们可以找到从特定域名发送的所有电子邮件。 但是,让我们学习一种新的正则表达式模式,以提高找到所需项目的精度。 管道符号“ |”在其本身的两侧寻找字符。 例如,“ a | b”寻找“ a”或“ b”。 `|`似乎和`[]`一样,但是它们确实不同。 假设我们要匹配“ crab”,“ lobster”或“ isopod”。 使用`crab | lobster | isopod`比`[crablobsterisopod]`更有意义,不是吗? 前者将寻找每个单词,而后者将寻找每个字母。 现在,让我们使用`|`查找从一个或另一个域名发送的所有电子邮件。
We’ve used a rather lengthy line of code here. Let’s start from the inside out. `emails_df[‘sender_email’]` selects the column labelled `sender_email`. Next, `str.contains(maktoob|spinfinder)` returns `True` if the substring `”maktoob”` or `”spinfinder”` is found in that column. Finally, the outer `emails_df[]` returns a view of the rows where the `sender_email` column contains the target substrings. Nifty! We can view emails from individual cells too. To do this, we go through four steps. In Step 1, we find the index of the row where the `”sender_email”` column contains the string `”@maktoob”`. Notice how we use regex to do this.
我们在这里使用了相当长的代码。 让我们从内而外开始。 emails_df ['sender_email']`选择标有“ sender_email”的列。 接下来,如果在该列中找到子字符串“ maktoob”或“ spinfinder”,则“ str.contains(maktoob | spinfinder)”将返回“ True”。 最后,外部的“ emails_df []”返回行的视图,其中“ sender_email”列包含目标子字符串。 好漂亮! 我们也可以查看来自各个单元的电子邮件。 为此,我们经历了四个步骤。 在步骤1中,我们找到“ sender_email”列包含字符串“ @@ maktoob”的行的索引。 注意我们如何使用正则表达式来执行此操作。
# Step 1: find the index where the "sender_email" column contains "@maktoob.com".
# Step 1: find the index where the "sender_email" column contains "@maktoob.com".
index index = = emails_dfemails_df [[ emails_dfemails_df [[ "sender_email""sender_email" ]] .. strstr .. containscontains (( rr "wS*@maktoob.com""wS*@maktoob.com" )])] .. indexindex .. values
values
In Step 2, we use the index to find the email address, which the `loc[]` method returns as a Series object with several different properties. We print it out below to see what it looks like.
在第2步中,我们使用索引查找电子邮件地址,`loc []`方法将其作为具有几个不同属性的Series对象返回。 我们在下面将其打印出来以查看其外观。
In Step 3, we extract the email address from the Series object as we would items from a list. You can see that its type is now class.
在第3步中,我们将从Series对象中提取电子邮件地址,就像从列表中提取项目一样。 您可以看到它的类型现在是class。
# Step 3: extract the email address, which is at index 0 in the Series object.
# Step 3: extract the email address, which is at index 0 in the Series object.
address_string address_string = = address_Seriesaddress_Series [[ 00 ]
]
printprint (( address_stringaddress_string )
)
printprint (( typetype (( address_stringaddress_string ))
))
Step 4 is where we extract the email body.
步骤4是提取电子邮件正文的位置。
In Step 4, `emails_df[‘sender_email’] == “[email protected]“` finds the row where the `sender_email` column contains the value `”[email protected]“`. Next, `[’email_body’].values` finds the value of the `email_body` column in that same row. Finally, we print out the value. As you can see, we can work with regex in many ways and it plays splendidly with pandas too. ## Other resources Regex has grown tremendously since it leaped from biology to engineering all those years ago. Today, regex is used across different programming languages, where there are some variations beyond its basic patterns. We’ve exercised it in Python in this tutorial but, if you’re so inclined, you can start exploring its differences with this [Stack Overflow](https://stackoverflow.com/questions/4644847/list-of-all-regex-implementations) post. Wikipedia has a [table](https://en.m.wikipedia.org/wiki/Comparison_of_regular_expression_engines#Part_1) comparing the different regex engines. There is a lot more to regex than a tutorial can reveal. For a thorough reference, check out Python’s [documentation](https://docs.python.org/3/library/re.html) for its `re` module. Google has a [quicker reference](https://developers.google.com/edu/python/regular-expressions). If you require data sets to experiment with, [Kaggle](https://www.kaggle.com/) and [StatsModels](http://www.statsmodels.org/devel/datasets/index.html#available-datasets) are useful. Here’s a [Regex cheatsheet](https://github.com/dmikalova/sublime-cheat-sheets/blob/master/cheat-sheets/Regular%20Expressions.cheatsheet). It’s designed for Sublime but still convenient for most. Finally, if you found this tutorial helpful you’ll like Dataquest’s [regex course](https://www.dataquest.io/m/82/regular-expressions/6/counting-simple-matches-in-the-data-set-with-re).
在步骤4中,`emails_df ['sender_email'] ==“ [email protected] ”查找行,其中`sender_email`列包含值'“ [email protected] ”。 接下来,[['email_body']。values`查找同一行中`email_body`列的值。 最后,我们打印出该值。 如您所见,我们可以以多种方式使用正则表达式,并且它在熊猫中也表现出色。 ##其他资源自从多年前从生物学跃入工程学以来,Regex取得了巨大的发展。 如今,正则表达式已在不同的编程语言中使用,其中除了其基本模式以外,还有一些变化。 在本教程中,我们已经在Python中进行了练习,但是如果您愿意,可以通过此[Stack Overflow](https://stackoverflow.com/questions/4644847/list-of-all-正则表达式实现)发布。 Wikipedia的[table](https://en.m.wikipedia.org/wiki/Comparison_of_regular_expression_engines#Part_1)比较了不同的正则表达式引擎。 正则表达式的功能远不止一个教程可以揭示。 要获得全面的参考,请查看Python的[re]模块的[documentation](https://docs.python.org/3/library/re.html)。 Google有[快速参考](https://developers.google.com/edu/python/regular-expressions)。 如果您需要数据集进行试验,请[Kaggle](https://www.kaggle.com/)和[StatsModels](http://www.statsmodels.org/devel/datasets/index.html#available-datasets )很有用。 这是[Regex速查表](https://github.com/dmikalova/sublime-cheat-sheets/blob/master/cheat-sheets/Regular%20Expressions.cheatsheet)。 它是专为Sublime设计的,但对于大多数人来说仍然很方便。 最后,如果您发现本教程对您有所帮助,您将喜欢Dataquest的[regex课程](https://www.dataquest.io/m/82/regular-expressions/6/counting-simple-matches-in-the-data-重新设置)。
翻译自: https://www.pybloggers.com/2017/11/regular-expressions-for-data-scientists/
正则表达式科学计数法
正则表达式科学计数法_数据科学家的正则表达式相关推荐
- 【C/C++】小数的输出 %e的用法 用科学计数法输出数据 %e输出00
小数的输出 %e的用法 %e是printf的格式控制字符,用于指定浮点类型数据使用指数形式输出 浮点类型分为整数部分和小数部分,它们由点号.分隔,例如 0.0.75.0.4.023.0.27.-937 ...
- java导出excel 科学计数法_基于Java将Excel科学计数法解析成数字
需要注意的是一般的科学表达式是 1.8E12 1.8E-12 而在Excel中的科学表达式是 1.8E+12 1.8E-12 我写的科学计数法的正则表达式是 (-?\d+\.?\d*)[Ee]{1}[ ...
- Python不使用科学计数法输出数据的实现方法
文章目录 前言 一.背景介绍 二.例子详解 1.例1 以常规形式输出: 2.例2 以科学计数法形式输出: 总结 前言 本文主要介绍在利用Python进行科学计算的时候,怎么让计算出来的数据不以科学计数 ...
- javascript number转string不用科学计数法_[JavaScript]之数据类型篇
JavaScript共有7种数据类型:number,string,boolean,symbol,undefined,null,object 1. number 整数和浮点数 JavaScript 内部 ...
- 科学计数法_第一章 科学计数法与近似数
生活中,我们常常遇到一些较大的数,如10000000.3450000000等.利用科学计数法表示某些较大的数可以免去一些不必要的麻烦,尤其是遇到一些乘法运算时,如20000000×245000000. ...
- vb 导出整数 科学计数法_可整数组的计数
vb 导出整数 科学计数法 Problem statement: 问题陈述: Given two positive integer n and m, find how many arrays of s ...
- js导出科学计数法_怎么让js不自动转换成科学计数法
2016-03-20 回答 function convertnum(beforecounttest) { //转换之前的科学计数法表示 var tempvalue = befo ...
- java double 不用科学计数法_如何使java中double类型不以科学计数法表示
在java中,把一个double或者BigDecimal的小数转换为字符串时,经常会用科学计数法表示,而我们一般不想使用科学计数法,可以通过: DecimalFormat a = new Decima ...
- sql显示结果不要科学计数法_教你一招丨标准平板菌落计数法
平板菌落计数法,是种统计物品含菌数的有效方法.但许多小伙伴却不能很好地掌握其计算方法,今天,小析姐就为大家整理了标准平板菌落计数法,希望能对小伙伴们有所帮助. 检测食品中微生物数量,一般采用标准平板菌 ...
- matlab怎么取消科学计数法_在MATLAB中更改数据科学计数法
数据显示格式可以由命令: vpa , format 等改变另外还有 fprintf 格式与 C 基本一致, format rational 最接近的有理数, format long 14 位小数, f ...
最新文章
- python numpy.savetxt(),np.column_stack保存(多行/列)数据 保存多维数组
- zabbix安装配置详解(一)
- Fov手术会不会在手术中新增手术边界
- cmd中检测远程的ip和端口是否处于监听状态
- android play gif,Play.gif image in android without using webview
- oracle磁盘组故障组的概念,ASM中理解的问题大家帮忙!!(asm的外部冗余,为什么也有故障组呢?)...
- 我开博客啦,呵呵,欢迎各位朋友。
- ERP通用附件管理功能设计与实现
- genymotion 前端调试
- 用计算机语言拜年,鸡年大吉!22种编程语言大拜年
- MacBook telnet安装
- pythoncad标注教程,AotuCAD国标字体和标注设置技巧图文教程
- 史上最强NLP知识集合:知识结构、发展历程、导师名单
- eventlet绿化和patch原理
- Android之USB打印
- html 颜色代码_HTML颜色(颜色代码)
- python软件安装链接电视_Python爬虫程序:电视剧琅琊榜全集的自动化处理
- login.keyring的问题
- Qt5 QML TreeView currentIndex当前选中项的一些问题
- Linux快速安装Python3.6 - 邱乘屹的个人技术博客