用Heartbeat实现web服务器高可用
用Heartbeat实现web服务器高可用
heartbeat概述:
Heartbeat 项目是 Linux-HA 工程的一个组成部分,它实现了一个高可用集群系统。心跳服务和集群通信是高可用集群的两个关键组件,在 Heartbeat 项目里,由 heartbeat 模块实现了这两个功能。
端口号:694
1)heartbeat的工作原理:
heartbeat最核心的包括两个。部分,心跳监测部分和资源接管部分,心跳监测可以通过网络链路和串口进行,而且支持冗余链路,它们之间相互发送报文来告诉对方自己当前的状态,如果在指定的时间内未收到对方发送的报文,那就认为对方失效,这时需启动资源接管模块来接管运行在对方主机上的资源或者服务
2)高可用集群
高可用集群是指一组通过硬件和软件连接起来的独立计算机,它们在用户面前表现为一个单一系统,在这样的一组计算机系统内部的一个或者多个节点停止工作,服务会从故障节点切换到正常工作的节点上运行,不会引起服务中断。从这个定义可以看出,集群必须检测节点和服务何时失效,何时恢复为可用。这个任务通常由一组被称为“心跳”的代码完成。在Linux-HA里这个功能由一个叫做heartbeat的程序完成
3)Heartbeat-3.X版本以后被分为了4个模块:
1)ClusterLabs-resource-agents-v3.9.2-0-ge261943.tar.gz #集群实验资源代理
2)Heartbeat-3-0-7e3a82377fa8.tar.bz2 # 心跳主程序包
3)pacemaker-1.1.9-1512.el6.src.rpm # 起搏器
4)Reusable-Cluster-Components-glue--glue-1.0.9.tar.bz2 #可重复使用的群集组件
一:实验拓扑
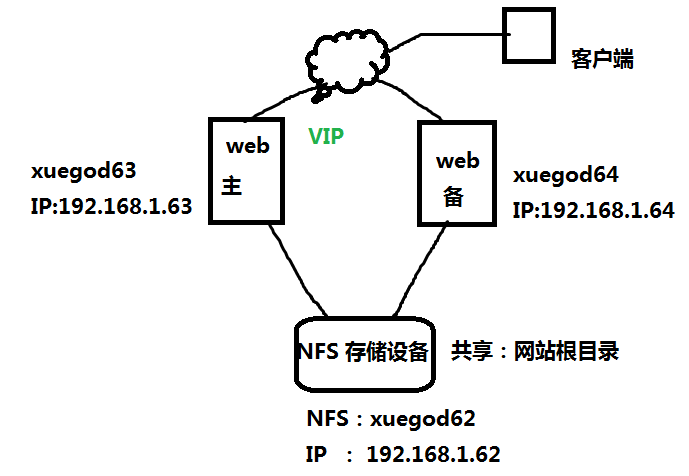
三:实验环境
Note1:WEB主 xuegod63.cn 192.168.1.63
Note2:WEB备 xuegod64.cn 192.168.1.64
NFS xuegod62.cn 192
准备工作:保持两台节点主机一致
1. 修改主机名,永久生效
# vim /etc/sysconfig/network
HOSTNAME=xuegod63.cn
2. 解析
# vim /etc/hosts
192.168.1.63 xuegod63.cn
192.168.1.64 xuegod64.cn
3:时间一致
[root@xuegod63 ~]# date
2016年 10月 30日 星期日 15:18:47 CST
4. 关防火墙,关掉selinux
[root@xuegod63 ~]# service iptables stop
四:实验代码
--------------------------------------------------------------------------------------------------------------
1、配置xuegod62为NFS服务器,提供存储资源
1)安装NFS服务
[root@xuegod62 ~]# rpm -ivh /mnt/Packages/nfs-utils-1.2.3-39.el6.x86_64.rpm
2)编写测试网页并共享
[root@xuegod62 ~]# mkdir /wwwdir
[root@xuegod62 ~]# echo "heartbeat http ha" > /wwwdir/index.html
[root@xuegod62 ~]#vim /etc/exports #编写共享文件及网段
/wwwdir 192.168.1.0/24(rw) :
3)添加共享目录权限:
[root@xuegod62 ~]# chmod 777 -R /wwwdir/
4)开启nfs服务
[root@xuegod62 ~]# service nfs restart
[root@xuegod62 ~]# chkconfig nfs on
2、xuegod63测试nfs 存储挂载并安装httpd web服务器:
1)安装阿帕奇服务并测试NFS文件有没有共享成功
[root@xuegod63 ~]# yum install httpd -y
[root@xuegod63 ~]# showmount -e 192.168.1.62 #查看NFS共享文件
Export list for 192.168.1.62:
/wwwdir 192.168.1.0/24
2)挂载文件夹到本地网站根目录
[root@xuegod63 ~]# mount -t nfs 192.168.1.62:/wwwdir /var/www/html/
[root@xuegod63 ~]#df -h
[root@xuegod63 ~]# service httpd restart
3)测试:
[root@xuegod63 ~]# yum install elinks -y
[root@xuegod63 ~]# elinks --dump 192.168.1.63
heartdeat http ha
httpd//:192.168.1.63
4)卸载资源:后期这些资源通过heartbeat直接加载
[root@xuegod63 ~]# umount /var/www/html/
[root@xuegod63 ~]# service httpd stop
[root@xuegod63 ~]# chkconfig httpd off #后期依靠hartbeat启动
3、xuegod64测试nfs 存储挂载并安装httpd web服务器:
1)安装阿帕奇服务并测试NFS文件有没有共享成功
[root@xuegod64 ~]# yum install httpd -y
[root@xuegod64 ~]# showmount -e 192.168.1.62
Export list for 192.168.1.62:
/wwwdir 192.168.1.0/24
2)挂载文件夹到本地网站根目录
[root@xuegod64 ~]# mount -t nfs 192.168.1.62:/wwwdir /var/www/html/
[root@xuegod64 ~]# service httpd restart
3)测试:
[root@xuegod64 ~]# yum install elinks -y
[root@xuegod64 ~]# elinks --dump 192.168.1.64
heartdeat http ha
4)卸载资源:后期这些资源通过heartbeat直接加载
[root@xuegod64 ~]# umount /var/www/html/
[root@xuegod64 ~]# service httpd stop
[root@xuegod64 ~]# chkconfig httpd off
4、xuegod63安装heartbeat
1)配置好yum源:
[root@xuegod63 ~]# cat /etc/yum.repos.d/rhel-source.repo
[rhel-source]
name=Red Hat Enterprise Linux $releasever - $basearch - Source
baseurl=file:///mnt/
enabled=1
gpgcheck=0
gpgkey=file:///etc/pki/rpm-gpg/RPM-GPG-KEY-redhat-release
#增加以下红色内容
[rhel-ha]
name=Red ha
baseurl=file:///mnt/HighAvailability
enabled=1
gpgcheck=0
gpgkey=file:///etc/pki/rpm-gpg/RPM-GPG-KEY-redhat-release
[root@xuegod63 ~]# yum clean all
[root@xuegod63 ~]#yum list
#说明,如果不配置这个baseurl=file:///mnt/HighAvailabilit ,则无法使用yum安装cluster-glue和resource-agents 。
centos 6.2或5的源里 cluster-glue、resource-agents、pacemaker 都有,就是没有heartbeat。 幸好heartbeat的source里提供了.spec 可以用rpmbuild来生成rpm包。
2)安装heartbeat
[root@xuegod63 ~]# tar -jxvf /root/Heartbeat-3-0-958e11be8686.tar.bz2
[root@xuegod63 ~]# cd Heartbeat-3-0-958e11be8686
[root@xuegod63 Heartbeat-3-0-958e11be8686]# rpmbuild -ba heartbeat-fedora.spec
error: File /root/rpmbuild/SOURCES/heartbeat.tar.bz2: #错误提示。有那个文件或目录,但是会创建好目录
[root@xuegod63 ~]# tar -jxvf /root/Heartbeat-3-0-958e11be8686.tar.bz2 -C /root/rpmbuild/SOURCES/
[root@xuegod63 ~]# cd /root/rpmbuild/SOURCES/
[root@xuegod63 SOURCES]# mv Heartbeat-3-0-958e11be8686 heartbeat #修改名称
[root@xuegod63 SOURCES]# tar -jcvf heartbeat.tar.bz2 heartbeat # 打包,生成的heartbeat.tar.bz2软件包,如果直接使用源码包,生成rpm包时,会报错。
(1)开始生成RPM包
参数:rpmbuild参数 (-bb 只编译二进制rpm包 -bs 只编译源码srpm包 -ba 同时编译二进制和源码srpm包)
[root@xuegod64 ~]# yum install ncurses-devel openssl-devel gettext bison flex mailx cluster-glue-libs-devel docbook-dtds docbook-style-xsl libtool-ltdl-devel -y
[root@xuegod63 SOURCES]# cd heartbeat
[root@xuegod63 heartbeat]# rpmbuild -ba heartbeat-fedora.spec
3):安装软件包
[root@xuegod63 ~]# cd /root/rpmbuild/RPMS/x86_64/
[root@xuegod63 x86_64]# yum install -y cluster-glue resource-agents
[root@xuegod63 x86_64]# rpm -ivh heartbeat-libs-3.0.6-1.el6.x86_64.rpm
[root@xuegod63 x86_64]# rpm -ivh heartbeat-3.0.6-1.el6.x86_64.rpm
5、在xuegod64上安装:heartbeat
1)把软件包和yum配置文件拷贝到xuegod64上:
[root@xuegod63 ~]#cd /root/rpmbuild/RPMS/x86_64/
[root@xuegod63 x86_64]# scp -r ./* 192.168.1.64:/root/
[root@xuegod63 x86_64]#scp /etc/yum.repos.d/rhel-source.repo 192.168.1.64:/etc/yum.repos.d/
[root@xuegod64 ~]#cd /root/rpmbuild/RPMS/x86_64/
[root@xuegod64 x86_64]#yum install ncurses-devel openssl-devel gettext bison flex mailx cluster-glue-libs-devel docbook-dtds docbook-style-xsl -y
[root@xuegod64 x86_64]# rpm -ivh heartbeat-libs-3.0.5-1.el6.x86_64.rpm
[root@xuegod64 x86_64]# yum install -y cluster-glue resource-agents
[root@xuegod64 x86_64]# rpm -ivh heartbeat-3.0.6-1.el6.x86_64.rpm
2)查看生成的用户和组:
[root@xuegod64 ~]# grep haclient /etc/group
haclient:x:489:
[root@xuegod64 ~]# id hacluster
uid=495(hacluster) gid=489(haclient) groups=489(haclient)
6、配置heartbeat :xuegod63 和xuegod64
xuegod63上生成heartbeat配置文件 (将xuegod63配置好的文件拷贝的xuegod64上)
1)拷贝配置文件
[root@xuegod63 ~]# cp /usr/share/doc/heartbeat-3.0.6/ha.cf /etc/ha.d/ #主配置文件
[root@xuegod63 ~]# cp /usr/share/doc/heartbeat-3.0.6/authkeys /etc/ha.d/ #主备节点间通信时所使用的验证文件,保证安全性
[root@xuegod63 ~]# cp /usr/share/doc/heartbeat-3.0.6/haresources /etc/ha.d/ #浮动资源的配置文件
2)设置主备节点间通信时所使用的验证文件,保证安全性。主备节点配置要求一致。
[root@xuegod63 ~]# vim /etc/ha.d/authkeys
改: 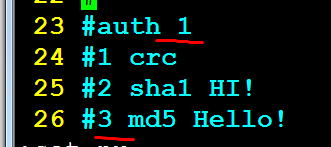
为:
auth 3
#1 crc
#2 sha1 HI!
3 md5 mkkey
[root@xuegod63 ~]# chmod 600 /etc/ha.d/authkeys #此文件权限必须是600,否则启动不成功
注:
/etc/ha.d/authkeys 文件决定了认证密钥。共有三种认证方式:crc,md5,和sha1。
三种认证方法的用途
如果Heartbeat运行于安全网络之上,如本例中的交叉线,可以使用crc,从资源的角度来看,这是代价最低的方法。如果网络并不安全,但也希望降低CPU使用,则使用md5。最后,如果想得到最好的认证,而不考虑CPU使用情况,则使用sha1,它在三者之中最难破解。
3)修改浮动资源,注意添加的顺序,::表示分隔符
[root@xuegod63 ~]#vim /etc/ha.d/haresources
改: 44 #node-name resource1 resource2 ... resourceN
为:
xuegod63.cn IPaddr::192.168.1.200/24/eth0 Filesystem::192.168.1.62:/wwwdir::/var/www/html::nfs httpd
注:
node-name填的是主服务器的主机名。 xuegod64上不需要修改。这样资源默认会加一这个主机上。当xuegod63坏了,xuegod64会再接管。
IPaddr::192.168.1.200/24/eth0 #指定VIP及绑定到哪个网卡上
Filesystem::192.168.1.62:/wwwdir::/var/www/html::nfs #指定要挂载的存储
httpd #指定要启动的服务。这个服务必须是/etc/init.d下,可以通过service去启动或关闭
4)测试
(1)测试: 手动加载VIP 192.168.1.200到eth0上
[root@xuegod63 ~]# ll /etc/ha.d/resource.d/IPaddr
-rwxr-xr-x 1 root root 2273 Jul 29 20:49 /etc/ha.d/resource.d/IPaddr
[root@xuegod63 ~]# /etc/ha.d/resource.d/IPaddr 192.168.1.200/24/eth0 start
IPaddr[7116]: INFO: Success
INFO: Success
查看 VIP:
[root@xuegod63 x86_64]#ip addr #可以看到 eth0:0 的IP为:192.168.1.200
注:在Linux rhel6.2版本中可以使用ifconfig查看,但是在rhel6.5上只能用ip addr 命令来查看到
(2)测试: 手动加载NFS存储资源到/var/www/html
[root@xuegod63 ~]# /etc/ha.d/resource.d/Filesystem 192.168.1.62:/wwwdir /var/www/html/ nfs start
Filesystem[23575]: INFO: Running start for 192.168.1.62:/wwwdir on /var/www/html
Filesystem[23567]: INFO: Success
INFO: Success
[root@xuegod63 ~]# mount
192.168.1.62:/wwwdir on /var/www/html type nfs (rw,vers=4,addr=192.168.1.62,clientaddr=192.168.1.63)
(3)测试: 手动启动httpd服务
[root@xuegod63 ~]# /etc/init.d/httpd restart
[root@xuegod63 ~]# grep /etc/ha.d/ha.cf #默认只开启了以下两行内容
logfacility local0
auto_failback on
注释:
#auto_failback on #为on时,主结点恢复正常后,资源自动转给主结点。 建议设为auto_failback off ,等主节点恢复正常后,在业务不繁忙时,切换回来。防止主节点恢复正常时,回切时,再次影起网络中断。
5)修改配置文件
[root@xuegod63 ~]# vim /etc/ha.d/ha.cf #将配置文件中,以下内容前面的#号去掉
24 debugfile /var/log/ha-debug
29 logfile /var/log/ha-log
48 keepalive 2 #设定heartbeat之间的时间间隔为2秒。
56 deadtime 30 #在30秒后宣布节点死亡。
61 warntime 10 #在日志中发出“late heartbeat“警告之前等待的时间,单位为秒。
71 initdead 120 #在某些系统上,系统启动或重启之后需要经过一段时间网络才能正常工作,该选项用于解决这种情况产生的时间间隔。取值至少为deadtime的两倍。
76 udpport 694 #使用端口694进行bcast和ucast通信。这是默认的,并且在IANA官方注册的端口号。
121 ucast eth0 192.168.1.64 #表示从本机的eth0接口发心跳消息给对方节点,写另一端的IP地址 。 这是单播地址。 xuegod64上改为192.168.1.63 。心跳网卡 ,如果你有两个网卡,可以写成eth1
注:配置文件中 91 #bcast eth0 #表示在eth0接口上使用广播heartbeat(将eth1替换为eth0,eth2,或者您使用的仸何接口)。
157 auto_failback on #当auto_failback设置为on时,一旦主节点重新恢复联机,将从从节点取回所有资源。若该选项设置为off,主节点便不能重新获得资源。
211 node xuegod63.cn #该选项是必须配置的。集群中机器的主机名,与“uname –n”的输出相同。
212 node xuegod64.cn
修改以下内容
改:223 #ping 10.10.10.254
为:223 ping 192.168.1.1 #通过ping命令来实现仲裁
改:256 #respawn hacluster /usr/lib/heartbeat/ipfail
为:256 respawn hacluster /usr/libexec/heartbeat/ipfail
改:262 #apiauth ipfail gid=haclient uid=hacluster
为: apiauth ipfail gid=haclient uid=hacluster
到此修改结束,保存,退出。
7、xuegod64上配置heartbeat
1)复制配置文件到xuegod64上:
root@xuegod63 ~]# cd /etc/ha.d/
[root@xuegod63 ha.d]# scp ha.cf haresources authkeys 192.168.1.64:/etc/ha.d/
[root@xuegod64 ~]# chmod 600 /etc/ha.d/authkeys #此文件必须是600否则heartbeat启动不成功
#修改单播地址
[root@xuegod64 ~]# vim /etc/ha.d/ha.cf
改: ucast eth0 192.168.1.64
为: ucast eth0 192.168.1.63
2)两机器启动heartbeat服务:
[root@xuegod63 ~]# /etc/init.d/heartbeat restart
[root@xuegod64 ~]# /etc/init.d/heartbeat restart
#等待资源接管完成。 takeover接管。 当启动停留在这个界面时,xuegod64会接管所有浮动资源。等下面启动成功时,xuegod64会释放资源,浮云资源,再次加载。
3)在xuegod63查看集群资源:
[root@xuegod63 ~]# ifconfig
eth0:0 Link encap:Ethernet HWaddr 00:0C:29:12:EC:1E
inet addr:192.168.1.200 Bcast:192.168.1.255 Mask:255.255.255.0
[root@xuegod63 ~]# df -h
/dev/sr0 3.4G 3.4G 0 100% /mnt
192.168.1.62:/wwwdir 9.7G 3.4G 5.8G 37% /var/www/html
[root@xuegod63 ~]# /etc/init.d/httpd status
httpd (pid 23641) is running...
4)xuegod64上查看,没有任何浮云资源:
[root@xuegod64 ~]# ifconfig
[root@xuegod64 ~]# df -h
[root@xuegod63 ~]# /etc/init.d/httpd status
httpd is stopped
8、测试:
两台主机都开启时,所有请求到转到了xuegod63上。访问:http://192.168.1.200/ 正常 。当掉xuegod63,关闭网卡,等30秒钟,所有请求都转到xuegod64上了
1)主挂掉,验证备
[root@xuegod63 ha.d]# ifdown eth0
[root@xuegod64 ~]# ifconfig
eth0:0 Link encap:Ethernet HWaddr 00:0C:29:48:80:95
inet addr:192.168.1.200 Bcast:192.168.1.255 Mask:255.255.255.0
[root@xuegod64 ~]# df -h
192.168.1.62:/wwwdir 9.7G 3.4G 5.8G 37% /var/www/html
[root@xuegod64 ~]# service httpd status
httpd (pid 6375) is running...
2)主再次复活,验证抢占功能---xuegod63上把eth0网卡再次开启:
[root@xuegod63 ~]# ifup eth0
等30秒后,查看:
[root@xuegod63 ~]# df -h
192.168.1.62:/wwwdir 9.7G 3.4G 5.8G 37% /var/www/html #已经加载了httpd资源
[root@xuegod63 ~]# service httpd status
httpd (pid 27097) is running...
[root@xuegod63 ~]# ifconfig
eth0:0 Link encap:Ethernet HWaddr 00:0C:29:12:EC:1E
inet addr:192.168.1.200 Bcast:192.168.1.255 Mask:255.255.255.0
资源已经回切过来。
3)在xuegod64上查看释放资料:
[root@xuegod64 ~]# ifconfig #查看不到eth0:0 192.168.1.200 这个IP地址
[root@xuegod64 ~]# df -h
Filesystem Size Used Avail Use% Mounted on
/dev/sda2 9.7G 3.7G 5.5G 41% /
tmpfs 569M 0 569M 0% /dev/shm
/dev/sda1 194M 28M 157M 15% /boot
/dev/sr0 3.4G 3.4G 0 100% /mnt
[root@xuegod64 ~]# service httpd status
httpd is stopped
转载于:https://blog.51cto.com/blxueyuan/1927500
用Heartbeat实现web服务器高可用相关推荐
- lvs服务器需要开启web服务么_Nginx+Keepalived实现web服务器高可用
1.Nginx 业务背景 现公司需求快速搭建web服务器,对外提供给用户web服务. 需求拆分 需要基于http协议的软件,搭建服务实现 介绍 常见用法: 1) web服务器软件 httpd http ...
- Heartbeat+httpd+NFS 实现高可用的Web服务器
一.环境 系统:CentOS 6.4x64位最小化安装 nfs:192.168.3.31 node1:192.168.3.32 node2:192.168.3.33 vip:192.168.3.34 ...
- Mysql+Heartbeat+Drbd生产环境高可用部署若干问题解惑
Mysql+Heartbeat+Drbd生产环境高可用部署若干问题解惑: ############################################################ # ...
- 游戏服务器高性能负载均衡,游戏服务器高可用负载均衡
游戏服务器高可用负载均衡 内容精选 换一换 公有云提供弹性公网IP(EIP).NAT网关.弹性负载均衡(ELB)等方式连接公网.EIPEIP提供独立的公网IP资源,包括公网IP地址与公网出口带宽服务. ...
- shell解决服务器高可用
标签:shell 高可用 arping 原创作品,允许转载,转载时请务必以超链接形式标明文章 原始出处 .作者信息和本声明.否则将追究法律责任.http://president.blog.51cto. ...
- corosync/openais+pacemaker+drbd+web实现web服务高可用集群
1. drbd简介: Distributed Replicated Block Device(DRBD)是一个用软件实现的.无共享的.服务器之间镜像块设备内容的存储复制解决方案. 数据镜像:实时.透明 ...
- 大型网站系统架构实践(五)深入探讨web应用高可用方案
从上篇文章到这篇文章,中间用了一段时间准备,主要是想把东西讲透,同时希望大家给与一些批评和建议,这样我才能有所进步,也希望喜欢我文章的朋友,给个赞,这样我才能更有激情,呵呵. 由于本篇要写的内容有点多 ...
- corosync/openais+pacemaker+drbd+web实现高可用群集
拓扑图: 配置前提: 1.节点的名字必须跟uname -n的名字相同,而且两个主机必须能通过主机名来访问.尽量不通过DNS来访问.时钟时间保持一样. 2.双方的通信要必须通过SSL的无障碍通信机制 3 ...
- CentOS 6.4 Heartbeat+mysql+nfs实现高可用的mysql集群
一.Heartbeat网络架构 二.准备工作 1.操作系统 CentOS 6.4 X86-64 最小化安装 由于用源码编译安装heartbeat一直没有通过,所以没办法只能采用yum安装. heart ...
最新文章
- python不能创建新变量_Python之变量的创建过程!
- 鸿蒙计划什么时候开始,华为鸿蒙计划被曝!研究者是2020应届生,网友:初出茅庐凭啥...
- Hibernate学习之hibernate状态
- 在3D世界中创建不同的相机模式——检查对象是否可见
- C 预处理器 —— __DATE__ # __TIME__ # __FILE__ # __LINE__ # __STDC__ (预处理宏的使用 —— 打印debug信息:)
- 什么情况下应不建或少建索引
- windows下tensorflow安装
- 爬数据html解析,jsoup网络爬取数据HTML解析
- linux中original_如何在 Linux 中整理磁盘碎片
- CentOS 7 安装方式汇总
- 在JPA中处理Java的LocalDateTime
- ubuntun系统mysql数据库同步_Canal 实现 Mysql数据库实时数据同步
- Excel VBA获取当文件下级子目录或目录中文件
- 程序员,请远离拖延症!
- linux使用中的问题 ---(Cannot find a valid baseurl for repo: base)
- SAPUI5教程——URLHelper的使用技巧
- 【C语言】三子棋游戏详解
- php怎样截取图片部分,PHP截取指定图片大小的方法
- CSS3鼠标悬停360度旋转效果
- 数据采集 - 获取【码市】最新发布需求,并实时通知用户 案例二