DHTML乌托邦:使用JavaScript和DOM的现代Web设计
动态HTML(简称DHTML)是一组Web开发技术的名称,这些技术主要用于具有非平凡用户输入功能的Web页面。 DHTML意味着处理HTML文档的文档对象模型,在样式信息中摆弄CSS指令,并使用客户端JavaScript脚本将所有内容绑定在一起。
DHTML乌托邦:使用JavaScript和DOM的现代Web设计
此摘录摘自SitePoint的新版本DHTML Utopia:使用JavaScript和DOM的现代Web设计 。 该标题包含300多页的DHTML技术,这些技术可在不牺牲可用性或不遵守标准的情况下丰富用户体验。
作者,SitePoint自己的Stuart Langridge,利用Web标准,并在构建引人入胜的,可用的和交互式的DHTML应用程序时,将代码与标记分开,从而优雅地降级。
DHTML乌托邦:使用JavaScript和DOM进行现代Web设计探讨了文档对象模型,远程脚本,Ajax,XML-RPC和xPath等技术,向您展示了如何为自己的Web项目创建应用程序。 建立自己的符合标准的分层导航菜单; 创建动画工具提示; 使用正则表达式验证表单数据,并向用户提供动态反馈; 构造一个AJAX注册表单,该表单可以让用户知道他们选择的用户名是否已被使用,而无需自己提交表单。
本书提供了无数的DHTML应用程序,这些应用程序将改善您的网站在支持标准的浏览器中的交互性,并在不支持标准的浏览器中优雅地降级。
前四章应该让您了解操作。 要查找有关该书的更多信息,请访问该书的页面 ,或查看整个出版物的内容 。 与往常一样,如果您愿意,可以将本摘录下载为PDF 。 现在,转到第1章。
第1章DHTML技术
在本介绍性部分中,我将简要概述您需要了解的一些事项:构成DHTML网站的构建基块。 如果需要刷新内存,您会发现它很有用。 如果您已经知道所有这些详细信息,则可能还是要翻阅本章。 您甚至可能会对其中的某些内容感到有些惊讶。 在接下来的页面中,我们将了解DHTML实际上是针对您的内容的正确HTML,针对您的设计的级联样式表以及针对交互性的JavaScript的组合。 将这些技术混合在一起可以炖得很清淡或自助餐很丰盛。 这一切都是烹饪艺术,所以让我们开始为那些锅碗瓢盆嘎嘎作响吧!
HTML起点
网站是用HTML编写的。 如果您正在阅读本书,您几乎可以肯定会知道HTML是什么,并且至少会对HTML有一定的经验。 对于成功的DHTML增强网站,至关重要的是HTML是两件事情:有效和语义。 这些需求可能需要改变您以前编写HTML的经验。 与让您的首选工具为您编写HTML相比,它们可能还需要其他方法。
升级到有效HTML
HTML建议中列出了一组特定的规则,规定了应如何编写HTML。 符合这些规则的HTML被称为“有效”。 您的HTML必须有效,以便可以用作构建DHTML增强功能的基础。 虽然规则集非常复杂,但是您可以通过遵循一些简单的准则来确保HTML有效。
正确嵌套标签
不要让标签彼此“交叉”。 例如,没有看起来如下所示的HTML代码:
Here is some <strong>bold and <em>italic</strong> text</em>.在这里, <strong>和<em>标签相互交叉; 它们被错误地嵌套。 嵌套对于正确使用DHTML非常重要。 在本书的后续章节中,我们将研究DOM树,并且不正确的嵌套导致问题的原因将变得更加清楚。 现在,只需记住,如果您跨标签,每个浏览器将根据不同的规则(而不是根据标准)以不同的方式解释您的代码。 除非您正确执行此操作,否则您希望能够跨浏览器控制页面外观和功能的任何希望都会消失。
关闭容器标签
包含其他项目的诸如<strong>或<p>标签应始终使用</strong>或</p>或适当的结束标签关闭。 重要的是要知道哪些标签包含东西(例如文本或其他标签),并确保将其关闭。 例如, <p>并不意味着“在此处插入一个段落”,而是“一个段落在这里开始”,而应与</p>配对,“该段落在这里结束”。 (知道容器标记用途的人会意识到HTML 4.01实际上并不需要关闭所有容器标记(尽管XHTML仍然要求关闭)。但是,关闭容器标记绝不是无效的,尽管有时这样做是无效的。仅关闭所有内容比记住允许您保持打开状态的标记要容易得多。)同样的逻辑也适用于<li>标记。
一律使用文件类型
文档类型(或DOCTYPE)描述了已使用的HTML的方言。 有几种不同的选择。 在本书中,我们将使用称为HTML 4.01 Strict的方言。 (如果您正在考虑“但是我想使用XHTML!”,那么我敢打赌,您已经对DOCTYPE有足够的了解,可以正确使用它们了。)您的DOCTYPE应该显示在每个HTML页面的顶部,看起来应该像这样:
<!DOCTYPE HTML PUBLIC "-//W3C//DTD HTML 4.01//EN" "http://www.w3.org/TR/html4/strict.dtd">这些信息可以在一行中键入,或者与后一个换行符EN"别担心,就目前而言,这意味着什么:。只是一定要放置在每个页面顶部的文章解决您的发布在A List Apart上的“ 具有正确DOCTYPE!”的站点列出了您可能要使用的所有DOCTYPE,以及为什么要使用它们的原因。我一直访问该文章,以剪切并粘贴我需要的DOCTYPE! !
验证您的页面
页面创建最重要的步骤是检查HTML是否有效。 您可以下载许多工具,并在自己的计算机上运行这些工具来测试代码的有效性-一些HTML编辑器甚至内置了此类工具-或者您可以使用许多在线验证器之一,其中最常见的是W3C自己的验证器 。 验证程序将告诉您如何调整HTML以使其与DHTML技术兼容。 构成有效HTML的最终参考是HTML建议。 它是复杂且详细的,但是如果您对应如何编写HTML或是否确实存在标签有任何疑问,则可以在此处找到答案。 如上所述,浏览器依赖于描述如何解释经过验证的HTML的标准。 但是,没有标准来描述如何解释无效的HTML。 每个浏览器制造商都建立了自己的规则来填补这一空白。 试图理解这些规则中的每一个都是困难且费力的,并且您的时间会更好。 坚持使用有效的HTML意味着您发现的任何问题都被认为是该浏览器中的错误-您可能可以解决的错误。 因此,使用有效的HTML可让您有更多的时间陪伴家人,玩斯诺克台球等,如果您问我,这是这样做的一个很好的理由。
加强语义HTML
除了其有效性外,您的HTML还应该是语义性的,而不是表示性的。 这意味着您应该使用HTML标记来描述文档中元素的性质,而不是该元素的外观。 因此,如果您的意思是“在此处输入空白行”,请不要使用<p>标记。 用它来表示“一个段落从这里开始”(并在该段落的末尾放置一个</p> )。 不要使用<blockquote>来表示“缩进下一段文本”。 用它来表示“此块是引号”。 如果您以这种方式标记HTML,则会发现将DHTML技术应用到此行中更加容易。 这种方法称为语义标记 -一种奇特的说法,“使用标签描述含义”。
让我们看一些示例代码片段。 首先,假设您的网站有指向不同部分的链接列表。 该列表应根据其内容进行标记:一个列表。 不要将其设置为由<br>标记分隔的<a>标记集; 它是一个列表,因此应使用<ul>和<li>标签对其进行标记。 它可能看起来像这样:
<ul> <li><a href="index.html">Home</a></li> <li><a href="about.html">About this Website</a></li> <li><a href="email.html">Contact details</a></li>
</ul>您会发现自己经常使用<ul>标记。 网站中的许多项目实际上都是列表:面包屑跟踪是链接列表,菜单结构是链接列表列表,照片库是图像列表。
同样,如果您的列表包含与注释相关联的项目,则可能应将其标记为定义列表:
<dl> <dt><a href="index.html">Home</a></dt> <dd>Back to the home page</dd> <dt><a href="about.html">About this Website</a></dt> <dd>Why this site exists, how it was set up, and who did it </dd> <dt><a href="email.html">Contact details</a></dt> <dd>Getting in contact with the Webmaster: email addresses and phone numbers</dd>
</dl>
请记住:页面的外观并不真正相关。 重要的是,页面中的信息以描述其内容的方式进行标记。 HTML中有很多标签; 不要将它们视为在页面上布置信息的方法,而是将其定义为信息的含义。
如果您不使用HTML来控制页面的显示,如何使它们看起来像您希望的那样? 这就是层叠样式表的用武之地。
添加CSS
级联样式表(CSS)是一种允许您描述HTML表示形式的技术。 本质上,它允许您声明页面上每个元素的外观。 元素是一段HTML,代表一件事:一个段落,一个标题,一个图像,一个列表。 元素通常对应于特定标签及其内容。 使用CSS样式时,DHTML页面可以独立处理页面的外观和内容。 这是一个方便而干净的分隔。 如果您想看起来不错,就需要学习如何打扮, 并定期去健身房!
一个简单的CSS示例
假设您希望主页标题( <h1>标记)以大的红色居中文本显示。 您应该在样式表中指定以下内容:
h1 { font-size: 300%; color: #FF0000; text-align: center;
}
有关CSS入门教程的一些链接,请参阅本章末尾的“更多阅读”部分,如果以上几行对您没有太大的意义,则应该有所帮助。
在应用这些样式之前和之后,这是一个简单的HTML页面:
图1.1。 那个HTML的风格!
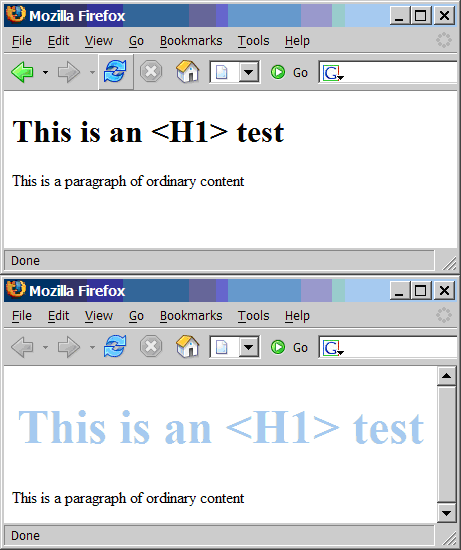
这里的关键点是从HTML中删除表示方面,并将其放入样式表中。 例如,如果您通过在HTML中放置<font>标记来使页面标题变大,那么您需要将这些标记粘贴到使用标题的每个页面中。 通过使HTML语义化并将页面的表示形式移动到CSS中,您可以通过一个样式表来控制整个网站标题的外观。 这使您作为网站开发人员的工作更加轻松。
当然,这并不那么容易。 尽管CSS的完整定义使您可以做一些相当令人惊奇的事情,并在很大程度上控制页面的显示,但是并不是每个浏览器都支持CSS所提供的所有功能。
为了了解浏览器对CSS支持的差异,您需要知道CSS可以做什么。 浏览器不兼容有两种:给定浏览器不实现的功能和不正确实现的功能。 有时,浏览器也会添加自己的“特殊功能”,但是我们不会担心本书中的那些功能。
缺少的实现相对容易处理:如果您希望CSS在无法实现它们的浏览器中运行,请不要依赖这些规则。 这可能会很痛苦,尤其是因为世界上最常用的浏览器Windows版Internet Explorer在CSS支持方面存在一些严重漏洞; 但是,这种“解决方案”通常是必要的折衷方案。 了解可以使用和不使用哪些规则是CSS专家体系的第一步。
执行不力的标准是一个更大的问题。 在这种情况下,浏览器会出错。 CSS专家的另一个步骤是确切地了解每个浏览器的错误之处,以及如何解决这些错误。 不过,您不需要这些知识就可以开始学习:随着时间的流逝,您会逐渐掌握它。 通常使用CSS hacks来解决不同浏览器中的CSS bug。 这些黑客利用浏览器CSS解析器中的错误为它提供特定的样式表指令,以解决其标准实施不力的问题。 在Web的各个位置,针对每个浏览器记录了各种各样的CSS hack。 有关更多信息,请参见“进一步阅读”部分。
学会理解并适应各种浏览器中CSS处理的各种变化是有效使用CSS所需的工作的一部分。 尽管可能需要做很多工作,但是只有通过复杂使用该技术,许多CSS错误才会变得明显。 大多数CSS可以在各种平台和浏览器上完美处理,而无需黑客或复杂的测试。
尽管CSS功能强大,但并不能给我们真正的灵活性。 CSS的功能一直在增加,并且越来越多的“交互式”功能不断添加到CSS规范中。 但是,它并非旨在构建真正的交互式网站。 为此,我们需要DHTML的最后一个构建块:JavaScript。
添加JavaScript
JavaScript是一种简单但功能强大的编程语言。 它用于向您的网站添加动态行为-DHTML中的D。 HTML定义了页面的结构,CSS定义了页面的外观,但是动作,与页面交互时发生的事情(单击按钮,拖动图像或移动鼠标)在JavaScript中定义。 JavaScript与下一章所述的文档对象模型一起使用,可将动作附加到不同的事件(鼠标悬停,拖动和单击)。 我们不会在这里详细描述所有复杂的JavaScript语法-如果需要,“深入阅读”部分提供了一些JavaScript教程的链接。
一个简单的JavaScript示例
这是一段简单的JavaScript,可在用户跳出字段时将文本字段的值转换为大写。 首先,让我们看一下旧的,糟糕的方法:
范例1.1。 oldlisteners.html (节选)
<input id="street" type="text" onchange="this.value = this.value.toUpperCase();">在本书中,我们将推荐一种更现代的技术。 首先,HTML:
范例1.2。 newlisteners.html (节选)
<input id="street" type="text">其次,JavaScript,通常位于页面的<head>部分:
示例1.3 newlisteners.html (节选)
<script type="text/javascript">
function uppercaseListener() { this.value = this.value.toUpperCase();
}

function installListeners() { var element = document.getElementById('street'); element.addEventListener('change', uppercaseListener, false);
}

window.addEventListener('load', installListeners, false);
</script>
第一个功能完成转换文本的工作。 第二个功能确保第一个功能连接到正确的HTML标签。 页面完全加载后,最后一行执行此连接。 尽管这意味着更多的代码,但是请注意它如何保持HTML内容的简洁明了。 在以后的章节中,我们将大量探讨这种方法。 现在不用担心太多的机制了–有足够的时间了!
获取一些工具!
良好的JavaScript开发环境使JavaScript的使用比以前容易得多。 在Internet Explorer(IE)中测试页面可能会有一些不足之处。 如果您的页面生成JavaScript错误(在构建过程中会一直发生!),则IE在诊断它们的位置或位置方面可能不是很有帮助。 用于JavaScript调试的最有用但最简单的工具是Mozilla或Mozilla Firefox中的JavaScript Console。 该控制台将清楚显示页面上发生JavaScript错误的位置以及该错误是什么。 在构建JavaScript脚本时,这是一个宝贵的工具。 Mozilla Firefox几乎可以在所有平台上运行,下载量不是很大。 与Internet Explorer相比,它还为CSS提供了更好的支持,并且应该成为开发工具包的一部分。 除此之外,Mozilla中还有一个JavaScript调试器,名为Venkman。 如果您是那种使用其他语言处理大型项目并习惯于调试器的编码器,那么Venkman可能会很有用,但是请注意,这需要一些设置。 但是,实际上,当您使用DHTML增强网站时,您不需要像调试器那样复杂的东西。 JavaScript控制台以及明智地使用警报语句来识别正在发生的事情,将帮助您应对几乎每种情况。
另一个绝对有用的工具是一个好的代码编辑器,可在其中编写您的网站。 JavaScript的语法高亮是一个非常方便的功能。 它使您在编写代码时更易于阅读,并在省略括号或引号时迅速提醒您。 编辑器是一个非常个人化的工具,在这方面,您可能需要先亲吻一些青蛙,然后才能找到您的王子,但是好的编辑器将认真地加快并简化您的编码工作。 如果您还没有首选程序,则可以免费使用许多功能强大的可自定义编辑器。 但是,如果您当前正在使用Windows记事本编写代码,请查看其他可用内容,看看是否有任何其他产品提供了您更喜欢的环境。 如前所述,您需要语法高亮显示; 绑定页面外部验证的一种方法也很有用。 Textpad和Crimson Editor是基于Windows的编辑器,如果您在Windows平台上进行开发,则涵盖了基础知识。 Mac用户倾向于使用BBEdit ; Linux用户可以使用gedit或Kate或vim来进行基础操作,并且始终有Emacs。
JavaScript是运行DHTML的引擎。 DHTML专注于处理HTML和CSS,以使您的页面执行用户想要的操作,而JavaScript则可以实现这种操作。 在本书的其余部分中,我们将越来越详细地探讨这种操作。
进一步阅读
如果您想了解CSS本身的更多信息,请尝试这些链接。
SitePoint对CSS世界的简单介绍是一个很好的起点。
W3Schools的CSS教程对您学习还是对CSS的了解都有帮助。
CSS Zen Garden很好地展示了层叠样式表的强大功能。 它有一个真正的哇!
如果您需要向特定的浏览器隐藏某些CSS指令(或提供某些指令),则此CSS hack的详细列表向您显示哪些浏览器将受到给定的hack的影响。
该站点演示了各种浏览器中的CSS问题,并说明了如何解决这些问题。
CSS-Discuss邮件列表 “致力于讨论CSS及其在现实世界中的使用方式;换句话说,是实际用途和应用程序”。 关联的Wiki是有用技巧和窍门的存储库。
如果您需要更明确的内容,SitePoint的书《 HTML乌托邦:使用CSS进行表的无设计》是CSS初学者的完整指南和参考。 如果您喜欢边做边学,那么CSS选集:101技巧,窍门和技巧是一个完美的选择。
Web上的许多教程都涉及JavaScript。 有些浏览了DHTML和DOM,而另一些则没有。 您应该尝试找到前者。
本教程为整个非程序员介绍了JavaScript的基础知识 。 本文介绍的某些技术并不像本书中介绍的替代技术那样现代,但是您会对该语言本身有很好的了解。
Peter-Paul Koch的JS技术和脚本列表涵盖了该领域的大量知识。
摘要
在本章中,我们概述了DHTML的非常基本的构建块:真正的HTML,如何使用CSS在文档中排列和显示它,以及如何使用JavaScript添加交互性。 在本书的其余部分中,我们将研究可用于使网站动态化的基本技术,然后继续讨论涵盖特定领域的某些高级脚本技术。 继续演出!
第2章文档对象模型
一天,有人进来,在电传打字机之一伸出来的纸上,以巨大的隔离显示了这个不祥的短语:
值:

会引起dom!
……这句话本身真是太令人惊讶了! 完全没有意义,但看起来像什么……警告? 什么是“ dom”?
— 丹尼斯·里奇 ( Dennis M. Richie)
网页是一个文档。 要查看该文档,可以将其显示在浏览器窗口中,也可以查看HTML源代码。 两种情况下都是相同的文档。 万维网联盟的文档对象模型(DOM)提供了另一种查看同一文档的方法。 它将文档内容描述为JavaScript程序可以看到的一组对象。 自然,这对于发生大量脚本的DHTML页面非常有用。 (上面的引用纯属巧合-是从网络出现之前的日子开始的!)
根据万维网联盟的说法,“文档对象模型是一种与平台和语言无关的界面,它将允许程序和脚本动态访问和更新文档的内容,结构和样式。文档可以进行进一步处理,并且该处理的结果可以并入所显示的页面中。” 这句话基本上说DOM不仅是新颖的,而且对做事很有用。 在接下来的几页中,我们将简要介绍DOM的历史,然后更深入地研究它是什么以及如何使用它。 我们将以一些示例脚本结束,这些脚本演示了DHTML的这一关键方面的强大功能。
DOM的起源
在Netscape Navigator 2中,Netscape Communications引入了JavaScript(简称为LiveScript),它使Web开发人员可以脚本访问其网页中的元素-首先访问表单,然后访问图像,链接和其他功能。 为了与Netscape保持同步,Microsoft在Internet Explorer 3中实现了JavaScript(尽管他们将其称为JScript)。
到第4版时,这两种浏览器在各自的功能集和它们对页面内容的访问方面都大不相同。 每个浏览器制造商都实现了自己的专有方法来提供对层的脚本访问。 希望在两种浏览器中都可以使用的脚本需要包含每种方法的代码。 命运不佳的“浏览器之战”全都与这些专有的Web扩展有关,因为每个制造商都在努力通过引诱新功能吸引更多开发人员使用其平台。 尽管Microsoft复制并支持Netscape所做的大多数早期创新,但几乎没有考虑跨浏览器的兼容性。
当所有这些都发生时,W3C制定了文档对象模型级别1的规范,其中概述了使用脚本访问XML文档各个部分的通用和标准方法。 由于HTML可以被视为XML的方言,因此DOM Level 1规范也适用于HTML。
两家主要的浏览器制造商都实现了DOM级别1规范:在Internet Explorer 5和Netscape 6中。 由于新标准是DOM级别1,因此那些旧的且现在不推荐使用的方法称为DOM级别0。 。)尽管没有正式的DOM Level 0标准。
什么是DOM?
因此,您知道DOM 曾经是什么。 现在让我们讨论它是什么。
本质上,DOM通过将HTML页面中的元素映射到节点树来提供对HTML页面结构的访问。 每个元素成为一个元素节点,文本的每一位成为一个文本节点。 以以下HTML代码段为例:
<body>  <p>   This is a paragraph, containing  <a href="#">   a link  </a>  in the middle.  </p>  <ul>  <li>   This item has  <em>   some emphasized text  </em>  in it.  </li>   <li>   This is another list item.  </li>  </ul>
</body>
我添加了许多额外的缩进,以便您可以将此代码段与匹配的DOM树进行比较。 在现实生活中不要这样做–在这种情况下,我只是想让事情变得更清楚。 匹配的DOM树如图2.1所示。
正如你所看到的, a元素,它位于内侧p元素在HTML,成为一个子节点 ,或者只是孩子 ,的p DOM树节点。 (对称地, p节点是父 a节点。这两个li节点,相同父的儿童,被称为兄弟节点或只是兄弟姐妹 。)
请注意,HTML标记中每个标签的嵌套级别与到达DOM树中相同项目所需要的行数相匹配。 例如, <a>标签在其他标签( <p>和<body>标签)内嵌套了两次,因此树中的a节点位于顶部两行。
图2.1。 DOM树的示例。

有效HTML的重要性
从最后一个示例中,我们可以更清楚地看到为什么有效的HTML(包括正确嵌套的元素)如此重要的原因。 如果元素嵌套不正确,则会出现问题。 采取以下行:
<strong>These <em>elements are</strong> badly nested</em>.由此错误嵌套的代码产生的DOM树根本不会是一棵树:为了表示此HTML请求的无效元素布局,需要将其畸形。 每种浏览器都以不同的方式修复格式错误的内容,这可能会产生恐怖元素,因为它是其自己的父节点。 保持HTML有效可以避免所有这些问题。
行走的DOM树
节点树在计算中的应用非常广泛,因为它们具有非常有用的属性:轻松进行“遍历树”(即依次遍历树中的每个节点)很容易。码。 漫步一棵树很容易,因为任何元素节点都可以视为其自己的小树的顶部。 因此,要遍历一棵树,可以使用一系列步骤,例如:
- 对我们正在寻找的节点做一些事情
- 这个节点有孩子吗? 如果是这样的话:
- 对于每个子节点,请转到步骤1
此过程称为递归 ,并且定义为对调用自身的函数的使用。 每个孩子都是与父母同类型的事物,因此可以用相同的方式处理。 我们自己对递归的处理不多,但是我们在很大程度上依赖浏览器在页面树中的递归。 当需要处理事件时,它特别有用,我们将在第3章“处理DOM事件”中看到。
寻找树顶
为了遍历DOM树,您需要引用其顶部的节点:根节点。 该“引用”将是一个指向根节点的变量。 根节点对于JavaScript应该可以作为document.documentElement使用。 并不是所有的浏览器都支持这种方法,但是幸运的是,这并不重要,因为您几乎不需要从根开始遍历整个文档的DOM树。 取而代之的是,采用的方法是使用getElementsBy Whatever方法之一直接获取树的特定部分。 这些方法从window.document对象(或简称document)开始。
从树中获取元素
有两种主要方法可用于获取特定元素或元素集。 在DHTML编程中一直使用的第一种方法是getElementById 。 第二个是getElementsByTagName 。 另一个方法getElementsByName很少使用,因此我们现在仅看前两个方法。
getElementById
在HTML中,任何元素都可以具有唯一的ID。 必须使用HTML id属性指定ID:
<div id="codesection">  <p id="codepara">  </p>  <ul>  <li><a href="http://www.sitepoint.com/" id="splink"  >SitePoint</a></li>  <li><a href="http://www.yahoo.com/" id="yalink"  >Yahoo!</a></li>  </ul>
</div>
该代码段中的每个非列表元素都有一个ID。 您应该能够发现其中的四个。 ID在您的文档中必须是唯一的–每个元素必须具有不同的ID(或根本没有ID)–因此您可以知道特定的ID仅标识给定的元素。 要在JavaScript代码中获得对该元素的引用,请使用document.getElementById( elementId ) :
var sitepoint_link = document.getElementById('splink')现在,变量sitepoint_link包含对上述HTML代码段中第一个<a>标记的引用。 稍后我们将看到您可以使用该元素引用做什么。 此HTML代码段的DOM树如图2.2所示。
图2.2。 片段的DOM树。

getElementsByTagName
document.getElementsByTagName方法用于检索特定类型的所有元素。 该方法返回一个包含所有匹配元素的数组(从技术上讲,它返回一个节点集合,但这就像一个数组一样工作):
var all_links = document.getElementsByTagName('a');
var sitepoint_link = all_links[0];all_links变量包含一个数组,该数组包含两个元素:对SitePoint链接的引用和对Yahoo!的引用。 链接。 元素以在HTML中找到的顺序返回,因此all_links[0]是SitePoint链接,而all_links[1]是Yahoo!。 链接。
请注意,即使仅找到一个匹配的元素, document.getElementsByTagName始终返回一个数组。 假设我们使用以下方法:
var body_list = document.getElementsByTagName('body');在这种情况下,要获得对唯一body元素的引用,我们将需要使用以下内容:
var body = body_list[0];如果body_list.length (数组的大小)不是1,我们将感到非常惊讶,因为应该只有一个<body>标签! 我们还可以通过将前两行替换为以下内容来稍微缩短此过程:
var body = document.getElementsByTagName('body')[0];JavaScript使您可以像这样将表达式折叠在一起。 它可以使您的代码更加紧凑,并使您不必声明很多实际上没有用到的变量。
还有另一个有用的功能。 getElementsByTagName完全在任何节点上定义,而不仅仅是文档。 因此,要查找文档正文中的所有<a>标签,我们可以使用如下方法:
var links_in_body = body.getElementsByTagName('a');请注意,“ Element”在此方法的名称中为复数形式,但对于getElementById为单数形式。 提醒您,前者返回元素数组,而后者仅返回单个元素。
从父母走到孩子
每个节点都有一个父节点(根元素除外),并且可能有多个子节点。 您可以从节点的parentNode属性中获得对节点父节点的引用。 在节点的childNodes属性中可以找到节点的子级,该属性是一个数组。 如果节点没有子节点,则childNodes数组可能不包含任何内容(此类节点称为叶节点 )。
假设变量节点指向DOM树的ul元素。 我们可以像这样获取节点的父节点( div元素):
parent = node.parentNode;我们可以通过查看childNodes数组的length属性来检查无序列表是否有任何列表项(子项):
if (node.childNodes.length == 0) {  alert('no list items found!');
}
如果有任何子代,则其编号从零开始。 我们可以在示例HTML( li元素)中获得第二个孩子,如下所示:
list_item = node.childNodes[1];对于第一个孩子的特殊情况,位于:
list_item = node.childNodes[0];我们还可以使用以下缩写:
child = node.firstChild;同样,最后一个孩子(在本例中为第二个li )具有自己的特殊属性:
child = node.lastChild;在本书的其余部分中,我们将常规使用所有这些属性。
与Elements怎么办
现在,您知道如何获取对元素的引用– HTML页面中的节点。 DHTML的核心–动态的D –在于我们更改,删除和添加新元素的能力。 在本章的其余部分中,我们将使用下面的代码片段,我们先前已经看到它们:
<div id="codesection">  <p id="codepara">  </p>  <ul>  <li><a href="http://www.sitepoint.com/" id="splink"  >SitePoint</a></li>  <li><a href="http://www.yahoo.com/" id="yalink"  >Yahoo!</a></li>  </ul>
</div>
更改元素属性
元素的每个属性以及可以应用到该元素的每种CSS样式都可以通过JavaScript进行设置。 也可以设置和读取脚本中可以应用于HTML元素的属性(例如<a>标记的href属性),如下所示:
// using our sitepoint_link variable from above
sitepoint_link.href = "http://www.google.com/";
脚本运行后,单击该链接,您将被带到Google而不是SitePoint。 The new HTML content, as it exists in the browser's imagination (the HTML file itself hasn't changed), looks like this:
<div id="codesection">  <p id="codepara">  </p>  <ul>  <li><a href= "http://www.google.com/" id="splink"  >SitePoint</a></li>  <li><a href="http://www.yahoo.com/" id="yalink"  >Yahoo!</a></li>  </ul>
</div>
Each element has a different set of attributes that can be changed: a elements have the href attribute, <img> elements have the src attribute, and so on. In general, an attribute that can be applied to a tag in your HTML is also gettable and settable as a property on a node from JavaScript. So, if our code contains a reference to an img element, we can change the image that's displayed by altering the img_element.src property. (One notable divergence from this rule is that an element's class attribute in HTML is available in JavaScript as node.className , not node.class . This is because "class" is a JavaScript reserved word.)
The two most useful references that document elements and their supported attributes are those provided by the two major browser makers: the Microsoft DOM reference , and the Mozilla Foundation's DOM reference .
Importantly, though, when we altered our link's href above, all we changed was the destination for the link. The text of the link, which read "SitePoint" before, has not changed; if we need to alter that, we have to do so separately. Changing the text in a page is slightly more complex than changing an attribute; to alter text, you need to understand the concept of text nodes.
Changing Text Nodes
In Figure 2.1 above, you can see how the HTML in a document can be represented as a DOM tree. One of the important things the figure illustrates is that the text inside an element is not part of that element. In fact, the text is in a different node: a child of the element node. If you have a reference to that text node, you can change the text therein using the node's nodeValue property:
myTextNode.nodeValue = "Some text to go in the text node";How can we get a reference to that text node? We need to walk the DOM tree – after all, we have to know where the text node is before we can alter it. If we consider the sitepoint_link node above, we can see that its childNodes array should contain one node: a text node with a nodeValue of "SitePoint" . We can change the value of that text node as follows:
sitepoint_link.childNodes[0].nodeValue = 'Google';Now, the text displayed on-screen for that link will read Google, which matches the link destination that we changed earlier. We can shorten the code slightly to the following:
sitepoint_link.firstChild.nodeValue = 'Google';You may recall that a node's firstChild property, and childNodes[0] , both refer to the same node; in this case, you can substitute childNodes[0] with success. After this change, the browser will see the following document code:
<div id="codesection">  <p id="codepara">  </p>  <ul>  <li><a href="http://www.google.com/" id="splink"  >Google</a></li>  <li><a href="http://www.yahoo.com/" id="yalink"  >Yahoo!</a></li>  </ul>
</div>
Changing Style Properties
As we have seen, the attributes that are set on an HTML tag are available as properties of the corresponding DOM node. CSS style properties can also be applied to that node through the DOM, using the node's style property. Each CSS property is a property of that style property, with its name slightly transformed: a CSS property in words-and-dashes style becomes a property of style with dashes removed and all words but the first taking an initial capital letter. This is called InterCaps format . 这是一个例子。 A CSS property that was named:
some-css-propertywould appear to a script as the following JavaScript property:
someCssPropertySo, to set the CSS property font-family for our sitepoint_link element node, we'd use the following code:
sitepoint_link.style.fontFamily = 'sans-serif';CSS values in JavaScript are almost always set as strings; some values, such as font-size, are strings because they must contain a dimension, such as "px" or "%". (Internet Explorer will let you get away without using a dimension, as it assumes that a dimensionless number is actually a pixel measurement. However, do not try to take advantage of this assumption; it will break your code in other browsers, and it's in violation of the specification.) Only entirely numeric properties, such as z-index (which is set as node .style.zIndex , as per the above rule) may be set as a number:
sitepoint_link.style.zIndex = 2;Many designers alter style properties to make an element appear or disappear. In CSS, the display property is used for this: if it's set to none , the element doesn't display in the browser. So, to hide an element from display, we can set its display property to none :
sitepoint_link.style.display = 'none';To show it again, we give it another valid value:
sitepoint_link.style.display = 'inline';For a complete reference to the available CSS style properties and what each does, see SitePoint's HTML Utopia: Designing Without Tables Using CSS .
Bigger DOM Tree Changes
The next level of DOM manipulation, above and beyond changing the properties of elements that are already there, is to add and remove elements dynamically. Being able to change the display properties of existing elements, and to read and alter the attributes of those elements, puts a lot of power at your disposal, but the ability to dynamically create or remove parts of a page requires us to leverage a whole new set of techniques.
Moving Elements
To add an element, we must use the appendChild method of the node that will become the added node's parent. In other words, to add your new element as a child of an existing node in the document, we use that node's appendChild method:
// We'll add the link to the end of the paragraph
var para = document.getElementById('codepara');
para.appendChild(sitepoint_link);
After this, our page will look a little odd. Here's the updated HTML code:
<div id="codesection">  <p id="codepara">  <a href="http://www.google.com/" id="splink">Google</a>  </p>  <ul>  <li></li>  <li><a href="http://www.yahoo.com/" id="yalink"  >Yahoo!</a></li>  </ul>
</div>
Another useful thing to know is that, in order to move the node to its new place in the document, we don't have to remove it first. If you use appendChild to insert a node into the document, and that node already exists elsewhere in the document, the node will not be duplicated; instead, it will move from its previous location to the new location at which you've inserted it. We can do the same thing with the Yahoo! 链接:
para.appendChild(document.getElementById('yalink'));After this, the page will again be rearranged to match the HTML:
<div id="codesection">  <p id="codepara">  <a href="http://www.google.com/" id="splink">Google</a>  <a href="http://www.yahoo.com/" id="yalink">Yahoo!</a>  </p>  <ul>  <li></li>  <li></li>  </ul>
</div>
Figure 2.3 shows the new DOM tree so far.
Figure 2.3. The DOM tree after changes.

What if you didn't want to add your new (or moved) element to the end of that paragraph? In addition to appendChild , each node has an insertBefore method, which is called with two arguments: the node to insert, and the node before which it will be inserted. To move the Yahoo! link to the beginning of the paragraph, we want to insert it as a child of the paragraph that appears before the Google link. So, to insert the Yahoo! link (the first argument) as a child of the paragraph right before the Google link ( sitepoint_link , the second argument), we'd use the following:
para.insertBefore(document.getElementById('yalink'), sitepoint_link);Be sure that the second argument ( sitepoint_link ) really is an existing child node of para, or this method will fail.
Throwing Away Elements
Removing an element is very similar to the process of adding one: again, we use the removeChild method on the element's parent node. Remembering from earlier that we can access a given node's parent as node .parentNode, we can remove our sitepoint_link from the document entirely:
// never hurts to be paranoid: check that our node *has* a parent
if (sitepoint_link.parentNode) {  sitepoint_link.parentNode.removeChild(sitepoint_link);
}
That action will change the HTML code to that shown below:
<div id="codesection">  <p id="codepara">  <a href="http://www.yahoo.com/" id="yalink">Yahoo!</a>  </p>  <ul>  <li></li>  <li></li>  </ul>
</div>
Note
Even after the node's removal, sitepoint_link still constitutes a reference to that link. It still exists, it's just not in the document any more: it's floating in limbo. We can add it back to the document somewhere else if we want to. Set the variable to null to make the deleted element disappear forever.
Creating Elements
Moving existing elements around within the page is a powerful and useful technique (with which you're well on the way to implementing Space Invaders or Pac Man!). But, above and beyond that, we have the ability to create brand new elements and add them to the page, providing the capacity for truly dynamic content. The point to remember is that, as before, a page's text resides in text nodes, so if we need to create an element that contains text, we must create both the new element node and a text node to contain its text. To achieve this, we need two new methods: document.createElement and document.createTextNode .
First, we create the element itself:
var linux_link = document.createElement('a');Even though we've created the element, it's not yet part of the document. Next, we set some of its properties in the same way that we'd set properties on an existing link:
linux_link.href = 'http://www.linux.org/';We then create the text node for the text that will appear inside the link. We pass the text for the text node as a parameter:
var linux_tn = document.createTextNode('The Linux operating system');The text node is also floating around, separate from the document. We add the text node to the element's list of children, as above:
linux_link.appendChild(linux_tn);The element and text node now form a mini-tree of two nodes (officially a document fragment ), but they remain separate from the DOM. Finally, we insert the element into the page, which is the same as putting it into the DOM tree:
para.appendChild(linux_link);Here's the resulting HTML:
<div id="codesection">  <p id="codepara">  <a href="http://www.yahoo.com/" id="yalink">Yahoo!</a>  <a href="http://www.linux.org/">The Linux operating system</a>  </p>  <ul>  <li></li>  <li></li>  </ul>
</div>
As you can see, to create elements, we use the same techniques and knowledge – text nodes are children of the element node, we append a child with node.appendChild – we use to work with nodes that are already part of the document. To the DOM, a node is a node whether it's part of the document or not: it's just a node object.
Copying Elements
Creating one element is simple, as we've seen. But what if you want to add a lot of dynamic content to a page? Having to create a whole batch of new elements and text nodes – appending the text nodes to their elements, the elements to each other, and the top element to the page – is something of a laborious process. Fortunately, if you're adding to the page a copy of something that's already there, a shortcut is available: the cloneNode method. This returns a copy of the node, including all its attributes and all its children. (You can elect to clone the node only – not its children – by passing false to the cloneNode method.) If you have a moderately complex piece of HTML that contains many elements, cloneNode is a very quick way to return a copy of that block of HTML ready for insertion into the document:
var newpara = para.cloneNode(true);
document.getElementById('codesection').appendChild(newpara);
You can't rush ahead and just do this, though: it pays to be careful with cloneNode . This method clones all attributes of the node and all its child nodes, including IDs, and IDs must be unique within your document. So, if you have elements with IDs in your cloned HTML block, you need to fix those IDs before you append the cloned block to the document.
It would be nice to be able to grab the Yahoo! link in our cloned block using the following code:
var new_yahoo_link = newpara.getElementById('yalink');But, unfortunately, we can't. The getElementById method is defined only on a document, not on any arbitrary node. The easiest way around this is to refrain from defining IDs on elements in a block that you wish to clone. Here's a line of code that will remove the Yahoo! link's id :
newpara.firstChild.removeAttribute('id');We still have the ID on the paragraph itself, though, which means that when we append the new paragraph to the document, we'll have two paragraphs with the ID codepara . This is bad – it's not supposed to happen. We must fix it before we append the new paragraph, revising the above code as follows:
var newpara = para.cloneNode(true);
newpara.id = 'codepara2';
newpara.firstChild.removeAttribute('id');
document.getElementById('codesection').appendChild(newpara);
This code returns the following results:
<div id="codesection">  <p id="codepara">  <a href="http://www.yahoo.com/">Yahoo!</a>  <a href="http://www.linux.org/">The Linux operating system</a>  </p>  <p id="codepara2">  <a href="http://www.yahoo.com/">Yahoo!</a>  <a href="http://www.linux.org/">The Linux operating system</a>  </p>  <ul>  <li></li>  <li></li>  </ul>
</div>
As you can see, there's a little bit of surgery involved if you choose to copy big chunks of the document. This demonstration concludes our experimentation with this particular bit of code.
Making an Expanding Form
As our first full example, we'll use the DOM's element creation methods to build a form that can grow as the user fills it. This allows users to add to the form as many entries as they like.
Let's imagine an online system through which people can sign up themselves, and any number of their friends, for free beer. (Maybe there's a mad millionaire philanthropist on the loose. No, I can't give you a URL at which this system is running for real!)
The users add their own names, then the names of all of the friends they wish to invite. Without the DOM, we'd require the form either to contain a large number of slots for friends' names (more than anyone would use), or to submit regularly back to the server to get a fresh (empty) list of name entry areas.
In our brave new world, we can add the extra name entry fields dynamically. We'll place a button on the form that says, Add another friend. Clicking that button will add a new field to the list, ready for submission to the server. Each newly-created field will need a different name attribute, so that it can be distinguished when the server eventually receives the submitted form. (Depending on the server-side language used to process the form, this isn't strictly necessary. Since our example form won't actually submit to anything, we'll implement it as a useful exercise.)
Our form will provide a text entry box for the user's name, a fieldset containing one text entry box for a friend's name, and a button to add more friends. When the button is clicked, we'll add a new text entry box for another friend's name.
Example 2.1. expandingForm.html
<!DOCTYPE html PUBLIC "-//W3C//DTD HTML 4.01//EN"  "http://www.w3.org/TR/html4/strict.dtd">
<html>  <head>  <title>Free beer signup form</title>

<script type="text/javascript">  var fieldCount = 1;  function addFriend() {  fieldCount++;  var newFriend = document.createElement('input');  newFriend.type = 'text';  newFriend.name = 'friend' + fieldCount;  newFriend.id = 'friend' + fieldCount;  document.getElementById('fs').appendChild(newFriend);  }  </script>

<style type="text/css">  input {  display: block;  margin-bottom: 2px;  }  button {  float: right;  }  fieldset {  border: 1px solid black;  }  </style>

</head>  <body>  <h1>Free beer signup form</h1>  <form>  <label for="you">Your name</label>  <input type="text" name="you" id="you">  <fieldset id="fs">  <legend>Friends you wish to invite</legend>  <button onclick="addFriend(); return false;">  Add another friend  </button>  <input type="text" name="friend1" id="friend1">  </fieldset>  <input type="submit" value="Save details">  </form>  </body>
</html>
Notice our fieldCount variable; this keeps track of how many friend fields there are.
Example 2.2. expandingForm.html (excerpt)
var fieldCount = 1;When the button is clicked, we run the addFriend function (we'll discuss handling clicks – and various other kinds of events – more in the next chapter):
<button onclick="addFriend(); return false;">The addFriend function completes a number of tas ks each time it's run:
- Increments the
fieldCount:Example 2.3.
expandingForm.html(excerpt)fieldCount++; - Creates a new
inputelement:Example 2.4.
expandingForm.html(excerpt)var newFriend = document.createElement('input'); - Sets its type to
text– we want a text entry box, an element specified by<input type="text">:Example 2.5.
expandingForm.html(excerpt)newFriend.type = 'text'; - Sets a unique id and name (because the ID must be unique, and all the entry boxes must have different names so they can be distinguished when the form's submitted):
Example 2.6.
expandingForm.html(excerpt)newFriend.name = 'friend' + fieldCount;
newFriend.id = 'friend' + fieldCount; - Adds this newly-created element to the document:
Example 2.7.
expandingForm.html(excerpt)document.getElementById('fs').appendChild(newFriend);
Here's what the page looks like after the "add another friend" button has been clicked twice, and two friends' names have been added:
Figure 2.4. Signing up for free beer.

Free beer, thanks to the power of the DOM. We can't complain about that!
Making Modular Image Rollovers
Image rollover scripts, in which an image is used as a link, and that image changes when the user mouses over it, are a mainstay of JavaScript programming on the Web. Traditionally, they've required a lot of script, and a lot of customization, on the part of the developer. The introspective capability of the DOM – the ability of script to inspect the structure of the page in which it's running – gives us the power to detect rollover images automatically and set them up without any customization. This represents a more systematic approach than the old-fashioned use of onmouseover and onmouseout attributes, and keeps rollover code separate from other content.
We'll build our page so that the links on which we want to display rollover effects have a class of rollover . They'll contain one img element – nothing else. We'll also provide specially named rollover images: if an image within the page is called foo.gif , then the matching rollover image will be named foo_over.gif . When the page loads, we'll walk the DOM tree, identify all the appropriate links (by checking their class and whether they contain an img element), and set up the rollover on each. This specially-named rollover image allows us to deduce the name of any rollover image without saving that name anywhere. It reduces the amount of data we have to manage.
An alternative technique involves use of a non-HTML attribute in the image tag:
<img src="basic_image.gif" oversrc="roll_image.gif">However, since oversrc isn't a standard attribute, this approach would cause your HTML to be invalid.
Some of the following script may seem a little opaque: we will be attaching listeners to DOM events to ensure that scripts are run at the appropriate times. If this is confusing, then feel free to revisit this example after you've read the discussion of DOM events in the next chapter.
A Sample HTML Page
First, the HTML: here we have our links, with class rollover , containing the images.
Example 2.8. rollovers.html
<!DOCTYPE html PUBLIC "-//W3C//DTD HTML 4.01//EN"  "http://www.w3.org/TR/html4/strict.dtd">
<html>  <head>  <title>Modular rollovers</title>  <script type="text/javascript" src="rollovers.js"></script>  <style type="text/css">  /* Remove the blue border on the rollover images */  a.rollover img {  border-width: 0;  }  </style>  </head>  <body>  <h1>Modular rollovers</h1>  <p>Below we have two links, containing images that we want   to change on mouseover.</p>  <ul>  <li>  <a href="" class="rollover" alt="Roll"  ><img src="basic_image.gif" /></a>  </li>  <li>  <a href="" class="rollover" alt="Roll"  ><img src="basic_image2.gif"></a>  </li>  </ul>  </body>
</html>
The page also includes the JavaScript file that does all the work:
Example 2.9. rollovers.js
function setupRollovers() {  if (!document.getElementsByTagName)  return;  var all_links = document.getElementsByTagName('a');  for (var i = 0; i < all_links.length; i++) {  var link = all_links[i];  if (link.className &&  (' ' + link.className + ' ').indexOf(' rollover ') != -1)  {  if (link.childNodes &&  link.childNodes.length == 1 &&  link.childNodes[0].nodeName.toLowerCase() == 'img') {  link.onmouseover = mouseover;  link.onmouseout = mouseout;  }  }  }
}

function findTarget(e)
{  /* Begin the DOM events part, which you */  /* can ignore for now if it's confusing */  var target;

if (window.event && window.event.srcElement)  target = window.event.srcElement;  else if (e && e.target)  target = e.target;  if (!target)  return null;

while (target != document.body &&  target.nodeName.toLowerCase() != 'a')  target = target.parentNode;

if (target.nodeName.toLowerCase() != 'a')  return null;

return target;
}

function mouseover(e) {  var target = findTarget(e);  if (!target) return;

// the only child node of the a-tag in target will be an img-tag  var img_tag = target.childNodes[0];

// Take the "src", which names an image called "something.ext",  // Make it point to "something_over.ext"  // This is done with a regular expression  img_tag.src = img_tag.src.replace(/(.[^.]+)$/, '_over$1');
}

function mouseout(e) {  var target = findTarget(e);  if (!target) return;

// the only child node of the a-tag in target will be an img-tag  var img_tag = target.childNodes[0];

// Take the "src", which names an image as "something_over.ext",  // Make it point to "something.ext"  // This is done with a regular expression  img_tag.src = img_tag.src.replace(/_over(.[^.]+)$/, '$1');
}

// When the page loads, set up the rollovers
window.onload = setupRollovers;
The DOM-walking parts of this code are found in setupRollovers and in findTarget , which is called from the two mouseover/mouseout functions. Let's look at each of these in turn.
The setupRollovers Function
The code for the setupRollovers function starts like this:
Example 2.10. rollovers.js (excerpt)
if (!document.getElementsByTagName)

        return;
This code confirms that we're in a DOM-supporting browser. If we're not (ie if document.getElementsByTagName , the method, doesn't exist), we exit here and progress no further. If the method does exist, we continue:
Example 2.11. rollovers.js (excerpt)
var all_links = document.getElementsByTagName('a');
Here, we make all_links a reference to a list of all the <a> tags in the document.
Example 2.12. rollovers.js (excerpt)
for (var i = 0; i < all_links.length; i++) {

        var link = all_links[i];
The above code iterates through the retrieved list of tags in standard JavaScript fashion. We assign the link variable to each link, as a way to simplify the following code.
Example 2.13. rollovers.js (excerpt)
if (link.className &&

        (' ' + link.className + ' ').indexOf(' rollover ') != -1)

        {
We need to know whether each link is of class rollover . However, an element may have more than one class; if this tag had two classes, rollover and hotlink , for example, it would have className="rollover hotlink" . This would mean that we could not check for an element having a specific class using the following:
if ( element .className == " my class")If the element has multiple classes, the above condition will always evaluate to false . A useful approach here is to look for the string ' myclass ' (the class name with a space before and after it) in the string ' ' + element.className + ' ' (the element's class attribute with a space before and after it). This will always find your class, as you're expecting. It also avoids a problem with a similar technique, which uses className.indexOf to look for 'myclass' . If the element in question is of class myclassroom , this technique will give a false positive. (Another option is to use a regular expression to spot the class name. In the interests of simplicity, however, we'll stick with the method already presented.)
Example 2.14. rollovers.js (excerpt)
if (link.childNodes &&

        link.childNodes.length == 1 &&

        link.childNodes[0].nodeName.toLowerCase() == 'img') {
We want to confirm that this link contains nothing but an img element, so we make use of a very handy property of JavaScript, called short-circuit evaluation . In an if statement of the form if (a && b && c) , if a is false, then b and c are not evaluated at all. This means that b and c can be things that depend on a 's trueness: if a is not true, then they are not evaluated, so it's safe to put them into the if statement.
Looking at the above code may make this clearer. We need to test if the nodeName of the link's first child node is img . We might use the following code:
if (link.childNodes[0].nodeName.toLowerCase == 'img')However, if the current link doesn't have any child nodes, this code will cause an error because there is no link.childNodes[0] . So, we must first check that child nodes exist; second, we confirm that there is one and only one child; third, we check whether that one-and-only first child is an image. We can safely assume in the image check that link.childNodes[0] exists, because we've already confirmed that that's the case: if it didn't exist, we wouldn't have got this far.
Example 2.15. rollovers.js (excerpt)
link.onmouseover = mouseover;This code attaches an event handler to the mouseover event on a node.
Example 2.16. rollovers.js (excerpt)
link.onmouseout = mouseout;And this line attaches an event handler to the mouseout event on that node. 就这样!
The findTarget Function
This little function is called by the mouseover and mouseout functions. As we'll see, they pass event objects to findTarget , which, in return, passes back the link tag surrounding the image that generated the event, if any such tag is to be found.
findTargetExample 2.17.rollovers.js(excerpt)var target; if (window.event && window.event.srcElement) target = window.event.srcElement; else if (e && e.target) target = e.target; if (!target) return null;
This first part is related to DOM event handling, which is explained in the next chapter. We'll ignore its workings for now, except to say that it caters for the differences between Internet Explorer and fully DOM-supporting browsers. Once this code has run, however, we should have in our variable target the element that the browser deems to be responsible for the mouseover or mouseout event – ideally the <a> tag.
Example 2.18. rollovers.js (excerpt)
while (target != document.body &&

        target.nodeName.toLowerCase() != 'a')

        target = target.parentNode;
if (target.nodeName.toLowerCase() != 'a')

        return null;
The variable target should be a reference to the <a> tag on which the user clicked, but it may be something inside the <a> tag (as some browsers handle events this way). In such cases, the above code keeps getting the parent node of that tag until it gets to an <a> tag (which will be the one we want). If we find the document body – a <body> tag – instead, we've gone too far. We'll give up, returning null (nothing) from the function, and going no further.
If we did find an <a> tag, however, we return that:
Example 2.19. rollovers.js (excerpt)
return target;

        }
The mouseover / mouseout Functions
These functions work in similar ways and do very similar things: mouseover is called when we move the mouse over one of our rollover links, while mouseout is called when we move the mouse out again.
The code for mouseover starts like this:
Example 2.20. rollovers.js (excerpt)
var target = findTarget(e);

        if (!target) return;
We call the findTarget function, described above, to get a reference to the link over which the mouse is located. If no element is returned, we give up, degrading gracefully. Otherwise, we have the moused-over <a> tag in target. Next, we dig out the image.
Example 2.21. rollovers.js (excerpt)
var img_tag = target.childNodes[0];
We also know that the <a> tag has one, and only one, child node, and that's an <img> tag. We know this because we checked that this was the case when we set up the event handler in setupRollovers .
Example 2.22. rollovers.js (excerpt)
img_tag.src = img_tag.src.replace(/(.[^.]+)$/, '_over$1');
Images have a src attribute, which you can access through the DOM with the element's src property. In the code snippet above, we apply a regular expression substitution to that string. (Although the full details of regular expressions are beyond the scope of this book, we'll look at the basics in Chapter 6, Forms and Validation . A more detailed resource is Kevin Yank's article on sitepoint.com, Regular Expressions in JavaScript .) Changing the value of an <img> tag's src attribute causes it to reload itself with the new image; thus, making this substitution (replacing something.gif with something_over.gif ) causes the original image to change to the rollover image. The mouseout function does the exact opposite: it changes the reference to something_over.gif in the image's src attribute to something.gif, causing the original image to reappear.
Something for Nothing (Almost)
If you look at the code for this modular rollover, you'll see that it's divided into parts. The setupRollovers function does nothing but install listeners. The findTarget function does nothing but find the link tag for a given event. The mouseover and mouseout functions do little other than the actual image swapping work. The tasks are neatly divided.
That means that this code is good for other applications. We can change the mouseover and mouseout functions to do something else – for example, to make popup help content appear – without needing to start from scratch to get it working. We get to reuse (or at least rip off with minimal change) the other functions in the script. This is not only convenient; it's also neat and clean. We're on the way to a better kind of scripting!
摘要
In the introduction, we referred to the DOM as a critical part of DHTML. Exploring the DOM – being able to find, change, add, and remove elements from your document – is a powerful technique all by itself, and is a fundamental aspect of modern DHTML. Once you've mastered the techniques described in this chapter, everything else will fall into place. Through the rest of the book, we'll be describing techniques and tricks with which you can do wondrous things on your sites, and in your Web applications, using DHTML. They all build upon this fundamental approach of manipulating the Document Object Model.
Chapter 3. Handling DOM Events
When I can't handle events, I let them handle themselves.
–Henry Ford
An event is something that happens, be it in real life, or in DHTML programming. But to those working with DHTML, events have a very specific meaning. An event is generated, or fired, when something happens to an element: a mouse clicks on a button, for example, or a change is made to a form. DHTML programming is all about event handling; your code will run in response to the firing of this or that event.
Learning which events are available, how to hook your code up to them, and how to make best use of them is a critical part of building dynamic Web applications. (It does seem that there are quite a few "critical" bits, I know!) That's what we cover in this chapter, along with a couple of real-world examples.
About Elements and Events
We're using a modern approach to DHTML, so all our DHTML code will be set to run in response to the firing of an event. If you've done any JavaScript Web programming before, you may already be using this technique without knowing it. Let's look at the procedure by which code has traditionally been hooked up to events, learn how to do it under the DOM (and why the DOM method is better), and find out exactly what these techniques make possible.
Common Events
Every page element fires a given selection of events. Some events are common to all elements; others are more specific. For example, all visible elements will fire a mouseover event when the mouse is moved over them. A change event, however, will only be fired by elements whose contents can be changed: text boxes, text areas, and drop-down lists.
You might have noticed above that I used mouseover, rather than onmouseover , for the event name. Even though the HTML attribute for handling this event is onmouseover , the modern way to describe the event itself is simply mouseover. This allows us to talk about the event (mouseover) and the event handler ( onmouseover ) separately. The event handler is the location at which an event handler is placed. In the bad old browser days, these concepts were all mixed up, but now we can safely think of them as separate entities.
The documents that describe the events fired by a given element are the W3C DOM specifications and HTML recommendations, which were mentioned in the last chapter, as well as the W3C DOM 2 Events specification . There's also some extra information on key events in the DOM 3 Events specification .
A summary of the events that you're likely to find useful, and that have cross-browser support, is given in Table 3.1. Note that this isn't an exhaustive survey: it's a listing of events that you're likely to use often, rather than everything under the sun.
Table 3.1. Useful Events.

Click to popup a larger image of this table.
Hooking Code to Events
So, now you know some common events, and when they fire. But how do you make your code run in response to those events?
Hooking up the Old Way
If you've done any JavaScript coding before, you'll probably have written something like this:
<a href="somewhere.html" onclick="myJavaScriptFunction(); return false;" >click me!</a>That onclick attribute connects some JavaScript code to that link's click event. When the link is clicked, it will fire a click event, and that code will run. 没问题! Notice, though, that the code never actually mentions "click," which is the actual name of the event.
What if we wanted to detect a keypress? Here's the equivalent script:
function aKeyWasPressed() {   // put event handler code here ...
}
And here's the matching snippet of HTML:
<textarea id="myta" onkeypress="aKeyWasPressed()"></textarea>In this case, how does our aKeyWasPressed function know which key was pressed? Well, it doesn't. That's a major limitation of the old-fashioned approach. But we can improve on that!
Hooking up the DOM Way
The DOM specifications enlarge the idea of event handlers by providing event targets and event listeners . An event target is the thing at which an event is aimed – an element, essentially. An event listener is the thing that grabs the event when it appears, and responds to it. Where do events come from in the first place? They come from the user. The browser software captures the user action and sends the event to the right event target.
A given event source can be relevant to more than one event listener. Using the old-fashioned method above, only one piece of code could be run in response to any event. For example, an element could have only one onclick attribute. (Actually, you could have as many as you liked, but each one would overwrite the one before it, so, effectively, you have only one. Alternatively, you could string JavaScript statements together, using semicolons in the attribute, but this makes the HTML code even more cluttered.) Using the modern method, you can run as many pieces of code as you want upon the firing of an event or events. Listeners get to share events, and events get to share listeners. To facilitate this, we must move our "hookup" code from the HTML to a separate script section: as noted above, no element can have more than one onclick attribute.
Event handling works in different ways, depending on the browser. We'll examine the W3C-approved way first, before we look at event handling in Internet Explorer. Here's the W3C approach.
Example 3.1. keycodedetect.html (excerpt)
function aKeyWasPressed(e) {   // put event listener code here...
}

var textarea = document.getElementById('myta');
textarea.addEventListener('keyup', aKeyWasPressed, false);
And here's the matching bit of HTML:
Example 3.2. keycodedetect.html (excerpt)
<textarea id="myta"></textarea>HTML Before Script… for Now
If you're working through this example in your HTML editor of choice, be sure to place the JavaScript code after the HTML in this and the next few examples in this chapter. The textarea must exist before the JavaScript code can assign an event listener to it.
If you're used to placing JavaScript at the top of your HTML files, don't fret. We'll discuss an elegant way around this restriction at the end of the section.
Those few lines of code contain a number of complex concepts. Consider this snippet:
Example 3.3. keycodedetect.html (excerpt)
var textarea = document.getElementById('myta');Here, we see a familiar reference to the <textarea> . Next, there's something new:
Example 3.4. keycodedetect.html (excerpt)
textarea.addEventListener('keyup', aKeyWasPressed, false);This is the crucial line that sets everything up. Each element has an addEventListener method, which allows you to hook a function to any event that the element receives. (We've used the keyup event here, rather than the more commonly expected keypress, because, at the time of writing, Safari on Macintosh does not support the assigning of keypress events using addEventListener . Perhaps more importantly, the DOM3 recommendation does not mention a keypress event.) The method takes three arguments: the event, the function that should be called, and a true-or-false value for useCapture . This last item relates to a rarely-used feature of DOM events called event capture . For the moment, we'll just set it to false , to indicate that we don't want to use event capture. If you'd like to get the full story, see the DOM Level 3 Events specification (not for the faint of heart!).
The event is specified as a string, which is the (modern) name of the event (ie without the "on" prefix). The function is specified using only the name of the function; do not place brackets after it, as in aKeyWasPressed() , as this would call the function. We don't want to call it now; we want to call it later, when the event is fired. (If you have worked in other languages, you may recognize that this means that functions are first-class objects in JavaScript; we can pass around references to a function using its name, but without calling it. This procedure doesn't work in all languages, but it's a very useful feature of JavaScript.)
Now, when a key is pressed in our <textarea> , our aKeyWasPressed function will be called. Note that JavaScript no longer clutters up our HTML; much like the separation of design and content facilitated by CSS, we've separated our page content (HTML) from our page behavior (JavaScript) . This is an important benefit of the new technique: we can switch new event listeners in and out without altering the HTML in our page. It's the modern way!
We still haven't addressed the question we posed earlier, though: how does the aKeyWasPressed function know which key was pressed?
Getting Event Information
A subtle change that we made in the above code was to give the aKeyWasPressed function an argument, e .
Example 3.5. keycodedetect.html (excerpt)
function aKeyWasPressed(e) { ...When a function is called as an event listener, it is passed, in the case of a W3C events-compliant browser, to an event object , which holds details of the event. This object has a number of properties containing useful information, such as target, and a reference to the element that fired the event. The precise properties that are available will depend on the type of event in question, but the most useful properties are listed in Table 3.2.
Table 3.2. Useful Properties.

Click to popup a larger image of this table.
[a] Don't use charCode here, even though some Websites tell you to. keyCode has good cross-browser support, and charCode does not. Key codes in the DOM are a standards mess! There are three ways to get the code: keyCode (IE), charCode (Mozilla/Netscape) and data (the official DOM 3 Events way). Fortunately, all major browsers support the nonstandard keyCode. So always use this, at least until the data property is widespread (in about 2010!).
Code that identifies which key was pressed would look like this:
Example 3.6. keycodedetect.html (excerpt)
function aKeyWasPressed(e) {   var key = e.keyCode;   alert('You pressed the key: ' + String.fromCharCode(key));
}
var textarea = document.getElementById('myta');
textarea.addEventListener('keyup', aKeyWasPressed, false);
When a key is pressed, our function will pop up a dialog box to tell us so. (Note that we use the String.fromCharCode method to convert the keyboard code provided by keyCode to a human-readable string.)
Re-using Listeners Across Targets
The target attribute might not seem very useful; after all, we know that it will be a reference to the <textarea> . But we can hook up the same function as an event listener on more than one element. We can, for example, attach one single function as an event listener for click events to every link in our page. When any link is clicked, our function will be called; we can then tell which link was clicked by examining the function's e.target . We'll come back to this in later examples in this chapter.
For now, all we need to know is that we don't have to write a separate event listener for every single tag in which we're interested.
What Happens After an Event Fires?
Events have two further important properties: bubbling and default actions . Think about an HTML document. It's hierarchical: elements are contained by other elements. Consider this HTML snippet:
<div>   <p>   <a href="">a link</a>   </p>
</div>
Clicking on the link will cause that link to fire a click event. But the link is contained within the paragraph, and the paragraph is contained within the <div> . So clicking the link will also cause both the paragraph and the <div> to see the click event. This is called event bubbling ; an event "bubbles" up through the DOM tree, starting with the target element, until it reaches the top. Not all events bubble; for example, focus and blur events do not. Bubbling can often be ignored, but there are times when you'll want to prevent a specific event from bubbling. (There are a lot of complex rules about event bubbling and event capturing, the phase of event propagation that occurs before event bubbling. In practice, we don't need to know much beyond how to stop it happening, but a complete write-up is available at for those who would like to know more of the theory underlying this aspect of the DOM.)
Once you've got an event, the DOM Events specification says that you can stop any further bubbling like this:
function aKeyWasPressed(e) {   var key = e.keyCode;   e.stopPropagation();   ...
}
Once the call to topPropagation is in place, the event will occur on the <a> tag only: any listeners on the <p> or <div> tags will miss out. If there are no listeners on those other tags, there's no need to stop bubbling. In this case, the event silently passes through the parent tags, having no extra effect.
Some events have a default action. The most obvious example is clicking a link: the default action for this event is to navigate the current window or frame to the link's destination. If we wanted to handle clicks on a link entirely within our JavaScript code, we might want to prevent that default action from being taken.
In our examples so far, we have handled the keyup event, which is fired when a key is released. As it turns out, this event has no default action. A closely-related event that does have a default action is keypress, which occurs whenever a character is typed using the combination of keydown and keyup. The keypress event is nonstandard (ie it is not described by the W3C DOM standard), which is why I have avoided mentioning it until now, but it is well supported by the major browsers.
Let's say we want to prevent keypress events from inputting text into our textarea . We could do this by setting up an event listener that cancelled the default action of that type of event. The DOM standard specifies a method, named preventDefault , that achieves this, but again, Internet Explorer implements its own proprietary technique. Here's the DOM approach:
function aKeyWasPressed(e) {   e.preventDefault();
}
var textarea = document.getElementById('myta');
textarea.addEventListener('keypress', aKeyWasPressed, false);
Assigning Event Listeners on Page Load
In all of the examples we've seen so far in this chapter, the JavaScript code has had to follow the HTML code to which it assigns event listeners. If the JavaScript code were to come first, it would be unable to find the HTML elements in question, as they would not yet exist.
A solution to this problem is to assign event listeners for specific document elements in a listener assigned to the window's load event. As a result, event listeners will only be assigned once the document has finished loading, and all elements are available.
Here's the complete listing for our keystroke detection example, restructured in this way:
Example 3.7. keycodedetect.html
<!DOCTYPE html PUBLIC "-//W3C//DTD HTML 4.01//EN"   "http://www.w3.org/TR/html4/strict.dtd">
<html>   <head>   <title>Detect keystrokes</title>   <script type="text/javascript">   function aKeyWasPressed(e) {   var key = e.keyCode;   alert('You pressed the key: ' + String.fromCharCode(key));   }

function addListeners(e) {   var textarea = document.getElementById('myta');   textarea.addEventListener('keyup', aKeyWasPressed, false);   }

window.addEventListener('load', addListeners, false);   </script>   </head>   <body>   <form>   <textarea id="myta"></textarea>   </form>   </body>
</html>
Our main event listener, aKeyWasPressed , has not been changed. What has changed is the way in which this listener is assigned. The code that assigns it has been placed inside a new function, addListeners :
Example 3.8. keycodedetect.html (excerpt)
function addListeners(e) {

        var textarea = document.getElementById('myta');

        textarea.addEventListener('keyup', aKeyWasPressed, false);

        }
This function is itself an event listener, which we assign to the window object's load event:
Example 3.9. keycodedetect.html (excerpt)
window.addEventListener('load', addListeners, false);
This event is fired once the document has finished loading, to signal that all HTML elements are now available. The addListeners function takes this opportunity to assign listeners to elements as required.
We'll continue to use this structure as we move forward through this chapter, and the rest of the book.
Making Events Work Cross-Browser
Naturally, making events work cross-browser is not as easy as just following the DOM standard. Internet Explorer doesn't implement the DOM Events model very well. Instead, it offers a proprietary and different way to hook up event listeners and gain access to event data.
Adding Event Listeners Portably
Instead of using an addEventListener method on an element, IE has an attachEvent method, and instead of passing an event object to each event listener, it has a global event object in window.event. This is inconvenient but not catastrophic; it just means that you have to take different actions for different browsers. In practice, what this means is that you have a small number of standard functions and techniques that you use to carry out event handling actions. One of these is the addEvent function, created by Scott Andrew:
Example 3.10. portabledetect.php (excerpt)
function addEvent(elm, evType, fn, useCapture)
// cross-browser event handling for IE5+, NS6+ and Mozilla/Gecko
// By Scott Andrew
{   if (elm.addEventListener) {   elm.addEventListener(evType, fn, useCapture);    return true;    } else if (elm.attachEvent) {   var r = elm.attachEvent('on' + evType, fn);    return r;    } else {   elm['on' + evType] = fn;   }
}
IE's attachEvent method is called, with an event name and a function to be the listener, but the event name should have "on" at the beginning. The addEvent function above takes care of the cross-browser differences (Note that if the browser doesn't support either addEventListener or attachEvent , which is the case for IE5 for Macintosh, the code assigns the event listener directly to the element as an event handler using its on event property. This will overwrite any previous event handler that was attached to that event, which isn't good, but it's an interim solution (and better than it not working at all). There is a way around this issue, which, though it makes the code significantly more complex, does avoid this problem; details can be found in this Stylish Scripting blog post ; simply include it in your code, then use it to attach events. As such, the code above becomes:
function aKeyWasPressed(e) {   var key = e.keyCode;   alert('You pressed the key: ' + String.fromCharCode(key));
}

function addListeners(e) {   var textarea = document.getElementById('myta');   addEvent(textarea, 'keyup', aKeyWasPressed, false);
}

addEvent(window, 'load', addListeners, false);

function addEvent(elm, evType, fn, useCapture)
// cross-browser event handling for IE5+, NS6+ and Mozilla/Gecko
// By Scott Andrew
{   if (elm.addEventListener) {   elm.addEventListener(evType, fn, useCapture);   return true;    } else if (elm.attachEvent) {   var r = elm.attachEvent('on' + evType, fn);   return r;   } else {   elm['on' + evType] = fn;   }
}
We're now using the addEvent function to make aKeyWasPressed listen for keyup events on the textarea .
Inspecting Event Objects Portably
This is not the only change that's required; we also have to take into account the fact that IE doesn't pass an event object to our event listener, but instead stores the event object in the window object. Just to make our lives as DHTML developers a little more complex, it also uses slightly different properties on the event object that it creates. These are shown in Table 3.3.
Table 3.3. W3C Event Object Properties.

Click to popup a larger image of this table.
[a] 0 = left button; 2 = right button; 1 = middle button.
[b] 1 = left button; 2 = right button; 4 = middle button. For combinations, add numbers: 7 means all three buttons pressed.
As previously noted, the standard data property is not well supported.
Taking all this into consideration, our portable code becomes:
Example 3.11. portabledetect.html (excerpt)
function aKeyWasPressed(e) {   if (window.event) {   var key = window.event.keyCode;   } else {   var key = e.keyCode;   }   alert('You pressed the key: ' + String.fromCharCode(key));
}

function addListeners(e) {   var textarea = document.getElementById('myta');   addEvent(textarea, 'keyup', aKeyWasPressed, false);
}

addEvent(window, 'load', addListeners, false);

function addEvent(elm, evType, fn, useCapture)
// cross-browser event handling for IE5+, NS6+ and Mozilla/Gecko
// By Scott Andrew
{   if (elm.addEventListener) {   elm.addEventListener(evType, fn, useCapture);    return true;    } else if (elm.attachEvent) {   var r = elm.attachEvent('on' + evType, fn);    return r;    } else {   elm['on' + evType] = fn;   }
}
This updated version of aKeyWasPressed first checks whether a window.event object exists:
Example 3.12. portabledetect.html (excerpt)
if (window.event) {
If it does, then it and its corresponding window.event.keyCode property, are used to obtain the code of the pressed key. (This technique for checking that something exists is called feature sniffing , and will be explained in more detail in the next chapter.) If not, the event object passed to the function (as e ), which also has a keyCode property, is used.
Stopping Propagation and Default Actions Portably
Halting bubbling can be done in two ways, as is the case with much event handling: via the DOM approach and the Internet Explorer approach. In DOM-compliant browsers, we can prevent an event from bubbling by calling the event object's stopPropagation method inside the event listener.
In Internet Explorer (where there is a global window.event object), we set window.event.cancelBubble to true inside the event listener. In practice, the usual technique is to use feature sniffing to Do The Right Thing:
if (window.event && window.event.cancelBubble) {   window.event.cancelBubble = true;
}
if (e && e.stopPropagation) {   // e is the event object passed to this listener   e.stopPropagation();
}
Unfortunately, even this doesn't cover all the major browsers. Arguably a worse offender even than Internet Explorer, Apple's Safari browser provides the stopPropagation method, but doesn't actually do anything when it is called. There is no easy way around this, but since event bubbling will not significantly affect any of the examples in this book, we'll just ignore this problem for now.
We also need to feature-sniff to stop default actions. With the DOM, we use the passed event object's preventDefault method; with Internet Explorer, we set the global event object's returnValue property to false .
if (window.event && window.event.returnValue) {   window.event.returnValue = false;
}
if (e && e.preventDefault) {   e.preventDefault();
}
Again, Safari appears to support preventDefault , but doesn't actually do anything when it is called. Unfortunately, preventing the default action associated with an event is a rather vital feature for many of the examples we'll look at in this book. The only way to do it in Safari (at least until Apple fixes its DOM standard event support) is to use an old-style event handler that returns false .
For example, to prevent the click event of a link from navigating to the target of the link, we would normally just use an event listener that prevented the default action of the link:
function cancelClick(e) {   if (window.event && window.event.returnValue) {   window.event.returnValue = false;   }   if (e && e.preventDefault) {   e.preventDefault();   }
}
addEvent(myLink, 'click', cancelClick, false);
To make this work in Safari, we need a second function, which will return false to cancel the event, and which we will assign as the onclick event handler of the link:
function cancelClick(e) {   if (window.event && window.event.returnValue) {   window.event.returnValue = false;   }   if (e && e.preventDefault) {   e.preventDefault();   }
}    function cancelClickSafari() {   return false;
}
addEvent(myLink, 'click', cancelClick, false);    myLink.onclick = cancelClickSafari;
This is actually quite an ugly solution, as it will overwrite any onclick event handler that another script may have installed. This kind of inter-script conflict is what modern event listeners are designed to avoid. Unfortunately, there is simply no better way around the problem in Safari. We'll see an example of this solution in practice later in this chapter.
This sort of cross-browser coding is obviated to a large extent by browser manufacturers coming together to implement the W3C DOM, but for event handling it's still required.
Smart Uses of Events
That's enough about how events work. Let's see a couple of practical examples. You should also know enough now to fully understand the image rollover code we saw in Chapter 2, The Document Object Model.
Creating Smarter Links
Some Websites open all clicked links in a new window. Often, they do this with the intention that the user will return to their site more readily if it's still open in another browser window. Some users find this useful; others find it heartily annoying. It would be possible, given our event-handling techniques above, to give them the choice.
Imagine we placed a checkbox on the page, which, initially unchecked, was accompanied by the label Open links in new window. Clicking any link will open that link in a new window if the box is checked.
We could implement this functionality using a combination of event listeners: we attach to each link on the page a click listener, which investigates the checkbox and opens the corresponding link in a new window if the box is checked. We also need a listener to run upon page load, to actually attach the listener to each link.
First, here's the HTML page we'll work on:
Example 3.13. smartlinks.html
<!DOCTYPE html PUBLIC "-//W3C//DTD HTML 4.01//EN"   "http://www.w3.org/TR/html4/strict.dtd">
<html>   <head>   <title>Smart Links</title>   <script type="text/javascript" src="smartlink.js"></script>   <style type="text/css">   form {   float: right;   width: 25em;   height: 5em;   border: 1px solid blue;   padding: 1em;   }   </style>   </head>   <body>   <h1>Smart Links</h1>   <form action=""><p>   <label for="newwin">Open links in new window?   <input type="checkbox" id="newwin">   </label>   </p></form>

<p>This page contains several links, such as   <a href="http://www.sitepoint.com/">SitePoint</a>,    <a href="http://www.yahoo.com/">Yahoo!</a>, and   <a href="http://www.google.com/">Google</a>.   These links should ordinarily open in the same window when   clicked, unless the checkbox is checked; this will make them   open in a new window.   </p>   </body>
</html>
As you can see, this page is quite simple, and contains no JavaScript except for the file that the <script> tag brings in. Figure 3.1 shows how the code displays:
Figure 3.1. The example "smart links" Web page.

Next, let's look at the content of smartlink.js . This code has been assembled from our earlier discussions, although it contains some extra code for this particular page. First, here's an outline of what the script holds:
Example 3.14. smartlink.js (excerpt)
function addEvent(elm, evType, fn, useCapture) { ... }
function handleLink(e) { ... }
function cancelClick() { ... }
function addListeners(e) { ... }

addEvent(window, 'load', addListeners, false);
And here are those four items in detail:
Example 3.15. smartlink.js
function addEvent(elm, evType, fn, useCapture) {   // cross-browser event handling for IE5+, NS6+ and Mozilla/Gecko   // By Scott Andrew    if (elm.addEventListener) {    elm.addEventListener(evType, fn, useCapture);    return true;    } else if (elm.attachEvent) {    var r = elm.attachEvent('on' + evType, fn);    return r;    } else {   elm['on' + evType] = fn;   }
}

function handleLink(e) {   var el;   if (window.event && window.event.srcElement)   el = window.event.srcElement;   if (e && e.target)   el = e.target;   if (!el)   return;

while (el.nodeName.toLowerCase() != 'a' &&   el.nodeName.toLowerCase() != 'body')   el = el.parentNode;

if (document.getElementById('newwin') &&   document.getElementById('newwin').checked) {   window.open(el.href);   if (window.event) {   window.event.cancelBubble = true;   window.event.returnValue = false;   }   if (e && e.stopPropagation && e.preventDefault) {   e.stopPropagation();   e.preventDefault();   }   }
}

function cancelClick() {   if (document.getElementById('newwin') &&   document.getElementById('newwin').checked) {   return false;   }   return true;
}

function addListeners() {   if (!document.getElementById)   return;

var all_links = document.getElementsByTagName('a');   for (var i = 0; i < all_links.length; i++) {   addEvent(all_links[i], 'click', handleLink, false);   all_links[i].onclick = cancelClick;   }
}

addEvent(window, 'load', addListeners, false);
Our code includes the now-familiar addEvent function to carry out cross-browser event hookups. We use it to call the addListeners function once the page has loaded.
The addListeners function uses another familiar technique; it iterates through all the links on the page and does something to them. In this case, it attaches the handleLink function as a click event listener for each link, so that when a link is clicked, that function will be called. It also attaches the cancelClick function as the old-style click event listener for each link – this will permit us to cancel the default action of each link in Safari.
When we click a link, that link fires a click event, and handleLink is run. The function does the following:
Example 3.16. smartlink.js (excerpt)
if (window.event && window.event.srcElement)

        el = window.event.srcElement;

        if (e && e.target)

        el = e.target;

        if (!el)

        return;
This is the cross-browser approach to identifying which link was clicked; we check for a window.event object and, if it exists, use it to get window.event.srcElement , the clicked link. Alternatively, if e , the passed-in parameter, exists, and e.target exists, then we use that as the clicked link. If we've checked for both e and e.target , but neither exists, we give up and exit the function (with return ).
Next up, we want to make sure that we have a reference to our link element:
Example 3.17. smartlink.js (excerpt)
while (el.nodeName.toLowerCase() != 'a' &&

        el.nodeName.toLowerCase() != 'body')

        el = el.parentNode;

        if (el.nodeName.toLowerCase() == 'body')

        return;
Some browsers may pass the text node inside a link as the clicked-on node, instead of the link itself. If the clicked element is not an <a> tag, we ascend the DOM tree, getting its parent (and that node's parent, and so on) until we get to the a element. (We also check for body , to prevent an infinite loop; if we get as far up the tree as the document body , we give up.)
Note that we also use toLowerCase on the nodeName of the element. This is the easiest way to ensure that a browser that returns a nodeName of A , and one that returns a nodeName of a , will both be handled correctly by the function.
Next, we check our checkbox:
Example 3.18. smartlink.js (excerpt)
if (document.getElementById('newwin') &&

        document.getElementById('newwin').checked) {
We first confirm (for paranoia's sake) that there is an element with id newwin (which is the checkbox). Then, if that checkbox is checked, we open the link in a new window:
Example 3.19. smartlink.js (excerpt)
window.open(el.href);
We know that el , the clicked link, is a link object, and that link objects have an href property. The window.open method creates a new window and navigates it to the specified URL.
Finally, we take care of what happens afterward:
Example 3.20. smartlink.js (excerpt)
if (window.event) {

        window.event.cancelBubble = true;

        window.event.returnValue = false;

        }

        if (e && e.stopPropagation && e.preventDefault) {

        e.stopPropagation();

        e.preventDefault();

        }

        }
We don't want the link to have its normal effect of navigating the current window to the link's destination. So, in a cross-browser fashion, we stop the link's normal action from taking place.
As previously mentioned, Safari doesn't support the standard method of canc elling the link's default action, so we have an old-style event listener, cancelClick , that will cancel the event in that browser:
Example 3.21. smartlink.js (excerpt)
function cancelClick() {   if (document.getElementById('newwin') &&   document.getElementById('newwin').checked) {   return false;   }   return true;
}
You can see that some of this code is likely to appear in every project we attempt, particularly those parts that have to do with listener installation.
Making Tables More Readable
A handy trick that many applications use to display tables of data is to highlight the individual row and column that the viewer is looking at; paper-based tables often shade table rows and columns alternately to provide a similar (although non-dynamic(…until paper technology gets a lot cooler than it is now, at any rate!) effect.
Here's a screenshot of this effect in action. Note the location of the cursor. If we had another cursor, you could see that the second table is highlighted differently. But we don't, so you'll just have to try the example code for yourself…
Figure 3.2. Example of table highlighting in a Web page.
We can apply this effect to tables in an HTML document using event listeners. We'll attach a mouseover listener to each cell in a table, and have that listener highlight all the other cells located in that cell's row and column. We'll also attach a mouseout listener that turns the highlight off again.
The techniques we have explored in this chapter are at their most powerful when we combine the dynamic capabilities of DHTML with the page styling of CSS. Instead of specifically applying a highlight to each cell we wish to illuminate, we'll just apply a new class, hi , to those cells; our CSS will define exactly how table cells with class hi should be displayed. To change the highlight, simply change the CSS. For a more powerful effect still, use CSS's selectors to apply different styles to highlighted cells depending on the table in which they appear.
Here's an example page that contains tables:
Example 3.22. tableHighlight.html
<!DOCTYPE html PUBLIC "-//W3C//DTD HTML 4.01//EN"   "http://www.w3.org/TR/html4/strict.dtd">
<html>   <head>   <title>Highlighted Tables</title>   <script type="text/javascript" src="tableHighlight.js">   </script>   <style type="text/css">   tr.hi td, td.hi {   background-color: #ccc;   }   table.extra tr.hi td, table.extra td.hi {   color: red;    text-decoration: underline overline;   background-color: transparent;   }   </style>   </head>   <body>   <h1>Highlighted Tables</h1>

<h2>A table with highlighting</h2>   <table>   <tr>   <td></td>   <td>Column 1</td>   <td>Column 2</td>    <td>Column 3</td>   <td>Column 4</td>   </tr>   <tr>   <td>Row 1</td>   <td>1,1</td><td>1,2</td><td>1,3</td><td>1,4</td>   </tr>   <tr>   <td>Row 2</td>   <td>2,1</td><td>2,2</td><td>2,3</td><td>2,4</td>   </tr>   <tr>   <td>Row 3</td>   <td>3,1</td><td>3,2</td><td>3,3</td><td>3,4</td>   </tr>   <tr>   <td>Row 4</td>   <td>4,1</td><td>4,2</td><td>4,3</td><td>4,4</td>   </tr>   </table>

<h2>A table with different highlighting</h2>   <table class="extra">   <tr>   <td></td>   <td>Column 1</td>   <td>Column 2</td>   <td>Column 3</td>   <td>Column 4</td>   </tr>   <tr>   <td>Row 1</td>   <td>1,1</td><td>1,2</td><td>1,3</td><td>1,4</td>   </tr>   <tr>   <td>Row 2</td>   <td>2,1</td><td>2,2</td><td>2,3</td><td>2,4</td>   </tr>   <tr>   <td>Row 3</td>   <td>3,1</td><td>3,2</td><td>3,3</td><td>3,4</td>   </tr>   <tr>   <td>Row 4</td>   <td>4,1</td><td>4,2</td><td>4,3</td><td>4,4</td>   </tr>   </table>   </body>
</html>
That code creates two four-by-four tables, each with column and row headings (so each table contains five rows and five columns in total). Notice that none of the styles have any effect because, as yet, there are no elements with class="hi" .
Let's look at the matching tableHighlight.js script. Its structure reflects our earlier discussions, but it contains some additional code for this particular technique. Here's an outline of the script:
Example 3.23. tableHighlight.js (excerpt)
function addEvent(elm, evType, fn, useCapture) { ... }
function ascendDOM(e, target) { ... }
function hi_cell(e) { ... }
function lo_cell(e) { ... }
function addListeners() { ... }

addEvent(window, 'load', addListeners, false);
Notice how similar the function outline is to the smart links example. Here are the six items in all their detail.
Example 3.24. tableHighlight.js
function addEvent(elm, evType, fn, useCapture)
// cross-browser event handling for IE5+, NS6+ and Mozilla/Gecko
// By Scott Andrew
{   if (elm.addEventListener) {   elm.addEventListener(evType, fn, useCapture);   return true;    } else if (elm.attachEvent) {   var r = elm.attachEvent('on' + evType, fn);   return r;   } else {   elm['on' + evType] = fn;   }
}

// climb up the tree to the supplied tag.
function ascendDOM(e, target) {   while (e.nodeName.toLowerCase() != target &&    e.nodeName.toLowerCase() != 'html')   e = e.parentNode;

return (e.nodeName.toLowerCase() == 'html') ? null : e;
}

// turn on highlighting
function hi_cell(e) {   var el;   if (window.event && window.event.srcElement)   el = window.event.srcElement;   if (e && e.target)   el = e.target;   if (!el) return;

el = ascendDOM(el, 'td');   if (el == null) return;

var parent_row = ascendDOM(el, 'tr');   if (parent_row == null) return;

var parent_table = ascendDOM(parent_row, 'table');   if (parent_table == null) return;

// row styling   parent_row.className += ' hi';

// column styling   var ci = -1;   for (var i = 0; i < parent_row.cells.length; i++) {   if (el === parent_row.cells[i]) {   ci = i;   }   }   if (ci == -1) return; // this should never happen

for (var i = 0; i < parent_table.rows.length; i++) {   var cell = parent_table.rows[i].cells[ci];   cell.className += ' hi';   }
}

// turn off highlighting
function lo_cell(e) {   var el;   if (window.event && window.event.srcElement)   el = window.event.srcElement;   if (e && e.target)   el = e.target;   if (!el) return;

el = ascendDOM(el, 'td');   if (el == null) return;

var parent_row = ascendDOM(el, 'tr');   if (parent_row == null) return;

var parent_table = ascendDOM(parent_row, 'table');   if (parent_table == null) return;

// row de-styling   parent_row.className =   parent_row.className.replace(/b ?hib/, '');

// column de-styling   var ci = el.cellIndex;   for (var i = 0; i < parent_table.rows.length; i++) {   var cell = parent_table.rows[i].cells[ci];   cell.className = cell.className.replace(/b ?hib/, '');   }
}

function addListeners() {   if (!document.getElementsByTagName) return;

var all_cells = document.getElementsByTagName('td');   for (var i = 0; i < all_cells.length; i++) {   addEvent(all_cells[i], 'mouseover', hi_cell, false);   addEvent(all_cells[i], 'mouseout', lo_cell, false);   }
}

addEvent(window, 'load', addListeners, false);
We add our mouseover and mouseout event listeners using the standard approach. The addListeners function sets up our hi_cell and lo_cell functions as mouseover and mouseout event listeners, respectively.
To minimize duplicate code, we've added a handy little utility function called ascendDOM . This marches up the tree from the element supplied in the first argument to find the first enclosing tag whose name matches the second argument.
Processing happens as follows. Mousing over a table cell triggers the hi_cell function. This finds the moused-over cell, then calculates the row and the table in which that cell appears. The ascendDOM function is called quite often in the code, so you can see the benefit of putting that code into a function. In hi_cell , the lines that actually do the styling work are these:
Example 3.25. tableHighlight.js (excerpt)
parent_row.className += ' hi';
Example 3.26. tableHighlight.js (excerpt)
cell.className += ' hi';
The rest of the code is simply concerned with picking out the right elements for these lines to work on.
Our intention here is to apply the class hi to the other cells in the row that contains the moused-over cell, and its column. The first line above executes the first task. The second line applies the class to a given cell, but our script needs to find the appropriate cells first.
This is where things get a little complicated. The row is a simple <tr> tag, whereas the column is a list of cells scattered across all the rows in the table. According to the DOM Level 2 specification, table cell elements have a cellIndex property, which indicates the cell's index in the row. To find the other cells in this column, we could iterate through all the rows in the table and find within each row the cell that has the same cellIndex .
Sadly, Safari doesn't properly support cellIndex – it is always set to 0 , no matter what the actual index should be. If Safari supported cellIndex , the process could have been simple:
var ci = el.cellIndex;
In fact, this concise snippet must be replaced with the much longer section below:
Example 3.27. tableHighlight.js (excerpt)
var ci = -1;

        for (var i = 0; i < parent_row.cells.length; i++) {

        if (el === parent_row.cells[i]) {

        ci = i;

        }

        }

        if (ci == -1) return; // this should never happen
ciis thecellIndex, and can be used to highlight other cells with the same cellIndex in the other rows in the table: Example 3.28.tableHighlight.js(excerpt)for (var i = 0; i < parent_table.rows.length; i++) { var cell = parent_table.rows[i].cells[ci]; cell.className += ' hi'; }
All the table's rows are held in the table's rows array. We walk through that array, applying the hi class to the cell in each row that has the same index as the moused-over cell.
The upshot of this exercise is that all the cells in the same column as the moused-over cell will have class hi ; the table row containing the cell will also have class hi .
Our CSS code takes care of the appearance of these cells:
Example 3.29. tableHighlight.html (excerpt)
tr.hi td, td.hi {

        background-color: #ccc;

        }
We've applied a background color of class hi to both td s, and tds in a tr of class hi ; thus, these cells will be highlighted. The lo_cell function works similarly, except that it removes the class hi from the row and column rather than applying it. The removal is done with the following lines:
Example 3.30. tableHighlight.js (excerpt)
parent_row.className =

        parent_row.className.replace(/b ?hib/, '');
Example 3.31. tableHighlight.js (excerpt)
cell.className = cell.className.replace(/b ?hib/, '');
Since a className is a string, it has all the methods of a string, one of which is replace ; we can call the replace method with a regular expression (first parameter) and a substitute string (second parameter). If a match for the regular expression is found in the string, it is replaced by the substitute string. In our example, we look for matches to the expression b ?hib (note that regular expressions are delimited by slashes, not quotes) – that is, a word boundary followed by an optional space, the word 'hi', and another word boundary – and replace it with a blank string, thus removing it from the className.
An added bonus of using CSS to provide the style information is that we can apply different highlighting to different tables on the page without changing the script. For example, the HTML of the page contains two tables, one with a class of extra . We apply some CSS specifically to tables with class extra :
Example 3.32. tableHighlight.html (excerpt)
table.extra tr.hi td, table.extra td.hi {    color: red;    text-decoration: underline overline;    background-color: transparent;
}
As a result, the highlighted cells in that particular table will be highlighted differently. CSS makes achieving this kind of effect very easy.
摘要
Understanding the processes by which events are fired, and by which code is hooked to those events, is vital to DHTML programming. Almost everything you do in DHTML will involve attaching code to events, as described in this chapter. We've examined some common events and the two browser models for listening to them. We have also covered what happens when an event fires, and how you can interrupt or alter that process. Finally, we looked at a few events in detail, and saw some simple examples of how code can attach to those events and improve the user experience on sites that employ these techniques.
Chapter 4. Detecting Browser Features
You just listed all my best features.
–The Cat, Red Dwarf , Series 3, Episode DNA
An important design constraint when adding DHTML to your Websites is that it should be unobtrusive. By "unobtrusive," I mean that if a given Web browser doesn't support the DHTML features you're using, that absence should affect the user experience as little as possible. Errors should not be shown to the user: the site should be perfectly usable without the DHTML enhancements. The browsers that render your site will fall into the following broad categories:
- Offer no JavaScript support at all, or have JavaScript turned off.
- Provide some JavaScript support, but modern features are missing.
- Have full JavaScript support, but offer no W3C DOM support at all.
- Provide incomplete DOM support, but some DOM features are missing or
buggy. - Offer complete DOM support without bugs.
The first and the last categories hold no concerns for you as a DHTML developer. A browser that does not run JavaScript at all will simply work without calling any of your DHTML code, so you can ignore it for the purposes of this discussion. You just need to make sure that your page displays correctly when JavaScript is turned off. (For example, if your DHTML shows and hides some areas of the page, those areas should show initially, then be hidden with DHTML, so that they are available to non-DHTML browsers.) Similarly, a browser that implements the DOM completely and without bugs would make life very easy. It's a shame that such browsers do not exist.
The three categories in the middle of the list are of concern to us in this chapter. Here, we'll explore how to identify which DHTML features are supported by a given browser before we try to utilize those features in running our code.
There are basically two ways to working out whether the browser that's being used supports a given feature. (Actually, there's a third way to identify browser support. The DOM standards specify a document.implementation.hasFeature method that you can use to detect DOM support. It's rarely used, though.) The first approach is to work out which browser is being used, then have a list within your code that states which browser supports which features. The second way is to test for the existence of a required feature directly. In the following discussion, we'll see that classifying browsers by type isn't as good as detecting features on a case-by-case basis.
Old-Fashioned Browser Sniffing
In the bad old days, before browser manufacturers standardized on the DOM, JavaScript developers relied on detection of the browser's brand and version via a process known as browser sniffing. Each browser provides a window.navigator object, containing details about the browser, which can be checked from JavaScript. We can, for example, find the name of the browser (the "user agent string") as follows:
var browserName = navigator.userAgent;
var isIE = browserName.match(/MSIE/); // find IE and look-alikes
Don't do this any more! This technique, like many other relics from the Dark Ages of JavaScript coding (before the W3C DOM specifications appeared), should not be used . Browser sniffing is flaky and prone to error, and should be avoided like the black plague. Really : I'm not kidding here.
Why am I so unenthusiastic about browser sniffing? There are lots of reasons. Some browsers lie about, or attempt to disguise, their true details; some, such as Opera, can be configured to deliver a user agent string of the user's choice. It's pretty much impossible to stay up-to-date with every version of every browser, and it's definitely impossible to know which features each version supported upon its release. Moreover, if your site is required to last for any reasonable period of time, new browser versions will be released after your site, and your browser-sniffing code will be unable to account for them. Browser sniffing – what little of it remains – should be confined to the dustbin of history. Put it in the "we didn't know any better" category. There is a significantly better method available: feature sniffing.
Modern DOM Feature Sniffing
Instead of detecting the user's browser, then working out for yourself whether it supports a given feature, simply ask the browser directly whether it supports the feature. For example, a high proportion of DHTML scripts use the DOM method getElementById . To work out whether a particular visitor's browser supports this method, you can use:
if (document.getElementById) {    // and here you know it is supported
}
If the if statement test passes, we know that the browser supports the feature in question. It is important to note that getElementById is not followed by brackets! We do not say:
if (document.getElementById())If we include the brackets, we call the methodgetElementById. If we do not include the brackets, we're referring to the JavaScriptFunctionobject that underlies the method. This is a very important distinction. Including the brackets would mean that we were testing the return value of the method call, which we do not want to do. For a start, this would cause an error in a non-DOM browser, because we can't call thegetElementByIdmethod there at all - it doesn't exist! When we test theFunctionobject instead, we're assessing it for existence. Browsers that don't support the method will fail the test. Therefore, they will not run the code enclosed by theifstatement; nor will they display an error.This feature of JavaScript - the ability to test whether a method exists - has been part of the language since its inception; thus, it is safe to use it on even the oldest JavaScript-supporting browsers. You may recall from the previous chapter the technique of referring to aFunctionobject without calling it. In Chapter 3, Handling DOM Events , we used it to assign a function as an event listener without actually calling it. In JavaScript, everything can be treated as an object if you try hard enough; methods are no exception! Which DOM Features Should We Test? The easiest approach is to test for every DOM method you intend to use. If your code usesgetElementByIdandcreateElement, test for the existence of both methods. This will cover browsers in the fourth category above: the ones that implement some - but not all - of the DOM.It is not reasonable to assume that a browser that supportsgetElementByIdalso supportsgetElementsByTagName. You must explicitly test for each feature. Where Should We Test for DOM Features? An easy way to handle these tests is to execute them before your DHTML sets up any event listeners. A large subset of DHTML scripts work by setting on page load some event listeners that will be called as various elements in the browser fire events. If, before setting up the event listeners, you check that the browser supplies all the DOM features required by the code, event listeners will not be set up for browsers that do not support those features. You can therefore reasonably assume in setting up your event listeners that all the features you require are available; this assumption can simplify your code immensely. Here's an example:
function myScriptInit() {    if (!document.getElementById ||    !document.getElementsByTagName ||    !document.createElement) {    return;    }    // set up the event listeners here
}

function myScriptEventListener() {    var foo = document.getElementById('foo');  // safe to use
}

addEvent(window, 'load', myScriptInit, false);
This script contains amyScriptInitfunction, which sets upmyScriptEventListeneras an event listener. But, before we set up that listener, we check for the existence of the DOM methodsgetElementById,getElementsByTagName, andcreateElement.
The if statement says: "if the JavaScriptFunctionobjectdocument.getElementByIddoes not exist, or if theFunctionobjectdocument.getElementsByTagNamedoes not exist, or if theFunctionobjectdocument.createElementdoes not exist, exit themyScriptInitfunction." This means that, should any of those objects not be supported, themyScriptInitfunction will exit at that point: it will not even get as far as setting up the event listeners. Our code will set up listeners only on browsers that do support those methods. Therefore, as above, the listener functionmyScriptEventListenercan feel safe in usingdocument.getElementByIdwithout first checking to ensure that it is supported. If it wasn't supported, the listener function would not have been set up. All this sniffing relies on JavaScript's runtime behavior. Even though the scripts are read by the browser at load time, no checks are done on the objects stated in the scripts until the code is run. This allows us to put browser objects in all scripts, and use them only when our detection code gets around to it: an arrangement called late binding . Testing Non-DOM Features Feature sniffing can be used on any JavaScript object: not just methods, and not just those methods that are part of the DOM. Commonly used examples are the offset properties (offsetWidth,offsetHeight,offsetLeftandoffsetTop) of an element. These JavaScript properties are an extension to the DOM provided by all the major browsers. They return information on the size and position of an element in pixels. We can test whether those properties are defined on a given element's object as follows:
var foo = document.getElementById('foo');

if (typeof foo.offsetHeight != 'undefined') {    var fooHeight = foo.offsetHeight;
}
Here, we set fooHeight if, and only if, offsetHeight is supported on foo. This is a different type of check from the method we used before, though: isn't it possible simply to say, if(foo.offsetHeight)? This isn't a good approach to use. Iffoo.offsetHeightis not defined, if (foo.offsetHeight) will not be true, just as we expect. However, the if statement will also fail iffoo.offsetHeightdoes exist, but is equal to0(zero). This is possible because JavaScript treats zero as meaningfalse. Testing whether a given item is defined just got a little more complex (but only a little!). If you are testing for the existence of functionfunctionName, or methodmethodName(on an objectobj), use the function/method name without the brackets to do so:
if (functionName) { ... }
if (obj.methodName) { ... }
Likewise, if you're testing for a variable v , or for a DOM property prop of an object, you can often use the variable or the DOM attribute's property name directly:
if (v) { ... }
if (obj.prop) { ... }
But, watch out! If the variable or property contains numbers or strings (as doesoffsetHeight, for example) then usetypeof, because a number might be0(zero), and a string might be the empty string "", both which also evaluate tofalse:
if (typeof v != 'undefined') { ... }
if (typeof obj.prop != 'undefined') { ... }
Sniffing at Work: scrollImage
Lots of Websites contain photo galleries: pages listing thumbnails of photographs that, when clicked on, display the photos at full size. An interesting enhancement to such a site might be to let the user see the full-size photo without having to click to load it. When the user mouses over the thumbnail, that thumbnail could become a "viewing area" in which a snippet of the full-sized image is shown. This technique is useful if your thumbnails aren't detailed enough to enable users to tell the difference between superficially similar images. It's especially handy if your thumbnails display something like a document, rather than a photo. Figure 4.1 shows the final effect: Figure 4.1. The thumbnail display implemented by thescrollImageexample.. We'll describe what's going on here in a moment. We'll review the code first, then see a demonstration before we get to the explanation. Setting Up the Page
The HTML file for this technique is straightforward:
 Example 4.1. scrollImage.html
<!DOCTYPE HTML PUBLIC "-//W3C//DTD HTML 4.01//EN"    "http://www.w3.org/TR/html4/strict.dtd">
<html>    <head>    <title>ScrollImage demonstration</title>    <script src="scrollImage.js" type="text/javascript"></script>    <style type="text/css">    .scrollimage {    display: block;    float: left;    border: 1px solid black;    margin: 1em;    padding: 0;    }

.scrollimage:hover {    position: relative;    }

.scrollimage img {    border: none;    }

.scrollimage:hover img {    display: none;    }    </style>    </head>    <body>

<h1>Scanned documents</h1>

<p>    <a href="1.jpg" class="scrollimage"    mainx="563" mainy="823" thumbx="82" thumby="120"    style="background: url(1.jpg); width: 82px;    height: 120px;"    ><img src="1-thumb.jpg"></a>

<a href="2.jpg" class="scrollimage"    mainx="563" mainy="777" thumbx="87" thumby="120"    style="background: url(2.jpg); width: 87px;    height: 120px;"    ><img src="2-thumb.jpg"></a>

<a href="3.jpg" class="scrollimage"    mainx="567" mainy="823" thumbx="83" thumby="120"    style="background: url(3.jpg); width: 83px;    height: 120px;"    ><img src="3-thumb.jpg"></a>

<a href="4.jpg" class="scrollimage"    mainx="558" mainy="806" thumbx="83" thumby="120"    style="background: url(4.jpg); width: 83px;    height: 120px;"    ><img src="4-thumb.jpg"></a>

<a href="5.jpg" class="scrollimage"    mainx="434" mainy="467" thumbx="112" thumby="120"    style="background: url(5.jpg); width: 112px;    height: 120px;"    ><img src="5-thumb.jpg"></a>    </p>

</body>
</html>/#pc#/

The content of this page is fairly obvious. Notice how the image elements are hidden by CSS styles when the mouse moves over them. This page also includes - with the <script src="scrollImage.js" type="text/javascript"></script> line - this JavaScript file:

 Example 4.2. scrollImage.js

/#pc#/// Based on findPos*, by ppk
// (http://www.quirksmode.org/js/findpos.html)
function findPosX(obj) {    var curLeft = 0;    if (obj.offsetParent) {    do {    curLeft += obj.offsetLeft;    } while (obj = obj.offsetParent);    }    else if (obj.x) {    curLeft += obj.x;    }    return curLeft;
}

function findPosY(obj) {    var curTop = 0;    if (obj.offsetParent) {    do {    curTop += obj.offsetTop;    } while (obj = obj.offsetParent);    }    else if (obj.y) {    curTop += obj.y;    }    return curTop;
}

// cross-browser event handling for IE5+, NS6+ and Mozilla/Gecko
// By Scott Andrew
function addEvent(obj, evType, fn, useCapture) {    if (obj.addEventListener) {    obj.addEventListener(evType, fn, useCapture);    return true;    } else if (obj.attachEvent) {    var r = obj.attachEvent('on' + evType, fn);    return r;    } else {     obj['on' + evType] = fn;    }
}

addEvent(window, 'load', scrollInit, false);

function scrollInit() {    if (!document.getElementsByTagName)    return;    var allLinks = document.getElementsByTagName('a');    for (var i = 0; i < allLinks.length; i++) {    var link = allLinks[i];    if ((' ' + link . className + ' ').indexOf(' scrollimage ') !=    -1) {    addEvent(link, 'mousemove', moveListener, false);    }    }
}

function attVal(element, attName) {    return parseInt(element.getAttribute(attName));
}

function moveListener(ev) {    var e = window.event ? window.event : ev;    var t = e.target ? e.target : e.srcElement;

var xPos = e.clientX - findPosX(t);    var yPos = e.clientY - findPosY(t);

if (t.nodeName.toLowerCase() == 'img')     t = t.parentNode;    if (t.nodeName.toLowerCase() == 'a') {

// scaleFactorY = (width(big) - width(small)) / width(small)    var scaleFactorY =    (attVal(t, 'mainy') - attVal(t, 'thumby')) / attVal(t,    'thumby');    var scaleFactorX =    (attVal(t, 'mainx') - attVal(t, 'thumbx')) / attVal(t,    'thumbx');

t.style.backgroundPosition =    (-parseInt(xPos * scaleFactorX)) + 'px ' +    (-parseInt(yPos * scaleFactorY)) + 'px';    }
}
We'll explore (and fix!) this code shortly. Finally, the page also contains images: five at full-size, and five thumbnails. You can find them in the code archive for this book. Demonstrating the DHTML Effect Let's see how the page works. The HTML document shows five images as thumbnails; in this example, they're thumbnails of individual pages of a scanned-in document. Figure 4.2 shows the page content under normal circumstances. Figure 4.2. Thumbnails of a document.When we mouse-over a thumbnail image, though, the display of that thumbnail changes to show the actual image to which it's linked, as shown in Figure 4.3. The thumbnail becomes a viewing area in which we can see a snippet of the full-size image. As the cursor moves over the third image, we see the content of the third image at full size through the viewing area. For a document thumbnail such as this, we can use the cursor to move around the document within the viewing area, so that we can read the content and see if it's the document we want. This technique can also be useful, as mentioned, in photo galleries containing images that look similar when displayed at thumbnail size. Figure 4.3. Mousing over a thumbnail.
How the Code Works Conceptually, the code works as follows: we set up the page so that every "scrollable" image is made up of an
<a>tag of classscrollimage, which contains an<img>tag displaying the thumbnail. We apply the full-size image as the CSS background image of the<a>tag. Then, when the user mouses over theaelement, we hide theimgelement entirely, allowing theaelement's background image to show through. We then manipulate the position of that background image so that it moves in accordance with the cursor. (We're storing the dimensions of the larger image in custom attributes on theaelement:mainx,mainy,thumbx, andthumby. This is a slightly suspect technique: it will prevent the HTML from validating, and should therefore be approached with caution. In this case, however, it is the easiest way to tie the required values to each of the a elements.)
This is all fairly advanced stuff, so we need to confirm that the running browser supports all the features we need in order to make it work. We start by making the script initialize on page load with the line:
 Example 4.3. scrollImage.js (excerpt)
addEvent(window, 'load', scrollInit, false);/#pc#/

We saw the addEvent method in Chapter 3, Handling DOM Events , but, with what we've learned about feature detection, its workings should now be much clearer to you. First, we check for the existence of an addEventListener method on the passed object, to see if the user's browser supports the DOM Events model correctly:

 Example 4.4. scrollImage.js (excerpt)

/#pc#/function addEvent(obj, evType, fn, useCapture) {    if (obj.addEventListener) {    obj.addEventListener(evType, fn, useCapture);    return true;
Failing that, we look for Internet Explorer's proprietaryattachEventmethod on the object. Example 4.5.scrollImage.js(excerpt)} else if (obj.attachEvent) { var r = obj.attachEvent('on' + evType, fn); return r;Failing that , we attach the event listener directly to the element, as an event handler; this is required for IE5 on Macintosh. Example 4.6.scrollImage.js(excerpt)} else { obj['on' + evType] = fn; }This procedure caters for all the ways by which we might attach an event listener, using feature sniffing to see which option is available. The initialization function that sets up the scrolling effect,scrollInit, usesdocument.getElementsByTagNameto find all theaelements in the document. Therefore,scrollInitchecks for this method’s existence before proceeding: Example 4.7.scrollImage.js(excerpt)
function scrollInit() { if (!document.getElementsByTagName) return;If the user’s browser doesn’t support document.getElementsByTagName, then we return from thescrollInitfunction and don’t progress any further. One extra trick in the feature sniffing code, as described in Chapter 3, Handling DOM Events , addresses the way in which we find the event object when we’re inside themoveListenerevent listener. As we know, the DOM Events specification mandates that an event object is passed to the event listener as an argument, whereas Internet Explorer makes the event object available as the global window.event. So, our code checks for the existence ofwindow.event, and uses it as the event object if it exists; the code falls back to the passed-in argument if window.event is not present:
Example 4.8. scrollImage.js (excerpt)
function moveListener(ev) { var e = window.event ? window.event : ev;Next, we need to get the event’s target from that event object; the DOM specifiese.target, and Internet Explorer providese.srcElement. Another feature-sniff gives us the appropriate value: Example 4.9.scrollImage.js(excerpt)var t = e.target ? e.target : e.srcElement;This is a compressed, shorthand version of the code we saw in Chapter 3, Handling DOM Events . The next step is for the code to get the position of the mouse inside the thumbnail image area. This is the code from the full listing above that is supposed to do this:var xPos = e.clientX - findPosX(t); var yPos = e.clientY - findPosY(t);In theory, e.clientX and e.clientY give the x- and y-coordinates of the mouse within the browser window, respectively. By subtracting from these the x- and y-coordinates of the target element, we obtain the mouse’s position within that element. Depending on your browser of choice, this might seem to work just fine at first glance. Peter-Paul Koch’sfindPosXandfindPosYfunctions make short work of getting the target element’s position. (For a complete description of howfindPosXandfindPosYwork, visit Peter-Paul Koch’s page on the subject .) Unfortunately, the clientX and clientY properties of the event object are nowhere near as reliable. clientX and clientY Problems The code above is flawed: the event listener usese.clientXande.clientYto ascertain the position of the mouse. But that’s not a flaw, is it? After all, it’s in the DOM specifications! Well, it’s sort of a flaw – a flaw in the way browser manufacturers interpret the specification. Peter-Paul Koch studies this problem in great detail in his comprehensive article, Mission Impossible – Mouse Position . The problem occurs only when the page is scrolled (which was not the case with the above page). When a page is scrolled, the specification is rather vague on whether clientX and clientY are returned relative to the whole document, or to the window (the part of the document that is visible). Internet Explorer returns them relative to the window, as does Mozilla, but all of Opera, Konqueror, and iCab return them relative to the document. Netscape also provides pageX and pageY, which are mouse coordinates relative to the document. (Ironically enough, Internet Explorer may be the only browser which is fully compliant with the standard; the best reading of the specification is that clientX and clientY should be relative to the window.)
So, we need to use pageX and pageY if they exist, and clientX and clientY if they do not; if we’re in Internet Explorer, however, we have to add to clientX and clientY the amounts by which the page has been scrolled. But how do we know if we’re in Internet Explorer? We use browser detection. Browser Detection You Can’t Avoid That spluttering noise you can hear in the background is the crowd rightly pointing out that we consigned browser detection to the dustbin of history only a few pages back, and they’re not wrong. However, there are occasions when different browsers implement the same properties (in this case, clientX and clientY) in different ways and when there are no other objects available for sniffing that can us tell which of the different implementations is in use. On such occasions, there is no alternative but to use the dreaded browser sniffing to work out what to do. The mouse position issue described here is almost the only such situation. The very thought that it might be necessary to use browser detection should make all right-thinking DHTML developers shudder with guilt, but, sadly, there’s nothing for it! We add the browser detection script to the code just before we calladdEventto set up our window load listener: Example 4.10.scrollImage.js(excerpt)
var isIE = !window.opera && navigator.userAgent.indexOf('MSIE') != -1;Note that, first, we check that window.opera isfalseor non-existent; Opera sets this variable to make it easy for scripts to detect that it is the browser in use (Opera also implements user-agent switching, so that, from anavigator.userAgentperspective, it can appear to be Internet Explorer). Once we’ve established that we’re not using Opera, we go on to look for "MSIE" in the user agent string; if this is present, Internet Explorer is the browser in use. Our updatedmoveListenerevent listener now looks like this: Example 4.11.scrollImage.js(excerpt)
function moveListener(ev) {    var e = window.event ? window.event : ev;    var t = e.target ? e.target : e.srcElement;

var mX, mY;    if (e.pageX && e.pageY) {    mX = e.pageX;    my = e.pageY;    } else if (e.clientX && e.clientY) {    mX = e.clientX;    mY = e.clientY;    if (isIE) {    mX += document.body.scrollLeft;    mY += document.body.scrollTop;    }    }

var xPos = mX - findPosX(t);    var yPos = mY - findPosY(t);

// ... the rest as before ...
Note that we check first for pageX and pageY (for Mozilla), then fall through to clientX and clientY. We handle Internet Explorer by checking theisIEvariable; if it’strue, we add the document’s scroll amounts as required. We’re using the browser detect as little as possible; specifically, Netscape/Mozilla provide the pageX and pageY properties, and we look for them through feature sniffing, not by performing browser detection for Mozilla. Calculating Screen Positions The last section of our code has little to do with browser detects, but, having spent all this time to get the right X and Y coordinates, it makes sense to understand how to use them. The last part of themoveListenerfunction starts with a couple of if s, which ensure that we have in hand a reference to the<a>tag surrounding the thumbnail<img>of interest. No surprises there, so we grab the required DOM element: Example 4.12.scrollImage.js(excerpt)
if (t.nodeName.toLowerCase() == 'img') t = t.parentNode; if (t.nodeName.toLowerCase() == 'a') {Next, we have the first of two sets of calculations: Example 4.13.scrollImage.js(excerpt)// scaleFactorY = (width(big) - width(small)) / width(small) var scaleFactorY = (attVal(t, 'mainy') - attVal(t, 'thumby')) / attVal(t, 'thumby'); var scaleFactorX = (attVal(t, 'mainx') - attVal(t, 'thumbx')) / attVal(t, 'thumbx');Code like this is liable to be specific to each DHTML effect you undertake, but the mind-bending you have to do to come up with the code is similar in all cases. Take a deep breath: here we go! With the large background image showing through the viewing area, what should appear when the cursor is in the top-left corner of that viewing area? The top-left corner of the big image should be in the top-left corner of the viewing area: that’s straightforward. Now, what should appear when the cursor is located at the bottom-right corner of the viewing area? Should the bottom-right corner of the full-sized image be in the top-left corner of the viewing area? That’s what would happen if the big image were moved by its full size across the viewing area as the cursor was moved the full distance across the viewing area. Think about it carefully; you might like to try experimenting with two pieces of paper, one of which has a rectangular hole in it. The big image would eventually disappear off the top-left corner of the viewing area! If the background image were tiled (the default), additional copies of the image would be visible at this bottom-right corner – a very odd result. We don’t want the image to move that far. If we move the cursor to the extreme bottom-right of the viewing area, we want the big image to move by almost its entire size – but not quite! We want the bottom-right corner of the big image to move only as far as the bottom-right corner of the viewing area, and not move any further towards the top-left. Now, to make the big image move, we have to calculate a distance by which to move it. Take some example figures: suppose the big image is ten times the size of the thumbnail. Let’s suppose the image is 500 pixels on each side, and the thumbnail’s 50 pixels on each side. For every pixel by which the cursor moves, the big image should move 500/50: ten times as fast. So the "scale factor" is ten. But, wait a minute! If the cursor moves 50 pixels left, the big image will move 500 pixels left: right off the left edge of the viewing area. That’s too far. We want it to move at most 500 minus 50 pixels, so that it’s always "inside" the viewing area. Therefore, the real scale factor is (500 – 50) / 50 = 9. The full-sized image should move nine times as fast as the cursor. That’s what the first set of calculations does, except that it calculates scale factors in both dimensions, since most images are rectangles, not squares. Next, we want to move the big image. Here’s the second set of calculations: Example 4.14.scrollImage.js(excerpt)t.style.backgroundPosition = (-parseInt(xPos * scaleFactorX)) + 'px ' + (-parseInt(yPos * scaleFactorY)) + 'px';Now, if (for example) we move the mouse from the top-left towards the bottom-right, we’re scanning diagonally across the viewing area. As we move, we want new areas of the big image to come into view. So the big image had better slide in the opposite direction to the mouse: up towards, and beyond, the top left. It’s like using a negative margin to bleed text to the left and top of a page. And that’s what we do by calculating negative pixel amounts. This idea may seem back-to-front initially. Think of it as though you were shooting a scene for a movie. The camera (the thumbnail viewing area) is fixed into place, so it must be the scene at which the camera points that moves if there’s to be any panning effect. Alternately, imagine yourself looking out of the window of a moving train without turning your head. It’s the same effect again, provided the train goes backwards!
Summary
In this chapter, we’ve learned that browsers don’t always support all the DOM features we’d like, and discussed how feature sniffing helps us as DHTML developers to code defensively around this issue. Browser sniffing allows us to deliver dynamic features to browsers that can handle them and, at the same time, to avoid crashing or throwing errors in browsers that can’t. We looked at the old method, browser sniffing, and explained why it shouldn’t be used if at all possible. We then explored one occasion on which feature sniffing can’t provide everything we need, leaving us the old method as a last resort.
That’s it for this excerpt of DHTML Utopia: Modern Web Design Using JavaScript & DOM ! What’s next?
 Download this chapter in PDF format , and you’ll have a copy you can refer to at any time.
Review the book’s table of contents to find out exactly what’s included.
 Buy your own copy of the book now, right here at SitePoint.com.
We hope you enjoy DHTML Utopia: Modern Web Design Using JavaScript & DOM .
From: https://www.sitepoint.com/dhtml-utopia-modern-web-design/
DHTML乌托邦:使用JavaScript和DOM的现代Web设计相关推荐
- dhtml_DHTML乌托邦:使用JavaScript和DOM的现代Web设计
dhtml 动态HTML(简称DHTML)是一组Web开发技术的名称,这些技术主要用于具有非平凡用户输入功能的Web页面. DHTML意味着处理HTML文档的文档对象模型,在样式信息中摆弄CSS指令, ...
- 前端入门之——javascript day8 DOM对象(DHTML)
DOM对象(DHTML) 7.1 什么是 DOM? DOM 是 W3C(万维网联盟)的标准.DOM 定义了访问 HTML 和 XML 文档的标准: "W3C 文档对象模型(DOM)是中立于平 ...
- 深入理解JavaScript系列(23):JavaScript与DOM(上)——也适用于新手
文档对象模型Document Object Model DOM(Document Object Model,文档对象模型)是一个通过和JavaScript进行内容交互的API. Javascript和 ...
- JavaScript学习笔记(2)——JavaScript和DOM的关系
文档对象模型(Document Object Model,简称DOM),是W3C组织推荐的处理可扩展标志语言的标准编程接口.DOM实际上是以面向对象方式描述的文档模型.DOM定义了表示和修改文档所需的 ...
- Javascript中DOM技术的的简单学习
第十四课 DOM技术概述 1:DOM概述 文档对象模型DOM(Document Object Model)定义访问和处理HTML文档的标准方法.DOM 将HTML文档呈现为带有元素.属性和文本的树结构 ...
- Javascript操作DOM常用API总结
文本整理了javascript操作DOM的一些常用的api,根据其作用整理成为创建,修改,查询等多种类型的api,主要用于复习基础知识,加深对原生js的认识. 基本概念 在讲解操作DOM的api之前, ...
- JavaScript操作DOM对象
目录 一.DOM操作 (一).DOM操作分类 (二).节点和节点的关系 (三).访问节点 (四).节点信息 二.操作节点 (一)操作节点的属性 (二).创建和插入节点 (三).删除和替换节点 (四). ...
- 【repost】Javascript操作DOM常用API总结
Javascript操作DOM常用API总结 文本整理了javascript操作DOM的一些常用的api,根据其作用整理成为创建,修改,查询等多种类型的api,主要用于复习基础知识,加深对原生js的认 ...
- 【前端】第二章 HTML、CSS、JavaScript、DOM和JSON
第二章 HTML.CSS.JavaScript.DOM和JSON 文章目录 第二章 HTML.CSS.JavaScript.DOM和JSON 一.HTML 1.表单 2.小票 3.注册页面 4.音视频 ...
最新文章
- Linux安装无法运行install,Linux新手安装Debian-8.2.0可能遇到的问题
- PHP ftp_mkdir 函数
- mac本地搭建kafka
- python数字的鲁棒输入_请教关于python的手写数字识别神经网络问题~~~~
- 后端:Spring IOC 知识点总结,写得太好了!
- appium java简单实例_Appium创建一个Note的实例
- 修改android.jar教程,Android修改jar包文件
- 吉林大学计算机与科学专业排名,吉林大学专业排名 哪些王牌专业推荐就读
- 第三:jenkins集成httpclient项目并生成在线报告(接口自动化落地)
- 反恐精英ol永恒python厉害吗_【CS】Python高阶
- 初学STM32F205的库包搭建工程
- k8s安装prometheus+grafana(第二弹:prometheus-operator)
- 乾隆盛世,居然是“饥饿的盛世”?
- CMD命令行高级教程精选合编合集 转
- [2016 NUIST 程序设计竞赛] D. 达朗贝尔的台阶
- 回溯法求解N皇后问题及其时间复杂度分析
- 【源码】程序员优质资源汇总
- python判断用户输入的数是正数还是负数
- android在体检报告叫什么,体检报告助手app下载-体检报告助手v3.1.5 安卓版-腾牛安卓网...
- (转)十分钟搞懂Lombok使用与原理
热门文章
- android的适配器作用,适配器模式安卓中的应用
- 应用基准化分析—Benchmark
- 歌谣:2022年年终总结
- sklearn 中 pca.components_
- 使用Windows Server 2003轻松建立森林间信任
- 数加平台在数据挖掘项目中的实践 1
- java毕业设计——基于java+Jsoup+HttpClient的网络爬虫技术的网络新闻分析系统设计与实现(毕业论文+程序源码)——网络新闻分析系统
- 彬彬偷偷告诉了平行世界的其他杰哥们这个世界里的杰哥已经得到了阿伟,于是他们也来到了这个世界想要教阿伟登Dua郎,现在他们“成群杰队”地赶来了!
- 2023 绿茶小说网站系统PHP自适应源码
- 网络爬虫---用urllib模块爬取京东笔记本电脑的数据、并对其做一个可视化