navigationController中navigationBar 的设置
摘自社会成员的cnblog,原文链接如下:http://www.cnblogs.com/lsck/archive/2012/05/19/2508878.html
感谢分享
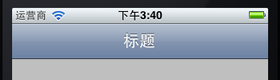
3、设置标题:
打开ViewController.m,在viewDidLoad方法中[super viewDidLoad];之后添加代码:
self.navigationItem.title = @"标题";
运行:
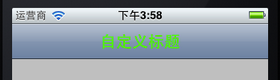
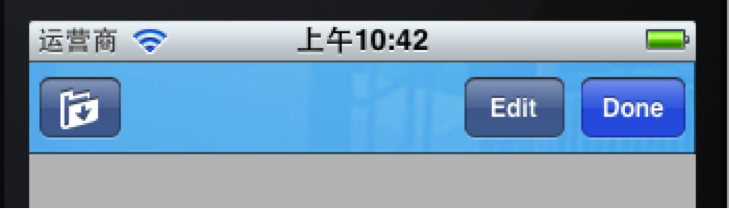
4、自定义标题,设置titleView:
如果我们想改变标题的颜色和字体,就需要自己定义一个UILabel,并且已经设置好这个Label的内容,可以设置自己想要的字体、大小和颜色等。然后执行self.navigationItem.titleView = myLabel;就可以看到想要的效果。
4.1 打开ViewController.h,向其中添加属性:
@property (strong, nonatomic) UILabel *titleLabel;
4.2 打开ViewController.m,在@implementation ViewController下面一行添加代码:
@synthesize titleLabel;
4.3 在viewDidLoad方法中,去掉self.navigationItem.title = @"标题";,并添加代码:
//自定义标题
titleLabel = [[UILabel alloc] initWithFrame:CGRectMake(0, 0 , 100, 44)];
titleLabel.backgroundColor = [UIColor clearColor];  //设置Label背景透明
titleLabel.font = [UIFont boldSystemFontOfSize:20];  //设置文本字体与大小
titleLabel.textColor = [UIColor colorWithRed:(0.0/255.0) green:(255.0 / 255.0) blue:(0.0 / 255.0) alpha:1];  //设置文本颜色
titleLabel.textAlignment = UITextAlignmentCenter;
titleLabel.text = @"自定义标题";  //设置标题
self.navigationItem.titleView = self.titleLabel;
运行:
实际上,不仅仅可以将titleView设置成Label,只要是UIView的对象都可以设为titleView,例如,将4.3中的代码改成:
UIButton *button = [UIButtonbuttonWithType: UIButtonTypeRoundedRect];
[button setTitle: @"按钮" forState: UIControlStateNormal];
[button sizeToFit];
self.navigationItem.titleView = button;
则运行起来效果如下:

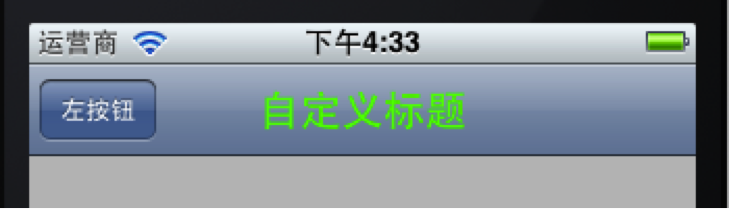
5、为Navigation Bar添加左按钮
以下是进行leftBarButtonItem设置的代码:
self.navigationItem.leftBarButtonItem = (UIBarButtonItem *)
self.navigationItem.leftBarButtonItems = (UIBarButtonItem *)
self.navigationItemsetLeftBarButtonItem:(UIBarButtonItem *)
self.navigationItemsetLeftBarButtonItem:(UIBarButtonItem *) animated:(BOOL)
self.navigationItemsetLeftBarButtonItems:(NSArray *)
self.navigationItemsetLeftBarButtonItems:(NSArray *) animated:(BOOL)
其实很简单,只要定义好一个UIBarButtonItem,然后执行上述某行代码就行了。
5.1 为了使得运行时不出错,我们在ViewController.m中添加一个空方法,由将要创建的左右按钮使用:
//空方法
-(void)myAction {}
5.2 添加一个左按钮:
在ViewDidLoad方法最后添加代码:
//添加左按钮
UIBarButtonItem *leftButton = [[UIBarButtonItem alloc]  initWithTitle:@"左按钮"  style:UIBarButtonItemStylePlain  target:self   action:@selector(myAction)];
[self.navigationItem setLeftBarButtonItem:leftButton];
运行效果如下:
创建一个UIBarButtonItem用的方法主要有:
[UIBarButtonItemalloc]initWithTitle:(NSString *) style:(UIBarButtonItemStyle) target:(id) action:(SEL)
[UIBarButtonItemalloc]initWithBarButtonSystemItem:(UIBarButtonSystemItem) target:(id) action:(SEL)
在第一个方法中,我们可以使用的按钮样式有:
UIBarButtonItemStyleBordered
UIBarButtonItemStyleDone
UIBarButtonItemStylePlain
效果分别如下:


看上去第一个和第三个样式效果是一样的。
6、添加一个右按钮
在ViewDidLoad方法最后添加代码:
//添加右按钮
UIBarButtonItem *rightButton = [[UIBarButtonItem alloc]initWithBarButtonSystemItem:UIBarButtonSystemItemUndotarget:selfaction:@selector(myAction)];
self.navigationItem.rightBarButtonItem = rightButton;
运行如下:

这里创建UIBarButtonItem用的方法是
[UIBarButtonItemalloc]initWithBarButtonSystemItem:(UIBarButtonSystemItem) target:(id) action:(SEL)
用了系统自带的按钮样式,这些样式的标签和效果如下:
| 标签 | 效果 | 标签 | 效果 |
| UIBarButtonSystemItemAction |

|
UIBarButtonSystemItemPause |

|
| UIBarButtonSystemItemAdd |

|
UIBarButtonSystemItemPlay |

|
| UIBarButtonSystemItemBookmarks |

|
UIBarButtonSystemItemRedo |

|
| UIBarButtonSystemItemCamera |

|
UIBarButtonSystemItemRefresh |

|
| UIBarButtonSystemItemCancel |

|
UIBarButtonSystemItemReply |

|
| UIBarButtonSystemItemCompose |

|
UIBarButtonSystemItemRewind |

|
| UIBarButtonSystemItemDone |

|
UIBarButtonSystemItemSave |

|
| UIBarButtonSystemItemEdit |

|
UIBarButtonSystemItemSearch |

|
| UIBarButtonSystemItemFastForward |

|
UIBarButtonSystemItemStop |

|
| UIBarButtonSystemItemOrganize |

|
UIBarButtonSystemItemTrash |

|
| UIBarButtonSystemItemPageCurl |

|
UIBarButtonSystemItemUndo |

|
注意,UIBarButtonSystemItemPageCurl只能在Tool Bar上显示。
7、添加多个右按钮
在ViewDidLoad方法中最后添加代码:
//添加多个右按钮
UIBarButtonItem *rightButton1 = [[UIBarButtonItem alloc]initWithBarButtonSystemItem:UIBarButtonSystemItemDonetarget:selfaction:@selector(myAction)];
UIBarButtonItem *rightButton2 = [[UIBarButtonItem alloc]initWithBarButtonSystemItem:UIBarButtonSystemItemFixedSpacetarget:nilaction:nil];
UIBarButtonItem *rightButton3 = [[UIBarButtonItem alloc]initWithBarButtonSystemItem:UIBarButtonSystemItemEdittarget:selfaction:@selector(myAction)];
UIBarButtonItem *rightButton4 = [[UIBarButtonItem alloc]initWithBarButtonSystemItem:UIBarButtonSystemItemFlexibleSpacetarget:nilaction:nil];
UIBarButtonItem *rightButton5 = [[UIBarButtonItem alloc]initWithBarButtonSystemItem:UIBarButtonSystemItemOrganizetarget:selfaction:@selector(myAction)];
NSArray *buttonArray = [[NSArray alloc]initWithObjects:rightButton1,rightButton2,rightButton3,rightButton4,rightButton5, nil];
self.navigationItem.rightBarButtonItems = buttonArray;
为了更好的显示效果,把设置titleView以及设置leftBarButtonItem的代码注释掉,运行效果如下:

上面的UIBarButtonSystemItemFixedSpace和UIBarButtonSystemItemFlexibleSpace都是系统提供的用于占位的按钮样式。
8、设置Navigation Bar背景颜色
在viewDidLoad方法后面添加代码:
//设置Navigation Bar颜色
self.navigationController.navigationBar.tintColor = [UIColor colorWithRed:(218.0/255.0) green:(228.0 / 255.0) blue:(250.0 / 255.0) alpha:1];
运行如下:
9、设置Navigation Bar背景图片
首先将准备好作为背景的图片拖到工程中,我用的图片名称是title_bg.png。
将上面的代码改成:
//设置Navigation Bar背景图片
UIImage *title_bg = [UIImage imageNamed:@"title_bg.png"];  //获取图片
CGSize titleSize = self.navigationController.navigationBar.bounds.size;  //获取Navigation Bar的位置和大小
title_bg = [self scaleToSize:title_bg size:titleSize];//设置图片的大小与Navigation Bar相同
[self.navigationController.navigationBar setBackgroundImage:title_bgforBarMetrics:UIBarMetricsDefault];  //设置背景
之后,在ViewController.m中添加一个方法用于调整图片大小:
//调整图片大小
- (UIImage *)scaleToSize:(UIImage *)img size:(CGSize)size{UIGraphicsBeginImageContext(size);[img drawInRect:CGRectMake(0, 0, size.width, size.height)];UIImage* scaledImage = UIGraphicsGetImageFromCurrentImageContext();UIGraphicsEndImageContext();return scaledImage;
}
运行:
navigationController中navigationBar 的设置相关推荐
- iphone iPhone开发中为UINavigationBar设置背景图片方法
1:原文摘自:http://mobile.51cto.com/iphone-284865.htm iPhone开发中为UINavigationBar设置背景图片方法是本文要介绍的内容,在iPhone开 ...
- powerdesigner 同步mysql 报错_PowerDesigner实用技巧小结 及 导出word,想字段顺序跟模型中一致,如何设置...
powerdesigner导出word,想字段顺序跟模型中一致,如何设置 右键List of columns of the table %PARENT% ,selection,define sort ...
- 【转】Word2007中不连续页码设置 多种页码设置
[转]Word2007中不连续页码设置 多种页码设置 页码是论文必不可少的部分.我们看一下如何添加页码,并且针对一些特殊的格式要求怎么应对: 如果是[毕业论文]有多种混合页码,有Ⅰ.Ⅱ.Ⅲ...还有1 ...
- pb 修改数据窗口种指定字段位置_如何在PB数据窗口中修改数据---设置数据窗口的更新属性...
如何在 PB 数据窗口中修改数据 --- 设置数据窗口的更新属性 数据窗口对象非常强大的原因之一就是能够很容易地修改数据库.当用户修 改了数据窗口中的数据,插入了新的数据行或者删除了数据行以后,只要调 ...
- linux恢复设置文件夹,将.bashrc文件恢复到Ubuntu中的默认设置
以下介绍在Ubuntu系统中将.bashrc文件恢复默认设置的方法,如果你在Ubuntu系统中把.bashrc文件搞坏了就按下面的方法恢复bashrc文件. 背景 我有一个Ubuntu VM,我经常用 ...
- python中matplotlib自定义设置图像标题使用的字体类型:获取默认的字体族及字体族中对应的字体、自定义设置图像标题使用的字体类型
python中matplotlib自定义设置图像标题使用的字体类型:获取默认的字体族及字体族中对应的字体.自定义设置图像标题使用的字体类型 目录
- fusioncompute中cpu可以设置的qos参数有哪些?_kubernetes 中 Qos 的设计与实现
kubernetes 中的 Qos QoS(Quality of Service) 即服务质量,QoS 是一种控制机制,它提供了针对不同用户或者不同数据流采用相应不同的优先级,或者是根据应用程序的要求 ...
- [Android]ListView中分割线的设置
1.在布局文件中ListView元素中通过属性设置 [html] view plaincopy android:divider="#fffff" 分割线颜色 android:di ...
- 全面认识Eclipse中JVM内存设置
这里向大家描述一下Eclipse中如何进行JVM内存设置,JVM主要管理两种类型的内存:堆和非堆.简单来说堆就是Java代码可及的内存,是留给开发人员使用的:非堆就是JVM留给自己用的,所以方 ...
最新文章
- 盘点11个面向文档的开源NoSQL数据库
- Vue实现仿音乐播放器11-实现访问百度音乐API实现播放音乐功能
- bootstrap datetimepicker的一些小总结
- epp是什么意思_有效的个人生产力(EPP)——助力洁绿形成组织发展合力
- HTML+CSS+JS实现 ❤️酷炫3D瀑布流动画特效❤️
- python os path isfile_Python path.isfile方法代码示例
- 浏览器js 获取手机标识信息_手机软件多次要求获取手机信息,习惯性让其通过有安全隐患?...
- qjsonarray 合并_QJsonObject和QJsonArray的巨坑
- iostream.h和iostream 区别
- 【小白学前端】化腐朽为神奇-Bootstrap实现表单美化(day02-6)
- python爬取全国真实地址_python爬虫学习之爬取全国各省市县级城市邮政编码
- 计算机软件的初始密码,怎么设置电脑软件密码
- Autodesk BIM 360 全球在线骇客马拉松
- JAVA:实现Lucas Series卢卡斯系列算法(附完整源码)
- 长城服务器装双系统,苹果双系统怎么装win7系统,教你苹果windows7双系统教程
- 安装虚拟机步骤 详细
- VS2010使用DX报错 VS报错之混合模式程序集是针对“v1.1.4322”版的运行时生成的,在没有配置其他信息的情况下,无法在 4.0 运行时中加载该程序集。...
- MySQL自动删除指定时间以前的记录
- input框点击时去掉默认的外层边框
- 基于matlab的步进电机仿真(一)