阻止搜索引擎抓取网站的工具_使用PHP将抓取的网站转变为搜索引擎
阻止搜索引擎抓取网站的工具
In the previous part of this tutorial, we used Diffbot to set up a crawljob which would eventually harvest SitePoint’s content into a data collection, fully searchable by Diffbot’s Search API. We also demonstrated those searching capabilities by applying some common filters and listing the results.
在本教程的上一部分中,我们使用Diffbot设置了一个crawljob,最终将SitePoint的内容收集到数据集中,可通过Diffbot的Search API进行完全搜索。 我们还通过应用一些常见的过滤器并列出了结果来展示了这些搜索功能。
In this part, we’ll build a GUI simple enough for the average Joe to use it, in order to have a relatively pretty, functional, and lightweight but detailed SitePoint search engine. What’s more, we won’t be using a framework, but a mere total of three libraries to build the entire application.
在这一部分中,我们将构建一个足够简单的GUI,以使普通的Joe可以使用它,以便拥有一个相对漂亮,功能强大,轻巧但详细的SitePoint搜索引擎。 而且,我们不会使用框架,而是仅使用三个库来构建整个应用程序。
You can see the demo application here.
您可以在此处查看演示应用程序。
This tutorial is completely standalone, and as such if you choose to follow along, you can start with a fresh Homestead Improved instance. Note that in order to actually fully use what we build, you need a Diffbot account with Crawljob and Search API functionality.
本教程是完全独立的,因此,如果您选择继续学习,则可以从一个全新的Homestead Improvement实例开始。 请注意,为了真正充分利用我们构建的内容,您需要一个具有Crawljob和Search API功能的Diffbot帐户。
自举 (Bootstrapping)
Moving on, I’ll assume you’re using a Vagrant machine. If not, find out why you should, then come back.
继续,我假设您使用的是Vagrant机器。 如果不是,请找出原因 ,然后再回来。
On a fresh Homestead Improved VM, the bootstrapping procedure is as follows:
在新的Homestead Enhanced VM上,引导过程如下:
composer global require beelab/bowerphp:dev-master
mkdir sp_search
cd sp_search
mkdir public cache template template/twig app
composer require swader/diffbot-php-client
composer require twig/twig
composer require symfony/var-dumper --dev
In order, this:
按此顺序:
installs BowerPHP globally, so we can use it on the entire VM.
全局安装BowerPHP ,因此我们可以在整个VM上使用它。
- creates the project’s root folder and several subfolders.创建项目的根文件夹和几个子文件夹。
installs the Diffbot PHP client, which we’ll use to make all calls to the API and to iterate through the results.
安装Diffbot PHP客户端 ,我们将使用它来对API进行所有调用并遍历结果。
installs the Twig templating engine, so we’re not echoing out HTML in PHP like peasants :)
安装了Twig模板引擎 ,因此我们不会像农民一样在PHP中回显HTML :)
installs VarDumper in dev mode, so we can easily debug while developing.
在开发人员模式下安装VarDumper ,因此我们可以在开发时轻松调试。
To bootstrap the “front end” part of our app, we do the following:
要引导应用程序的“前端”部分,请执行以下操作:
cd public
mkdir assets assets/{css,js,img}
bowerphp install bootstrap
bowerphp install normalize.css
touch assets/css/main.css assets/js/main.js index.php token.php
I also used iconifier to generate some icons, and grabbed a big SitePoint logo image to use as the site’s background, but that’s all entirely optional.
我还使用了iconifier来生成一些图标,并获取了一个较大的SitePoint徽标图像用作网站的背景,但这完全是可选的。
The above commands make some folders and blank files and install Bootstrap. They also create the front controller (index.php) of our little search app. We can set up this file like so:
上面的命令将创建一些文件夹和空白文件,然后安装Bootstrap。 他们还创建了我们的小型搜索应用程序的前端控制器( index.php )。 我们可以这样设置该文件:
<?php
use SitePoint\Helpers\SearchHelper;
use Swader\Diffbot\Diffbot;
require_once '../vendor/autoload.php';
require_once '../token.php';
$loader = new Twig_Loader_Filesystem(__DIR__ . '/../template/twig');
$twig = new Twig_Environment($loader
, array('cache' => false, 'debug' => true)
);
$vars = [];
// Get query params from request
parse_str($_SERVER['QUERY_STRING'], $queryParams);
// Check if the search form was submitted
if (isset($queryParams['search'])) {
$diffbot = new Diffbot(DIFFBOT_TOKEN);
// Building the search string
$string = '';
// Basics
$search = $diffbot
->search($string)
->setCol('sp_search');
// Pagination
// ...
}
echo $twig->render('home.twig', $vars);
Essentially, we set up Twig, grab the $_GET contents, and initialize a Diffbot search call (but never execute it). Finally, we make the template file template/twig/home.twig:
本质上,我们设置了Twig,获取$_GET内容,并初始化了Diffbot搜索调用(但从不执行)。 最后,我们制作模板文件template/twig/home.twig :
Hello!If you try to run this “app” now, you should see “Hello”. You should also see a cached version of the template appear in the cache folder. Be sure to set up the token.php file first – it needs the contents:
如果您现在尝试运行此“应用程序”,则应看到“您好”。 您还应该看到cache文件夹中显示了模板的缓存版本。 确保首先设置token.php文件-它需要以下内容:
<?php
define('DIFFBOT_TOKEN', 'my_token');
Then, we add this file to the project’s .gitignore file. Feel free to use this one and update it as needed. This is so we don’t accidentally commit our Diffbot token to Github – a stolen token can become very expensive.
然后,我们将此文件添加到项目的.gitignore文件中。 随意使用这一个 ,并根据需要更新。 这样一来,我们就不会将Diffbot令牌意外地提交给Github了-被盗的令牌可能会变得非常昂贵。
Bootstrapping done, let’s get to the meat of things now.
引导完成后,现在就开始讨论。
前端 (Front end)
The idea (at this point) is to have one main search field, like Google, accepting almost raw Search API queries, and three plain old text fields into which users can enter comma separated values:
目前的想法是拥有一个主要的搜索字段(例如Google),接受几乎原始的Search API查询,以及三个普通的旧文本字段,用户可以在其中输入逗号分隔的值:
- “Author(s)” will support authors. Entering several will do an “OR” search – as in, articles written either by author 1, or author 2, or author 3, etc…“作者”将支持作者。 输入多个将进行“或”搜索-例如,作者1,作者2或作者3等撰写的文章等…
- “Keywords (any)” will search for any of the given keywords in any of the Diffbot-extracted fields. This includes body, title, meta, even author, etc.“关键字(任意)”将在Diffbot提取的任何字段中搜索任何给定的关键字。 这包括正文,标题,元数据甚至作者等。
“Keywords (all)” searches for keywords, too, but those must all appear across any of the Diffbot extracted fields.
“关键字(全部)”也搜索关键字,但是这些关键字必须全部出现在Diffbot提取的任何字段中。
Let’s update our home.twig file, inspired by HTML5 boilerplate.
让我们更新受HTML5样板启发的home.twig文件。
<!doctype html>
<html lang="en">
<head>
<meta charset="utf-8">
<meta http-equiv="x-ua-compatible" content="ie=edge">
<title>SitePoint Search</title>
<meta name="description" content="Diffbot-powered SitePoint Search Engine">
<meta name="viewport" content="width=device-width, initial-scale=1">
<link rel="apple-touch-icon" href="/apple-touch-icon.png">
<link rel="stylesheet" href="/bower_components/normalize.css/normalize.css">
<link rel="stylesheet"
href="/bower_components/bootstrap/dist/css/bootstrap.min.css"/>
<link rel="stylesheet" href="/assets/css/main.css">
</head>
<body>
<img src="/assets/img/sp_square.png" alt="" class="bg"/>
<header>
<h3>SitePoint
<small>search</small>
</h3>
</header>
<div class="content">
<!--[if lt IE 8]>
<p class="browserupgrade">You are using an <strong>outdated</strong>
browser.
Please <a href="http://browsehappy.com/">upgrade your browser</a> to
improve
your experience.</p>
<![endif]-->
<div class="search-form">
<form id="main-form" class="submit-once">
<div class="main-search form-group">
<div class="input-group">
<input class="form-control" type="text" name="q" id="q"
placeholder="Full search query"/>
<span class="input-group-btn">
<button class="btn btn-default" type="button"
data-toggle="modal"
data-target="#examples-table">?
</button>
</span>
</div>
<a href="#" class="small detailed-search">>> Toggle Detailed
searching</a>
</div>
<div class="detailed-search-group" style="display: none;">
<div class="form-group">
<label for="authorinput">Author(s): </label><input
class="form-control"
id="authorinput"
name="authors"
type="text"
placeholder="Bruno Skvorc"/>
</div>
<div class="form-group">
<label for="kanyinput">Keywords (any): </label><input
class="form-control"
id="kanyinput"
name="keywords_any"
type="text"
placeholder="sitepoint, diffbot, whatever"/>
</div>
<div class="form-group">
<label for="kallinput">Keywords (all): </label><input
class="form-control"
id="kallinput"
name="keywords_all"
type="text"
placeholder="sitepoint, diffbot, whatever"/>
<a href="#" class="small detailed-search">>> Toggle Detailed
searching</a>
</div>
</div>
<div class="form-group">
<input id="submit" class="btn btn-default" type="submit"
value="Search" name="search"/>
</div>
</form>
{% include 'results.twig' %}
</div>
<script src="/bower_components/jquery/dist/jquery.min.js"></script>
<script src="/bower_components/bootstrap/dist/js/bootstrap.min.js"></script>
<script src="/assets/js/main.js"></script>
{% include 'google-analytics.twig' %}
</div>
<footer>
<a href="what.html">What's this all about?</a>
<br>-<br>
Built by <a href="https://twitter.com/bitfalls">@bitfalls</a> for <a
href="https://www.sitepoint.com">SitePoint</a>. Hosted on <a
href="http://bit.ly/do-ref">DigitalOcean</a>.
</footer>
{% include "modal-examples.twig" %}
</body>
</html>
Note that I also extracted some tedious bits of HTML into sub-templates that get included. Those include the Google Analytics snippet, the modal with search query examples, and most importantly, the results template which we’ll use to output results later. Only the results one is important, so make the file template/twig/results.twig, even if it’s empty or just has the contents “Test”. The others can be removed from the home.twig template altogether, or you can grab them from the Github repo.
注意,我还提取了一些乏味HTML到包含的子模板中。 其中包括Google Analytics(分析)代码段 ,带有搜索查询示例的模式以及最重要的是结果模板,我们将在稍后使用该模板输出结果。 只有一个结果很重要,因此,使文件template/twig/results.twig即使为空或仅包含“ Test”内容。 其他的可以完全从home.twig模板中删除,或者您可以从Github home.twig中获取它们。
Let’s now add to the whole thing a little bit of CSS flexbox magic, background imagery, and basic jQuery-isms to make the elements get along nicely. For example, we use a form class to prevent double submits, and we also use localStorage to remember if the user prefers detailed or regular searching:
现在,让我们在整个过程中添加一些CSS flexbox魔术,背景图像和基本的jQuery-isms,以使元素相处得很好。 例如,我们使用一个表单类来防止重复提交,并且我们还使用localStorage来记住用户是喜欢详细搜索还是常规搜索:
// main.js
$(document).ready(function () {
$('form.submit-once').submit(function(e){
if( $(this).hasClass('form-submitted') ){
e.preventDefault();
return;
}
$(this).addClass('form-submitted');
$('#submit').addClass('disabled');
});
var dsg = $('.detailed-search-group');
var ms = $('.main-search');
if (localStorage.getItem('detailed-on') == "true") {
dsg.show();
ms.hide();
} else {
dsg.hide();
ms.show();
}
$(".detailed-search").click(function (e) {
ms.toggle();
dsg.toggle();
localStorage.setItem('detailed-on', dsg.is(':visible'));
});
});
/* main.css */
body {
display: flex;
min-height: 100vh;
flex-direction: column;
font-family: arial,sans-serif;
}
div.content {
display: flex;
flex: 1;
align-items: center;
justify-content: center;
}
div.content.what {
max-width: 500px;
margin: auto;
}
div.hidden {
display: none;
}
div.search-form {
width: 80%;
}
.results {
max-width: 600px;
font-size: small;
}
footer {
padding: 1.5rem;
background: #404040;
color: #999;
font-size: .85em;
text-align: center;
z-index: 1;
}
header {
text-align: center;
}
img.bg {
/* Set rules to fill background */
min-height: 100%;
min-width: 1024px;
/* Set up proportionate scaling */
width: 100%;
height: auto;
/* Set up positioning */
position: fixed;
top: -60px;
left: 0;
z-index: -1000;
opacity: 0.05;
filter: alpha(opacity=5);
}
@media screen and (max-width: 1024px) { /* Specific to this particular image */
img.bg {
left: 50%;
margin-left: -512px; /* 50% */
}
}and we have our basic interface (with the “Test” from a mocked results.twig):
并且我们有了基本的界面(带有模拟的results.twig的“ Test”):
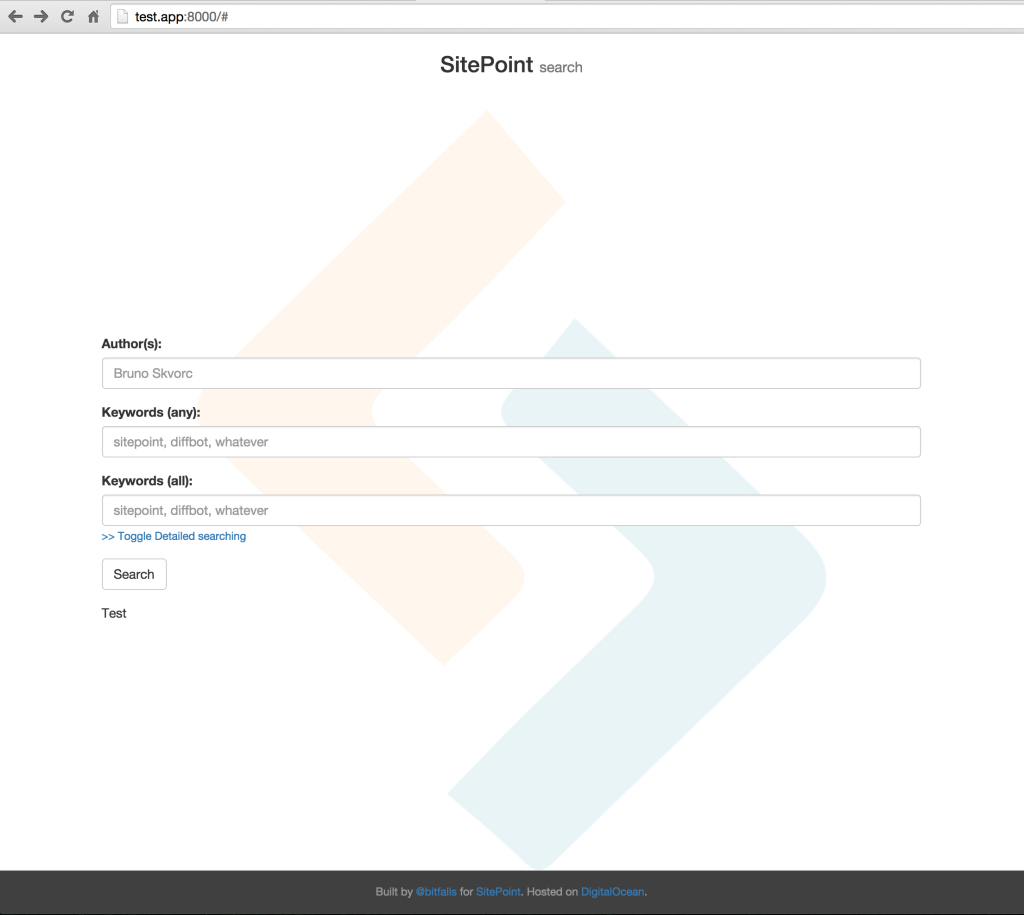
There is one main search field, similar to Google, which accepts any keyword or phrase constructed in a Search API friendly way. Think of it like direct access to the Search API. See the examples modal for what it’s about.
有一个主要的搜索字段,类似于Google,它接受以Search API友好方式构造的任何关键字或词组。 可以将其视为直接访问Search API。 请参阅示例模式以了解其内容。
By clicking on “Toggle Detailed”, however, the situation changes and we have our individual search fields with which we can get more precise results. Let’s wire these fields up now.
但是,通过单击“切换详细”,情况会发生变化,并且我们具有单独的搜索字段,通过它们可以获取更精确的结果。 现在将这些字段连接起来。
后端 (Back end)
Let’s change the Building the search string part of index.php to the following:
让我们将Building the search string index.php Building the search string部分更改为以下内容:
// Building the search string
$searchHelper = new \SitePoint\Helpers\SearchHelper();
$string = (isset($queryParams['q']) && !empty($queryParams['q']))
? $queryParams['q']
: $searchHelper->stringFromParams($queryParams);
For the purpose of cleaner code, we abstract the query building mechanics into a brute-force SearchHelper class.
为了使代码更简洁,我们将查询构建机制抽象为蛮力的SearchHelper类。
// [root]/app/helpers/SearchHelper.php
<?php
namespace SitePoint\Helpers;
class SearchHelper
{
protected $strings = [];
public function stringFromParams(array $queryParams)
{
$this->authorCheck($queryParams);
$this->keywordCheck($queryParams);
if (empty($this->strings)) {
die("Please provide at least *some* search values!");
}
return (count($this->strings) > 1) ? implode(' AND ',
$this->strings) : $this->strings[0];
}
protected function authorCheck(array $queryParams)
{
if (isset($queryParams['authors']) && !empty($queryParams['authors'])) {
$authors = array_map(function ($item) {
return 'author:"' . trim($item) . '"';
}, explode(',', $queryParams['authors']));
$this->strings[] = '(' . ((count($authors) > 1)
? implode(' OR ', $authors)
: $authors[0]) . ')';
}
}
protected function keywordCheck(array $queryParams)
{
$kany = [];
if (isset($queryParams['keywords_any']) && !empty($queryParams['keywords_any'])) {
$kany = array_map(function ($item) {
return trim($item);
}, explode(',', $queryParams['keywords_any']));
}
$kall = [];
if (isset($queryParams['keywords_all']) && !empty($queryParams['keywords_all'])) {
$kall = array_map(function ($item) {
return trim($item);
}, explode(',', $queryParams['keywords_all']));
}
$string = '';
if (!empty($kany)) {
$string .= (count($kany) > 1) ? '(' . implode(' OR ',
$kany) . ')' : $kany[0];
}
if (!empty($kall)) {
$string .= ' AND ';
$string .= (count($kall) > 1) ? implode(' AND ', $kall) : $kall[0];
}
if (!empty($string)) {
$this->strings[] = '(' . $string . ')';
}
}
}
The method stringFromParams calls some sub-methods which look for some predefined array keys in the array of params passed in, and use them to build a Search API compliant query string. For simplicity’s sake, I included only an author and keyword check in this tutorial.
stringFromParams方法调用一些子方法,这些子方法在传入的参数数组中查找一些预定义的数组键,并使用它们来构建与Search API兼容的查询字符串。 为了简单起见,本教程中仅包括作者和关键字检查。
Naturally, we’ll need to add the SitePoint\Helpers namespace to Composer for autoloading:
当然,我们需要将SitePoint\Helpers命名空间添加到Composer以便自动加载:
"autoload": {
"psr-4": {
"SitePoint\\Helpers\\": "app/Helpers/"
}
}
After editing an autoload block, we need to update the autoloader with composer dump-autoload.
编辑自动加载块后,我们需要使用composer dump-autoload更新自动composer dump-autoload 。
So far, we have query-building functionality and the search form.
到目前为止,我们具有查询构建功能和搜索表单。
Let’s test and see if we get some results back.
让我们测试一下,看看是否能得到一些结果。
At the end of index.php’s if (isset($queryParams['search'])) { block, put the following:
在index.php的if (isset($queryParams['search'])) { ,放置以下内容:
dump($search->call());
dump($search->call(true));
Entering diffbot into the main search field, I do indeed get 13 SitePoint posts back:
在主要搜索字段中输入diffbot ,我确实得到了13个SitePoint帖子:
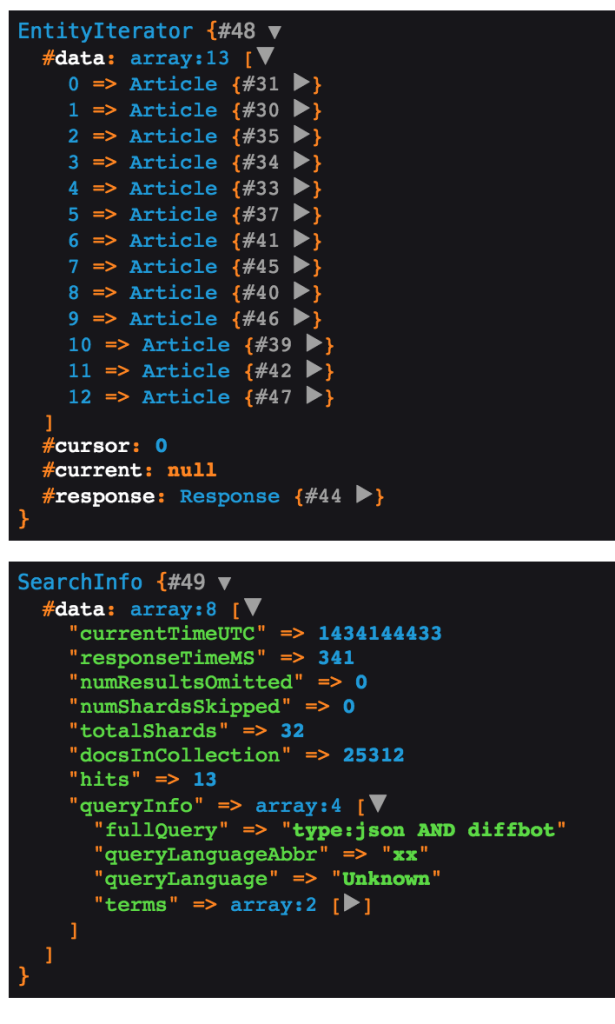
Two aspects of our app still remain:
我们应用程序的两个方面仍然存在:
- getting this data printed nicely in the template.将此数据很好地打印在模板中。
- letting users navigate through pages, in case more than 20 results are returned.如果返回的结果超过20,则使用户可以浏览页面。
输出量 (Output)
To get proper output, the first thing we should do is assign the data to template variables:
为了获得正确的输出,我们应该做的第一件事就是将数据分配给模板变量:
// index.php modification - instead of the two `dumps`
// Add to template for rendering
$vars = [
'results' => $search->call(),
'info' => $search->call(true)
];
Then, we edit the results.twig template.
然后,我们编辑results.twig模板。
<hr>
<div class="results">
{% for article in results %}
<div class="Media post">
<img class="Media-figure"
src="{{ attribute(article.meta.og, 'og:image') is defined ? attribute(article.meta.og, 'og:image') : '/apple-touch-icon.png'}}" alt="">
<div class="Media-body">
<h3><a target="_blank"
href="{{ article.pageUrl }}">{{ article.title }}</a></h3>
<p class="author">Written by {{ article.author }}, published on {{ article.date|date("jS F, Y") }}</p>
<p class="description">{{ article.meta.description }}</p>
</div>
</div>
{% else %}
<p>No results :(</p>
{% endfor %}
</div>
We also need to add the media object styles to our CSS.
我们还需要将媒体对象样式添加到CSS中。
.Media h3 {
font-size: 18px;
margin-top: 0;
}
.Media h3 a {
text-decoration: none;
color: #1a0dab;
}
.Media h3 a:visited {
color: #609;
}
.Media h3 a:hover {
text-decoration: underline;
}
.Media {
display: flex;
align-items: flex-start;
width: 530px;
}
.Media.post {
margin-bottom: 23px;
}
.Media-figure {
margin-right: 1em;
width: 50px;
}
.Media-body {
flex: 1;
}
.Media .description {
line-height: 1.4;
word-wrap: break-word;
color: #545454;
}
Voilà. We have a basic Google-like results page:
Voilà。 我们有一个基本的类似于Google的结果页面:
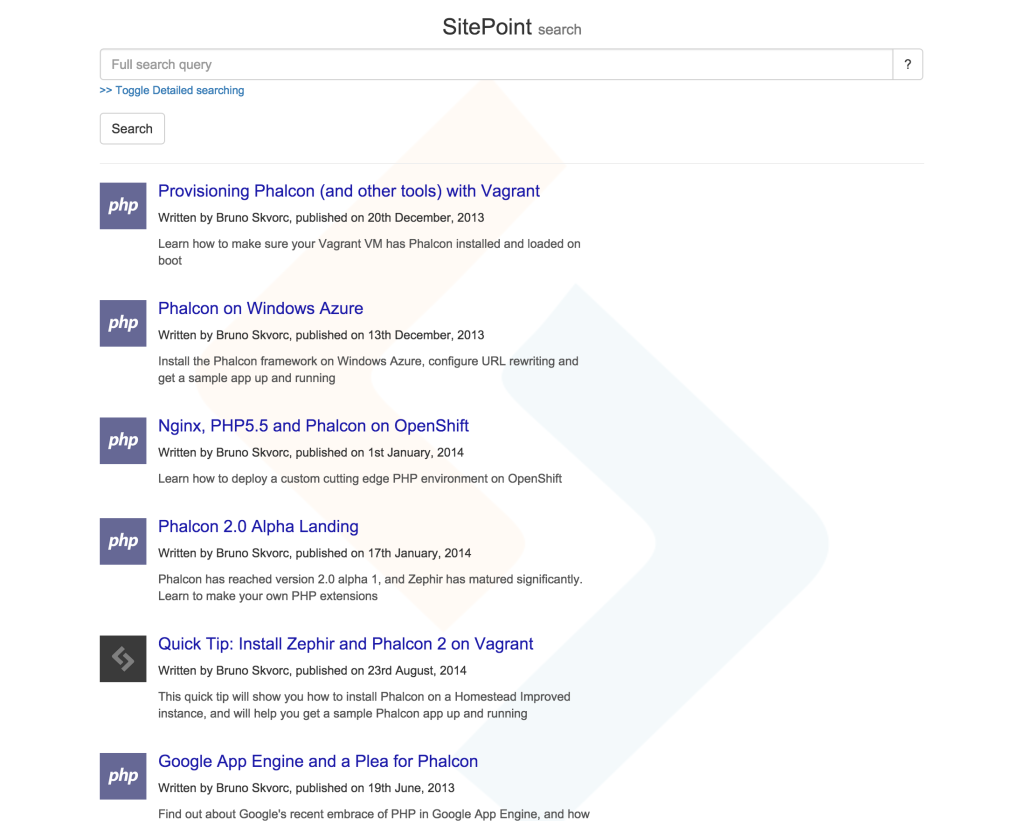
Note: Some of the results are duplicated due to different live links leading to the same resources (redirects). This is a temporary Search API limitation, and can be resolved by manually cleaning dupes out until Diffbot’s development team adds a fix.
注意 :由于导致相同资源(重定向)的实时链接不同,因此某些结果重复。 这是Search API的一个临时限制,可以通过手动清除重复项来解决,直到Diffbot的开发团队添加修复程序为止。
分页 (Pagination)
To add pagination, we need the total number of hits, and the number of results per page. If we know the current page, we can then easily calculate everything else. To implement pagination, we do the following.
要添加分页,我们需要命中总数和每页结果数。 如果知道当前页面,则可以轻松计算其他所有内容。 要实现分页,我们执行以下操作。
First, we edit home.twig by adding the following code snippet under the results.twig include tag:
首先,我们通过在results.twig include标签下添加以下代码片段来编辑home.twig :
{% include 'pagination.twig' %}and then create that template:
然后创建该模板:
{% if paginationData.pageCount > 1 %}
<nav>
<ul class="pagination">
{% if paginationData.currentPage != 1 %}
<li><a href="/{{ qprw({ 'page': 1 }) }}">« First</a></li>
{% else %}
<li class="disabled">
<span>« {{ 'First' }}</span>
</li>
{% endif %}
{% if paginationData.previousPage %}
<li><a href="/{{ qprw({ 'page': paginationData.currentPage - 1 }) }}">‹ Previous</a></li>
{% else %}
<li class="disabled">
<span>‹ {{ 'Previous' }}</span>
</li>
{% endif %}
{% for page in paginationData.pagesInRange %}
{% if page != paginationData.currentPage %}
<li>
<a href="/{{ qprw({ 'page': page }) }}">{{ page }}</a>
</li>
{% else %}
<li class="active">
<span>{{ page }}</span>
</li>
{% endif %}
{% endfor %}
{% if paginationData.nextPage %}
<li><a href="/{{ qprw({ 'page': paginationData.currentPage + 1 }) }}">Next ›</a></li>
{% else %}
<li class="disabled">
<span>{{ 'Next' }} ›</span>
</li>
{% endif %}
{% if paginationData.currentPage != paginationData.pageCount %}
<li><a href="/{{ qprw({ 'page': paginationData.pageCount }) }}">Last ({{ paginationData.pageCount }}) »</a></li>
{% else %}
<li class="disabled">
<span>{{ 'Last' }} »</span>
</li>
{% endif %}
</ul>
</nav>
{% endif %}The first two IF blocks render the first and last page links, or show them as disabled if the user is already on the first page. The loop in the middle goes through a range of pages and renders them – several before the current page, and several after, also known as “sliding pagination”. The last two blocks render the “next page” and “last page” links, respectively.
前两个IF块呈现第一页和最后一页链接,如果用户已经在第一页上,则将其显示为已禁用。 中间的循环遍历一系列页面并呈现它们-当前页面之前的几个页面,以及之后页面的多个页面,也称为“滑动分页”。 最后两个块分别呈现“下一页”和“最后一页”链接。
To get the paginationData values this template uses, we’ll create another helper class:
为了获得此模板使用的paginationData值,我们将创建另一个帮助器类:
// app/Helpers/PaginationHelper.php
<?php
namespace SitePoint\Helpers;
use Swader\Diffbot\Entity\EntityIterator;
use Swader\Diffbot\Entity\SearchInfo;
class PaginationHelper
{
public function getPaginationData(
$currentPage,
$itemsPerPage,
$pageRange,
EntityIterator $res,
SearchInfo $searchInfo
) {
$paginationData = [];
$paginationData['pageCount'] = !count($res)
? 0
: ceil($searchInfo->getHits() / $itemsPerPage);
$paginationData['currentPage'] = ($paginationData['pageCount'] < $currentPage)
? $paginationData['pageCount']
: $currentPage;
$paginationData['pageRange'] = ($pageRange > $paginationData['pageCount'])
? $paginationData['pageCount']
: $pageRange;
$delta = ceil($paginationData['pageRange'] / 2);
if ($paginationData['currentPage'] - $delta > $paginationData['pageCount'] - $paginationData['pageRange']) {
$pages = range($paginationData['pageCount'] - $paginationData['pageRange'] + 1,
$paginationData['pageCount']);
} else {
if ($paginationData['currentPage'] - $delta < 0) {
$delta = $paginationData['currentPage'];
}
$offset = $paginationData['currentPage'] - $delta;
$pages = range($offset + 1, $offset + $paginationData['pageRange']);
}
$paginationData['pagesInRange'] = $pages;
$proximity = floor($paginationData['pageRange'] / 2);
$paginationData['startPage'] = $paginationData['currentPage'] - $proximity;
$paginationData['endPage'] = $paginationData['currentPage'] + $proximity;
if ($paginationData['startPage'] < 1) {
$paginationData['endPage'] = min($paginationData['endPage'] + (1 - $paginationData['startPage']),
$paginationData['pageCount']);
$paginationData['startPage'] = 1;
}
if ($paginationData['endPage'] > $paginationData['pageCount']) {
$paginationData['startPage'] = max($paginationData['startPage'] - ($paginationData['endPage'] - $paginationData['pageCount']),
1);
$paginationData['endPage'] = $paginationData['pageCount'];
}
$paginationData['previousPage'] = $paginationData['currentPage'] > 1;
$paginationData['nextPage'] = $paginationData['currentPage'] < $paginationData['pageCount'];
return $paginationData;
}
}
Largely inspired by a similar implementation from KnpLabs, this class assembles the array of paginationData required to make the pagination controls work. Go through it if you’re interested in what it does – it’s quite straightforward, but if not, let me know and I’ll try to explain.
此类在很大程度上受到KnpLabs的类似实现的启发 ,它组装了使分页控件正常工作所需的paginationData数组。 如果您对它的功能感兴趣,请仔细阅读它-很简单,但是如果没有,请告诉我,我将尝试解释。
Finally, we need to implement this in index.php. The final version of the file looks like this:
最后,我们需要在index.php实现它。 该文件的最终版本如下所示:
<?php
use SitePoint\Helpers\PaginationHelper;
use SitePoint\Helpers\SearchHelper;
use Swader\Diffbot\Diffbot;
require_once '../vendor/autoload.php';
require_once '../token.php';
$loader = new Twig_Loader_Filesystem(__DIR__ . '/../template/twig');
$twig = new Twig_Environment($loader
, array('cache' => false, 'debug' => true)
);
$function = new Twig_SimpleFunction('qprw', function (array $replacements) {
parse_str($_SERVER['QUERY_STRING'], $qp);
foreach ($replacements as $k => $v) {
$qp[$k] = $v;
}
return '?'.http_build_query($qp);
});
$twig->addFunction($function);
$vars = [];
// Get query params from request
parse_str($_SERVER['QUERY_STRING'], $queryParams);
$resultsPerPage = 20;
$pageRange = 9;
if (!isset($queryParams['page'])) {
$queryParams['page'] = 1;
}
// Check if the search form was submitted
if (isset($queryParams['search'])) {
$diffbot = new Diffbot(DIFFBOT_TOKEN);
// Building the search string
$searchHelper = new SearchHelper();
$string = (isset($queryParams['q']) && !empty($queryParams['q']))
? $queryParams['q']
: $searchHelper->stringFromParams($queryParams);
// Basics
$search = $diffbot
->search($string)
->setCol('sp_search')
->setStart(($queryParams['page'] - 1) * $resultsPerPage)
->setNum($resultsPerPage)
;
// Add to template for rendering
$results = $search->call();
$info = $search->call(true);
$ph = new PaginationHelper();
$vars = [
'results' => $results,
'info' => $info,
'paginationData' => $ph->getPaginationData(
$queryParams['page'], $resultsPerPage, $pageRange, $results, $info
)
];
}
echo $twig->render('home.twig', $vars);
We added a custom Twig function which we’ll use in the template to replace a query parameter with another (e.g. the page value in URLs – see qprw in the template code above). We also added variables for the number of results per page, and for the page range – the number of pages to show in the pagination control. We initialize the first page if no page param is passed in, and then modify the Search API call to accommodate this. Finally, we pass the required values into the template, and we have a working SitePoint search engine:
我们添加了一个自定义的Twig函数,该函数将在模板中使用,以用另一个参数替换查询参数(例如,URL中的page值–请参见qprw的模板代码中的qprw )。 我们还为每页结果数和页面范围(即分页控件中要显示的页面数)添加了变量。 如果未传入任何页面参数,我们将初始化第一页,然后修改Search API调用以适应此情况。 最后,我们将所需的值传递到模板中,并且我们有一个有效的SitePoint搜索引擎:

按日期自动排序 (Autosort by date)
Last but not least, we can and should work on autosorting by date of publication – right now, the Search API returns the URLs by order of processing, which can be completely random. We can accomplish this by improving our SearchHelper class:
最后但并非最不重要的一点是,我们可以并且应该按发布日期进行自动排序-现在,Search API会按处理顺序返回网址,这可以是完全随机的。 我们可以通过改进SearchHelper类来实现:
protected function sortCheck(array $queryParams)
{
if (isset($queryParams['sort']) && !empty($queryParams['sort'])) {
$operator = (isset($queryParams['dir']) && $queryParams['dir'] == 'asc') ? "revsortby:" : "sortby:";
$this->appendStrings[] = $operator . $queryParams['sort'];
} else {
$this->appendStrings[] = "sortby:date";
}
}
We also needed to put in a new protected property:
我们还需要放置一个新的受保护财产:
protected $appendStrings = [];This is because the misc non-conditional query values like sortby (see documentation) can’t be boolean-linked, ergo, cannot have AND before them, else results become unpredictable. They must be separated from the query string via whitespace.
这是因为杂乱无条件的查询值(例如sortby (请参见文档 ))不能进行布尔链接,ergo,不能在它们之前使用AND ,否则结果将变得不可预测。 它们必须通过空格与查询字符串分开。
结论 (Conclusion)
In this standalone part 2 of our SitePoint Search Engine tutorial, we built a simple search GUI for crawled SitePoint article data, making the entire site’s library instantly searchable across many fields. We learned how easy it is to quickly start new projects, and seen how effective tools like Twig and BowerPHP make us – all without the need to pull in whole frameworks.
在我们的SitePoint搜索引擎教程的独立第2部分中,我们为抓取的SitePoint文章数据构建了一个简单的搜索GUI,使整个网站的库可在多个字段中立即搜索。 我们了解了快速启动新项目是多么容易,并且了解了Twig和BowerPHP之类的有效工具如何使我们–无需引入整个框架。
I’ll be making gradual improvements (including the above) to the app in the near future as I partially integrate it into another application, so stay tuned and keep checking in! We’ll even deal with some of these upgrades in future tutorials, so if the app doesn’t look like it does in the screenshots of this tutorial when you access it here, it simply evolved. There’s always the original 0.1 version you can clone to get this exact copy.
当我将其部分集成到另一个应用程序中时,我将在不久的将来对该应用程序进行逐步改进(包括上述内容),因此请继续关注并继续检查! 我们甚至会在以后的教程中处理其中一些升级,因此,如果在此处访问该应用程序时,该应用程序看上去不像本教程的屏幕快照中所示,则它只是在演变。 您始终可以克隆原始的0.1版本来获取此精确副本。
If you have any questions or comments, please leave them below!
如果您有任何疑问或意见,请留在下面!
翻译自: https://www.sitepoint.com/turning-crawled-website-search-engine-php/
阻止搜索引擎抓取网站的工具
阻止搜索引擎抓取网站的工具_使用PHP将抓取的网站转变为搜索引擎相关推荐
- 如何抓取一个网站的分页_如何设计一个吸引人的网站
做网站的好处就是能够利用网站来展示推广产品,提升公司形象,为公司的发展提供有效的平台,还能扩大销售渠道.但是,想要建设一个吸引人的网站是要求非常高的,今天八爪网就来教大家如何设计一个吸引人的网站,一起 ...
- python如何爬取网站所有目录_用python爬虫爬取网站的章节目录及其网址
认识爬虫 网络爬虫(又被称为网页蜘蛛,网络机器人,在FOAF社区中间,更经常的称为网页追逐者),是一种按照一定的规则,自动地抓取万维网信息的程序或者脚本.另外一些不常使用的名字还有蚂蚁.自动索引.模拟 ...
- python 抓取解析接口数据_[干货]用python抓取摩拜单车API数据并做可视化分析(源码)...
原标题:[干货]用python抓取摩拜单车API数据并做可视化分析(源码) 在APP中能看到很多单车,但走到那里的时候,才发现车并不在那里.有些车不知道藏到了哪里:有些车或许是在高楼的后面,由于有GP ...
- python抓取京东联盟优惠券_[爬虫]使用python抓取京东全站数据(商品,店铺,分类,评论)...
网上抓取京东数据的文章,现在要么无法抓取数据,要么只能抓取部分数据,本文将介绍如何抓取京东全站数据,包括商品信息.店铺信息,评论信息,分类信息等. -------------------------- ...
- java 网站统计工具_基于B/S模式下的JAVA网站流量统计系统
今日思考,完成一个网站流量统计系统项目,需要实现哪些功能? 此类项目常见描述如下: 传统的网站只是在页面上使用计数器进行简单的访问者数量的统计.随着网站运营规模的扩大,依靠这种简单的数量统计并不能真正 ...
- 网站备案负责人_三分钟教你如何做好网站备案
根据国家的相关法律要求,若使用中国大陆地区服务器开办网站,或提供其他类似的网络信息服务,需要依法进行备案. 通过域名访问网站.浏览网站内容时,此网站会被解析到某地的服务器上,每个网站背后需要有对应运营 ...
- python 爬取直播弹幕视频_调用斗鱼API爬取直播间弹幕信息(用户昵称及弹幕内容)...
调用斗鱼API爬取直播间弹幕信息(用户昵称及弹幕内容) 查看<斗鱼弹幕服务器第三方接入协议v1.4.1>,了解斗鱼API的使用方法,即如何连接斗鱼弹幕服务器.维持连接及获取弹幕信息 Pyt ...
- python爬虫爬网站数据登录_使用webdriver+urllib爬取网页数据(模拟登陆,过验证码)...
urilib是python的标准库,当我们使用Python爬取网页数据时,往往用的是urllib模块,通过调用urllib模块的urlopen(url)方法返回网页对象,并使用read()方法获得ur ...
- 抓取spotify歌单_如何使用python抓取Spotify上最受欢迎的歌曲
抓取spotify歌单 Spotify is one of the most popular music streaming services in the world, with nearly 30 ...
最新文章
- mysql字段中去掉括号
- 申请鸿蒙选择应用程序是什么,申请鸿蒙系统有一个应用选择怎么选择呢
- Java并发编程:线程池
- 数据结构(java版)学习笔记(序章)
- SpringBoot集成jsp(附源码)+遇到的坑
- 如何使用python批量压缩图片_Python实现批量压缩图片
- 网络安全习惯_健康习惯,确保良好的网络安全
- 中兴通讯:将在全球范围内发布近10款5G手机
- Jenkins自动部署SpringCloud项目
- ionic使用ImagePicker插件中文显示
- JavaScript-bind-call-apply改变this指向
- 看雪CTF.TSRC 2018 团队赛 第六题 『追凶者也』 解题思路
- 【供应链金融】五阿哥:如何打造钢铁电商独特供应链金融风控体系?
- 多线程面试题(值得收藏)
- 黑苹果之技嘉(GIGABYTE)主板BIOS设置篇
- Unity3D 场景切换
- 政企数智办公潮水里的融云「答卷」
- Android的隐私沙盒,与iOS隐私政策有哪些不同?
- 1 buffers were freed while being dequeued
- Spring注解开发以及基于java的容器配置