用pyui4win快速开发小妞会装机
2019独角兽企业重金招聘Python工程师标准>>> 
开源项目官方地址: http://www.xiaoniuhui.com/
原文链接: http://xiaoniuhui.com/#!/用pyui4win快速开发小妞会装机
目录
- 分析小妞会装机
- 建立项目
- 用pyui4win designer设计界面
- 用pyui4win designer生成界面代码
- 运行程序
- 项目组织
- 修改界面逻辑
- 调试程序
- 发布程序
- 要注意的问题
分析小妞会装机
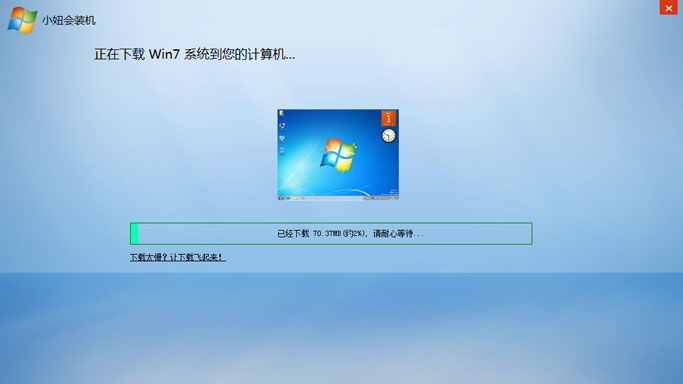
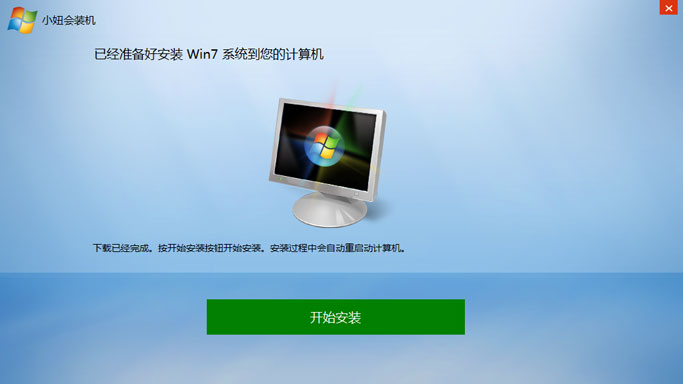
接下来我们会用pyui4win开发一个功能和界面都与小妞会装机一样的软件。首先看看小妞会装机的界面和功能。 界面很简洁,只有三个界面:系统选择界面,镜像下载界面和系统安装界面。界面和功能如下:

建立项目
将Tamplate拷贝到d盘下,并改名为netwin,这个目录就是新的项目目录,执行Launcher.exe可以看到一个简单带动画的窗口。Tamplate实际上是一个 带动画界面的多线程python演示。现在我们用pycharm建立netwin工程,并调试起来。
在pycharm中选择file->open dirctory...,选择D:\netwin。然后在左边展开netwin项目
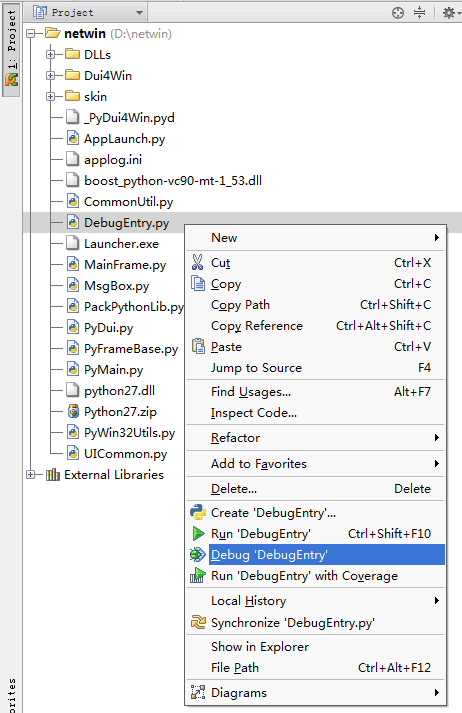
选择DebugEntry.py,如图中选择Debug "DebugEntry.py", 一个界面出来了。选择执行时,动画开启,开始转圈,直到python功能函数执行完成。在执行过程中,界面上的信息也在不断更新。最后动画停止。
当然,这个界面不是我们想要的。接下来我们将它改为我们需要的界面。
用pyui4win designer设计界面
pyui4win中,界面是有xml文件来配置的。主界面为MainFrame.xml。如果你很熟悉界面控件元素,可以手动来编写该文件。 pyui4win designer是一个可视化的界面配置工具,是pyui4win开源项目的一部分。你可以用它来快速的配置界面。
这个示例中,最快的方法是安装小妞会装机,然后直接提取小妞会装机的皮肤文件。覆盖到d:\netwin\skin。如果你的系统是win7,那么将UIMainWin7.xml改名为MainFrame.xml。 如果是xp,那么将UIMainXP.xml改名为MainFrame.xml。以下是在win7上,小妞会装机的界面配置文件。
UIMainWin7.xml和UIMainXP.xml文件中,只有字体部分不同。xp下用的是宋体,win7用的是微软雅黑。
<Window size="1024,576" caption="0,0,0,60"><Font name="微软雅黑" size="19" bold="false" italic="false" ></Font><Font name="微软雅黑" size="16" bold="false" italic="false" ></Font><Font name="微软雅黑" size="14" bold="false" italic="false" ></Font><VerticalLayout name="VerticalLayoutUI1" width="427" height="153" bkimage="vistabg.png"><Container name="ContainerUITitle" width="1022" height="114"><Label name="LabelUIDescription" text="您想安装哪个系统 ?" float="true" pos="141,48,0,0" width="618" height="66" textcolor="#FF000000" disabledtextcolor="#FFA7A6AA" font="0" ></Label><Button name="BtnClose" tooltip="退出程序" float="true" pos="989,0,0,0" width="27" height="22" textcolor="#FF000000" disabledtextcolor="#FFA7A6AA" align="center" normalimage="file=&apos;sys_button_close.png&apos; source=&apos;27,0,53,22&apos;" hotimage="file=&apos;sys_button_close.png&apos; source=&apos;54,0,80,22&apos;" ></Button><Label name="LabelUI6" text="小妞会装机" float="true" pos="63,18,0,0" width="279" height="23" textcolor="#FF000000" disabledtextcolor="#FFA7A6AA" font="1" ></Label><Label name="LabelUI4" float="true" pos="10,7,0,0" width="48" height="48" bkimage="xiaoniu48.png" textcolor="#FF000000" disabledtextcolor="#FFA7A6AA" ></Label></Container><Container name="ContainerUIStep2" width="1023" height="291"><Label name="LabelUIOS" float="true" pos="416,50,0,0" width="182" height="137" bkimage="file=&apos;win7.jpg&apos; hole=&apos;true&apos;" textcolor="#FF000000" disabledtextcolor="#FFA7A6AA" ></Label><Progress name="ProgressDownload" float="true" pos="195,220,0,0" width="603" height="33" bordercolor="#00008000" focusbordercolor="#000000FF" textcolor="#FF000000" disabledtextcolor="#FFA7A6AA" align="center" foreimage="progress.png" min="0" max="100" value="20" hor="true" ></Progress><Label name="LabelWaiting" text="已经下载20%, 请耐心等待..." float="true" pos="416,221,0,0" width="373" height="30" textcolor="#FF000000" disabledtextcolor="#FFA7A6AA" ></Label><Button name="BtnDownloadTooSlow" text="{u}{l}下载太慢?让下载飞起来!{/l}{/u}" float="true" pos="195,262,0,0" width="398" height="22" textcolor="#FF000000" disabledtextcolor="#FFA7A6AA" showhtml="true" align="left"></Button></Container><Container name="ContainerUIStep1" width="1023" height="291"><Button name="BtnWin7" tooltip="点击安装win 7" float="true" pos="587,68,0,0" width="182" height="137" textcolor="#FF000000" disabledtextcolor="#FFA7A6AA" align="center" normalimage="win7.jpg" hotimage="win7-hot.jpg" pushedimage="win7-push.jpg" ></Button><Button name="BtnXP" tooltip="点击安装xp" float="true" pos="260,68,0,0" width="182" height="137" textcolor="#FF000000" disabledtextcolor="#FFA7A6AA" align="center" normalimage="xp.jpg" hotimage="xp-hot.jpg" pushedimage="xp-push.jpg" ></Button><Label name="LabelUI5" text="将鼠标移动到您想安装的系统桌面图像上并点击。" float="true" pos="139,241,0,0" width="662" height="24" textcolor="#FF000000" disabledtextcolor="#FFA7A6AA" font="2" ></Label><Label name="LabelUI2" text="XP: 流行了10年的经典系统" float="true" pos="262,30,0,0" width="181" height="27" textcolor="#FF000000" disabledtextcolor="#FFA7A6AA" font="2" ></Label><Label name="LabelUI3" text="Win 7: 更炫的新系统" float="true" pos="589,30,0,0" width="269" height="30" textcolor="#FF000000" disabledtextcolor="#FFA7A6AA" font="2" ></Label></Container><Container name="ContainerUIStep3" width="1023" height="291"><Label name="LabelUI12" float="true" pos="366,2,0,0" width="256" height="256" bkimage="Vista.png" textcolor="#FF000000" disabledtextcolor="#FFA7A6AA" ></Label><Label name="LabelUI11" text="下载已经完成。按开始安装按钮开始安装。安装过程中会自动重启动计算机。" float="true" pos="139,245,0,0" width="662" height="24" textcolor="#FF000000" disabledtextcolor="#FFA7A6AA" font="2" ></Label></Container><Container name="ContainerUIBottom" width="1023" height="169"><Button name="ButtonUIReboot" visible="false" text="开始安装" float="true" pos="310,44,0,0" width="387" height="53" textcolor="#00FFFBF0" disabledtextcolor="#FFA7A6AA" font="0" align="center" normalimage="reboot.png" hotimage="reboot-hot.png" pushedimage="reboot.png" focusedimage="reboot.png" ></Button><Button name="adv1" visible="false" float="true" pos="19,15,0,0" width="181" height="143" bordercolor="#0000FF00" textcolor="#FF000000" disabledtextcolor="#FFA7A6AA" align="center" ></Button><Button name="adv2" visible="false" float="true" pos="219,15,0,0" width="181" height="143" bordercolor="#0000FF00" textcolor="#FF000000" disabledtextcolor="#FFA7A6AA" align="center" ></Button><Button name="adv3" visible="false" float="true" pos="419,15,0,0" width="181" height="143" bordercolor="#0000FF00" textcolor="#FF000000" disabledtextcolor="#FFA7A6AA" align="center" ></Button><Button name="adv4" visible="false" float="true" pos="619,15,0,0" width="181" height="143" bordercolor="#0000FF00" textcolor="#FF000000" disabledtextcolor="#FFA7A6AA" align="center" ></Button><Button name="adv5" visible="false" float="true" pos="819,15,0,0" width="181" height="143" bordercolor="#0000FF00" textcolor="#FF000000" disabledtextcolor="#FFA7A6AA" align="center" ></Button></Container></VerticalLayout>
</Window>用pyui4win designer生成界面代码
在pyui4win designer中,选择生成python类。pyui4win designer会根据界面配置文件,自动生成该界面对应的处理类。它会自动生成界面元素代码和部分事件处理。 以下代码就是自动生成的代码。
# coding=gbk
__author__ = 'generated by py-ui4win'import string, os, timefrom PyUI import *
from MsgBox import *
from PyFrameBase import *
import UICommon
from CommonUtil import CommonUtilsclass MainFrame(PyFrameBase):def __init__(self):super(MainFrame, self).__init__()self.clsName = self.__class__.__name__self.skinFileName = self.__class__.__name__ + '.xml'# 不要改动def GetSkinFile(self):return self.skinFileName# 不要改动def GetWindowClassName(self):return self.clsName# 退出处理def OnExit(self, sendor, wParam, lParam):self.ExitApp()# 准备显示前的处理def OnPrepare(self, sendor, wParam, lParam):self.LabelUIDescription = self.PyFindLabel("LabelUIDescription")self.LabelUI6 = self.PyFindLabel("LabelUI6")self.LabelUI4 = self.PyFindLabel("LabelUI4")self.LabelUIOS = self.PyFindLabel("LabelUIOS")self.LabelWaiting = self.PyFindLabel("LabelWaiting")self.LabelUI5 = self.PyFindLabel("LabelUI5")self.LabelUI2 = self.PyFindLabel("LabelUI2")self.LabelUI3 = self.PyFindLabel("LabelUI3")self.LabelUI12 = self.PyFindLabel("LabelUI12")self.LabelUI11 = self.PyFindLabel("LabelUI11")self.BtnDownloadTooSlow = self.PyFindButton("BtnDownloadTooSlow")self.BtnWin7 = self.PyFindButton("BtnWin7")self.BtnXP = self.PyFindButton("BtnXP")self.ButtonUIReboot = self.PyFindButton("ButtonUIReboot")self.adv1 = self.PyFindButton("adv1")self.adv2 = self.PyFindButton("adv2")self.adv3 = self.PyFindButton("adv3")self.adv4 = self.PyFindButton("adv4")self.adv5 = self.PyFindButton("adv5")self.ProgressDownload = self.PyFindProgress("ProgressDownload")self.ContainerUITitle = self.PyFindContainer("ContainerUITitle")self.ContainerUIStep2 = self.PyFindContainer("ContainerUIStep2")self.ContainerUIStep1 = self.PyFindContainer("ContainerUIStep1")self.ContainerUIStep3 = self.PyFindContainer("ContainerUIStep3")self.ContainerUIBottom = self.PyFindContainer("ContainerUIBottom")self.VerticalLayoutUI1 = self.PyFindVerticalLayout("VerticalLayoutUI1")# 界面事件处理def OnNotify(self, sendor, sType, wParam, lParam):# 用户点击事件if sType == DUI_MSGTYPE_CLICK:if sendor == "BtnDownloadTooSlow":passelif sendor == "BtnWin7":passelif sendor == "BtnXP":passelif sendor == "ButtonUIReboot":passelif sendor == "adv1":passelif sendor == "adv2":passelif sendor == "adv3":passelif sendor == "adv4":passelif sendor == "adv5":pass# 用户选择事件if sType == DUI_MSGTYPE_ITEMSELECT:pass
运行程序
将生成的MainFrame.py文件拷贝到d:\netwin,运行DebugEntry.py或Launcher.exe,就可以看到小妞会装机的软件界面出来了。
项目组织
好了。现在让我们回过头来看看pyui4win是如何组织项目的。在pyui4win中,存在python开发模式和win原生发布模式。前者是在开发中使用,DebugEntry.py是调试入口, 这可以让项目的开发方式和普通的python项目的开发方式没有区别,此时需要依赖电脑上的python环境。; 后者是测试或发布使用,Launcher.exe是执行入口。此时python是作为嵌入语言嵌到c++程序中, pyui4win已经只带python环境,所以不再需要依赖电脑上的python环境。
在pyui4win中, 界面配置文件和界面资源都放在skin目录中,主界面为MainFrame.xml。每个界面xml配置对应一个相同名称的py文件, 该py文件中有一个相同名称的python处理类。比如MsgBox.xml对应MsgBox.py,msgbox.py中定义了一个MsgBox类。 其中,MsgBox.py放在最顶层目录下。
将所有自定义py文件都放在最顶层目录下显得有点乱,最好将它们都放在python27.zip中。而且我相信一定可以这么做。但我还没有找到这个方法。如果恰巧你知道,请告诉我。谢谢啦。
如果想创建并显示一个窗口,那么用以下代码来实现:
pyFrameObj = PyFrameCreator()#将MainFrame改为你想创建的窗口的配置文件名obj = pyFrameObj.CreateForm(0, 'MainFrame', 'MainFrame', 'pyui4win界面示例')#obj.YouDefinedFun() #可以先执行你定义的函数pyFrameObj.Show()编写界面逻辑
用pyui4win designer自动生成的代码,运行可以看到小妞会装机的软件界面出来了,但是可以看到ContainerUIStep2, 但是它应该隐藏。那么我们需要处理。有两种方法可以解决这个问题。
1. 在OnPrepare加入隐藏ContainerUIStep2和ContainerUIStep3的代码或者。
self.ContainerUIStep2.SetVisible(False)self.ContainerUIStep3.SetVisible(False)2. 修改界面xml。直接隐藏ContainerUIStep2和ContainerUIStep3
<Container name="ContainerUIStep1" width="1023" height="291" visible="false">...<Container name="ContainerUIStep1" width="1023" height="291" visible="false">调试程序
一个重要的问题是如何调试程序。这时候你需要进入python开发模式。此时pyui4win是一个python扩展。 DebugEntry.py是调试入口。
在pycharm中打开MainFrame.py, 在需要调试的地方按Ctrl+F8,比如self.ContainerUIStep2.SetVisible(False)这句话,然后如下图选择 Debug "DebugEntry.py",你会发现现在停在了调试的地方。
发布程序
程序调试完成,如何测试和发布呢?我们不希望用户的电脑上必须先安装一个python环境才能执行, 而且我们也不希望用户直接执行DebugEntry.py文件。这样很不专业。pyui4win的win原生发布模式已经帮你解决了这个问题。 在这种模式中,pyui4win不再是作为python的扩展,而是反过来,python是作为嵌入语言嵌到c++程序中,而c++宿主 程序就是Launcher.exe。所以,只需要直接执行Launcher.exe即可。
要注意的问题
如果你知道是什么原因导致了该问题,请告诉我。希望大家一起,把pyui4win项目做的越来越好。
转载于:https://my.oschina.net/u/159675/blog/158535
用pyui4win快速开发小妞会装机相关推荐
- 小妞会装机 -- 一个装机软件的开发笔记( 三)
本文配套程序下载地址为: http://pan.baidu.com/share/link?shareid=358034&uk=3995556177 界面基本山确定下来,感觉操作起来的确很简单, ...
- 小妞会装机 -- 一个装机软件的开发笔记 (一)
本文配套程序下载地址为: http://pan.baidu.com/share/link?shareid=358034&uk=3995556177 见很多人不会装系统,拿了ghost盘也还是不 ...
- java 对比两个表的字段的差异_Joolun小程序商城 2.2.2版本上线了——Java微信快速开发平台...
Joolun是一款基于spring-boot的微信快速开发平台,目前拥有公众号基础版和小程序商城版两个版本.Joolun采用目前流行的前后端分离技术所写,是一款高效.易用的java微信开发框架平台,二 ...
- jeecgboot前端开发_一款基于代码生成器的Java快速开发平台【jeecg-boot】
原标题:一款基于代码生成器的Java快速开发平台[jeecg-boot] 今天给大家介绍一个后台脚手架框架:jeecg-boot 来看看官方怎么介绍的. 一款基于代码生成器的Java快速开发平台!全新 ...
- 【转】 Android快速开发系列 10个常用工具类 -- 不错
原文网址:http://blog.csdn.net/lmj623565791/article/details/38965311 转载请标明出处:http://blog.csdn.net/lmj6235 ...
- 快速开发一个PHP扩展
快速开发一个PHP扩展 作者:heiyeluren 时间:2008-12-5 博客:http://blog.csdn.net/heiyeshuwu 本文通过非常快速的方式讲解了如何制作一个PHP 5. ...
- 快速 开发平台 架构_快速介绍清洁架构
快速 开发平台 架构 by Daniel Deutsch 由Daniel Deutsch 快速介绍清洁架构 (A quick introduction to clean architecture) I ...
- 度量快速开发平台端口映射的介绍
度量快速开发平台在客户中部署的时候,可能会想内网与外网用户同时使用.一般情况下,服务端都是部署在内网的,那外网用户要访问,就可能用到端口映射的功能.端口映射基本都是在路由器上进行. 下面就是几个常用的 ...
- 利用UltimateAndroid框架进行快速开发
UltimateAndroid是一套集成了许多现有优秀的Android开源类库并将之组合成一个整体的Android快速开发框架.框架目前主要包含的功能有View Injection,ORM,异步网络请 ...
最新文章
- 《PLACEBO》(安慰剂)米津玄師/野田洋次郎 (罗马音、歌词、汉译)
- IDE---Gvim支持php的函数自动补全
- 【深度学习入门到精通系列】医疗影像分割
- 从迁移到Java 7的小技巧
- vue watch 第一次不执行_Vue 实现前进刷新,后退不刷新的效果
- 谷歌地图VS苹果地图:大数据领域竞争
- LeetCode 1427. 字符串的左右移
- Matplotlib - 折线图 plot() 所有用法详解
- util:properties/加载的配置文件中有中文导致乱码,如何通过分析源码解决问题?...
- ios 数字键盘左下角添加按钮_ios数字键盘添加完成按钮
- 比赛之前的数据清零操作
- OpenCV保存H264视频的问题
- sqlserver字符串拼接
- NBNS 数据包 和 NetBIOS 协议
- Unity发布WebGL遇到的问题
- android 局域网socket,Android基于局域网socket通信
- 一个基于vue的时间轴轮播图插件
- Apple ID 的申请流程
- 2019年给Java编程初学者的建议(附学习大纲)
- solid works土炮模型建模
热门文章
- 每个人都有自己的梦想,I have a dream.Thinking After The Ring Of The Nibelungs
- ajax未捕获Reference,未捕获的ReferenceError:liftAjax未定义
- oracle写SQL快捷键,Oracle数据库PL/SQL快捷键设置详解
- 3 、库存是企业的墓场
- 【资源】免费好用的在线PS网站【更新中】
- 【Nginx】如何基于主从模式搭建Nginx+Keepalived双机热备环境?这是最全的一篇了!!
- 【微观】十分重要的需求弹性和供给弹性
- Hexo 建立你的博客
- 记录一次阿里云ECS服务器系统盘扩容
- MacOS安装和使用标注软件“labelImg”教程