实战mongodb3.06 Relica Sets+sharding集群
实战mongodb3.06 Relica Sets+sharding集群
前 言
MongoDB 的Sharding机制解决了海量存储和动态扩容的问题,但离实际生产环境所需要的高可靠、高可用还有些距离,例如Shard Server的单点故障就无法解决,所以提出”ReplicatSets +Sharding”的解决方案。本方案是某某公司真实实例介绍采用MongoDB复制集和Sharding高可能用方案。本方案采用MongoDB 3.06版本。
MongoDB3.0以上版本提升7到10倍的写入效率以及增加80%的数据压缩率,还能减少95%的运维成本 。
MonoDB3.0新特性主括:可插入式的存储引擎API、支持WiredTiger存储引擎、MMAPv1提升、复制集全面提升、集群方面的改进、提升了安全性。
MongoDB3.0以上版本拥有大幅度的改进,本作者所以采用最新的3.06版本讲解。本实例采用最新的配置文件,在官方网可以看到。
1.Relica Sets+sharding架构
Replica Sets+sharding解决方案内容如下:
Shard服务器:使用Replica Sets确保每个数据节点都具有备份、自动容错转移、自动恢复能力
配置服务器:使用3个配置服务器确保元数据完整性。
路由进程:使用3个路由进程实现负载均衡,提高客户端接入性能。
配置完成的Replica Sets+sharding环境如下图所示。
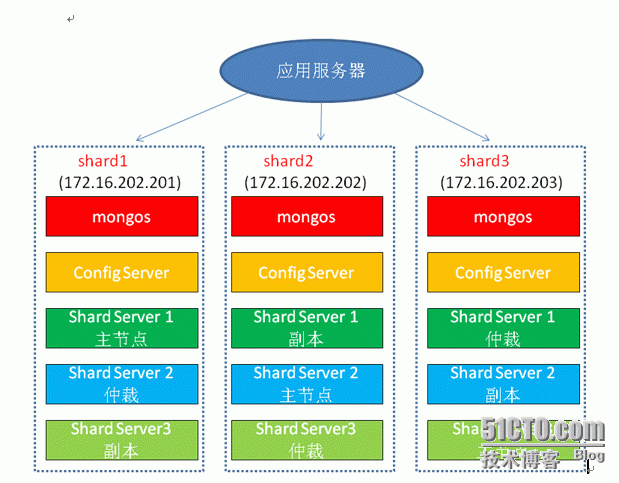
2.搭建一个高可用架构
采用Replica Sets+sharding 架构,可以避免单机Sharding架构中的ShardServer单点故障,这方案组合解决的sharding架构中的高可用问题。
各服务器开放的监听端口如图所示。
|
主机 |
IP |
服务及端口 |
|
Mongodb01 |
172.16.202.201 |
Mongod shard1_1 11731 |
|
Mongod shard2_1 11732 |
||
|
Mongod shard3_1 11733 |
||
|
Mongod config 30000 |
||
|
Mongos 1 60000 |
||
|
Mongodb02 |
172.16.202.202 |
Mongod shard1_2 11731 |
|
Mongod shard2_2 11732 |
||
|
Mongod shard3_2 11733 |
||
|
Mongod config 30000 |
||
|
Mongos 2 60000 |
||
|
Mongodb03 |
172.16.202.203 |
Mongod shard1_3 11731 |
|
Mongod shard2_3 11732 |
||
|
Mongod shard3_3 11733 |
||
|
Mongod config 30000 |
||
|
Mongos 3 60000 |
2.1.创建mongo用户
在三台服务器中创建mongo用户,如下面的代码所示
[root@mongodb01 ~]# useradd mongo
[root@mongodb01 ~]#passwd mongo
[root@mongodb01 ~]# su - mongo
[mongo@mongodb01 ~]$
2.2.创建数据目录
首先要在mongo用户下创建shard server和Config Server的数据目录,用于存储数据,创建logs的日志目录、创建config存放配置文件目录。
在mongodb01上创建shard server和Config Server的数据目录、logs的日志目录、config存放配置文件目录。
[mongo@mongodb01 ~]$ mkdir -p /home/mongo/data/shard1_1
[mongo@mongodb01 ~]$ mkdir -p /home/mongo/data/shard2_1
[mongo@mongodb01 ~]$ mkdir -p /home/mongo/data/shard3_1
[mongo@mongodb01 ~]$ mkdir -p /home/mongo/data/config
[mongo@mongodb01 ~]$ mkdir -p /home/mongo/data/logs
[mongo@mongodb01 ~]$ mkdir -p /home/mongo/config
如以上代码所示,目录/home/mongo/data/shard1_1供 shard1主节点使用,目录/home/mongo/data/shard2_1供shard2仲裁使用,目录/home/mongo/data/shard3_1 供shard3副本使用,目录/home/mongo/data/config 供整个ReplicaSets+sharding架构中的1个configServer使用,目录/home/mongo/data/logs供日志使用,
目录/home/mongo/config供配置文件使用。
在mongodb02上创建shard server和Config Server的数据目录、logs的日志目录、config存放配置文件目录。
[mongo@mongodb02 ~]$ mkdir -p /home/mongo/data/shard1_2
[mongo@mongodb02 ~]$ mkdir -p /home/mongo/data/shard2_2
[mongo@mongodb02 ~]$ mkdir -p /home/mongo/data/shard3_2
[mongo@mongodb02 ~]$ mkdir -p /home/mongo/data/config
[mongo@mongodb02 ~]$ mkdir -p /home/mongo/data/logs
[mongo@mongodb02 ~]$ mkdir -p /home/mongo/config
如以上代码所示,目录/home/mongo/data/shard1_2供 shard1副本使用,目录/home/mongo/data/shard2_2供shard2主节点使用,目录/home/mongo/data/shard3_1 供shard3仲裁使用,目录/home/mongo/data/config 供整个ReplicaSets+sharding架构中的1个configServer使用,目录/home/mongo/data/logs供日志使用,
目录/home/mongo/config供配置文件使用。
在mongodb03上创建shard server和Config Server的数据目录、logs的日志目录、config存放配置文件目录。
[mongo@mongodb03 ~]$ mkdir -p /home/mongo/data/shard1_3
[mongo@mongodb03 ~]$ mkdir -p /home/mongo/data/shard2_3
[mongo@mongodb03 ~]$ mkdir -p /home/mongo/data/shard3_3
[mongo@mongodb03 ~]$ mkdir -p /home/mongo/data/config
[mongo@mongodb03 ~]$ mkdir -p /home/mongo/data/logs
[mongo@mongodb03 ~]$ mkdir -p /home/mongo/config
如以上代码所示,目录/home/mongo/data/shard1_3供 shard1仲裁使用,目录/home/mongo/data/shard2_3供shard2副本使用,目录/home/mongo/data/shard3_3 供shard3主节点使用,目录/home/mongo/data/config 供整个ReplicaSets+sharding架构中的1个configServer使用,目录/home/mongo/data/logs供日志使用,
目录/home/mongo/config供配置文件使用。
2.3.配置Replica Sets
在三台服务器上解压mongodb-linux-x86_64-3.0.6.tgz
[mongo@mongodb01 ~]$ tar zxvfmongodb-linux-x86_64-3.0.6.tgz
[mongo@mongodb01 ~]$ mvmongodb-linux-x86_64-3.0.6 mongodb
2.3.1.配置shard1所用到的Relica Set 1
#注意配置文件缩进
在mongodb01上操作,如下的代码所示:
[mongo@mongodb01 ~]$ cd config/
[mongo@mongodb01 config]$ cat shard1_1.conf
systemLog:
destination: file
##Log
path:/home/mongo/data/logs/shard1_1.log
logAppend: true
storage:
journal:
enabled: true
dbPath: /home/mongo/data/shard1_1
directoryPerDB: true
engine: wiredTiger
wiredTiger:
engineConfig:
cacheSizeGB: 1
directoryForIndexes:true
collectionConfig:
blockCompressor: snappy
processManagement:
fork: true
net:
bindIp: 172.16.202.201
port: 11731
replication:
oplogSizeMB: 500
replSetName: shard1
sharding:
clusterRole: shardsvr
#sercurity:
#authorization: enabled
#keyFile:/home/mongo/key/security
[mongo@mongodb01 config]$ /home/mongo/mongodb/bin/mongod -f/home/mongo/config/shard1_1.conf
如以上代码所示,在mongodb01启动Replica Set1中的1个成员节点,复制集名字是shard1,监听端口是11731。
在mongodb02上操作,如下的代码所示:
[mongo@mongodb02 ~]$ cd config/
[mongo@mongodb02 config]$ cat shard1_2.conf
systemLog:
destination: file
##Log
path: /home/mongo/data/logs/shard1_2.log
logAppend: true
storage:
journal:
enabled: true
dbPath: /home/mongo/data/shard1_2
directoryPerDB: true
engine: wiredTiger
wiredTiger:
engineConfig:
cacheSizeGB: 1
directoryForIndexes:true
collectionConfig:
blockCompressor: snappy
processManagement:
fork: true
net:
bindIp: 172.16.202.202
port: 11731
replication:
oplogSizeMB: 500
replSetName: shard1
sharding:
clusterRole: shardsvr
#sercurity:
#authorization: enabled
#keyFile:/home/mongo/key/security
[mongo@mongodb02 config]$ /home/mongo/mongodb/bin/mongod -f/home/mongo/config/shard1_2.conf
如以上代码所示,在mongodb2启动Replica Set1中的1个成员节点,复制集名字是shard1,监听端口是11731。
在mongodb03上操作,如下的代码所示:
[mongo@mongodb03~]$ cd config/
[mongo@mongodb03 config]$ cat shard1_3.conf
systemLog:
destination: file
##Log
path: /home/mongo/data/logs/shard1_3.log
logAppend: true
storage:
journal:
enabled: true
dbPath: /home/mongo/data/shard1_3
directoryPerDB: true
engine: wiredTiger
wiredTiger:
engineConfig:
cacheSizeGB: 1
directoryForIndexes:true
collectionConfig:
blockCompressor: snappy
processManagement:
fork: true
net:
bindIp: 172.16.202.203
port: 11731
replication:
oplogSizeMB: 500
replSetName: shard1
sharding:
clusterRole: shardsvr
#sercurity:
#authorization: enabled
#keyFile:/home/mongo/key/security
[mongo@mongodb03 config]$ /home/mongo/mongodb/bin/mongod -f/home/mongo/config/shard1_3.conf
如以上代码所示,在mongodb3启动Replica Set1中的1个成员节点,复制集名字是shard1,监听端口是11731。
连接mongodb01的11731端口的mongod,初始化Replicat Set1,如下代码所示:
[mongo@mongodb01 ~]$ /home/mongo/mongodb/bin/mongo 172.16.202.201:11731
MongoDB shell version: 3.0.6
connecting to: 172.16.202.201:11731/test
> config={_id:'shard1',members:[{_id:0,host:'172.16.202.201:11731',priority:2},{_id:1,host:'172.16.202.202:11731'},{_id:2,host:'172.16.202.203:11731',arbiterOnly:true}]}
{
"_id": "shard1",
"members": [
{
"_id": 0,
"host": "172.16.202.201:11731",
"priority": 2
},
{
"_id": 1,
"host": "172.16.202.202:11731"
},
{
"_id": 2,
"host": "172.16.202.203:11731",
"arbiterOnly": true
}
]
}
>rs.initiate(config)
{ "ok" : 1 }
以上代码通过执行rs.initiate(config)命令来初始化shard1的复制集Replica Set 1。
2.3.2.配置shard2所用到的Relica Set 2
在mongodb01上操作,如下的代码所示:
[mongo@mongodb01 ~]$ cd config/
[mongo@mongodb01 config]$ cat shard2_1.conf
systemLog:
destination: file
##Log
path: /home/mongo/data/logs/shard2_1.log
logAppend: true
storage:
journal:
enabled: true
dbPath: /home/mongo/data/shard2_1
directoryPerDB: true
engine: wiredTiger
wiredTiger:
engineConfig:
cacheSizeGB: 1
directoryForIndexes:true
collectionConfig:
blockCompressor: snappy
processManagement:
fork: true
net:
bindIp: 172.16.202.201
port: 11732
replication:
oplogSizeMB: 500
replSetName: shard2
sharding:
clusterRole: shardsvr
#sercurity:
#authorization: enabled
#keyFile:/home/mongo/key/security
[mongo@mongodb01 config]$ /home/mongo/mongodb/bin/mongod -f/home/mongo/config/shard2_1.conf
如以上代码所示,在mongodb01启动Replica Set1中的1个成员节点,复制集名字是shard2,监听端口是11732。
在mongodb02上操作,如下的代码所示:
[mongo@mongodb02 ~]$ cd config/
[mongo@mongodb02 config]$ cat shard2_2.conf
systemLog:
destination: file
##Log
path: /home/mongo/data/logs/shard2_2.log
logAppend: true
storage:
journal:
enabled: true
dbPath: /home/mongo/data/shard2_2
directoryPerDB: true
engine: wiredTiger
wiredTiger:
engineConfig:
cacheSizeGB: 1
directoryForIndexes:true
collectionConfig:
blockCompressor: snappy
processManagement:
fork: true
net:
bindIp: 172.16.202.202
port: 11732
replication:
oplogSizeMB: 500
replSetName: shard2
sharding:
clusterRole: shardsvr
#sercurity:
#authorization: enabled
#keyFile:/home/mongo/key/security
[mongo@mongodb02 config]$ /home/mongo/mongodb/bin/mongod -f/home/mongo/config/shard2_2.conf
如以上代码所示,在mongodb2启动Replica Set1中的1个成员节点,复制集名字是shard2,监听端口是11732。
在mongodb03上操作,如下的代码所示:
[mongo@mongodb03~]$ cd config/
[mongo@mongodb03 config]$ cat shard2_3.conf
systemLog:
destination: file
##Log
path: /home/mongo/data/logs/shard2_3.log
logAppend: true
storage:
journal:
enabled: true
dbPath: /home/mongo/data/shard2_3
directoryPerDB: true
engine: wiredTiger
wiredTiger:
engineConfig:
cacheSizeGB: 1
directoryForIndexes:true
collectionConfig:
blockCompressor: snappy
processManagement:
fork: true
net:
bindIp: 172.16.202.203
port: 11732
replication:
oplogSizeMB: 500
replSetName: shard2
sharding:
clusterRole: shardsvr
#sercurity:
#authorization: enabled
#keyFile:/home/mongo/key/security
[mongo@mongodb03 config]$ /home/mongo/mongodb/bin/mongod -f/home/mongo/config/shard2_3.conf
如以上代码所示,在mongodb3启动Replica Set1中的1个成员节点,复制集名字是shard2,监听端口是11732。
连接mongodb02的11732端口的mongod,初始化Replicat Set1,如下代码所示:
[mongo@mongodb02 config]$/home/mongo/mongodb/bin/mongo 172.16.202.202:11732
MongoDB shell version: 3.0.6
connecting to: 172.16.202.202:11732/test
> config={_id:'shard2',members:[{_id:0,host:'172.16.202.201:11732',arbiterOnly:true},{_id:1,host:'172.16.202.202:11732',priority:2},{_id:2,host:'172.16.202.203:11732'}]}
{
"_id": "shard2",
"members": [
{
"_id": 0,
"host": "172.16.202.201:11732",
"arbiterOnly": true
},
{
"_id": 1,
"host": "172.16.202.202:11732",
"priority": 2
},
{
"_id": 2,
"host": "172.16.202.203:11732"
}
]
}
> rs.initiate(config)
{ "ok" : 1 }
以上代码通过执行rs.initiate(config)命令来初始化shard2的复制集Replica Set 1。
2.3.3.配置shard3所用到的Relica Set 3
在mongodb01上操作,如下的代码所示:
[mongo@mongodb01 ~]$ cd config/
[mongo@mongodb01 config]$ cat shard3_1.conf
systemLog:
destination: file
##Log
path: /home/mongo/data/logs/shard3_1.log
logAppend: true
storage:
journal:
enabled: true
dbPath: /home/mongo/data/shard3_1
directoryPerDB: true
engine: wiredTiger
wiredTiger:
engineConfig:
cacheSizeGB: 1
directoryForIndexes:true
collectionConfig:
blockCompressor: snappy
processManagement:
fork: true
net:
bindIp: 172.16.202.201
port: 11733
replication:
oplogSizeMB: 500
replSetName: shard3
sharding:
clusterRole: shardsvr
#sercurity:
#authorization: enabled
#keyFile:/home/mongo/key/security
[mongo@mongodb01 config]$/home/mongo/mongodb/bin/mongod -f /home/mongo/config/shard3_1.conf
如以上代码所示,在mongodb01启动Replica Set1中的1个成员节点,复制集名字是shard3,监听端口是11733。
在mongodb02上操作,如下的代码所示:
[mongo@mongodb02 ~]$ cd config/
[mongo@mongodb02 config]$ cat shard3_2.conf
systemLog:
destination: file
##Log
path: /home/mongo/data/logs/shard3_2.log
logAppend: true
storage:
journal:
enabled: true
dbPath: /home/mongo/data/shard3_2
directoryPerDB: true
engine: wiredTiger
wiredTiger:
engineConfig:
cacheSizeGB: 1
directoryForIndexes:true
collectionConfig:
blockCompressor: snappy
processManagement:
fork: true
net:
bindIp: 172.16.202.202
port: 11733
replication:
oplogSizeMB: 500
replSetName: shard3
sharding:
clusterRole: shardsvr
#sercurity:
#authorization: enabled
#keyFile:/home/mongo/key/security
[mongo@mongodb02 config]$ /home/mongo/mongodb/bin/mongod -f/home/mongo/config/shard3_2.conf
如以上代码所示,在mongodb2启动Replica Set1中的1个成员节点,复制集名字是shard3,监听端口是11733。
在mongodb03上操作,如下的代码所示:
[mongo@mongodb03~]$ cd config/
[mongo@mongodb03 config]$ cat shard3_3.conf
systemLog:
destination: file
##Log
path: /home/mongo/data/logs/shard3_3.log
logAppend: true
storage:
journal:
enabled: true
dbPath: /home/mongo/data/shard3_3
directoryPerDB: true
engine: wiredTiger
wiredTiger:
engineConfig:
cacheSizeGB: 1
directoryForIndexes:true
collectionConfig:
blockCompressor: snappy
processManagement:
fork: true
net:
bindIp: 172.16.202.203
port: 11733
replication:
oplogSizeMB: 500
replSetName: shard3
sharding:
clusterRole: shardsvr
#sercurity:
#authorization: enabled
#keyFile:/home/mongo/key/security
[mongo@mongodb03 config]$ /home/mongo/mongodb/bin/mongod -f/home/mongo/config/shard3_3.conf
如以上代码所示,在mongodb3启动Replica Set1中的1个成员节点,复制集名字是shard3,监听端口是11733。
连接mongodb03的11733端口的mongod,初始化Replicat Set1,如下代码所示:
[mongo@mongodb03 config]$/home/mongo/mongodb/bin/mongo 172.16.202.203:11733
MongoDB shell version: 3.0.6
connecting to: 172.16.202.203:11733/test
> config={_id:'shard3',members:[{_id:0,host:'172.16.202.201:11733'},{_id:1,host:'172.16.202.202:11733',arbiterOnly:true},{_id:2,host:'172.16.202.203:11733',priority:2}]}
{
"_id": "shard3",
"members": [
{
"_id": 0,
"host": "172.16.202.201:11733"
},
{
"_id": 1,
"host": "172.16.202.202:11733",
"arbiterOnly": true
},
{
"_id": 2,
"host": "172.16.202.203:11733",
"priority": 2
}
]
}
> rs.initiate(config)
{ "ok" : 1 }
以上代码通过执行rs.initiate(config)命令来初始化shard2的复制集Replica Set 1。
2.3.4.查看复制集状态
shard1:PRIMARY> rs.status()
{
"set": "shard1",
"date": ISODate("2015-11-25T10:53:06.091Z"),
"myState": 1,
"members": [
{
"_id": 0,
"name": "172.16.202.201:11731",
"health": 1,
"state": 1,
"stateStr": "PRIMARY", #主库
"uptime": 3009,
"optime": Timestamp(1448448493, 1),
"optimeDate": ISODate("2015-11-25T10:48:13Z"),
"electionTime": Timestamp(1448448497, 1),
"electionDate": ISODate("2015-11-25T10:48:17Z"),
"configVersion": 1,
"self": true
},
{
"_id": 1,
"name": "172.16.202.202:11731",
"health": 1,
"state": 2,
"stateStr": "SECONDARY", #复本
"uptime": 292,
"optime": Timestamp(1448448493, 1),
"optimeDate": ISODate("2015-11-25T10:48:13Z"),
"lastHeartbeat": ISODate("2015-11-25T10:53:05.389Z"),
"lastHeartbeatRecv": ISODate("2015-11-25T10:53:05.391Z"),
"pingMs": 0,
"lastHeartbeatMessage": "could not find member to sync from",
"configVersion": 1
},
{
"_id": 2,
"name": "172.16.202.203:11731",
"health": 1,
"state": 7,
"stateStr": "ARBITER", #仲裁
"uptime" : 292,
"lastHeartbeat": ISODate("2015-11-25T10:53:05.391Z"),
"lastHeartbeatRecv": ISODate("2015-11-25T10:53:05.390Z"),
"pingMs": 0,
"configVersion": 1
}
],
"ok": 1
}
2.4.配置3台Config Server
三台上执行操作如下代码所示:
[mongo@mongodb01 config]$ catconfig.conf
systemLog:
destination: file
##Log
path: /home/mongo/data/logs/config.log
logAppend: true
storage:
journal:
enabled: true
dbPath:/home/mongo/data/config
directoryPerDB: true
processManagement:
fork: true
net:
#bindIp:172.16.202.201 #这里根据自己来是否绑定IP
port: 30000
sharding:
clusterRole: configsvr
[mongo@mongodb01 config]$ /home/mongo/mongodb/bin/mongos-f /home/mongo/config/config.conf
如以上代码所示,在三台服务器上分别执行启动ConfigServer进程,并指定此进程监听是30000
2.5.配置3台Route Process
三台上执行操作如下代码所示:
[mongo@mongodb01 config]$ catmongos.conf
systemLog:
destination: file
##Log
path: /home/mongo/data/logs/mongo.log
logAppend: true
processManagement:
fork: true
net:
#bindIp:172.16.202.201
port: 6000
sharding:
configDB: 172.16.202.201:30000,172.16.202.202:30000,172.16.202.203:30000
[mongo@mongodb01config]$ /home/mongo/mongodb/bin/mongos -f /home/mongo/config/mongos.conf
如以上代码所示,在三台服务器上分别启动路由控制器,并指定此进程监听端口是60000,同时指定三台服务器上的Config Server的IP和端口。
2.6.配置Shard Cluster
连接到其中一台机器的端口60000的mongos进程,并切换到admin数据到开始配置Sharding环境,如下面的代码所示:
[mongo@mongodb01 logs]$/home/mongo/mongodb/bin/mongo 172.16.202.201:60000
MongoDB shell version: 3.0.6
connecting to: 172.16.202.201:60000/test
mongos> use admin
switched to db admin
mongos>db.runCommand({addshard:"shard1/172.16.202.201:11731,172.16.202.202:11731,172.16.202.203:11731",name:"shard1"});
{ "shardAdded" :"shard1", "ok" : 1 }
mongos>db.runCommand({addshard:"shard2/172.16.202.201:11732,172.16.202.202:11732,172.16.202.203:11732",name:"shard2"});
{ "shardAdded" :"shard2", "ok" : 1 }
mongos>db.runCommand({addshard:"shard3/172.16.202.201:11733,172.16.202.202:11733,172.16.202.203:11733",name:"shard3"});
{ "shardAdded" :"shard3", "ok" : 1 }
以上代码通过执行以下命令:
db.runCommand({addshard:"shard1/172.16.202.201:11731,172.16.202.202:11731,172.16.202.203:11731",name:"shard1"});
将Replica Set 1在三台服务器上的3个成员节点作为Shard Server 1添加进sharding环境中。
以上代码通过执行以下命令:
db.runCommand({addshard:"shard2/172.16.202.201:11732,172.16.202.202:11732,172.16.202.203:11732",name:"shard2"});
将Replica Set 2在三台服务器上的3个成员节点作为Shard Server 2添加进sharding环境中。
以上代码通过执行以下命令:
db.runCommand({addshard:"shard3/172.16.202.201:11733,172.16.202.202:11733,172.16.202.203:11733",name:"shard3"});
将Replica Set 3在三台服务器上的3个成员节点作为Shard Server 3添加进sharding环境中。
接下来激活分片,如下面的代码所示: 采用hash分片
[mongo@mongodb01 logs]$/home/mongo/mongodb/bin/mongo 172.16.202.201:60000
MongoDB shell version: 3.0.6
connecting to: 172.16.202.201:60000/test
mongos> use admin
switched to db admin
mongos> db.runCommand({enablesharding:"logs"})
{"ok" : 1 }
mongos>db.runCommand({shardcollection:"logs.users",key:{id:"hashed"}})
{ "collectionsharded" :"logs.users", "ok" : 1 }
如以上代码所示,首先执行db.runCommand({enablesharding:"logs"})命令激活logs库上的分片功能;然后执行
db.runCommand({shardcollection:"logs.methodlog",key:{_id:1}})
命令激活users表的分片功能。
2.7.查看分片
mongos> sh.status()
--- Sharding Status ---
sharding version: {
"_id": 1,
"minCompatibleVersion": 5,
"currentVersion": 6,
"clusterId": ObjectId("56559b076bc525804dde4141")
}
shards:
{ "_id" : "shard1", "host" :"shard1/172.16.202.201:11731,172.16.202.202:11731" }
{ "_id" : "shard2", "host" :"shard2/172.16.202.202:11732,172.16.202.203:11732" }
{ "_id" : "shard3", "host" : "shard3/172.16.202.201:11733,172.16.202.203:11733"}
balancer:
Currentlyenabled: yes
Currentlyrunning: no
Failedbalancer rounds in last 5 attempts: 0
MigrationResults for the last 24 hours:
2: Success
1: Failed with error 'could not acquire collection lock for logs.users tomigrate chunk [{ : MinKey },{ : MaxKey }) :: caused by :: Lock for migratingchunk [{ : MinKey }, { : MaxKey }) in logs.users is taken.', from shard1 toshard2
2: Failed with error 'migration already in progress', from shard1 to shard2
databases:
{ "_id" : "admin", "partitioned" : false, "primary" : "config" }
{ "_id" :"logs", "partitioned" : true, "primary" : "shard1" }
logs.users
shard key: { "id" :"hashed" }
chunks:
shard1 2
shard2 2
shard3 2
{"id" : { "$minKey" : 1 } } -->> { "id" :NumberLong("-6148914691236517204") } on : shard1 Timestamp(3, 2)
{"id" : NumberLong("-6148914691236517204") } -->> {"id" : NumberLong("-3074457345618258602") } on : shard1Timestamp(3, 3)
{"id" : NumberLong("-3074457345618258602") } -->> {"id" : NumberLong(0) } on : shard3 Timestamp(3, 4)
{"id" : NumberLong(0) } -->> { "id" :NumberLong("3074457345618258602") } on : shard3 Timestamp(3, 5)
{"id" : NumberLong("3074457345618258602") } -->> {"id" : NumberLong("6148914691236517204") } on : shard2Timestamp(3, 6)
{"id" : NumberLong("6148914691236517204") } -->> {"id" : { "$maxKey" : 1 } } on : shard2 Timestamp(3, 7)
转载于:https://blog.51cto.com/jxzhfei/1722243
实战mongodb3.06 Relica Sets+sharding集群相关推荐
- Mongodb安装搭建Replica Set+Sharding集群
2019独角兽企业重金招聘Python工程师标准>>> Mongodb安装搭建Replica Set+Sharding集群 一.简介 Replica Set:复制在为数据提供了冗余同 ...
- 生产环境实战spark (5)分布式集群 5台设备之间hosts文件配置 ssh免密码登录
生产环境实战spark (5)分布式集群 5台设备之间 ssh免密码登录 之前已经在master节点单台设备上配置ssh免密码的登录工作,现在要做的事情是在5台设备之间实现ssh免密码操作.我在整个大 ...
- Java后端架构开荒实战(二)——单机到集群
Java后端架构开荒实战(二)--单机到集群 一.前言 上一篇文章做了一些准备工作,这边文章正式开始写代码. 在做好单实例架构之后,升级到集群是一件很容易的事情,所以把单机和集群放在这一篇一起说. 二 ...
- Dapr + .NET 实战(十四)虚拟机集群部署 mDNS + Consul
前面我们说了在单机模式下和K8S集群下的Dapr实战,这次我们来看看如何在不使用K8S的情况下,在一个传统的虚拟机集群里来部署Dapr. 1.环境准备 我们准备两台centos7虚拟机 Dapr1:1 ...
- 【华为云技术分享】MongoDB经典故障系列五:sharding集群执行sh.stopBalancer()命令被卡住怎么办?
[摘要] MongoDB sharding集群执行sh.stopBalancer()命令时被卡住怎么办?别慌,华为云数据库来给您支招,收下这份方案指南,让您分分钟远离被自建MongoDB数据库支配的恐 ...
- Mongo 3.6.1版本Sharding集群配置
Mongo低版本和高版本的sharding集群配置,细节不太一样.目前网上的配置文档大都是针对低版本的.本人在配置3.6.1版本的mongosharding集群的过程中,碰到不少问题,官方文档没有直观 ...
- 实战:kubeadm方式搭建k8s集群(k8s-v1.22.2,containerd-v1.5.5)-2023.2.22(测试成功)
实验环境 1.硬件环境 3台虚机 2c2g,20g.(nat模式,可访问外网) 角色 主机名 ip master节点 master1 172.29.9.51 node节点 node1 172.29.9 ...
- 实战_23_高可用负载均衡集群的实现(Mycat+ZK +HAProxy + Keepalived)
接上一篇:实战_22_Mycat设置开机自启https://blog.csdn.net/weixin_40816738/article/details/100086556 文章目录 一.高可用集群架构 ...
- Cloudera Hadoop 4 实战课程(Hadoop 2.0、集群界面化管理、电商在线查询+日志离线分析)...
课程大纲及内容简介: 每节课约35分钟,共不下40讲 第一章(11讲) ·分布式和传统单机模式 ·Hadoop背景和工作原理 ·Mapreduce工作原理剖析 ·第二代MR--YARN原理剖析 ·Cl ...
最新文章
- java怎么自动提示关键词_Eclipse 实现关键字自动补全功能
- [YTU]_2428(C语言习题 计算该日在本年中是第几天)
- OCS Inventory NG使用之在windows 2008 R2平台下安装服务器端(二)
- FPGA课程设计使用VHDL语言
- 010 使用list和tuple
- ZigBee网络数据传递流程_Zigbee网络架构解析
- 为什么有了scanf还要getchar()
- 分享一段php获取随意时间的前一天代码
- 如何隐藏UITabBar 已经如何使已经隐藏的TabBar重现(原创)
- 第一章 Shiro简介——《跟我学Shiro》[张开涛]
- WinRAR压缩加密的做法
- 小米MIX 2最简单卡刷开发版启用root权限的方法
- 关于DBF文件格式的详细说明
- 《低代码指南100解决方案》——5疫情防控常态化之下,如何做好访客管理?
- 安卓苹果手机在微信内打开支付宝h5拉起app支付
- heavy r.com index.php,AngularJS - Computation-Heavy Tasks
- IOS开发学习笔记(一)
- 分别编写两个类Point2D,Point3D来表示二维空间和三维空间的点,使之满足下列要求
- 速度测量插件speed-measure-webpack-plugin
- java解答约瑟夫问题