创建自己的盒子box_创建自己的
创建自己的盒子box
Note from author :
作者注:
In this article we will learn how to create your own WhatsApp sticker using python. We will also understand the fundamentals behind creating stickers, instead of doing it through a third party application.
在本文中,我们将学习如何使用python创建自己的WhatsApp标签。 我们还将了解创建贴纸的基本原理,而不是通过第三方应用程序来完成。
The article contains working code of clipping your own sticker from any photo using OpenCV.
本文包含使用OpenCV从任何照片剪切您自己的贴纸的工作代码。
We are going to use GrabCut Algorithm to achieve this. GrabCut is an image segmentation method based on graph cuts. Starting with an user-specified bounding box around the object to be segmented, the algorithm estimates the color distribution of the target object and that of the background using a Gaussian mixture model(GMM).
我们将使用GrabCut算法来实现这一点。 GrabCut是一种基于图 割的图像分割方法。 从围绕分割对象的用户指定的边界框开始,该算法使用高斯混合模型 (GMM)估计目标对象的颜色分布和背景的颜色分布。
高斯混合模型( GMM ) (Gaussian mixture model (GMM))
A Gaussian mixture model (GMM) is a category of probabilistic model which assumes that the observed data is made up of a mixture of several Gaussian distributions. These individual distributions (referred to as mixture components) may be given different means and variances. They may also be given different mixture weights. It is basically here is used for clustering.
高斯混合模型( GMM )是一类概率模型,它假定观测数据由几种高斯分布的混合物组成。 可以为这些单独的分布(称为混合成分)提供不同的均值和方差。 它们也可以被赋予不同的混合重量。 它基本上在这里用于集群。
The idea here is to extract the foreground image and change the background to black using the GrabCut algorithn
这里的想法是使用GrabCut算法提取前景图像并将背景更改为黑色。
这个怎么运作? (How it works?)
- User inputs the image(rectangle). The rectangle could be the whole image or portion of an image which you wanted to segment. Everything outside this rectangle will be taken as background, everything inside rectangle is unknown.用户输入图像(矩形)。 矩形可以是您要分割的整个图像或图像的一部分。 此矩形外部的所有内容都将作为背景,矩形内部的所有内容均未知。

- For example, here I have segmented MS Dhoni’s image from the background using grabcut algorithm.例如,在这里我使用抓取算法从背景中分割了MS Dhoni的图像。
- Computer does an initial labeling depending on the input we give. It labels the foreground and background pixels. Now a Gaussian Mixture Model(GMM) is used to model the foreground and background based on the input that we give, it learns and creates a new pixel distribution.计算机根据我们提供的输入进行初始标记。 它标记前景和背景像素。 现在,根据我们给出的输入,使用高斯混合模型(GMM)对前景和背景进行建模,从而学习并创建新的像素分布。
- The unknown pixels are labelled either as probable foreground or probable background depending on its relationship with the other hard-labelled pixels in terms of color statistics (It is just like clustering). Now anything outside the rectangle is taken as background and anything inside the rectangle is taken as probable background or foreground depends on the rectangle that we define.未知像素根据颜色统计与其他硬标记像素的关系而被标记为可能的前景或可能的背景(就像聚类一样)。 现在,矩形外部的任何内容都将作为背景,矩形内部的任何内容都将被视为可能的背景或前景,这取决于我们定义的矩形。
- A graph is built from this pixel distribution.根据此像素分布构建图形。
- Nodes in the graphs are pixels. There are two more additional nodes:图中的节点为像素。 还有另外两个节点:
i) Source node : Every foreground pixel is connected to Source node and
i)源节点:每个前景像素都连接到源节点,并且
II) Sink node: Every background pixel is connected to Sink node.
II)接收器节点:每个背景像素都连接到接收器节点。
- The weights of edges connecting pixels to source node/end node are defined by the probability of a pixel being foreground/background.将像素连接到源节点/末端节点的边缘的权重由像素是前景/背景的概率定义。
- The weights between the pixels are defined by the edge information or pixel similarity. If there is a large difference in pixel color, the edge between them will get a low weight.像素之间的权重由边缘信息或像素相似度定义。 如果像素颜色差异很大,则它们之间的边缘将变低。
- Then mincut algorithm is used to segment the graph. It cuts the graph into two separating source node and sink node with minimum cost function. The cost function is the sum of all weights of the edges that are cut.然后使用mincut算法分割图。 它将图切成具有最小成本函数的两个分离的源节点和宿节点。 成本函数是被切割边缘的所有权重的总和。
- After the cut, all the pixels connected to Source node become foreground and those connected to Sink node become background.剪切后,连接到“源”节点的所有像素都变为前景,而连接到“接收器”节点的像素都变为背景。
- The process is continued until the classification converges.继续该过程,直到分类收敛为止。
锻炼以创建自己的贴纸 (EXERCISE TO CREATE YOUR OWN STICKER)
We will write a python program to create our very own sticker using OpenCV – GrabCut
我们将编写一个Python程序,使用OpenCV – GrabCut创建我们自己的贴纸
To set up python environment → Setup Python environment in windows machine
设置python环境→ 在Windows计算机中设置python环境
We will create the folder structure as below
我们将如下创建文件夹结构
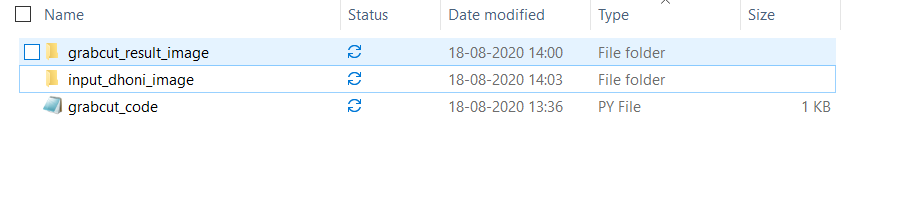
The input_dhoni_image folder will contain the input images, grabcut_result_image folder is where the results gets stored after executing the grabcut_code.py file
input_dhoni_image文件夹将包含输入图像,grabcut_result_image文件夹是在执行grabcut_code.py文件之后存储结果的位置
copy the below code in grabcut_code.py file and save as .py file
将以下代码复制到grabcut_code.py文件中,并另存为.py文件
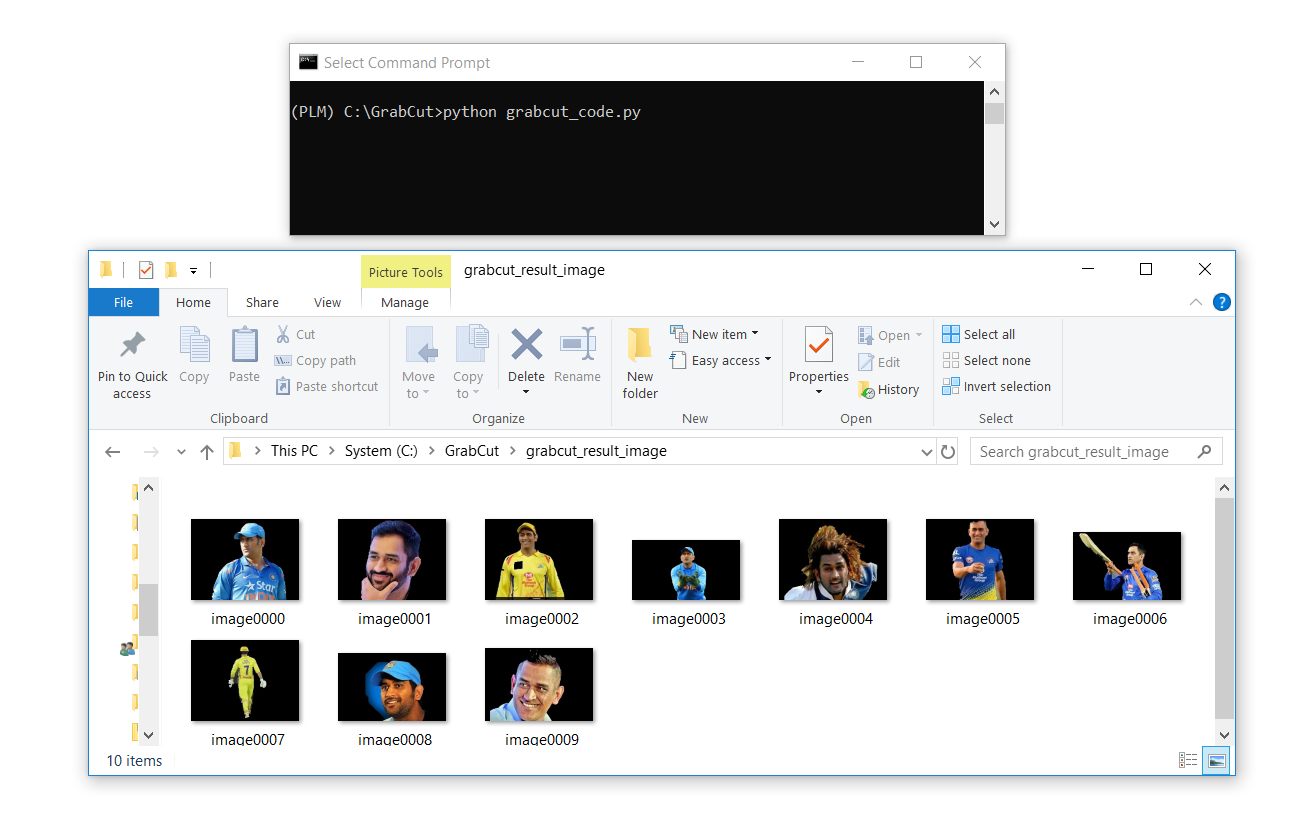
# Import necessary library import numpy as npimport cv2from matplotlib import pyplot as plot import osimport globos.mkdir = 'grabcut_result_image'i=0for img in glob.glob(r'PATH_TO_YOUR_IMAGES_FOLDER\input_dhoni_image\*.jpg'): in_image= cv2.imread(img) mask = np.zeros(in_image.shape[:2],np.uint8) bgdModel = np.zeros((1,65),np.float64) fgdModel = np.zeros((1,65),np.float64) rect = (13,4,230,300) cv2.grabcut(in_image,mask,rect,bgdModel, fgdModel,5,cv2.GC_INIT_WITH_RECT) mask2 = np.where((mask==0)|(mask==2),0,1).astype('uint8') op_image= in_image*mask2[:,:,np.newaxis] cv2.imwrite('grabcut_result_image/image%04i.jpg' %i, op_image) i+=1 >python grabcut_code.py
> pythongrabcut_code.py
代码说明 (Code Explanation)
- The First 5 lines of code are to import the packages that are essential for this exercise代码的前5行是导入此练习必不可少的软件包的
In next line of code we create a folder ‘grabcut_result_image’ to store our results using os.mkdir, mkdir will create an empty folder for us.
在下一行代码中,我们创建一个文件夹“ grabcut_result_image”以使用os.mkdir存储我们的结果, mkdir将为我们创建一个空文件夹。
- Next we assign a counter variable i = 0 , to iterate through multiple images and store it in the result folder in an increasing order, the counter i will be incremented while we write the result in the result folder.接下来,我们分配一个计数器变量i = 0,以遍历多张图像并将其以递增顺序存储在结果文件夹中,当我们将结果写入结果文件夹时,计数器i将递增。
- Next we write a for loop to iterate through the input image folder and read the image files one after the other接下来,我们编写一个for循环以遍历输入图像文件夹,并一个接一个地读取图像文件。
In next line we read the image using cv2.imread function and store it in in_image variable. The input image essentially is a 8-bit 3-channel image.
在下一行中,我们使用cv2.imread函数读取图像并将其存储在in_image变量中。 输入图像本质上是8位3通道图像。
In the next line we create a mask variable with zero arrays using np.zeros() function, which will take the height and width of the input image and data type as parameter. image.shape gives the height,width and depth of an image. we use array slicing([:2]) to slice the first two attributes of the image.
在下一行中,我们使用np.zeros()函数创建一个零数组的mask变量,该变量将输入图像的高度和宽度以及数据类型作为参数。 image.shape给出图像的高度,宽度和深度。 我们使用数组切片([:2])切片图像的前两个属性。
In the next lines of code, we create bgdModel and fgdModel temporary array used by GrabCut internally when modeling the background and foreground model respectively..
在接下来的代码行中,当分别为背景模型和前景模型建模时,我们将在内部创建GrabCut使用的bgdModel和fgdModel临时数组。
Next we create a rect variable — rect : Region of Interest(ROI) containing the segmented object. The pixels outside of the ROI are marked as obvious background. The parameter is only used when mode==GC_INIT_WITH_RECT .
接下来,我们创建一个rect变量— rect :包含分段对象的感兴趣区域(ROI)。 ROI外部的像素标记为明显的背景。 仅在mode == GC_INIT_WITH_RECT时使用该参数。
- Next line of code we are going to use cv2.grabCut from Opencv Library, which takes few parameters. First the input image, then the mask, then the rectangle for our main object, the background model, foreground model, the amount of iterations to run, and what mode you are using.下一行代码将使用Opencv库中的cv2.grabCut,该参数很少。 首先是输入图像,然后是遮罩,然后是我们的主要对象的矩形,背景模型,前景模型,要运行的迭代次数以及所使用的模式。
Syntax: cv2.grabCut(image,mask,rect,bgdModel,fgdModel,5,cv2.GC_INIT_WITH_RECT)
语法:cv2.grabCut(图片,遮罩,矩形,bgdModel,fgdModel,5,cv2.GC_INIT_WITH_RECT)
cv2.grabcut parameters:
cv2.grabcut参数:
in_image :Input image variable which has the image read using cv2.imread
in_image :输入图像变量,该变量具有使用cv2.imread读取的图像
mask : Input/output 8-bit single-channel mask. The mask is initialized by the function when mode is set to GC_INIT_WITH_RECT. Its elements may have one of following values:
mask :输入/输出8位单通道掩码。 当模式设置为GC_INIT_WITH_RECT时,该掩码由函数初始化。 其元素可能具有以下值之一:
i) GC_BGD defines an obvious background pixels.
i)GC_BGD定义了明显的背景像素。
ii) GC_FGD defines an obvious foreground (object) pixel.
ii)GC_FGD定义了明显的前景(对象)像素。
iii) GC_PR_BGD defines a possible background pixel.
iii)GC_PR_BGD定义了可能的背景像素。
iv) GC_PR_FGD defines a possible foreground pixel.
iv)GC_PR_FGD定义了可能的前景像素。
rect : The bounding box rectangle that contains the region that we want to segment. This parameter is only used when you set the mode to (cv2.GC_INIT_WITH_RECT).
rect:包含我们要分割的区域的边界框矩形。 仅当将模式设置为(cv2.GC_INIT_WITH_RECT)时,才使用此参数。
rect = (13,4,230,300)
rect =(13,4,230,300)
Syntax: rect = (start_x, start_y, width, height).
语法:rect =(start_x,start_y,宽度,高度)。
This is the rectangle that covers our main object. The main aim is to find the proper coordinates based on the input we give, in order to achieve the proper outcome.
这是覆盖我们主要对象的矩形。 主要目的是根据我们提供的输入找到合适的坐标,以实现合适的结果。
bgdModel : Temporary array for the background model. Do not modify it while you are processing the same image.
bgdModel :背景模型的临时数组。 在处理同一图像时,请勿对其进行修改。
fgdModel : Temporary arrays for the foreground model. Do not modify it while you are processing the same image.
fgdModel :前景模型的临时数组。 在处理同一图像时,请勿对其进行修改。
iterCount : Number of iterations the algorithm should make before returning the result. Note that the result can be refined with further calls with mode==GC_INIT_WITH_MASK or mode==GC_EVAL .
iterCount :算法在返回结果之前应该进行的迭代次数。 请注意,可以通过使用mode == GC_INIT_WITH_MASK或mode == GC_EVAL进行进一步调用来完善结果。
mode : Operation mode that could be one of the following:
mode :操作模式,可能是以下其中一种:
i) GC_INIT_WITH_RECT This function initializes the state and the mask using the provided rectangle. ie, Bounding box. After that it runs iterCount iterations of the algorithm.
i)GC_INIT_WITH_RECT此函数使用提供的矩形初始化状态和掩码。 即边界框。 之后,它将运行算法的iterCount迭代。
ii) GC_INIT_WITH_MASK This function initializes the state using the provided mask. Note that GC_INIT_WITH_RECT and GC_INIT_WITH_MASK can be combined. Then, all the pixels outside of the ROI are automatically initialized with GC_BGD .
ii)GC_INIT_WITH_MASK该函数使用提供的掩码初始化状态。 请注意,可以合并GC_INIT_WITH_RECT和GC_INIT_WITH_MASK。 然后,使用GC_BGD自动初始化ROI之外的所有像素。
Finally cv2.grabcut returns a tuple of populated mask, bgModel and fgModel.
最后, cv2.grabcut返回一个元组 填充的遮罩,bgModel和fgModel。
10. In the next link we are creating the new mask by changing the existing mask which contains background (0 & 2) as ‘0’ (black) and foreground (1& 3) as ‘1’ (White) as below. So, we have now changed the mask ad created the new one.
10.在下一个链接中,我们通过更改现有的遮罩来创建新的遮罩,如下所示,其将背景(0&2)设置为'0'(黑色),将前景(1&3)设置为'1'(白色)。 因此,我们现在更改了创建新遮罩广告的遮罩广告。
mask2 = np.where((mask==0)|(mask==2),0,1).astype(‘uint8’)
mask2 = np.where(((mask == 0)|(mask == 2),0,1).astype('uint8')
11. In the next line we multiply the input image with the new mask to get out output image, as below.
11.在下一行中,我们将输入图像与新蒙版相乘以得出输出图像,如下所示。
img = image*mask2[:,:,np.newaxis]
img =图片* mask2 [:,:,np.newaxis]

But in some cases, the segmentation won’t be fine, like, it may have marked some foreground region as background and vice versa.
但是在某些情况下,分割可能不会很好,例如,可能已将某些前景区域标记为背景,反之亦然。

In that case, we just try to change our rectangle coordinates or try to increase or decrease the iterations.
在这种情况下,我们只是尝试更改矩形坐标或尝试增加或减少迭代次数。
12. In the last line we write the output images to the output folder grabcut_result_image using cv2.imwrite
12.在最后一行我们写的图像输出到输出文件夹grabcut_result_image使用cv2.imwrite
学分 (Credits)
This article is co-authored by Meena Manogaran @Meena Manogran , Senior Engineer at Nissan Motors → https://www.linkedin.com/in/meena-manogaran-9834b2117/
本文由日产汽车公司高级工程师Meena Manogaran @Meena Manogran合着→ https: //www.linkedin.com/in/meena-manogaran-9834b2117/
翻译自: https://medium.com/swlh/create-your-own-whatsapp-sticker-using-python-program-9fd8e676c492
创建自己的盒子box
http://www.taodudu.cc/news/show-3055748.html
相关文章:
- impala创建kudu表过程,并发时异常
- 数据库索引的创建以及常见优化
- PyFlink 教程(三):PyFlink DataStream API - state timer
- 十、提升state
- Unexpected state导致HMaster abort
- Java设计模式——状态模式【State Pattern】
- PyFlink 教程:PyFlink DataStream API - state timer
- Fragment Transactions Activity State Loss
- Java 能创建多少线程
- 微博营销2——赢利模式之资讯中心
- list redis 怎样做排行_Redis中5种数据结构的使用场景介绍
- 最短路径问题
- 微博“超话”幻灭之后
- 珍爱生命,远离微博
- 谁杀死了腾讯微博?
- 新浪微博草根大号困局:新鲜感丧失 商业化过度
- 【可视化分析案例】用python分析Top100排行榜数据
- 带你走进微博背后的大数据原理:微博推荐算法
- 【转发】日访问量百亿级的微博如何做缓存架构设计
- python微博评论情感分析_Python采集微博热评进行情感分析祝你狗年脱单
- 新浪微博松绑140字限制 内容和社交能否兼得?
- 新浪微博传播途径研究
- 姚晨为何可以新浪微博排名第一
- 微博是怎么演变的?
- android博客排行榜,新浪博文排行_新浪博客 新浪博客Android客户端
- twitter和新浪微博--比较
- python微博爬虫分析_python爬取和分析新浪微博(一):scrapy构建新浪微博榜单、博主及微博信息爬虫...
- 0到新浪微博综搜榜第一
- 2021第七届美亚杯中国电子数据取证大赛详解write up
- 从拟物化到扁平,再到Material Design
创建自己的盒子box_创建自己的相关推荐
- conda创建虚拟环境 和 用conda创建GPU的cuda、cudnn使用环境
conda创建虚拟环境 和 用conda创建GPU的cuda.cudnn使用环境 1 conda在linux.windows上创建虚拟环境 1.1 首先在所在系统中安装Anaconda. 1.2 co ...
- MFC小程序003------MFC使用WebBrowser组件,在对话框中创建滚动视图,动态创建一个静态文本控件并设置鼠标单击的消息响应...
MFC小程序截图: 一.在MFC中简单使用WebBrowser的ActiveX插件的方法: 见博文: http://blog.csdn.net/supermanking/article/detail ...
- php 自动创建文件,php:自动创建多级文件夹
/** * 函数说明 * is_dir:判断给定文件名是否是一个目录,如果是返回ture,如果不是返回false * dirname:返回路径中的目录部分,本函数返回去掉文件名后的目录名.比如$pat ...
- R语言数据可视化 ggplot2基础2 创建单图层的散点图 创建facet
R语言数据可视化 ggplot2基础2 创建单图层的散点图 创建facet 单图层散点图 单图层散点图的facet 单图层散点图 这一讲我们从最简单的散点图开始介绍ggplot2应用的基础,首先我们下 ...
- java创建文件夹代码_Java创建文件夹及文件实例代码
package com.xhkj.util; import java.io.File; import java.io.IOException; public class CreateFileUtil ...
- 动态创建表格给同一个标签创建点击事件并让点击事件操作内容不一样
动态创建表格给同一个标签创建点击事件,每个点击事件操作的元素不一样. 现在有这样的需求,点击"查看详细"显示或隐藏标签.要实现这样的效果就要给点击标签添加两个属性,一个属性是nam ...
- python创建一个集合_python如何创建一个集合
创建集合 创建集合可以使用大括号{}来创建,元素间用逗号分隔,但是不能用它来创建空集合,因为{}创建的是空字典.如 set1 = {1,2,3} 也可以使用set()函数来创建集合,其中的参数为可迭代 ...
- 快速创建springboot项目:使用http://start.spring.io/网页创建,使用IDEA的Spring Initializr创建,使用SpringBoot CLI创建
1 快速创建SpringBoot项目 快速创建SpringBoot项目至少可以通过两种方式: 1.使用http://start.spring.io/网页版的创建 2.使用IDEA创建 1.1.通过访问 ...
- 创建ACCESS数据库,并且创建表和数据。重点:关闭ACCESS数据库引用
/// <summary>/// 创建ACCESS数据库,并且创建表和数据/// </summary>/// <param name="dictTable&qu ...
最新文章
- 调用Remoting的两种激活方式和以及因此而产生的三种.net Remoting对象
- Pycharm显示行号,修改字号大小
- Python语言学习之字母C开头函数使用集锦:count用法之详细攻略
- Linux2017Linux架构师!
- RMQ(Range Minimum Query)
- 11 linux suse 本地源_suse 11 Linux 静态路由的添加方法
- Windows-server-2008-R2安装Oracle-11g-R2-dataguard
- 多维度创新打造领先阿里云技术生态
- 使用ASP.NET Core MVC的Vue.Js
- python如何快速导入未安装模块_如何导入安装在sitepackages中的模块
- Undefined symbols for architecture i386:问题解决
- [MySql] - 数据库备份还原
- Android 四大组件 之 服务(Service)
- jstat 监控调整GC很好用
- React封装多个日期段组件--BatchDate组件
- kdj买卖指标公式源码_量+优化kdj买卖指标公式、源码-大智慧公式 -程序化交易(CXH99.COM)...
- 基于DirectShow实现的视频捕捉与采集
- 返利网app有那些?哪一个最好用?
- hdu 5285 wyh2000 and pupil【二分图+染色法】
- Android图片压缩——Luban鲁班压缩