如何为您的插件创建一个很棒的WordPress.org页面
You’ve just developed an awesome plugin for WordPress and you want to share it with as many people as possible. To do that, the WordPress.org platform seems to be the best choice as it’s the official WordPress plugins repository.
您刚刚为WordPress开发了一个很棒的插件,并且希望与尽可能多的人分享。 为此, WordPress.org平台似乎是最好的选择,因为它是官方的WordPress插件存储库。
But submitting your plugin to WordPress.org is not enough to gain users: you must introduce your plugin in the best possible way to let WordPress users know what your plugin can do.
但是将插件提交到WordPress.org还不足以吸引用户:您必须以最好的方式介绍插件,以使WordPress用户知道您的插件可以做什么。
A complete WordPress.org page will make your plugin more attractive. You will gain more users and these users will know how to use your plugin.
完整的WordPress.org页面将使您的插件更具吸引力。 您将获得更多用户,这些用户将知道如何使用您的插件。
为什么要创建一个好的插件页面? (Why Create a Good Plugin Page?)
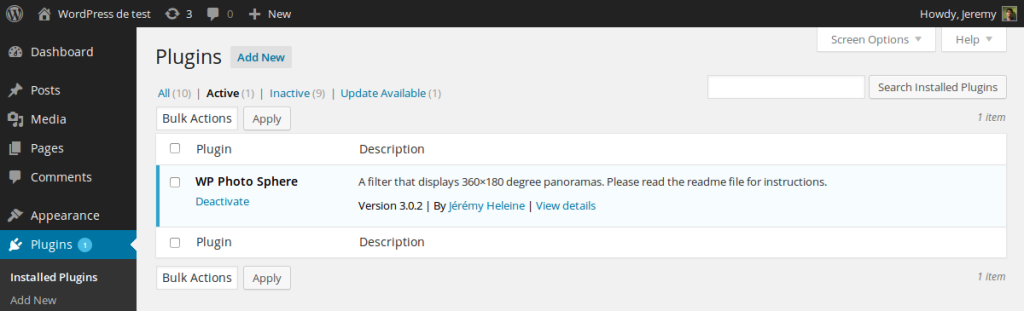
Once a WordPress plugin is installed, a short description can be displayed on the Installed Plugins page of the administration panel thanks to a correctly formatted comment, placed in the main file of the plugin. While this is a good way to help your users to remember what your plugin does, it doesn’t help you gain more users.
一旦安装了WordPress插件,由于在插件主文件中放置了正确格式的注释,因此可以在管理面板的“ Installed Plugins页面上显示简短说明。 虽然这是帮助用户记住插件功能的好方法,但并不能帮助您获得更多用户。
Before deciding to download your plugin, users generally check your plugin’s WordPress.org page in order to find out what it can do. Users will look at the description of your plugin, so you should describe precisely the features of your plugin (we will see how in a next part). But users will also want to know if your plugin is easy to use: several screenshots and a FAQ are useful for that. When you release an update, your users will want to know why they must download this update (does it fix known bugs or eradicate security risks?), so be sure to include this type of information as well.
在决定下载插件之前,用户通常会检查插件的WordPress.org页面以了解其功能。 用户将查看您的插件说明,因此您应该准确描述插件的功能(我们将在下一部分中介绍)。 但是用户也将想知道您的插件是否易于使用:几个屏幕截图和一个常见问题解答对此很有用。 当您发布更新时,您的用户将想知道为什么他们必须下载此更新(它是否解决了已知的错误或消除了安全风险?),因此请确保也包括此类信息。
Keep in mind that your plugin is not the only one: users have choice between several plugins, so you need to demonstrate why yours is better than others. A good plugin page can bring you more users, so it’s a good idea to make sure yours is as accurately and detailed as possible.
请记住,您的插件不是唯一的:用户可以在多个插件之间进行选择,因此您需要证明为什么您的插件比其他插件更好。 一个好的插件页面可以为您带来更多的用户,因此最好确保您的插件尽可能准确和详细。
向插件页面添加信息 (Adding Information to a Plugin Page)
WordPress can’t guess the usefulness of your plugin. So, to display information about it, WordPress uses two sources: the comments in your plugin’s main file, and the readme.txt file located at the root of your plugin’s folder.
WordPress无法猜测您插件的有用性。 因此,为了显示有关它的信息,WordPress使用了两种资源:插件主文件中的注释和位于插件文件夹根目录下的readme.txt文件。
Both are important, so we will see how to correctly complete them in the two following subparts.
两者都很重要,因此我们将在以下两个子部分中了解如何正确完成它们。
正确的评论 (The Right Comment)
Your plugin might include several files, but at the very least you’ll have one main file. This is the file loaded by WordPress, often with the same name as your plugin (for example, hello-world.php for the plugin Hello World). To be recognizable by WordPress, this main file must contain a ‘comment’, formatted in a specific way.
您的插件可能包含多个文件,但是至少您将只有一个主文件。 这是WordPress加载的文件,通常与您的插件同名(例如,插件Hello World hello-world.php )。 要被WordPress识别,此主文件必须包含以特定方式格式化的“注释”。
The ‘comment’ is where you fill in the basic information about your plugin. Not all the fields are not required; some are essential, while others are very useful.
在“注释”中,您可以填写有关插件的基本信息。 并非所有字段都是必填字段; 有些是必不可少的,而另一些则非常有用。
Basically, here is the minimal comment to indicate at the beginning of your plugin’s main file.
基本上,这是在您的插件主文件开头指示的最小注释。
<?php
/*
* Plugin Name: My good plugin page
* Plugin URI: http://mygoodpluginpage.com
* Description: A test for correctly completing a plugin page.
* Version: 1.0
* Author: Jérémy Heleine
* Author URI: http://jeremyheleine.me
* License: MIT
*/
?>
The Plugin Name field is, as its name suggests, used to indicate the name of the plugin. It must be unique in order for WordPress to recognize it.
顾名思义,“ Plugin Name字段用于指示插件的名称。 它必须是唯一的,以使WordPress能够识别它。
In the Plugin URI field, indicate a URI describing your plugin, if there is one. For example, if you have a page on your personal website which describes precisely your plugin, indicate its URL here.
在“ Plugin URI字段中,指示描述您的插件的URI(如果有)。 例如,如果您的个人网站上有一个页面可以准确描述您的插件,请在此处指示其URL。
The Description field is important, as its value is displayed in the Installed Plugins page of your users’ administration panel. It should be short.
“ Description字段很重要,因为它的值显示在用户管理面板的“ Installed Plugins页面中。 它应该很短。
Chances are, you will provide several versions of your plugin, with new features or bugs fixes. The current version number must be indicated in the Version field.
您可能会提供插件的多个版本,并提供新功能或错误修复。 当前版本号必须在“ Version字段中指出。
You can guess that the Author field must be filled with your name, while the Author URI field refers to your personal web page, where you present yourself and your projects, for example.
您可以猜测“ Author字段必须填写您的姓名,而“ Author URI字段引用您的个人网页,例如,您在其中展示自己和您的项目。
Finally, we find the License field in which you indicate a short name for the license under which you release your plugin. For example, you can indicate GPL3 or MIT.
最后,我们在“ License字段中找到用于发布插件的许可证的简称。 例如,您可以指示GPL3或MIT 。
Except for the License field, all these fields are read by WordPress to display information about your plugin, essentially in the Installed Plugins page. That’s why you should always indicate them.
除了“ License字段外,WordPress都会读取所有这些字段,以显示有关您的插件的信息,基本上在“ Installed Plugins页面中。 因此,您应该始终指示它们。
To personalize your plugin even further, WordPress has added three other fields to this special comment. We can find, for example, the Network one which is a boolean indicating whether the plugin can be activated on all sites in a installation (when Multisite is enabled) or not. By default, Network is set to true.
为了进一步个性化您的插件,WordPress在此特殊注释中添加了其他三个字段。 例如,我们可以找到Network一,它是一个布尔值,指示是否可以在安装中的所有站点(启用多站点)上激活该插件。 默认情况下, Network设置为true 。
If the usefulness of the Network field is limited, it is not the case of the last two ones: Text Domain and Domain Path in which you can indicate respectively your plugin’s text domain and the directory containing the .mo files to translate your work.
如果“ Network字段的用途有限,则不是最后两个字段: Text Domain和Domain Path ,您可以在其中分别指示插件的文本域和包含.mo文件的目录以翻译您的工作。
Thanks to these fields, you will be able to translate the other fields: in the Installed Plugins page, you will be able to display a description in several languages.
由于这些字段,您将能够翻译其他字段:在“ Installed Plugins页面中,您将能够以多种语言显示说明。
/*
* Plugin Name: Plugin page
* Plugin URI: http://jeremyheleine.me
* Description: A test for correctly fill a plugin page.
* Version: 1.0
* Author: Jérémy Heleine
* Author URI: http://jeremyheleine.me
* Text Domain: myplugin-page
* Domain Path: /lang/
* License: MIT
*/
Note that the path indicated in the Domain Path field is relative to your plugin’s folder. For example, with the previous comment, WordPress will use the .mo files contained in the /lang/ subdirectory of my plugin’s folder. By default, WordPress will search for your .mo files in the root of this folder.
请注意,“ Domain Path字段中指示的Domain Path是相对于插件文件夹的。 例如,使用前面的注释,WordPress将使用插件文件夹的/lang/子目录中包含的.mo文件。 默认情况下,WordPress将在此文件夹的根目录中搜索您的.mo文件。
自述文件 (The Readme File)
Now that our plugin is ready to be correctly displayed on your user’s administration panel, we need to attract these users with a good plugin page on WordPress.org. To do this, we only need one file: readme.txt which must be at the root of our plugin’s folder.
现在我们的插件已准备好正确显示在用户的管理面板上,我们需要在WordPress.org上提供一个不错的插件页面来吸引这些用户。 为此,我们只需要一个文件: readme.txt ,该文件必须位于插件文件夹的根目录下。
You can find an example of what WordPress accepts here, where you can see that a plugin’s readme.txt file is essentially a list of sections filled in with the right information.
您可以在此处找到WordPress接受的示例,在该示例中您可以看到插件的readme.txt文件实质上是用正确的信息填充的部分的列表。
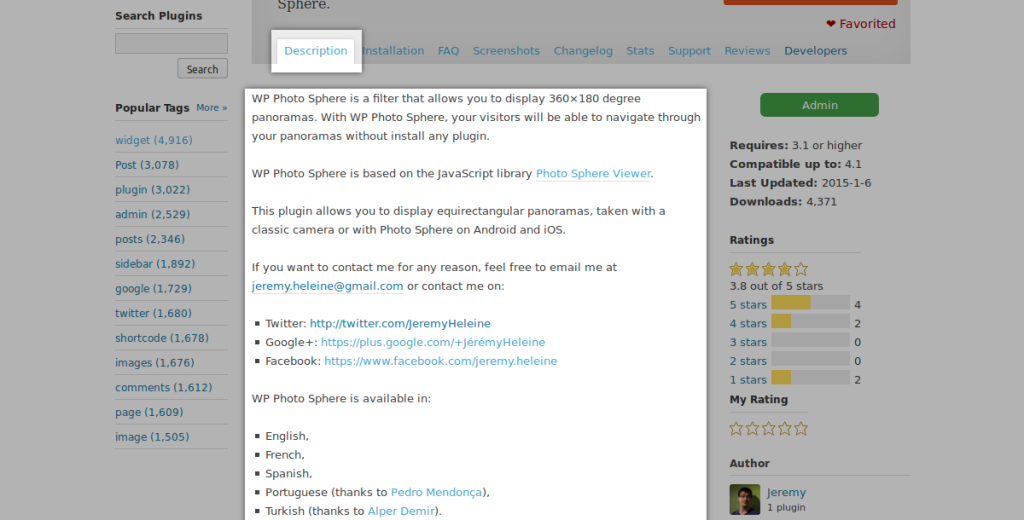
Most of these sections will be displayed on your plugin page as tabs. For example, with the readme file linked above, we will find several tabs like “Description“, “Installation“, “FAQ” or “Screenshots“.
这些部分中的大多数都将在选项卡页面上显示为选项卡。 例如,使用上面链接的自述文件,我们将找到几个选项卡,例如“ Description ”,“ Installation ”,“ FAQ ”或“ Screenshots ”。
标头 (Header)
First we find a special section.
首先,我们找到一个特殊的部分。
=== Plugin Name ===
Contributors: First author, second author
Donate link: http://link.for/allowing/users/give/you/money
Tags: tag 1, tag 2, tag 3
Requires at least: 3.7
Tested up to: 4.1
Stable tag: 3.0
License: GPLv2
License URI: http://www.gnu.org/licenses/gpl-2.0.html
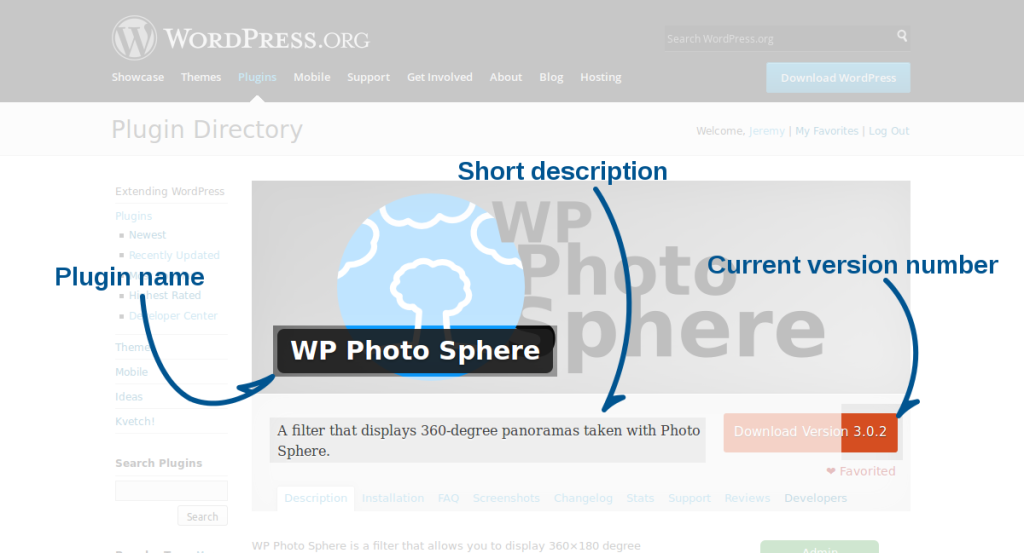
A short description of your plugin.As you might have guessed, this replaces Plugin Name with the full name of your plugin. It will be displayed in the header of your plugin’s page, above the short description indicated at the end of this section.
您可能已经猜到了,这会将Plugin Name替换为Plugin Name的全名。 它会显示在您插件页面的标题中,在本节末尾简短说明的上方。
Fill out the Contributors field using the list of the plugin’s authors and contributors. This list must contain WordPress.org identifiers.
使用插件的作者和贡献者列表填写“ Contributors字段。 此列表必须包含WordPress.org标识符。
The Donate link is here to indicate the link of a web page where users can donate to support your work. Then, the Tags field is a list of keywords associated with your plugin. They won’t be displayed on your plugin page but they will be used by WordPress users to find your plugin.
“ Donate link在此处表示网页的链接,用户可以在其中捐赠以支持您的工作。 然后, Tags字段是与您的插件关联的关键字列表。 它们不会显示在您的插件页面上,但是WordPress用户将使用它们来查找您的插件。
The Requires at least and Tested up to fields are important. In the former, indicate the minimal version your users must use to have your plugin working: for example, if your plugin is entirely based on a function appearing in WordPress 3.7, indicate 3.7. In the latter, indicate the highest version number of WordPress on which you have tested your plugin: if you know that your plugin works on the latest version of the CMS, you should indicate it.
Requires at least和经过Tested up to字段很重要。 在前者中,指出用户必须使用的最低版本才能使您的插件正常工作:例如,如果您的插件完全基于WordPress 3.7中出现的功能,请指示3.7 。 在后者中,指示已对其进行测试的WordPress的最高版本号:如果您知道您的插件可在最新版本的CMS上运行,则应指出它。
The Stable tag field is here to indicate the current version number of your plugin. It is important, as WordPress reads this field to know if an update is available or not.
Stable tag字段在此处指示插件的当前版本号。 这很重要,因为WordPress会读取此字段以了解是否有可用的更新。
The License and License URI tags are used to indicate the license under which you release your plugin: indicate a short name in the former and indicate a link where we can find more information about the license in the latter.
License和License URI标记用于指示您在其下释放插件的许可证:在前者中表示一个短名称,并在我们可以在后者中找到有关许可证的更多信息的链接。
描述 (Description)
Right after this essential information, we find the Description section. In this section, you should precisely describe your plugin. For example, you can indicate what it can do, in which languages it is available, where users can contact you, and any other information your users might find useful: WordPress does not limit the size of the description, so you are free to write what you want.
在此基本信息之后,我们可以找到“ Description部分。 在本节中,您应该精确描述您的插件。 例如,您可以指示其功能,可用的语言,用户可以与您联系的地方以及您的用户可能认为有用的其他任何信息:WordPress并不限制描述的大小,因此您可以自由编写你想要什么。
As in the rest of the sections in the readme file, you can use Markdown in the description to format your text.
与自述文件的其余部分一样,您可以在描述中使用Markdown来设置文本格式。
安装 (Installation)
In the Installation section, you should describe how users can install your plugin. Most of the time, this section is a short list like the one below.
在“ Installation部分,您应该描述用户如何安装插件。 在大多数情况下,此部分是一个简短列表,如下所示。
== Installation ==
1. Upload the `myplugin` folder to the `/wp-content/plugins` directory
2. Activate the plugin through the 'Plugins' menu in WordPress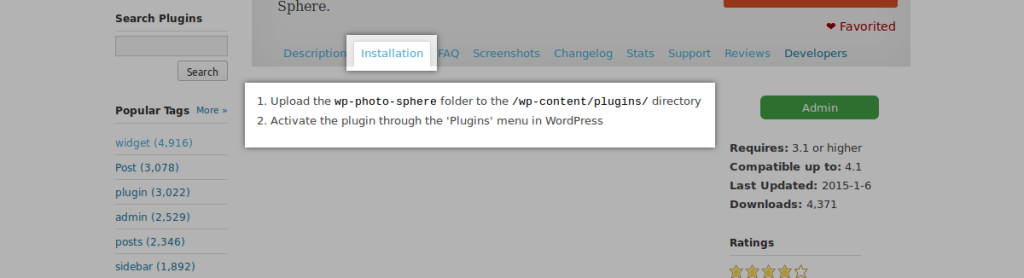
经常问的问题 (Frequently Asked Questions)
This section consists of a list of questions your users frequently ask you. You can also use this section to describe how to use your plugin, how to configure an option, or how to personalize a widget, for example.
本部分包含用户经常问您的问题列表。 例如,您还可以使用本节描述如何使用插件,如何配置选项或如何个性化窗口小部件。
Below is an example of an FAQ section (using two irrelevant questions), but you can add as many questions as you want. Useful questions are preferred.
以下是FAQ部分的示例(使用两个不相关的问题),但是您可以根据需要添加任意多个问题。 有用的问题是首选。
== Frequently Asked Questions ==
= What's the name of this plugin? =
The name of the plugin is the one displayed on this page.
= Do you love kittens? =
Of course.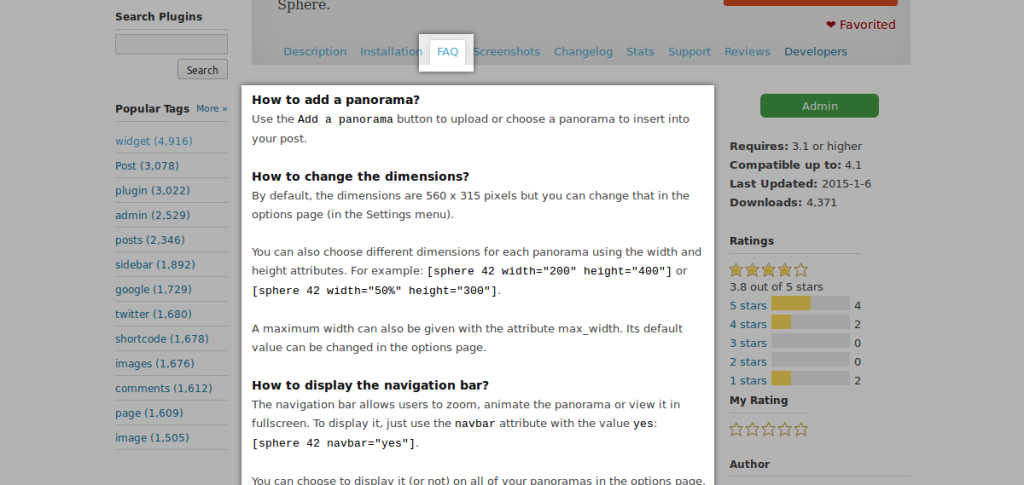
变更日志和升级通知 (Changelog and Upgrade Notice)
As a project evolves, new ideas are generated and, with them, new versions of your plugin. In the header of the readme file, you need to indicate the current stable version, so that your (future) users know how your plugin has evolved, or simply what they are likely to find in the latest version. This way, they will know if a feature they have been waiting on has finally been released.
随着项目的发展,将产生新的想法,并随之产生新版本的插件。 在自述文件的标题中,您需要指示当前的稳定版本,以便您(未来的)用户知道您的插件如何发展,或者只是他们可能会在最新版本中找到什么。 这样,他们将知道他们一直在等待的功能是否终于发布。
That’s the aim of the Changelog section. In this part, you list all the versions you have released for your plugin, listing for each of them the features they include. Most of the time, we prefer listing our versions in a reverse chronological order but you are free to do what you want.
这就是Changelog部分的目的。 在这一部分中,您列出了为插件发布的所有版本,并为每个版本列出了它们所包含的功能。 在大多数情况下,我们倾向于按相反的时间顺序列出我们的版本,但您可以自由地做自己想做的事情。
== Changelog ==
= 2.0 =
* Awesome new feature
* A brand new button
= 1.0.1 =
* Oops. Bug fixed.
= 1.0 =
* A beautiful button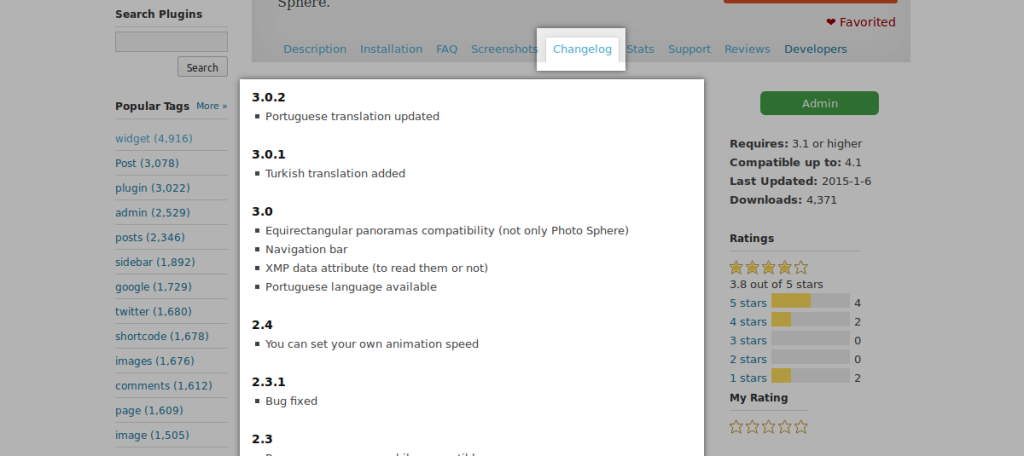
The next section is also ‘new-features-related’, and is called Upgrade Notice. It is principally here for users who have already installed your plugin: when a new version of your plugin is available, you can display a particular message to indicate what’s new, and why your users should upgrade.
下一节也是“新功能相关的”部分,称为“ Upgrade Notice 。 它主要是在这里给已经安装了插件的用户使用:当有新版本的插件可用时,您可以显示一条特定消息,以指示新功能以及用户为什么升级。
For example, with the section below, your users will be notified that version 2.0 is available, and they will see the message “Upgrade for awesome new features!“.
例如,在下面的部分中,您的用户将收到版本2.0可用的通知,并且他们将看到消息“ 升级真棒新功能! ”。
== Upgrade Notice ==
= 2.0 =
Upgrade for awesome new features!
= 1.0.1 =
This version fixes an important bug.
= 1.0 =
Hello, this is the first version.
另一个主意? (Another Idea?)
The sections above should always be present in your readme file as they are essential for users to understand what your plugin can do and how. But if you have other ideas of sections, you can add your own as any other ‘classic’ section.
上面的部分应该始终存在于您的自述文件中,因为它们对于用户了解您的插件可以做什么以及如何进行至关重要。 但是,如果您对节有其他想法,则可以将自己的节添加为其他“经典”节。
== My Section ==
This section is unique, my plugin is the only one in the world to use it!
== Another Section ==
Sections are **cool**.
将图像添加到插件页面 (Adding Images to a Plugin Page)
屏幕截图 (Screenshots)
If you read the example of the readme file provided by WordPress and linked above, you might have noticed that we forgot a section: Screenshots. Its name is clear enough: in this section, you should include some screenshots describing the interface of our plugin.
如果您阅读了WordPress提供并在上面链接的自述文件的示例,则可能已经注意到我们忘记了一个部分: Screenshots 。 它的名字很清楚:在本节中,您应该包括一些截图,描述我们插件的界面。
As a simple readme file can’t contain images, it is necessary to know where to upload them. First, you should know that WordPress accepts several formats; you can use PNG (*.png), JPEG (*.jpg or *.jpeg) and GIF (*.gif) files for your screenshots.
由于一个简单的自述文件不能包含图像,因此有必要知道将图像上传到哪里。 首先,您应该知道WordPress接受几种格式; 您可以将PNG( *.png ),JPEG( *.jpg或*.jpeg )和GIF( *.gif )文件用于屏幕截图。
Name them in the format screenshot-n.ext where n is a number and ext is the extension of the file. For example, if we have three PNG screenshots, we name them screenshot-1.png, screenshot-2.png and screenshot-3.png.
将它们命名为screenshot-n.ext ,其中n是数字,而ext是文件的扩展名。 例如,如果我们有三个PNG屏幕截图,则将它们命名为screenshot-1.png , screenshot-2.png和screenshot-3.png 。
You now have two choices to place your files: in the /assets directory or in the one containing the current readme file (for example in the /tag/2.0 directory if your current version is 2.0). Note that WordPress will first search for your screenshots in the /assets directory: for example, if you have the files /assets/screenshot-1.png and /tags/2.0/screenshot-1.png, the one in the /assets directory will be displayed and not the one in the /tags/2.0 directory.
现在,您有两种选择来放置文件:在/assets目录中或在包含当前自述文件的文件中(例如,如果当前版本为2.0,则在/tag/2.0目录中)。 请注意,WordPress首先会在/assets目录中搜索您的屏幕截图:例如,如果您拥有文件/assets/screenshot-1.png和/tags/2.0/screenshot-1.png ,则该文件位于/assets目录中将会显示,而不是/tags/2.0目录中的/tags/2.0 。
Once you have placed your screenshots in the right directory, return to your readme file and complete the Screenshots section with an ordered list. The first item will describe the first screenshot (named screenshot-1.png for example), the second item will describe the second screenshot, and so on.
将屏幕快照放置在正确的目录中后,返回自述文件并使用有序列表完成Screenshots部分。 第一项将描述第一个屏幕截图(例如,命名为screenshot-1.png ),第二项将描述第二个屏幕截图,依此类推。
== Screenshots ==
1. This is the administration page of this plugin.
2. The button is beautiful, isn't it?
3. This is what your visitors will see.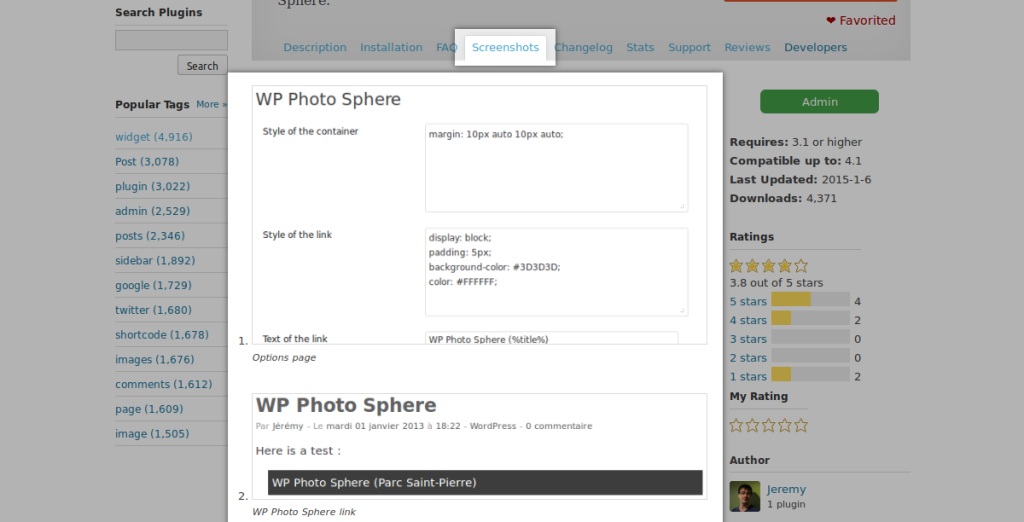
旗帜 (Banner)
In a WordPress.org plugin page, we can see the name of the plugin in the foreground of a big banner. This banner is optional but you can add it to enhance the look of your page.
在WordPress.org插件页面中,我们可以在大横幅的前景中看到插件的名称。 该横幅是可选的,但您可以添加它以增强页面的外观。
Your banner must be 772 pixels wide and 250 pixels tall and named banner-772x250.png or banner-772x250.jpg. Note that the GIF format is not allowed here. Place this banner in the /assets directory, and that is it: WordPress will display it in your plugin page.
您的横幅必须宽772像素,高250像素,并命名为banner-772x250.png或banner-772x250.jpg 。 请注意,此处不允许使用GIF格式。 将此横幅放置在/assets目录中,就是这样:WordPress将在您的插件页面中显示它。
With a width of 772 pixels, your image can be blurry on high-DPI displays. To fix this problem, you can add another optional image which must be 1544 wide and 500 pixels tall and named banner-1544x500.png (or .jpg). Place it in the /assets directory and WordPress will use it on high-DPI displays in the place of the small banner.
宽为772像素的图像在高DPI显示器上可能会模糊。 要解决此问题,您可以添加另一个可选图像,该图像的宽度必须为1544,高度为500像素,并命名为banner-1544x500.png (或.jpg )。 将其放在/assets目录中,WordPress将在高DPI显示器上的小横幅位置使用它。
结论 (In Conclusion)
Just like many other developers, you love your plugin and want to have as many users as possible. But providing a good plugin is not enough: users won’t know that your plugin is awesome if you don’t correctly describe it.
就像许多其他开发人员一样,您喜欢您的插件,并希望拥有尽可能多的用户。 但是提供一个好的插件是不够的:如果您没有正确描述插件,用户将不会知道您的插件很棒。
A good plugin page can bring you more users and, to do that, the readme file will be your best friend. To help you make the best readme file, WordPress provides you a tool: the readme validator, which will tell you if an information is missing.
一个好的插件页面可以为您带来更多的用户,为此,自述文件将是您最好的朋友。 为了帮助您制作最佳的自述文件,WordPress为您提供了一个工具: 自述验证程序 ,它将告诉您是否缺少信息。
If you want to retrieve the readme file that we’ve written about in this article, you can find a very small example plugin here.
如果要检索我们在本文中编写的自述文件,可以在此处找到一个非常小的示例插件。
翻译自: https://www.sitepoint.com/create-awesome-wordpress-org-page-plugin/
如何为您的插件创建一个很棒的WordPress.org页面相关推荐
- 20个很棒的WordPress社交媒体插件—用于社交共享
寻找一些WordPress社交媒体插件进行社交共享? 我一直在为下一个项目寻找新的东西. 有时是关于在特定主题中看起来不错,而有时则是关于功能,有时您只需要一些额外的东西即可最大化社交共享. 这是我收 ...
- css 插件_10个很棒的PostCSS插件,使您成为CSS向导
PostCSS是一种功能强大的工具,可以使用JavaScript插件转换CSS样式 . 它的灵活性在于其构建方式. PostCSS的核心部分是一个Node.js模块 ,您可以使用npm进行安装,它具有 ...
- Giphy – 分享一个很棒的 GIF 动画图片搜索引擎
GIF 动画图片是一种非常有趣的图片格式,比静态图片更能够表达出含义,如果能制作得有创意,那就非常的有趣.今天向大家推荐一个很棒的 GIF 动画图片搜索引擎--Giphy. 您可能感兴趣的相关文章 轻 ...
- easyexcel一个很棒的Excel解析工具
easyexcel一个很棒的Excel解析工具 前言 Excel格式 核心原理对比 理解与使用 总结 前言 最近手头上有一个项目,其中有一个需求就是要Excel表格导入导出,之前有过类似的经验,不过当 ...
- 研究生跟了一个很棒的导师,是什么神仙体验?
来源 | 百度学术 个人感觉读研是很重要的,如果问小编从小到大做的最英明的决定是什么,那一定是考上了研究生,而且重要的是要考一个大城市的研究生. 大家要吐槽是有趣的,但是不希望大家的吐槽对于读研这个事 ...
- 一个很棒的手机app:金手指音乐曲谱
http://apk.hiapk.com/appinfo/com.jh.APPfbf19bf66a8a4ed0a11f952a11fa6e07.news 一个很棒的手机app:金手指音乐曲谱 转载于: ...
- 创建一个学生信息表,与页面分离
一.需求分析 做一个jsp页面,动态显示信息表的内容. 1. 做一个实体类:StudentInfo (包含4个字段) 2. 如图模拟生成3条数据,本质上就是new StudentInfo 3个实例 ...
- 有一个很棒的想法,如何向老板证明你是对的
作者:姚说 全文共 2281 字 1 图,阅读需要 5 分钟 ---- / BEGIN / ---- 很多人经常遇到这样的情况:自己想出了一个很好的想法,但是被老板或者领导给否定掉了,应该怎么办? 其 ...
- 用web前端所学知识创建一个简单版的个人介绍页面
完成第一部分简单的学习,现在进行前端的简单项目实践.并记录下来!本文记录第一个静态页面的制作! PS:这是在freecodecamp上的第一个入门级测试项目. 现有要求如下: 需求 1:我的致敬页应有 ...
最新文章
- Linux-Shell 快捷键
- python nltk 入门demo
- 如何保证Linux服务器的安全
- php 一个简单正则表达式,PHP中正则表达式回顾(3)--编写一个简单的正则表达式工具类...
- vue指令:v-once 元素和组件只渲染一次,不会随着数据的改变而改变
- addView的误区
- network中的请求信息,headers中的每一项分别是什么意义?
- [剑指offer][JAVA]面试题第[32-2]题[从上到下打印二叉树][BFS]
- 你好,C++(34)有一只叫做多利的羊 6.2.4 拷贝构造函数
- 无法打开文件“python35_d.lib”
- 综述 | 联邦学习-新兴的人工智能基础技术
- Hibernate 1
- android+统计功能,React Native 轻松集成统计功能(Android 篇)
- 十几个NPM恶意包劫持 Discord 服务器
- Project Euler Problem 92 Square digit chains
- 收藏版: 深度介绍分布式系统原理
- 随手记_重建的五花八门的点云地图效果(供娱乐)
- jquery Map转JSON
- appscan10.0下载
- 基于R语言的DynNom包绘制动态列线图