Mininet系列实验(四):基于Mininet测量路径的损耗率
1 实验目的
熟悉Mininet自定义拓扑脚本的编写与损耗率的设定;
熟悉编写POX脚本,测量路径损耗速率
2 实验原理
在SDN环境中,控制器可以通过对交换机下发流表操作来控制交换机的转发行为,此外,还可以利用控制器测量路径的损耗率。在本实验中,基于Mininet脚本,设置特定的交换机间的路径损耗速率,然后编写POX脚本,实现对路径的损耗率的测量
3 实验内容
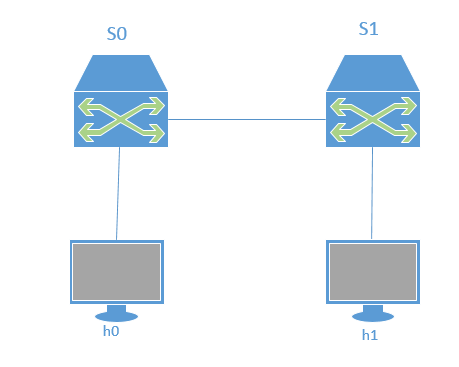
这是本实验的拓扑图,在该环境下,h0向h1发送数据包,由于在mininet脚本中设置了连接损耗率,在传输过程中会丢失一些包,本次实验的目的是展示如何通过控制器计算路径损耗速率(h0-s0-s1-h1)。这里假设控制器预先知道网络拓扑,所以没有显示发现网络的代码以及其他相关代码。控制器将向s0和s1发送flow_stats_request,当控制器接收到来自s0的response时,将特定流的数据包数保存在input_pkts中,当控制器接收到来自s1的response时,将接收到特定流的数据包数保存在output_pkts中,差值就是丢失的数据包数量。
搭建环境:本实验需要安装POX和支持OpenFlow1.3协议的Mininet。POX的安装教程如下:
Https://blog.csdn.net/shallynever/article/details/48522941
关于python中的logging以及相关函数的使用说明:
https://www.jb51.net/article/126681.htm
1.1 在装有mininet的虚拟机上创建脚本mymininet.py
cd mininetgedit mymininet.py
1.2 编辑脚本(稍微解释了一下)
  1
  2 #!/usr/bin/python
  3
  4 #coding:utf-8
  5
  6
  7
  8 # 调用关于mininet和time的一些模块
  9
 10 from mininet.net import Mininet
 11
 12 from mininet.node import Node
 13
 14 from mininet.link import TCLink
 15
 16 from mininet.log import setLogLevel, info
 17
 18 from threading import Timer
 19
 20 from mininet.util import quietRun
 21
 22 from time import sleep
 23
 24
 25
 26 #定义mynet函数
 27
 28 def myNet(cname='controller', cargs='-v ptcp:'):
 29
 30 #通过使用OVS抓取来创建网络
 31
 32
 33
 34 #诊断信息然后开始创建节点,其中有控制器C0和交换机s0,s1,还有主机h0,h1
 35
 36 info( "*** Creating nodes\n" )
 37
 38 controller = Node( 'c0', inNamespace=False )
 39
 40 switch = Node( 's0', inNamespace=False )
 41
 42 switch1 = Node( 's1', inNamespace=False )
 43
 44 h0 = Node( 'h0' )
 45
 46 h1 = Node( 'h1' )
 47
 48
 49
 50 #诊断以后开始创建链路(这一块不是很懂)
 51
 52 info( "*** Creating links\n" )
 53
 54
 55
 56 #这是链路选项设置,丢包以及延迟还有带宽等等
 57
 58 linkopts0=dict(bw=100, delay='1ms', loss=0)
 59
 60 linkopts1=dict(bw=100, delay='1ms', loss=10)
 61
 62
 63
 64 #链路0,1,2分别表示h0和s0,s0和s1,h1和s1的链路并调用以上两行的参数
 65
 66 link0=TCLink( h0, switch, **linkopts0)
 67
 68 link1 = TCLink( switch, switch1, **linkopts1)
 69
 70 link2 = TCLink( h1, switch1, **linkopts0)
 71
 72
 73
 74 #MAC地址设置:按照拓扑图来设置的,这一块有些不理解,个人理解为,链路0,2只需要设置一个能连上
 75
 76 #s0/s1的端口就行,而1需要左边的s0端口和右边的s1端口
 77
 78 link0.intf2.setMAC("0:0:0:0:0:1")
 79
 80 link1.intf1.setMAC("0:0:0:0:0:2")
 81
 82 link1.intf2.setMAC("0:1:0:0:0:1")
 83
 84 link2.intf2.setMAC("0:1:0:0:0:2")
 85
 86
 87
 88 #诊断后设置主机ip
 89
 90 info( "*** Configuring hosts\n" )
 91
 92 h0.setIP( '192.168.123.1/24' )
 93
 94 h1.setIP( '192.168.123.2/24' )
 95
 96
 97
 98 #通过使用OVS开始网络连接,然后单引号里的意思是搭建和删除桥梁
 99
100 info( "*** Starting network using Open vSwitch\n" )
101
102 switch.cmd( 'ovs-vsctl del-br dp0' )
103
104 switch.cmd( 'ovs-vsctl add-br dp0' )
105
106 switch1.cmd( 'ovs-vsctl del-br dp1' )
107
108 switch1.cmd( 'ovs-vsctl add-br dp1' )
109
110
111
112 #控制器的设置不是很懂
113
114 controller.cmd( cname + ' ' + cargs + '&' )
115
116
117
118 #打印出每个交换机的链路信息
119
120 for intf in switch.intfs.values():
121
122 print intf
123
124 print switch.cmd( 'ovs-vsctl add-port dp0 %s' % intf )
125
126 for intf in switch1.intfs.values():
127
128 print intf
129
130 print switch1.cmd( 'ovs-vsctl add-port dp1 %s' % intf )
131
132
133
134 # 控制器和交换机同属根命名空间所以我们可以通过环回接口连接,对了,10.0.0.13是别的up主的主机
135
136 # ip,需要用自己的,因为控制器是你自己的
137
138 switch.cmd( 'ovs-vsctl set-controller dp0 tcp:10.0.0.13:6633' )
139
140 switch1.cmd( 'ovs-vsctl set-controller dp1 tcp:10.0.0.13:6633' )
141
142
143
144 #诊断并等待交换机连接上控制器,在连接完成前会一秒一个点
145
146 info( '*** Waiting for switch to connect to controller' )
147
148 while 'is_connected' not in quietRun( 'ovs-vsctl show' ):
149
150 sleep( 1 )
151
152 info( '.' )
153
154 info( '\n' )
155
156
157
158 #运行测试20次h0和h1的传输情况
159
160 #info( "*** Running test\n" )
161
162 h0.cmdPrint( 'ping -Q 0x64 -c 20 ' + h1.IP() )
163
164
165
166 #休息一秒后关闭网络:删除“桥梁”
167
168 sleep( 1 )
169
170 info( "*** Stopping network\n" )
171
172 controller.cmd( 'kill %' + cname )
173
174 switch.cmd( 'ovs-vsctl del-br dp0' )
175
176 switch.deleteIntfs()
177
178 switch1.cmd( 'ovs-vsctl del-br dp1' )
179
180 switch1.deleteIntfs()
181
182 info( '\n' )
183
184
185
186 #主函数,看不懂,意思应当是如果是个主函数就设定info的等级然后开始获取网络demo然后运行
187
188 #mynet()函数
189
190 if __name__ == '__main__':
191
192 setLogLevel( 'info' )
193
194 info( '*** Scratch network demo (kernel datapath)\n' )
195
196 Mininet.init()
197
198 myNet()
2.1 我们在pox文件里面创建脚本
cd poxgedit flow_stats.py
2.2 编辑脚本 (中文部分是对程序的解释,未翻译部分是对具体代码的代码解释)
  1
  2 #!/usr/bin/python
  3
  4 # Copyright 2012 William Yu
  5
  6 # wyu@ateneo.edu
  7
  8 #
  9
 10 # This file is part of POX.
 11
 12 #
 13
 14 # POX is free software: you can redistribute it and/or modify
 15
 16 # it under the terms of the GNU General Public License as published by
 17
 18 # the Free Software Foundation, either version 3 of the License, or
 19
 20 # (at your option) any later version.
 21
 22 #
 23
 24 # POX is distributed in the hope that it will be useful,
 25
 26 # but WITHOUT ANY WARRANTY; without even the implied warranty of
 27
 28 # MERCHANTABILITY or FITNESS FOR A PARTICULAR PURPOSE. See the
 29
 30 # GNU General Public License for more details.
 31
 32 #
 33
 34 # You should have received a copy of the GNU General Public License
 35
 36 # along with POX. If not, see <http://www.gnu.org/licenses/>.
 37
 38 #
 39
 40
 41
 42 """
 43
 44 This is a demonstration file created to show how to obtain flow
 45
 46 and port statistics from OpenFlow 1.0-enabled switches. The flow
 47
 48 statistics handler contains a summary of web-only traffic.
 49
 50 """
 51
 52
 53
 54 # standard includes
 55
 56 from pox.core import core
 57
 58 from pox.lib.util import dpidToStr
 59
 60 import pox.openflow.libopenflow_01 as of
 61
 62 from pox.lib.addresses import IPAddr, EthAddr
 63
 64
 65
 66 # include as part of the betta branch
 67
 68 from pox.openflow.of_json import *
 69
 70 from pox.lib.recoco import Timer
 71
 72 import time
 73
 74
 75
 76 log = core.getLogger()
 77
 78 #初始化网络的参数0
 79
 80 src_dpid = 0
 81
 82 dst_dpid = 0
 83
 84 input_pkts = 0
 85
 86 output_pkts = 0
 87
 88
 89
 90 def getTheTime():
 91
 92 #设定当地时间的函数
 93
 94 flock = time.localtime()
 95
 96 then = "[%s-%s-%s" %(str(flock.tm_year),str(flock.tm_mon),str(flock.tm_mday))
 97
 98
 99
100 if int(flock.tm_hour)<10:
101
102 hrs = "0%s" % (str(flock.tm_hour))
103
104 else:
105
106 hrs = str(flock.tm_hour)
107
108 if int(flock.tm_min)<10:
109
110 mins = "0%s" % (str(flock.tm_min))
111
112 else:
113
114 mins = str(flock.tm_min)
115
116 if int(flock.tm_sec)<10:
117
118 secs = "0%s" % (str(flock.tm_sec))
119
120 else:
121
122 secs = str(flock.tm_sec)
123
124 then +="]%s.%s.%s" % (hrs,mins,secs)
125
126 return then
127
128
129
130 # 用于将请求发送到连接到控制器的所有交换机的定时器功能的处理程序
131
132 def _timer_func ():
133
134 for connection in core.openflow._connections.values():
135
136 connection.send(of.ofp_stats_request(body=of.ofp_flow_stats_request()))
137
138 connection.send(of.ofp_stats_request(body=of.ofp_port_stats_request()))
139
140 log.debug("Sent %i flow/port stats request(s)", len(core.openflow._connections))
141
142
143
144 # 显示在事件的JSON格式结构中接收到的流统计信息的处理程序由ofp_flow_stats()定义
145
146 def _handle_flowstats_received (event):
147
148 #stats = flow_stats_to_list(event.stats)
149
150 #log.debug("FlowStatsReceived from %s: %s", dpidToStr(event.connection.dpid), stats)
151
152 global src_dpid, dst_dpid, input_pkts, output_pkts
153
154 #print "src_dpid=", dpidToStr(src_dpid), "dst_dpid=", dpidToStr(dst_dpid)
155
156 for f in event.stats:
157
158 if f.match.dl_type==0x0800 and f.match.nw_dst==IPAddr("192.168.123.2") and f.match.nw_tos==0x64 and event.connection.dpid==src_dpid:
159
160 #print "input: ", f.byte_count, f.packet_count
161
162 input_pkts = f.packet_count
163
164 if f.match.dl_type==0x0800 and f.match.nw_dst==IPAddr("192.168.123.2") and f.match.nw_tos==0x64 and event.connection.dpid==dst_dpid:
165
166 #print "output: ", f.byte_count, f.packet_count
167
168 output_pkts = f.packet_count
169
170 if input_pkts !=0:
171
172 print getTheTime(), "Path Loss Rate =", (input_pkts-output_pkts)*1.0/input_pkts*100, "%"
173
174
175
176 # 处理程序以显示JSON格式接收的端口统计信息
177
178 def _handle_portstats_received (event):
179
180 #print "\n<<<STATS-REPLY: Return PORT stats for Switch", event.connection.dpid,"at ",getTheTime()
181
182 #for f in event.stats:
183
184 #if int(f.port_no)<65534:
185
186 #print " PortNo:", f.port_no, " Fwd's Pkts:", f.tx_packets, " Fwd's Bytes:", f.tx_bytes, " Rc'd Pkts:", f.rx_packets, " Rc's Bytes:", f.rx_bytes
187
188 #print " PortNo:", f.port_no, " TxDrop:", f.tx_dropped, " RxDrop:", f.rx_dropped, " TxErr:", f.tx_errors, " RxErr:", f.rx_errors, " CRC:", f.rx_crc_err, " Coll:", f.collisions
189
190 stats = flow_stats_to_list(event.stats)
191
192 log.debug("PortStatsReceived from %s: %s", dpidToStr(event.connection.dpid), stats)
193
194
195
196 def _handle_ConnectionUp (event):
197
198 global src_dpid, dst_dpid
199
200 print "ConnectionUp: ", dpidToStr(event.connection.dpid)
201
202 for m in event.connection.features.ports:
203
204 if m.name == "s0-eth0":
205
206 src_dpid = event.connection.dpid
207
208 elif m.name == "s1-eth0":
209
210 dst_dpid = event.connection.dpid
211
212 #设置网络的参数(优先级,时间,端口号)
213
214 msg = of.ofp_flow_mod()
215
216 msg.priority =1
217
218 msg.idle_timeout = 0
219
220 msg.match.in_port =1
221
222 msg.actions.append(of.ofp_action_output(port = of.OFPP_ALL))
223
224 event.connection.send(msg)
225
226
227
228 msg = of.ofp_flow_mod()
229
230 msg.priority =1
231
232 msg.idle_timeout = 0
233
234 msg.match.in_port =2
235
236 msg.actions.append(of.ofp_action_output(port = of.OFPP_ALL))
237
238 event.connection.send(msg)
239
240
241
242 msg = of.ofp_flow_mod()
243
244 msg.priority =10
245
246 msg.idle_timeout = 0
247
248 msg.hard_timeout = 0
249
250 msg.match.dl_type = 0x0800
251
252 msg.match.nw_tos = 0x64
253
254 msg.match.in_port=1
255
256 msg.match.nw_dst = "192.168.123.2"
257
258 msg.actions.append(of.ofp_action_output(port = 2))
259
260 event.connection.send(msg)
261
262
263
264 msg = of.ofp_flow_mod()
265
266 msg.priority =10
267
268 msg.idle_timeout = 0
269
270 msg.hard_timeout = 0
271
272 msg.match.dl_type = 0x0800
273
274 msg.match.nw_tos = 0x64
275
276 msg.match.nw_dst = "192.168.123.1"
277
278 msg.actions.append(of.ofp_action_output(port = 1))
279
280 event.connection.send(msg)
281
282
283
284 # 启动模块的主函数
285
286 def launch ():
287
288 # attach handsers to listners
289
290 core.openflow.addListenerByName("FlowStatsReceived",
291
292 _handle_flowstats_received)
293
294 core.openflow.addListenerByName("PortStatsReceived",
295
296 _handle_portstats_received)
297
298 core.openflow.addListenerByName("ConnectionUp", _handle_ConnectionUp)
299
300
301
302 # 定时器每5秒执行一次
303
304 Timer(1, _timer_func, recurring=True)
3 执行两个脚本
此处为mymininet的脚本
![]()
![]()
此处为flow_stats脚本
![]()
![]()
总结:
1.能看懂2/3的脚本内容,以及脚本的程序意义
2.明白了pox的安装
3.对网络的了解还是不够深刻
转载于:https://www.cnblogs.com/a1164520408/p/9629131.html
Mininet系列实验(四):基于Mininet测量路径的损耗率相关推荐
- Mininet系列实验(三):Mininet命令延伸实验扩展
Mininet系列实验(三):Mininet命令延伸实验扩展 1 实验目的 熟悉Mininet自定义拓扑三种实现方式:命令行创建.Python脚本编写.交互式界面创建. 2 实验原理 Mininet ...
- Mininet系列实验(五):Mininet设置带宽之简单性能测试
Mininet系列实验(五):Mininet设置带宽之简单性能测试 1.实验目的 该实验通过Mininet学习python自定义拓扑实现,可在python脚本文件中设计任意想要的拓扑,简单方便,并通过 ...
- Mininet系列实验(七):Mininet脚本实现控制交换机行为
Mininet系列实验(七):Mininet脚本实现控制交换机行为 1 实验目的 熟悉Mininet自定义拓扑脚本的编写: 掌握使用"ovs-vsctl"命令直接控制Open vS ...
- Mininet系列实验(六):Mininet动态改变转发规则实验
Mininet系列实验(六):Mininet动态改变转发规则实验 一. 实验目的 熟悉Mininet自定义拓扑脚本的编写: 熟悉编写POX脚本动态改变转发规则 二.实验原理 在SDN环境中,控制器可以 ...
- Mininet系列实验(一):Mininet使用源码安装
Mininet系列实验(一):Mininet使用源码安装 1 实验目的 掌握Mininet使用源码安装的方法. 2 实验原理 Mininet 是一个轻量级软件定义网络和测试平台:它采用轻量级的虚拟化技 ...
- Mininet 系列实验(一)
关于SDN的第一个实验,似乎实验室里的前辈们也都是从这里开始的. 实验内容 使用源码安装Mininet 参考 Mininet使用源码安装 实验环境 虚拟机:Oracle VM VirtualBox U ...
- Mininet系列实验(二):Mininet可视化应用
Mininet系列实验(二):Mininet可视化应用 1 实验目的 该实验通过Mininet学习miniedit可视化操作,可直接在界面上编辑任意想要的拓扑,生成python自定义拓扑脚本,简单方便 ...
- Mininet 系列实验(七)
实验内容 本实验在基于 Mininet 脚本的不同拓扑环境下使用 OpenDaylight 控制交换机行为.任务一:一台交换机两台主机,从1端口进入的数据流转发到 2 端口,从 2 端口进入的数据流转 ...
- 【数据库实验】实验四 基于嵌入SQL的综合应用编程(基于QSqlTableModel实现)
[数据库实验]实验四 基于嵌入SQL的综合应用编程 一.实验目的 二.实验要求 三.实验内容.实验结果与主要程序代码 数据准备(建表并插入数据) 前言:黎哥的写法 参考 建表 SQL语言插入数据 S表 ...
最新文章
- halcon算子翻译——set_framegrabber_callback
- 我们离得开美国的软件和硬件吗?
- Android 自定义电池控件
- 怎么屏蔽跳出来的登陆窗口_我是怎么从机构跳出来做兼职的(二)
- 来个邪恶假说,假如有人把支付宝所有存储服务器炸了,我们在里边的钱是不是都丢了?
- web 静态页面和动态页面的区别
- TensorFlow 2学习和工业CV领域应用 心得分享
- 【转】C#中的命名空间namespace全解
- java 设计char类型_JAVA中的char类型
- javascript:访问iframe中的js函数
- 形象描述oracle是如何工作的--有点意思
- 有哪些开源html5的组态软件,FScada组态软件
- 信息处理技术员下午考试试题分析
- python面板数据分析代码_【译】用python做计量之面板数据模型
- 【云和恩墨大讲堂】视频课程震撼来袭-SQL优化精选案例
- 光盘重装linux系统教程视频,重装系统?一步一步安装系统详细教程【带视频】。...
- <<飞 鸟 集>> 泰戈尔
- android仿今日头条个人中心页面
- 基于TCP的网络对战象棋--python
- [Pandas 学习笔记] - No.1 pandas学习笔记