ubuntu 14.04安装quickbuild buildagent (二)
使用方法:
/home/carloz/programfiles/quickbuild6/buildagent/bin/agent.sh start
/home/carloz/programfiles/quickbuild6/buildagent/bin/agent.sh stop
==============================================================
安装指南 http://wiki.pmease.com/display/QB60/Build+Agent+Installation+Guide
1. 启动 QuickBuild server, 并且login to QuickBuild as administrator, 然后打开 Grid tab
![]()
点击 download build agent , 下载 buildagent 软件,并解压在 安装目录下
carloz@linux:~/programfiles/quickbuild6$ cd buildagent/
carloz@linux:~/programfiles/quickbuild6/buildagent$ pwd
/home/carloz/programfiles/quickbuild6/buildagent
carloz@linux:~/programfiles/quickbuild6/buildagent$ ls
asset  bin  conf  logs  plugins
保证当前用户有足够的权限
2. 保证系统已经安装了 JDK6 or JDK7 , 环境变量已经被设定,并且java 命令能够被执行
3. 运行 <agent install dir>/bin/config.bat|sh 来设置build agent的属性, 如 IP address, port number, SSL setting, 等等
carloz@linux:~/programfiles/quickbuild6/buildagent$ bin/config.sh
java version "1.8.0_60"
Java(TM) SE Runtime Environment (build 1.8.0_60-b27)
Java HotSpot(TM) 64-Bit Server VM (build 25.60-b23, mixed mode)
===========================================================
carloz@linux:~/programfiles/quickbuild6/buildagent$
![]()
信息保存在 /home/carloz/programfiles/quickbuild6/buildagent/conf/node.properties里, 如下
![]()
carloz@linux:~/programfiles/quickbuild6/buildagent$ bin/agent.sh
Usage: bin/agent.sh [ console | start | stop | restart | condrestart | status | install | remove | dump ]Commands:console      Launch in the current console.start        Start in the background as a daemon process.stop         Stop if running as a daemon or in another console.restart      Stop if running and then start.condrestart  Restart only if already running.status       Query the current status.install      Install to start automatically when system boots.remove       Uninstall.dump         Request a Java thread dump if running.carloz@linux:~/programfiles/quickbuild6/buildagent$ bin/agent.sh start
Starting QuickBuild Build Agent...
Waiting for QuickBuild Build Agent......
running: PID:13984
carloz@linux:~/programfiles/quickbuild6/buildagent$
4. 在build agent 启动以后, 我们会发现我们并不能运行它, 我们需要在 QuickBuild server 中添加, 并且授权加入网络
4.1 打开 http://localhost:8810/grid/active_nodes
![]()
这里仅仅有一个节点, 这个节点 就是QuickBuild server 本身.
我们需要在这里添加 build agent, 方法参考 Working with Build Grid , 在未授权 节点列表里找到并选中它, 给他授权, 如下
![]()
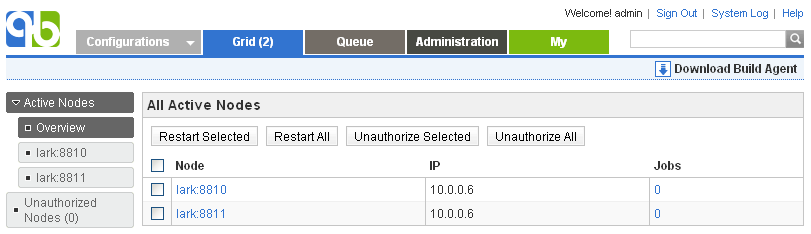
然后 Active nodes 列表就变成了两个
![]()
然而 我发现 http://localhost:8811/ 这个网址还是不能访问, 返回404, 需要继续解决
============================================
Supported operating systems
- Windows 2000/XP/Vista/7, Windows server 2003/2008, 32 bit and 64 bit, x86 and IA architecture
- Linux, 32 bit and 64 bit, x86, PowerPC and S/390 architecture
- Mac OS X, 32 bit and 64 bit
- Solaris, 32 bit and 64 bit, Sparc and x86 architecture
- AIX, 32 bit and 64 bit, PowerPC architecture
- HP-UX, 32 bit and 64 bit, IA and PARISC architecture
- FreeBSD, 32 bit and 64 bit, x86 architecture
Memory requirement
- 64M minimum, 256M recommended
Installation Steps
- Make sure QuickBuild server is up and running, login to QuickBuild as administrator and navigate to Grid tab, follow the download build agent link to download the build agent. Extract downloaded file into the directory where the build agent should be installed. Make sure the user running user agent has full access rights to the installation directory.
- Make sure you have JDK6 or JDK7 installed. Download the appropriate JDK version from http://java.sun.com
 if needed.
 - Make sure the java command exists in the system path; if not, you will need to modify the file conf/wrapper.conf under the build agent's installation directory, and point the entry wrapper.java.command to path of the java command.
- Optionally run <agent install dir>/bin/config.bat|sh) to configure build agent properties such as IP address, port number, SSL setting, etc.
- Open a command prompt window, switch to folder <agent install dir>/bin, and run command agent.(bat|sh) console to start the agent.

Follow this guide on how to install the agent as system service so that it auto-starts when machine reboots.
- After the agent starts up, it may complain with the message "This build agent is not authorized to join the grid". Upon this, you need to login to QuickBuild server and authorize the agent to join the grid. Refer to Working with Build Grid for how to authorize build agents to join grid.
- If the build agent is connected to QuickBuild server correctly, you will see its entry in active node list of the build grid like below by logging in as administrator:
Trouble Shooting
If your agent does not connect with server, please make sure that:
- You can telnet to server port from agent machine with below command:
telnet _<server host name>_ _<server port>_Here <server host name> and <server port> has to be extracted from serverUrl in file conf/node.properties of under agent directory.
- You can telnet to agent port from server machine with below command:
telnet <agent ip address> <agent port> - If auto-detected agent ip reported in server console log is incorrect, specify it explicitly by editing conf/node.properties of the agent to add below property:
ip=_<agent ip address>_ - Recently we found a case where QB agent from other subnets connects to server but then times out during initialization (agents from same subnet works fine), and it turns out that server response package is dropped for some reason (maybe the package content matches some pre-set drop rule) across the gateway, and the problem is solved by connecting to server via ssl port so that server response package is encrypted.
转载于:https://www.cnblogs.com/carlo/p/4833894.html
ubuntu 14.04安装quickbuild buildagent (二)相关推荐
- 在Ubuntu 14 04安装和使用Docker
在Ubuntu 14.04安装和使用Docker 作者:chszs,版权所有,未经同意,不得转载.博主主页:http://blog.csdn.net/chszs Docker是一个开源软件,它可以把一 ...
- 在Ubuntu 14.04安装和使用Docker
在Ubuntu 14.04安装和使用Docker 作者:chszs,版权全部,未经允许.不得转载.博主主页:http://blog.csdn.net/chszs Docker是一个开源软件,它能够把一 ...
- ubuntu 14.04 安装 vmware 10 X64 后无法启动解决方法
ubuntu 14.04 安装成功后,平时的工作什么的都够用了, 最近需要做一个测试,测试环境还必须是windows的.所以就准备整个虚拟机来,kvm 跟 vmware 考虑再三,选择了 vmware ...
- Ubuntu 14.04 安装 CUDA 问题及解决
Ubuntu 14.04 安装 CUDA 问题及解决 参考文章: (1)Ubuntu 14.04 安装 CUDA 问题及解决 (2)https://www.cnblogs.com/gaowengang ...
- java ubuntu 14.04,Ubuntu 14.04安装java的方法
摘要 腾兴网为您分享:Ubuntu 14.04安装java的方法,掌上电力,虚拟按键,新东方,小度等软件知识,以及公务用车平台,手机秀色直播,新视觉影院,浩辰cad批量打印,bartender2016 ...
- Ubuntu 14.04安装openProj
Ubuntu 14.04安装openProj openProj,下载deb的包,软件已经是08年的了,很久没更新了,或许也没什么功能需要开发,就不更了?安装完后,执行一下.出现了以下的警告: 提示要使 ...
- Ubuntu 14.04 安装 Sublime Text 3
Ubuntu 14.04 安装 Sublime Text 3 听语音 | 浏览:24435 | 更新:2014-09-25 22:14 | 标签:ubuntu 1 2 3 4 5 6 分步阅读 ubl ...
- Ubuntu 14.04安装JDK1.8.0_25与配置环境变量
Ubuntu 14.04安装JDK1.8.0_25与配置环境变量 [日期:2015-01-19] 来源:Linux社区 作者:lizhangyong1989 [字体:大 中 小] 以 ...
- Ubuntu 14.04 安装 WPS
本文转自http://www.linuxidc.com/Linux/2014-04/100499p2.htm,所有权力归原作者所有. 经测试在64位Ubuntu14.04下也可按此方法安装,或者在已安 ...
最新文章
- 2020,智能货柜的现状与未来
- How to Enable Trace or Debug for APIs executed as SQL Script Outside of the Applications ?
- 统计学习方法笔记(五)-线性可分支持向量机原理及python实现
- C++ 编译,运行过程 详解。
- C++MFC编程笔记day01 MFC介绍、创建MFC程序和重写消息处理
- Ubuntu18.04 安装搜狗输入法后无法启动的问题
- apache点NET环境
- Apache OpenOffice 漏洞使数千万用户易受代码执行攻击
- Spark 读写 Es
- edui 富文本编辑_百度umeditor富文本编辑器插件扩展
- android是j2me的一个实现吗,j2me与android的区别
- CISSP避坑经验指南
- 刺客信条3免uplay破解补丁
- SMPL 人体模型简要
- java replaceLast
- 这几个棘手的面试常见问题,如何高情商的回答?
- 百度快照不更新与投诉处理的经验
- java代码下划线是啥意思_关于语法:在这个Java代码中,下划线实际上做了什么?...
- MySQL笔记--2、3、4、5
- 我是一个线程 【转】