Spring Boot 入门之基础篇(一)
2019独角兽企业重金招聘Python工程师标准>>> 
一、前言
Spring Boot 是由 Pivotal 团队提供的全新框架,其设计目的是用来简化新 Spring 应用的初始搭建以及开发过程。该框架使用了特定的方式来进行配置,从而使开发人员不再需要定义样板化的配置。
本系列以快速入门为主,可当作工具小手册阅读
二、环境搭建
创建一个 maven 工程,目录结构如下图:
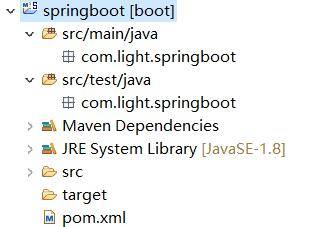 image
image
2.1 添加依赖
创建 maven 工程,在 pom.xml 文件中添加如下依赖:
|
1 2 3 4 5 6 7 8 9 10 11 12 13 14 15 16 17 18 19 20 21 22 23 24 25 26 27 28 29 30 31 |
<!-- 定义公共资源版本 --> <parent> <groupId>org.springframework.boot</groupId> <artifactId>spring-boot-starter-parent</artifactId> <version>1.5.6.RELEASE</version> <relativePath /> </parent> <properties> <project.build.sourceEncoding>UTF-8</project.build.sourceEncoding> <project.reporting.outputEncoding>UTF-8</project.reporting.outputEncoding> <java.version>1.8</java.version> </properties> <dependencies> <!-- 上边引入 parent,因此 下边无需指定版本 --> <!-- 包含 mvc,aop 等jar资源 --> <dependency> <groupId>org.springframework.boot</groupId> <artifactId>spring-boot-starter-web</artifactId> </dependency> </dependencies> <build> <plugins> <plugin> <groupId>org.springframework.boot</groupId> <artifactId>spring-boot-maven-plugin</artifactId> </plugin> </plugins> </build> |
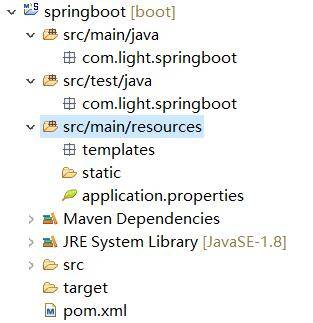
2.2 创建目录和配置文件
创建 src/main/resources 源文件目录,并在该目录下创建 application.properties 文件、static 和 templates 的文件夹。
application.properties:用于配置项目运行所需的配置数据。
static:用于存放静态资源,如:css、js、图片等。
templates:用于存放模板文件。
目录结构如下:
 image
image
2.3 创建启动类
在 com.light.springboot 包下创建启动类,如下:
|
1 2 3 4 5 6 7 8 9 10 11 12 |
/** 该注解指定项目为springboot,由此类当作程序入口 自动装配 web 依赖的环境 **/ @SpringBootApplication public class SpringbootApplication { public static void main(String[] args) { SpringApplication.run(SpringbootApplication.class, args); } } |
2.4 案例演示
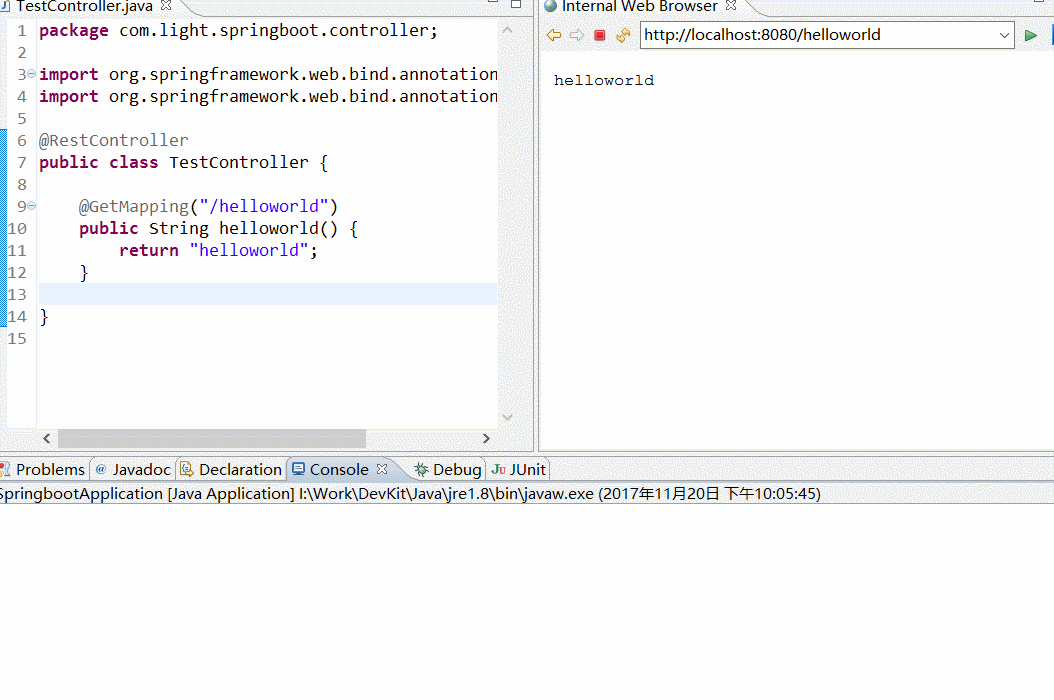
创建 com.light.springboot.controller 包,在该包下创建一个 Controller 类,如下:
|
1 2 3 4 5 6 7 8 |
@RestController public class TestController { @GetMapping("/helloworld") public String helloworld() { return "helloworld"; } } |
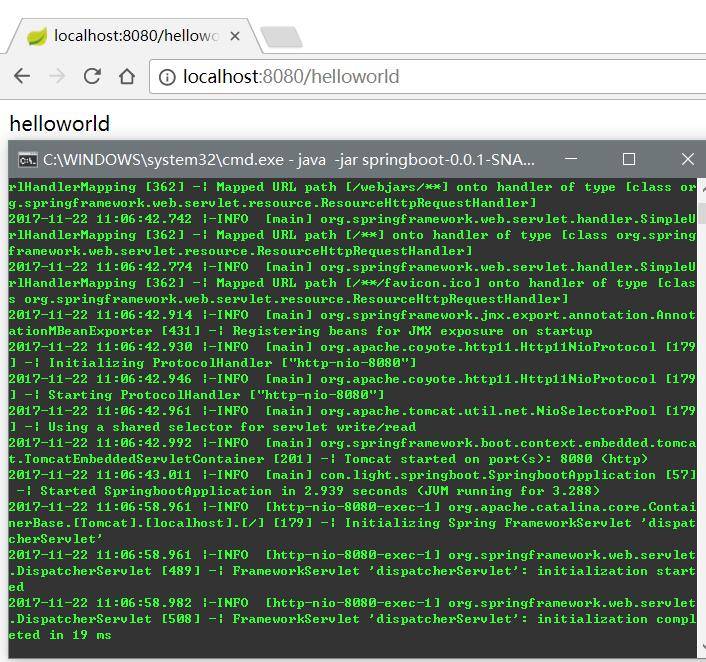
在 SpringbootApplication 文件中右键 Run as -> Java Application。当看到 “Tomcat started on port(s): 8080 (http)” 字样说明启动成功。
打开浏览器访问 http://localhost:8080/helloworld,结果如下:
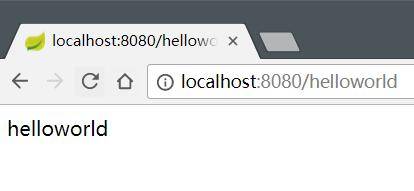 image
image
读者可以使用 STS 开发工具,里边集成了插件,可以直接创建 Spingboot 项目,它会自动生成必要的目录结构。
三、热部署
当我们修改文件和创建文件时,都需要重新启动项目。这样频繁的操作很浪费时间,配置热部署可以让项目自动加载变化的文件,省去的手动操作。
在 pom.xml 文件中添加如下配置:
|
1 2 3 4 5 6 7 |
<!-- 热部署 --> <dependency> <groupId>org.springframework.boot</groupId> <artifactId>spring-boot-devtools</artifactId> <optional>true</optional> <scope>true</scope> </dependency> |
|
1 2 3 4 5 6 7 8 9 10 11 12 |
<build> <plugins> <plugin> <groupId>org.springframework.boot</groupId> <artifactId>spring-boot-maven-plugin</artifactId> <configuration> <!-- 没有该配置,devtools 不生效 --> <fork>true</fork> </configuration> </plugin> </plugins> </build> |
配置好 pom.xml 文件后,我们启动项目,随便创建/修改一个文件并保存,会发现控制台打印 springboot 重新加载文件的信息。
演示图如下:
 image
image
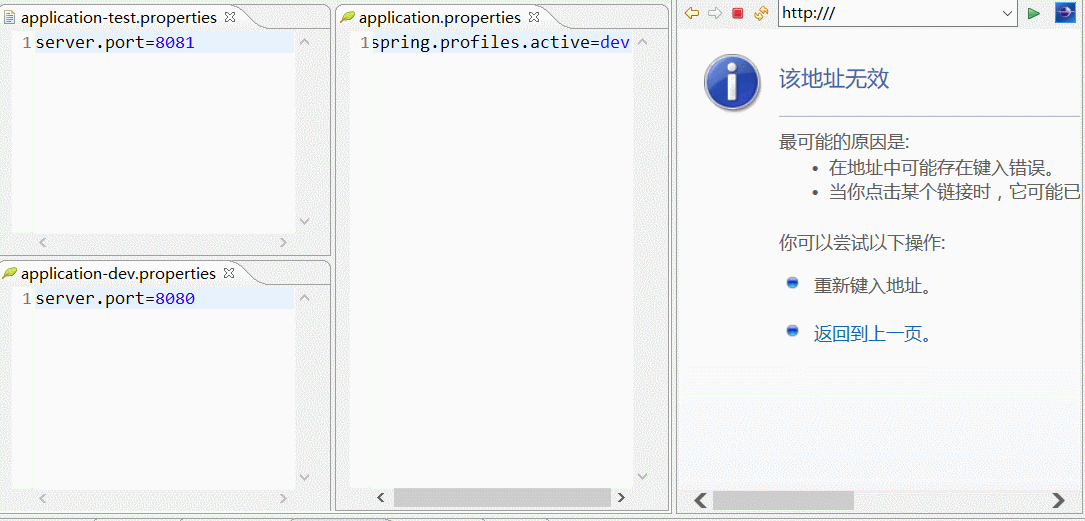
四、多环境切换
application.properties 是 springboot 在运行中所需要的配置信息。
当我们在开发阶段,使用自己的机器开发,测试的时候需要用的测试服务器测试,上线时使用正式环境的服务器。
这三种环境需要的配置信息都不一样,当我们切换环境运行项目时,需要手动的修改多出配置信息,非常容易出错。
为了解决上述问题,springboot 提供多环境配置的机制,让开发者非常容易的根据需求而切换不同的配置环境。
在 src/main/resources 目录下创建三个配置文件:
|
1 2 3 |
application-dev.properties:用于开发环境 application-test.properties:用于测试环境 application-prod.properties:用于生产环境 |
我们可以在这个三个配置文件中设置不同的信息,application.properties 配置公共的信息。
在 application.properties 中配置:
|
1 |
spring.profiles.active=dev |
表示激活 application-dev.properties 文件配置, springboot 会加载使用 application.properties 和 application-dev.properties 配置文件的信息。
同理,可将 spring.profiles.active 的值修改成 test 或 prod 达到切换环境的目的。
演示图如下:
 image
image
切换项目启动的环境不仅对读取配置文件信息有效,也可以对 Bean 有效。
当我们需要对不同环境使用不同的 Bean 时,可以通过 @Profile 注解进行区分,如下:
|
1 2 3 4 5 6 7 8 9 10 11 12 13 14 15 16 17 18 19 20 21 22 23 24 |
@Configuration public class BeanConfiguration { @Bean @Profile("dev") public Runnable test1() { System.out.println("开发环境使用的 Bean"); return () -> {}; } @Bean @Profile("test") public Runnable test2() { System.out.println("测试环境使用的 Bean"); return () -> {}; } @Bean @Profile("pro") public Runnable test3() { System.out.println("生成环境使用的 Bean"); return () -> {}; } } |
当启动项目后,Spring 会根据 spring.profiles.active 的值实例化对应的 Bean。
五、配置日志
5.1 配置 logback(官方推荐使用)
5.1.1 配置日志文件
spring boot 默认会加载 classpath:logback-spring.xml 或者 classpath:logback-spring.groovy。
如需要自定义文件名称,在 application.properties 中配置 logging.config 选项即可。
在 src/main/resources 下创建 logback-spring.xml 文件,内容如下:
|
1 2 3 4 5 6 7 8 9 10 11 12 13 14 15 16 17 18 19 20 21 22 23 24 25 26 27 28 29 30 31 32 33 34 35 36 37 38 39 40 41 42 43 44 45 46 47 48 49 50 51 52 53 54 55 56 57 58 59 60 61 |
<?xml version="1.0" encoding="UTF-8"?> <configuration> <!-- 文件输出格式 --> <property name="PATTERN" value="%-12(%d{yyyy-MM-dd HH:mm:ss.SSS}) |-%-5level [%thread] %c [%L] -| %msg%n" /> <!-- test文件路径 --> <property name="TEST_FILE_PATH" value="d:/test.log" /> <!-- pro文件路径 --> <property name="PRO_FILE_PATH" value="/opt/test/log" /> <!-- 开发环境 --> <springProfile name="dev"> <appender name="CONSOLE" class="ch.qos.logback.core.ConsoleAppender"> <encoder> <pattern>${PATTERN}</pattern> </encoder> </appender> <logger name="com.light.springboot" level="debug" /> <root level="info"> <appender-ref ref="CONSOLE" /> </root> </springProfile> <!-- 测试环境 --> <springProfile name="test"> <!-- 每天产生一个文件 --> <appender name="TEST-FILE" class="ch.qos.logback.core.rolling.RollingFileAppender"> <!-- 文件路径 --> <file>${TEST_FILE_PATH}</file> <rollingPolicy class="ch.qos.logback.core.rolling.TimeBasedRollingPolicy"> <!-- 文件名称 --> <fileNamePattern>${TEST_FILE_PATH}/info.%d{yyyy-MM-dd}.log</fileNamePattern> <!-- 文件最大保存历史数量 --> <MaxHistory>100</MaxHistory> </rollingPolicy> <layout class="ch.qos.logback.classic.PatternLayout"> <pattern>${PATTERN}</pattern> </layout> </appender> <logger name="com.light.springboot" level="debug" /> <root level="info"> <appender-ref ref="TEST-FILE" /> </root> </springProfile> <!-- 生产环境 --> <springProfile name="prod"> <appender name="PROD_FILE" class="ch.qos.logback.core.rolling.RollingFileAppender"> <file>${PRO_FILE_PATH}</file> <rollingPolicy class="ch.qos.logback.core.rolling.TimeBasedRollingPolicy"> <fileNamePattern>${PRO_FILE_PATH}/warn.%d{yyyy-MM-dd}.log</fileNamePattern> <MaxHistory>100</MaxHistory> </rollingPolicy> <layout class="ch.qos.logback.classic.PatternLayout"> <pattern>${PATTERN}</pattern> </layout> </appender> <root level="warn"> <appender-ref ref="PROD_FILE" /> </root> </springProfile> </configuration> |
其中,springProfile 标签的 name 属性对应 application.properties 中的 spring.profiles.active 的配置。
即 spring.profiles.active 的值可以看作是日志配置文件中对应的 springProfile 是否生效的开关。
5.2 配置 log4j2
5.2.1 添加依赖
|
1 2 3 4 |
<dependency> <groupId>org.springframework.boot</groupId> <artifactId>spring-boot-starter-log4j2</artifactId> </dependency> |
5.2.2 配置日志文件
spring boot 默认会加载 classpath:log4j2.xml 或者 classpath:log4j2-spring.xml。
如需要自定义文件名称,在 application.properties 中配置 logging.config 选项即可。
log4j2.xml 文件内容如下:
|
1 2 3 4 5 6 7 8 9 10 11 12 13 14 15 16 17 18 |
<?xml version="1.0" encoding="utf-8"?> <configuration> <properties> <!-- 文件输出格式 --> <property name="PATTERN">%d{yyyy-MM-dd HH:mm:ss.SSS} |-%-5level [%thread] %c [%L] -| %msg%n</property> </properties> <appenders> <Console name="CONSOLE" target="system_out"> <PatternLayout pattern="${PATTERN}" /> </Console> </appenders> <loggers> <logger name="com.light.springboot" level="debug" /> <root level="info"> <appenderref ref="CONSOLE" /> </root> </loggers> </configuration> |
log4j2 不能像 logback 那样在一个文件中设置多个环境的配置数据,只能命名 3 个不同名的日志文件,分别在 application-dev,application-test 和 application-prod 中配置 logging.config 选项。
除了在日志配置文件中设置参数之外,还可以在 application-*.properties 中设置,日志相关的配置:
|
1 2 3 4 5 6 7 8 9 |
logging.config # 日志配置文件路径,如 classpath:logback-spring.xml logging.exception-conversion-word # 记录异常时使用的转换词 logging.file # 记录日志的文件名称,如:test.log logging.level.* # 日志映射,如:logging.level.root=WARN,logging.level.org.springframework.web=DEBUG logging.path # 记录日志的文件路径,如:d:/ logging.pattern.console # 向控制台输出的日志格式,只支持默认的 logback 设置。 logging.pattern.file # 向记录日志文件输出的日志格式,只支持默认的 logback 设置。 logging.pattern.level # 用于呈现日志级别的格式,只支持默认的 logback 设置。 logging.register-shutdown-hook # 初始化时为日志系统注册一个关闭钩子 |
六、注解介绍
下面列出 Spring Boot 开发中常用的注解:
|
1 2 3 4 5 6 7 8 9 10 11 |
@Configuration # 作用于类上,相当于一个 xml 配置文件 @Bean # 作用于方法上,相当于 xml 配置中的 <bean> @SpringBootApplication # Spring Boot的核心注解,是一个组合注解,用于启动类上 @EnableAutoConfiguration # 启用自动配置,允许加载第三方 Jar 包的配置 @ComponentScan # 默认扫描 @SpringBootApplication 所在类的同级目录以及它的子目录 @PropertySource # 加载 properties 文件 @Value # 将配置文件的属性注入到 Bean 中特定的成员变量 @EnableConfigurationProperties # 开启一个特性,让配置文件的属性可以注入到 Bean 中,与 @ConfigurationProperties 结合使用 @ConfigurationProperties # 关联配置文件中的属性到 Bean 中 @Import # 加载指定 Class 文件,其生命周期被 Spring 管理 @ImportResource # 加载 xml 文件 |
传统项目下使用的注解,此处就不再累述。
七、读取配置文件
7.1 属性装配
有两种方式:使用 @Value 注解和 Environment 对象。
在 application.properties 中添加:
|
1 2 3 4 |
ds.userName=root ds.password=tiger ds.url=jdbc:mysql://localhost:3306/test ds.driverClassName=com.mysql.jdbc.Driver |
以上是自定义的配置。
创建一个配置类,如下:
|
1 2 3 4 5 6 7 8 9 10 11 12 13 14 |
@Configuration public class WebConfig { @Value("${ds.userName}") private String userName; @Autowired private Environment environment; public void show() { System.out.println("ds.userName:" + this.userName); System.out.println("ds.password:" + this.environment.getProperty("ds.password")); } } |
通过 @Value 获取 config.userName 配置;通过 environment 获取 config.password 配置。
测试:
|
1 2 3 4 5 6 7 8 |
@SpringBootApplication public class SpringbootApplication { public static void main(String[] args) { ConfigurableApplicationContext context = SpringApplication.run(SpringbootApplication.class, args); context.getBean(WebConfig.class).show(); } } |
打印结果:
|
1 2 |
userName:root password:tiger |
7.2 对象装配
创建一个封装类:
|
1 2 3 4 5 6 7 8 9 10 11 12 13 14 15 16 17 18 19 20 21 |
@Component @ConfigurationProperties(prefix="ds") public class DataSourceProperties { private String url; private String driverClassName; private String userName; private String password; public void show() { System.out.println("ds.url=" + this.url); System.out.println("ds.driverClassName=" + this.driverClassName); System.out.println("ds.userName=" + this.userName); System.out.println("ds.password=" +this.password); } } |
此处省略 setter 和 getter 方法。
测试:
|
1 2 3 4 5 6 7 8 |
@SpringBootApplication public class SpringbootApplication { public static void main(String[] args) { ConfigurableApplicationContext context = SpringApplication.run(SpringbootApplication.class, args); context.getBean(DataSourceProperties.class).show(); } } |
打印结果:
|
1 2 3 4 |
ds.url=jdbc:mysql://localhost:3306/test ds.driverClassName=com.mysql.jdbc.Driver ds.userName=root ds.password=tiger |
八、自动配置
在上文的例子中,我们其实就使用到自动配置了,在此小结中再举例说明,加深印象。
现有 2 个项目,一个 Maven 项目 和 Spring Boot 项目。
Spring Boot 项目引入 Maven 项目并使用 Maven 项目中写好的类。
8.1 编码
Maven 项目中的代码:
|
1 2 3 4 5 6 7 8 9 10 11 12 13 14 15 16 17 18 19 20 21 |
public class Cache { private Map<String,Object> map = new HashMap<String,Object>(); public void set(String key,String value) { this.map.put(key,value); } public Object get(String key) { return this.map.get(key); } } @Configuration public class CacheConfirguration { @Bean public Cache createCacheObj() { return new Cache(); } } |
Spring Boot 项目引入 Maven 项目:
pom.xml 文件:
|
1 2 3 4 5 |
<dependency> <groupId>com.light</groupId> <artifactId>cache</artifactId> <version>0.0.1-SNAPSHOT</version> </dependency> |
测试:
|
1 2 3 4 5 6 7 8 9 10 11 12 13 14 15 16 17 18 |
@SpringBootApplication public class SpringbootApplication extends SpringBootServletInitializer { @Override protected SpringApplicationBuilder configure(SpringApplicationBuilder application) { return application.sources(SpringbootApplication.class); } public static void main(String[] args) { ConfigurableApplicationContext context = SpringApplication.run(SpringbootApplication.class, args); CacheConfirguration conf = context.getBean(CacheConfirguration.class); System.out.println(conf); Cache Cache = context.getBean(Cache.class); System.out.println(Cache); } } |
打印结果:
|
1 |
Caused by: org.springframework.beans.factory.NoSuchBeanDefinitionException: No qualifying bean of type 'com.light.cache.Cache' available |
从结果我们可知 Spring Boot 并不会自动配置第三方 jar 资源文件。
因为 @SpringBootApplication 注解包含 @ComponentScan 注解,项目启动时 Spring 只扫描与 SpringbootApplication 类同目录和子目录下的类文件,引入第三方 jar 文件无法被扫描,因此不能被 Spring 容器管理。
8.2 解决方案
方式一:
在启动类 SpringbootApplication 上添加 @Import(CacheConfirguration.class)。
方式二:
在 Maven 项目的 src/main/resources 目录下创建 META-INF 文件夹,在该文件夹下再创建 spring.factories 文件,内容如下:
|
1 2 |
org.springframework.boot.autoconfigure.EnableAutoConfiguration=\ com.light.cache.CacheConfirguration |
启动项目,结果如下:
 image
image
九、条件配置
需要装配的类:
|
1 2 3 4 5 6 7 8 9 10 11 |
public interface EncodingConvertor { } public class UTF8EncodingConvertor implements EncodingConvertor { } public class GBKEncodingConvertor implements EncodingConvertor { } |
配置类:
|
1 2 3 4 5 6 7 8 9 10 11 12 13 |
@Configuration public class EncodingConvertorConfiguration { @Bean public EncodingConvertor createUTF8EncodingConvertor() { return new UTF8EncodingConvertor(); } @Bean public EncodingConvertor createGBKEncodingConvertor() { return new GBKEncodingConvertor(); } } |
测试:
|
1 2 3 4 5 6 7 8 9 10 11 12 13 14 |
@SpringBootApplication public class SpringbootApplication extends SpringBootServletInitializer { @Override protected SpringApplicationBuilder configure(SpringApplicationBuilder application) { return application.sources(SpringbootApplication.class); } public static void main(String[] args) { ConfigurableApplicationContext context = SpringApplication.run(SpringbootApplication.class, args); Map<String, EncodingConvertor> map = context.getBeansOfType(EncodingConvertor.class); System.out.println(map); } } |
打印结果:
|
1 |
{createUTF8EncodingConvertor=com.light.springboot.config.UTF8EncodingConvertor@4c889f9d, createGBKEncodingConvertor=com.light.springboot.config.GBKEncodingConvertor@26f067d9} |
从结果看出,Spring 帮我们装配了 2 个 Bean。
当我们需要根据系统环境的字符集选择性的装配其中一个 Bean 时,需要结合 @Conditional 注解 和 Condition 接口使用。如下:
创建条件类:
|
1 2 3 4 5 6 7 8 9 10 11 12 13 14 15 16 17 18 19 20 21 22 23 24 25 |
public class UTF8Condition implements Condition { @Override public boolean matches(ConditionContext context, AnnotatedTypeMetadata metadata) { String encoding = System.getProperty("file.encoding"); if (encoding != null) { return "utf-8".equals(encoding.toLowerCase()); } return false; } } public class GBKCondition implements Condition { @Override public boolean matches(ConditionContext context, AnnotatedTypeMetadata metadata) { String encoding = System.getProperty("file.encoding"); if (encoding != null) { return "gbk".equals(encoding.toLowerCase()); } return false; } } |
Condition 用于判断是否进行装配,需要实现 matches 方法。当方法返回 true 时表示需要装配,否则反之。
修改配置类:
|
1 2 3 4 5 6 7 8 9 10 11 12 13 14 15 |
@Configuration public class EncodingConvertorConfiguration { @Bean @Conditional(UTF8Condition.class) public EncodingConvertor createUTF8EncodingConvertor() { return new UTF8EncodingConvertor(); } @Bean @Conditional(GBKCondition.class) public EncodingConvertor createGBKEncodingConvertor() { return new GBKEncodingConvertor(); } } |
在对应的 Bean 上添加 @Conditional 注解。
测试:
|
1 2 3 4 5 6 7 8 9 10 11 12 13 14 15 |
@SpringBootApplication public class SpringbootApplication extends SpringBootServletInitializer { @Override protected SpringApplicationBuilder configure(SpringApplicationBuilder application) { return application.sources(SpringbootApplication.class); } public static void main(String[] args) { ConfigurableApplicationContext context = SpringApplication.run(SpringbootApplication.class, args); System.out.println(System.getProperty("file.encoding")); Map<String, EncodingConvertor> map = context.getBeansOfType(EncodingConvertor.class); System.out.println(map); } } |
打印结果:
|
1 2 |
UTF-8 {createUTF8EncodingConvertor=com.light.springboot.config.UTF8EncodingConvertor@24701bc1} |
除了 @Conditional 之外,Spring Boot 还提供了其他注解进行条件装配:
|
1 2 3 4 5 6 7 8 9 10 11 12 13 |
@ConditionalOnBean # 当指定 Bean 存在时进行装配 @ConditionalOnMissingBean # 当指定 Bean 不存在时进行装配 @ConditionalOnClass # 当指定 Class 在 classpath 中时进行装配 @ConditionalOnMissingClass # 当指定 Class 不在 classpath 中时进行装配 @ConditionalOnExpression # 根据 SpEL 表达式进行装配 @ConditionalOnJava # 根据 JVM 版本进行装配 @ConditionalOnJndi # 根据 JNDI 进行装配 @ConditionalOnWebApplication # 当上下文是 WebApplication 时进行装配 @ConditionalOnNotWebApplication # 当上下文不是 WebApplication 时进行装配 @ConditionalOnProperty # 当指定的属性名的值为指定的值时进行装配 @ConditionalOnResource # 当指定的资源在 classpath 中时进行装配 @ConditionalOnCloudPlatform # @ConditionalOnSingleCandidate # |
十、打包运行
打包的形式有两种:jar 和 war。
10.1 打包成可执行的 jar 包
默认情况下,通过 maven 执行 package 命令后,会生成 jar 包,且该 jar 包会内置了 tomcat 容器,因此我们可以通过 java -jar 就可以运行项目,如下图:
 image
image
10.2 打包成部署的 war 包
让 SpringbootApplication 类继承 SpringBootServletInitializer 并重写 configure 方法,如下:
|
1 2 3 4 5 6 7 8 9 10 11 12 |
@SpringBootApplication public class SpringbootApplication extends SpringBootServletInitializer { @Override protected SpringApplicationBuilder configure(SpringApplicationBuilder application) { return application.sources(SpringbootApplication.class); } public static void main(String[] args) { SpringApplication.run(SpringbootApplication.class, args); } } |
修改 pom.xml 文件,将 jar 改成 war,如下:
|
1 |
<packaging>war</packaging> |
打包成功后,将 war 包部署到 tomcat 容器中运行即可。
十一、参考资料
- https://docs.spring.io/spring-boot/docs/1.5.8.RELEASE/reference/html/ 官方文档
- 本文作者: moonlightL
- 本文链接: http://www.extlight.com/2017/11/23/Spring-Boot-入门之基础篇(一)/
- 版权声明: 本博客所有文章除特别声明外均为原创,采用 CC BY-NC-SA 4.0 许可协议。转载请在文章开头明显位置注明原文链接和作者等相关信息,明确指出修改(如有),并通过 E-mail 等方式告知,谢谢合作!
转载于:https://my.oschina.net/u/3053883/blog/1621221
Spring Boot 入门之基础篇(一)相关推荐
- Spring Boot 入门之缓存和 NoSQL 篇(四)
原文地址:Spring Boot 入门之缓存和 NoSQL 篇(四) 博客地址:http://www.extlight.com 一.前言 当系统的访问量增大时,相应的数据库的性能就逐渐下降.但是,大多 ...
- 19年8月 字母哥 第一章 spring boot 2.x基础及概念入门 这里全部看完了 热部署没出来 第二章在前面2页 用热点公司网不行
http://springboot.zimug.com/1233100 文档 http://www.zimug.com/page/5 字母哥个人博客 11111 第一章 spring bo ...
- 史上最全,Spring Boot入门篇总结,收藏起来慢慢看
Spring Boot是Spring家族下的一个全新开发框架,其设计目的主要是用来简化Spring应用的创建及开发过程,它提供了自动配置,starter依赖等特性,从而使开发人员从大量的XML配置中解 ...
- Spring Boot 2.x基础教程:使用Elastic Job实现定时任务
上一篇,我们介绍了如何使用Spring Boot自带的@Scheduled注解实现定时任务(https://blog.didispace.com/spring-boot-learning-2-7-1/ ...
- Spring Boot 2.x基础教程:使用集中式缓存Redis
点击上方蓝色"程序猿DD",选择"设为星标" 回复"资源"获取独家整理的学习资料! 之前我们介绍了两种进程内缓存的用法,包括Spring B ...
- Spring Boot 2.x基础教程:MyBatis的多数据源配置
点击上方蓝色"程序猿DD",选择"设为星标" 回复"资源"获取独家整理的学习资料! 前两天,我们已经介绍了关于JdbcTemplate的多数 ...
- Spring Boot 2.x基础教程:使用JdbcTemplate访问MySQL数据库
点击上方蓝色"程序猿DD",选择"设为星标" 回复"资源"获取独家整理的学习资料! 作者 | 翟永超 来源 | didispace.com/ ...
- Spring Boot 2.x基础教程:Swagger静态API文档的生成
点击蓝色"程序猿DD"关注我 回复"资源"获取独家整理的学习资料! 作者 | 翟永超 来源 | didispace.com/spring-boot-learni ...
- Spring Boot 2.x基础教程:JSR-303实现请求参数校验
点击蓝色"程序猿DD"关注我 回复"资源"获取独家整理的学习资料! 作者 | 翟永超 来源 | didispace.com/spring-boot-learni ...
最新文章
- Linux内核中关于定时器Timer的应用
- MPB:南土所褚海燕组-小麦相关微生物的野外采样与样品保存
- JavaScript 高级程序设计第四章解读,总结。
- 以空格为分隔符读取内容给两个变量_问与答61: 如何将一个文本文件中满足指定条件的内容筛选到另一个文本文件中?...
- 操作系统中的多级队列调度
- 海南首例供港造血干细胞志愿者启程赴广东捐献
- Docker1.8在Centos7下的安装
- RHEL/CentOS 6.x 系统服务详解
- SQL性能健康检查脚本
- matlab控制图像的边界(margin),subplot的间距(gap)
- Servlet乱码解决
- python中in,not in,比较运算符,格式化输出,编码
- 2019年税务师进行继续教育?
- 企业IT基础架构设计概要
- javascript用DOM解释XML
- Samba TDB 数据库 在嵌入式中的使用
- RSA加解密的OAEP MGF1 填充解析
- 软测项目辅导综合教程
- juniper:SRX-产品简介
- mysql 联查字段名重复_查询数据库多个字段名时的结果有重复的解决办法_MySQL