LAMMP源码环境搭建
一、LAMMP环境简介
LAMMP是linux、Apache、Mysql、Memcahed、PHP的首字母缩写
LAMMP网络拓扑图(待补)
工作模式:
apache响应回复用户html请求并转发php程序给FastCGI
FastCGI把php程序执行结果响应给apache
mysql响应用户的数据的写入和查询
memcached根据用户请求的程序决定是否需要memcached服务器将数据缓存至内存中
系统环境:
LAMMP分别搭建在4台CentOS6.4.x86_64服务器上并且安装好编译环境
地址规划:
memcached 192.168.1.105
apache 192.168.1.106
php 192.168.1.107
mysql 192.168.1.108
二、Apache源码安装
安装apr
[root@www ~]# tar xf apr-1.4.6.tar.bz2
[root@www apr-1.4.6]# ./configure --prefix=/usr/local/apr
[root@www apr-1.4.6]# make && make install
安装apr-util
[root@www ~]# tar xf apr-util-1.5.2.tar.bz2
[root@www apr-util-1.5.2]# ./configure --prefix=/usr/local/apr-util --with-apr=/usr/local/apr
[root@www apr-util-1.5.2]# make && make install
yum方式安装pcre-devel
[root@www ~]# yum install pcre-devel
安装httpd
[root@www ~]# tar xf httpd-2.4.6.tar.bz2
[root@www httpd-2.4.6]# ./configure --prefix=/usr/local/apache24 --sysconfdir=/etc/httpd24 --enable-so --enable-ssl --enable-cgi --enable-rewrite --with-zlib --with-pcre --with-apr=/usr/local/apr --with-apr-util=/usr/local/apr-util --enable-modules=most  --enable-mpms-shared=all --with-mpm=event
[root@www httpd-2.4.6]# make && make install
为httpd提供服务脚本
[root@www ~]# vim /etc/rc.d/init.d/httpd24
#!/bin/bash
#
# httpd        Startup script for the Apache HTTP Server
#
# chkconfig: - 85 15
# description: Apache is a World Wide Web server.  It is used to serve \
#           HTML files and CGI.
# processname: httpd
# config: /etc/httpd/conf/httpd.conf
# config: /etc/sysconfig/httpd
# pidfile: /var/run/httpd.pid# Source function library.
. /etc/rc.d/init.d/functionsif [ -f /etc/sysconfig/httpd ]; then. /etc/sysconfig/httpd
fi# Start httpd in the C locale by default.
HTTPD_LANG=${HTTPD_LANG-"C"}# This will prevent initlog from swallowing up a pass-phrase prompt if
# mod_ssl needs a pass-phrase from the user.
INITLOG_ARGS=""# Set HTTPD=/usr/sbin/httpd.worker in /etc/sysconfig/httpd to use a server
# with the thread-based "worker" MPM; BE WARNED that some modules may not
# work correctly with a thread-based MPM; notably PHP will refuse to start.# Path to the apachectl script, server binary, and short-form for messages.
apachectl=/usr/local/apache24/bin/apachectl
httpd=${HTTPD-/usr/local/apache24/bin/httpd}
prog=httpd
pidfile=${PIDFILE-/usr/local/apache24/logs/httpd.pid}
lockfile=${LOCKFILE-/var/lock/subsys/httpd}
RETVAL=0start() {echo -n $"Starting $prog: "LANG=$HTTPD_LANG daemon --pidfile=${pidfile} $httpd $OPTIONSRETVAL=$?echo[ $RETVAL = 0 ] && touch ${lockfile}return $RETVAL
}stop() {echo -n $"Stopping $prog: "killproc -p ${pidfile} -d 10 $httpdRETVAL=$?echo[ $RETVAL = 0 ] && rm -f ${lockfile} ${pidfile}
}
reload() {echo -n $"Reloading $prog: "if ! LANG=$HTTPD_LANG $httpd $OPTIONS -t >&/dev/null; thenRETVAL=$?echo $"not reloading due to configuration syntax error"failure $"not reloading $httpd due to configuration syntax error"elsekillproc -p ${pidfile} $httpd -HUPRETVAL=$?fiecho
}# See how we were called.
case "$1" instart)start;;stop)stop;;status)status -p ${pidfile} $httpdRETVAL=$?;;restart)stopstart;;condrestart)if [ -f ${pidfile} ] ; thenstopstartfi;;reload)reload;;graceful|help|configtest|fullstatus)$apachectl $@RETVAL=$?;;*)echo $"Usage: $prog {start|stop|restart|condrestart|reload|status|fullstatus|graceful|help|configtest}"exit 1
esacexit $RETVAL
为脚本赋予执行权限
[root@www ~]# chmod +x /etc/rc.d/init.d/httpd24
添加环境变量
[root@www ~]# vim /etc/profile.d/httpd24.sh
export PATH=/usr/local/apache24/bin:$PATH   #添加此行
设置开机启动
[root@www ~]# chkconfig --add httpd24
[root@www ~]# chkconfig httpd24 on
修改主机名为www.xiaoya.net
启动服务
[root@www ~]# service httpd24 start
浏览器访问测试一下
显示 It works!
httpd服务成功启动
三、通用二进制格式安装mysql
生产环境中通常将数据库文件存放在逻辑卷(LVM)上
新建逻辑卷并挂载在/mydata目录上(创建过程省略...)
新建用户mysql并让其对/mydata/data有属主属组权限
[root@mysql ~]# mkdir /mydata/data
[root@mysql ~]# groupadd -r mysql
[root@mysql ~]# useradd -g mysql -r -s /sbin/nologin -M -d /mydata/data mysql
[root@mysql ~]# chown -R mysql:mysql /mydata/data
查看当前系统是否在监听3306端口,有则关闭
将二进制包解压至/usr/local下
[root@mysql ~]# tar xf mysql-5.5.38-linux2.6-x86_64.tar.gz -C /usr/local/
[root@mysql local]# ln -sv mysql-5.5.38-linux2.6-x86_64 mysql #创建链接
[root@mysql local]# chown -R root:mysql /usr/local/mysql/* #修改mysql下所有文件属组为mysql
建立并修改配置文件
[root@mysql support-files]# cp my-huge.cnf /etc/my.cnf
[root@mysql support-files]# vim /etc/my.cnf
thread_concurrency = 4  #修改为物理核心数的2倍
datadir = /mydata/data #添加此行
建立服务脚本
[root@mysql support-files]# cp mysql.server /etc/rc.d/init.d/mysqld
启动服务之前先初始化
[root@mysql mysql]# scripts/mysql_install_db --user=mysql --datadir=/mydata/data #指定用户和数据目录
现在可以启动服务了
[root@mysql ~]# service mysqld start
[root@mysql ~]# chkconfig --add mysqld
[root@mysql ~]# chkconfig  mysqld on
导出man文档
[root@mysql ~]# vim /etc/man.config
MANPATH /usr/local/mysql/man  #添加此行
导出头文件
[root@mysql ~]# ln -sv /usr/local/mysql/include /usr/include/mysql
导出库文件
[root@mysql ~]# echo '/usr/local/mysql/lib' > /etc/ld.so.conf.d/mysql.conf
[root@mysql ~]# ldconfig
添加mysql环境变量
[root@mysql ~]# vim /etc/profile.d/mysql.sh
[root@mysql ~]# . /etc/profile.d/mysql.sh
export PATH=/usr/local/mysql/bin:$PATH
成功登录mysql
[root@mysql ~]# mysql
Welcome to the MySQL monitor.  Commands end with ; or \g.
Your MySQL connection id is 1
Server version: 5.5.38-log MySQL Community Server (GPL)
Copyright (c) 2000, 2014, Oracle and/or its affiliates. All rights reserved.
Oracle is a registered trademark of Oracle Corporation and/or its
affiliates. Other names may be trademarks of their respective
owners.
Type 'help;' or '\h' for help. Type '\c' to clear the current input statement.
mysql>
四、PHP源码安装
安装libxml
[root@php ~]# yum -y install libxml2-devel
安装bzip2
[root@php ~]# yum -y install bzip2-devel
安装mcrypt(yum默认源没有此安装包,需要额外源)
我这里是直接下载到本机用rpm安装
[root@php ~]# rpm -ivh libmcrypt-2.5.8-9.el6.x86_64.rpm
[root@php ~]# rpm -ivh libmcrypt-devel-2.5.8-9.el6.x86_64.rpm
解压安装php
[root@php ~]# tar xf php-5.4.30.tar.gz
[root@php php-5.4.30]# ./configure --prefix=/usr/local/php --with-openssl --enable-mbstring --with-freetype-dir --with-jpeg-dir --with-png-dir --with-zlib --with-libxml-dir=/usr --enable-xml --enable-fpm --enable-sockets --with-mcrypt --with-config-file-path=/etc --with-config-file-scan-dir=/etc/php.d --with-bz2 --with-mysql=mysqlnd --with-pdo-mysql=mysqlnd --with-mysqli=mysqlnd
使用PHP.5.3以上版本,为了链接MySQL数据库,可以指定mysqlnd,这样在本机就不需要先安装MySQL或MySQL开发包了 (使用--with-mysql=mysqlnd --with-pdo-mysql=mysqlnd --with-mysqli=mysqlnd在本地服务器可以不用安装mysql)
[root@php php-5.4.30]# make && make install
建立php配置文件
[root@php php-5.4.30]# cp php.ini-production /etc/php.ini
建立php-fpm服务脚本
[root@php fpm]# cp init.d.php-fpm /etc/rc.d/init.d/php-fpm
[root@php ~]# chmod +x /etc/rc.d/init.d/php-fpm #赋予执行权限
建立并修改php-fpm配置文件
[root@php etc]# cp php-fpm.conf.default php-fpm.conf
[root@php etc]# vim php-fpm.conf
listen = 192.168.1.107:9000 #修改
添加开机启动
[root@php ~]# chkconfig --add php-fpm
[root@php ~]# chkconfig php-fpm on
启动php-fpm
[root@php ~]# service php-fpm start
安装xcache
[root@php ~]# tar xf xcache-3.0.3.tar.bz2
[root@php ~]# cd xcache-3.0.3
[root@php xcache-3.0.3]# /usr/local/php/bin/phpize
[root@php xcache-3.0.3]# ./configure --with-php-config=/usr/local/php/bin/php-config --enable-xcache
[root@php xcache-3.0.3]# make && make install
安装结束后出现如下行
Installing shared extensions: /usr/local/php/lib/php/extensions/no-debug-non-zts-20100525/
整合xcache和php
将xcache提供的样例配置导入php.ini
[root@php xcache-3.0.3]# mkdir /etc/php.d
[root@php xcache-3.0.3]# cp xcache.ini /etc/php.d/
修改xcache.ini
[root@php ~]# vim /etc/php.d/xcache.ini
extension = /usr/local/php/lib/php/extensions/no-debug-non-zts-20100525/xcache.so
五、整合Apache和PHP
1.httpd配置
[root@www ~]# vim /etc/httpd24/httpd.conf
注释掉DocumentRoot "/usr/local/apache24/htdocs"
启用mod_proxy.so和mod_proxy_fcgi.so模块
LoadModule proxy_module modules/mod_proxy.so
LoadModule proxy_fcgi_module modules/mod_proxy_fcgi.so
载入虚拟主机配置文件
Include /etc/httpd24/extra/httpd-vhosts.conf
让apache能识别php格式的页面,并支持php格式的主页
AddType application/x-httpd-php .php
AddType application/x-httpd-php-source .phps
设置index.php为默认主页
DirectoryIndex index.php index.html
配置虚拟主机
[root@www ~]# vim /etc/httpd24/extra/httpd-vhosts.conf
<VirtualHost *:80>DocumentRoot  "/web/htdocs" ServerName   www.xiaoya.netProxyRequests  Off  #关闭正向代理ProxyPassMatch  ^/(.*\.php)$ fcgi://192.168.1.107:9000/web/htdocs/$1(fastcgi服务存放php文件的目录,需要在php服务器上建立) <Directory "/web/htdocs">Options  noneAllowOverride noneRequire all granted</Directory>
</virtualHost>
#把以.php结尾的文件请求发送到php-fpm进程,php-fpm至少需要知道运行的目录和URI,所以这里直接在fcgi://192.168.1.107:9000后指明了这两个参数,其它的参数的传递已经被mod_proxy_fcgi.so进行了封装,不需要手动指定。
2.PHP设置
[root@php ~]# mkdir -pv /web/htdocs
建立测试网页文件index.php
[root@php ~]# vim /web/htdocs/index.php
<?phpphpinfo();
?>
本地配置好hosts在浏览器输入www.xiaoya.net 测试
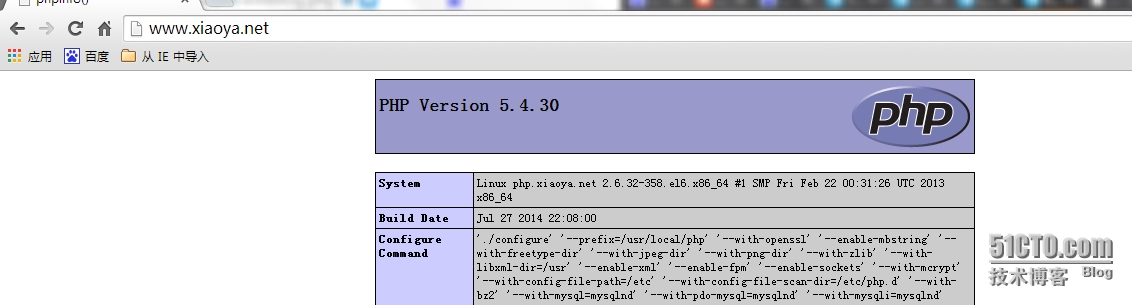
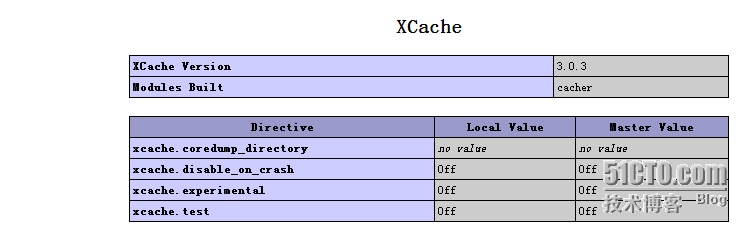
上图显示PHP工作正常并且已成功整合xcache
测试PHP与mysql连接
[root@php ~]# vim /web/htdocs/sqltest.php
<?php$link=mysql_connect('192.168.1.108','root','' );if ($link)echo "Success...";elseecho "Failure..."
?>
浏览器输入http://192.168.1.106/sqltest.php
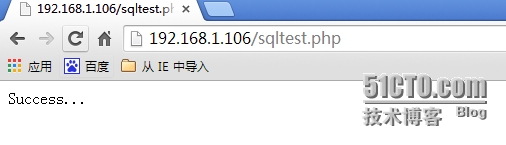
成功连接mysql
六、源码安装memcached
先安装libevent
[root@mem ~]# tar xf libevent-2.0.21-stable.tar.gz
[root@mem libevent-2.0.21-stable]# ./configure --prefix=/usr/local/libevent
[root@mem libevent-2.0.21-stable]# make && make install
导出库文件
root@mem ~]# vim /etc/ld.so.conf.d/libevent.conf
/usr/local/libevent/lib #添加此行
[root@mem ~]# ldconfig
安装memcached
[root@mem ~]# tar xf memcached-1.4.15.tar.gz
[root@mem ~]# cd memcached-1.4.15
[root@mem memcached-1.4.15]# ./configure --prefix=/usr/local/memcached --with-libevent=/usr/local/libevent
[root@mem memcached-1.4.15]# make && make install
提供服务脚本
root@mem bin]# vim /etc/rc.d/init.d/memcached
#!/bin/bash
#
# Init file for memcached
#
# chkconfig: - 86 14
# description: Distributed memory caching daemon
#
# processname: memcached
# config: /etc/sysconfig/memcached
. /etc/rc.d/init.d/functions
## Default variables
PORT="11211"
USER="nobody"
MAXCONN="1024"
CACHESIZE="64"
OPTIONS=""
RETVAL=0
prog="/usr/local/memcached/bin/memcached"
desc="Distributed memory caching"
lockfile="/var/lock/subsys/memcached"
start() {echo -n $"Starting $desc (memcached): "daemon $prog -d -p $PORT -u $USER -c $MAXCONN -m $CACHESIZE RETVAL=$?[ $RETVAL -eq 0 ] && success && touch $lockfile || failureechoreturn $RETVAL
}
stop() {echo -n $"Shutting down $desc (memcached): "killproc $progRETVAL=$?[ $RETVAL -eq 0 ] && success && rm -f $lockfile || failureechoreturn $RETVAL
}
restart() {stopstart
}
reload() {echo -n $"Reloading $desc ($prog): "killproc $prog -HUPRETVAL=$?[ $RETVAL -eq 0 ] && success || failureechoreturn $RETVAL
}
case "$1" instart)start;;stop)stop;;restart)restart;;condrestart)[ -e $lockfile ] && restartRETVAL=$?;;       reload)reload;;status)status $progRETVAL=$?;;*)echo $"Usage: $0 {start|stop|restart|condrestart|status}"RETVAL=1
esac
exit $RETVAL
[root@mem bin]# chmod +x /etc/rc.d/init.d/memcached
[root@mem bin]# service memcached start
七、整合Memcached和PHP
安装memcache客户端
[root@php ~]# tar xf memcache-2.2.7.tgz
[root@php ~]# cd memcache-2.2.7
[root@php memcache-2.2.7]# /usr/local/php/bin/phpize
[root@php memcache-2.2.7]# ./configure --with-php-config=/usr/local/php/bin/php-config --enable-memcache
[root@php memcache-2.2.7]# make && make install
建立memcache.ini文件
[root@php memcache-2.2.7]# vim /etc/php.d/memcache.ini
extension =  /usr/local/php/lib/php/extensions/no-debug-non-zts-20100525/memcache.so
重启php-fpm服务
[root@php memcache-2.2.7]# service php-fpm restar
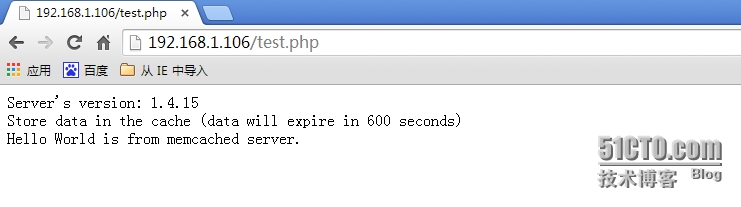
测试Memcached和PHP连接,建立测试文件test.php
[root@php ~]# vim /web/htdocs/test.php
<?php
$mem = new Memcache;
$mem->connect("192.168.1.105", 11211)  or die("Could not connect");
$version = $mem->getVersion();
echo "Server's version: ".$version."<br/>\n";
$mem->set('hellokey', 'Hello World', 0, 600) or die("Failed to save data at the memcached server");
echo "Store data in the cache (data will expire in 600 seconds)<br/>\n";
$get_result = $mem->get('hellokey');
echo "$get_result is from memcached server.";
?>
浏览器输入http://192.168.1.106/test.php 测试
memcached服务器上查看
[root@mem bin]# telnet 192.168.1.105 11211
Trying 192.168.1.105...
Connected to 192.168.1.105.
Escape character is '^]'.
get hellokey
VALUE hellokey 0 11
Hello World
END
以上信息表明emcached工作正常
-----------------------------LAMMP环境全部搭建完毕。
转载于:https://blog.51cto.com/liuzhong/1530928
LAMMP源码环境搭建相关推荐
- spring boot 源码_SpringBoot2.1.x源码环境搭建详解
前言 笔者试着从GitHub上拉取SpringBoot源码.然鹅,在本地IDEA打开后,爆各种编译错误,各种问题.经过反复操作,现在总结一下SpringBoot源码环境搭建的实践,便于后期对于源码的学 ...
- zookeeper3.5.4源码环境搭建
zookeeper3.5.4源码环境搭建 1. 准备工作 渠道 地址 网盘 zk源码下载地址 提取码:5555 注意:因为zookeeper是由ant来构建的,所以需要使用ant命令来转换成工程,然后 ...
- Android源码环境搭建(aosp Ubuntu 16.04)
Android源码环境搭建(aosp Ubuntu 16.04) FrameWork入门课视频链接:https://edu.csdn.net/course/detail/30298 FrameWork ...
- Kafka源码环境搭建
欢迎支持笔者新作:<深入理解Kafka:核心设计与实践原理>和<RabbitMQ实战指南>,同时欢迎关注笔者的微信公众号:朱小厮的博客. 欢迎跳转到本文的原文链接:https: ...
- datax源码环境搭建
文章目录 datax源码环境搭建 写在前面 环境 下载源码并编译 错误1 错误2 运行 生产模式 debug模式 datax源码环境搭建 写在前面 DataX 是阿里巴巴集团内被广泛使用的离线数据同步 ...
- ZooKeeper源码阅读心得分享+源码基本结构+源码环境搭建
首发CSDN:徐同学呀,原创不易,转载请注明源链接.我是徐同学,用心输出高质量文章,希望对你有所帮助. 一.心得分享 如何阅读ZooKeeper源码?从哪里开始阅读?最近把ZooKeeper源码看了个 ...
- win10环境下的spark2.4源码环境搭建
spark2.4源码环境搭建 1.概述 2.版本信息及环境 3.基础环境准备 4.源码准备 5.IDEA设置 5.1 IDEA内maven插件设置与更新 5.2 IDEA内导入spark各个模块 6. ...
- kafka项目启动_Kafka 探险 源码环境搭建
这个 Kafka 的专题,我会从系统整体架构,设计到代码落地.和大家一起杠源码,学技巧,涨知识.希望大家持续关注一起见证成长! 我相信:技术的道路,十年如一日!十年磨一剑! 前言 在阅读源码之前,首先 ...
- Spring源码阅读 源码环境搭建(一)
ring 源码阅读的搭建(一) 一 下载spring源码 进入官方网页:https://spring.io/projects/spring-framework 进入相关的github位置,下载zip包 ...
最新文章
- 源码解读 Spring Boot Profiles
- 浅拷贝+引用计数--写时拷贝---模拟实现string容器
- navicat fo mysql 教程_Navicat For MySQL的简单使用教程
- 西南民族大学计算机考试试题,西南民族大学预科教育学院 2007级《计算机》模拟试题(含答案)...
- UVA 1411 - Ants(二分图完美匹配)
- mysql一张表可以用吗_MySQL表操作
- leetcode探索动态规划(一)
- 标签打印软件如何制作DataMatrix二维码
- FFmpeg进行推流的两种方法
- 计算机英语单词怎么读语音,英语单词发音
- 旷视研究院「技术圆桌派-上海专场 」报名启动!
- 微信小程序分享小程序码的生成,多参数以及参数的获取
- 第十四周 项目2-用文件保存的学生名单
- 2022国赛新大陆物联网Ubuntu系统维护(中职)
- 不懂这显然您不专业!云计算术语大全(转自IT168)
- freetype的简单使用
- 为别人着想,是最大的利己
- 【项目管理一点通】(46) 项目验收
- Linux也可以这样美——Ubuntu18.04安装、配置、美化-踩坑记
- 常见的软件文件夹命名笔记好