RESTLET开发实例(二)使用Component、Application的REST服务
2019独角兽企业重金招聘Python工程师标准>>> 
上一篇文章,我们介绍了基于JAX-RS的REST服务,本篇文章我们介绍不基于JAX-RS的模式。JAX-RS其实就是一个简单的Application服务。和我们接下来介绍的Application基本一致,唯一不同的地方就是,不使用JAX-RS自动映射为xml。restlet的一些基本概念可以参考上篇文章 RESTLET开发实例(一)基于JAX-RS的REST服务 的介绍,这里不再阐述。
一、基于ServerResource的REST,来实现JAX-RS中get方法。
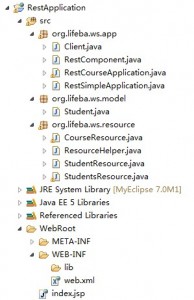
1、新建RestApplication Web工程。
然后把相应的restlet的lib下的全部jar加入工程引用中,然后在web.xml,加入如下配置:
<context-param>
<param-name>org.restlet.application</param-name>
<param-value>org.lifeba.ws.app.RestSimpleApplication</param-value>
</context-param>
<servlet>
<servlet-name>RestletServlet</servlet-name>
<servlet-class>org.restlet.ext.servlet.ServerServlet</servlet-class>
</servlet>
<servlet-mapping>
<servlet-name>RestletServlet</servlet-name>
<url-pattern>/*</url-pattern>
</servlet-mapping>
上面的配置和基于JAX-RS的配置一样的。
2、新建RestSimpleApplication对象。将应用程序和资源类绑定在一起,代码如下:
public class RestSimpleApplication extends org.restlet.Application{
@Override
public Restlet createInboundRoot() {
Router router = new Router(getContext());
router.attach("/student/{studentId}", StudentResource.class);
return router;
}
}
和JAX-RS不同主要有2个地方:
1)RestSimpleApplication直接扩展了Application对象,而不是JAX-RS中的JaxRsApplication对象。
2)重载了createInboundRoot通过attach方法绑定资源类,并且制定了访问路径。而JAX-RS中调用了this.add(new StudentApplication())来绑定资源类,并且不用指定访问路径,因为是在资源类中指定。
3、新建Student对象,代码如下:和JAX-RS的区别就是少了@XmlRootElement(name="Student")标注。
public class Student {
private int id;
private String name;
private int sex;
private int clsId;
private int age;
public int getId() {
return id;
}
public void setId(int id) {
this.id = id;
}
public String getName() {
return name;
}
public void setName(String name) {
this.name = name;
}
public int getSex() {
return sex;
}
public void setSex(int sex) {
this.sex = sex;
}
public int getClsId() {
return clsId;
}
public void setClsId(int clsId) {
this.clsId = clsId;
}
public int getAge() {
return age;
}
public void setAge(int age) {
this.age = age;
}
public String toString(){
return "Id:"+this.id+"\r\nName:"+this.name+"\r\nClass:"+
this.clsId+"\r\nSex:"+this.sex+"\r\nAge:"+this.age;
}
}
4、新建StudentResource类,该类扩展ServerResource类。代码如下:
public class StudentResource extends ServerResource{
private int id;
@Override
protected void doInit() throws ResourceException {
id = Integer.valueOf((String) getRequestAttributes().get("studentId"));
}
@Get
public Representation get(Representation entity) {
Student student = ResourceHelper.findStudent(id);
return new StringRepresentation(student.toString());
}
}
上面的代码实现的功能和JAX-RS中的下面的代码的功能一样,都是根据ID来获取对应的student信息。
@GET
@Path("{id}/xml")
@Produces("application/xml")
public Student getStudentXml(@PathParam("id") int id) {
return ResourceHelper.findStudent(id);
}
非JAX-RS模式的,扩展了ServerResource类,并且重载了doInit()方法用来获取传递过来的studentId占位符的值。因为没有传递method方法,默认是调用@Get标注的无参方法,最后返回StringRepresentation对象(你也可以返回xml或json的Representation对象)。
JAX-RS的也是类似,不过他的方法是带参数,并且返回一个Student对象(会根据@Produces("application/xml")自动封装xml数据)。
5、完成了上面的主要类得创建和编写,你就可以在tomcat中运行了,启动tomcat后,访问http://localhost:8085/RestApplication/student/1,你将看到下面界面:

二、实现更新、删除、添加(delete,put,post)及列表展示
1、上面的介绍,我们实现将JAX-RS中的get方法,用ServerResource方式的来实现。根据rest规范,对StudentResource,除了有get方法外,还有delete及put方法。
@Delete
public Representation delete() {
int status = ResourceHelper.deleteStudent(id);
return new StringRepresentation(String.valueOf(status));
}
@Put
public Representation put(Representation entity)
throws ResourceException {
Form form = new Form(entity);
Student student = ResourceHelper.findStudent(id);
String name = form.getFirstValue("name");
int clsId = Integer.parseInt(form.getFirstValue("clsId"));
int sex = Integer.parseInt(form.getFirstValue("sex"));
student.setClsId(clsId);
student.setName(name);
student.setSex(sex);
return new StringRepresentation(String.valueOf(ResourceHelper.updateStudent(student)));
}
2、测试更新和删除:
1)通过页面修改用户资料
update.jsp页面中加入:
<form action="/RestApplication/student/1?method=put" method="post">
用户名:<input type="text" name="name"><br>
班级:<input type="text" name="clsId"><br>
性别:<input type="text" name="sex"><br>
<input type="submit" value="提交">
</form>
提交后访问,返回1表示修改成功。


访问http://localhost:8085/RestApplication/student/1就会看到名字已经修改了。

2)通过客户端删除用户资料。新建Client类,加入如下代码,执行成功返回1.
public void student_delete(){
try {
ClientResource client = new ClientResource("http://localhost:8085/RestApplication/student/1");
Representation representation =client.delete();
System.out.println(representation.getText());
} catch (Exception e) {
e.printStackTrace();
}
}
这个时候访问 http://localhost:8085/RestApplication/student/1 ,会提示错误。因为找不到这个1的用户。
3、添加一个student,及显示全部student信息
1)StudentResource资源,按照restlet的规范,包含了get put delete方法。所以添加一个student及显示全部student信息我们需要再加入一个资源类StudentsResource,代码如下:
@Get
public Representation get(Representation entity) {
StringBuilder sb = new StringBuilder();
Iterator it = ResourceHelper.students.keySet().iterator();
while(it.hasNext()){
sb.append(ResourceHelper.students.get(it.next()).toString()+"\r\n\r\n");
}
return new StringRepresentation(sb.toString());
}
@Post
public Representation post(Representation entity)
throws ResourceException {
Form form = new Form(entity);
String name = form.getFirstValue("name");
int clsId = Integer.parseInt(form.getFirstValue("clsId"));
int sex = Integer.parseInt(form.getFirstValue("sex"));
Student student = new Student();
student.setClsId(clsId);
student.setName(name);
student.setSex(sex);
ResourceHelper.maxId++;
int id = ResourceHelper.maxId;
student.setId(id);
return new StringRepresentation(String.valueOf(ResourceHelper.addStudent(student)));
}
添加了上面代码后,我们还要在RestSimpleApplication添加下面代码,指定下资源类StudentsResource的访问路径才可以。
router.attach("/student", StudentsResource.class);
2)首先我们添加一个id为2的student对象,client类中加入下面代码,执行成功后返回新添加的studentid:2。
public void student_post(){
try {
Form queryForm = new Form();
queryForm.add("name","steven3");
queryForm.add("clsId","201002");
queryForm.add("sex","2");
queryForm.add("age","12");
ClientResource client = new ClientResource("http://localhost:8085/RestApplication/student");
Representation representation =client.post(queryForm.getWebRepresentation());
System.out.println(representation.getText());
} catch (Exception e) {
e.printStackTrace();
}
}
访问http://localhost:8085/RestApplication/student 如下,返回了全部的student资料:
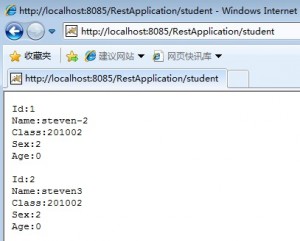
可以看到我们已经成功添加了一个2的student。
三、使用Component绑定多个Application
我们已经实现了一个student的application。里面包含了2个资源类(StudentResource和StudentsResource)。如果我们加入一个course的资源类,我们可以按照上面的方式直接建立CourseResource,然后在RestSimpleApplication中绑定下 router.attach("/course/{courseId}", CourseResource.class)。不过这样处理会把业务逻辑混在一起,并不是很好的方法。因此我们建立一个RestCourseApplication,然后在这里绑定CourseResource类,来实现业务逻辑的分离。
RestCourseApplication代码如下:
public class RestCourseApplication extends org.restlet.Application{
@Override
public Restlet createInboundRoot() {
Router router = new Router(getContext());
router.attach("/course/{courseId}", CourseResource.class);
return router;
}
}
CourseResource代码如下:
public class CourseResource extends ServerResource{
private int id;
@Override
protected void doInit() throws ResourceException {
id = Integer.valueOf((String) getRequestAttributes().get("courseId"));
}
@Get
public Representation get(Representation entity) {
return new StringRepresentation("course id:"+id);
}
}
现在我们有2个Application了,web.xml中就不能使用org.restlet.application了,必须使用org.restlet.component。
<context-param>
<param-name>org.restlet.application</param-name>
<param-value>org.lifeba.ws.app.RestSimpleApplication</param-value>
</context-param>
把上面的代码改为:
<init-param>
<param-name>org.restlet.component</param-name>
<param-value>component</param-value>
</init-param>
新建RestComponent类,代码如下,因为必须执行路径,所以在访问的时候记得要带上对应的前缀。
public class RestComponent extends org.restlet.Component{
public RestComponent(){
getDefaultHost().attach("/a", new RestSimpleApplication());
getDefaultHost().attach("/b", new RestCourseApplication());
}
}
访问:http://localhost:8085/RestApplication/a/student

访问:http://localhost:8085/RestApplication/b/course/1

四、资源下载
RestApplication工程项目
转载于:https://my.oschina.net/jiyayun/blog/146444
RESTLET开发实例(二)使用Component、Application的REST服务相关推荐
- JAVA :RESTLET开发实例(一)基于JAX-RS的REST服务
本文转自http://www.cnblogs.com/redmondfan/p/3209290.html,所有权力归原作者所有. RESTLET介绍 Restlet项目为"建立REST概念与 ...
- RESTLET开发实例(三)基于spring的REST服务
http://www.lifeba.org/arch/restlet_spring_3.html 前面两篇文章,我们介绍了基于JAX-RS的REST服务以及Application的Rest服务.这里将 ...
- [转贴]JAVA:RESTLET开发实例(三)基于spring的REST服务
前面两篇文章,我们介绍了基于JAX-RS的REST服务以及Application的Rest服务.这里将介绍restlet如何整合spring框架进行开发.Spring 是一个开源框架,是为了解决企业应 ...
- ext 6.0开发实例二
由于Ext JS 6将原来的Ext JS和Sencha Touch合并为一个框架,因而在使用CMD来创建应用程序前,需要考虑清楚你是要创建一个通用应用程序,还是仅仅只是针对桌面或移动设备的应用程序. ...
- Python 语言 SAP2000 二次开发 实例
目 录 Blog Links Remarks Example Blog Links DalNur | 博客总目录 Python语言 SAP2000 二次开发 -- 概述 Python语言 SAP200 ...
- solidworks api二次开发实例详解_Solidworks开发语言对比及分析
很多初学Solidworks二次开发的同学,也许都会纠结使用何种语言进行二次开发.对于Solidworks二次开发的语言,官方有VBA,VB.NET,C#以及C++,四种语言. 用户通常会有如下疑问, ...
- python对abaqus本构二次开发_基于Python的Abaqus二次开发实例讲解
第 1 页 共 11 页 基于 Python 的 Abaqus 二次开发实例讲解 ( asian58 2013.6.26 ) 基于 Python 的 Abaqus 的二次开发便捷之处在于: 1 .所有 ...
- ecshop二次开发 给商品添加自定义字段【包含我自己进一步的开发实例详解】
本文包含商品自定义添加教程及进一步的开发实例: 教程: 说起自定义字段,我想很多的朋友像我一样会想起一些开源的CMS(比如Dedecms.Phpcms.帝国)等,他们是可以在后台直接添加自定义字段的. ...
- oa java 二次开发_泛微OA ecology 二次开发实例 开发完整.doc
泛微OA ecology 二次开发实例 开发完整 二次开发培训文档 ECOLOGY系统框架结构 主要的程序结构 Ecology Classbean 存放编译后的CLASS文件 js 系统中使用的JAV ...
最新文章
- 一文读懂PID控制算法
- 太赞!639页《深度学习:Deep Learning》硬核课程PPT下载
- Linux下socket最大连接数 ulimit -n 最大值修改
- 解决Redis服务错误一例听语音
- Google Map API v2 步步为营 (二)----- Location
- Centos7 中文乱码
- ASP.NET 2.0 Club Web Site Starter Kit 补丁
- iOS学习笔记-自定义过渡动画
- Linux环境下FTP工具的使用方法
- 微信小程序踩坑”日记“--Failed to load image xxx (404)
- 冒泡排序算法(bubbling sort)
- [[机缘参悟-87]:每个人需要了解自己的性格特征(老虎、孔雀、考拉、猫头鹰、变色龙)
- 国内十大优质炒白银交易app软件排名(2023精选版)
- mt950报文解析_系列之五 | MT759报文升级内容解析
- Python序列(包括序列类型和常用操作)
- linux沙箱隔离_360隔离沙箱在WINDOWS 10 的WSL下的沙箱逃逸
- Proteus8 发生关键仿真错误
- 遭遇Trojan DL Multi wfg sss exe SCVHOST EXE autorun inf 等
- 手机电脑卖不动,AR\VR和自动驾驶也不给力;苹果的未来在哪里?
- Android学习笔记Android必备开发工具之一命令行创建Git库