CentOS5.8 RHCS配置
大纲
一、系统环境
二、准备工作
三、cman + rgmanager + NFS + httpd的高可用服务
一、环境说明
系统环境
CentOS5.8 x86_64
node1.network.com node1 172.16.1.101
node2.network.com node2 172.16.1.105
node3.network.com node3 172.16.1.106
NFS Server /www 172.16.1.102
软件版本
cman-2.0.115-124.el5.x86_64.rpm
rgmanager-2.0.52-54.el5.centos.x86_64.rpm
system-config-cluster-1.0.57-17.noarch.rpm
拓扑图

二、准备工作
1、时间同步
[root@node1 ~]# ntpdate s2c.time.edu.cn
[root@node2 ~]# ntpdate s2c.time.edu.cn
[root@node3 ~]# ntpdate s2c.time.edu.cn可根据需要在每个节点上定义crontab任务
[root@node1 ~]# which ntpdate
/sbin/ntpdate
[root@node1 ~]# echo "*/5 * * * * /sbin/ntpdate s2c.time.edu.cn &> /dev/null" >> /var/spool/cron/root
[root@node1 ~]# crontab -l
*/5 * * * * /sbin/ntpdate s2c.time.edu.cn &> /dev/null
2、主机名称要与uname -n保持一致,并通过/etc/hosts解析
node1
[root@node1 ~]# hostname node1.network.com
[root@node1 ~]# uname -n
node1.network.com
[root@node1 ~]# sed -i 's@\(HOSTNAME=\).*@\1node1.network.com@g'  /etc/sysconfig/networknode2
[root@node2 ~]# hostname node2.network.com
[root@node2 ~]# uname -n
node2.network.com
[root@node2 ~]# sed -i 's@\(HOSTNAME=\).*@\1node2.network.com@g'  /etc/sysconfig/networknode3
[root@node3 ~]# hostname node3.network.com
[root@node3 ~]# uname -n
node3.network.com
[root@node3 ~]# sed -i 's@\(HOSTNAME=\).*@\1node3.network.com@g'  /etc/sysconfig/networknode1添加hosts解析
[root@node1 ~]# vim /etc/hosts
[root@node1 ~]# cat /etc/hosts
127.0.0.1   localhost localhost.localdomain localhost4 localhost4.localdomain4
::1         localhost localhost.localdomain localhost6 localhost6.localdomain6172.16.1.101  node1.network.com node1
172.16.1.105    node2.network.com node2
172.16.1.110    node3.network.com node3拷贝此hosts文件至node2
[root@node1 ~]# scp /etc/hosts node2:/etc/
The authenticity of host 'node2 (172.16.1.105)' can't be established.
RSA key fingerprint is 13:42:92:7b:ff:61:d8:f3:7c:97:5f:22:f6:71:b3:24.
Are you sure you want to continue connecting (yes/no)? yes
Warning: Permanently added 'node2,172.16.1.105' (RSA) to the list of known hosts.
root@node2's password:
hosts                  100%  233     0.2KB/s   00:00拷贝此hosts文件至node3
[root@node1 ~]# scp /etc/hosts node3:/etc/
The authenticity of host 'node3 (172.16.1.110)' can't be established.
RSA key fingerprint is 13:42:92:7b:ff:61:d8:f3:7c:97:5f:22:f6:71:b3:24.
Are you sure you want to continue connecting (yes/no)? yes
Warning: Permanently added 'node3,172.16.1.110' (RSA) to the list of known hosts.
hosts                                    100%  320     0.3KB/s   00:00
3、ssh互信通信
node1
[root@node1 ~]# ssh-keygen -t rsa -f ~/.ssh/id_rsa -P ''
Generating public/private rsa key pair.
/root/.ssh/id_rsa already exists.
Overwrite (y/n)? n                                            # 我这里已经生成过了
[root@node1 ~]# ssh-copy-id -i ~/.ssh/id_rsa.pub node2
root@node2's password:
Now try logging into the machine, with "ssh 'node2'", and check in:.ssh/authorized_keysto make sure we haven't added extra keys that you weren't expecting.[root@node1 ~]# setenforce 0
[root@node1 ~]# ssh node2 'ifconfig'
eth0      Link encap:Ethernet  HWaddr 00:0C:29:D6:03:52  inet addr:172.16.1.105  Bcast:255.255.255.255  Mask:255.255.255.0inet6 addr: fe80::20c:29ff:fed6:352/64 Scope:LinkUP BROADCAST RUNNING MULTICAST  MTU:1500  Metric:1RX packets:9881 errors:0 dropped:0 overruns:0 frame:0TX packets:11220 errors:0 dropped:0 overruns:0 carrier:0collisions:0 txqueuelen:1000 RX bytes:5898514 (5.6 MiB)  TX bytes:1850217 (1.7 MiB)lo        Link encap:Local Loopback  inet addr:127.0.0.1  Mask:255.0.0.0inet6 addr: ::1/128 Scope:HostUP LOOPBACK RUNNING  MTU:16436  Metric:1RX packets:16 errors:0 dropped:0 overruns:0 frame:0TX packets:16 errors:0 dropped:0 overruns:0 carrier:0collisions:0 txqueuelen:0 RX bytes:1112 (1.0 KiB)  TX bytes:1112 (1.0 KiB)同理node2也需要做同样的双击互信,一样的操作,此处不再演示
4、关闭iptables和selinux
node1
[root@node1 ~]# service iptables stop
[root@node1 ~]# vim /etc/sysconfig/selinux
[root@node1 ~]# cat /etc/sysconfig/selinux
# This file controls the state of SELinux on the system.
# SELINUX= can take one of these three values:
#   enforcing - SELinux security policy is enforced.
#   permissive - SELinux prints warnings instead of enforcing.
#   disabled - SELinux is fully disabled.
#SELINUX=permissive
SELINUX=disabled
# SELINUXTYPE= type of policy in use. Possible values are:
#   targeted - Only targeted network daemons are protected.
#   strict - Full SELinux protection.
SELINUXTYPE=targeted
node2
[root@node2 ~]# service iptables stop
[root@node2 ~]# vim /etc/sysconfig/selinux
[root@node2 ~]# cat /etc/sysconfig/selinux
# This file controls the state of SELinux on the system.
# SELINUX= can take one of these three values:
#   enforcing - SELinux security policy is enforced.
#   permissive - SELinux prints warnings instead of enforcing.
#   disabled - SELinux is fully disabled.
#SELINUX=permissive
SELINUX=disabled
# SELINUXTYPE= type of policy in use. Possible values are:
#   targeted - Only targeted network daemons are protected.
#   strict - Full SELinux protection.
SELINUXTYPE=targeted
node3
[root@node3 ~]# service iptables stop
[root@node3 ~]# vim /etc/sysconfig/selinux
[root@node3 ~]# cat /etc/sysconfig/selinux
# This file controls the state of SELinux on the system.
# SELINUX= can take one of these three values:
#   enforcing - SELinux security policy is enforced.
#   permissive - SELinux prints warnings instead of enforcing.
#   disabled - SELinux is fully disabled.
#SELINUX=permissive
SELINUX=disabled
# SELINUXTYPE= type of policy in use. Possible values are:
#   targeted - Only targeted network daemons are protected.
#   strict - Full SELinux protection.
SELINUXTYPE=targeted
三、cman + rgmanager + NFS + httpd的高可用服务
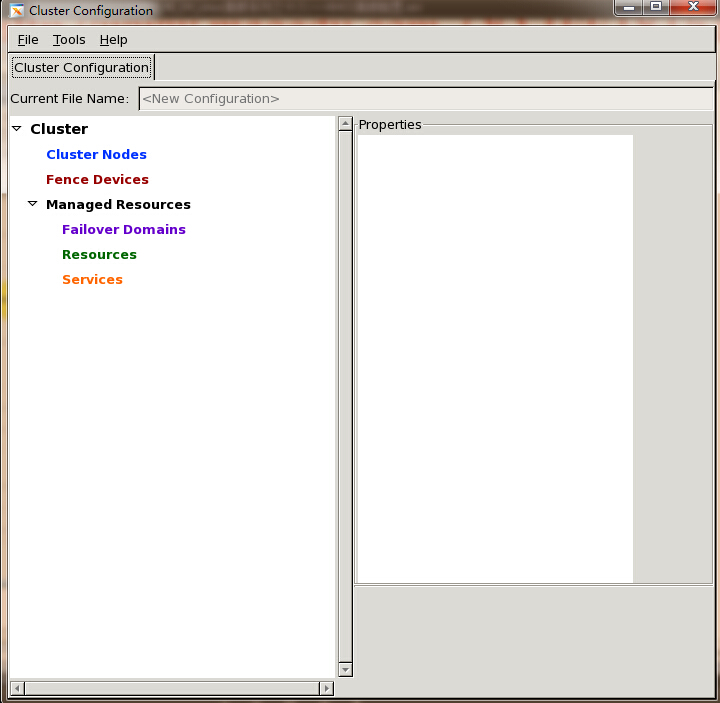
1、启动system-config-cluster
[root@node1 ~]# system-config-cluster &
[1] 3987

输入集群名称,自定义

点击ok进入如下界面
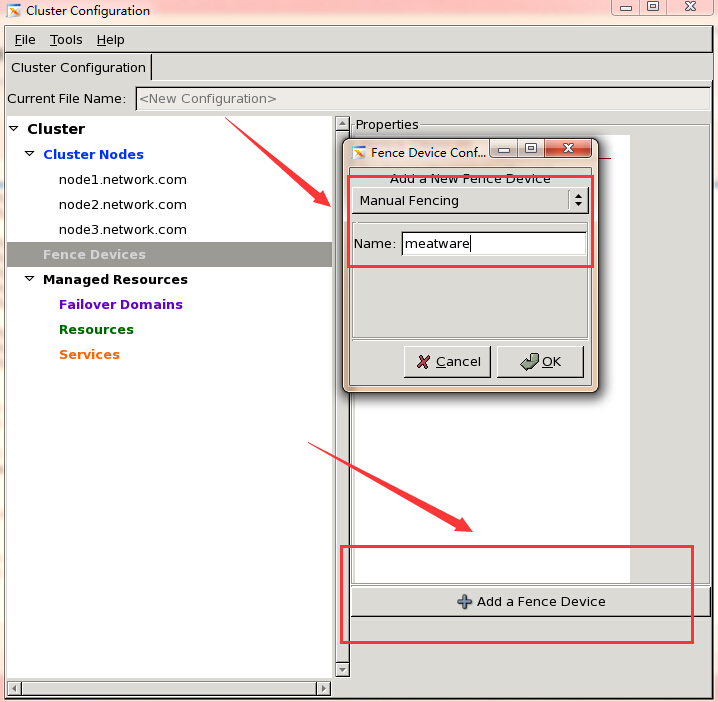
添加三个节点node1、node2、node3、这里的集群节点名称与uname -n保持一致

添加三个节点完成之后,再添加fence设备
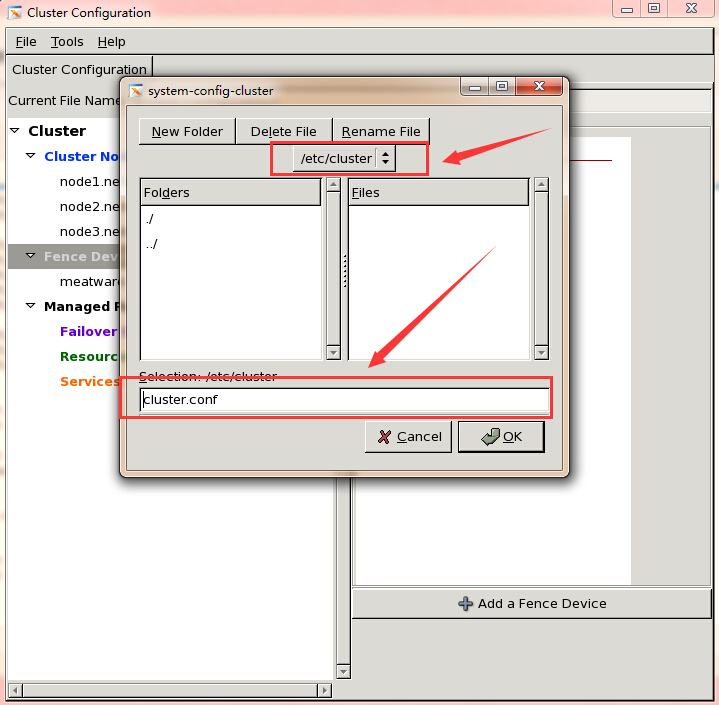
点击File-->Save
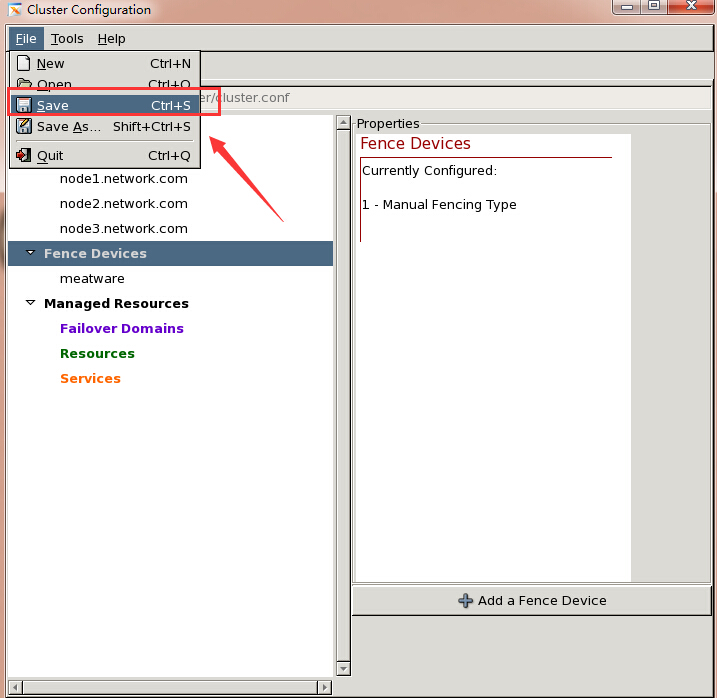
默认保存为/etc/cluster/cluster.conf
保存完成之后就可以关闭此GUI接口
2、三个节点上启动cman与rgmanager服务
node1
[root@node1 ~]# service cman start
Starting cluster: Loading modules... doneMounting configfs... doneStarting ccsd... doneStarting cman... doneStarting daemons... doneStarting fencing... doneTuning DLM... done                     [  OK  ]
[root@node1 ~]# service rgmanager start
Starting Cluster Service Manager:         [  OK  ]node2
[root@node2 cluster]# service cman start
Starting cluster: Loading modules... doneMounting configfs... doneStarting ccsd... doneStarting cman... doneStarting daemons... doneStarting fencing... doneTuning DLM... done                        [  OK  ]
[root@node2 cluster]# service rgmanager start
Starting Cluster Service Manager:         [  OK  ]node3
[root@node3 ~]# service cman start
Starting cluster: Loading modules... doneMounting configfs... doneStarting ccsd... doneStarting cman... doneStarting daemons... doneStarting fencing... doneTuning DLM... done                     [  OK  ]
[root@node3 ~]# service rgmanager start
Starting Cluster Service Manager:         [  OK  ]查看各集群节点状态信息
[root@node1 ~]# cman_tool status
Version: 6.2.0
Config Version: 2
Cluster Name: tcluster
Cluster Id: 28212
Cluster Member: Yes
Cluster Generation: 260
Membership state: Cluster-Member
Nodes: 3
Expected votes: 3
Total votes: 3
Node votes: 1
Quorum: 2
Active subsystems: 8
Flags: Dirty
Ports Bound: 0 177
Node name: node1.network.com
Node ID: 1
Multicast addresses: 239.192.110.162
Node addresses: 172.16.1.101 也可以使用clustat来查看
[root@node1 ~]# clustat
Cluster Status for tcluster @ Mon Jan 11 21:44:04 2016
Member Status: QuorateMember Name                                                     ID   Status------ ----                                                     ---- ------node1.network.com                                                   1 Online, Local, rgmanagernode2.network.com                                                   2 Online, rgmanagernode3.network.com                                                   3 Online, rgmanager今天做这个出了点问题,先添加ip,再添加httpd,服务死活启动不了,百度谷歌查了一天也没结果
只是不停报错,错误日志如下
Jan 11 21:22:45 node1 clurgmgrd[5425]: <notice> Reconfiguring
Jan 11 21:22:46 node1 clurgmgrd[5425]: <notice> Initializing service:webservice
Jan 11 21:22:48 node1 clurgmgrd[5425]: <notice> Recovering failed service service:webservice
Jan 11 21:22:48 node1 clurgmgrd[5425]: <notice> start on ip "172.16.1.110/16" returned 1 (generic error)
Jan 11 21:22:48 node1 clurgmgrd[5425]: <warning> #68: Failed to start service:webservice; return value: 1
Jan 11 21:22:48 node1 clurgmgrd[5425]: <notice> Stopping service service:webservice
Jan 11 21:22:49 node1 clurgmgrd[5425]: <notice> Service service:webservice is recovering
Jan 11 21:22:50 node1 ccsd[3455]: Update of cluster.conf complete (version 15 -> 18).
Jan 11 21:22:59 node1 gconfd (root-6662): GConf server is not in use, shutting down.
Jan 11 21:22:59 node1 gconfd (root-6662): Exiting后来我尝试着不启动ip,只启动httpd,发现服务可以启动,再然后我把ip添加进来,结果竟然可以了
坑爹,不得不说,莫名其妙的原因坑了我一整天
现在细细想来,貌似是我添加的ip跟我本地物理主机不在同一网段内,我把ip换成了172.16.1.110/24就好了
注意:请确保各节点上openais服务关闭开机自启动
[root@node1 ~]# chkconfig --list openais
openais         0:off   1:off   2:off   3:off   4:off   5:off   6:off
3、安装httpd并且配置不同页面,方便测试
node1
[root@node1 ~]# yum install -y httpd
[root@node1 ~]# echo "<h1>node1.network.com</h1>" > /var/www/html/index.htmlnode2
[root@node2 ~]# yum install -y httpd
[root@node2 ~]# echo "<h1>node2.network.com</h1>" > /var/www/html/index.htmlnode3
[root@node3 ~]# yum install -y httpd
[root@node3 ~]# echo "<h1>node3.network.com</h1>" > /var/www/html/index.html在3个节点上做测试,这里暂以node1为例
httpd服务是否能正常访问,测试成功之后关闭httpd服务,并设置不能开机自启动
[root@node1 ~]# service httpd start
Starting httpd:                                            [  OK  ]
[root@node1 ~]# curl http://172.16.1.101
<h1>node1.network.com</h1>
[root@node1 ~]# service httpd stop
Stopping httpd:                                            [  OK  ]
[root@node1 ~]# chkconfig httpd off
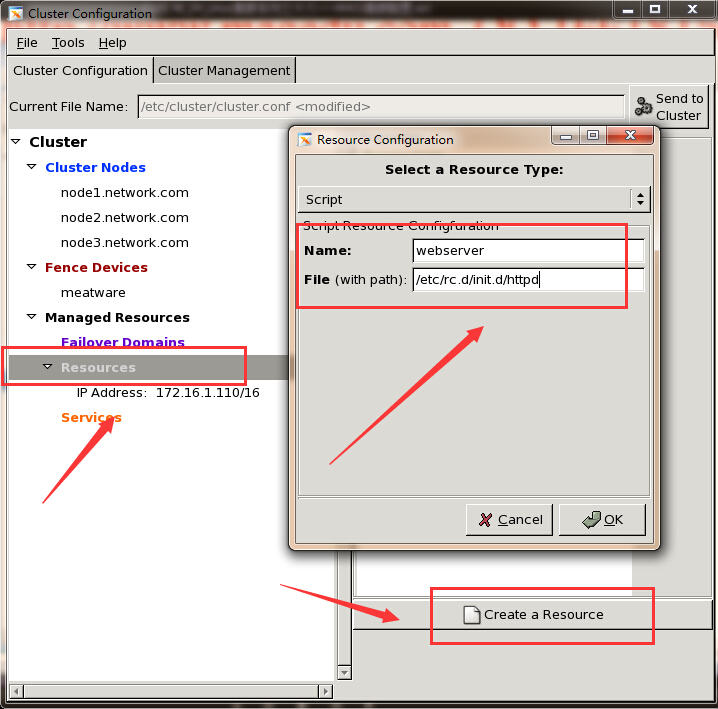
4、配置资源和服务
[root@node1 ~]# system-config-cluster &
[1] 4605

再来配置webserver资源

点击File-->Save

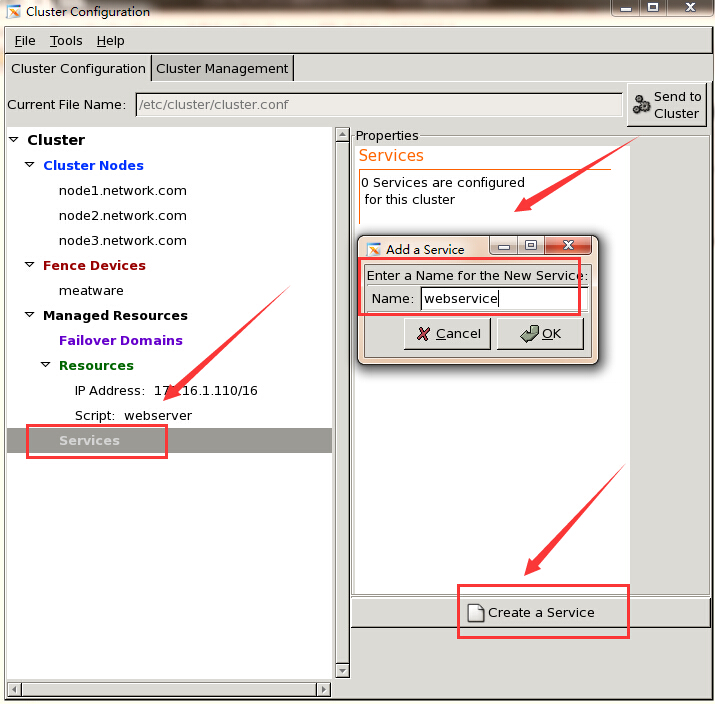
两个资源配置完成,接下来就可以配置服务了
点击Add a Shared Resource to this service,将刚才配置的两个资源添加进来

配置好服务之后,同步给其它节点

5、查看服务状态
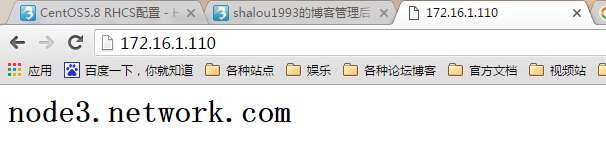
[root@node1 ~]# clustat
Cluster Status for tcluster @ Mon Jan 11 21:49:32 2016
Member Status: QuorateMember Name                          ID   Status------ ----                          ---- ------node1.network.com                    1 Online, Local, rgmanagernode2.network.com                    2 Online, rgmanagernode3.network.com                    3 Online, rgmanagerService Name                         Owner (Last)                       State         ------- ----                         ----- ------                       -----         service:webservice                   node1.network.com                  started    这里使用curl访问测试,没有用浏览器,懒得贴图了,一天被上面那个莫名其妙的原因搞得心累
[root@node1 ~]# curl http://172.16.1.110
<h1>node1.network.com</h1>测试是否能进行资源迁移
[root@node1 ~]# clusvcadm -r webservice -m node3.network.com
Trying to relocate service:webservice to node3.network.com...Success查看集群服务状态
[root@node1 ~]# clustat
Cluster Status for tcluster @ Mon Jan 11 21:49:32 2016
Member Status: QuorateMember Name                          ID   Status------ ----                          ---- ------node1.network.com                    1 Online, Local, rgmanagernode2.network.com                    2 Online, rgmanagernode3.network.com                    3 Online, rgmanagerService Name                         Owner (Last)                       State         ------- ----                         ----- ------                       -----         service:webservice                   node3.network.com                  started
这次使用浏览器访问测试一下
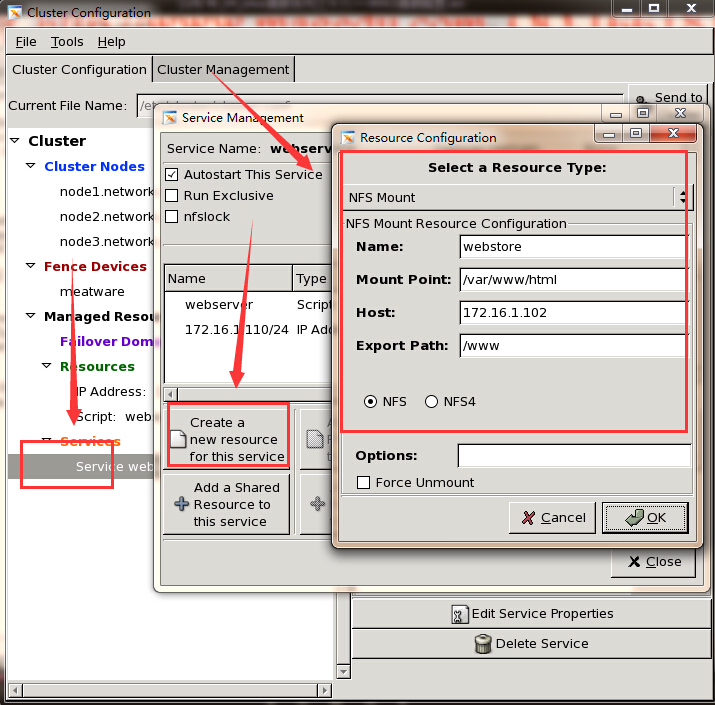
6、再来添加一个Filesystem资源作为web页面存储路径
先准备好NFS Server,这里不给出具体过程,之前的文档中有
再手动迁移一下服务
[root@node1 ~]# clusvcadm -r webservice -m node1.network.com
Trying to relocate service:webservice to node1.network.com...Success
再来访问一下

到此,一个非常简单的cman + rgmanager + NFS + httpd的高可用服务搭建完成
四、基于命令行配置(补充内容,另外一种配置方式)
1、生成配置文件
请先确保三个节点是刚安装完cman、rgmanager的,并没有配置文件
[root@node1 ~]# ccs_tool create tcluster查看生成的配置文件
[root@node1 ~]# cat /etc/cluster/cluster.conf
<?xml version="1.0"?>
<cluster name="tcluster" config_version="1"><clusternodes/><fencedevices/><rm><failoverdomains/><resources/></rm>
</cluster>
2、配置fence设备
[root@node1 ~]# ccs_tool addfence meatware fence_manual
running ccs_tool update...查看fence设备
[root@node1 ~]# ccs_tool lsfence
Name             Agent
meatware         fence_manual
3、添加节点
[root@node1 ~]# ccs_tool addnode -v 1 -n 1 -f meatware node1.network.com
[root@node1 ~]# ccs_tool addnode -v 1 -n 2 -f meatware node2.network.com
[root@node1 ~]# ccs_tool addnode -v 1 -n 3 -f meatware node3.network.com查看添加的各节点
[root@node1 ~]# ccs_tool lsnodeCluster name: tcluster, config_version: 30Nodename                        Votes Nodeid Fencetype
node1.network.com                  1    1    meatware
node2.network.com                  1    2    meatware
node3.network.com                  1    3    meatware
目前的话如果想编辑资源,还是得去编辑配置文件,这一点还是比较头疼的
转载于:https://blog.51cto.com/soysauce93/1733554
CentOS5.8 RHCS配置相关推荐
- ecshop支持mysql5.5吗,centos5.5 安装配置 ecshop【nginx + php + mysql】
centos5.5 安装配置 ecshop[nginx + php + mysql] 备注:建议使用centos5.5作为ecshop的注意,因为centos6的最新版本都是5.3以上的,所以而ecs ...
- centos5 vnc安装配置
centos5.5下安装配置vnc服务 一. 1:安装vnc [root@tech1-148 ~]# yum install vnc-server -y 设置vnc的登录密码 [root@tech1- ...
- 处理Centos5.5 x64 配置NFS服务过程中nfsnobody用户造成的问题
今天使用 Centos5.5 64位的系统部署一个NFS服务器之后,使用客户端进行挂载,遇到了权限不足的问题,以下把我的排错过程和问题处理过程和各位分享.如果您在配置NFS服务器的过程中,遇到了同样的 ...
- centos5.8 安装配置vsftp虚拟用户
vsftp因为公司时不时要用,也不是经常弄ftp,不常用就老是忘记有些东西,所以就在网上查些资料和自己遇到的一些问题结合起来写一个文档,以后需要使用ftp的时候搭建比较方便,使用虚拟用户不用担心用户登 ...
- centos5.4 安装配置oracle10g
准备环境: 首先自然是一个5.4的centos操作系统了 把需要安装的oracle11g数据可上传到服务器,我这里使用的是UltraEdit中自带的sftp来传输的.(sftp的速度比ftp快很多,据 ...
- CentOS5.6下配置rsync内网同步数据到外网
一.需求 卫士那边有一个需求,就是要把一台内网服务器的数据同步到外网的一台服务器上,之前我用的是rsync+intify-tool+ssh实现的实时同步更新,前几天我还在东莞出差,开发的人给我打电话说 ...
- RHCS配置web高可用集群
基本条件三台主机 10.37.129.5 web1.xzdz.hk web1 10.37.129.6 web2.xzdz.hk web2 10.37.129.4 luci.xzdz.hk luci 其 ...
- RHEL 集群(RHCS)配置小记 -- 文档记录
1.RHEL 6 集群配置官方管理手册 https://access.redhat.com/site/documentation/zh-CN/Red_Hat_Enterprise_Linux/6/pd ...
- 5.4php-fpm配置,CentOS5.4下配置Nginx0.8.33+PHP5.3+PHP-fpm+MySQL5.5
一.CentOS准备工作. # 更新所有已安装软件包 yum -y update # 安装必要的开发工具 yum -y install gcc gcc-c++ autoconf make libjpe ...
最新文章
- VS2005 和 SQL Server 2005 安装顺序不同会发生什么?
- Android ActionBar完全解析,使用官方推荐的最佳导航栏(下) .
- 华硕计算机用户名默认,华硕路由器后台默认网址是多少
- Qt--在.pro文件中添加链接库的写法
- div+css 你知道多少?值得一看
- 工作83:wacch的使用
- cad快捷键文件路径_办公格式转太难不会看这里!CAD、PDF、Word、Excel、TXT教你玩转...
- python文件操作小总结
- Java语言和C语言相比,为什么C语言的运算速度会更快,是因为vjm的性能不行么?
- 2018百度原创力排行榜公示(转载)
- 首都师范大学计算机科学与技术考研分数线,2017考研:计算机科学与技术专业考研院校推荐之首都师范...
- jquery中Uncaught TypeError: $(...).ajaxUpload is not a function(…)错误解决方法
- OpenHarmony 简介:使用鸿蒙操作系统,开发者能做的是啥呢,学习NodJS,可以开发应用了。后续慢慢学习,赶紧去加星星。
- mysql卸载如何彻底删除6_如何彻底卸载删除MySQL
- matlab 创建同型矩阵_仅在第1部分之间的海洋中探索同型图
- 不要再走弯路了,黑客学习路线看这里
- nessus在kali中的安装与详细使用
- Services-服务
- 人人都应知道电脑辐射什么时候最强?
- 有限元数值分析方法:我们认识世界的工具
热门文章
- 编写字符串反转函数 - 小小外星人的技术博客 - 博客频道 - CSDN.NET
- 【前端来刷LeetCode】两数之和与两数相加
- TCP/IP协议——ARP详解
- 变量声明和定义的区别
- compass reset和layout [Sass和compass学习笔记]
- java中表示二进制、八进制、十进制、十六进制,double、float、整型
- MySQL 5.5 的COMPRESSED INNODB 表
- 用JQuery模仿淘宝的图片显示效果
- 【Big Data - Hadoop - MapReduce】通过腾讯shuffle部署对shuffle过程进行详解
- 自助收银导致货损增加,阿里安全如何用视频识别AI应对?